Neat Image plug-in for Photoshop (Win) User guide
←
→
Page content transcription
If your browser does not render page correctly, please read the page content below
Neat Image
plug-in for Photoshop (Win)

To make images look better.

User guide
Document version 8.6, 15-Oct-2020

Neat Image © 1999-2020 Neat Image team, ABSoft. All rights reserved.

User Guide                                                                                    Neat Image v8 plug-in for Photoshop (Win)

Table of contents
    1   Introduction                                                                                                                                                                   4
        1.1 Overview . . . . . . . . . . . . . . . . . . . . . . . . . . . . . . . . . . . . . . . . . . .                                                                             4
        1.2 Features . . . . . . . . . . . . . . . . . . . . . . . . . . . . . . . . . . . . . . . . . . . .                                                                           4
        1.3 Requirements . . . . . . . . . . . . . . . . . . . . . . . . . . . . . . . . . . . . . . . . .                                                                             5

    2   Key concepts                                                                                                                                                                   7
        2.1 What it can do – functionality of Neat Image . . . . . . . . . . . . . . . . . . . . . . . .                                                                               7
        2.2 When it works – types of input images . . . . . . . . . . . . . . . . . . . . . . . . . . .                                                                                7

    3   Installing the plug-in                                                                                                                                                        8

    4   Filtration process overview                                                                                                                                                    9
        4.1 Overview of Neat Image filtration process . . . . . . . . . . . . . . . . . . . . . . . . .                                                                                9
        4.2 Running Neat Image on a sample image . . . . . . . . . . . . . . . . . . . . . . . . . .                                                                                  10

    5   Filtration process details                                                                                                                                                    12
        5.1 Stage I. Invoke the plug-in in Photoshop . . . . . .                                      .   .   .   .   .   .   .   .   .   .   .   .   .   .   .   .   .   .   .   .   12
        5.2 Stage II. Prepare a device noise profile . . . . . . .                                    .   .   .   .   .   .   .   .   .   .   .   .   .   .   .   .   .   .   .   .   12
        5.3 Stage III. Adjust filter settings . . . . . . . . . . . .                                 .   .   .   .   .   .   .   .   .   .   .   .   .   .   .   .   .   .   .   .   15
        5.4 Stage IV (a). Beginner Mode . . . . . . . . . . . .                                       .   .   .   .   .   .   .   .   .   .   .   .   .   .   .   .   .   .   .   .   16
        5.5 Stage IV (b). Advanced Mode . . . . . . . . . . . .                                       .   .   .   .   .   .   .   .   .   .   .   .   .   .   .   .   .   .   .   .   18
        5.6 Stage V. Save filter settings into a preset (optional) .                                  .   .   .   .   .   .   .   .   .   .   .   .   .   .   .   .   .   .   .   .   25
        5.7 Stage VI. Adjust Action settings (optional) . . . . .                                     .   .   .   .   .   .   .   .   .   .   .   .   .   .   .   .   .   .   .   .   26
        5.8 Stage VII. Apply filter . . . . . . . . . . . . . . . .                                   .   .   .   .   .   .   .   .   .   .   .   .   .   .   .   .   .   .   .   .   27

    6   Using plug-in in actions and smart filters                                                                                                                                    28
        6.1 Configuring Neat Image in actions and smart filters . . . . . . . . . . . . . . . . . . . .                                                                               28
        6.2 Neat Image in action-based batch processing . . . . . . . . . . . . . . . . . . . . . . . .                                                                               29

    7   Device noise profiles                                                                                                                                                         30
        7.1 Getting ready-made noise profiles . . . . . . . . . . . . . . . . . .                                                     .   .   .   .   .   .   .   .   .   .   .   .   30
        7.2 Building a profile for a device mode (standard profiling procedure)                                                       .   .   .   .   .   .   .   .   .   .   .   .   30
        7.3 Preparing profile set for different device modes . . . . . . . . . . .                                                    .   .   .   .   .   .   .   .   .   .   .   .   37
        7.4 Using noise profiles . . . . . . . . . . . . . . . . . . . . . . . . . .                                                  .   .   .   .   .   .   .   .   .   .   .   .   42

    8   Additional tools                                                                                                                                                              44
        8.1 Variants of filtration . . . . . . . .                .   .   .   .   .   .   .   .   .   .   .   .   .   .   .   .   .   .   .   .   .   .   .   .   .   .   .   .   .   44
        8.2 Alternative modes of image viewer                     .   .   .   .   .   .   .   .   .   .   .   .   .   .   .   .   .   .   .   .   .   .   .   .   .   .   .   .   .   45
        8.3 Navigator . . . . . . . . . . . . . .                 .   .   .   .   .   .   .   .   .   .   .   .   .   .   .   .   .   .   .   .   .   .   .   .   .   .   .   .   .   45
        8.4 Profile Viewer . . . . . . . . . . . .                .   .   .   .   .   .   .   .   .   .   .   .   .   .   .   .   .   .   .   .   .   .   .   .   .   .   .   .   .   46

    9   Preferences                                                                                                                                                                   47
        9.1 General preferences . . .     .   .   .   .   .   .   .   .   .   .   .   .   .   .   .   .   .   .   .   .   .   .   .   .   .   .   .   .   .   .   .   .   .   .   .   47
        9.2 Defaults . . . . . . . . .    .   .   .   .   .   .   .   .   .   .   .   .   .   .   .   .   .   .   .   .   .   .   .   .   .   .   .   .   .   .   .   .   .   .   .   47
        9.3 Profiling preferences . .     .   .   .   .   .   .   .   .   .   .   .   .   .   .   .   .   .   .   .   .   .   .   .   .   .   .   .   .   .   .   .   .   .   .   .   48
        9.4 Matching preferences . .      .   .   .   .   .   .   .   .   .   .   .   .   .   .   .   .   .   .   .   .   .   .   .   .   .   .   .   .   .   .   .   .   .   .   .   48
        9.5 Preview preferences . . .     .   .   .   .   .   .   .   .   .   .   .   .   .   .   .   .   .   .   .   .   .   .   .   .   .   .   .   .   .   .   .   .   .   .   .   49
        9.6 Performance preferences       .   .   .   .   .   .   .   .   .   .   .   .   .   .   .   .   .   .   .   .   .   .   .   .   .   .   .   .   .   .   .   .   .   .   .   49
        9.7 Folder preferences . . .      .   .   .   .   .   .   .   .   .   .   .   .   .   .   .   .   .   .   .   .   .   .   .   .   .   .   .   .   .   .   .   .   .   .   .   50

    10 Examples                                                                                                                                                                       52
       10.1 Images to build a noise profile . . . . . . . . . . . . . . . . . . . . . . . . . . . . . . . .                                                                           52
       10.2 Filtration results . . . . . . . . . . . . . . . . . . . . . . . . . . . . . . . . . . . . . . . .                                                                        54

    11 Questions and answers                                                                                                                                                          55
       11.1 General questions . . . . . . . . . . . . . . . . . . . . . . . . . . . . . . . . . . . . . . .                                                                           55
       11.2 Filtration-related questions . . . . . . . . . . . . . . . . . . . . . . . . . . . . . . . . . .                                                                          55

   15-Oct-2020             Neat Image © 1999-2020 Neat Image team, ABSoft. All rights reserved.                                                                                        2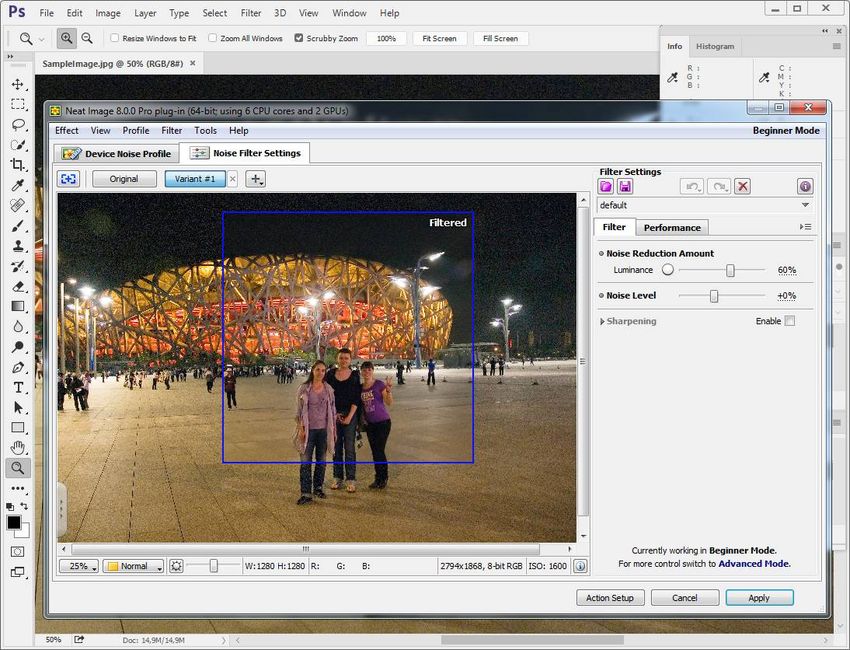
User Guide                                                                                        Neat Image v8 plug-in for Photoshop (Win)

12 Tips and tricks                                                                                                                                                                    57
   12.1 Preventing banding . . . . . . . . . . . . . . . . . . . . . . . . . . . . . . . . . . . . . .                                                                                57
   12.2 Filtration of shadow areas . . . . . . . . . . . . . . . . . . . . . . . . . . . . . . . . . .                                                                                57
   12.3 Partial filtration . . . . . . . . . . . . . . . . . . . . . . . . . . . . . . . . . . . . . . . .                                                                            57

13 Information                                                                                                                                                                        58
   13.1 Issues and bugs . . .     .   .   .   .   .   .   .   .   .   .   .   .   .   .   .   .   .   .   .   .   .   .   .   .   .   .   .   .   .   .   .   .   .   .   .   .   .   58
   13.2 Plans . . . . . . . . .   .   .   .   .   .   .   .   .   .   .   .   .   .   .   .   .   .   .   .   .   .   .   .   .   .   .   .   .   .   .   .   .   .   .   .   .   .   58
   13.3 Detailed feature map      .   .   .   .   .   .   .   .   .   .   .   .   .   .   .   .   .   .   .   .   .   .   .   .   .   .   .   .   .   .   .   .   .   .   .   .   .   58
   13.4 Contacts . . . . . . .    .   .   .   .   .   .   .   .   .   .   .   .   .   .   .   .   .   .   .   .   .   .   .   .   .   .   .   .   .   .   .   .   .   .   .   .   .   58
   13.5 Legal information . .     .   .   .   .   .   .   .   .   .   .   .   .   .   .   .   .   .   .   .   .   .   .   .   .   .   .   .   .   .   .   .   .   .   .   .   .   .   59
   13.6 Registration . . . . .    .   .   .   .   .   .   .   .   .   .   .   .   .   .   .   .   .   .   .   .   .   .   .   .   .   .   .   .   .   .   .   .   .   .   .   .   .   60
   13.7 Acknowledgments .         .   .   .   .   .   .   .   .   .   .   .   .   .   .   .   .   .   .   .   .   .   .   .   .   .   .   .   .   .   .   .   .   .   .   .   .   .   61

Index                                                                                                                                                                                 62

15-Oct-2020            Neat Image © 1999-2020 Neat Image team, ABSoft. All rights reserved.                                                                                           3
User Guide                                                       Neat Image v8 plug-in for Photoshop (Win)

1. Introduction
 1.1. Overview
    Neat Image is a filter software designed to reduce
                                                                Noise is a serious problem that hinders
    visible noise and grain in digital photographic images.
                                                                high-quality digital image processing. In
    Neat Image detects, analyzes and reduces noise.             digital photography, the consumer- and
    Neat Image incorporates the most advanced image             prosumer-level cameras produce images with
    noise reduction algorithms in the industry. The             an easily noticeable noise component. This
    filtration quality is also higher than that of other        component is especially strong in images
    methods because Neat Image takes into account noise         shot at high ISO rates. The noise reduces the
    characteristics of particular image acquisition devices,    visual quality of digital images and resulting
    making the filtration more accurate. Using device           printouts. Some image processing operations,
    noise profiles, Neat Image adapts itself to almost any      like sharpening, make quality of noisy images
    input device – digital camera, scanner, etc.                even worse.

    The rich control set of the noise filter allows you to easily achieve the
                                                                                      Online examples of
    desired level of noise reduction. In addition, Neat Image can make
                                                                                  Neat Image noise reduction:
    images look sharper without degradation of image quality (which is
                                                                                   https://ni.neatvideo.com/
    usually inevitable with noisy images). Smart application of sharpening
    based on preceding noise analysis makes such an effect possible.
    Neat Image plug-in for Photoshop (Win) is currently produced in three editions: Demo, Home and Pro.
    All editions provide top-quality noise reduction and sharpening. The key differences are the following:
         • Demo plug-in is a free edition of the software with limited functionality
         • Home plug-in processes only 8-bit images and does not support Photoshop actions
         • Pro plug-in supports 8-bit, 16-bit and 32-bit images as well as Photoshop actions and smart filters

 1.2. Features
  Photoshop plug-in
         • To selectively apply noise reduction to layers, channels, selections (areas of interest)
         • To automate your workflow using Photoshop actions including Neat Image noise reduction
         • To enable noise reduction in Photoshop action-based batches
         • 32-bit and 64-bit versions of Photoshop and compatible applications are supported

  Noise Reduction and Smart Sharpening
         • Advanced noise filters to reduce noise and grain in digital images
         • Smart sharpening filter to make images look sharper without amplification of noise
         • 8-bit, 16-bit and 32-bit image support to fully utilize capabilities of modern image acquisition
           devices and support HDR post-processing workflows
         • CUDA and OpenCL acceleration to speed up processing using computation-capable GPUs

  Device Noise Profiles
         • Auto Profile to build noise profiles for your camera or scanner on the fly
         • Rich set of pre-built noise profiles in the online profile library
         • Auto Match to select the most suitable pre-built noise profiles
    Some features are only available in the Home or Pro edition. Detailed feature map (page 58) explains the
    differences between Neat Image Demo, Home and Pro editions in details.

    15-Oct-2020            Neat Image © 1999-2020 Neat Image team, ABSoft. All rights reserved.                  4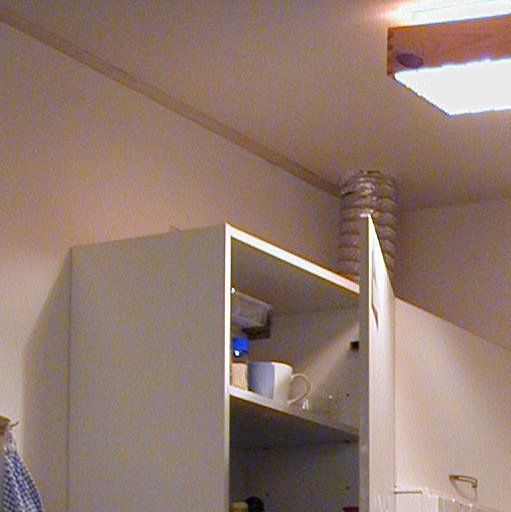
User Guide                                                      Neat Image v8 plug-in for Photoshop (Win)

1.3. Requirements
1.3.1. Hardware requirements
  System requirements for practical use of Neat Image depend on size of input images. The more system
  RAM is available the larger the images that can be handled. The processing speed is determined primarily
  by the processor’s number-crunching power (clock frequency, number of cores/processors, cache size),
  memory speed and availability of supported computation-capable GPUs.
  Recommended system configuration to process photos produced by modern digital cameras:
       • Intel i7 / i5 / Xeon / compatible; single or multi-processor
       • Windows 10, 8, 7, Vista, XP; 64-bit

  Optional CUDA acceleration requires:
       • CUDA-capable NVIDIA GPU with compute capability 3.5 or higher;
       • Recent video driver supporting CUDA 9 or newer
         (you can download the latest versions of the video drivers from
         https://www.nvidia.com/Download/index.aspx)

  Optional OpenCL acceleration requires:
       • Supported AMD video card:
                AMD Radeon HD 7790;
                AMD Radeon R7 250X, 260/265/260X;
                AMD Radeon R7 360/370;
                AMD Radeon R9 255/270/280/285/290; 250X, 270X, 280X, 290X, 295X2;
                AMD Radeon R9 380/390/390X;
                AMD Radeon R9 Fury, R9 Nano, R9 Fury X, Pro Duo;
                AMD Radeon RX 460/470/480;
                AMD Radeon RX 540/540X/550/550X/560/570/580;
                AMD Radeon RX Vega 56/64;
                AMD Radeon Vega Frontier Edition;
                AMD Radeon RX 5300M/5500/5500M;
                AMD Radeon RX 5600/5700/5600 XT/5700 XT;
                AMD Radeon Pro WX 2100/3100/4100/5100/7100/9100;
                AMD Radeon VII;
                Another AMD GPU based on one of the following chip series: Bonaire, Hawaii, Tonga,
                Fiji, Ellesmere, Baffin, gfx804, gfx900, gfx901, gfx906, gfx907, gfx1010, gfx1012
       • The latest version of AMD Adrenalin driver.
         If you experince a problem with the latest version of the driver, please check the known issues
         page for possible solutions:
         https://ni.neatvideo.com/support/known-issues
         You can download the latest and archive versions of AMD Driver from
         https://www.amd.com/en/support

  15-Oct-2020           Neat Image © 1999-2020 Neat Image team, ABSoft. All rights reserved.               5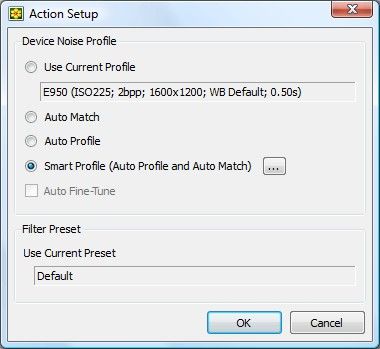
User Guide                                                        Neat Image v8 plug-in for Photoshop (Win)

1.3.2. 64-bit plug-in
   Recommended OS:
        • Windows 10 64-bit, Windows 8 64-bit, Windows 7 64-bit, Vista 64-bit, Windows XP 64-bit
   The 64-bit plug-in is compatible with the following plug-in hosts:
        • Adobe Photoshop 2020 / 2019 / CC / CS6 / CS5.x / CS4 (64-bit)
        • Adobe Photoshop Elements 2021 / 2020 / 2019 / 2018 / 15 / 14 / 13 (64-bit)
        • Corel PaintShop Pro 2021 / 2020 / 2019 / 2018 / X9 / X8 / X7 / X6 (64-bit)
        • Corel PHOTO-PAINT 2020 / 2019 / 2018 / 2017 / X8 / X7 / X6 (64-bit)
        • Affinity Photo 1.5+
        • Serif PhotoPlus X8 / X7 / X6 (64-bit)
        • PhotoLine (64-bit)
   The plug-in may be compatible with other 64-bit hosts as well.

1.3.3. 32-bit plug-in
   Recommended OS:
        • Windows 10, Windows 8, Windows 7, Vista, XP; 32-bit or 64-bit
   The 32-bit plug-in is compatible with the following plug-in hosts:
        • Adobe Photoshop CC / CS6 / CS5.x / CS4 / CS3 / CS2 / CS / 7 / 6 / 5 (32-bit)
        • Adobe Photoshop Elements 14 / 13 / 12 / 11 / 10 / 9 / 8 / 7 / 6 / 5 / 4 / 3 / 2 (32-bit)
        • Corel PaintShop Pro 2021 / 2020 / 2019 / 2018 / X9 / X8 / X7 / X6 / X5 / X4 / X3 / X2 / XI / X / 9
          / 8 / 7 (32-bit)
        • Corel PHOTO-PAINT 2020 / 2019 / 2018 / 2017 / X8 / X7 / X6 / X5 / X4 / X3 / 12 (32-bit)
        • Corel / Ulead PhotoImpact X3 / 12 / 11 / 10 / XL / 8 (32-bit)
        • Serif PhotoPlus X8 / X7 / X6 / X5 / X3 / 12 / 11 / 10 / 9 / 8 / 7 / 6 (32-bit)
        • Microsoft Digital Image Pro
        • Microsoft Digital Image Suite 2006
        • PhotoLine (32-bit)
   The plug-in may be compatible with other 32-bit hosts as well.

1.3.4. Supported types of images
   The following image types are supported:
        • 8-bit / 16-bit / 32-bit per channel RGB images
        • 8-bit / 16-bit / 32-bit per channel grayscale images
   Color input images are supposed to be in a flavor of RGB color space, like AdobeRGB, sRGB, etc. If an
   input image is in some flavor of RGB color space then Neat Image produces the output image in exactly
   the same flavor of RGB color space.
   The minimum size of an input image is 40x40 pixels; the maximum size is usually limited by the amount
   of system RAM available.
   The plug-in can work with images stored using any file format that can be opened by Photoshop: PSD,
   TIFF, RAW, JPEG, etc.

   15-Oct-2020            Neat Image © 1999-2020 Neat Image team, ABSoft. All rights reserved.              6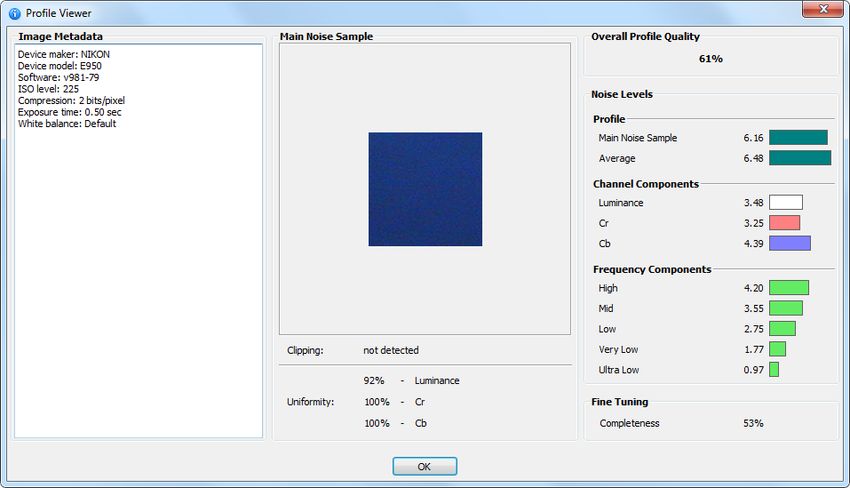
User Guide                                                        Neat Image v8 plug-in for Photoshop (Win)

2. Key concepts
 2.1. What it can do – functionality of Neat Image
   Neat Image is a digital image filter. Its main function is to reduce noise in digital images.
   Neat Image can work with images produced by any imaging devices – digital cameras, scanners, etc.
   Neat Image can be adjusted to a particular device by means of a device noise profile, which describes the
   noise characteristics of the device.
   A device noise profile is built by analyzing featureless areas of an image – areas that contain no visible or
   important details and show only noise. Usually, the software can find such featureless areas completely
   automatically. In a difficult case, you can assist it and select a featureless area manually. Finding such
   areas is very easy for human eyes but may sometimes be a bit difficult for computer software.
   By analyzing those featureless areas, the Auto Profile function builds a profile which describes the
   properties of the noise contained there. Using such a profile, Neat Image’s noise filter can then efficiently
   reduce noise in the whole image.
   When you have several such noise profiles for different device modes (for example, different ISO rates),
   the Auto Match function can automatically select the profile that matches a given input image. In this
   way, you can skip noise analysis and simply re-use one of profiles built earlier.
   Smart Profile combines the power of Auto Profile and Auto Match by preparing two candidate profiles
   and then selecting the better one for actual image processing. This helps to achieve great results with less
   manual assistance.
   The noise filter processes images in several spatial frequency ranges. This allows, for example, to
   accurately reduce noise in one frequency range while fully preserving details that may be present in
   other frequency ranges. In the same way, the filter can also selectively process the color channels.
   In addition to the noise filter, there is the smart sharpening filter, which sharpens only details but not noise,
   so the noise is not amplified. Combining the noise reduction and sharpening in this way saves processing
   time and produces better overall results.

 2.2. When it works – types of input images
   Neat Image is designed to reduce noise in images produced by digital cameras and scanners, and can also
   be used to process images from other sources. For Neat Image to be efficient, input images should satisfy
   the following requirements:
        • Noise must be uniformly distributed throughout the image, i.e., there should be no strong
          surges of noise intensity in some areas of the image or significant changes of noise characteristics
          across the image.
          Neat Image works fine, for example, on images with high ISO noise because such noise usually
          uniformly covers the whole image area. However, ‘hot’ or ‘dead’ pixels (produced by single
          ‘broken’ elements of image sensor) do not satisfy the uniformity condition and, therefore, are not
          efficiently removed by Neat Image.
          Another frequent source of noise is JPEG compression. The JPEG noise is approximately uniform
          when high quality setting (low compression rate, larger file size) is used. However, low compression
          quality makes noise non-uniform. Therefore, we recommend using the highest quality levels
          whenever possible. Try to avoid visible artifacts (‘squares’ or ‘blocks’ introduced by JPEG
          compression) in input images beginning from the early stages of image processing. If you can, use
          lossless file formats such as TIFF or RAW (any file format supported by Photoshop can be used
          with the Neat Image plug-in in Photoshop environment).

   15-Oct-2020            Neat Image © 1999-2020 Neat Image team, ABSoft. All rights reserved.                    7
User Guide Neat Image v8 plug-in for Photoshop (Win)
3. Installing the plug-in
To automatically install Neat Image plug-in to Photoshop
1. Make sure you have started Photoshop at least once before installing the plug-in. If you have not done
that yet, start Photoshop;
2. Close Photoshop;
3. Download the EXE installer of Neat Image that matches your version of Photoshop;
• if you already purchased the product and have a current license for the Home or Pro plug-in,
please use the download instruction supplied with the license to download the corresponding
plug-in;
• if you want to try Neat Image before purchase please download the installer of the Demo
version from this page: https://ni.neatvideo.com/download
4. Double-click the downloaded EXE file to start the installer;
5. Follow the steps of the installer wizard to complete the installation process.
Make sure the installer finds the location of your version of Photoshop in the Additional tasks step
of the installation process. If necessary, manually specify the location of Photoshop’s Plug-ins folder
there.
For example, the Plug-ins folder of the 64-bit version of Photoshop CS6 is:
C:∖Program Files∖Adobe∖Adobe Photoshop CS6 (64 Bit)∖Plug-ins∖
while for the 64-bit version of Photoshop CC 2015 that is:
C:∖Program Files∖Adobe∖Adobe Photoshop CC 2015∖Plug-ins∖
If for some reason the plug-in is not automatically installed, then you can install it manually using the
guidelines below.
To manually install Neat Image plug-in to 64-bit host application:
è 64-bit Photoshop (CC / CS6 / CS5.x / CS4, 64-bit) or Photoshop Elements (14 / 13, 64-bit)
Copy the NeatImage.8bf file from the Neat Image installation folder
(typically, C:∖Program Files∖Neat Image for Photoshop∖) into the Plug-Ins1 subfolder inside the
Photoshop folder.
Then re-start Photoshop (make sure you start the 64-bit version of Photoshop, as there may be two
Photoshop versions available, 32-bit and 64-bit one) and find Neat Image in the menu:
Filter > Neat Image > Reduce Noise v8.
To manually install Neat Image plug-in to 32-bit host application:
è 32-bit Photoshop or Photoshop Elements
Copy the NeatImage.8bf file from the Neat Image installation folder
(typically, C:∖Program Files∖Neat Image for Photoshop∖ in 32-bit Windows or
C:∖Program Files (x86)∖Neat Image for Photoshop∖ if you use 64-bit Windows) into Plugins
or Plug-Ins1 subfolder inside the Photoshop / Photoshop Elements folder.
Then re-start Photoshop and find Neat Image in the menu: Filter > Neat Image > Reduce Noise v8.
è Other image editors (plug-in hosts)
Please refer to the documentation of the corresponding plug-in host to find the correct way to install a
third-party Photoshop-compatible plug-in (8BF-type).
You can find the Neat Image plug-in itself (NeatImage.8bf ) in the Neat Image installation folder:
C:∖Program Files∖Neat Image for Photoshop∖
or
C:∖Program Files (x86)∖Neat Image for Photoshop∖
depending on the version of Windows (32-bit vs 64-bit).
1 If the language of Photoshop is not English, you may have to use another Plug-Ins folder, for example, ”Modules externes” in
French, ”Zusatzmodule” in German version, ”Insteekmodules” in Dutch, ”Plug-In” in Italian, etc.
15-Oct-2020 Neat Image © 1999-2020 Neat Image team, ABSoft. All rights reserved. 8User Guide Neat Image v8 plug-in for Photoshop (Win)
4. Filtration process overview
4.1. Overview of Neat Image filtration process
1. Prepare image
– in Photoshop, open the image to be
processed;
– use the Filter > Neat Image > Reduce
Noise v8. . . menu item to open Neat Image;
2. Prepare a device noise profile - noise analysis
necessary to filter the image
– to build a new profile click the
Auto Profile button; this will automatically
select and analyze a featureless (noise–only)
image area;
if you see that automatic selection includes
any important image details, then move the
selection to an area without details and click
the Auto Profile button again;
3. Adjust the filter settings
– switch to the Noise Filter Settings tab;
– adjust the filter settings to achieve desired
level of noise reduction:
– try to vary the setting: Noise
Reduction Amounts: Luminance
and see how the preview changes;
4. When you are happy with preview results, apply
the filter to the image: click the Apply button.
15-Oct-2020 Neat Image © 1999-2020 Neat Image team, ABSoft. All rights reserved. 9User Guide Neat Image v8 plug-in for Photoshop (Win)
4.2. Running Neat Image on a sample image
You can download a test-kit prepared to help you start using Neat Image plug-in via this link:
https://ni.neatvideo.com/project/resources/testkit8.zip, 2.5 MB. Please download and unzip it to a new
folder on the hard disk.
The test-kit contains a sample image: SampleImage.jpg. This is a typical photo taken with a modern
digital camera. The detailed information about the image is available in the SampleImageInfo.txt file.
Please go through the stages below to see how the image can be improved by Neat Image:
Stage I. Open the image in Photoshop and invoke Neat Image
1. Open the image (SampleImage.jpg) in Photoshop;
You will see that there is some strong noise in the image (zoom in to better see the noise). This is
typical noise produced by a digital camera. The task of Neat Image is to reduce this noise.
2. Select the Filter >Neat Image > Reduce Noise v8. . . menu in Photoshop to open Neat Image.
Stage II. Build a noise profile using Auto Profile
To reduce noise Neat Image generally needs a noise profile describing the noise properties of the image. It
is possible to build such a noise profile using the image itself.
To prepare a noise profile please do the following:
1. In the Device Noise Profile tab: ,
click (the Auto Profile button);
Auto Profile will try to automatically find and analyze a flat featureless image area that contains
only noise and no important details.
2. Visually inspect the image area selected by Auto Profile. The area should contain no visible
details, only noise; otherwise the noise profile and subsequent noise reduction may be inaccurate.
If the selected area does contain any details, move the selection to another area without details or
draw a new selection in such an area. Then click the Auto Profile button again.
Once processing is completed, the noise profile is ready and Neat Image can apply its noise reduction to
the image.
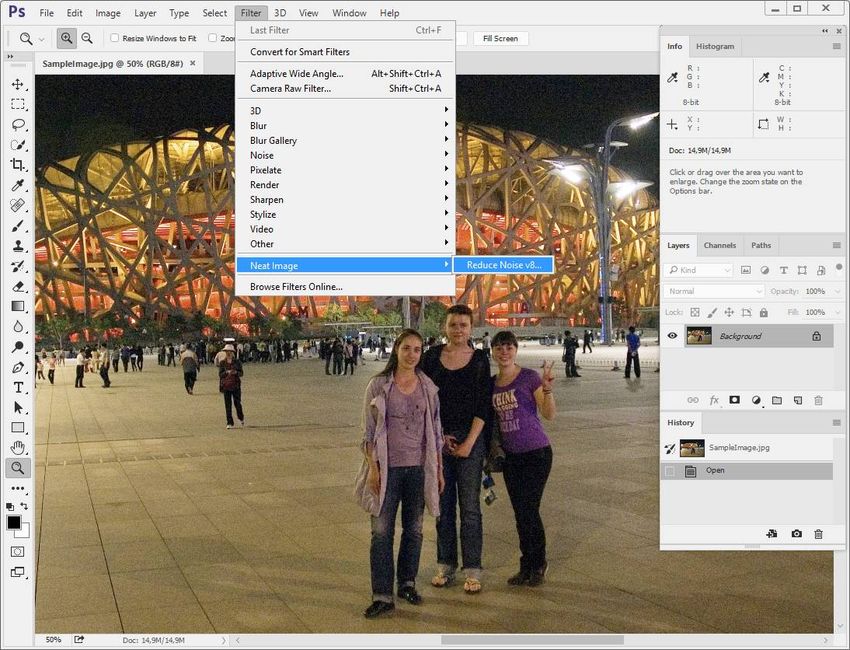
Stage III. Check preview
1. Switch to the Noise Filter Settings tab: ;
2. Once preview is automatically prepared, visually evaluate the results of noise reduction.
You can click the image to quickly switch between original and filtered images for comparison.
Zoom in to better see details at 100% zoom level.
3. You can also try to adjust the filter settings a bit. For example, try to vary Noise Reduction
Amounts: Luminance control and see how that affects the preview.
Stage IV. Apply the filter
1. Click in the bottom of the plug-in window and wait until the image processing is
completed. That can take a few seconds. Then the filtered image is displayed in Photoshop.
Zoom in to better see details at 100% zoom level. Notice that the noise has been significantly
reduced throughout the image while the image details have been preserved.
15-Oct-2020 Neat Image © 1999-2020 Neat Image team, ABSoft. All rights reserved. 10User Guide Neat Image v8 plug-in for Photoshop (Win) You can process your own images in a similar fashion as well. Neat Image can perform similar noise reduction on images captured or acquired by any digital camera (or scanner) working in any mode. To be able to do that Neat Image needs a device noise profile describing the properties of noise produced by the corresponding device. Neat Image can build such a profile on the fly using the Auto Profile function. Also, you can find ready-made noise profiles for many cameras and scanners in the Profiles section of the Neat Image web page (you will find more details on that later in the document). The next sections – Filtration process details, page 12, and Device noise profiles, page 30 contain detailed descriptions of the filtration and profiling processes. There are also examples of profiling and filtration in the Neat Image web page: https://ni.neatvideo.com/examples 15-Oct-2020 Neat Image © 1999-2020 Neat Image team, ABSoft. All rights reserved. 11
User Guide                                                                    Neat Image v8 plug-in for Photoshop (Win)

5. Filtration process details
    The Neat Image plug-in can be used in Photoshop to process one or multiple images. This section
    describes the key stages of using the Neat Image plug-in to process one image. There is also a way
    to automatically process many images (see the Using plug-in in actions and smart filters section, page 28).

 5.1. Stage I. Invoke the plug-in in Photoshop
    In Photoshop, open and select an image to be processed (it will be called “input image” hereafter) and
    then invoke the Neat Image plug-in using the standard method:
    è Select the Filter >Neat Image > Reduce Noise. . . menu item in Photoshop.
          The Neat Image plug-in window will open and show the input image.

  To scroll and pan the image
             • press the middle mouse button and then drag the image using the mouse;
             • press the spacebar and the left mouse button and then drag the image using the mouse.

  To change zoom level
             • use the mouse wheel when the mouse pointer is over the viewer;
             • use the zoom control under the viewer;
             • use the Ctrl-Plus, Ctrl-Minus, Ctrl-0 (zero), Ctrl-Alt-0 (zero) keyboard shortcuts.

 5.2. Stage II. Prepare a device noise profile
    To filter the input image, Neat Image needs to know the characteristics of noise produced by the image
    acquisition device (digital camera, scanner, etc.) that the image comes from. The noise characteristics of a
    device working in a certain mode constitute a device noise profile.
    There are several ways to prepare a noise profile for the input image:
           1. Auto Profile: to build a new profile by analyzing the input image itself
              (or a specially prepared test image);
           2. Auto Match: to automatically select the most suitable device noise profile from a pre-built set of
              profiles (when such a set is available);
           3. Smart Profile: to use both Auto Profile and Auto Match (with optional Auto Fine-Tune) to
              prepare two candidate profiles and then automatically select the better of two profiles;
           4. Load Profile: to manually select a suitable profile from a pre-built set of profiles
              (when such a set is available).
    The first option is often the easiest one provided the input image contains uniform featureless areas that
    include noise but no visible or important details.1 Auto Profile will try to automatically find such image
    areas and analyze them to build a noise profile. When the image does contain featureless areas, this
    automatic way of preparing a noise profile is the most accurate and therefore recommended. If the input
    image includes no such areas, another image with featureless areas can be used to build a profile (provided
    both images come from the same source and therefore contain the noise with the same properties).
    The other options are available once you already have a pre-built set of profiles. You can prepare such a
    set yourself or find some profile sets built by other users of the same camera or scanner. You can find more
    information about profiles and profiling in the Device noise profiles section, page 30.
    Again, using Auto Profile is often the simplest and fastest way to prepare an accurate noise profile, so
    below this method is described first.
    1   You can see some examples of featureless image areas in the Examples section, page 52.

    15-Oct-2020                  Neat Image © 1999-2020 Neat Image team, ABSoft. All rights reserved.                   12
User Guide Neat Image v8 plug-in for Photoshop (Win)
Auto Profile: build a new profile using the input image
è Make sure you have switched to the Device Noise Profile tab:
è Click (the Auto Profile button) in the toolbar, or use the Profile > Auto Profile
with Regular Image menu item, or press F2.
Auto Profile function will find and select an area for main analysis. Neat Image will then automatically
analyze the noise in that area to build a new noise profile. It will then analyze the rest of the image as
well, but the most important part of the analysis is the area highlighted by the selection. Which is why
it is important to visually control that area selected by Auto Profile.
In difficult cases, Neat Image may be not able to find a large enough, uniform enough and featureless
enough area in the image. You will then notice that the area selected by Auto Profile, for example,
contains some important details, not just noise. In such cases, Neat Image also warns you that the
area is not very suitable for analysis. It may say that the selected area is not uniform in one or more
channels, or is too small, or contains clipping in one or more channels.
One way to address that is to manually move the selection (or resize, or draw a new one) to an area
that does not contain any visible details and then click the same Auto Profile button again. To find
the most suitable area, use the Assist mode of the image viewer to better see weak details that may
be present in the candidate image areas. The Assist mode emphasizes the weak details present in
Luminance (Y), Cr, Cb channels, as shown in the example below:
The top image shows the original picture where details around the sun are barely visible, while the
channels in the bottom part display the image data in such a way as to emphasize those weak details.
That helps to visually verify that the selected area contains no useful details, which is very important
for accurate noise analysis.
Alternatively, you can just ignore those warnings about possible non-uniformity, clipping or size of the
area,, but the quality of the resulting noise profile may be lower than it could in principle be with that
image. The filter will still work though.
After the profile is built, check the Quality indicator in the Device Noise Profile box. A profile built
using a large, uniform and featureless image area will show a high value there. If the profile quality is
high (for example, higher than 70%) then you can be sure that the noise profile is accurate. In this case,
consider the noise profile ready and proceed to Stage III. Adjust filter settings, page 15.
If the quality is not high or you clearly see that the area used for analysis contains some details, try to
find another uniform image area and use Auto Profile again. It is usually best to select the most noisy
area for analysis.
That may not help still, especially if the image contains only a few featureless areas. In this case,
consider building a noise profile using an alternative image or a special test image prepared with
the Calibration Target. Please see the Device noise profiles section, page 30, to learn how to use the
Calibration Target to build noise profiles. You can also try to load some pre-built profile using one of
the methods described below.
15-Oct-2020 Neat Image © 1999-2020 Neat Image team, ABSoft. All rights reserved. 13User Guide Neat Image v8 plug-in for Photoshop (Win)
Auto Match: select matching noise profile from a pre-built profile set
This option can only be used if you already have a pre-built set of profiles. You can prepare such a set
yourself or find some pre-built profile online.
è Click (the Auto Match button) or use the Profile > Auto Match menu item.
The Auto Match function uses the EXIF data fields of the input image to automatically select and
load the device noise profile that matches the device mode of the image. The most matching profile is
selected from profiles stored in the Profile folder. By default, this folder is in your Documents folder1 :
Documents∖Neat Image v8 for Photoshop∖Profiles∖
Auto Match will look for matching profiles in that folder as well as all its subfolders (where you can
place profiles built by you or downloaded from the Internet).
After a profile is loaded by Auto Match, the degree of match between the current input image and
loaded noise profile is displayed in the Device Noise Profile box. Higher Match values mean better
match, leading to more accurate filtration.
Smart Profile: prepare two profiles and select the better one
è Use the Profile > Smart Profile menu item (or press the F5 key).
Smart Profile uses both Auto Profile and Auto Match (with Auto Fine-Tune) to prepare two candidate
profiles and then selects the better of two profiles. For Smart Profile to be fully efficient, the input
image must contain flat featureless areas with noise for Auto Profile to analyze, and also there must be
several pre-built profiles to let Auto Match find the most matching noise profile, as described above.
You can adjust settings of Smart Profile function in Preferences.
Load Profile: manually select a noise profile from a pre-built profile set
è Click (the Load Profile button) or use the Profile > Load Profile. . . menu item.
Then select a profile in the Load Device Noise Profile dialog.
or
è Click (the drop-down button) in the Device Noise Profile box to open the popup menu with all
available profiles and then select one of the available profiles.
Please note that you must either build your own profiles or download some pre-built profiles and place
them to Neat Image’s Profile folder to make this drop-down button and popup menu truly work. By
default the Profile folder is located in your Documents folder 2 :
Documents∖Neat Image v8 for Photoshop∖Profiles∖
If you build or download some pre-built profiles, place them to the above folder (unzip the downloaded
ZIP archive to that folder). Neat Image will recognize and display those profiles in the popup menu to
help you quickly load any of them when needed.
When manually selecting a profile for an input image, use the profile file names and sub-folder
structure to guide your search. See Preparing profile set for different device modes: Stage III. Structuring
profile set, page 40, for more information on profile set structuring.
Load Profile: manually select a noise profile from a generic profile set
There may be some cases the images you are working on have no featureless areas suitable for building a
noise profile, no pre-built profiles available for particular device and noise characteristics. For such cases
Neat Image has a set of generic pre-built noise profiles that can provide a solution when other options are
not available. Of course it is better to use the regular solution (Auto Profile, Auto Match, Smart Profile)
when possible, because that delivers the most accurate results.
1 You can check and adjust the location of that folder using the menu Tools > Preferences > Matching.
2 You can check and adjust the location of the Profile folder using the menu Tools > Preferences > Folders.
15-Oct-2020 Neat Image © 1999-2020 Neat Image team, ABSoft. All rights reserved. 14User Guide Neat Image v8 plug-in for Photoshop (Win)
è To use one of the generic profiles click (the Load Profile button). Then select a
profile from the Generic Profiles folder.
or
Click (the drop-down button) in the Device Noise Profile box to open the popup menu showing
all profiles (currently available in Neat Image’s Profile folder), click on Generic Profiles and select
one of the available profiles.
By default, Generic Profiles are located in your Documents folder:
Documents∖Neat Image v8 for Photoshop∖Profiles∖Generic Profiles∖
There are seven profiles available in the Generic Profiles folder: Generic-1 (weak noise), Generic-2
(weak noise), Generic-3 (medium noise) . . . . . . and Generic-7 (strong noise). They have been ranked
according to the noise level they have been designed to deal with. Generic-1 (weak noise) noise profile
designed to work with images that do not have much noise, while Generic-7 (strong noise) noise profile
has been created for very noisy images.
Try different generic profiles to find one that delivers the best results in preview in the Noise Filter
Settings tab:
To additionally fine-tune the manually loaded or matched profile
You may want to additionally fine-tune the profile after it has been loaded either automatically
(using Auto Match) or manually (using Load Profile). Fine-tuning the profile to the current image
usually makes the profile more accurate and better reflecting the image’s noise properties. Please note
that you do not need to fine-tune a profile if you have just built it using Auto Profile. Auto Profile
automatically applies fine-tuning so you do not need to repeat that operation. However if you load an
existing profile instead of building a new one, fine-tuning such a loaded profile can be very useful.
è Click (the Auto Fine-Tune button) or use the Profile > Auto Fine-Tune menu
item to fine-tune the profile to the current input image.
There is no need to select any area in the input image because Auto Fine-Tune automatically analyzes
the whole image.
Once you have loaded the profile that matches the input image or you have just built a new profile
specifically for the current input image, proceed to process the image in the Stages III-V below.
5.3. Stage III. Adjust filter settings
As soon as the noise profile is ready you can use the noise and sharpening filters. These filters have
several adjustable settings. The default settings usually produce good results (provided the noise profile is
accurate). You may want to additionally vary the filter settings to achieve the filtration results that look
best to your eyes.
è Switch to the Noise Filter Settings tab:
5.3.1. Use preview when adjusting filter settings
The image viewer in the Noise Filter Settings tab shows a part of the image processed by the noise and
sharpening filters. When you change any filter settings, the preview is automatically updated. You can
zoom in and out, drag, scroll and pan the image to see how the filtration affects different parts of the
image. If you manually select an area in the image then only that area will be processed for preview. That
can also be faster than processing the whole visible area, so if you work on a slower machine, try selecting
a smaller area for preview. The simplest way to do that is to double-click the image in the area of interest:
Neat Image will then add a selection around that point.
When the preview is ready (the preview area shows “Filtered”), you can click inside that preview area to
temporarily switch back to the original for comparison.
15-Oct-2020 Neat Image © 1999-2020 Neat Image team, ABSoft. All rights reserved. 15User Guide Neat Image v8 plug-in for Photoshop (Win)
5.3.2. Beginner and Advanced modes
Neat Image has two sets of filter controls available in Beginner mode and Advanced mode. You can
select the mode using the Tools > Beginner mode and Tools > Advanced Mode menu items or using the
dedicated Beginner mode and Advanced Mode menu in top right corner of the plug-in’s window.
The Beginner mode provides a simplified control set recommended for beginners who have just started
using Neat Image. The Advanced Mode provides the most complete control set with the maximum
control over the noise profiling and filtration processes. The Advanced Mode offers several additional
filter options and modes that help to achieve better noise reduction results.
We recommend to start with the simplified control set of the Beginner mode and later switch to the
Advanced Mode to be able to utilize Neat Image to its full potential.
Adjusting filter settings in Beginner Mode and Advanced Mode is described in two separate sub-sections
below.
For Beginner mode please follow the sub-section Stage IV (a). Beginner Mode below.
If you want to jump right to the most complete control set in Advanced Mode then please instead follow
the sub-section Stage IV (b). Advanced Mode, page 18.
5.4. Stage IV (a). Beginner Mode
Please make sure Filter Settings panel is switched to the Filter tab.
5.4.1. Beginner Mode: Adjusting filter settings
There are two main filters in Neat Image: noise reduction filter and sharpening filter. These two filters can
be used together and each of them can be used independently. You can enable, disable and adjust these
filters using the guidelines in the subsections below.
Filter
The noise filter itself has two main settings (when working
in Beginner Mode): Noise Level and Noise Reduction
Amount.
The Noise Level setting is a threshold determining which
image elements are considered noise and which elements
are considered true details. The Noise Reduction Amount
setting determines how much reduction is applied to the
elements identified as noise.
è Use the Noise Reduction Amount: Luminance control
to adjust the amount of noise reduction applied to the
noisecontrol
This in the luminance
is the mostcomponent
importantofand
the most
imagefrequently
data. adjusted setting of the noise filter. The
higher this setting, the more of the detected noise is removed in the luminance component. Be careful,
setting the noise reduction amount too high may lead to loss of fine details and/or unnaturally looking
(over-smooth, plastic-like) results. Too low amounts may be not enough to sufficiently reduce the
objectionable part of the noise. The default value of 60% usually provides a good balance between
noise removal and preserving natural (not over-processed) appearance of filtered image. Try to adjust
the setting up and down to get the results that look best to your eyes.
è Use the Noise Level control to adjust the setting (only when necessary).
Please note that if the noise profile is accurate,1 then it is not necessary to adjust this setting. However,
if the noise profile is not accurate or it was built for a different image, then the noise filter may need
1 Use the Quality indicator in the Device Noise Profile box (in the Device Noise Profile tab) to estimate the accuracy of the profile.
The indicator shows how accurate and complete is the noise analysis itself. Higher values usually lead to more accurate noise
reduction. Also pay attention to the Match indicator: it should either show a high value or there should be the (AP) sign indicating
that the profile has been built by Auto Profile using this very image. That ensures that the profile is not only accurate but it also
matches the input image.
15-Oct-2020 Neat Image © 1999-2020 Neat Image team, ABSoft. All rights reserved. 16User Guide Neat Image v8 plug-in for Photoshop (Win)
an adjusted estimation of the actual noise level to be able to work correctly. By adjusting the Noise
Level setting, you provide the filter with such an adjusted estimation. Use the preview to visually
guide yourself when making such adjustments. The right adjustment will leave no noise elements in
the image yet will not destroy the actual details.
It is best to gradually increase the noise level and watch the preview to find the point where most the
noise elements are already reduced and the details are still preserved. If you go beyond that point, then
some details may be lost too, so make sure you do not set the noise level unnecessarily high.
Sharpening (optional)
The sharpening filter in Neat Image increases the sharpness of image details without increasing the noise
strength.
The sharpening filter is disabled by default. You can enable it and adjust the sharpening amounts separately
for three typical scales of details: fine, medium-sized and large.
Like any sharpening method, try to balance the amount of sharpening to avoid over-sharpening.
è Use the Sharpening: Fine, Medium and Large sliders
to adjust the amount of sharpening applied to the image
details of the corresponding sizes.
It is best to start with adjusting the Fine sharpening
amount. If sharpening the fine details alone is not
sufficient to make the image look sharp, then try to increase the Medium and Large settings too.
Use preview
While adjusting the settings, use the available preview facilities to evaluate the corresponding changes in
the results of Neat Image processing:
• Click inside the preview area to temporarily switch back to the original image for comparison;
• Move the preview area from one part of the image to another to see how the Neat Image processing
affects different image content;
• Create several alternative variants of filtration, compare results and select the best variant. For
more information on using variants please see the Variants of filtration section, page 44.
5.4.2. Beginner Mode: Optimize performance settings (optional)
Before applying the filter to the image (especially if that is only one of many images in a large batch), you
may want to measure the processing speed on that image and potentially improve the speed by optimizing
the performance settings of Neat Image. This is entirely optional but in some cases, the optimization can
appreciably reduce the time of batch processing.
It is generally a good idea to optimize the performance settings when you run Neat Image on that specific
computer for the very first time, to adapt the filter to the current hardware (the CPUs and GPUs available
in that machine).
To check the current speed and to optimize the performance settings switch to the Performance tab in the
Filter Settings box.
15-Oct-2020 Neat Image © 1999-2020 Neat Image team, ABSoft. All rights reserved. 17User Guide Neat Image v8 plug-in for Photoshop (Win)
è To measure the filter speed click
Neat Image will run a test and will then display the
measured processing speed based on the current filter
settings (as shown in the text field in the Performance
tab).
è To optimize the performance settings click
to open the Performance tab in Neat Image Preferences.
In that tab, you can inspect the available and current CPU
and GPU settings.
Then click to open a specialized
dialog designed to measure image processing speeds
achieved with different combinations of the CPU and
GPU settings. It allows to automatically benchmark all
possible combinations of those settings and to identify
the best combination (for the current hardware and current filter settings). You can then just click
to apply the found optimal combination achieving the best performance.
Once you have completed this step, please proceed to the section Stage VIII. Apply filter, page 27.
Or if you want to switch to the Advanced Mode and adjust the filters using the most complete set of
controls please proceed to the next sub-section dedicated to the Advanced Mode.
5.5. Stage IV (b). Advanced Mode
As said in the previous sections, Neat Image has two sets of filter controls, that are available in the
Beginner mode and Advanced mode (you can select the mode using the Tools > Beginner mode and
Tools > Advanced Mode menu items).
The Beginner mode described earlier provides a simplified control set recommended for beginners who
have just started using Neat Image. The Advanced Mode provides the most complete control set with the
maximum control over the noise profiling and filtration processes. The Advanced Mode offers several
additional filter options and modes that help to achieve better noise reduction results.
It is usually best to start learning Neat Image using the simplified control set of the Beginner mode and
later switch to the Advanced Mode to be able to utilize Neat Image to its full potential.
If you want to use the Advanced mode then please follow this sub-section, otherwise skip it and proceed
to page 25 for the next stage.
As compared with the Beginner mode, the Advanced mode offers a more extensive set of filter controls.
There are also several quality modes allowing to opt for higher quality of image processing over processing
speed or the other way around.
15-Oct-2020 Neat Image © 1999-2020 Neat Image team, ABSoft. All rights reserved. 18User Guide Neat Image v8 plug-in for Photoshop (Win)
5.5.1. Advanced Mode: Selecting Quality Mode
Please make sure Filter Settings panel is switched to the
Filter tab.
The first setting available in the Filter tab is the Quality
Mode, which is a global setting affecting the way all or
most parts of the filter work. Quality Mode determines
whether Neat Image should generally work more accurately
(but somewhat slower) or somewhat less accurately (but
significantly faster).
By default, Quality Mode is set to High, which provides
a good balance between processing speed and the visual
quality of results. There are also Highest (slower) and
Normal (faster) modes.
è Use the Quality Mode control to select the preferred processing mode.
While adjusting the Quality Mode, observe how the preview progress indicator (the yellow bar at the
top of the preview area) is updating to get an idea of expected processing speed in each processing
mode. You may not immediately notice the difference in visual quality in preview but the speed
difference should be immediately obvious.
If the preview is updating too slowly, you do not necessarily have to decrease the Quality Mode. You
can simply zoom into the image or manually select a smaller part of the image to limit the preview to
that smaller area. Then the preview will update faster.
Preview has to update in many situations: when you change any filter settings, move the selected
area to another part of the image, zoom in or out, etc. Therefore it is important to make those updates
comfortably fast.
Once you find a comfortable way to evaluate the preview results, proceed to the next steps to adjust the
actual filters.
5.5.2. Advanced Mode: Adjusting filter settings
There are several sections in the Filter tab. Most of the sections are related to the noise reduction filter
and the last section is about sharpening. Most of the sections can be enabled or disabled individually to
achieve the desired results in different image processing situations.
15-Oct-2020 Neat Image © 1999-2020 Neat Image team, ABSoft. All rights reserved. 19User Guide Neat Image v8 plug-in for Photoshop (Win)
Filter
In Advanced Mode, the main noise filter has separate
settings for all (spatial) frequency1 and channel components
of the image data. There are pairs of noise level – noise
reduction amount controls for each of these components.
You have access to eight such pairs – three for channel
components (Luminance, Cr, Cb) and five for spatial
frequency components (High, Mid, Low, Very Low, Ultra
Low) of the image data.
The meaning of each noise level – noise reduction amount
pair is the following:
• the noise level control adjusts the threshold
determining which elements of the corresponding
image component are considered noise and which
elements are considered true details;
• the noise reduction amount control determines how
much reduction is applied to the elements identified
as noise in that component.
Thus, with a noise level – noise reduction amount pair of
settings you can adjust what should be considered noise in
a component of the image data and how much of that noise
should be reduced.
The noise level settings are relative and are based on the
noise levels of the current noise profile. Because the noise
level controls are relative to the measured levels of the
noise profile, the default filter settings usually produce good
results as long as the noise profile is accurate.2
Noise Reduction Amount3
Noise reduction amounts are the most frequently adjusted settings of the noise filter.
è Use the Noise Reduction Amount > Luminance; and Noise Reduction Amount > Components >
Cr, Cb; High, Mid, Low, Very Low, Ultra Low sliders.
1 See “What is frequency” question in page 55.
2 Use the Quality indicator in the Device Noise Profile box (in the Device Noise Profile tab) to estimate the accuracy of the profile.
The indicator shows how accurate and complete is the noise profile itself. Higher values usually lead to more accurate noise
reduction. Also pay attention to the Match indicator: it should either show a high value or there should be the (AP) sign indicating
that the profile has been built by Auto Profile using this very image. That ensures that the profile is not only accurate but it also
matches the input image.
3 We recommend disabling the sharpening filter when adjusting the noise filter. This can make the influence of adjustments easier to
see in preview.
15-Oct-2020 Neat Image © 1999-2020 Neat Image team, ABSoft. All rights reserved. 20User Guide Neat Image v8 plug-in for Photoshop (Win)
You can vary the noise reduction amount for each frequency
and channel component of the image data. The higher a
certain noise reduction amount is, the more of the detected
noise is removed in the corresponding component.
Noise reduction amounts can be in the range from 0% (none
of the detected noise is removed) to 100% (all the detected
noise is removed). By default, the noise filter removes 60%
in the Luminance channel and 80% in the Cr, Cb channels
(you can always change the defaults if necessary1 ).
Be careful: setting the noise reduction amounts too high,
especially in the Luminance channel, may lead to loss
of fine details and/or unnaturally looking (over-smooth,
plastic-like) results. Too low amounts may be not enough to
sufficiently reduce the objectionable part of the noise. Try to
balance the noise reduction amounts (most importantly, the
amount of noise reduction in the Luminance channel) to get
the results that look best to your eyes.
Decreasing the noise reduction amounts can have a positive effect
As human vision is not very
if the image contains some natural noise. For example, when
sensitive to variations of
you work with an image showing asphalt, sand, or anything else
colors, strong filtration in the
that contains fine natural noise-like features, it may be helpful
chrominance channels (Cr, Cb)
to reduce the amounts at least for some of the components (for
does not noticeably distort image,
example, Luminance).
but efficiently reduces color noise.
Filter Tuning Assist (optional)
Filter Tuning Assist is a special tool, which facilitates
adjustment of other filter settings by helping to better
see the influence of other settings in preview. It is not
necessary to use this tool, but it may help to speed up the
adjustment process as a whole.
When you use Filter Tuning Assist, all noise reduction
amounts are temporarily increased to a higher Amount
value (the specific value of that special Amount can be
adjusted here as well). That makes it easier to see the
difference caused by adjustments in other settings such
as Noise Level, Artifact Removal, Detail Recovery and
other filter settings available in Advanced Mode and
described further in this section.
è Click Filter Tuning Assist > Begin for easier tuning
of filter settings.
The preview image may then look unnaturally plastic,
but that is just a temporary effect that will go away
once tuning is complete.
è Adjust highlighted filter settings so that no noise is visible, but details are still preserved.
è Click Filter Tuning Assist > Finish button to complete the tuning process.
Please note that some noise will return to the preview image after that. This is normal. The amount of
noise reduction can be adjusted using other filter settings if required.
1 You can adjust the filter settings and then save them as a new default preset using the menu Filter > Set As Default Preset. . .
Also see the description of the Default Filter Preset setting in Neat Image Preferences, page 47.
15-Oct-2020 Neat Image © 1999-2020 Neat Image team, ABSoft. All rights reserved. 21User Guide Neat Image v8 plug-in for Photoshop (Win)
Noise Level (optional)
Usually it is not necessary to change the noise level settings if the noise profile is accurate. You only
need to adjust the noise levels if you see in preview that some noise elements are not reduced by the
filter even if you increase the noise reduction amounts. Such incomplete reduction is usually caused by
an inaccurate noise profile providing inaccurate noise level estimations to the noise filter. This may be
compensated by adjusting (increasing) the noise levels in the filter settings.
è Use the Noise Level > Luminance, Cr, Cb; High, Mid,
Low, Very Low, Ultra Low sliders.
The noise filter is applied to the five frequency
components and the three channel components of the
image data. Corresponding sliders adjust the estimated
noise levels for each of these components.
The higher a certain noise level is, the more elements in
the corresponding component are considered noise. Be
careful: setting a noise level too high can lead to removal
of true details. Setting it too low can lead to incomplete
filtration: residual noise and compression artifacts can
stay in the filtered image.
As a rule, if the device noise profile has been built
properly, it is not necessary to increase the noise levels
by more than 50%. If the image contains strong surges
of noise in the high frequency range, it is recommended
to increase the high frequency noise level up to +20 to
40% and/or use the artifact filter (see below).
If the image contains strong color noise, it is
recommended to increase the Cr and Cb noise levels
to +30% or more. In some cases, it may be useful to
increase these noise levels up to +100%.
If adjusting noise levels still does not help and some noise elements remain in the filtered image, probably
the device noise profile is not good at all. Return to Stage V. Prepare a device noise profile, page 12, and
additionally fine-tune the noise profile or simply rebuild it from scratch.
Artifact Removal (optional)
Neat Image has an additional filter to remove residual
dot-like and line-like noise elements that may remain
in image even after applying Neat Image’s regular
noise filters. Such residual noise elements / artifacts
are typically created by in-camera noise reduction and
compression or by other post-processing. Neat Image’s
noise reduction can make those elements more visible
if the noise levels are under-estimated during profiling.
You can see an example of such digital artifacts in
the first picture on the right. The second picture shows the results of noise reduction with the Artifact
Removal filter enabled.
Such artifacts are usually of digital nature. They are typically of very small size yet they are different from
the regular random noise, so they require special treatment provided by the Artifact Removal filter.
You can enable and adjust this filter using the following controls in the Filter > Artifact Removal
section:
15-Oct-2020 Neat Image © 1999-2020 Neat Image team, ABSoft. All rights reserved. 22You can also read