User Guide ROOMIE REMOTE - Version 6.7 Released Spring 2021
←
→
Page content transcription
If your browser does not render page correctly, please read the page content below

ROOMIE REMOTE

User Guide

          Version 6.7
 Released Spring 2021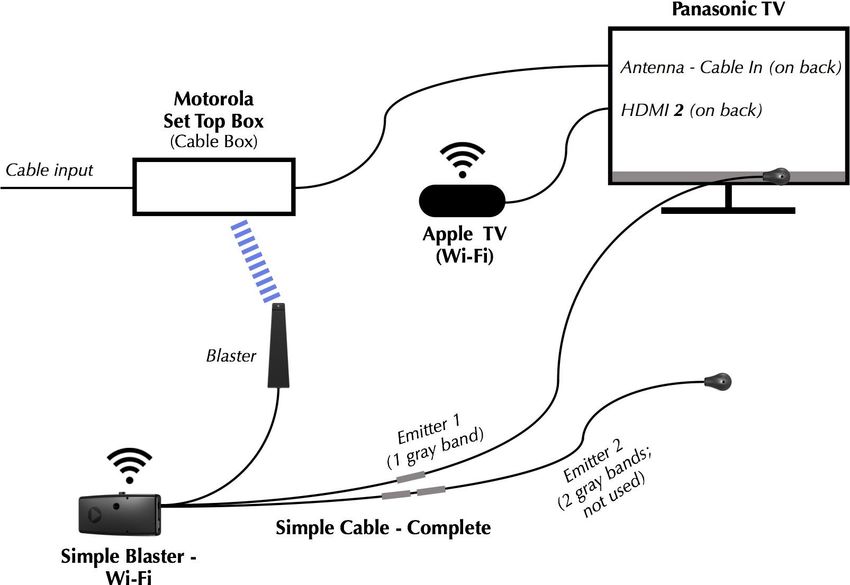
Version Information
              Roomie Remote User Guide, Version 6.7, released Spring 2021.

Copyright Information
              Copyright © 2021 by Roomie Remote, Inc. All rights reserved. You may make copies of this document;
              however, doing so means you agree: you will give full attribution to Roomie Remote, Inc., you will not make
              changes to the content, you will not use the copies for commercial purposes, and you do not gain any rights
              to this content.

Trademark Information
              “Roomie Remote” and the Roomie Remote logo are trademarks of Roomie Remote, Inc. All other company,
              product, and service names are for identification only. All trademarks and registered trademarks are the
              property of their respective owners.

Limitations
              The information in this document may change at any time. It may include technical inaccuracies or
              typographical errors.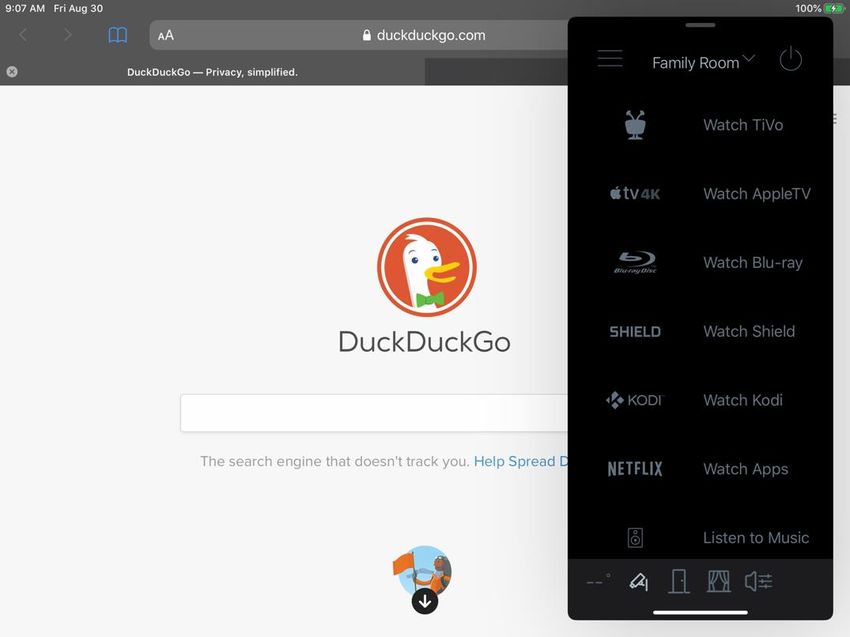
Roomie Remote User Guide                                                                                                                                                   Version 6.0

    CONTENTS
                  INTRODUCTION .................................................................................................................................................4

                  GETTING STARTED .............................................................................................................................................7

                  USER INTERFACE .............................................................................................................................................. 10

                  SETTINGS ........................................................................................................................................................... 14

                  DEVICES ............................................................................................................................................................. 26

                  ACTIVITIES ......................................................................................................................................................... 31

                  COMMANDS ..................................................................................................................................................... 50

                  AMAZON ECHO INTEGRATION ..................................................................................................................... 54

                  HOMEKIT ........................................................................................................................................................... 61

                  AUTOMATION .................................................................................................................................................. 64

                  BACKING UP CONFIGURATIONS .................................................................................................................. 69

                  CUSTOM IMAGES ............................................................................................................................................. 71

                  HARDWARE SETUP .......................................................................................................................................... 72

                  SIMPLE BLASTER, ROOMIE BLASTER, AND ITACH FLEX .......................................................................... 75

                  ADDITIONAL INFORMATION ......................................................................................................................... 81

Released Spring 2021                                                                    3                                         Copyright © 2021 by Roomie Remote, Inc.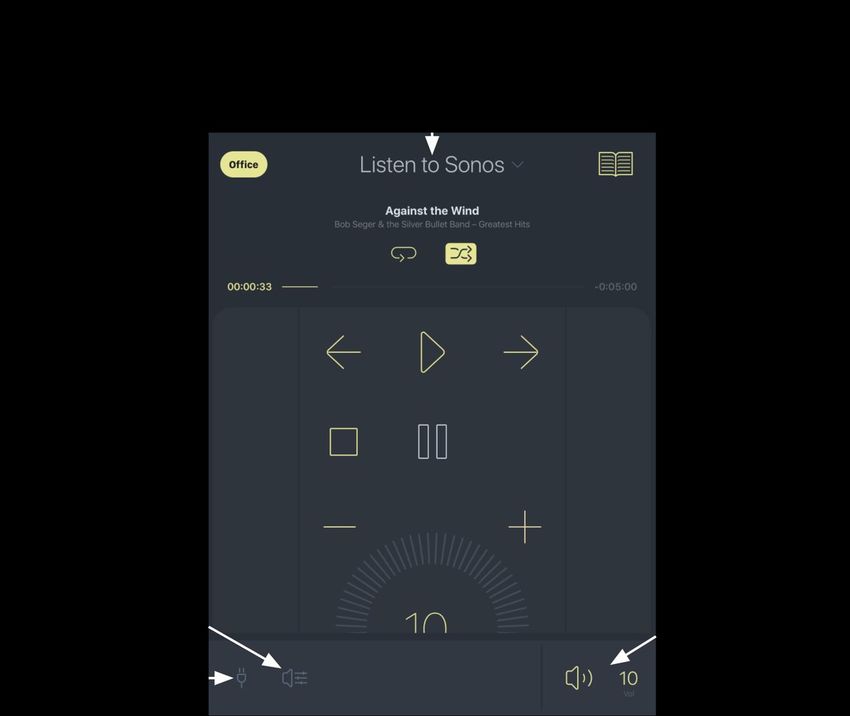
Roomie Remote User Guide                                                                                            Version 6.7

    INTRODUCTION
             This User Guide describes Roomie Remote, which lets you control a wide variety of smart Devices using an
             app on an iOS or macOS 11 device.

         About Roomie Remote
             Roomie Remote lets you control a wide variety of smart Devices from your iOS Device: TVs, speakers, set top
             boxes, security cameras, thermostats, blinds, and many other types of Devices.
             Do you have a dumb Device that can’t get on your local network? No problem, it’s easy to add it to your
             local network so that you can control it. You’ve already implemented a system like SmartThings, Apple
             HomeKit, or Amazon Alexa? No problem, we play nicely with them.
             To use Roomie Remote, download and install the Roomie Remote app onto your iOS Device, use an existing
             Simple Service subscription or sign up for a free trial subscription, configure Roomie Remote, and then put
             away those other remotes because you can control virtually everything from Roomie Remote.

         Technical Specifications
             Technical specifications for Roomie Remote include:

             •    Apple iPad, iPhone, or iPod Touch running iOS 13.4 or above, or a macOS 11 system to host the required
                  Roomie Remote app; active Apple ID account.
             •    TCP/IP network, with Wi-Fi enabled and Internet access. Devices can access the network through either
                  a Wi-Fi or an Ethernet connection. Internet access is required during setup.
             •    Devices controllable by Roomie Remote. Control is achieved via:
                  -    Direct IP control. Many smart Devices can connect directly to your home network. If they are also
                       supported Devices, no additional hardware is needed for Roomie Remote to control them.
                  -    Infrared control. Some Devices use infrared for control. Roomie Remote can control these Devices
                       via a Simple Blaster, Roomie Blaster, or Global Caché iTach.
                  -    Serial control. Some Devices use a serial (RS-232) connection for control. Roomie Remote can
                       control these Devices via a Simple Blaster, Roomie Blaster, or Global Caché iTach.
             IMPORTANT:       You must update your entire Roomie Remote environment to the latest version 6 release.
                              Make sure no stray instances of Simple Control Version 4 or 5 remain on your network.
                              Always ensure all devices are updated around the same time especially across major version
                              changes.

Released Spring 2021                                         4                          Copyright © 2021 by Roomie Remote, Inc.
Roomie Remote User Guide                                                                                               Version 6.7

         A Roomie Remote Solution
             A Roomie Remote solution is made up of multiple parts:

             •    Roomie Remote app. Download from the App Store. To get started, use an existing Simple Service
                  subscription (from V5 and V4) or sign up for a free trial subscription to the Roomie Service.
             •    Roomie Service Subscription. In-app purchase. Subscription levels are:
                  -    8 Device lets you control up to 8 Devices in 1 Home up to 1 Room (quarterly)
                  -    24 Devices lets you control up to 24 Devices in 1 Home up to 5 Rooms (annual)
                  -    Unlimited lets you control unlimited Devices, Rooms, and Homes (annual)
                  -    Unlimited Perpetual lets you control unlimited Devices, Rooms, and Homes for the life of the app.
             NOTE:     Your Device count will probably increase over time. You may need a larger Device count than you
                       think. App Store subscriptions purchased inside Version 6 or above now allow pro-rated upgrades of
                       subscriptions at any time during the subscription period if you need to upgrade later.

             •    Primary Controller. Provides triggers, and central control over certain devices including Denon receivers,
                  Honeywell Thermostats, nVidia Shield, and more. A Primary Controller (always an iOS, tvOS, or macOS
                  11 device running Roomie Remote) is selected dynamically and usually will not be something you need
                  to worry about. Some specific devices such as Honeywell Thermostats require a primary controller
                  designated in the Homes panel to a specific controller so that it never changes. In general, if you have
                  any dedicated device or macOS 11 system for Roomie Remote, it is always a good idea to specify the
                  Primary Controller.
             •    Roomie Remote account. Enables Amazon Alexa control. If you will be using Alexa control, you will need
                  to establish a Roomie Remote account through the app in the Always-on Services panel.
                  You can see if you are signed in to your Roomie Remote account by tapping the Settings Menu (three
                  horizontal lines), tapping Settings, then tapping the Always-on Services item, and scrolling to the
                  bottom of the Always-on Services screen.
                  If you are not signed in, the button will say Sign In. If you are signed in, the button will say Sign Out and
                  show the email address associated with your Roomie Remote account.
                  You do not need an account if you will not be using Alexa Control.

             •    Rooms. A Room is a physical space in your home or office, wherever you are using Roomie Remote. You
                  can create as many as you need. Number of controlled rooms may be limited by your subscription level.
             •    Devices. A Device is a thing you want to control with Roomie Remote. For example, a TV set, a
                  thermostat, a wireless speaker, or a video camera. Number of controlled devices may be limited by your
                  subscription level.
             •    Activities. Activities are what you do in Roomie Remote; watch television, listen to music, control your
                  thermostat, these are all Activities. Activities are created automatically when you add a Device; you can
                  also create them manually.
             •    Action Panel. The controls for a Device.
             •    Logo Tray. At the bottom of many Action Panels is the logo for the Device. Tap the logo to bring up
                  additional commands on the Logo Tray.

Released Spring 2021                                          5                            Copyright © 2021 by Roomie Remote, Inc.
Roomie Remote User Guide                                                                                              Version 6.7

             •    Dashboard. Shows recently used Activities and their Rooms in a single view. Roomie Remote reads
                  “Home Dashboard” when you are viewing the Dashboard. Tap “Home Dashboard” to see a context-
                  sensitive menu.
             •    Homebar. The gray bar across the bottom of most screens provides fast access to many types of Devices
                  (lighting, cameras, more smart home Devices) and volume controls; what you see at any given time
                  depends on your setup. If your Homebar fills up with icons, it scrolls left and right.
             •    Guides icon. Gives easy access to your channel, media, and DVR guides.
             •    Triggers. Roomie Remote monitors the status of a Device and takes an action when the status of the
                  monitored Device changes to something you specified.
             •    Remote Access. You may control Devices and most features from outside your local network by installing
                  a VPN solution such as OpenVPN.
             •    Amazon Echo. Once integrated, you can control Roomie Remote using voice commands.
             •    Apple HomeKit. Accessories in your HomeKit configuration are automatically synchronized and
                  controlled by Roomie Remote. HomeKit accessories are not counted against your subscription level.
             •    Cloud services. Lets you add Devices controlled by a cloud service, if you have any set up in your Roomie
                  Remote environment.
             •    Global Caché iTach, Simple Blaster, or Roomie Blaster. Gets infrared and serial Devices — that otherwise
                  cannot connect to your local network — onto your local network. Required for certain configurations.
                  Wi-Fi, Ethernet, and Power over Ethernet versions are available.

         Audience
             This User Guide is for all users of Roomie Remote. We expect that you are familiar with:

             •    using your iOS or macOS Device
             •    basic networking concepts
             •    setting up and configuring the Devices you want Roomie Remote to control

         Additional Resources
             Additional resources for Roomie Remote include:

             •    Roomie Remote Knowledge Base: Answers many common questions.
             •    Roomie Remote Issue Tracker: Submitting a manual ticket via the website is permitted, but all tickets
                  must be submitted via the Submit Bug Report button in the About section of the app unless that is
                  impossible. Issue submissions are for bug reports only. If you require A/V consultation, advice on
                  equipment, device-specific information on which commands might be best to send in your home
                  environment, and similar queries, seek the help of local installers in your area or you may be able to find
                  information in our user forums.
             •    Roomie Remote User Forums: This is a moderated user to user forum. While official replies are made
                  from time to time, general support inquiries should not be posted to the forum.

Released Spring 2021                                         6                            Copyright © 2021 by Roomie Remote, Inc.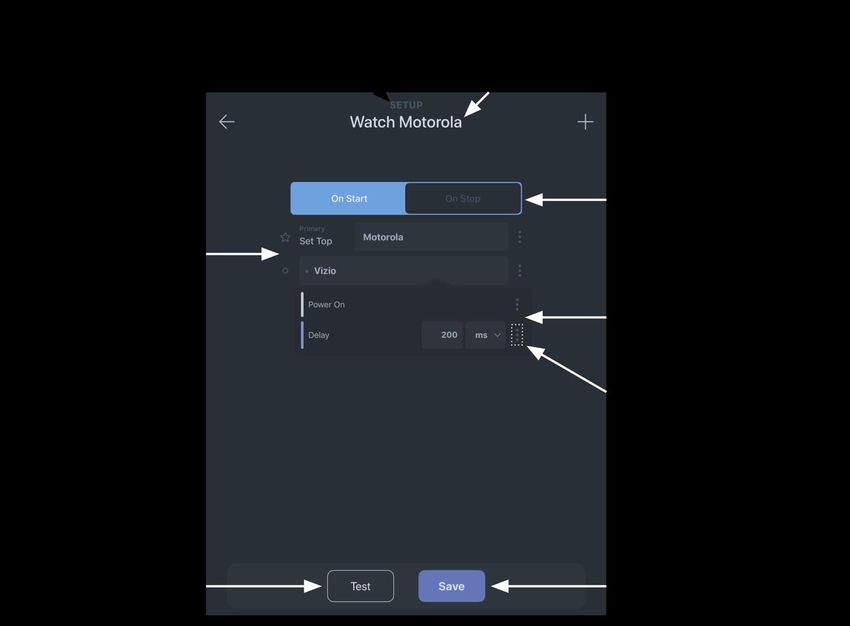
Roomie Remote User Guide                                                                                               Version 6.7

    GETTING STARTED
             This section describes how to get started using Roomie Remote, whether you are a new or a returning user.

         Start Here If You Are a New User
             As a new user, you need to purchase and download the Roomie Remote app, and then purchase a
             subscription that includes a free trial if you have not previously subscribed.
             If you have done any of these things already, you don’t need to do them again.
             To get started with Roomie Remote as a new user:
             1. On your iOS Device, find and open the App Store.
             2. If you are using an iPad, tap in the Search field in the upper right corner.

                  If you are using an iPhone or iPod Touch, tap the Search button, then tap in the Search field at the top of
                  the screen.

             3. Type Roomie Remote using the keyboard that appears, then tap Search.
                  NOTE:    If Roomie Remote appears in the list of suggestions as you are typing, tap it.
             4. Tap Roomie Remote in the search results.
             5. Download and install the Roomie Remote app.

Released Spring 2021                                          7                            Copyright © 2021 by Roomie Remote, Inc.
Roomie Remote User Guide                                                                                              Version 6.7

         Start Here If You Are Upgrading from Version 5
             If you are upgrading to Roomie Remote Version 6.x.x from Simple Control Version 5.x.x, the most recent
             previous version, some important changes you are going to see are:

             •    the concept of Simple Hub has been eliminated. Synchronization is now cloud-based and no longer
                  requires a central controller.
             •    some legacy features have been removed such as Remote Access which is now performed via third-
                  party free VPN software such as OpenVPN.
             •    signing into an account is no longer required unless you wish to integrate with Amazon Alexa.
             There are, of course, many additional improvements and bug fixes, but these are some of the highlights. See
             the front page of our website for the full What’s New document.
             IMPORTANT:     All Roomie Remote clients in your environment must be upgraded to Version 6.x.x with this
                            release. Roomie Remote recommends upgrading all Roomie Remote instances in your
                            environment to Version 6.x.x at the same time. Any 2015 Simple Hub appliance should be
                            taken offline. Any Apple TV client previously used should be deleted and replaced by the
                            current Roomie Remote Version 6.x.x for that platform.
             IMPORTANT:     Make sure to perform a final backup before upgrading. The Roomie Remote app is a separate
                            app, so if you still have Simple Control 5.x.x, you will now have two apps on your iOS Device.
                            Make sure to disable Background Refresh for the old app. You will only be using the new app
                            from now on unless you need to periodically open the old app to refresh a subscription.
                            Otherwise, delete the old app after installing the new app.

         Start Here If You Are Upgrading from Version 4.5.x or Older
             If you are upgrading from an older version (Version 4.5.x or older), then you are in for a lot of positive
             changes:

             •    Updated, streamlined user interface
             •    Apple HomeKit integration
             •    Enhanced Alexa capabilities
             •    Easy Guide access
             •    Much, much more
             NOTE:     The Simple Hub appliance from 2015 and any tvOS clients of prior apps should be removed from
                       your environment.
             IMPORTANT:     All Roomie Remote clients must be upgraded to Version 6.x.x with this release. Roomie
                            Remote recommends upgrading all Roomie Remote instances in your environment to Version
                            6.x.x at the same time.
             To get started with Roomie Remote 6.x.x when upgrading an older version:
             1. On your iOS Device, find and open the App Store.
             2. If you are using an iPad, tap in the Search field in the upper right corner.

Released Spring 2021                                         8                            Copyright © 2021 by Roomie Remote, Inc.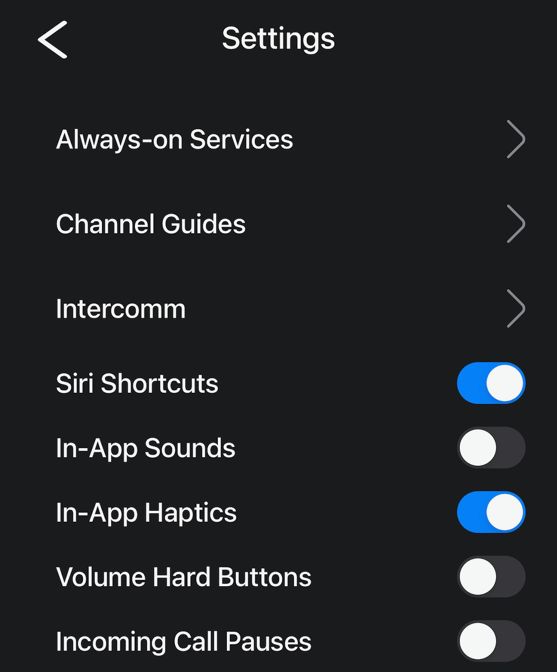
Roomie Remote User Guide                                                                                               Version 6.7

                  If you are using an iPhone or iPod Touch, tap the Search button, then tap in the Search field at the top of
                  the screen.

             3. Type Roomie Remote using the keyboard that appears, then tap Search.
                  NOTE:    If Roomie Remote appears in the list of suggestions as you are typing, tap it.
             4. Tap Roomie Remote in the search results.
             5. Download and install the Roomie Remote app.
             6. The Roomie Remote app is a separate app, so if you still have 4.5.x, you will now have two apps on your
                iOS Device. Make sure to disable Background Refresh for the old app. You will only be using the new app
                from now on unless you need to periodically open the old app to refresh a subscription. Otherwise,
                delete the old app after installing the new app.

         Updating Your Subscription
             If you have an automatically renewing Simple Service subscription that you established for a previous
             version, you should definitely move your Simple Service subscription to the new Roomie Remote app as
             soon as possible.
             To do this, you need to purchase a new subscription from the Version 6 app, then turn off automatic
             renewal of the old subscription.
             To update your subscription:
             1. In Roomie Remote 6.x.x, purchase a new subscription.
             2. On your iOS Device, go to Settings > [your name] > Subscriptions.
             3. Tap the old subscription you want to manage that is associated with the older Legacy or Home app, and
                not with the new Roomie Remote 6.x.x app.
             4. Stop renewal for the old subscription.
             NOTE:        If you need to keep an older version and the current version of Roomie Remote on your iOS
                          device, then we recommend disabling Background App Refresh (Settings > General > Background
                          App Refresh on your iOS device) for the older version.

Released Spring 2021                                          9                            Copyright © 2021 by Roomie Remote, Inc.
Roomie Remote User Guide                                                                                               Version 6.7

    USER INTERFACE
             This section takes you through the process of creating a Room, adding a Device, and then using that Device;
             it also points out important aspects of the Roomie Remote user interface along the way

         Creating a Room and Adding a Device
             This procedure assumes that you have not created any new Rooms or added any Devices.
             If you have already started using Roomie Remote, go to Settings Menu > Devices, then start at Step 2. Note
             that what you see may be different than what is described below.
             To create a Room and add a Device:
             1. On your iOS or macOS Device, tap the Roomie Remote icon to open the app.
             2. Tap Add.
                  The Add Device screen appears.
                  The Devices you see listed are smart Devices on your local network. There are buttons at the bottom of
                  the list of Devices so that you can add a Cloud Service and add a Device manually. Using these buttons is
                  described later.
                  Note that it may take a few seconds for Roomie Remote to locate and display all of the smart Devices on
                  your local network. So if you don’t see a Device you think you should, just wait for a little bit and it will
                  appear shortly.
             3. Tap Sonos PLAY:1.
                  We will be adding a Sonos speaker in this procedure.
                  The Next button appears at the bottom of the screen, plus some explanatory text.
             4. Tap Next.
                  Because you have not created a Room, you will be asked to pick one from a list of common Room
                  names. You can also tap Add Room and create a Room with the name you prefer.
             5. Tap Office.
                  The Sonos Office PLAY:1 screen appears.
                  This screen shows you information about the Device you are adding.
                  It also gives you a number of options to choose from:
                  -    If you want to change the Room Assignment, tap Office and then pick a different Room name from
                       the list or tap Add Room and create a Room with the name you prefer.
                  -    To see if you added the Device correctly, tap Test. The Action Panel for the Device — in this case, a
                       Sonos speaker — appears. Use the controls to verify that you can control the Device, then tap Done.
                  -    If you are ready to add the Device, tap Add.
                  The Office screen appears, showing the Sonos Device you just created.
             6. Tap the Settings Menu in the upper left corner of the screen (the three horizontal lines).
             7. Tap Office, then select Simple Home from the menu that appears.
                  The Dashboard screen appears.

Released Spring 2021                                          10                           Copyright © 2021 by Roomie Remote, Inc.
Roomie Remote User Guide Version 6.7
This is a screen you are going to see a lot, so let’s look at it for a bit:
- This is the Dashboard screen, a special screen in Roomie Remote that shows Rooms, and the
Activities in them, in a single view. The Dashboard is the only screen whose name is Home
Dashboard. Once you start adding all of your Devices to Roomie Remote, a lot more things will
appear on the Dashboard.
- In the upper left corner is the Settings Menu icon (three horizontal lines). Tap this icon to see a list
of categories you can access to control Roomie Remote. Refer to Settings for more information.
- In the top middle of the screen is the name of the screen. If it says Home Dashboard, you are
looking at the Dashboard; if it shows a different name, it’s the name of a Room. The down-facing
triangle next to Simple Home or a Room name means there are commands available; tap the name
to see them.
- In the upper right corner is the Power icon (an almost-complete circle with a line coming out of the
top). If an Activity is the active Activity (the Device name and Activity name are shown in color), you
can tap the Power icon to turn off the Activity.
- In the middle of the screen is a list of the Activities assigned to the Room. Activities are created
automatically when you configure a Device. Refer to Activities for more information about
Activities.
- At the bottom of the screen is the Homebar. Right now, the left side shows an icon for a HomeKit
device (it looks like a plug) and the Activity Volume icon (it looks like a side view of a speaker with
sound coming out of it).
Released Spring 2021 11 Copyright © 2021 by Roomie Remote, Inc.Roomie Remote User Guide Version 6.7
- The right side of the Homebar shows the volume setting for the Sonos device if it is active. If an
Activity on the Dashboard is active, it’s icon and the Activity display in color (the color of the Room
to which they are assigned); Activities that are not active are not shown in color.
8. We will look at the Action Panel for the Sonos speaker in the next procedure.
Controlling a Device
This procedure assumes you are signed in to your active Roomie Remote account and you have added a
Sonos speaker to Roomie Remote.
To control a Device:
1. On your iOS or macOS Device, tap the Roomie Remote icon to open the app.
The Dashboard appears. If another screen appears, navigate to the Dashboard.
2. Tap Listen to Sonos.
The Listen to Sonos Action Panel appears.
Released Spring 2021 12 Copyright © 2021 by Roomie Remote, Inc.Roomie Remote User Guide Version 6.7
3. This is a screen you are going to see a lot, so let’s look at it for a bit:
- In the upper left corner is the Home icon (a house). Tap the Home icon to return to the Dashboard.
- In the center of the screen is the Screen Name, now showing the name of the active Device, Sonos.
Tap the Screen Name to get the Screen Name Menu, a list of commands that is context sensitive.
- In the upper right corner of the screen is the Guides icon (an open book). Tap the Guides icon to
display your guides.
- The main part of the screen is the Action Panel. It shows the controls appropriate for the Activity.
- In our case, it is showing the controls for the Sonos speaker. Text labels are available; pull down the
Screen Name Menu and select Show Text Labels.
- If you scroll down, a large volume control appears (not visible in the graphic above), which you can
use to control the volume for the current Activity.
- Below the large volume control is the word Sonos (not visible in the graphic above). This is the Logo
Tray; it says Sonos because the Device whose Action Panel is active is from Sonos. Tap the Logo Tray
(in this case, Sonos) to bring up additional controls that are appropriate for the Sonos speaker.
This image shows the bottom of
the large volume control and, just
below it, the Logo Tray.
As this is a Sonos Device, the Sonos
logo is shown in the Logo Tray.
The Homebar is also visible, at the
bottom of the image.
If you edit an Activity to add additional commands to it, those commands may also appear in the Logo
Tray, depending on the command.
At the very bottom of the screen is the Homebar.
In the graphic on the previous page, it shows an icon for a HomeKit Device, a volume icon, and the
volume controls for the Sonos speaker.
4. Tap the Home icon to return to the Dashboard.
Released Spring 2021 13 Copyright © 2021 by Roomie Remote, Inc.Roomie Remote User Guide Version 6.7
SETTINGS
This section describes the Settings for the Roomie Remote app, which let you control a variety of important
functions for using Roomie Remote.
Accessing Settings
The Settings Menu gives you access to Roomie Remote Settings.
To access Settings for the Roomie Remote app:
1. Open the Roomie Remote app on your iOS or macOS Device.
2. Tap the Settings Menu (three horizontal lines, upper left corner).
The list of Settings categories appears on the left.
To return to Roomie Remote, tap on the
right side of the screen.
3. Tap on the name of the Settings category you want to view.
4. To return to the list of Settings categories, tap the three horizontal lines in the upper left corner of the
screen, as appropriate.
5. To return to Roomie Remote, tap the right side of the screen; you will be returned to the screen you
were on when you tapped the Settings Menu.
Homes
A Home corresponds to a real world home or facility. It represents the entire configuration controlling all
items below it including Rooms, Activities, Devices, and Automation. A few Settings are global to all Homes
such as whether to use In-App Haptics, and some are specific to the current Home such as Custom Devices.
Released Spring 2021 14 Copyright © 2021 by Roomie Remote, Inc.Roomie Remote User Guide Version 6.7
Homes are either Owned or Shared. The owner of a Home configuration is the only one that controls which Apple
Home app accessories are associated with the home. If you share a Home, you must also share the same Home in the
Apple Home app in order for the person you shared with to be able to control the same HomeKit accessories.
IMPORTANT: If you have multiple homes in the Apple Home app, make sure they are named exactly the same as
the associated home in Roomie Remote to ensure that only the appropriate accessories are
synchronized. If you change the name, the Owner can use the Force HomeKit Sync button to
update.
Sharing a home happens in iCloud. Tap the Sharing… button for the Home you wish to share. Then tap Add
People… Now choose the method you’d like to use to send the recipient the shared Home. Note that you
are not sending a copy of the Home, but rather ongoing access to the Home and immediate updates
whenever it is changed. You may revoke such access at any time in the Sharing panel using the Stop Sharing
button or by selecting a specific share and removing access.
Using Messages to send the share generally works best, but many options exist for sending the share to your
recipient. Instruct the recipient to install the Roomie Remote app prior to using the link – it does work either
way but the flow is smoother if you install the app first, run it, and then receive the share. Tap Share
Options at the bottom if you’d like to specify that the user is a View only user and thus unable to make any
changes to your configuration. In general, we recommend not using that feature and instead activating
Prevent Editing on the device(s) associated with the user, but specifying a user as View only is an effective
method to ensure absolutely no changes can be made by the shared party. Note that core synchronization
of for instance the current activity in a room is not a configuration change and will still be immediately
reflected on all devices shared or owned regardless of the View only setting.
You may add new homes using the Add Home button. Homes you add are always owned by you. All other
access is via your opting to share the Home. All homes and all changes therein are immediately reflected via
iCloud on all of your Owned devices, and anyone with whom you have shared.
To delete a Home, swipe right to left on the Home to expose the Delete button.
IMPORTANT: Deleting a Home also deletes the Home on all of your other devices, deletes any record of sharing,
and deletes the Home on all shared devices. It is a global delete. Please be sure you want to
completely delete the home before using that option.
The Name of your Home should be the same as the name of the Home in Apple’s Home app if you use it for
other home automation devices.
The Wi-Fi SSID field will attempt to auto-populate, but may need to be manually set. If you use third-party
VPN software, setting this field will allow Roomie Remote to detect whether you are on your home network,
whether you are currently connected to a VPN, and whether you can currently control your devices. You will
then receive appropriate warnings if your connectivity is not correct for your home. To disable all of that, set
this field to blank.
The Preferred Primary Controller allows you to lock down which of your iOS, tvOS, or macOS controllers act
as your Primary Controller. Your Primary Controller by default is selected dynamically at any given moment
unless you change this item from Default. If you specify a specific controller here, only that device will ever
be the Primary Controller. In certain cases, this is necessary. Using Honeywell or Ecobee thermostat control
when controlling devices directly via Cloud Service and not via HomeKit requires specifying this. Alexa
Control does not require this to be set. In general, if you are migrating from a setup that previously used a
Simple Hub, and you have an iOS, tvOS, or macOS device appropriate for this role that is configured to be an
always-on device connected to power and in Guided Access mode (iOS) or prevented from Sleep (macOS),
we recommend specifying the device here.
Note that in the past virtually every aspect of the system passed through what was known as Simple Hub,
and that is now far from the case. All synchronization is cloud-based. Only several specific features depend
Released Spring 2021 15 Copyright © 2021 by Roomie Remote, Inc.Roomie Remote User Guide Version 6.7
on a Primary Controller. These include relay of commands to work around devices only capable of a single
connection such as Denon/Marantz/Onkyo/Integra/Pioneer receivers, nVidia Shield, Amazon Fire TV, LG
WebOS TVs, and Samsung 2018+ TVs. If you use any of those devices, it is recommended to specify this field
as a fixed device. An option to Disable Relay is also provided on a device by device basis in the Advanced
panel for the device if you choose to turn off the relay feature.
Rooms
A Room is a physical space in a facility. If you use Roomie Remote at your home, then a Room could be a
bedroom, living room, or an office.
You can create as many Rooms as you want and name them whatever you want. When you open Roomie
Remote for the first time, there are no configured Rooms.
When you tap on Rooms in the list of Settings categories, the Rooms screen appears. It shows existing Rooms
and the colors assigned to those Rooms. It also lets you edit the settings for an existing Room or add a new
Room.
When you done using the Rooms screen, tap the X in the upper right corner to return to the list of Settings
categories.
To add a Room:
1. In Roomie Remote, Settings Menu > Rooms.
The Rooms screen appears.
2. Tap Add Room.
The Add Room screen appears.
3. In the Name field, enter a name for the Room.
4. In the Power Off Activity field, accept the default setting or tap the Edit icon (it looks like a pencil) to
change its settings.
If you tap the Edit icon, the Edit Activity screen appears.
Make the desired changes to the Activity, then tap Save.
If you decide not to make any changes, tap Cancel.
5. In the Add to Dashboard field, tap to disable it if you do not want the Room you are adding to always
appear on the Dashboard.
6. Tap Add.
To switch to another Room while using Roomie Remote:
• Tap the Screen Name, tap the desired Room from the list, or
Released Spring 2021 16 Copyright © 2021 by Roomie Remote, Inc.Roomie Remote User Guide Version 6.7
• Swipe down on any non-Settings screen, tap the name of the desired Room.
To edit the settings of a Room:
1. In Roomie Remote, tap the Settings Menu, then tap Rooms. The Rooms screen appears.
2. Tap the row of the Room you want to edit. The settings for that Room appear.
3. In the Name field, change the current name, if desired.
4. In the Power Off Activity field, accept the default settings or tap the Edit icon to change its settings.
5. In the Add to Dashboard field, tap to disable if you do not want the Room you are adding to always
appear on the Dashboard.
6. If you want to delete the Room, tap Delete.
Tap Delete on the confirmation dialog that appears. The Room is deleted, and the Rooms screen
appears.
7. Tap Done.
To change the color assigned to a Room:
1. In Roomie Remote, tap the Settings Menu, then tap Rooms. The Rooms screen appears.
2. Tap the color swatch of the Room whose color you want to change. The Select Color screen appears.
3. Tap the desired color swatch.
The color is accepted, and the Rooms screen appears.
Activities
Activities are what you do in Roomie Remote: watch television, listen to music, control your thermostat, and
so on. Activities are created automatically when you add a Device; you can also manually create an Activity
or edit an existing Activity.
Refer to Activities for detailed information about Activities.
Devices
Devices are the components you want to control with Roomie Remote. For example, a TV, a receiver, a
thermostat, a wireless speaker, a video camera, or a streaming Device; all of these, and many more, are
Devices to Roomie Remote.
Devices are always associated with a Room. Refer to Devices for detailed information about Devices.
Automation
Automation let you monitor the status of a Device and take an action when the status of the monitored
Device changes to something you have specified.
Roomie Remote supports the following types of Automation:
• Device-based: You can configure Automation that monitors specific Devices for a particular action; when
the action occurs, Roomie Remote initiates an Activity or a command.
For example, you could set up Automation to watch for the lights in your living room being turned on.
When the lights go on, Automation causes Roomie Remote to run an Activity that turns on the TV and
Released Spring 2021 17 Copyright © 2021 by Roomie Remote, Inc.Roomie Remote User Guide Version 6.7
set top box in your living room. You could also create a second Automation to do the reverse: when the
lights are turned off, the TV and set top box are also turned off.
Roomie Remote can monitor these Devices: HomeKit accessories, Lutron Radio RA2, Lutron Caséta,
Philips Hue, Vera, Universal Devices ISY, iTach or Roomie Blaster Contact Closures, and iPort
SurfaceMount.
Additional Devices are added from time to time; check the Device on the appropriate Compatibility
page of the Roomie Remote website to see if it supports Device-based Automation.
• Timer-based: You can create an Activity that performs an action based on an amount of time passing.
For example, you could create an Activity to turn off the system after 30 minutes have passed. These
Automations are created via commands in Activities and not in the Automation editor.
• Time-based: You can configure Automation that runs an Activity or a command based on the day and
time.
For example, you could create Automation that runs an Activity every weekday evening at 11 p.m.
IMPORTANT: Make sure to create the Activity you want to run before you create the Automation.
• Dynamic Time-based: Automations can be created by delaying command execution from within an
Activity. Add a command in an Activity for instance to start another activity and then Add Delay for 1
minute on that command. When executed, a temporary Automation entry is created to represent the
future action.
Refer to Automation for complete information about Automation.
Released Spring 2021 18 Copyright © 2021 by Roomie Remote, Inc.Roomie Remote User Guide Version 6.7
Settings
Settings let you control various aspects of Roomie Remote.
To access Settings, Settings Menu > Settings.
Always-on Services
This section contains controls for devices that are always running Roomie Remote.
Tip: If you dedicate an iOS Device to running Roomie Remote, that device will automatically act as your
Primary Controller and thus is responsible for Alexa commands and other relayed commands for
specific devices. You should designate any such dedicated device for that role in the Homes panel.
Tap Always-on Services to bring up the Always-on Services screen.
The exact list of options shown here depends on your device. macOS devices show fewer options as some
items do not apply there. The Always-on Services screen gives you access to:
• Guided Access (read-only here, must be set in Apple’s Settings app Accessibility section)
• Prevent Editing / Single Room Mode
• Auto-Dim Delay
• Auto-Lock Delay
• Alexa Control
• Local Network Control
Guided Access
Guided Access Mode is an iOS feature that restricts the iOS Device to running a single app; in this case,
Roomie Remote. It also silences extraneous iOS interruptions. Guided Access Mode locks your Roomie
Remote device; you must exit Guided Access Mode in order to change apps.
Guided Access Mode is quite useful if you decide to dedicate an iOS Device to running Roomie Remote.
Released Spring 2021 19 Copyright © 2021 by Roomie Remote, Inc.Roomie Remote User Guide Version 6.7
Guided Access, in conjunction with Single Room Mode, dedicates Roomie Remote to a single Room. This
could be used in a guest Room, for example, where you want the iOS Device to work in that Room only and
you do not want Roomie Remote configuration to be edited.
Guided Access is not available on macOS because alerts and notifications on macOS have no affect on other
apps so the feature is not needed. For best performance on macOS, leave Roomie Remote in the
foreground.
To dedicate an iOS Device to Roomie Remote:
1. Connect the iOS Device to a power source.
2. On your iOS Device (not in Roomie Remote), navigate to Settings > General > Accessibility > Guided
Access.
The Guided Access screen appears.
3. Enable Guided Access (by tapping the slider so the green background appears).
4. Tap Passcode Settings.
5. Tap Set Guided Access Passcode or enable Touch ID (you can do both).
If you decide to set a passcode, make sure not to forget it.
6. Exit from Settings on your iOS Device.
7. Open the Roomie Remote app.
8. Tap the Settings Menu, tap Settings, then tap Always-on Services; set Auto-Lock Delay to Never.
9. With Roomie Remote open, triple click the Home button on the iOS Device.
A popup screen appears, telling you that Guided Access has started.
You can use the Roomie Remote app normally on the iOS Device, but you cannot leave the app until you
exit from Guided Access mode.
10. To exit from Guided Access mode, triple click the Home button, enter the passcode, then click End.
A popup screen appears, telling you that Guided Access has ended.
Prevent Editing
Prevent Editing prevents all configuration changes to Roomie Remote. You can use Roomie Remote, you just
cannot make any configuration changes.
Prevent Editing applies only to the Roomie Remote app on the iOS or macOS Device you are currently using.
So if you are sharing the same Roomie Remote configuration on an iPad and an iPhone, for example, and
you enable Prevent Editing on the iPad, there is no impact on the Roomie Remote app on your iPhone.
NOTE: Prevent Editing is disabled by default.
You can lock the configuration of Roomie Remote with a PIN or Touch ID or Face ID for temporary access for
configuration changes by combining Prevent Editing with Guided Access. All changes to the configuration of
Roomie Remote on the iOS Device you specify are locked out until you disable Guided Access.
Released Spring 2021 20 Copyright © 2021 by Roomie Remote, Inc.Roomie Remote User Guide Version 6.7
Single Room Mode
When you enable Prevent Editing, Single Room Mode becomes available.
NOTE: If you disable Prevent Editing, Single Room Mode is also disabled. Single Room Mode lets you
restrict Roomie Remote usage to a single Room.
To restrict Roomie Remote usage to a single Room:
1. Enable Prevent Editing.
Single Room Mode appears, showing All Rooms.
2. Tap All Rooms. A menu appears, showing All Rooms and all configured Rooms.
3. Tap the Room you want Roomie Remote to work in.
NOTE: This prevents Roomie Remote from functioning in other Rooms.
The list of configured Rooms disappears; the name of the selected Room appears under Single Room
Mode.
NOTE: You can now use Roomie Remote only in the specified Room.
If you want to be able to use Roomie Remote again in all Rooms, set Single Room Mode back to All
Rooms or disable Prevent Editing.
Auto-Dim Delay
Tap Auto-Dim to set a period of inactivity after which the Roomie Remote app screen dims.
Available values are: Never, 10 Seconds, 30 Seconds, 1 Minute, 2 Minutes, 5 Minutes, 10 Minutes,
30 Minutes, and 1 Hour.
Auto-Lock Delay
Tap Auto-Lock to set a period of inactivity after which the Roomie Remote app screen automatically locks.
Available values are: Default (the iOS Device’s Auto Lock setting is used), 10 Minutes, 30 Minutes,
1 Hour, 2 Hours, and Never.
IMPORTANT: Setting this field to Never is the most important aspect of configuring an always-on device.
Local Network Control
Local Network Control enables an HTTP REST API on your local network for unauthenticated Activity
launching from other systems or apps. The API documentation is available in the website Knowledge Base.
Most commonly, this interface is used for SmartThings Triggers such as to start an Activity based on tripping
a motion detector. However, the interface is entirely open so can be used by any external system. This
interface defaults to off.
Alexa Control
Activating Alexa Control turns this device (and this device only) into a receiver for commands from Alexa.
Additional options will appear when this switch is active including the Alexa Visibility controls, the Sign In
button, and a button to launch and link the skill with your Alexa devices. To enable Alexa Control from a
device (only one device should be enabled as such), make sure the device is setup to be always-on via
Guided Access, connected to power at all times, Alexa Control is turned on, the Roomie Remote Alexa Skill is
Released Spring 2021 21 Copyright © 2021 by Roomie Remote, Inc.Roomie Remote User Guide Version 6.7
enabled in the Amazon Alexa app, and you have created and/or signed into your Roomie Remote account
using the Sign In button below this switch. The button will say “Sign Out: ” when you
are properly signed in.
Alexa Visibility
If the Alexa Control switch is on, the Alexa Visibility panel will also be available. In this panel you may turn
on and off any Room, Activity, or Device as visible to Alexa or not. These controls allow precise de-cluttering
of items that you don’t want to control from Alexa.
Sign-in / Sign-out
Lets you sign in to or sign out of your Roomie Remote account. This is only needed for Alexa Control. Other
users have no need to Sign In and thus the option is not available unless Alexa Control is turned on.
If you are not signed in, the button will say Sign In. If you are signed in, the button will say Sign Out and
display the email address associated with your Roomie Remote account.
NOTE: Your Roomie Remote account is not associated with your Apple ID account. It is used only for Alexa
Control and can otherwise be ignored. Note that use of Roomie Remote with Siri Shortcuts does not
require any sort of account, nor does it require any of your Roomie Remote devices are always-on so
that may be a simpler option for some users.
Channel Guides
Channel Guides lets you add Channel Guides for your TV channel provider.
NOTE: You must specify at least one Guide Provider as part of adding a Channel Guide.
To specify a Guide Provider:
4. In Roomie Remote, Settings Menu > Channel Guides.
The Channel Guides screen appears.
5. Tap Add Guide on the Channel Guides screen.
The country selection menu appears.
6. Specify a Country, Postal Code, and Language.
7. When the Providers list appears, make the appropriate selection.
8. The Select Channels screen appears, now showing the channels available from the provider you
specified.
On the Select Channels screen, put a check to the left of the channels you want to set as favorites.
NOTE: Roomie Remote shows all available channels, including premium channels that may require
additional payment. So while you may be able to see a channel in the list, it does not necessarily
mean you can view it. Correlate the channels in the list with the actual channels you need to
tune to determine which to select.
9. Tap the back arrow at the top to complete your selection of channels.
The Add Guide screen appears.
10. Tap Add.
Released Spring 2021 22 Copyright © 2021 by Roomie Remote, Inc.Roomie Remote User Guide Version 6.7
The Channel Guides screen appears.
11. Tap the back arrow at the top to exit the Channel Guides section.
Intercomm
Settings specific to intercom functionality are available here. Intercomm is a separate app while the
intercom functionality if licensed in that app is also provided within Roomie Remote allowing you to run
either app on your device to maintain the intercom feature. Enable Intercomm turns on or off the intercom
functionality regardless of any license. Device Identification specifies a custom identity for this device such
as “Master Bedroom” instead of “Joe’s iPad” to distinguish more easily in lists of Intercomm clients. Settings
are also provided here for various required system permissions related to Intercomm.
Intercomm Voice Control is enabled via the Voice Control switch. The Local Speech Only switch then further
controls whether voice is processed only on your local device or sent to Apple’s Siri Cloud for parsing. The
default is to process locally and generally works very well with the kinds of simple voice commands needed.
Activating the Voice Control option enables the following voice commands to your local device:
• “Intercomm Hangup”
• “Intercomm All”
• “Intercomm ”
The latter command can be used with any of the Intercomm names in your list of Intercomm instances. You
should use the Device Identification field to ensure simple and easy to understand names are used for each
of your devices. Good examples are “Master Bedroom” and “Living Room” for instance. These will have very
high rates of correct parsing by the voice control system.
The Pair Sonos button provides a way to pair your Sonos Account with Roomie Remote. If you have already
added a Sonos Cloud device to your Roomie configuration, this button will already be configured. Once
paired, announcement messages can be sent to your local Sonos speakers. An additional option to Always
Play via Sonos Cloud ensures that such announcements will always be sent via the Sonos Cloud. If not set,
Roomie will attempt in certain cases to send such announcements directly to the Sonos speakers on your
local network. You must have added every Sonos speaker involved to your local Roomie configuration in that
case. Sending them locally is generally faster and will be synchronized between speakers, but will not reset
the speakers to their prior content. Using the Sonos Cloud ensures that the speakers return to exactly what
they were doing before the announcement and conveniently ducks the prior sound during the
announcement.
Siri Shortcuts
Enable Siri Shortcuts to activate the user interface throughout Roomie Remote for Siri voice control and
enable iOS integration with it. Activities can be started and stopped, commands such as play/pause can be
issued by room, and more. Specific commands are also available for scripting-level control from a Shortcut
such as detailed command issuance including explicit volume control, setting the current room, and more.
In-App Sounds
Enable In-App Sounds (tap the slider to display the blue square) if you want buttons in Roomie Remote to
make a sound when you tap them.
In-App Sounds is off by default.
Released Spring 2021 23 Copyright © 2021 by Roomie Remote, Inc.Roomie Remote User Guide Version 6.7
In-App Haptics
Enable In-App Haptics (tap the slider to display the blue square) if you want buttons in Roomie Remote to
vibrate when you tap them.
NOTE: In-App Haptics works only on iOS Devices that support vibration. If the iOS Device you are using does
not support vibration, then In-App Haptics has no effect. iPads do not typically support haptics.
In-App Haptics is on by default on supported devices.
Volume Hard Buttons
Enable Volume Hard Buttons to use the physical volume buttons on your iOS device to impact the current
activity when Roomie Remote is open to an activity with an Action Panel.
Incoming Call Pauses
Enable Incoming Call Pauses (by tapping the slider so the blue background appears) if you want Roomie
Remote to invoke the Pause button on the active Action Panel when you receive an incoming phone call.
The feature is also compatible with most Voice over IP apps.
NOTE: Incoming Call Pauses has no effect on iOS Devices that do not receive telephone calls. You must
have an Activity open with an Action Panel that has a Pause button.
Collect Diagnostics
Enable Collect Diagnostics if you are directed to do so by Roomie Remote Support. This setting creates a log
that is useful in diagnosing issues.
IMPORTANT: Enabling Collect Diagnostics causes Roomie Remote to run much slower and use significant
storage space on the Device. Be sure to disable Collect Diagnostics when you are done
gathering the necessary data.
Collect Diagnostics is off by default.
If you are directed to turn on Collect Diagnostics by Roomie Remote Support:
1. Close all Activities in Roomie Remote, then tap Collect Diagnostics.
A confirmation dialog appears, telling you that collecting diagnostics results in slower performance.
2. Tap OK.
3. Restart your iOS Device using the power button.
4. Open Roomie Remote and perform actions as directed by Roomie Remote Support.
5. Tap Send Diagnostics (to send the diagnostic information to Roomie Remote Support) and then disable
Collect Diagnostics.
6. Respond to your active support ticket, or email Roomie Remote Support (support@roomieremote.com)
and let them know the time you sent the diagnostic information.
Custom Devices
To add a custom code set, tap Custom Devices, tap +Add Custom Device, and enter the codes from the
protocol document of the device you are adding.
Released Spring 2021 24 Copyright © 2021 by Roomie Remote, Inc.Roomie Remote User Guide Version 6.7
Custom devices are now added right in the user interface in this Custom Devices panel. Supporting a huge
array of base protocol and entry of custom commands in many formats, the Custom Devices editor now
allows adding almost any custom device fairly easily depending on the complexity of your target device.
IMPORTANT: Adding a custom non-infrared code set can be a technical process. Roomie Remote
recommends reading the Support Knowledge Base entry about adding support for a
Custom Device that provides detailed instructions for adding custom devices. Note that
custom infrared devices can be added usually without any special instructions. To add a
custom infrared device, make sure you have at least 1 infrared device already in your
Devices panel associated with a Global Caché infrared adapter, and then use the Custom
Devices panel to Add Custom Device and select Global Caché IR as the protocol. Then, tap
the resulting Learn Infrared Codes button to learn each individual code.
NOTE: If you are adding a Device that Roomie Remote cannot discover automatically, you will need to add
it manually using Add Device Manually.
Reset All Settings
Tap the Reset All Settings button to delete all Roomie Remote settings on the iOS device you are currently
using, including any Rooms, Devices, or Activities you have created.
IMPORTANT: Roomie Remote recommends making a backup of your current configuration before
resetting.
NOTE: Resetting the Roomie Remote configuration has no impact on the settings of any devices in your
environment or on any other Roomie Remote client in your Roomie Remote environment. After
resetting, any Homes stored in iCloud will automatically re-synchronize to your current device. To
remove a Home in iCloud itself, delete it from the Homes panel.
About
About provides information about Roomie Remote subscriptions.
Days Until Renewal
Displays the number of days left on your current subscription.
Tap the number of days left to display more information about subscriptions.
To purchase a subscription, tap the button of the desired device plan, tap Continue, and then follow the
instructions. Existing subscriptions can also be changed here by selecting the new level and then tap
Continue.
Restore Purchases
Tap Restore Purchases to restore purchases you have made that are not active.
This may be necessary if you are resetting the configuration of an iOS Device, or reinstalling Roomie Remote.
Note that if you purchased your subscription inside a different app such as Simple Control 4 or 5, you may
need to install that old app and Restore Purchases from it directly as Apple does not associate subscriptions
between apps. The new app will then recognize the old subscription until the next renewal. Make sure to
update your subscription to the new app to avoid that need in the future. The old app would be available in
your App Store purchase history if you need to re-download it for this purpose.
Released Spring 2021 25 Copyright © 2021 by Roomie Remote, Inc.Roomie Remote User Guide Version 6.7
DEVICES
This section describes how to control your Devices in Roomie Remote.
About Devices
Devices are the things you want to control with Roomie Remote. For example, a TV, a receiver, a
thermostat, a wireless speaker, a video camera, or a streaming Device; all of these, and many more, are
Devices to Roomie Remote.
To control a Device, the Roomie Remote app must be able to communicate with it:
• The Device must be either on the local network directly (called direct IP) or connected via an “adapter”
that is on the network directly (such as a Simple Blaster). Simple Blasters get Devices that are controllable
via infrared or serial connections onto your local network.
• The Device must be on the same network as the iOS Device hosting Roomie Remote.
IMPORTANT: After you add a Device, Roomie Remote strongly recommends reserving the IP address
assigned to the Device. This can be done using a feature of your router generally called
“static IP” or “DHCP Reservation”.
Refer to your router documentation for more information. Roomie Remote often recognizes when the IP
address of a Device it controls changes and adapts to the change. However, some devices and some events
like a power outage may result in changed IP addresses, making it appear that Roomie Remote is not
working correctly when in fact the issue is changed IP addresses on the network; reserving the IP address of
a Device prevents this issue.
Prerequisites
Two things are required to control a Device using Roomie Remote:
1. The Device must be accessible and controllable on the local network.
There are three ways to get a Device accessible and controllable on a network:
- Direct IP. In this case, network access and IP control – via Wi-Fi or Ethernet – is built in to the Device.
Follow the manufacturer’s instructions to get the Device onto the network. A key advantage of IP-
controllable Devices is that many provide additional feedback (called live feedback) that is not
available via infrared control. No additional hardware is needed for Roomie Remote to control these
Devices.
Be sure to check the Device Compatibility page on the Roomie Remote website to make sure IP
control is enabled for a network-accessible Device.
The existence of an Ethernet port does not guarantee the Device can be controlled via direct IP. The
manufacturer must explicitly enable IP control.
- Infrared. Infrared control is built in to the vast majority of consumer electronic Devices sold in the
past few decades. So if your Device comes with a physical remote, you can very likely get it
connected.
Use a Global Caché iTach, or the old Simple Blaster/Roomie Blaster products (collectively referred to
as “infrared/serial adapters”) and an appropriate cable to get an infrared Device connected to your
network and controllable by Roomie Remote.
Released Spring 2021 26 Copyright © 2021 by Roomie Remote, Inc.Roomie Remote User Guide Version 6.7
- Serial. Some Devices can be connected to your network and controlled via a serial (RS-232)
connection. There are several types of serial cables, so make sure to get the right one.
Use an infrared/serial adapter and a serial cable to get a serial Device connected to your network
and controllable by Roomie Remote.
2. The Device must be supported.
Roomie Remote must be configured with the commands to control the Device.
Refer to the Device Compatibility page on the Roomie Remote website to see if a Device is supported.
There are three compatibility lists, organized by how the Device connects to the network: direct IP,
infrared, and serial.
NOTE: It is possible to add support manually for a currently unsupported Device if you are using a Simple
Blaster. Refer to Adding Support for a Custom Device for more information.
Adding a Device
The following procedure adds a Sonos speaker.
To add a Device:
1. In Roomie Remote, Settings Menu > Devices.
The All Devices screen appears, showing all currently configured Devices.
2. Tap the large plus sign (+) in the upper right corner or the Add Device button.
The Add Device screen appears.
IMPORTANT: Some Devices take longer than others to appear on the Add Device screen. Roomie
Remote uses multiple protocols to find all relevant Devices on the local network. If the
Device you want to add does not appear immediately, wait for a minute then check
again. In some cases, power cycling your iOS device may help as well.
The Add Device screen gives you several options to choose from:
- Direct IP Devices: Lets you add the Devices that Roomie Remote found automatically. For example,
Sonos PLAY:1 or Apple TV.
- Infrared/Serial Adapter: When you use a Global Caché iTach, Simple Blaster—Wi-Fi or Ethernet,
Roomie Blaster, or—to make an infrared or serial Device accessible and controllable by Roomie
Remote, you select the adapter listing on the Add Device screen.
- Cloud Service: Tap the Add Cloud Service button to add Devices controlled by a cloud service
(SmartThings, Honeywell, Ecobee, and so on), if you have any in your environment. Because a cloud
service displays on the Add Cloud Device screen does not mean it is necessarily available in your
Roomie Remote environment.
- Add Device Manually: Lets you add, by IP address/DNS name and port, Devices that are not
automatically discovered. You can enter either the IP address or DNS name and port number.
IMPORTANT: If you add a Device manually, reserve the IP address assigned to the Device. This can
be done using a feature of your router generally called “static DHCP” or “DHCP
reservation”. Refer to your router documentation for more information.
Released Spring 2021 27 Copyright © 2021 by Roomie Remote, Inc.You can also read