Adobe Media Encoder CC Help - Adobe Help Center
←
→
Page content transcription
If your browser does not render page correctly, please read the page content below
Adobe® Media Encoder CC Help
Legal notices

Legal notices
For legal notices, see http://help.adobe.com/en_US/legalnotices/index.html.

                                                            Last updated 3/8/2018
iii

Contents
Chapter 1: Get started
System Requirements | Adobe Media Encoder                                                . . . . . . . . . . . . . . . . . . . . . . . . . . . . . . . . . . . . . . . . . . . . . . . . . . . . . . . . . . . . . . . . . . . . . . . . . . .1
New features summary                          . . . . . . . . . . . . . . . . . . . . . . . . . . . . . . . . . . . . . . . . . . . . . . . . . . . . . . . . . . . . . . . . . . . . . . . . . . . . . . . . . . . . . . . . . . . . . . . . .2

Chapter 2: Encoding quick start and basics
Using the Preset Browser . . . . . . . . . . . . . . . . . . . . . . . . . . . . . . . . . . . . . . . . . . . . . . . . . . . . . . . . . . . . . . . . . . . . . . . . . . . . . . . . . . . . . . . . . . . . . 11
Encode video or audio items in Adobe Media Encoder                                                       . . . . . . . . . . . . . . . . . . . . . . . . . . . . . . . . . . . . . . . . . . . . . . . . . . . . . . . . . . . . . . . . . 18
File formats supported for import with Media Encoder                                                       . . . . . . . . . . . . . . . . . . . . . . . . . . . . . . . . . . . . . . . . . . . . . . . . . . . . . . . . . . . . . . . . 26
Working with log files                      . . . . . . . . . . . . . . . . . . . . . . . . . . . . . . . . . . . . . . . . . . . . . . . . . . . . . . . . . . . . . . . . . . . . . . . . . . . . . . . . . . . . . . . . . . . . . . . . 29
Files supported for export with Media Encoder                                              . . . . . . . . . . . . . . . . . . . . . . . . . . . . . . . . . . . . . . . . . . . . . . . . . . . . . . . . . . . . . . . . . . . . . . . . 30
Default keyboard shortcuts                            . . . . . . . . . . . . . . . . . . . . . . . . . . . . . . . . . . . . . . . . . . . . . . . . . . . . . . . . . . . . . . . . . . . . . . . . . . . . . . . . . . . . . . . . . . . 32
About video and audio encoding and compression                                                     . . . . . . . . . . . . . . . . . . . . . . . . . . . . . . . . . . . . . . . . . . . . . . . . . . . . . . . . . . . . . . . . . . . . 37
Compression tips                  . . . . . . . . . . . . . . . . . . . . . . . . . . . . . . . . . . . . . . . . . . . . . . . . . . . . . . . . . . . . . . . . . . . . . . . . . . . . . . . . . . . . . . . . . . . . . . . . . . . . . 39
Preferences              . . . . . . . . . . . . . . . . . . . . . . . . . . . . . . . . . . . . . . . . . . . . . . . . . . . . . . . . . . . . . . . . . . . . . . . . . . . . . . . . . . . . . . . . . . . . . . . . . . . . . . . . . . 40
Keyboard shortcuts                    . . . . . . . . . . . . . . . . . . . . . . . . . . . . . . . . . . . . . . . . . . . . . . . . . . . . . . . . . . . . . . . . . . . . . . . . . . . . . . . . . . . . . . . . . . . . . . . . . . . 42

Chapter 3: Encoding and exporting
Create custom presets for Media Encoder                                           . . . . . . . . . . . . . . . . . . . . . . . . . . . . . . . . . . . . . . . . . . . . . . . . . . . . . . . . . . . . . . . . . . . . . . . . . . . . . 43
IRT compliance                . . . . . . . . . . . . . . . . . . . . . . . . . . . . . . . . . . . . . . . . . . . . . . . . . . . . . . . . . . . . . . . . . . . . . . . . . . . . . . . . . . . . . . . . . . . . . . . . . . . . . . . 44
Export settings reference for Media Encoder                                             . . . . . . . . . . . . . . . . . . . . . . . . . . . . . . . . . . . . . . . . . . . . . . . . . . . . . . . . . . . . . . . . . . . . . . . . . . 46
Encode and export video and audio with Media Encoder                                                           . . . . . . . . . . . . . . . . . . . . . . . . . . . . . . . . . . . . . . . . . . . . . . . . . . . . . . . . . . . . . . 70
Managing the media cache database                                         . . . . . . . . . . . . . . . . . . . . . . . . . . . . . . . . . . . . . . . . . . . . . . . . . . . . . . . . . . . . . . . . . . . . . . . . . . . . . . . . . 73

                                                                                         Last updated 3/8/2018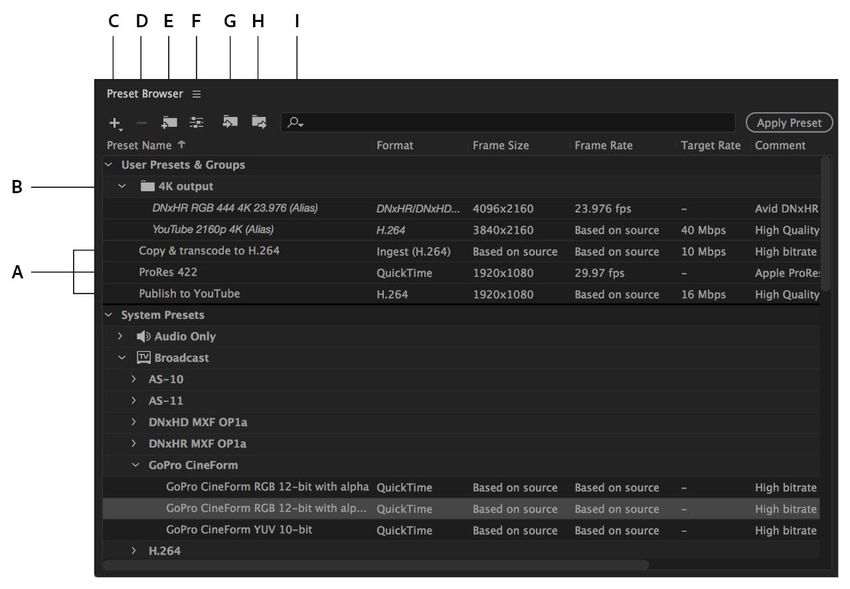
1

Chapter 1: Get started

System Requirements | Adobe Media Encoder

System requirements | October 2017 (12.0) release of Media Encoder CC

Windows
• Multicore processor with 64-bit support required
• Microsoft Windows 7 with Service Pack 1 (64 bit) or Windows 8.1 (64 bit), or Windows 10 (64 bit)
• Supports Windows 10 Creator Edition
• 4 GB of available hard-disk space; additional free space required during installation (cannot install on removable
  flash storage devices)
• 1024x768 display (1280x800 recommended)
• Optional: Adobe-recommended GPU card for GPU-accelerated performance
• Internet connection and registration are necessary for required software activation, validation of subscriptions, and
  access to online services.*

macOS
• Multicore Intel processor with 64-bit support
• macOS X v10.11, v10.12, or v10.13
• 8 GB of RAM (16 GB recommended)
• 4 GB of available hard-disk space for installation; additional free space required during installation (cannot install
  on a volume that uses a case-sensitive file system or on removable flash storage devices)
• 1024x768 display (1280x800 recommended)
• Optional: Adobe-recommended GPU card for GPU-accelerated performance
• Internet connection and registration are necessary for required software activation, validation of subscriptions, and
  access to online services.*

* NOTICE TO USERS: Internet connection, Adobe ID, and acceptance of license agreement required to activate and
use this product. This product may integrate with or allow access to certain Adobe or third-party hosted online
services. Adobe services are available only to users 13 and older and require agreement to additional terms of use and
the Adobe Privacy Policy. (see http://www.adobe.com/legal. html) Applications and services may not be available in all
countries or languages and may be subject to change or discontinuation without notice. Additional fees or membership
charges may apply.

                                              Last updated 3/8/2018
2
Get started

System requirements | April 2017 release of Media Encoder CC

Windows
• Multicore processor with 64-bit support required
• Microsoft Windows 7 with Service Pack 1 (64 bit), Windows 8.1 (64 bit) or Windows 10 (64 bit)
• 4 GB of available hard-disk space; additional free space required during installation (cannot install on removable
  flash storage devices)
• 1024x768 display (1280x800 recommended)
• Optional: Adobe-recommended GPU card for GPU-accelerated performance
• Internet connection and registration are necessary for required software activation, validation of subscriptions, and
  access to online services.*

macOS
• Multicore Intel processor with 64-bit support
• macOS X v10.10, v10.11 or v10.12
• 8 GB of RAM (16 GB recommended)
• 4 GB of available hard-disk space for installation; additional free space required during installation (cannot install
  on a volume that uses a case-sensitive file system or on removable flash storage devices)
• 1024x768 display (1280x800 recommended)
• Optional: Adobe-recommended GPU card for GPU-accelerated performance
• Internet connection and registration are necessary for required software activation, validation of subscriptions, and
  access to online services.*

* NOTICE TO USERS: Internet connection, Adobe ID, and acceptance of license agreement required to activate and
use this product. This product may integrate with or allow access to certain Adobe or third-party hosted online
services. Adobe services are available only to users 13 and older and require agreement to additional terms of use and
the Adobe Privacy Policy. (see http://www.adobe.com/legal. html) Applications and services may not be available in all
countries or languages and may be subject to change or discontinuation without notice. Additional fees or membership
charges may apply.

New features summary
                       Adobe Media Encoder is your go-to application for all media processing requirements such as ingest, transcode,
                       create proxies, and output to any format. With its tight integration with Adobe Premiere Pro CC, After Effects CC and
                       other applications, it provides a seamless media processing workflow for audio and video professionals.

                       Read on for a quick introduction to the list of new features, enhancements, and links to resources offering more
                       information.

                                                 Last updated 3/8/2018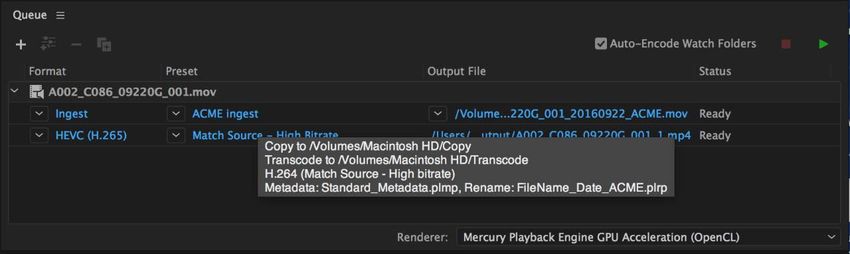
3
Get started

New features in the January 2018 release
This release of Adobe Media Encoder provides support for the following new import formats:
• HEVC in MOV container (iPhone/iPad/Phantom)
• Variable Frame Rate in h.264 and h.265 containers
• ALEXA MINI (ARRIRAW in MXF container)
For more information on the list of formats supported in Adobe Media Encoder, refer File formats supported for import
with Media Encoder.

Fixed issues in this release
For detailed list of fixed issues in this release, refer List of bug fixes in the Adobe Media Encoder CC.

New features in the October 2017 release

Publishing improvements
     New in this release of Adobe Media Encoder CC
This release of Adobe Media Encoder comes with a host of publishing improvements. Read on to know more about
these features.

Publishing improvements

Channel support for YouTube and Vimeo
     New in this release of Adobe Media Encoder CC

                                              Last updated 3/8/2018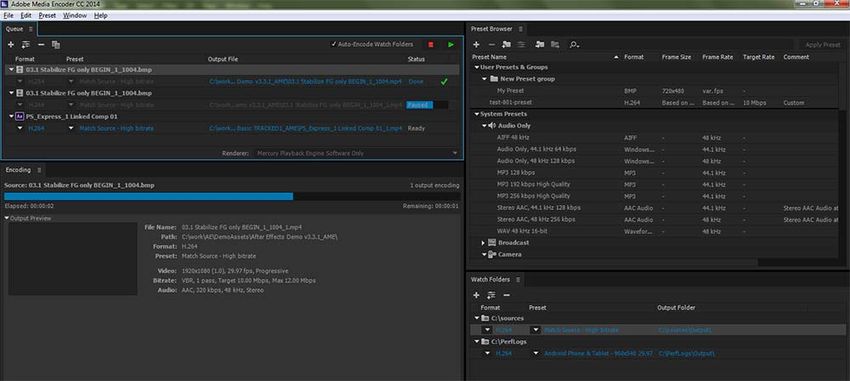
4
Get started

Publishing to YouTube and Vimeo

Adobe Media Encoder allows you to specify a channel when uploading to YouTube or Vimeo.
To learn more, see Specifying Channels in Youtube .

Playlist support for YouTube
     New in this release of Adobe Media Encoder CC
You can also specify a Playlist when uploading to YouTube. To learn more, see Specifying Channels in YouTube .

Custom Thumbnails for YouTube
     New in this release of Adobe Media Encoder CC
You can now choose a custom thumbnail for your YouTube videos. Select a frame from the source video or choose an
external graphic to use as a custom thumbnail.
To learn more, see Specifying Channels in Youtube.

Page support for Facebook
     New in this release of Adobe Media Encoder CC
Using Adobe Media Encoder, you can specify a page from the list of all available pages for your Facebook account.

Enhanced Titling
You can now use the title field to specify a custom title for your uploads and upload to Youtube, Facebook & Vimeo.

Support for animated GIFs on macOS
     New in this release of Adobe Media Encoder CC
Mac users can also export to Animated GIF format. This feature was available only on Windows in the previous
versions.
To learn more, see Files supported for export with Media Encoder.

Missing item notification
     New in this release of Adobe Media Encoder CC

                                            Last updated 3/8/2018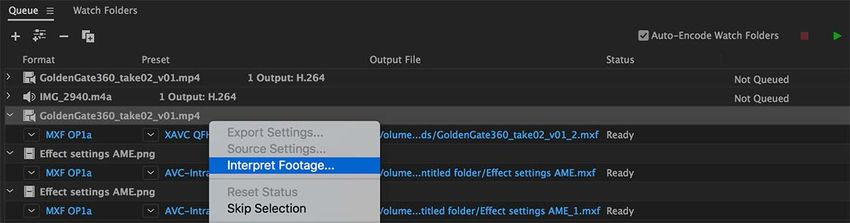
5
Get started

Adobe Media Encoder features a new enhanced missing item notification. Sources and outputs with missing items
show a Warning icon in the Queue. This allows you to correct any issues before starting to encode.

Missing items in queue

Preset Improvements
     New in this release of Adobe Media Encoder CC
The list of Match Source presets has been enhanced and changed with Adobe Media Encoder.
• Adaptive Bit rate added to Match Source presets: There are three new Match Source presets for H.264 that
  automatically choose the best bit rate based on the Frame Size and Frame Rate of the source:
    • Match Source – Adaptive High Bit rate
    • Match Source – Adaptive Medium Bit rate
    • Match Source – Adaptive Low Bit rate
• Streamlining of H.264 presets: To streamline redundant and outdated system presets for the H.264 exporter, some
  of the presets have been changed and enhanced.
    • Broadcast>H.264 — Shorter list of presets that use Match Source for frame rate
    • Devices>Mobile — Shorter list of generic device presets at common frame sizes
    • VR>H.264 — Shorter list of VR presets set to Match Source
    • Web Video>Social Media — A new Facebook preset that helps you upload for 1080p media

Time tuner improvements
     New in this release of Adobe Media Encoder CC
You can use the Skip Slates option that allows Time Tuner to ignore slates (a series of still images with a combined
duration longer than ten seconds.)
To learn more, see Time Tuner .

New UI font
     New in this release of Adobe Media Encoder CC
Adobe Media Encoder uses a new font, "Adobe Clean" as a display font on Mac and Windows. Adobe Clean is the new
standard display font for all digital video applications in Creative Cloud.

Adobe Media Encoder CC 2017.1 Release | April 2017

                                             Last updated 3/8/2018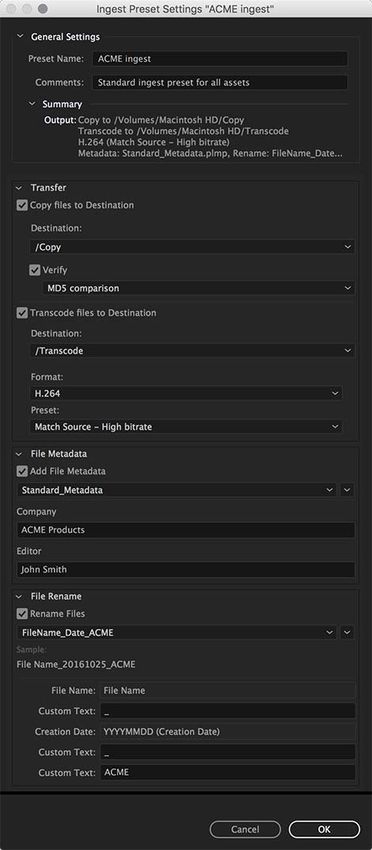
6
Get started

Collaborating using Team Projects
     New in this release of Adobe Media Encoder CC
This release introduces Team Projects. Team Projects is a hosted service that lets editors and motion graphics artists
work collaboratively in projects within Adobe Media Encoder, Prelude CC, Premiere Pro CC, and After Effects CC.
This service adds deep collaboration features such as version history and smart conflict resolution. Post-production
professionals can share their edits and get the latest changes from collaborators, allowing concurrent changes to happen
on a single project. The feature is powerful for workflows where you can ingest clips in Prelude at the same time when
visual effects and motion graphics are being done in After Effects and the edit is being refined in Premiere Pro.
Limitations:
• You cannot modify or share a production in AME; you can only encode Team Project assets within AME.
• To view your Team Project file in AME, ensure that you are logged in with an Enterprise or Team Project ID. You
  can be logged in to Creative Cloud, Premiere Pro, or other Adobe applications.
• When AME is installed as a stand-alone application on a clean system, you are prompted to log in. If you have
  Premiere Pro, After Effects, or other Adobe apps on the same system, AME uses those credentials.

Collaborating using Team Projects

For information on how to browse and render Team Projects in AME, see Working simultaneously in shared video
projects.

Embedding color profiles in JPEG files from After Effects compositions
     New in this release of Adobe Media Encoder CC
This release introduces support assignment of custom color profiles for After Effects sources. You can now embed color
profiles into JPEG files when exporting an After Effects composition.
Note: This release only supports embedding of custom color profiles for JPEG exports.

                                              Last updated 3/8/2018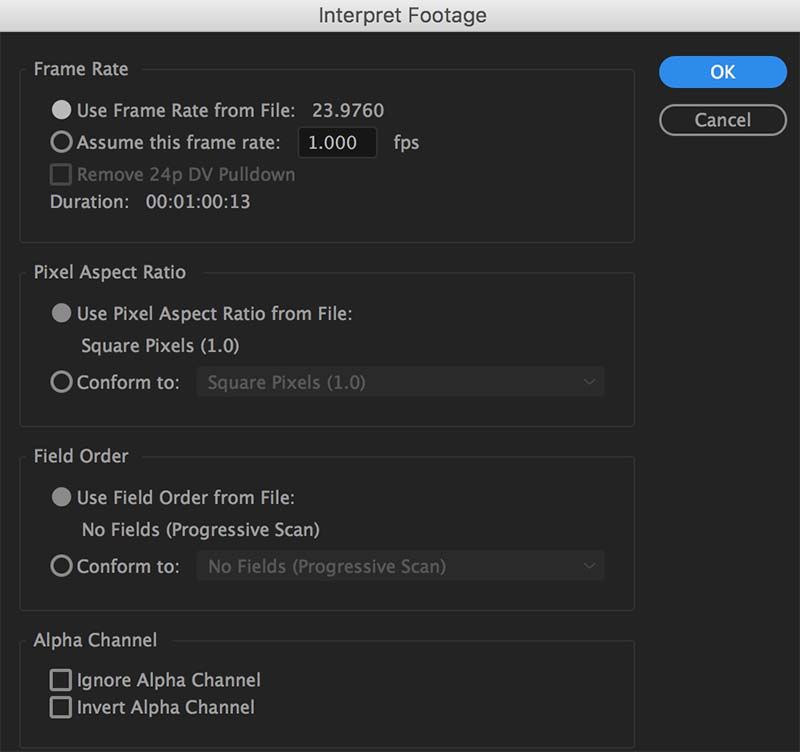
7
Get started

Color profile

For more information on support for color profiles, see Color management .

Relink assets in sequence
     New in this release of Adobe Media Encoder CC
You can now automatically relink assets in a Premiere Pro project while moving them to another machine. Previously,
when Media Encoder scouted for media files located relative to a project file path, those assets showed as Media Offline.
With the new enhancement, you can move your Premiere Pro projects and media files into a new location on a different
computer. Relink can be done only if your assets retain the same relative path to the project. Once you move the project
and media files, import the project file into Adobe Media Encoder and all media are automatically relinked.

Publish to Stock
     New in this release of Adobe Media Encoder CC
This release introduces the ability to automatically upload exported videos to the Adobe Stock Contributor portal.
Adobe Stock gives you millions of images, graphics, and videos built right into Photoshop, Illustrator, and all your
favorite apps. For a seamless login from Adobe Media Encoder, ensure that you accept the terms at Adobe Stock.

                                              Last updated 3/8/2018
8
Get started
Publish to Stock
For more information, see Export settings reference for Media Encoder
Prevent Premiere Pro from sending pause command to Adobe Media Encoder queue
New in this release of Adobe Media Encoder CC
This release introduces the ability to encode in Adobe Media Encoder and simultaneously playback or scrub in
Premiere Pro. Earlier there was no option to prevent Adobe Media Encoder from pausing the queue when scrubbing
or playing back media in Premiere Pro.
Note: This feature works only if you queue to Adobe Media Encoder from the Export settings dialog box in Premiere Pro.
Note: To prevent playback issues, ensure that your computer meets the system requirements, since Adobe Media Encoder
is simultaneously encoding and writing to disk.
Last updated 3/8/20189
Get started
Queue to Adobe Media Encoder
For more information on using the pause command, see Preferences.
Display Per-Channel Depth and Alpha in Color depth labels
New in this release of Adobe Media Encoder CC
Adobe Media Encoder now has clearer color depth and alpha channel information in bits-per-channel.
This feature also:
• Eases understanding of the bit depth settings.
• Indicates when an alpha channel is rendered.
Note: This feature is applicable to QuickTime exporter only.
Depth Settings
For more information on this feature, see Export settings reference for Media Encoder
Adobe Media Encoder CC 2017 Release | November 2016
Last updated 3/8/201810
Get started
Stitching clips on import
New in this release of Adobe Media Encoder CC
Stitching clips on import
You can now combine multiple assets into a single clip in AME. Users can edit the order of assets in the stitched clip
after import.
For more information, see Stitching clips together using Adobe Media Encoder.
Destination Publishing Support for Behance
New in this release of Adobe Media Encoder CC
Behance has been added to Adobe Media Encoder’s extensive destination publishing workflow, joining other social
media publishing options such as YouTube, Facebook, Vimeo, and Twitter. Now users can render and share videos
directly to Behance from Adobe Media Encoder.
For more information, see Behance settings.
Render Alpha Channel Only
New in this release of Adobe Media Encoder CC
This option can be used for sources that contain an alpha channel. When this option is enabled, only the alpha channel
gets rendered in the output video. A grayscale preview of the alpha channel is shown in the Output tab. This setting is
useful when exporting to formats like MXF that don't support transparency information. You can use the alpha
channel-only output to define transparent areas of your video in third-party applications.
Adobe Media Encoder now allows you to ingest media files from a camera onto a local drive so that you can quickly
start editing in Premiere Pro.
For more information, see Using Ingest Presets with Media Encoder .
Last updated 3/8/201811
Chapter 2: Encoding quick start and basics
Using the Preset Browser
The Preset Browser provides you with options that help streamline your workflow in Adobe Media Encoder.
To learn more about using the preset browser, see this video from video2brain.
System presets
System presets in the browser are organized as categories based on their use (such as Broadcast, Web Video) and device
destination (such as DVD, Blu-ray, Camera, Tablet). You can modify these presets to create custom presets, also called
User Presets.
In the Preset Browser, you can quickly find a preset using search, or using the enhanced navigation provided by the
collapsible folder structure.
Custom presets, preset groups, and aliases
To create a custom User preset, do one of the following:
• Choose Preset > Create Encoding Preset to create a new encoding preset.
• Choose Preset > Create Ingest Preset to create a new ingest preset. To see more information about this feature, see
Ingest Preset.
• Click the Create New Preset button in the Preset Browser and choose New Encoding Preset or New Ingest Preset
from the pop up menu.
To create a new Preset Group, do one of the following:
• Choose Preset > Create Group
• Click the Create New Preset Group button in the Preset Browser
Preset Groups can contain user presets, aliases to presets, or other preset groups.
To create an alias to a system or user preset, do one of the following:
• Select a system or user preset in the Preset Browser and choose Preset > Create Alias
• Drag a system preset to the User Presets & Groups section of the Preset Browser
• Hold the Alt (Windows) or Opt (Mac) key down and drag a user preset to a different location in the User Presets &
Groups section of the Preset Browser.
Managing Presets
To manage presets, use the Preset menu or the options in The Preset Browser (Window>Preset Browser). You can also
right-click a preset in the Preset Browser to view the context menu for the available options.
Last updated 3/8/201812
Encoding quick start and basics
The Preset Browser
A Custom preset B Preset group C Create new preset D Delete preset E Create new preset group F Preset settings G Import presets H Export
presets I Search for presets
Modify user presets
• To rename a preset, click the name of a selected preset. Type a name for the preset and press Enter. Alternatively,
select Preset > Rename to rename a preset.
• To modify preset settings, select a preset, and select Preset > Settings.
• To delete a preset, select the preset and press Delete. Alternatively, select Preset > Delete.
Note: Only custom presets can be edited. Changes to system presets can be saved as new user presets by clicking the Save A
Copy button in the Preset Settings dialog.
Show the location of a preset in Finder or Explorer
Right-click the preset in the Preset Browser and select Reveal Preset File.
Quickly find a preset in the browser
As you type in the search field, the Preset Browser filters the preset list to match your search string. All columns are
scanned for matching results.
Import and export presets
Presets can be imported and exported as EPR files. EPR files are saved in the XML format.
• Select Preset > Import to import EPR files. Imported presets appear in the User Presets and Groups section.
Last updated 3/8/201813
Encoding quick start and basics
• Select Preset > Export to export selected presets as EPR files.
Note: You can also drag-and-drop EPR files to the User Presets and Groups section.
Apply presets or preset groups to the Queue
To apply presets to sources in the Queue, do one of the following:
• Drag presets, preset groups, or aliases from the Preset Browser and drop them on sources or outputs in the Queue.
• Dropping a preset on a source adds an output to the source.
• Dropping a preset on an existing output replaces the settings of the output with the settings of the preset.
• To add an output to the source, drag a source from the Queue to a preset, preset group, or alias in the Preset Browser.
• To replace the settings of the output with the settings of the preset, drag an output from the Queue to a preset, preset
group, or alias in the Preset Browser.
• Select a source in the Queue and double-click a preset, preset group, or alias in the Preset Browser.
• Select a source in the Queue. Select presets, preset groups, or aliases selected in the Preset Browser. Click Apply
Preset.
Apply presets or preset groups to Watch Folders
To apply presets to watch folders in the Watch Folders panel, do one of the following:
• Drag presets, preset groups, or aliases from the Preset Browser and drop them on watch folders or outputs in the
Watch Folders panel.
• Dropping presets on a watch folder adds new outputs to the watch folder.
• Dropping presets on an existing output replaces the settings of the output with the settings of the preset.
• To add an output to the watch folder, drag a watch folder from the Watch Folders panel to a preset, preset group, or
alias in the Preset Browser.
• To replace the settings of the output with the settings of the preset, drag an output from the Watch Folders panel to
a preset, preset group, or alias in the Preset Browser.
• Select a watch folder in the Watch Folders panel. Alt + double-click (Win) or Opt + double-click (Mac) a preset,
preset group, or alias in the Preset Browser.
• Select a watch folder in the Watch Folders panel. Select presets, preset groups, or aliases in the Preset Browser. Alt
+ click (Win) or Opt + click (Mac) the Apply Preset button.
Apply presets to Premiere Pro sequences, After Effects compositions, and
media assets during import
To apply presets to Adobe Premiere Pro sequences, do one of the following:
• Navigate within an Adobe Premiere Pro project in the Media Browser and drag-and-drop sequences to a preset,
preset group, or alias in the Preset Browser.
• Drag a sequence from the Project panel of an open Adobe Premiere Pro project and drop it on a preset, alias, or
preset group in the Preset Browser.
Note: This procedure is the only way to add multiple presets to Adobe Premiere Pro sequences in a single step. The Export
Settings dialog in Adobe Premiere Pro allows you to apply single presets when exporting sequences to Adobe Media Encoder.
Last updated 3/8/201814
Encoding quick start and basics
Apply presets to After Effects compositions
• Navigate within an Adobe After Effects project in the Media Browser and drag-and-drop compositions to a preset,
preset group, or alias in the Preset Browser.
• Drag a composition from the Project panel of an open After Effects project to a preset, preset group, or alias in the
Preset Browser.
Apply presets to video and audio assets
• Drag media files from the Media Browser to a preset, preset group, or alias in the Preset Browser.
• Drag video and audio assets from Finder or Windows Explorer and drop them on a preset, preset group, or alias in
the Preset Browser.
Important considerations when applying presets
• Dropping a single preset on an output replaces the output. The new outputs inherit the output path, output name,
and source range settings from the targeted output
• Dropping a single preset on a source adds an output.
• Dropping a preset group (or multiple selected presets) on an output adds outputs. The new outputs inherit the
output path, output name, and source range settings from the targeted output.
• Dropping a preset group (or multiple selected presets) on a source adds outputs. Settings such as output path from
existing outputs are not inherited.
Using Ingest Presets with Media Encoder
Adobe Media Encoder now allows you to ingest media files from a camera onto a local drive so that you can quickly
start editing in Premiere Pro. You can now launch AME, select the clips you want to ingest using the Media Browser
and set In/Out points if necessary.
Ingest the clips by dragging them to an Ingest preset in the Preset Browser, or by dragging them directly to the Queue
and applying an Ingest preset to the new sources there. The Ingest Preset Settings dialog lets you choose a destination
on your local machine to copy the camera files to, choose a Transcode format, and set up Metadata or rename your
assets if necessary. When the queue is done processing, you can import the files to your Premiere Pro project to begin
editing.
Last updated 3/8/201815
Encoding quick start and basics
Ingest Preset settings
Last updated 3/8/201816
Encoding quick start and basics
To copy files from a camera or networked volume, turn on 'Copy files to destination' and specify a location for the
ingested files by clicking 'Browse For Location' and selecting a destination folder. To ensure that the copied files match
the original, select Verify and choose one of the following options:
• MD5 Comparison: Performs an MD5 check and ensures that the source file is the same as the ingested file.
• File Size Comparison: Checks whether the file size of the ingested file is the same as the size of the original movie
clip.
• Bit by Bit Comparison: Does a CRC check and verifies whether the checksum of the source file is the same as the
ingested file. If the files are different, the checksums don't match, and the test fails.
To transcode files during ingest, turn on 'Transcode files to destination' and specify a location for the ingested files by
clicking 'Browse For Location' and selecting a destination folder. Next, choose a transcoding Format and Preset from
any of the installed system presets or choose a custom Encoding preset that you previously created or imported to the
Preset Browser.
Adding Metadata to Files During Ingest
You can add metadata during ingest by creating a custom form (or schema) to be applied to each ingested file as XMP
metadata. To add metadata, turn on 'Add File Metadata' in the File Metadata section. To create a preset, do the
following:
1 Click the downward arrow icon next to the list of metadata presets and choose New Preset.
2 Click + to add a metadata field.
3 Enter a name for the metadata field. Ensure that the name doesn't contain spaces.
4 For mandatory fields, click the check box next to the asterisk *.
5 Optionally, in Input Metadata Value, enter the value for the preset.
6 To add more fields, click the + button again.
7 Click Save to save the preset.
Note: The metadata name and the metadata value together are called the metadata pair or key-value pair. You can choose
to provide a default value to the name or add the value dynamically during ingest.
To edit a preset, do the following:
1 Select a preset in the menu.
2 Click the downward icon next to the menu and select Edit. Edit the values as required and click Save.
3 To save the preset with a different name, select Save As. Enter a new name for the preset.
4 To go back to the Metadata panel without saving changes, click x. To delete a preset, click the Trash icon.
Metadata presets can be shared with other users by sending them the preset file. This can be helpful by establishing
consistent sets of metadata that your teams can leverage when organizing assets and content. To locate the presets on
your computer, click the downward icon next to the Preset menu, and select Show in Explorer or Show in Finder. To
import a preset, click the downward arrow next to the Preset menu and select Import Preset. Select the presets that you
want to import and click Open. File Metadata presets are saved as .PLMP files in the following location:
• Windows: C:\Users\\Documents\Adobe\Adobe Media Encoder\10.0\Presets\Metadata\
• Mac: HD/Users//Documents/Adobe/Adobe Media Encoder/10.0/Presets/Metadata/
Last updated 3/8/201817
Encoding quick start and basics
Renaming files during ingest
You can rename files during ingest by creating renaming presets that add specific strings to the output file name.
Note: Files that are a part of a complex folder structure (like P2) are not renamed.
To rename files on ingest, turn on 'Rename files' in the File Rename section. To create a preset for naming files, do the
following:
1 Click the downward arrow icon next to the list of renaming presets and choose New Preset.
2 Click "+" to add an element to your custom naming preset.
3 Custom Text: Type characters you want added to the output file name. For example, your company's name, the
project name, or a separator between two elements.
4 Date: Choose 'Ingest Date' to use the date files are added to the queue. Choose 'Creation Date' to use the timestamp
date from the source files.
5 Time: Choose 'Ingest Time' to use the time files are added to the queue. Choose 'Creation Time' to use the timestamp
time from the source files.
6 File Name: Adds the source file name (without the extension) as an elements in the new output name.
To add additional elements, click the "+" button again. Click Save to save the preset, enter a name for the preset, and
ensure that the name doesn't contain spaces.
To edit file renaming presets, follow these steps:
1 Select the preset in the menu.
2 Click the downward icon next to the menu, and select
3 Edit the values as required and click Save.
4 To save the preset with a different name, select Save As and enter a new name for the preset.
5 To go back to the File Rename panel without saving changes, click "x".
6 To delete a preset, click the Trash icon.
Consistent naming conventions can be useful in collaborative workflows. You can share renaming presets with other
users by sending them the preset file. To locate the presets on your computer, click the downward icon next to the Preset
menu and select Show in Explorer or Show in Finder. To import a preset, click the downward arrow next to the Preset
menu and select Import Preset. Select the presets that you want to import and click Open. File Rename presets are saved
as .PLRP files in the following location:
• Windows: C:\Users\\Documents\Adobe\Adobe Media Encoder\10.0\Presets\Rename\
• Mac: HD/Users//Documents/Adobe/Adobe Media Encoder/10.0/Presets/Rename/
Working with Ingest Outputs in the Queue Panel
Ingest outputs in the queue behave in a way similar to Encoding outputs but with some important differences. The
format of ingest outputs is always shown as 'Ingest'. If transcoding is enabled, the ingest output's tool tip will show the
format and preset of the encoding preset it is associated with. For example: 'H.264 (Match Source - High bitrate)'
You can change an ingest output to an encoding output by choosing a different format from the Format popup menu.
Conversely, you can change an encoding output to an ingest output by changing it's format to 'Ingest'. To edit an ingest
output, do one of the following:
• Select the output and choose Preset > Settings
Last updated 3/8/201818
Encoding quick start and basics
• Click the hot-text in the Format or Preset columns
This opens the Ingest Settings dialog where you can make any necessary changes. In order to save your settings click
the OK button. This changes the ingest output’s Preset Name to 'Custom' in the Queue.
Ingest destinations are shown in the Output File column. If both Copy and Transcode option are enabled you can
toggle between the two paths by using the popup arrow to the left of the destination path. Click the destination's hot-
text link to open the destination folder.
Ingest job in Queue
Encode video or audio items in Adobe Media Encoder
The encoding process
To encode a video or audio item, add the item to the encoding queue in Adobe Media Encoder, and then select
encoding presets or create your own custom settings. You can instruct the application to start encoding after you add
an item to the queue, or you can tell the application to wait until you decide to start encoding.
Add an item to the encoding queue - Drag video or audio files into the queue in Adobe Media Encoder.
Encode the item using presets - Select formats and presets from the Format and Presets pop-up menus with the item
in the queue. Or choose a preset from the Preset Browser and drag it to any item in the Queue. For more information,
see Encode using presets.
Encode the item using custom settings - Select the item and select Edit > Export Settings, and then choose your
settings. For more information, see Encode using custom settings.
To start encoding items in the queue automatically (or to turn off the feature), select or deselect the Start Queue
Automatically When Idle For option in the Preferences dialog box. For more information, see the Preferencesarticle.
Last updated 3/8/201819
Encoding quick start and basics
Adobe Media Encoder main window
Import items into the encoding queue
• To add video or audio files, do one of the following:
• Drag one more files into the queue from the desktop or the media browser.
• Click the Add Source button and choose one or more files.
• Double-click an open area in the Queue panel and choose one or more files.
• To add a Adobe Premiere Pro sequence, do one of the following:
• Navigate within an Adobe Premiere Pro project in the Media Browser and click drag sequences to the Queue.
• Choose File>Add Premiere Pro Sequence, select a Premiere Pro project, and select one or more sequences from
that project.
• Click drag a sequence from the Project panel in Adobe Premiere Pro into the queue.
• Click drag a Premiere Pro project from the desktop on the Queue.
• To add an Adobe After Effects composition, do one of the following:
• Navigate within an Adobe After Effects project in the Media Browser and drag-and-drop compositions to the
Queue.
• Choose File>Add After Effects Composition, select an After Effects project, and select a composition from that
project.
• Click drag a composition from the Project panel in After Effects into the queue.
• Click drag an After Effects project from the desktop on the Queue.
Stop encoding
• Choose File>Stop Current File to stop encoding the current item. Adobe Media Encoder continues encoding the
remaining items in the Queue.
• Choose File>Stop Queue to stop encoding all items in the Queue.
Last updated 3/8/201820
Encoding quick start and basics
Interpret items in the encoding queue
When Adobe Media Encoder imports a video asset, it attempts to determine the pixel aspect ratio, frame rate, and field
order for that asset, as well as how to interpret the alpha channel (transparency) information. If Adobe Media Encoder
is wrong about any of these characteristics, you can explicitly assign the correct interpretation.
1 Select one or more items in the encoding queue.
2 Choose File>Interpret Footage. You can also right click the file and choose Interpret Footage.
Interpret Footage selection
3 Choose the appropriate interpretation settings.
Last updated 3/8/201821
Encoding quick start and basics
Interpret Footage dialog box
Identify missing items in the encoding queue
You can identify sources and outputs in the queue that contain missing items before you encode. This helps you identify
and fix issues before you encode. A warning status is displayed next to the source or output that contains any missing
items. Hover over the icon to view a summary of the error which is associated with this problem.
Adobe Media Encoder shows a warning icon in the following cases:
• Premiere Pro projects contain offline media. In this case, Adobe Media Encoder uses proxy media in the place of
the missing set. If there are no proxies, a graphic that displays 'Media Offline' message is used.
• Some fonts are missing from Premiere Pro projects.
• Some effects are missing in Premiere Pro projects.
• Some files are missing in Overlay effects.
Last updated 3/8/201822
Encoding quick start and basics
Identify missing items
Watch folders in Adobe Media Encoder
You can configure Adobe Media Encoder to look for files in certain folders called watch folders. When Adobe Media
Encoder finds a video or audio file in a watch folder, it encodes the file using the encoding settings assigned to the
folder, and then exports the encoded file to an Output folder created inside the watch folder.
The Watch Folders panel in In Adobe Media Encoder can be used to add and manage folders. You can add a watch
folder in one of the following ways:
1 Choose File>Add Watch Folder and select a folder.
2 Double-click an empty area in the Watch Folders panel and select a folder.
3 Create a folder in Explorer (Windows) or Finder (Mac OS), and then drag it to the Watch Folders panel.
You can see the name of the folder in the left column of the Watch Folders panel after you have created it.
The items added to the encoding queue by the watch folder will be encoded along with other items in the queue when
you start the queue.
Note: If you have the “start queue automatically when idle for” preference selected, encoding begins when the specified
amount of time has elapsed after the watch folder has added a new item to the encoding queue.
Keep the Auto-Encode Watch Folders check box enabled to automatically encode items when they are added to the
watch folder.
Adding presets
You can choose a format and preset from the pop-up menus in the watch folder next to the folder name. Or drag a preset
to the watch folder from the preset browser.
Create output in multiple formats from a single source item using watch folders
You can generate multiple outputs with a single operation by using watch folders. For example, you want to generate an
AVI movie, and a JPEG thumbnail image whenever you transcode a video asset. Follow these steps to create these files
with a single user operation:
1 Create a folder using Explorer (Windows) or Finder (Macintosh) called, “My_WatchFolder,” for example.
2 Create a watch folder by clicking the Add Folder button, and then navigate to the folder you just made,
“My_Watchfolder.”
a Click Format and Select MPEG4 as the format from the pop-up menu.
b Click Preset and select the desired setting from the Preset pop-up menu.
Last updated 3/8/201823
Encoding quick start and basics
Format and Preset pop-up menu
c Click Output Folder. Select a location where you would like the result to be generated.
Output Folder
3 Create a Watch Folder item that also points to the folder “My_Watchfolder,” just like you created in Step 2.
a Select AVI as the format from the Format menu.
b Select a preset from the Preset Menu, and then click OK.
c Click Output Folder. Select a location where you would like the result to be generated.
4 Create a Watch Folder item that also points to the folder “My_Watchfolder,” just like you created in Step 2 and Step 3.
a Select JPEG as the format from the Format menu.
b Select a preset from the Preset Menu, and then click OK.
c Click Output Folder. Select a location where you would like the result to be generated.
5 Click drag the source file into “My_WatchFolder,” and then click the Start Queue button. The encoding process
begins automatically if the Auto-Encode Watch Folders is enabled.
Last updated 3/8/201824
Encoding quick start and basics
When complete, each file is in its expected output locations.
Note: The preset should be custom and the Export As Sequence option must be deselected. This will only export the first
frame of the video, which is often black.
Note: Still Image Sequences are not supported as source footage through Watch Folders. If a set of still images is placed in
the folder being watched, each individual still file is added as a separate item to the Queue rather than the entire sequence
as a single piece of footage.
Save the encoding queue
The encoding queue and all encoding settings are saved automatically when you exit Adobe Media Encoder.
The encoding queue is also saved automatically when a user starts an encoding.
To manually save the encoding queue, choose File > Save Queue.
Note: Turn off the Preferences > Remove completed files from the queue on exit check box if you want to keep completed
encoded items in the Queue when you close and restart Adobe Media Encoder.
Remove items from the encoding queue
1 Select the item, or items that you want to remove from the encoding queue.
2 Click the Remove button, choose Edit > Clear, or press the Delete key.
Delete items from Encoding queue
Duplicate items in the encoding queue
1 Select the item, or items that you want to duplicate in the encoding queue.
2 Do one of the following:
• Click the Duplicate button, choose Edit > Duplicate
• Press Ctrl-D (Windows), or Command-D (Mac OS)
• Right-click the file and choose Duplicate.
Last updated 3/8/201825
Encoding quick start and basics
Duplicate item
Skip items in the encoding queue
Skip items
1 Select the item, or items that you want to skip in the encoding queue.
2 Choose Edit > Skip Selection or you can right-click the file and choose Skip Selection.
Skip Selection
Reset a skipped file for encoding
1 Select the items in the encoding queue that you want to reset to the Ready state.
2 Choose Edit>Reset Status or you can also right-click the file and choose Edit>Reset Status.
Last updated 3/8/201826
Encoding quick start and basics
Reset Status of skipped file
File formats supported for import with Media Encoder
Some filename extensions such as MOV, AVI, MXF, and FLV denote container file formats rather than representing
specific audio, video, or image data formats. Container files can contain data encoded using various compression and
encoding schemes. Adobe Media Encoder can import these container files, but the ability to import the data that they
contain depends on which codecs (specifically, decoders) are installed.
By installing more codecs, you can extend the ability of Adobe Media Encoder to import extra file types. Many codecs
must be installed into the operating system and work as a component inside the QuickTime or Video for Windows
formats. Contact the manufacturer of your hardware or software for more information about codecs that work with the
files that your specific devices or applications create.
Note: As of September 15 2017, Adobe Creative Cloud apps now rely on your operating system (OS) to decode/encode
Dolby Digital and Dolby Digital Plus audio formats. Adobe no longer bundles the native libraries from Dolby with Creative
Cloud products.For information about how this change affects Dolby audio playback in your product, see Adobe Creative
Cloud apps use native OS support for Dolby .
Last updated 3/8/201827
Encoding quick start and basics
Video and animation formats
Format Description
3GP 3GPP file format
AAF Advanced Authoring Format
ARCUTX Adobe rough cut format. This format is supported only when queued
from Prelude, and cannot be imported directly.
Animated GIF (GIF) Supported on Windows only
ARI ARIRAW format
AVC-Intra, AVC-Intra LT, AVC Long GOP (Op1a), AVC Long GOP (Op1b) Panasonic codecs
including AVC-Ultra
Cinema DNG High-resolution raw format
RMF Canon RAW format
DV Stream Native video format used for tape
DNxHD Op1a Supported in MXF container
DNxHR Supported in MXF container
FLV, F4V. Flash video
MOV GoPro CineForm format
HEVC High Efficiency Video Coding. HEVC (also known as H.265) codec
footage in a QuickTime (.MOV) container, such as produced by an
iPhone or iPad with iOS 11 or a DJI Phantom 4 drone. VFR support.
IMX Supported in MXF container
JPEG2000 MXF Op1a Supported in MXF container
MXF Media eXchange Format. Note: Adobe Media Encoder supports
ARRIRAW files in an MXF container.
MPEG, MPE, MPG, M2V, MPA, MP2, M2A, MPV, M2P, M2T, MTS, MP4, MPEG-1, MPEG-2, and MPEG-4 formats. Variable Frame Rate (VFR)
M4V, M4A, VOB, 3GP, AVC, h.264 support in h.264.
MXF OP1a Supported in MXF container
Netshow ASF Windows only
P2 Movie Supported in MXF container
CINE Phantom CINE format
MOV QuickTime movie. HEVC (also known as H.265) codec footage in a
QuickTime (.MOV) container.
R3D RED Raw, RED Helium, RED WEAPON
SonyRAW Supported in MXF container
AVI, WAV, BWF Video for Windows and Mac OS(requries QuickTime player)
WMV, WMA, ASF Windows Media
XAVC Intra, XAVC Long GOP Sony codecs
1 FLV and F4V formats are container formats that are associated with a set of video and audio formats. F4V files
Last updated 3/8/201828
Encoding quick start and basics
generally contain video data that is encoded using an H.264 video codec and the AAC audio codec. FLV files
generally contain video data that is encoded using the On2 VP6 or Sorenson Spark codec and audio data encoded
using an MP3 audio codec. Adobe Media Encoder, however, can import FLV files using the On2 VP6 video codec,
not the Sorenson Spark codec. Also, Premiere Pro does not support FLV import.
2 Media eXchange Format (MXF) is a container format. Adobe Media Encoder can only import some kinds of data
contained within MXF files. It can import the Op-Atom variety used by Panasonic cameras using the DV, DVCPRO,
DVCPRO50, DVCPRO HD, and AVC-Intra codecs to record to Panasonic P2 media. Adobe Media Encoder can
also import XDCAM HD files in MXF format.
3 Several formats associated with specific modern cameras use MPEG-4 encoding. For example, the XDCAM EX
format uses MP4 files, and the AVCHD format uses MTS files.
Audio formats
Format Description
ASND, multi-track files imported as merged single track Adobe Sound Document
Adobe Audition tracks Audition track format
AAC, M4A Advanced Audio Coding
AIF, AIFF Audio Interchange File format
AVI, WAV Video for Windows. Require QuickTime Player on Mac OS.
MP3, MPEG, MPG, MPA, MPE MPEG Audio Layer 3
MPEG 2 MPEG 2
MOV; on Windows, require QuickTime player QuickTime format
WAV Waveform format
WMA, Windows only Windows Media Audio format
Still-image formats
Format Description
AI, EPS Adobe Illustrator
ARI ARRIRAW
BMP, DIB, RLE Bitmap
CIN, DPX Cineon/Digital Picture Exchange. Support for DPX asynchronous
decode.
GIF Graphics Interchange Format
ICO; Windows only Icon File
JPE, JPG, JPEG, JFIF JPEG
OpenEXR High dynamic range file format
PSD Photoshop
PIC, PCT PICT
Last updated 3/8/201829
Encoding quick start and basics
PNG Portable Network Graphics
TGA, ICB, VDA, VST Targa
TIF, TIFF Tagged Interchange File
Note: You can import files of any still-image format as a sequence. For more information, see Import items into the
encoding queue.
Closed captioning formats
Format Description
DFXP Distribution Format Exchange Profile
MCC MacCaption VANC
PTL, PRTL Adobe Premiere Title
SCC Scenarist Closed Caption
SRT Subrip Subtitle format
STL EBU N19 Subtitle
XML W3C/SMPTE/EBU Timed Text
Project file formats
Format Description
AEP, AEPX After Effects project
CHPROJ Adobe Character animator project
CMX3600 EDL Edit decision list (EDL)
FCP XML Final Cut Pro XML
PRPROJ Adobe Premiere Pro project
Working with log files
Encoding log file
The encoding log file is a plain-text file that contains a record of all files that were queued for encoding, whether
successfully completed or not. The encoding status of each file you encode is appended to the end of the file (placing
the newest entry at the end of the file). The log file adds entries until you manually clear them. To clear log file entries,
open the file in a text editor, select all of the entries, delete them, and save the empty file using the default filename
(AMEEncodingLog.txt).
The log file is stored in the following location:
• Windows 7 & 8: C:\Users\[user]\Documents\Adobe\Adobe Media Encoder\8.0\AMEEncodingLog.txt
Last updated 3/8/201830
Encoding quick start and basics
• Mac OS: /Users/[user]/Documents/Adobe/Adobe Media Encoder/8.0/AMEEncodingLog.txt
To view the log file, choose File > Show Log or press Ctrl + L.
There are two log files:
• AMEEncodingLog.txt: for successfully encoded jobs.
• AMEEncodingErrorLog.txt: for jobs that failed, or were stopped by the user.
Error log file
The log files, and error log files are stored in the same location as the Adobe Media Encoder files.
To view the error log file, choose File > Show Errors.
Files supported for export with Media Encoder
To export a file using Adobe Media Encoder, select a format in the Export Settings dialog box for the output. The
selected format determines the preset options that are available. Select the format best suited for your desired output.
Adobe Media Encoder is used both as a stand-alone application and as a component of Adobe Premiere Pro, After
Effects, Prelude, Audition, and Animate. The formats that Adobe Media Encoder can export depend on which of these
applications are installed.
Some filename extensions—such as MOV, AVI, and MXF —denote container file formats rather than denoting a
specific audio, video, or image data format. Container files can contain data encoded using various compression and
encoding schemes. Adobe Media Encoder can encode video and audio data for these container files, depending on
which codecs (specifically, encoders) are installed. Many codecs must be installed into the operating system and work
as a component inside the QuickTime or Video for Windows formats.
Depending on other software applications that you have installed, the following options are available.
Note: As of September 15 2017, Adobe Creative Cloud apps now rely on your operating system (OS) to decode/encode
Dolby Digital and Dolby Digital Plus audio formats. Adobe no longer bundles the native libraries from Dolby with Creative
Cloud products.For information about how this change affects Dolby audio playback in your product, see Adobe Creative
Cloud apps use native OS support for Dolby .
Video and animation
Format Description
Animated GIF Supported on Windows and Mac Operating Systems, supports match
source.
AS-10
AS-11 AVCI for HD Shim, IMX for SD Shim. IMX is MPEG-2.
DNxHR/DNxHD MXF OP1a Supported in MXF container.
H.264: AAC, 3GP, MP4, M4V, MPA (audio), WAV (PCM audio) Audio options are AAC and MPEG. MPEG audio option includes MPEG-
1, Layer I & MPEG-1, Layer II. Supports match source.
H.264: Blu-ray: M4V, WAV (PCM audio) Audio options include PCM. MPEG audio option includes MPEG-1,
Layer I & MPEG-1, Layer II, Blu-ray-compliant primary stream, and Blu-
ray-compliant secondary audio stream.
Last updated 3/8/201831
Encoding quick start and basics
HEVC (H.265): 4K HD, 8K HD, HD 720p, HD 1080p Match Source - High Bit Rate, SD 480p, and SD 480p Wide. Supports 8-
bit encoding and 10-bit encoding including High Dynamic Range and
Rec2020.
MPEG-2: M2T, M2V, MPA, MPG, WAV (PCM audio) Audio options are MPEG and PCM. Supports match source.
MPEG-2 DVD (M2V, MPG, MPA (audio), WAV (PCM audio) Supports match source.
MPEG-2 Blu-ray (M2V, M2T, WAV)
MPEG-4 (3GP, MP4, M4V, AAC (audio)) Audio option is AAC.
MXF OP1a (AVC-Intra, JPEG 2000, XAVC, IMX, XDCAM, XDCAM EX, Supported in MXF container.
XDCAM HD, DV, DVCPRO and AVC-LongGOP), XAVC Intra (including
Hybrid Log Gamma) and XAVC LongGOP
Animation, Apple ProRes (Mac only), DV formats, GoPro Native QuickTime support.
CineForm, Uncompressed RBG 8-bit, Uncompressed YUV 10-bit
4:2:2, Uncompressed YUV 8 bit 4:2:2, DNxHD, DNxHR, and PNG,
QuickTime MOV
AVC-Intra, AVC-LongG, DV, DVC PRO, DVC PRO 50, DVC PRO HD P2 Movie Format.
AVI, AVI (uncompressed) Windows only.
Wraptor DCP
Note: MXF is a container format. Adobe Media Encoder can encode and export movies in the Op-Atom variety of MXF
containers using the DVCPRO25, DVCPRO50, and DVCPRO100, and AVC-Intra codecs. Premiere Pro can export MXF
files containing the MPEG-2 essence items that comply with the XDCAM HD format used by such systems as Avid Unity.
The stand-alone Adobe Media Encoder can also export files in this format.
Still image and still-image sequence formats that support match source
• Bitmap (BMP; Windows only)
• DPX
• GIF (Windows only)
• JPEG
• OpenEXR
• PNG
• Targa (TGA)
• TIFF (TIF)
Note: To export a movie as a sequence of still-image files, select Export As Sequence on the Video tab when a still-image
format is selected.
Audio
• Advanced Audio Coding (AAC), Version 1, and Version 2
• Audio Interchange File Format (AIFF)
• mp3 format
• Waveform Audio (WAV)
Last updated 3/8/201832
Encoding quick start and basics
Support for web distribution
• Facebook 720HD
• Twitter 720P
• Vimeo 480p SD, 480p SD Wide, 720p HD, 1080p HD
• Web Video DG Fast Channel 480/512 MPEG-2
• YouTube 480p SD, 480p SD Wide, 720p HD, 1080p HD, 2160p 4K
Codecs support for Adobe Media Encoder installed with other products
• With Adobe Premiere Pro, After Effects, and Prelude: All codecs are supported. However, HEVC is not supported
during the trial period in Adobe Premiere Pro, After Effects, and Prelude.
• With all other products: All codecs are supported except
• AS-11 SD
• HEVC
• MPEG-2
• MPEG-2 DVD
• MPEG-2 Blu-ray
• MXF OP1a
Default keyboard shortcuts
Application shortcuts
Result Windows Mac OS
Open Preferences dialog Ctrl+, Cmd+,
Keyboard Shortcuts dialog Shift+Ctrl+Alt+K Shift+Cmd+Opt+K
Quit AME Ctrl+Q Cmd+Q
Add Source Ctrl+I Cmd+I
Add watch folder Ctrl+Alt+I Cmd+Opt+I
Start/Pause Queue Enter Enter
Stop Queue Esc Esc
Stop Current Item Ctrl+ - (minus) Cmd+ - (minus sign)
Save Queue Ctrl+S Cmd+S
Show Log Ctrl+L Cmd+L
Show errors Ctrl+Alt+L Cmd+Opt+L
Undo Ctrl+Z Cmd+Z
Last updated 3/8/201833
Encoding quick start and basics
Redo Shift+Ctrl+Z Shift+Cmd+Z
Redo Ctrl+Y Cmd+Y
Cut Ctrl+X Cmd+X
Copy Ctrl+C Cmd+C
Paste Ctrl+V Cmd+V
Clear Delete Delete
Duplicate Ctrl+D Cmd+D
Select All Ctrl+A Cmd+A
Deselect All Ctrl+Shift+A Cmd+Shift+A
Skip Selection Ctrl+Shift+. Cmd+Shift+.
Reset Status Ctrl+. Cmd+.
Open Export Settings dialog Ctrl+E Cmd+E
Restore AME preferences to default state Hold Shift Key during launch Hold Shift Key during launch
Launch Help F1 F1
Preset shortcuts
Result Windows Mac OS
Open Preset Settings dialog Ctrl+Alt+E Cmd+Opt+E
Apply to queue Ctrl+U Cmd+U
Apply to watch folders Ctrl+Alt+U Cmd+Opt+U
Create Encoding preset Ctrl+N Cmd+N
Create Ingest preset Ctrl+Alt+N Cmd+Opt+N
Create preset group Ctrl+G Cmd+G
Create alias to preset Ctrl+B Cmd+B
Rename user preset or preset group Ctrl+R Cmd+R
Preset Browser shortcuts
Result Windows Mac OS
Apply preset to source in Queue Double-Click preset Double-Click preset
Apply preset to Watch Folder Alt+Double-Click preset Opt+Double-Click preset
Create alias to System preset Drag preset Drag preset
New preset from System preset Alt+Drag preset Opt+Drag preset
Create alias to User preset Alt+Drag preset Opt+Drag preset
Open/Close folder and all sub-folders Ctrl+Double Click preset Cmd+Double Click preset
Reveal System preset Alt+Right Click preset Opt+Right Click preset
Last updated 3/8/201834
Encoding quick start and basics
Media Browser shortcuts
Result Windows Mac OS
Set In Point for selected clip I I
Set Out point for selected clip O O
Clear In & Out points C C
Toggle playback of selected clip Space Space
Fast-backward playback J J
Pause playback K K
Fast-forward playback L L
Slow-backward playback Shift+J Shift+J
Slow-forward playback Shift+L Shift+L
Workspace shortcuts
Result Windows Mac OS
Close/Open Queue panel Ctrl+1 Cmd+1
Close/Open Encoding panel Ctrl+2 Cmd+2
Close/Open Watch folders panel Ctrl+3 Cmd+3
Close/Open Preset browser Ctrl+4 Cmd+4
Close/Open Media Browser Ctrl+5 Cmd+5
Close the current panel Ctrl+W Cmd+W
Maximize/Restore panel under cursor `(backtick) `(backtick)
Maximize/Restore current panel Shift+` Shift+`
Maximize/Restore panel under cursor (Non- < <
English Keyboards)
Maximize/Restore current panel (Non-English Shift+< Shift+<
Keyboards)
Navigation shortcuts
Result Windows Mac OS
Open/close folder Right and Left Arrows Right and Left Arrows
Select previous/next item in list Up and Down Arrows Up and Down Arrows
Last updated 3/8/2018You can also read