MACE - Dec 23, 2020 - MACE documentation
←
→
Page content transcription
If your browser does not render page correctly, please read the page content below
MACE

Dec 23, 2020
Introduction

1 Introduction 3

2 Environment requirement 5

3 Using docker 7

4 Manual setup 9

5 Basic usage for CMake users 11

6 Basic usage for Bazel users 15

7 Advanced usage for CMake users 25

8 Advanced usage for Bazel users 35

9 Benchmark usage 47

10 Operator lists 53

11 Quantization 55

12 Contributing guide 59

13 Adding a new Op 61

14 How to run tests 65

15 How to debug 67

16 Memory layout 71

17 Data Format 73

18 Dynamic LSTM 75

19 Basic usage for Micro Controllers 79

20 Frequently asked questions 83

 i
21 中文 87

ii
MACE

Welcome to Mobile AI Compute Engine documentation.
The main documentation is organized into the following sections:

Introduction 1
MACE

2 Introduction
CHAPTER 1

 Introduction

MACE (Mobile AI Compute Engine) is a deep learning inference framework optimized for mobile heterogeneous
computing platforms. MACE provides tools and documents to help users to deploy deep learning models to mobile
phones, tablets, personal computers and IoT devices.

1.1 Architecture

The following figure shows the overall architecture.

1.1.1 MACE Model

MACE defines a customized model format which is similar to Caffe2. The MACE model can be converted from
exported models by TensorFlow, Caffe or ONNX Model.

1.1.2 MACE Interpreter

Mace Interpreter mainly parses the NN graph and manages the tensors in the graph.

1.1.3 Runtime

CPU/GPU/DSP runtime correspond to the Ops for different devices.

 3
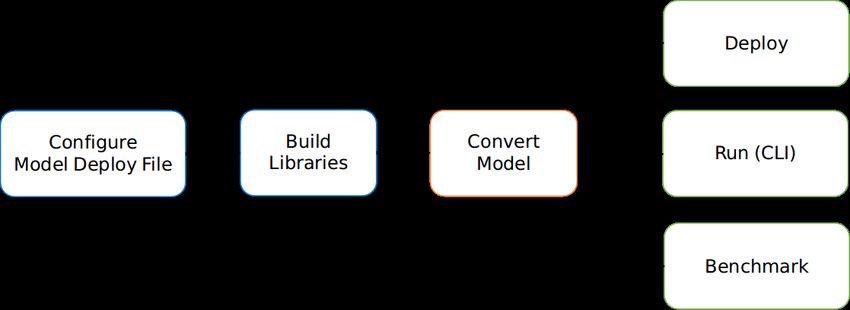
MACE

1.2 Workflow

The following figure shows the basic work flow of MACE.

1.2.1 1. Configure model deployment file

Model deploy configuration file (.yml) describes the information of the model and library, MACE will build the library
based on the file.

1.2.2 2. Build libraries

Build MACE dynamic or static libraries.

1.2.3 3. Convert model

Convert TensorFlow, Caffe or ONNX model to MACE model.

1.2.4 4.1. Deploy

Integrate the MACE library into your application and run with MACE API.

1.2.5 4.2. Run (CLI)

MACE provides mace_run command line tool, which could be used to run model and validate model correctness
against original TensorFlow or Caffe results.

1.2.6 4.3. Benchmark

MACE provides benchmark tool to get the Op level profiling result of the model.

4 Chapter 1. Introduction
CHAPTER 2

 Environment requirement

MACE requires the following dependencies:

2.1 Required dependencies

 Soft- Installation command Tested version
 ware
 Python 2.7 or 3.6
 CMake Linux:apt-get install cmake Mac:brew install >= 3.11.3
 cmake
 Jinja2 pip install jinja2==2.10 2.10
 PyYaml pip install pyyaml==3.12 3.12.0
 sh pip install sh==1.12.14 1.12.14
 Numpy pip install numpy==1.14.0 Required by model validation
 six pip install six==1.11.0 Required for Python 2 and 3 compat-
 ibility

For Bazel, install it following installation guide. For python dependencies,

 pip install -U --user -r setup/requirements.txt

 5
MACE

2.2 Optional dependencies

 Software Installation command Remark
 Android NDK NDK installation guide Required by Android build, r15b or
 higher version for bazel users, r17b
 or higher version for cmake users.
 Bazel bazel installation guide 0.13.0
 ADB Required by Android run, >= 1.0.32
 Linux:apt-get install
 android-tools-adb
 Mac:brew cask install
 android-platform-tools

 TensorFlow pip install tensorflow==1.8.0 Required by TensorFlow model
 Docker docker installation guide Required by docker mode for Caffe
 model
 Scipy pip install scipy==1.0.0 Required by model validation
 FileLock pip install filelock==3.0.0 Required by run on Android
 ONNX pip install onnx==1.5.0 Required by ONNX model

For python dependencies,

 pip install -U --user -r setup/optionals.txt

Note:
 • For Android build, ANDROID_NDK_HOME must be configured by using export ANDROID_NDK_HOME=/
 path/to/ndk.
 • It will link libc++ instead of gnustl if NDK version >= r17b and bazel version >= 0.13.0,
 please refer to NDK cpp-support.
 • For Mac, please install Homebrew at first before installing other dependencies. Set ANDROID_NDK_HOME
 in /etc/bashrc and then run source /etc/bashrc. This installation was tested with macOS Mo-
 jave(10.14).

6 Chapter 2. Environment requirement
CHAPTER 3

 Using docker

3.1 Pull or build docker image

MACE provides docker images with dependencies installed and also Dockerfiles for images building, you can pull
the existing ones directly or build them from the Dockerfiles. In most cases, the lite edition image can satisfy
developer’s basic needs.

Note: It’s highly recommended to pull built images.

 • lite edition docker image.

# You can pull lite edition docker image from docker repo (recommended)
docker pull registry.cn-hangzhou.aliyuncs.com/xiaomimace/mace-dev-lite
# Or build lite edition docker image by yourself
docker build -t registry.cn-hangzhou.aliyuncs.com/xiaomimace/mace-dev-lite ./docker/
 ˓→mace-dev-lite

 • full edition docker image (which contains multiple NDK versions and other dev tools).

# You can pull full edition docker image from docker repo (recommended)
docker pull registry.cn-hangzhou.aliyuncs.com/xiaomimace/mace-dev
# Or build full edition docker image by yourself
docker build -t registry.cn-hangzhou.aliyuncs.com/xiaomimace/mace-dev ./docker/mace-
 ˓→dev

Note: We will show steps with lite edition later.

 7
MACE

3.2 Using the image

Create container with the following command

# Create a container named `mace-dev`
docker run -it --privileged -d --name mace-dev \
 -v /dev/bus/usb:/dev/bus/usb --net=host \
 -v /local/path:/container/path \
 -v /usr/bin/docker:/usr/bin/docker \
 -v /var/run/docker.sock:/var/run/docker.sock \
 registry.cn-hangzhou.aliyuncs.com/xiaomimace/mace-dev-lite
# Execute an interactive bash shell on the container
docker exec -it mace-dev /bin/bash

3.3 Update images to repository

If you are mace inner developer and need update images in remote repository, it can be achieved by
docker/update_images.sh script.

cd docker/
./update_images.sh

8 Chapter 3. Using docker
CHAPTER 4

 Manual setup

The setup steps are based on Ubuntu, you can change the commands correspondingly for other systems. For the
detailed installation dependencies, please refer to Environment requirement.

4.1 Install Bazel

Recommend bazel with version larger than 0.13.0 (Refer to Bazel documentation).

export BAZEL_VERSION=0.13.1
mkdir /bazel && \
 cd /bazel && \
 wget https://github.com/bazelbuild/bazel/releases/download/$BAZEL_VERSION/bazel-
 ˓→$BAZEL_VERSION-installer-linux-x86_64.sh && \

 chmod +x bazel-*.sh && \
 ./bazel-$BAZEL_VERSION-installer-linux-x86_64.sh && \
 cd / && \
 rm -f /bazel/bazel-$BAZEL_VERSION-installer-linux-x86_64.sh

4.2 Install Android NDK

The recommended Android NDK versions includes r15b, r15c and r16b (Refers to NDK installation guide).

# Download NDK r15c
cd /opt/ && \
 wget -q https://dl.google.com/android/repository/android-ndk-r15c-linux-x86_64.
 ˓→zip && \

 unzip -q android-ndk-r15c-linux-x86_64.zip && \
 rm -f android-ndk-r15c-linux-x86_64.zip

export ANDROID_NDK_VERSION=r15c
 (continues on next page)

 9
MACE

 (continued from previous page)
export ANDROID_NDK=/opt/android-ndk-${ANDROID_NDK_VERSION}
export ANDROID_NDK_HOME=${ANDROID_NDK}

# add to PATH
export PATH=${PATH}:${ANDROID_NDK_HOME}

4.3 Install extra tools

apt-get install -y --no-install-recommends \
 cmake \
 android-tools-adb
pip install -i http://pypi.douban.com/simple/ --trusted-host pypi.douban.com
 ˓→setuptools

pip install -i http://pypi.douban.com/simple/ --trusted-host pypi.douban.com \
 "numpy>=1.14.0" \
 scipy \
 jinja2 \
 pyyaml \
 sh==1.12.14 \
 pycodestyle==2.4.0 \
 filelock

4.4 Install TensorFlow (Optional)

pip install -i http://pypi.douban.com/simple/ --trusted-host pypi.douban.com
 ˓→tensorflow==1.8.0

4.5 Install Caffe (Optional)

Please follow the installation instruction of Caffe.

4.6 Install ONNX (Optional)

Please follow the installation instruction of ONNX.

10 Chapter 4. Manual setup
CHAPTER 5 Basic usage for CMake users First of all, make sure the environment has been set up correctly already (refer to Environment requirement). 5.1 Clear Workspace Before you do anything, clear the workspace used by build and test process. tools/clear_workspace.sh [--expunge] 5.2 Build Engine Please make sure you have CMake installed. RUNTIME=GPU QUANTIZE=OFF bash tools/cmake/cmake-build-armeabi-v7a.sh which generate libraries in build/cmake-build/armeabi-v7a, you can use either static libraries or the libmace.so shared library. You can also build for other target abis: arm64-v8a, arm-linux-gnueabihf, aarch64-linux-gnu, host; and runtime: GPU, HEXAGON, HTA, APU. 5.3 Model Conversion When you have prepared your model, the first thing to do is write a model config in YAML format. models: mobilenet_v1: platform: tensorflow (continues on next page) 11
MACE

 (continued from previous page)
 model_file_path: https://cnbj1.fds.api.xiaomi.com/mace/miai-models/
 ˓→mobilenet-v1/mobilenet-v1-1.0.pb

 model_sha256_checksum:
 ˓→71b10f540ece33c49a7b51f5d4095fc9bd78ce46ebf0300487b2ee23d71294e6

 subgraphs:
 - input_tensors:
 - input
 input_shapes:
 - 1,224,224,3
 output_tensors:
 - MobilenetV1/Predictions/Reshape_1
 output_shapes:
 - 1,1001
 runtime: gpu

The following steps generate output to build directory which is the default build and test workspace. Suppose you
have the model config in ../mace-models/mobilenet-v1/mobilenet-v1.yml. Then run

 python tools/python/convert.py --config ../mace-models/mobilenet-v1/
 ˓→mobilenet-v1.yml

which generate 4 files in build/mobilenet_v1/model/

 mobilenet_v1.pb (model file)
 mobilenet_v1.data (param file)
 mobilenet_v1_index.html (visualization page, you can open it in
 ˓→browser)

 mobilenet_v1.pb_txt (model text file, which can be for debug
 ˓→use)

MACE also supports other platform: caffe, onnx. Beyond GPU, users can specify cpu, dsp to run on other target
devices.

5.4 Model Test and Benchmark

We provide simple tools to test and benchmark your model.
After model is converted, simply run

 python tools/python/run_model.py --config ../mace-models/mobilenet-v1/
 ˓→mobilenet-v1.yml --validate

Or benchmark the model

 python tools/python/run_model.py --config ../mace-models/mobilenet-v1/
 ˓→mobilenet-v1.yml --benchmark

It will test your model on the device configured in the model config (runtime). You can also test on other device by
specify --runtime=cpu (dsp/hta/apu) when you run test if you previously build engine for the device. The
log will be shown if --vlog_level=2 is specified.

12 Chapter 5. Basic usage for CMake users
MACE

5.5 Deploy your model into applications

Please refer to mace/tools/mace_run.ccfor full usage. The following list the key steps.

// Include the headers
#include "mace/public/mace.h"

// 0. Declare the device type (must be same with ``runtime`` in configuration file)
DeviceType device_type = DeviceType::GPU;

// 1. configuration
MaceStatus status;
MaceEngineConfig config(device_type);
std::shared_ptr gpu_context;
// Set the path to store compiled OpenCL kernel binaries.
// please make sure your application have read/write rights of the directory.
// this is used to reduce the initialization time since the compiling is too slow.
// It's suggested to set this even when pre-compiled OpenCL program file is provided
// because the OpenCL version upgrade may also leads to kernel recompilations.
const std::string storage_path ="path/to/storage";
gpu_context = GPUContextBuilder()
 .SetStoragePath(storage_path)
 .Finalize();
config.SetGPUContext(gpu_context);
config.SetGPUHints(
 static_cast(GPUPerfHint::PERF_NORMAL),
 static_cast(GPUPriorityHint::PRIORITY_LOW));

// 2. Define the input and output tensor names.
std::vector input_names = {...};
std::vector output_names = {...};

// 3. Create MaceEngine instance
std::shared_ptr engine;
MaceStatus create_engine_status;

// Create Engine from model file
create_engine_status =
 CreateMaceEngineFromProto(model_graph_proto,
 model_graph_proto_size,
 model_weights_data,
 model_weights_data_size,
 input_names,
 output_names,
 device_type,
 &engine);
if (create_engine_status != MaceStatus::MACE_SUCCESS) {
 // fall back to other strategy.
}

// 4. Create Input and Output tensor buffers
std::map inputs;
std::map outputs;
for (size_t i = 0; i < input_count; ++i) {
 // Allocate input and output
 int64_t input_size =
 std::accumulate(input_shapes[i].begin(), input_shapes[i].end(), 1,
 (continues on next page)

5.5. Deploy your model into applications 13
MACE
(continued from previous page)
std::multiplies());
auto buffer_in = std::shared_ptr(new float[input_size],
std::default_delete());
// Load input here
// ...
inputs[input_names[i]] = mace::MaceTensor(input_shapes[i], buffer_in);
}
for (size_t i = 0; i < output_count; ++i) {
int64_t output_size =
std::accumulate(output_shapes[i].begin(), output_shapes[i].end(), 1,
std::multiplies());
auto buffer_out = std::shared_ptr(new float[output_size],
std::default_delete());
outputs[output_names[i]] = mace::MaceTensor(output_shapes[i], buffer_out);
}
// 5. Run the model
MaceStatus status = engine.Run(inputs, &outputs);
More details are in Advanced usage for CMake users.
14 Chapter 5. Basic usage for CMake usersCHAPTER 6
Basic usage for Bazel users
6.1 Build and run an example model
At first, make sure the environment has been set up correctly already (refer to ../installation/env_requirement.rst).
The followings are instructions about how to quickly build and run a provided model in MACE Model Zoo.
Here we use the mobilenet-v2 model as an example.
Commands
1. Pull MACE project.
git clone https://github.com/XiaoMi/mace.git
cd mace/
git fetch --all --tags --prune
# Checkout the latest tag (i.e. release version)
tag_name=`git describe --abbrev=0 --tags`
git checkout tags/${tag_name}
Note: It’s highly recommended to use a release version instead of master branch.
2. Pull MACE Model Zoo project.
git clone https://github.com/XiaoMi/mace-models.git
3. Build a generic MACE library.
cd path/to/mace
# Build library
# output lib path: build/lib
bash tools/bazel_build_standalone_lib.sh [-abi=abi][-runtimes=rt1,rt2,...][-
˓→quantize][-static]
15MACE Note: • This step can be skipped if you just want to run a model using tools/converter.py, such as commands in step 5. • Use the -abi parameter to specify the ABI. Supported ABIs are armeabi-v7a, arm64-v8a, arm_linux_gnueabihf, aarch64_linux_gnu and host (for host machine, linux-x86-64). The default ABI is arm64-v8a. • For each ABI, several runtimes can be chosen by specifying the -runtimes parameter. Supported runtimes are CPU, GPU, DSP and APU. By default, the library is built to run on CPU. • Omit the -static option if a shared library is desired instead of a static one. By default, a shared library is built. • See ’bash tools/bazel_build_standalone_lib.sh -help’ for detailed information. • DO respect the hyphens (’-’) and the underscores (’_’) in the ABI. 4. Convert the pre-trained mobilenet-v2 model to MACE format model. cd path/to/mace # Build library python tools/converter.py convert --config=/path/to/mace-models/mobilenet-v2/ ˓→mobilenet-v2.yml 5. Run the model. Note: If you want to run on phone, please plug in at least one phone. Or if you want to run on embedded device, please give a Advanced usage for Bazel users. # Run python tools/converter.py run --config=/path/to/mace-models/mobilenet-v2/ ˓→mobilenet-v2.yml # Test model run time python tools/converter.py run --config=/path/to/mace-models/mobilenet-v2/ ˓→mobilenet-v2.yml --round=100 # Validate the correctness by comparing the results against the # original model and framework, measured with cosine distance for similarity. python tools/converter.py run --config=/path/to/mace-models/mobilenet-v2/ ˓→mobilenet-v2.yml --validate 6.2 Build your own model This part will show you how to use your own pre-trained model in MACE. 6.2.1 1. Prepare your model MACE now supports models from TensorFlow and Caffe (more frameworks will be supported). 16 Chapter 6. Basic usage for Bazel users
MACE

 • TensorFlow
 Prepare your pre-trained TensorFlow model.pb file.
 • Caffe
 Caffe 1.0+ models are supported in MACE converter tool.
 If your model is from lower version Caffe, you need to upgrade it by using the Caffe built-in tool before con-
 verting.

 # Upgrade prototxt
 $CAFFE_ROOT/build/tools/upgrade_net_proto_text MODEL.prototxt MODEL.new.prototxt

 # Upgrade caffemodel
 $CAFFE_ROOT/build/tools/upgrade_net_proto_binary MODEL.caffemodel MODEL.new.
 ˓→caffemodel

 • ONNX
 Prepare your ONNX model.onnx file.
 Use ONNX Optimizer Tool to optimize your model for inference. This tool will improve the efficiency of
 inference like the Graph Transform Tool in TensorFlow.

 # Optimize your model
 $python MACE_ROOT/tools/onnx_optimizer.py model.onnx model_opt.onnx

6.2.2 2. Create a deployment file for your model

When converting a model or building a library, MACE needs to read a YAML file which is called model deployment
file here.
A model deployment file contains all the information of your model(s) and building options. There are several example
deployment files in MACE Model Zoo project.
The following shows two basic usage of deployment files for TensorFlow and Caffe models. Modify one of them and
use it for your own case.
 • TensorFlow

 # The name of library
 library_name: mobilenet
 target_abis: [arm64-v8a]
 model_graph_format: file
 model_data_format: file
 models:
 mobilenet_v1: # model tag, which will be used in model loading and must be
 ˓→specific.

 platform: tensorflow
 # path to your tensorflow model's pb file. Support local path, http:// and
 ˓→https://

 model_file_path: https://cnbj1.fds.api.xiaomi.com/mace/miai-models/mobilenet-
 ˓→v1/mobilenet-v1-1.0.pb

 # sha256_checksum of your model's pb file.
 # use this command to get the sha256_checksum: sha256sum path/to/your/pb/file
 model_sha256_checksum:
 ˓→71b10f540ece33c49a7b51f5d4095fc9bd78ce46ebf0300487b2ee23d71294e6

 # define your model's interface
 (continues on next page)

6.2. Build your own model 17
MACE

 (continued from previous page)
 # if there multiple inputs or outputs, write like blow:
 # subgraphs:
 # - input_tensors:
 # - input0
 # - input1
 # input_shapes:
 # - 1,224,224,3
 # - 1,224,224,3
 # output_tensors:
 # - output0
 # - output1
 # output_shapes:
 # - 1,1001
 # - 1,1001
 subgraphs:
 - input_tensors:
 - input
 input_shapes:
 - 1,224,224,3
 output_tensors:
 - MobilenetV1/Predictions/Reshape_1
 output_shapes:
 - 1,1001
 # cpu, gpu or cpu+gpu
 runtime: cpu+gpu
 winograd: 0

 • Caffe
 # The name of library
 library_name: squeezenet-v10
 target_abis: [arm64-v8a]
 model_graph_format: file
 model_data_format: file
 models:
 squeezenet-v10: # model tag, which will be used in model loading and must be
 ˓→specific.

 platform: caffe
 # support local path, http:// and https://
 model_file_path: https://cnbj1.fds.api.xiaomi.com/mace/miai-models/squeezenet/
 ˓→squeezenet-v1.0.prototxt

 weight_file_path: https://cnbj1.fds.api.xiaomi.com/mace/miai-models/
 ˓→squeezenet/squeezenet-v1.0.caffemodel

 # sha256_checksum of your model's graph and data files.
 # get the sha256_checksum: sha256sum path/to/your/file
 model_sha256_checksum:
 ˓→db680cf18bb0387ded9c8e9401b1bbcf5dc09bf704ef1e3d3dbd1937e772cae0

 weight_sha256_checksum:
 ˓→9ff8035aada1f9ffa880b35252680d971434b141ec9fbacbe88309f0f9a675ce

 # define your model's interface
 # if there multiple inputs or outputs, write like blow:
 # subgraphs:
 # - input_tensors:
 # - input0
 # - input1
 # input_shapes:
 # - 1,224,224,3
 (continues on next page)

18 Chapter 6. Basic usage for Bazel users
MACE

 (continued from previous page)
 # - 1,224,224,3
 # output_tensors:
 # - output0
 # - output1
 # output_shapes:
 # - 1,1001
 # - 1,1001
 subgraphs:
 - input_tensors:
 - data
 input_shapes:
 - 1,227,227,3
 output_tensors:
 - prob
 output_shapes:
 - 1,1,1,1000
 runtime: cpu+gpu
 winograd: 0

 • ONNX
 # The name of library
 library_name: mobilenet
 target_abis: [arm64-v8a]
 model_graph_format: file
 model_data_format: file
 models:
 mobilenet_v1: # model tag, which will be used in model loading and must be
 ˓→specific.

 platform: onnx
 # path to your onnx model file. Support local path, http:// and https://
 model_file_path: https://cnbj1.fds.api.xiaomi.com/mace/miai-models/mobilenet-
 ˓→v1/mobilenet-v1-1.0.pb

 # sha256_checksum of your model's onnx file.
 # use this command to get the sha256_checksum: sha256sum path/to/your/pb/file
 model_sha256_checksum:
 ˓→71b10f540ece33c49a7b51f5d4095fc9bd78ce46ebf0300487b2ee23d71294e6

 # define your model's interface
 # if there multiple inputs or outputs, write like blow:
 # subgraphs:
 # - input_tensors:
 # - input0
 # - input1
 # input_shapes:
 # - 1,224,224,3
 # - 1,224,224,3
 # output_tensors:
 # - output0
 # - output1
 # output_shapes:
 # - 1,1001
 # - 1,1001
 subgraphs:
 - input_tensors:
 - input
 input_shapes:
 - 1,224,224,3
 (continues on next page)

6.2. Build your own model 19
MACE

 (continued from previous page)
 output_tensors:
 - MobilenetV1/Predictions/Reshape_1
 output_shapes:
 - 1,1001
 # onnx backend framwork for validation. Suppport pytorch/caffe/tensorflow.
 ˓→ Default is tensorflow.
 backend: tensorflow
 # cpu, gpu or cpu+gpu
 runtime: cpu+gpu
 winograd: 0

More details about model deployment file are in Advanced usage for Bazel users.

6.2.3 3. Convert your model

When the deployment file is ready, you can use MACE converter tool to convert your model(s).

python tools/converter.py convert --config=/path/to/your/model_deployment_file.yml

This command will download or load your pre-trained model and convert it to a MACE model proto file and weights
data file. The generated model files will be stored in build/${library_name}/model folder.

 Warning: Please set model_graph_format: file and model_data_format: file in your de-
 ployment file before converting. The usage of model_graph_format: code will be demonstrated in Ad-
 vanced usage for Bazel users.

6.2.4 4. Build MACE into a library

You could Download the prebuilt MACE Library from Github MACE release page.
Or use bazel to build MACE source code into a library.

 cd path/to/mace
 # Build library
 # output lib path: build/lib
 bash tools/bazel_build_standalone_lib.sh [-abi=abi][-runtimes=rt1,rt2,...][-
 ˓→static]

The above command will generate static library build/lib/libmace.a dynamic library build/lib/
libmace.so.

 Warning: Please verify that the -abi param in the above command is the same as the target_abi param
 in your deployment file.

6.2.5 5. Run your model

With the converted model, the static or shared library and header files, you can use the following commands to run
and validate your model.

20 Chapter 6. Basic usage for Bazel users
MACE
Warning: If you want to run on device/phone, please plug in at least one device/phone.
• run
run the model.
# Test model run time
python tools/converter.py run --config=/path/to/your/model_deployment_
˓→file.yml --round=100
# Validate the correctness by comparing the results against the
# original model and framework, measured with cosine distance for
˓→similarity.
python tools/converter.py run --config=/path/to/your/model_deployment_
˓→file.yml --validate
# If you want to run model on specified arm linux device, you should put
˓→device config file in the working directory or run with flag `--device_
˓→yml`
python tools/converter.py run --config=/path/to/your/model_deployment_
˓→file.yml --device_yml=/path/to/devices.yml
• benchmark
benchmark and profile the model. the details are in Benchmark usage.
# Benchmark model, get detailed statistics of each Op.
python tools/converter.py run --config=/path/to/your/model_deployment_
˓→file.yml --benchmark
6.2.6 6. Deploy your model into applications
You could run model on CPU, GPU and DSP (based on the runtime in your model deployment file). However, there
are some differences in different devices.
• CPU
Almost all of mobile SoCs use ARM-based CPU architecture, so your model could run on different
SoCs in theory.
• GPU
Although most GPUs use OpenCL standard, but there are some SoCs not fully complying with the
standard, or the GPU is too low-level to use. So you should have some fallback strategies when the
GPU run failed.
• DSP
MACE only supports Qualcomm DSP. And you need to push the hexagon nn library to the device.
# For Android device
adb root; adb remount
adb push third_party/nnlib/v6x/libhexagon_nn_skel.so /system/vendor/lib/
˓→rfsa/adsp/
In the converting and building steps, you’ve got the static/shared library, model files and header files.
${library_name} is the name you defined in the first line of your deployment YAML file.
6.2. Build your own model 21MACE
Note: When linking generated libmace.a into shared library, version script is helpful for reducing a specified set
of symbols to local scope.
• The generated static library files are organized as follows,
build
include
mace
public
mace.h
lib
libmace.a (for static library)
libmace.so (for shared library)
libhexagon_controller.so (for DSP runtime)
mobilenet-v1
model
mobilenet_v1.data
mobilenet_v1.pb
_tmp
arm64-v8a
mace_run_static
Please refer to mace/tools/mace_run.ccfor full usage. The following list the key steps.
// Include the headers
#include "mace/public/mace.h"
// 0. Declare the device type (must be same with ``runtime`` in configuration file)
DeviceType device_type = DeviceType::GPU;
// 1. configuration
MaceStatus status;
MaceEngineConfig config(device_type);
std::shared_ptr gpu_context;
// Set the path to store compiled OpenCL kernel binaries.
// please make sure your application have read/write rights of the directory.
// this is used to reduce the initialization time since the compiling is too slow.
// It's suggested to set this even when pre-compiled OpenCL program file is provided
// because the OpenCL version upgrade may also leads to kernel recompilations.
const std::string storage_path ="path/to/storage";
gpu_context = GPUContextBuilder()
.SetStoragePath(storage_path)
.Finalize();
config.SetGPUContext(gpu_context);
config.SetGPUHints(
static_cast(GPUPerfHint::PERF_NORMAL),
static_cast(GPUPriorityHint::PRIORITY_LOW));
// 2. Define the input and output tensor names.
std::vector input_names = {...};
std::vector output_names = {...};
// 3. Create MaceEngine instance
std::shared_ptr engine;
MaceStatus create_engine_status;
(continues on next page)
22 Chapter 6. Basic usage for Bazel usersMACE
(continued from previous page)
// Create Engine from model file
create_engine_status =
CreateMaceEngineFromProto(model_graph_proto,
model_graph_proto_size,
model_weights_data,
model_weights_data_size,
input_names,
output_names,
device_type,
&engine);
if (create_engine_status != MaceStatus::MACE_SUCCESS) {
// fall back to other strategy.
}
// 4. Create Input and Output tensor buffers
std::map inputs;
std::map outputs;
for (size_t i = 0; i < input_count; ++i) {
// Allocate input and output
int64_t input_size =
std::accumulate(input_shapes[i].begin(), input_shapes[i].end(), 1,
std::multiplies());
auto buffer_in = std::shared_ptr(new float[input_size],
std::default_delete());
// Load input here
// ...
inputs[input_names[i]] = mace::MaceTensor(input_shapes[i], buffer_in);
}
for (size_t i = 0; i < output_count; ++i) {
int64_t output_size =
std::accumulate(output_shapes[i].begin(), output_shapes[i].end(), 1,
std::multiplies());
auto buffer_out = std::shared_ptr(new float[output_size],
std::default_delete());
outputs[output_names[i]] = mace::MaceTensor(output_shapes[i], buffer_out);
}
// 5. Run the model
MaceStatus status = engine.Run(inputs, &outputs);
More details are in Advanced usage for Bazel users.
6.2. Build your own model 23MACE 24 Chapter 6. Basic usage for Bazel users
CHAPTER 7

 Advanced usage for CMake users

This part contains the full usage of MACE.

7.1 Deployment file

There are many advanced options supported.
 • Example
 Here is an example deployment file with two models.
 models:
 mobilenet_v1:
 platform: tensorflow
 model_file_path: https://cnbj1.fds.api.xiaomi.com/mace/miai-models/
 ˓→mobilenet-v1/mobilenet-v1-1.0.pb

 model_sha256_checksum:
 ˓→71b10f540ece33c49a7b51f5d4095fc9bd78ce46ebf0300487b2ee23d71294e6

 subgraphs:
 - input_tensors:
 - input
 input_shapes:
 - 1,224,224,3
 output_tensors:
 - MobilenetV1/Predictions/Reshape_1
 output_shapes:
 - 1,1001
 validation_inputs_data:
 - https://cnbj1.fds.api.xiaomi.com/mace/inputs/dog.npy
 runtime: cpu+gpu
 limit_opencl_kernel_time: 0
 obfuscate: 0
 winograd: 0
 squeezenet_v11:
 (continues on next page)

 25
MACE

 (continued from previous page)
 platform: caffe
 model_file_path: http://cnbj1-inner-fds.api.xiaomi.net/mace/mace-
 ˓→models/squeezenet/SqueezeNet_v1.1/model.prototxt

 weight_file_path: http://cnbj1-inner-fds.api.xiaomi.net/mace/mace-
 ˓→models/squeezenet/SqueezeNet_v1.1/weight.caffemodel

 model_sha256_checksum:
 ˓→625c952063da1569e22d2f499dc454952244d42cd8feca61f05502566e70ae1c

 weight_sha256_checksum:
 ˓→72b912ace512e8621f8ff168a7d72af55910d3c7c9445af8dfbff4c2ee960142

 subgraphs:
 - input_tensors:
 - data
 input_shapes:
 - 1,227,227,3
 output_tensors:
 - prob
 output_shapes:
 - 1,1,1,1000
 accuracy_validation_script:
 - path/to/your/script
 runtime: cpu+gpu
 limit_opencl_kernel_time: 0
 obfuscate: 0
 winograd: 0

 • Configurations

26 Chapter 7. Advanced usage for CMake users
MACE

 Options Usage
 model_name model name should be unique if there are more than one models. LIMIT: if build_type is code,
 model_name will be used in c++ code so that model_name must comply with c++ name speci-
 fication.
 platform The source framework, tensorflow or caffe.
 model_file_pathThe path of your model file which can be local path or remote URL.
 model_sha256_checksum
 The SHA256 checksum of the model file.
 weight_file_path[optional] The path of Caffe model weights file.
 weight_sha256_checksum
 [optional] The SHA256 checksum of Caffe model weights file.
 subgraphs subgraphs key. DO NOT EDIT
 in- The input tensor name(s) (tensorflow) or top name(s) of inputs’ layer (caffe). If there are more than
 put_tensors one tensors, use one line for a tensor.
 out- The output tensor name(s) (tensorflow) or top name(s) of outputs’ layer (caffe). If there are more
 put_tensors than one tensors, use one line for a tensor.
 in- The shapes of the input tensors, default is NHWC order.
 put_shapes
 out- The shapes of the output tensors, default is NHWC order.
 put_shapes
 in- The numerical range of the input tensors’ data, default [-1, 1]. It is only for test.
 put_ranges
 valida- [optional] Specify Numpy validation inputs. When not provided, [-1, 1] random values will be
 tion_inputs_dataused.
 accu- [optional] Specify the accuracy validation script as a plugin to test accuracy, see doc.
 racy_validation_script
 valida- [optional] Specify the similarity threshold for validation. A dict with key in ’CPU’, ’GPU’ and/or
 tion_threshold ’HEXAGON’ and value
MACE

# Get device's soc info.
adb shell getprop | grep platform

# command for generating sha256_sum
sha256sum /path/to/your/file

7.2 Advanced usage

There are three common advanced use cases:
 • run your model on the embedded device(ARM LINUX)
 • converting model to C++ code.
 • tuning GPU kernels for a specific SoC.

7.3 Run you model on the embedded device(ARM Linux)

The way to run your model on the ARM Linux is nearly same as with android, except you need specify a device config
file.
 python tools/python/run_model.py --config ../mace-models/mobilenet-v1/
 ˓→mobilenet-v1.yml --validate --device_yml=/path/to/devices.yml

There are two steps to do before run:
 1. configure login without password
 MACE use ssh to connect embedded device, you should copy your public key to embedded device
 with the blow command.
 cat ~/.ssh/id_rsa.pub | ssh -q {user}@{ip} "cat >> ~/.ssh/authorized_keys"

 2. write your own device yaml configuration file.
 • Example
 Here is an device yaml config demo.
 # one yaml config file can contain multi device info
 devices:
 # The name of the device
 nanopi:
 # arm64 or armhf
 target_abis: [arm64, armhf]
 # device soc, you can get it from device manual
 target_socs: RK3399
 # device model full name
 models: FriendlyElec Nanopi M4
 # device ip address
 address: 10.0.0.0
 # login username
 username: user
 raspberry:
 (continues on next page)

28 Chapter 7. Advanced usage for CMake users
MACE (continued from previous page) target_abis: [armv7l] target_socs: BCM2837 models: Raspberry Pi 3 Model B Plus Rev 1.3 address: 10.0.0.1 username: user • Configuration The detailed explanation is listed in the blow table. Op- Usage tions tar- Device supported abis, you can get it via dpkg --print-architecture and dpkg get_abis--print-foreign-architectures command, if more than one abi is supported, separate them by commas. tar- device soc, you can get it from device manual, we haven’t found a way to get it in shell. get_socs mod- device models full name, you can get via get lshw command (third party package, install els it via your package manager). see it’s product value. ad- Since we use ssh to connect device, ip address is required. dress user- login username, required. name 7.4 Model Protection Model can be encrypted by obfuscation. python tools/python/encrypt.py --config ../mace-models/mobilenet-v1/ ˓→mobilenet-v1.yml It will override mobilenet_v1.pb and mobilenet_v1.data. If you want to compiled the model into a library, you should use options --gencode_model --gencode_param to generate model code, i.e., python tools/python/encrypt.py --config ../mace-models/mobilenet-v1/ ˓→mobilenet-v1.yml --gencode_model --gencode_param It will generate model code into mace/codegen/models and also generate a helper function CreateMaceEngineFromCode in mace/codegen/engine/mace_engine_factory.h by which you can create an engine with models built in it. After that you can rebuild the engine. RUNTIME=GPU RUNMODE=code QUANTIZE=OFF bash tools/cmake/cmake-build-armeabi- ˓→v7a.sh RUNMODE=code means you compile and link model library with MACE engine. When you test the model in code format, you should specify it in the script as follows. python tools/python/run_model.py --config ../mace-models/mobilenet-v1/ ˓→mobilenet-v1.yml --gencode_model --gencode_param Of course you can generate model code only, and use parameter file. 7.4. Model Protection 29
MACE

When you need to integrate the libraries into your applications, you can link libmace_static.a and libmodel.a to your
target. These are under the directory: build/cmake-build/armeabi-v7a/install/lib/, the header files
you need are under build/cmake-build/armeabi-v7a/install/include.
Refer to mace/tools/mace_run.ccfor full usage. The following list the key steps.

 // Include the headers
 #include "mace/public/mace.h"
 // If the model_graph_format is code
 #include "mace/public/${model_name}.h"
 #include "mace/public/mace_engine_factory.h"

 // ... Same with the code in basic usage

 // 4. Create MaceEngine instance
 std::shared_ptr engine;
 MaceStatus create_engine_status;
 // Create Engine from compiled code
 create_engine_status =
 CreateMaceEngineFromCode(model_name.c_str(),
 model_data_ptr, // nullptr if model_data_format
 ˓→is code

 model_data_size, // 0 if model_data_format is
 ˓→code

 input_names,
 output_names,
 device_type,
 &engine);
 if (create_engine_status != MaceStatus::MACE_SUCCESS) {
 // Report error or fallback
 }

 // ... Same with the code in basic usage

7.5 Transform models after conversion

If model_graph_format or model_data_format is specified as file, the model or weight file will be generated
as a .pb or .data file after model conversion. After that, more transformations can be applied to the generated files, such
as compression or encryption. To achieve that, the model loading is split to two stages: 1) load the file from file system
to memory buffer; 2) create the MACE engine from the model buffer. So between the two stages, transformations can
be inserted to decompress or decrypt the model buffer. The transformations are user defined. The following lists the
key steps when both model_graph_format and model_data_format are set as file.

 // Load model graph from file system
 std::unique_ptr model_graph_data =
 make_unique();
 if (FLAGS_model_file != "") {
 auto fs = GetFileSystem();
 status = fs->NewReadOnlyMemoryRegionFromFile(FLAGS_model_file.c_str(),
 &model_graph_data);
 if (status != MaceStatus::MACE_SUCCESS) {
 // Report error or fallback
 }
 }
 // Load model data from file system
 (continues on next page)

30 Chapter 7. Advanced usage for CMake users
MACE
(continued from previous page)
std::unique_ptr model_weights_data =
make_unique();
if (FLAGS_model_data_file != "") {
auto fs = GetFileSystem();
status = fs->NewReadOnlyMemoryRegionFromFile(FLAGS_model_data_file.c_str(),
&model_weights_data);
if (status != MaceStatus::MACE_SUCCESS) {
// Report error or fallback
}
}
if (model_graph_data == nullptr || model_weights_data == nullptr) {
// Report error or fallback
}
std::vector transformed_model_graph_data;
std::vector transformed_model_weights_data;
// Add transformations here.
...
// Release original model data after transformations
model_graph_data.reset();
model_weights_data.reset();
// Create the MACE engine from the model buffer
std::shared_ptr engine;
MaceStatus create_engine_status;
create_engine_status =
CreateMaceEngineFromProto(transformed_model_graph_data.data(),
transformed_model_graph_data.size(),
transformed_model_weights_data.data(),
transformed_model_weights_data.size(),
input_names,
output_names,
config,
&engine);
if (create_engine_status != MaceStatus::MACE_SUCCESS) {
// Report error or fallback
}
7.6 Tuning for specific SoC’s GPU
If you want to use the GPU of a specific device, you can tune the performance for particular devices, which may get
1~10% performance improvement.
You can specify –tune option when you want to run and tune the performance at the same time.
python tools/python/run_model.py --config ../mace-models/mobilenet-v1/
˓→mobilenet-v1.yml --tune
It will generate OpenCL tuned parameter binary file in build/mobilenet_v1/opencl directory.
mobilenet_v1_tuned_opencl_parameter.MIX2S.sdm845.bin
It specifies your test platform model and SoC. You can use it in production to reduce latency on GPU.
To deploy it, change the names of files generated above for not collision and push them to your own device’s directory.
7.6. Tuning for specific SoC’s GPU 31MACE Use like the previous procedure, below lists the key steps differently. // Include the headers #include "mace/public/mace.h" // 0. Declare the device type (must be same with ``runtime`` in ˓→configuration file) DeviceType device_type = DeviceType::GPU; // 1. configuration MaceStatus status; MaceEngineConfig config(device_type); std::shared_ptr gpu_context; const std::string storage_path ="path/to/storage"; gpu_context = GPUContextBuilder() .SetStoragePath(storage_path) .SetOpenCLBinaryPaths(path/to/opencl_binary_paths) .SetOpenCLParameterPath(path/to/opencl_parameter_file) .Finalize(); config.SetGPUContext(gpu_context); config.SetGPUHints( static_cast(GPUPerfHint::PERF_NORMAL), static_cast(GPUPriorityHint::PRIORITY_LOW)); // ... Same with the code in basic usage. 7.7 Multi Model Support (optional) If multiple models are configured in config file. After you test it, it will generate more than one tuned parameter files. Then you need to merge them together. python tools/python/gen_opencl.py After that, it will generate one set of files into build/opencl directory. compiled_opencl_kernel.bin tuned_opencl_parameter.bin You can also generate code into the engine by specify --gencode, after which you should rebuild the engine. 7.8 Validate accuracy of MACE model MACE supports python validation script as a plugin to test the accuracy, the plugin script could be used for below two purpose. 1. Test the accuracy(like Top-1) of MACE model(specifically quantization model) converted from other frame- work(like tensorflow) 2. Show some real output if you want to see it. The script define some interfaces like preprocess and postprocess to deal with input/outut and calculate the accuracy, you could refer to the sample code for detail. the sample code show how to calculate the Top-1 accuracy with imagenet validation dataset. 32 Chapter 7. Advanced usage for CMake users
MACE

7.9 Reduce Library Size

Remove the registration of the ops and delegators unused for your models in the mace/ops/registry/
ops_registry.cc and mace/ops/registry/op_delegators_registry.cc, which will reduce the li-
brary size significantly. the final binary just link the registered ops and delegators’ code.

#include "mace/ops/registry/registry.h"

namespace mace {
namespace ops {
// Just leave the ops used in your models

...

} // namespace ops

void RegisterAllOps(OpRegistry *registry) {
// Just leave the ops used in your models

 ...

 ops::RegisterMyCustomOp(registry);

 ...

}

} // namespace mace

#include "mace/ops/registry/registry.h"

namespace mace {
namespace ops {
// Just leave the delegators used in your ops

...

} // namespace ops

void RegisterAllOpDelegators(OpDelegatorRegistry *registry) {
// Just leave the delegators used in your ops

 ...

 ops::RegisterMyCustomDelegator(registry);

 ...

}

} // namespace mace

7.9. Reduce Library Size 33
MACE 7.10 Reduce Model Size Model file size can be a bottleneck for the deployment of neural networks on mobile devices, so MACE provides several ways to reduce the model size with no or little performance or accuracy degradation. 1. Save model weights in half-precision floating point format The data type of a regular model is float (32bit). To reduce the model weights size, half (16bit) can be used to reduce it by half with negligible accuracy degradation. Therefore, the default storage type for a regular model in MACE is half. However, if the model is very sensitive to accuracy, storage type can be changed to float. In the deployment file, data_type is fp16_fp32 by default and can be changed to fp32_fp32, for CPU it can also be changed to bf16_fp32 and fp16_fp16``(``fp16_fp16 can only be used on armv8.2 or higher version). For CPU, fp16_fp32 means that the weights are saved in half and actual inference is in float, while bf16_fp32 means that the weights are saved in bfloat16 and actual inference is in float, and fp16_fp16 means that the weights are saved in half and actual inference is in half. For GPU, fp16_fp32 means that the ops in GPU take half as inputs and outputs while kernel execution in float. 2. Save model weights in quantized fixed point format Weights of convolutional (excluding depthwise) and fully connected layers take up a major part of model size. These weights can be quantized to 8bit to reduce the size to a quarter, whereas the accuracy usually decreases only by 1%-3%. For example, the top-1 accuracy of MobileNetV1 after quantization of weights is 68.2% on the ImageNet validation set. quantize_large_weights can be specified as 1 in the deployment file to save these weights in 8bit and actual inference in float. It can be used for both CPU and GPU. 34 Chapter 7. Advanced usage for CMake users
CHAPTER 8

 Advanced usage for Bazel users

This part contains the full usage of MACE.

8.1 Overview

As mentioned in the previous part, a model deployment file defines a case of model deployment. The building process
includes parsing model deployment file, converting models, building MACE core library and packing generated model
libraries.

8.2 Deployment file

One deployment file will generate one library normally, but if more than one ABIs are specified, one library will be
generated for each ABI. A deployment file can also contain multiple models. For example, an AI camera application
may contain face recognition, object recognition, and voice recognition models, all of which can be defined in one
deployment file.
 • Example
 Here is an example deployment file with two models.
 # The name of library
 library_name: mobile_squeeze
 # host, armeabi-v7a or arm64-v8a
 target_abis: [arm64-v8a]
 # soc's name or all
 target_socs: [all]
 # The build mode for model(s).
 # 'code' for transferring model(s) into cpp code, 'file' for keeping
 ˓→model(s) in protobuf file(s) (.pb).

 model_graph_format: code
 # 'code' for transferring model data(s) into cpp code, 'file' for keeping
 ˓→model data(s) in file(s) (.data).
 (continues on next page)

 35
MACE

 (continued from previous page)
 model_data_format: code
 # One yaml config file can contain multi models' deployment info.
 models:
 mobilenet_v1:
 platform: tensorflow
 model_file_path: https://cnbj1.fds.api.xiaomi.com/mace/miai-models/
 ˓→mobilenet-v1/mobilenet-v1-1.0.pb

 model_sha256_checksum:
 ˓→71b10f540ece33c49a7b51f5d4095fc9bd78ce46ebf0300487b2ee23d71294e6

 subgraphs:
 - input_tensors:
 - input
 input_shapes:
 - 1,224,224,3
 output_tensors:
 - MobilenetV1/Predictions/Reshape_1
 output_shapes:
 - 1,1001
 validation_inputs_data:
 - https://cnbj1.fds.api.xiaomi.com/mace/inputs/dog.npy
 runtime: cpu+gpu
 limit_opencl_kernel_time: 0
 obfuscate: 0
 winograd: 0
 squeezenet_v11:
 platform: caffe
 model_file_path: http://cnbj1-inner-fds.api.xiaomi.net/mace/mace-
 ˓→models/squeezenet/SqueezeNet_v1.1/model.prototxt

 weight_file_path: http://cnbj1-inner-fds.api.xiaomi.net/mace/mace-
 ˓→models/squeezenet/SqueezeNet_v1.1/weight.caffemodel

 model_sha256_checksum:
 ˓→625c952063da1569e22d2f499dc454952244d42cd8feca61f05502566e70ae1c

 weight_sha256_checksum:
 ˓→72b912ace512e8621f8ff168a7d72af55910d3c7c9445af8dfbff4c2ee960142

 subgraphs:
 - input_tensors:
 - data
 input_shapes:
 - 1,227,227,3
 output_tensors:
 - prob
 output_shapes:
 - 1,1,1,1000
 accuracy_validation_script:
 - path/to/your/script
 runtime: cpu+gpu
 limit_opencl_kernel_time: 0
 obfuscate: 0
 winograd: 0

 • Configurations

 Options Usage
 library_name Library name.
 target_abis The target ABI(s) to build, could be ’host’, ’armeabi-v7a’ or ’arm64-v8a’. If more than one ABIs will b

36 Chapter 8. Advanced usage for Bazel users
MACE

 Table 1 – continued from
 Options Usage
 target_socs [optional] Build for specific SoCs.
 model_graph_format model graph format, could be ’file’ or ’code’. ’file’ for converting model graph to ProtoBuf file(.pb) an
 model_data_format model data format, could be ’file’ or ’code’. ’file’ for converting model weight to data file(.data) and ’c
 model_name model name should be unique if there are more than one models. LIMIT: if build_type is code, mode
 platform The source framework, tensorflow or caffe.
 model_file_path The path of your model file which can be local path or remote URL.
 model_sha256_checksum The SHA256 checksum of the model file.
 weight_file_path [optional] The path of Caffe model weights file.
 weight_sha256_checksum [optional] The SHA256 checksum of Caffe model weights file.
 subgraphs subgraphs key. DO NOT EDIT
 input_tensors The input tensor name(s) (tensorflow) or top name(s) of inputs’ layer (caffe). If there are more than one
 output_tensors The output tensor name(s) (tensorflow) or top name(s) of outputs’ layer (caffe). If there are more than o
 input_shapes The shapes of the input tensors, default is NHWC order.
 output_shapes The shapes of the output tensors, default is NHWC order.
 input_ranges The numerical range of the input tensors’ data, default [-1, 1]. It is only for test.
 validation_inputs_data [optional] Specify Numpy validation inputs. When not provided, [-1, 1] random values will be used.
 accuracy_validation_script [optional] Specify the accuracy validation script as a plugin to test accuracy, see doc.
 validation_threshold [optional] Specify the similarity threshold for validation. A dict with key in ’CPU’, ’GPU’ and/or ’HEX
 backend The onnx backend framework for validation, could be [tensorflow, caffe2, pytorch], default is tensorflow
 runtime The running device, one of [cpu, gpu, dsp, cpu+gpu]. cpu+gpu contains CPU and GPU model definitio
 data_type [optional] The data type used for specified runtime. [fp16_fp32, fp32_fp32] for GPU; [fp16_fp32, bf16
 input_data_types [optional] The input data type for specific op(eg. gather), which can be [int32, float32], default to float3
 input_data_formats [optional] The format of the input tensors, one of [NONE, NHWC, NCHW]. If there is no format of th
 output_data_formats [optional] The format of the output tensors, one of [NONE, NHWC, NCHW]. If there is no format of t
 limit_opencl_kernel_time [optional] Whether splitting the OpenCL kernel within 1 ms to keep UI responsiveness, default is 0.
 opencl_queue_window_size [optional] Limit the max commands in OpenCL command queue to keep UI responsiveness, default is
 obfuscate [optional] Whether to obfuscate the model operator name, default to 0.
 winograd [optional] Which type winograd to use, could be [0, 2, 4]. 0 for disable winograd, 2 and 4 for enable w

Note: Some command tools:

# Get device's soc info.
adb shell getprop | grep platform

# command for generating sha256_sum
sha256sum /path/to/your/file

8.3 Advanced usage

There are three common advanced use cases:
 • run your model on the embedded device(ARM LINUX)
 • converting model to C++ code.
 • tuning GPU kernels for a specific SoC.

8.3. Advanced usage 37
MACE

8.4 Run you model on the embedded device(ARM Linux)

The way to run your model on the ARM Linux is nearly same as with android, except you need specify a device config
file.

python tools/converter.py run --config=/path/to/your/model_deployment_file.yml --
 ˓→device_yml=/path/to/devices.yml

There are two steps to do before run:
 1. configure login without password
 MACE use ssh to connect embedded device, you should copy your public key to embedded device
 with the blow command.

 cat ~/.ssh/id_rsa.pub | ssh -q {user}@{ip} "cat >> ~/.ssh/authorized_keys"

 2. write your own device yaml configuration file.
 • Example
 Here is an device yaml config demo.

 # one yaml config file can contain multi device info
 devices:
 # The name of the device
 nanopi:
 # arm64 or armhf
 target_abis: [arm64, armhf]
 # device soc, you can get it from device manual
 target_socs: RK3399
 # device model full name
 models: FriendlyElec Nanopi M4
 # device ip address
 address: 10.0.0.0
 # login username
 username: user
 raspberry:
 target_abis: [armv7l]
 target_socs: BCM2837
 models: Raspberry Pi 3 Model B Plus Rev 1.3
 address: 10.0.0.1
 username: user

 • Configuration The detailed explanation is listed in the blow table.

38 Chapter 8. Advanced usage for Bazel users
MACE
Op- Usage
tions
tar- Device supported abis, you can get it via dpkg --print-architecture and dpkg
get_abis--print-foreign-architectures command, if more than one abi is supported,
separate them by commas.
tar- device soc, you can get it from device manual, we haven’t found a way to get it in shell.
get_socs
mod- device models full name, you can get via get lshw command (third party package, install
els it via your package manager). see it’s product value.
ad- Since we use ssh to connect device, ip address is required.
dress
user- login username, required.
name
8.5 Convert model(s) to C++ code
• 1. Change the model deployment file(.yml)
If you want to protect your model, you can convert model to C++ code. there are also two cases:
– convert model graph to code and model weight to file with below model configuration.
model_graph_format: code
model_data_format: file
– convert both model graph and model weight to code with below model configuration.
model_graph_format: code
model_data_format: code
Note: Another model protection method is using obfuscate to obfuscate names of model’s
operators.
• 2. Convert model(s) to code
python tools/converter.py convert --config=/path/to/model_deployment_file.
˓→yml
The command will generate ${library_name}.a in build/${library_name}/model directory and **
.h * in build/${library_name}/include like the following dir-tree.
# model_graph_format: code
# model_data_format: file
build
include
mace
public
mace_engine_factory.h
mobilenet_v1.h
model
mobilenet-v1.a
(continues on next page)
8.5. Convert model(s) to C++ code 39MACE
(continued from previous page)
mobilenet_v1.data
# model_graph_format: code
# model_data_format: code
build
include
mace
public
mace_engine_factory.h
mobilenet_v1.h
model
mobilenet-v1.a
• 3. Deployment
– Link libmace.a and ${library_name}.a to your target.
– Refer to mace/tools/mace_run.ccfor full usage. The following list the key steps.
// Include the headers
#include "mace/public/mace.h"
// If the model_graph_format is code
#include "mace/public/${model_name}.h"
#include "mace/public/mace_engine_factory.h"
// ... Same with the code in basic usage
// 4. Create MaceEngine instance
std::shared_ptr engine;
MaceStatus create_engine_status;
// Create Engine from compiled code
create_engine_status =
CreateMaceEngineFromCode(model_name.c_str(),
model_data_ptr, // nullptr if model_data_format
˓→is code
model_data_size, // 0 if model_data_format is
˓→code
input_names,
output_names,
device_type,
&engine);
if (create_engine_status != MaceStatus::MACE_SUCCESS) {
// Report error or fallback
}
// ... Same with the code in basic usage
8.6 Transform models after conversion
If model_graph_format or model_data_format is specified as file, the model or weight file
will be generated as a .pb or .data file after model conversion. After that, more transformations can be
applied to the generated files, such as compression or encryption. To achieve that, the model loading is
split to two stages: 1) load the file from file system to memory buffer; 2) create the MACE engine from
the model buffer. So between the two stages, transformations can be inserted to decompress or decrypt
40 Chapter 8. Advanced usage for Bazel usersMACE
the model buffer. The transformations are user defined. The following lists the key steps when both
model_graph_format and model_data_format are set as file.
// Load model graph from file system
std::unique_ptr model_graph_data =
make_unique();
if (FLAGS_model_file != "") {
auto fs = GetFileSystem();
status = fs->NewReadOnlyMemoryRegionFromFile(FLAGS_model_file.c_str(),
&model_graph_data);
if (status != MaceStatus::MACE_SUCCESS) {
// Report error or fallback
}
}
// Load model data from file system
std::unique_ptr model_weights_data =
make_unique();
if (FLAGS_model_data_file != "") {
auto fs = GetFileSystem();
status = fs->NewReadOnlyMemoryRegionFromFile(FLAGS_model_data_file.c_str(),
&model_weights_data);
if (status != MaceStatus::MACE_SUCCESS) {
// Report error or fallback
}
}
if (model_graph_data == nullptr || model_weights_data == nullptr) {
// Report error or fallback
}
std::vector transformed_model_graph_data;
std::vector transformed_model_weights_data;
// Add transformations here.
...
// Release original model data after transformations
model_graph_data.reset();
model_weights_data.reset();
// Create the MACE engine from the model buffer
std::shared_ptr engine;
MaceStatus create_engine_status;
create_engine_status =
CreateMaceEngineFromProto(transformed_model_graph_data.data(),
transformed_model_graph_data.size(),
transformed_model_weights_data.data(),
transformed_model_weights_data.size(),
input_names,
output_names,
config,
&engine);
if (create_engine_status != MaceStatus::MACE_SUCCESS) {
// Report error or fallback
}
8.6. Transform models after conversion 41You can also read