User Manual WM55H - Samsung Display Solutions
←
→
Page content transcription
If your browser does not render page correctly, please read the page content below
User Manual
WM55H

The colour and the appearance may differ depending on the product, and the content in the
manual is subject to change without prior notice to improve the performance.

•• An administration fee may be charged if either
   –– (a) an engineer is called out at your request and there is no defect in the product
       (i.e. where you have failed to read this user manual).
    –– (b) you bring the unit to a repair Centre and there is no defect in the product
        (i.e. where you have failed to read this user manual).
•• The amount of such administration charge will be advised to you before any work or home
   visit is carried out.

© Samsung Electronics
Samsung Electronics owns the copyright for this manual. Use or reproduction of this manual in parts or entirety without the authorization of Samsung Electronics is prohibited.
Trademarks other than Samsung Electronics are property of their respective owners.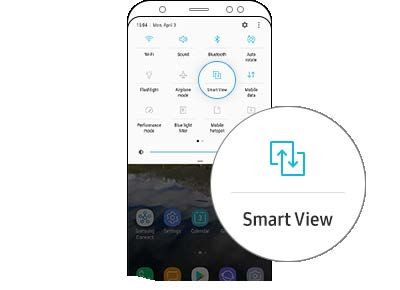
Table of contents

Before Using the Product                           Writing                                         EXPORT
Safety Precautions                            4    What's a 'Roll'?                           20   Sending Email                       33
Storage                                       4
                                                   Screen Elements                            21   Printing                            34
Electricity and safety                        4
                                                                                                   Installing Flip Printing Software   34
Installation                                  5    Drawing / Erasing                          22
                                                                                                   Setting up the printer              34
Operation                                     6    Changing pen thickness                     22
                                                   Changing the pen colour                    22   Exporting to a USB Device           36
Precautions for Use                           8
                                                   Erasing                                    22
                                                                                                   Exporting from a Network Drive      36
                                                   Managing Rolls                             23
                                                                                                   Sharing your screen                 37
                                                   ROLL EXPLORER                              24
Preparations
                                                   Page Viewer                                25
Checking the Components                       9
                                                                                                   Menu
Parts                                         10

Ports                                         12   IMPORT                                          Pen                                 38

                                                                                                   Connect                             39
Before Installing the Product (Installation        Connecting to a Mobile Device              27
Guide)                                        13   Connecting using Smart View or Screen           System                              47
Rotation                                      13   Mirroring                                  27
Ventilation                                   13   Connecting using NFC tagging               27   Picture                             49

Installing the Wall Mount                     14   Connecting to a Laptop                     28   Support                             50
Installing the Wall Mount                     14   Connecting using a cable                   28
Wall Mount Kit Specifications (VESA)          14   Connecting via the WiFi Display function   28

Connecting to a network                       15   Importing from a USB Device                29
Network Settings (Wired)                      15
                                                   Importing from a Network Drive             29
Network Settings (Wireless)                   17
Use WPS                                       19   Source Window                              30

                                                   Document Viewer                            31

                                                                                                                                        2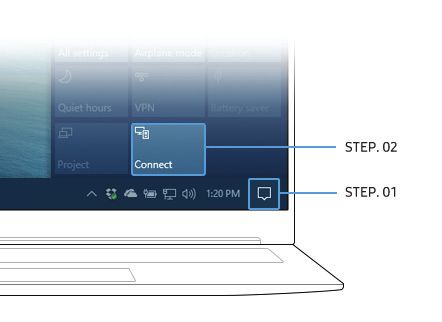
Table of contents

Troubleshooting Guide
Problems and Solutions                        51

Specifications
General                                       56

Preset Timing Modes                           58

Appendix
Responsibility for the Pay Service (Cost to
Customers)                                    60
Not a product defect                          60
A Product damage caused by customer's
fault                                         60
Others                                        60

Prevention of Afterimage Burn-in              61
What is afterimage burn-in?                   61
Recommended prevention practices              61

Licence                                       61

                                                   3
Chapter 01
Before Using the Product
Safety Precautions Storage
Due to the characteristics of high-glossy products, using a UV humidifier nearby may create
white-colored stains on the product.
Warning "" Contact Customer Service Centre if the inside of the product needs cleaning (service fee
A serious or fatal injury may result if instructions are not followed. will be charged).
Caution
Electricity and safety
Personal injury or damage to properties may result if instructions are not followed.
Warning
Activities marked by this symbol are prohibited. Do not use a damaged power cord or plug, or a loose power socket.
An electric shock or fire may result.
Do not use multiple products with a single power socket.
Instructions marked by this symbol must be followed. Overheated power sockets may cause a fire.
Do not touch the power plug with wet hands. Otherwise, an electric shock may result.
Do not bend or pull the power cord with force. Be careful not to leave the power cord
under a heavy object.
Damage to the cord may result in a fire or electric shock.
Do not place the power cord or product near heat sources.
A fire or electric shock may result.
4Insert the power plug all the way in so it is not loose.
Installation
An unsecure connection may cause a fire.
Connect the power plug to a grounded power socket (type 1 insulated devices only). Warning
An electric shock or injury may result.
Clean any dust around the pins of the power plug or the power socket with a dry cloth. DO NOT PLACE CANDLES, INSECT REPELLANTS OR CIGARETTES ON TOP OF THE
PRODUCT. DO NOT INSTALL THE PRODUCT NEAR HEAT SOURCES.
A fire may result.
A fire may result.
Caution Do not install the product in poorly ventilated spaces such as a bookcase or closet.
An increased internal temperature may cause a fire.
Do not disconnect the power cord while the product is being used. Do not install the product on an unstable or vibrating surface (insecure shelf, sloped
The product may become damaged by an electric shock. surface, etc.)
Only use the power cord provided with your product by Samsung. Do not use the power •• The product may fall and become damaged and/or cause an injury.
cord with other products. •• Using the product in an area with excess vibration may damage the product or
A fire or electric shock may result. cause a fire.
Keep the power socket where the power cord is connected unobstructed. Do not expose the product to direct sunlight, heat, or a hot object such as a stove.
The power cord must be disconnected to cut off power to the product when an issue The product lifespan may be reduced or a fire may result.
occurs. Do not install the product within the reach of young children.
Hold the plug when disconnecting the power cord from the power socket. •• The product may fall and injure children.
An electric shock or fire may result. •• As the front is heavy, install the product on a flat and stable surface.
Edible oil, such as soybean oil, can damage or deform the product. Do not install the
product in a kitchen or near a kitchen counter.
Have a technician install the wall-mount hanger.
•• Installation by an unqualified person can result in an injury.
•• Only use approved cabinets.
Install the product at least 10 cm away from the wall to allow ventilation.
An increased internal temperature may cause a fire.
5Keep the plastic packaging out of the reach of children.
Operation
Children may suffocate.
Do not install the product in a vehicle or a place exposed to dust, moisture (water drips, Warning
etc.), oil, or smoke.
A fire or electric shock may result. There is a high voltage inside the product. Never disassemble, repair or modify the
product yourself.
Caution •• A fire or electric shock may result.
•• Contact Samsung Customer Service Centre for repairs.
Do not set down the product on its front. Do not let children hang from the product or climb on top of it.
The screen may become damaged. Children may become injured or seriously harmed.
Do not drop the product while moving. If the product is dropped or the outer case is damaged, turn off the power switch and
Product failure or personal injury may result. disconnect the power cord. Then contact Samsung Customer Service Centre.
Set down the product gently. Continued use can result in a fire or electric shock.
Product failure or personal injury may result. Do not leave heavy objects or items that children like (toys, sweets, etc.) on top of the
Installing the product in an unusual place (a place exposed to a lot of fine dust, chemical product.
substances, extreme temperatures or a significant presence of moisture, or a place The product or heavy objects may fall as children try to reach for the toys or sweets
where the product will operate continuously for an extended period of time) may resulting in a serious injury.
seriously affect its performance. Do not move the product by pulling the power cord or any cable.
Be sure to consult Samsung Customer Service Centre if you want to install the Product failure, an electric shock or fire may result from a damaged cable.
product at such a place.
Do not lift or move the product by pulling the power cord or any cable.
Product failure, an electric shock or fire may result from a damaged cable.
Ensure the vents are not blocked by tablecloths or curtains.
An increased internal temperature may cause a fire.
Do not insert metallic objects (chopsticks, coins, hairpins, etc) or objects that burn easily
(paper, matches, etc) into the product (via the vent or input/output ports, etc).
•• Be sure to power off the product and disconnect the power cord when water
or other foreign substances have entered the product. Then contact Samsung
Customer Service Centre.
•• Product failure, an electric shock or fire may result.
6Do not place objects containing liquid (vases, pots, bottles, etc) or metallic objects on Caution
top of the product.
•• Be sure to power off the product and disconnect the power cord when water Do not use humidifiers or stoves around the product.
or other foreign substances have entered the product. Then contact Samsung A fire or electric shock may result.
Customer Service Centre.
Do not touch the screen when the product has been turned on for an extended period of
•• Product failure, an electric shock or fire may result.
time as it will become hot.
Before moving the product, turn off the power switch and disconnect the power cable
Do not place heavy objects on the product.
and all other connected cables.
Product failure or personal injury may result.
Damage to the cord may result in a fire or electric shock.
Leaving the screen fixed on a stationary image for an extended period of time may cause
If the product generates abnormal sounds, a burning smell or smoke, disconnect the
afterimage burn-in or defective pixels.
power cord immediately and contact Samsung Customer Service Centre.
Activate power-saving mode or a moving-picture screen saver if you will not be using
An electric shock or fire may result. the product for an extended period of time.
During a lightning or thunderstorm, power off the product and remove the power cable. Disconnect the power cord from the power socket if you do not plan on using the product
A fire or electric shock may result. for an extended period of time (vacation, etc).
Do not drop objects on the product or apply impact. Dust accumulation combined with heat can cause a fire, electric shock or electric
A fire or electric shock may result. leakage.
If a gas leakage is found, do not touch the product or power plug. Also, ventilate the area Use the product at the recommended resolution and frequency.
immediately. Your eyesight may deteriorate.
Sparks can cause an explosion or fire. Looking at the screen too close for an extended period of time can deteriorate your
Do not use or keep combustible spray or an inflammable substance near the product. eyesight.
An explosion or fire may result. Rest your eyes for more than 5 minutes for every 1 hour of product use.
Eye fatigue will be relieved.
Store small accessories out of the reach of children.
7Precautions for Use
Be careful that if you use the supplied pen with a load exceeding 2.5 kg, scratches may occur on the
protective glass.
If you use a ballpoint pen other than the supplied pen, be careful that the screen may be stained
with ink or damaged.
"" We recommend that you use the supplied pen. Do not use sharp, pointed objects other than
the pen.
"" If dust or dirt from the supplied pen remains on the protective glass, clean it referring to
the instructions below.
Cleaning the exterior and display
Wipe the surface with a slightly wet, soft cloth, and then wipe with a dry cloth.
1 2 3
8Chapter 02
Preparations
Checking the Components
"" Contact the vendor where you
purchased the product if any
components are missing. Warranty card
Quick Setup Guide Regulatory guide Power cord
"" The appearance of the components (Not available in some locations)
may differ from the images shown.
Touch Pen X 2 USB cable Cover Terminal
9Parts
"" The colour and shape of parts may differ from what is shown. Specifications are subject to change without
notice to improve quality.
Parts Description
Keep the touch pen in place.
•• When the product is turned off and you lift the pen from the pen holder, the
Pen holder screen turns on.
•• When the product is in the screen saver mode and you lift the pen from the pen
holder, the screen turns on.
Speaker •• Tag your mobile device to the NFC pad for connection.
"" In writing mode, an NFC tagging can automatically perform Smart View or
Screen Mirroring on your mobile device.
"" This function is supported only on Android 8.0 Oreo version or later of
NFC pad Samsung mobile devices.
•• Tag an NFC card to the NFC pad to enter an email address automatically.
"" While creating an email, an email address is automatically entered if it is read
from the encoded NFC tag.
"" For how to enter an email address in the NFC card, refer to 'Sending Email'.
•• Press and hold the button to turn off the product.
•• In writing mode, shortly press the Power button to switch to the screen saver
Power button mode.
•• In HDMI or Screen Mirroring mode, press the Power button to exit full screen
mode.
10Parts Description
Detects user's motions to turn the product on or off.
The screen is touched or the touch pen is lifted.
Motion is detected. Motion is detected.
WHITEBOARD /
Screen Saver Power Off
BLACKBOARD
There is no motion There is no motion
for 1 hour. for 1 hour.
"" If the product is turned off because no motion is detected, it operates as follows:
–– When → System → Advanced Settings → Auto Save is set to On: The last
roll you are creating is displayed on the screen.
Motion sensor –– When → System → Advanced Settings → Auto Save is set to Off: A new roll
is displayed on the screen.
"" Only when → System → Advanced Settings → Motion Sensor is set to Off, the
product automatically turns off at the time set at Auto Power Off.
"" When the screen of a mobile device and laptop is displayed on the product in the
full screen mode, the product does not switch to the screen saver mode.
"" When the screen is turned off, it may turn on in the screen saver mode due to the
surrounding environment and illumination. To turn the product's screen on or off
with the Power button only, set Motion Sensor to Off at → System → Advanced
Settings.
•• For ensuring normal operation of the motion sensor, do not install the
product in a place exposed to direct sunlight.
•• Do not hide the front of the motion sensor with an object.
•• When there are any foreign substances on the motion sensor, wipe them
with a soft cloth.
11Ports
"" The colour and shape of parts may differ from what is shown. Specifications are subject to change without
notice to improve quality.
Ports Description
USB (1.0A) Connect to a USB memory device.
"" The USB ports on the product accept a maximum constant current of 1.0A. If the
maximum value is exceeded, USB ports may not work.
LAN Connects to a network using a LAN cable. (10/100 Mbps)
"" Use Cat7(*STP Type) cable for the connection.
*Shielded Twist Pair.
RS232C IN Dedicated to service technicians.
HDMI IN Connects to a source device using a HDMI cable.
TOUCH OUT Connects to a PC using a USB cable. You can operate the PC screen by touching the
product screen.
USB (5V 0.5A) Connect to a USB memory device.
"" The USB ports on the product accept a maximum constant current of 0.5A. If the
maximum value is exceeded, USB ports may not work.
HDMI IN
RS232C
TOUCH
(1.0A)
LAN
OUT
IN
USB
USB
(5V 0.5A)
12Before Installing the Product (Installation Ventilation
Guide) "" Contact Samsung Customer Service Centre for further details.
Installation on a Perpendicular Wall
There is a product-specific stand sold separately from Samsung, and you can install it on the
wall, too.
"" Do not install or use the product with its front facing up. Touch-based functions may not A Minimum 15 mm
work properly. B Ambient temperature: 35 ℃ or less
"" When installing the product on a perpendicular wall, allow at least 15
Rotation mm of space between the product and wall surface for ventilation and
ensure that the ambient temperature is kept below 35 °C.
A
"" Contact Samsung Customer Service Centre for further details.
•• To use the product in landscape orientation, turn the product anticlockwise so that the
sensor part faces downward.
B
Installation on an Indented Wall
A Minimum 15 mm
B Minimum 25 mm B
C Ambient temperature: 35 ℃ or less
"" When installing the product on an indented wall, allow at least the
space specified above between the product and wall for ventilation and
ensure that the ambient temperature is kept below 35 °C. A
B
C
13Installing the Wall Mount
Installing the Wall Mount
•• The wall mount kit allows you to mount the product on the wall.
•• For detailed information on installing the wall mount, see the instructions provided with the wall mount.
•• We recommend you contact a technician for assistance when installing the wall mount bracket.
•• Samsung Electronics is not responsible for any damage to the product or injury to yourself or others if you select to install the wall mount on your own.
Wall Mount Kit Specifications (VESA) •• Samsung wall mount kits contain a detailed installation manual and all parts necessary for assembly are
provided.
"" Install your wall mount on a solid wall perpendicular to the floor. •• Do not use screws that are longer than the standard length or do not comply with the VESA standard screw
To install the product on the other wall area, contact the nearest specifications. Screws that are too long may cause damage to the inside of the product.
agency. •• For wall mounts that do not comply with the VESA standard screw specifications, the length of the screws may
If you install the product on a slanted wall, it may fall and result in differ depending on the wall mount specifications.
severe personal injury. •• Do not fasten the screws too firmly. This may damage the product or cause the product to fall, leading to
personal injury. Samsung is not liable for these kinds of accidents.
•• Samsung is not liable for product damage or personal injury when a non-VESA or non-specified wall mount is
used or the consumer fails to follow the product installation instructions.
•• Always have at least two people mount the product on a wall.
•• Standard dimensions for wall mount kits are shown in the table below.
VESA screw hole specs (A * B) in millimeters
Standard Screw Quantity
(inches)
400 × 400 (15.7 × 15.7) M8 4
"" Do not install your Wall Mount Kit while your product is turned on. It may result in personal injury due to electric
shock.
14Connecting to a network •• Depending on how your network is configured, you may be able to attach your product to
your LAN by connecting the LAN port on the back of your product directly to a network wall
outlet using a LAN cable.
See the diagram below. Note that the wall outlet is attached to a modem or router
elsewhere in your house.
Network Settings (Wired) LAN
The Modem Port on the Wall
RJ45
Connecting to a Wired Network
There are three ways to attach your product to your LAN using cable.
•• You can attach your product to your LAN by connecting the LAN port on the back of your
product to an external modem using a LAN cable. See the diagram below. LAN Cable
LAN
External Modem
The Modem Port on the Wall If you have a Dynamic Network, you should use an ADSL modem or router that supports
(ADSL / VDSL) RJ45
the Dynamic Host Configuration Protocol (DHCP). Modems and routers that support DHCP
automatically provide the IP address, subnet mask, gateway, and DNS values your product
needs to access the Internet so you do not have to enter them manually. Most home networks
are Dynamic Networks.
Some networks require a Static IP address. If your network requires a Static IP address, you
Modem Cable LAN Cable
must enter the IP address, subnet mask, gateway, and DNS values manually on your product
Cable Setup Screen when you set up the network connection. To get the IP address, subnet
•• You can attach your product to your LAN by connecting the LAN port on the back of your mask, gateway, and DNS values, contact your Internet Service Provider (ISP).
product to an IP Sharer which is connected to an external modem. Use LAN cable for the
If you have a Windows computer, you can also get these values through your computer.
connection. See the diagram below.
"" You can use ADSL modems that support DHCP if your network requires a Static IP address.
LAN
External Modem IP Sharer
The Modem Port on the Wall "" ADSL modems that support DHCP also let you use Static IP addresses.Empty-UpSp
(ADSL / VDSL) (having DHCP server) RJ45
Modem Cable LAN Cable LAN Cable
15Set the network connection to use Internet services such as perform software upgrades. How to set up manually
1 Set Network Type to Wireless from the Open Network Settings page.
Automatic Open Network Settings (Wired)
2 The network test screen appears and the verification process starts. Press Cancel. The
Connect to the network using a LAN cable. verification process stops.
Make sure a LAN cable is connected first. 3 Select IP Settings on network connection screen. The IP Settings screen appears.
How to set up automatically 4 Select the field at the top, press E, and then set IP setting to Enter manually Repeat the
entry process for each field in the IP Address.
1 Set Network Type to Wireless from the Open Network Settings page.
"" Setting IP setting to Enter manually automatically changes DNS setting to Enter
2 The network test screen appears and verifies the network connection.
manually.
When the connection has been verified, the “Success! Your device is connected to the
Internet. If you have any problems using online services, please contact your Internet 5 When done, select OK at the bottom of the page, and then press E. The network test
service provider.” message appears. screen appears and the verification process starts.
"" If the connection process fails, check the LAN port connection.
6 When the connection has been verified, the “Success! Your device is connected to the
"" If the automatic process cannot find the network connection values or if you want to set the Internet. If you have any problems using online services, please contact your Internet
connection manually, go to the next section, network setup. service provider.” message appears.
Manual Open Network Settings (Wired)
Offices may use static IP addresses.
If this is the case, ask the network administrator for the IP address, subnet mask, gateway and
DNS server address. Enter these values manually.
Getting the Network Connection Values
To view the Network connection values on most Windows computers, follow these steps.
1 Right click the Network icon on the bottom right of the screen.
2 In the pop-up menu that appears, click Status.
3 On the dialog that appears, click the Support tab.
4 On the Support Tab, click the Details button. The Network connection values are displayed.
16Network Settings (Wireless) Automatic Network Setup (Wireless)
Most wireless networks have an optional security system that requires devices that access the
network to transmit an encrypted security code called an Access or Security Key. The Security
Connecting to a Wireless Network Key is based on a Pass Phrase, typically a word or a series of letters and numbers of a specified
length you were asked to enter when you set up security for your wireless network. If you use
Wireless IP sharer this method of setting up the network connection, and have a Security Key for your wireless
(router having DHCP server) network, you will have to enter the Pass Phrase during the the automatic or manual setup
process.
The LAN Port on the Wall
How to set up automatically
1 Set Network Type to Wireless from the Open Network Settings page.
2 The Network function searches for available wireless networks. When done, it displays a list
LAN Cable of the available networks.
3 In the list of networks, press the ▲ or ▼ button to select a network, and then press the E
Samsung recommends using IEEE 802.11n. When you play video over a network connection, the button twice.
video may not play smoothly.
"" Select a channel for the wireless IP sharer that is not currently being used. If the channel set "" If the desired wireless router does not appear, select Refresh to search again.
for the wireless IP sharer is currently being used by another device nearby, this will result in "" If the router cannot be found after retrying, select the Stop button.
interference and communication failure. The Add Network button appears.
"" Your product supports only the following wireless network security protocols. 4 If the Enter the password for (AP Name). screen appears, go to step 5. If you select a
If you select the Pure High-throughput (Greenfield) 802.11n mode and the Encryption type is wireless router that does not have security, go to step 7.
set to WEP, TKIP or TKIP AES (WPS2Mixed) on your AP or wireless router, Samsung products
will not support a connection in compliance with new Wi-Fi certification specifications. 5 If the router has security, enter the Enter the password for (AP Name). (Security key or PIN).
"" If your wireless router supports WPS (Wi-Fi Protected Setup), you can connect to the
6 When done, use the right arrow button to move the cursor to Done, and then press E. The
network via PBC (Push Button Configuration) or PIN (Personal Identification Number). WPS
network connection screen appears and the verification process starts.
will automatically configure the SSID and WPA key in either mode.
"" Connection Methods: You can setup the wireless network connection in three ways. "" A connection with the router is established, but the Internet cannot be accessed.
Auto Setup (Using the Auto Network Search function), Manual Setup, Use WPS 7 When the connection has been verified, the “Success! Your device is connected to the
"" This product supports Enterprise WPA2 (TLS/TTLS/PEAP). Internet. If you have any problems using online services, please contact your Internet
service provider.” message appears.
17Manual Network Setup (Wireless) How to set up manually
Offices may use static IP addresses. 1 Set Network Type to Wireless from the Open Network Settings page.
If this is the case, ask the network administrator for the IP address, subnet mask, gateway and 2 The Network function searches for available wireless networks. When done, it displays a list
DNS server address. Enter these values manually. of the available networks.
3 In the list of networks, press the u or d button to select a network, and then press the E
Getting the Network Connection Values
button twice.
To view the Network connection values on most Windows computers, follow these steps.
"" If the desired wireless router does not appear, select Refresh to search again.
1 Right click the Network icon on the bottom right of the screen.
"" If the router cannot be found after retrying, select the Stop button.
2 In the pop-up menu that appears, click Status. The Add Network button appears.
3 On the dialog that appears, click the Support tab. 4 If the Enter the password for (AP Name). screen appears, go to step 5. If you select a
wireless router that does not have security, go to step 7.
4 On the Support Tab, click the Details button. The Network connection values are displayed.
5 If the router has security, enter the Enter the password for (AP Name). (Security key or PIN).
6 When done, use the right arrow button to move the cursor to Done, and then press E. The
network connection screen appears and the verification process starts.
7 Select Cancel while network connections are being attempted. This will stop the
connection.
8 Select IP Settings on network connection screen. The IP Settings screen appears.
9 Select the field at the top, press E, and then set IP setting to Enter manually. Repeat the
entry process for each field in the IP Address.
"" Setting IP setting to Enter manually automatically changes DNS setting to Enter
manually.
10 When done, select OK at the bottom of the page, and then press E. The network test
screen appears and the verification process starts.
11 When the connection has been verified, the “Success! Your device is connected to the
Internet. If you have any problems using online services, please contact your Internet
service provider.” message appears.
18Use WPS
How to set up using Use WPS
If your router has a Use WPS button, follow these steps.
1 Set Network Type to Wireless from the Open Network Settings page.
2 Select Use WPS, press E, and then press E again.
3 Press the WPS or PBC button on your wireless router withine the next two minutes. Your
product automatically acquires all the network setting values it needs and connects to your
network.
4 The network connection screen appears, and network setup is done.
19Chapter 03
Writing
What's a 'Roll'?
•• Files are called 'rolls' in this product. A 'roll' is a file with multiple pages linked together.
•• A roll can have up to 20 pages linked together.
•• Pages are linked vertically in portrait orientation, and horizontally in landscape orientation.
"" You can open only one roll on one screen. For more information, refer to 'Managing Rolls'.
Portrait orientation Landscape orientation
Page 1
Page 2
Page 1 Page 2
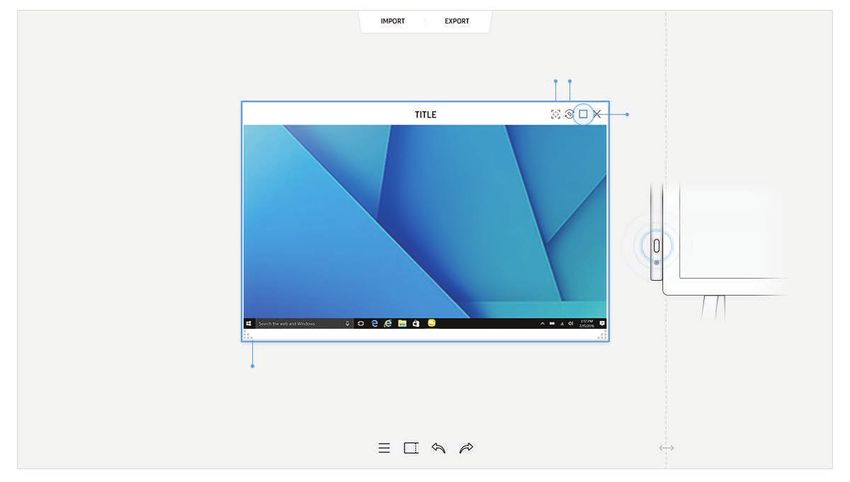
20Screen Elements Buttons Description
IMPORT View the screen of a mobile device or laptop connected to the product, or import
data such as images from a connected USB or network drive.
IMPORT EXPORT
EXPORT Share your creations in various ways.
Share your screen with selected devices.
"" This menu is only visible in SCREEN SHARE mode.
Manage and change the rolls and settings.
Move or edit the created rolls for each page.
Undo or redo the last action.
•• If any page editing actions such as page adding, deleting, and moving are
found, is reset.
"" can be performed up to 20 times for each individual.
Page breaking line Scroll the page breaking line to move the roll.
Bezel Scroll Scroll the black area to move the roll.
21Drawing / Erasing Changing the pen colour
You can change the pen colour by touching and holding the screen with the pen.
You can freely use the supplied pen to write
anything you want.
•• Thin Tip ( ): Pen Type
•• Thick Tip ( ): Highlighter Type
"" To change the pen colour type, select → Pen → Pen Colour or Highlighter Colour.
Erasing
Changing pen thickness You can use your finger or palm to erase your writing.
You can change the pen thickness.
"" Change the pen thickness at → Pen → Pen & Highlighter Thickness.
22Managing Rolls Buttons Description
NEW Create a new roll.
ROLL EXPLORER Open, delete or export saved rolls.
SAVE Save the current roll.
BLACKBOARD / Change the writing mode.
WHITEBOARD
"" The roll you are editing is automatically saved and a new roll is opened.
SCREEN LOCK Lock the screen to protect the contents from being modified.
"" Tap and hold the screen to release SCREEN LOCK.
•• : Press a four-digit password to lock the current roll.
NEW ROLL EXPLORER SAVE BLACKBOARD SCREEN LOCK
•• : To unlock a locked roll, press the four-digit password you set when locking the roll.
"" Once unlocked, the current roll remains unlocked until it is locked again.
Delete the current roll.
Adjust the volume.
You can view How To Use.
"" The displayed image may differ depending on the model. You can see the configuration menu.
23ROLL EXPLORER Deleting / Exporting rolls
→ ROLL EXPLORER → ROLL EXPLORER → Select
ROLL EXPLORER Select
By name By date Select Export Delete Cancel
"" The displayed image may differ depending on the model. "" The displayed image may differ depending on the model.
Select the desired roll. You can select multiple rolls to export or delete.
Parts Description Parts Description
By name ↔ By date Set the sort order of files. Share the selected rolls any way you like.
Export
•• Email / USB / Network Drive
Select Select multiple rolls to export or delete.
Delete Delete the selected rolls.
File Name Rename the file.
Cancel Deselect the roll.
"" To open a locked roll ( ), press the four-digit password.
"" The rolls are sorted by recent date.
24Page Viewer You can move or edit the created rolls for each page.
Parts Description
Preview the roll.
"" The preview mode does not support the draw / erase function.
Close the page viewer.
Page number Displays the page number.
Page viewer area
Displays the page you are currently viewing.
•• When you select a page, the focus is moved to it.
Focus •• Drag on the Page viewer area to move to other page.
•• Touch and hold a page to open the page editing screen. On the page editing
01
screen, press and drag the desired page to change its page order.
Delete the focused page.
02 Add a new page to the focused position.
"" You can create up to 20 pages per roll.
03
"" The displayed image may differ depending on the model.
25Chapter 04
IMPORT
You can view the screen of a mobile device or laptop connected to the product, or import data
such as images from a connected USB or network drive. Icons Description
•• Touch IMPORT at the top of the screen to select the desired device. Displays the screen from a mobile device by using Smart View or Screen
"" You can capture the screens you want from the imported content. Mirroring function.
Displays your laptop screen imported using HDMI connection or WiFi display.
IMPORT
Import images, native FLIP files, and documents from a USB device.
Import images, native FLIP files, and documents from a network drive.
MOBILE LAPTOP USB NETWORK DRIVE
"" The native FLIP format (.iwb) refers to files that are directly saved from the device and only
IMPORT EXPORT supported by FLIP devices.
"" Supportable image file formats: JPG, BMP, PNG, MPO
"" The displayed image may differ depending on the model.
"" Supported document file formats: DOC, PPT, PDF
26Connecting to a Mobile Device Connecting using NFC tagging
"" This function is supported only on Android 8.0 Oreo version or later of Samsung mobile
IMPORT → MOBILE devices.
"" In writing mode, an NFC tagging can automatically perform Smart View or Screen Mirroring
on your mobile device.
Connecting using Smart View or Screen Mirroring
Smart View
1 Turn on the NFC feature on a supported mobile device.
2 Tag the mobile device to the NFC pad at the side of the product.
1 Drag down the top bar on the mobile device screen to start Smart View or Screen Mirroring.
"" You can control the mobile device from the product screen.
2 Select this product from the list of devices displayed on the screen.
–– The initial device name is [Flip] Samsung WMH Series.
"" You can control the mobile device from the product screen.
"" HDCP-encrypted content may not be visible when connected.
27Connecting to a Laptop Connecting via the WiFi Display function
"" This function is only available for the laptops that support the WiFi Display function.
IMPORT → LAPTOP
IMPORT
MOBILE LAPTOP USB NETWORK DRIVE
LAPTOP
STEP. 02
HDMI Wireless
STEP. 01
"" The displayed image may differ depending on the model.
Connecting using a cable 1 Select Action Center or Devices in the taskbar notification area of the laptop.
1 Connect the product to the laptop using an HDMI cable. 2 Click Connect or Project and select a [Flip] Samsung WMH Series device to complete the
"" HDCP-encrypted content may not be visible when connected. connection.
"" The connection procedure may vary depending on the laptop.
HDMI
"" After the WiFi Display connection is made, you can control the laptop screen from the
product screen.
"" This function is only supported by Windows 8.1 and Windows 10.
2 Select IMPORT → LAPTOP → HDMI from the top of the screen.
3 To control the laptop from the product screen, connect the supplied USB cable to the
TOUCH OUT port on the product.
"" This function is supported only when the laptop screen is in both landscape orientation and
the full screen mode.
TOUCH OUT
28Importing from a USB Device Importing from a Network Drive
IMPORT → USB IMPORT → NETWORK DRIVE
IMPORT IMPORT
MOBILE LAPTOP USB NETWORK DRIVE MOBILE LAPTOP USB NETWORK DRIVE
USB NETWORK DRIVE
USB1 USB2 USB3 USB4 USB5 USB6 NETWORK1 NETWORK2 Add
"" The displayed image may differ depending on the model. "" The displayed image may differ depending on the model.
Connect an external HDD or a USB storage device. Connect the network drive to bring files.
"" Import images, native FLIP files (.iwb), and documents. "" You can register a network drive while the network is connected.
For information about how to connect to a network, see 'Connecting to a network'.
"" You can register a network drive account at → Connect → Advanced Settings → Network
Drive → Add Account.
To register a network drive account, you must enter the Address, Username, and Password.
To register your network drive account, refer to 'Add Account' for Network Drive.
"" Import images, native FLIP files (.iwb), and documents.
29Source Window When you connect a laptop or a mobile device to the product, the source window appears.
"" This function is available only in the writing mode.
Parts Description
Menu bar Drag the source window to move to the desired position.
Device name
Device name Displays the name of the connected device.
Capture the source window.
Rotate the source window.
"" This function is supported only on Android 8.0 Oreo version or later of Samsung
mobile devices.
Switch to the full screen mode.
•• When the power button is pressed on the full screen mode, the screen returns to
the original mode.
"" When the product is in portrait orientation, the full screen mode is supported
only on the Android 8.0 Oreo version or later of Samsung mobile devices.
"" The full screen mode for the laptop is only supported in the landscape
"" The displayed image may differ depending on the model. orientation.
Close the source window.
Adjust the size of the source window.
30Document Viewer Displays the document file you select to import from a USB device or network drive.
"" Supported document file formats: DOC, PPT, PDF
"" This function is available only in the writing mode.
Parts Description
File name
Menu bar Drag the menu bar to move the viewer around.
File name Name of the currently viewing file.
Capture the viewer screen.
Toggle full screen view.
•• Tap the button in full screen view to return to windowed view.
Close the viewer.
Tap or to move between pages.
"" Press-hold them to instantly go to the first or last page.
Adjust size of the viewer.
9/11
"" The displayed image may differ depending on the model.
31Chapter 05
EXPORT
You can export your created rolls in various ways.
Icons Description
Send your created rolls via email.
EXPORT
Print your created rolls.
EMAIL PRINT USB SCREEN SHARE NETWORK DRIVE Export your created rolls to a connected USB device.
IMPORT EXPORT Share your screen with selected devices.
"" The displayed image may differ depending on the model.
Export your created rolls to a registered and connected network drive.
32Sending Email To send your created rolls via email, first register your email account.
"" You can register your email account at → Connect → Advanced Settings → Email.
"" If you set Sender Authentication to Personal Account at → Connect → Advanced Settings → Email, you must
EXPORT → EMAIL authenticate your account each time you send an email. See below.
–– You can send emails when Sender Authentication is set to Personal Account as long as you have an account
on that mail server (SMTP Server Name and SMTP Port Number).
EMAIL However, you need to provide the ID and password of the sender SMTP account each time you send them.
Send –– If you set Sender Authentication to Default Account, you can use the SMTP ID and password you saved to
Default Account to send emails.
To *****@***. ***
–– For the SMTP information required to register a mail server, contact your mail server administrator.
"" Files saved as dedicated files are converted to PDF files and sent.
Subject [[Flip] Samsung WMH Series] ****-**-**, **:**
Parts Description
1
Enter the recipient's email address.
•• Press and type text by using the virtual keyboard.
"" Press on the virtual keyboard to enter text by handwriting.
"" Search recipient in Local Address Book or LDAP server.
To
•• To enter an email address automatically, tag an NFC card that has that email
address entered.
"" : Explains where to tag the NFC tag.
"" Using the NFC Writing App, register an email address with the NDEF Standard
Record Type to an NFC Forum Type 2 Card sold on the market.
Subject The email subject is automatically set to the device name and the current date.
Send Send the email.
Change the page view mode for the roll to send.
Select the pages to send.
2
33
"" The displayed image may differ depending on the model.Printing Installing Flip Printing Software
Follow the onscreen instructions to install Flip Printing Software.
To print, you must set up the Print Server and the Clock Set. "" The installation takes about 10 minutes, and the time taken may vary depending on your PC
To set up the Print Server, the product and the printer you want and your PC must be connected environment.
to the same network.
Flip Printing Software must be also installed on the PC connected.
PC installation requirements
"" For information about how to connect to a network, see 'Connecting to a network'. •• Supported operating systems:
Windows 7(32/64 bit), Windows 10(32/64 bit), MAC
"" You can set up the Print Server at → Connect → Print Server.
"" When installing the software, make sure that critical Windows updates are already
"" You can set Clock Set at → System → Time → Clock Set.
installed. Update Windows Update to the latest version before beginning the setup.
"" The Flip Printing Software is available on its website
"" For Windows 7, make sure that Service Pack 1 is already installed.
– http://displaysolutions.samsung.com
– http://www.samsung.com
"" Devices that transfer files, such as virtual printers (PDF, XPS, One note, etc.) or fax
Setting up the printer
machines, are not supported, but only printers that can print actual paper are supported. After the Flip Printing Software is installed, make the following settings on the product
"" For print paper size, only A4 is supported. onscreen menu.
Setting up automatically
1 Select → Connect menu.
2 Select Print Server → Connect to Server → Auto.
Setting up manually
1 Select → Connect menu.
2 Select Print Server → Connect to Server → Manual, and then enter the Server IP address of
the PC where Flip Printing Software is installed.
34EXPORT → PRINT
Parts Description
Printer Displays a list of connected printers. Select a printer to print the roll with.
PRINT
Print
Copies Set the number of prints.
Printer
Print preview area Preview the roll to print.
Copies 01 Colour Mode
Print Start the printing.
1
Colour Mode Select the colour to print the roll with.
Change the page view mode of the roll to print.
Select the pages to print.
2
"" The displayed image may differ depending on the model.
35Exporting to a USB Device Exporting from a Network Drive
EXPORT → USB EXPORT → NETWORK DRIVE
EXPORT EXPORT
EMAIL PRINT USB SCREEN SHARE NETWORK DRIVE EMAIL PRINT USB SCREEN SHARE NETWORK DRIVE
USB SAVE NETWORK DRIVE SAVE
USB1 USB2 USB3 USB4 USB5 USB6 NETWORK1 NETWORK2 Add
"" The displayed image may differ depending on the model. "" The displayed image may differ depending on the model.
Connect an external HDD or a USB storage device. Connect the network drive to save files.
"" Your device saves files in two versions (IWB and PDF formats). "" You can register a network drive while the network is connected.
For information about how to connect to a network, see 'Connecting to a network'.
"" You can register a network drive account at → Connect → Advanced Settings → Network
Drive → Add Account.
To register a network drive account, you must enter the Address, Username, and Password.
To register your network drive account, refer to 'Add Account' for Network Drive.
"" Your device saves files in two versions (IWB and PDF formats).
36Sharing your screen Share your screen with selected devices.
"" SCREEN SHARE feature works best when using FLIP in landscape orientation.
"" Devices must support Screen Mirroring in order to use SCREEN SHARE with.
Buttons Description
Change Device Change devices to share the screen with.
Disconnect Stop sharing.
Change Device Disconnect
"" The displayed image may differ depending on the model.
37Chapter 06
Menu
Pen
2nd 3rd Description
Pen & Highlighter Thickness Adjust the thickness of the pen and the highlighter. The highlighter is available by using the end of a supported pen.
Pen Colour Select the colour palette for the normal pen.
Highlighter Colour Select the colour palette for the highlighter. The highlighter is available by using the end of a supported pen.
38Connect
2nd 3rd Description
Network Configure your device's network.
Network Status View your current network and internet status.
Open Network Settings Configure network settings to connect to an available network.
IPv6 View your current network and Internet status.
IPv6 Status Check the status of your IPv6 Internet connection.
Device Connection Manager Allow devices, like smartphones and tablets, on your network to share content with your product.
Access Notification Display a notification when a device, such as a smartphone or tablet, is connected. If you use a Wi-Fi network that requires a
password, turn Off this option to automatically connect with devices without viewing notifications.
Device List View and manage connected devices.
392nd 3rd Description
Advanced Settings Email Set up an email account for sending emails.
•• SMTP Server Name: SMTP server address
•• SMTP Port Number: SMTP server port
•• SSL/TLS: Enable or disable SSL/TLS
•• Default Account: Default SMTP account
•• Password: Password for the default SMTP account
•• Recipient Address: Select from options to manage email contacts after successfully send emails
–– Auto Save / Do Not Save / Delete All
•• Sender Authentication: Choose the authentication mode to be used when sending emails
–– Personal Account / Default Account
•• Local Address Book: Import contacts from a USB device or delete them.
–– Import / Delete
"" For more information, refer to 'Importing Local Address Book contacts'.
40Importing Local Address Book contacts Using Local Address Book contacts
To use FLIP Local Address Book, first Import contacts from a CSV file using a USB device. Automatically search and suggest from the list of contacts when selecting recipient(s) in
EXPORT → Email.
1 Use LDAP: Set Don't Use.
"" To use this, complete setting details for Email menu.
→ Connect → Advanced Settings → Enter password → LDAP → Use LDAP → Don't Use
2 Set up details under Email menu.
→ Connect → Advanced Settings → Enter password → Email
Deleting Local Address Book contacts
3 Edit and save your Local Address Book to a USB device. → Connect → Advanced Settings → Enter password → Email → Local Address Book → Delete
Make a list of contacts in the following structure and save it to the root directory as
RecentSearchList.csv.
–– RecentSearchList.csv structure (example)
emailid1@samsung.com Name1 Level1 Team1 Company1
emailid2@samsung.com Name2 Level2 Team2 Company2
emailid3@samsung.com Name3 Level3 Team3 Company3
4 Connect the USB device to FLIP to import contacts.
→ Connect → Advanced Settings → Enter password → Email → Local Address Book →
Import
"" The USB device and its contents may not be detected properly if a USB extension cable
is used. (USB hubs are not supported.)
"" Do not remove the USB device while loading.
"" If more than two USB devices are connected, some of them may not be detected.
"" USB devices that require higher operating power need to be connected to the USB
(1.0A) port on the back.
"" The file system supports FAT, exFAT, and NTFS formats.
412nd 3rd Description
Advanced Settings LDAP The device support for LDAP is limited to contact search for emailing.
•• Set LDAP Connection
Configure a new LDAP connection.
–– Use LDAP: Whether or not to use LDAP
–– Import Setup Value: Can fetch the following settings from LDAPConnectionConfig.txt stored on the USB(Password
excluded)
"" For more information, refer to 'How to create a text file for use of LDAP'.
–– Authentication Type: Kerberos, Basic or Anonymous whichever is supported by the LDAP server
–– User ID: DN(Distinguished Name) of the User ID that is used in the LDAP server
"" The format of User ID complies with the DN format of LDAP.
e.g. cn=admin, dc=myldap, dc=com
–– Password: Password that is used for authentication of the LDAP server
–– Server Address: IP or URL of the LDAP server
–– Server Port Number: Port number of the LDAP server
–– Base DN: Top DN that is to be used for search in the DIT(Directory Information Tree) when connecting the LDAP
–– SSL/TLS: Whether or not to use SSL/TLS
"" When SSL/TLS is set to be Use, the encrypted data communication is enabled.
–– Use Untrusted Certificates: Whether or not to allow untrusted certificates
–– Kerberos Realm: Kerberos realm data
–– KDC Host: KDC Host URL
–– KDC Port: KDC Host port number
422nd 3rd Description
Advanced Settings LDAP •• LDAP Query Configuration
Set the query for the connected LDAP.
–– UID: Change the user UID that is used in LDAP.
–– Email: Change the Email that is used in LDAP.
–– Name: Change the user name (common name) that is used in LDAP.
–– Last Name: Change the surname of the user that is used in LDAP.
–– Position: Change the title that is used in LDAP.
–– Company name: Change the company name that is used in LDAP.
–– Department: Change the department name that is used in LDAP.
–– Custom Query: Fetches the user defined query from LDAPQuery.txt (case sensitive) stored on the USB.
"" For more information, refer to 'How to create a text file for use of LDAP'.
"" Press the Reset button to restore the settings to the factory defaults.
"" When the mapping does not match, the search result does not include the attributes.
43How to create a text file for use of LDAP
The LDAP configuration basically consists of many long sentences. (2) Allocation of values (VAL) for each key
During LDAP configuration, FLIP can be fetched using the text file to prevent typos and make a User ID: Enter the User ID.
batch setting. Server Address: Enter the IP or URL of the LDAP server.
"" Input of file name and content should be case sensitive for correct operation. Server Port Number: Enter the Port of the LDAP server.
•• Format of LDAPConnectionConfig.txt SSL/TLS: Enter Use or Don't Use.
(1) Example of the text file Use Untrusted Ceritificates: Enter Use or Don't Use.
User ID=cn=Manager, dc=example, dc=com Authentication Type: Enter Basic or Anonymous.
Server Address=123.456.789.012 ‒‒ The following three items will be added if you select Kerberos type verification.
Server Port Number=12345 Kerberos Realm: Fill in the Kerberos field (Example: MYLDAP.LDAP)
Base DN=dc=samsung, dc=example, dc=com KDC Host: Enter the KDC Host URL (Example: krb1.myldap.com)
SSL/TLS=Don't Use KDC Port: Enter the KDC Host Port (Example: 88)
Use Untrusted Certificates=Don't Use "" If you select to use Kerberos type verification, use the original Kerberos User ID for
a User ID instead of User ID in DN(Distinguished Name) format. (Example: Mirko)
Authentication Type=Basic
Kerberos Realm=MYLDAP.COM
KDC Host=krb1.myldap.com
KDC Port=88
44•• Format of LDAPQuery.txt (2) Allocation of values (VAL) for each key
(1) Example of the text file 1) Mapping part (all rows except the last)
UID=uid ‒‒Includes all rows except the last, in the order of UID, Email, Name, Last Name,
Position, Company name, and Department.
Email=mail
‒‒Values are mapped in the following manner.
Name=cn
On the left of "=" syntax is the name that is seen in the LDAP Query Configuration
Last Name=sn menu (also on the left) and mapped to the values on the right side of "=" (the actual
Position=title LDAP Server attributes).
Company Name=o ‒‒You can choose attributes to change values. For instance, you can change the right-
Department=departmentNumber side values without changing the left-side values.
2) Query part
Query=(|(mail=**)(cn=**))
‒‒ is the Keyword that is used for a Search.
‒‒The syntax for the Custom Query complies with the LDAP Query rule excluding .
For example, when is included in the mail or cn attribute, you can create it as
follows.
Query=(|(mail=**)(cn=**))
452nd 3rd Description
Advanced Settings Print Server Set up the Print Server to use the printing function.
"" For more information, refer to 'Printing'.
•• Connect to Server
–– Auto: View and select one from a list of server IP addresses of the PCs where Flip Printing Software is installed,
available on the network.
–– Manual: Enter the Server IP address of the PC where Flip Printing Software is installed.
Network Drive Add or edit network drive accounts. You can only add network drives by using Samba.
•• Add Account: Add new network drive accounts. Only Samba can be added to the network drive.
"" SAMBA 2.0 or later is supported. If you cannot connect to the network drive, update SAMBA to the latest version.
"" To register a network drive account, you must enter the Address, Username, and Password.
–– Address: //computer IP address/shared folder name
Add Account
"" When entering an address, be sure to use / instead of ₩
and \. Address //12.34.56.789/sharedfolder
For example, if you share a folder named "sharedfolder" on Username DomainName\WindowsAccount
a PC with IP address of 12.34.56.789, enter "//12.34.56.789/
sharedfolder" as the address. Password ********
–– Username: A Windows account with permissions to the shared
folder
"" When entering a domain, be sure to use ₩ or \.
For example, DomainName₩WindowsAccount Save Cancel
–– Password: The password you set for your Windows account
•• Edit Account: Edit network drive accounts.
46System
2nd 3rd Description
Language Change your Language settings.
Time Configure various time-related settings.
Clock Set Set current date and time.
DST Adjust clock for Daylight Saving Time.
"" Start Date, End Date and Time Offset are enabled only when DST is set to On.
Smart Security Security provided to protect your display device and connected storage devices against viruses includes.
Scan Inspect your display device and connected storage devices to check for viruses.
Isolated List Check the list of items that have been isolated they contain viruses.
Change PIN Change the 4-digit password required to use the Advanced Settings functions and the Reset All function.
"" The default PIN number is 0000.
"" Change the PIN to keep your device secure.
Device Name Enter Device Name.
You can find this name on the device being used over the network.
47You can also read