Matrox MuraControl for Windows - User Guide (for software version 3.00)
←
→
Page content transcription
If your browser does not render page correctly, please read the page content below

Matrox® MuraControl™ for Windows®
User Guide (for software version 3.00)

20179-301-0300
2014.02.25

    1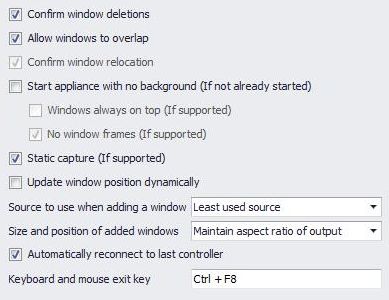
Contents
1 About this user guide........................................................................................ 4
        1.1 Using this guide .................................................................................................... 4
        1.2 More information................................................................................................... 4

2 Overview............................................................................................................ 5
        2.1 Features ................................................................................................................ 5
        2.2 Hardware required ................................................................................................ 5

3 Installing MuraControl software ....................................................................... 6
        3.1 Before you begin................................................................................................... 6

4 Getting started with MuraControl..................................................................... 7
        4.1 Accessing MuraControl ........................................................................................ 7
        4.2 Connecting to the controller ................................................................................. 7
        4.3 Understanding the main interface ........................................................................ 8
        4.4 Understanding the canvas.................................................................................... 8
        4.5 Using the canvas .................................................................................................. 8

5 MuraControl .................................................................................................... 10
        5.1 Connecting to the controller ............................................................................... 10
        5.2 MuraControl settings .......................................................................................... 11
        5.3 Stopping the appliance....................................................................................... 12
        5.4 About .................................................................................................................. 12
        5.5 Exit ...................................................................................................................... 12

6 Layouts ............................................................................................................ 13
        6.1 Layout management options .............................................................................. 13
        6.2 Settings............................................................................................................... 13
        6.3 Changing the layout............................................................................................ 15
        6.4 Locking the layout .............................................................................................. 16
        6.5 Managing multiple layouts.................................................................................. 16
        6.6 Importing and exporting a layout........................................................................ 16
        6.7 Marquee.............................................................................................................. 17

                                                                          Matrox MuraControl for Windows – User Guide                   2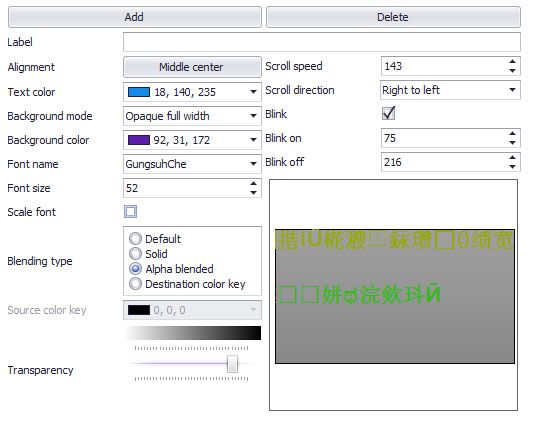
7 Windows...........................................................................................................18
            7.1 Window management options............................................................................ 18
            7.2 Defining the Z-order of a window ....................................................................... 18
            7.3 Settings............................................................................................................... 19
            7.4 Pinning a window ............................................................................................... 23
            7.5 Size ..................................................................................................................... 23
            7.6 Sources............................................................................................................... 23

    8 Sources ............................................................................................................24
            8.1 Source management options ............................................................................. 24
            8.2 Adding a source.................................................................................................. 25
            8.3 Settings............................................................................................................... 27
            8.4 Inactive stream ................................................................................................... 32
            8.5 Show side panel ................................................................................................. 32

    9 View ..................................................................................................................33
            9.1 Show or hide....................................................................................................... 33
            9.2 Snap to ............................................................................................................... 33
            9.3 Grid ..................................................................................................................... 33
            9.4 Grid lines............................................................................................................. 34
            9.5 Output labels ...................................................................................................... 34

10 Schedules ........................................................................................................35
           10.1Recurring layouts................................................................................................ 35
           10.2Scheduled layouts .............................................................................................. 36

11 Troubleshooting ...............................................................................................37
           11.1Common problems and solutions ...................................................................... 37

12 Appendix – Creating a display wall layout......................................................38
           12.1Step-by-step configuration ................................................................................ 38

13 Notes ................................................................................................................40
           13.1General ............................................................................................................... 40
           13.2Sources............................................................................................................... 40

14 Customer support............................................................................................41
           14.1Matrox Web ........................................................................................................ 41
           14.2Technical support ............................................................................................... 41

3     Matrox MuraControl for Windows – User Guide
1 About this user guide
Your Matrox user guide provides information on installing and using Matrox MuraControl for
Windows software. This guide also provides information on MuraControl features and options.
Note: This guide has references specific to version 3.00 of Matrox MuraControl for
Windows. If you’re using a previous version of the Matrox driver, certain references in this
guide may not reflect the software you have.
1.1 Using this guide
This guide assumes you’re familiar with basic functions like click, right-click and double-click, and
that you’re familiar with the basics of the operating system you’re using. Also, we use the following
conventions:
Bold for headings and for references to text that appears on-screen.
Italics for emphasis, file names, paths, publication titles, and new terms.
Bold Italics for emphasis.
Keyboard keys in square brackets, with a plus sign separating keys that you press
simultaneously. For example: press [Ctrl]+[Alt]+[Del] to start Windows Task Manager.
Arrows (“Æ”) to separate ordered directions. For example, “click OK Æ Close Æ OK” is
the same as “click OK, then click Close, then click OK”.
Green for cross-references. If you’re viewing online, click green text to jump to what’s
being referenced.
1.2 More information
This guide assumes your Matrox Mura MPX Series product is properly connected. For more
information on the connection setup of your product, see your Matrox Mura MPX Series user guide.
We provide additional information in help and Readme files. Be sure to check for any last-minute
release notes included with your product. Also, check the Matrox Web site
(www.matrox.com/graphics) for the latest Matrox software, technical support, and product
information.
Matrox MuraControl for Windows – User Guide 42 Overview
Matrox MuraControl for Windows is a program that enables you to manage your Matrox Mura
MPX-based display wall. You can use MuraControl software to create, save, and edit layouts so your
source content appears where and how you want it.
2.1 Features
Matrox MuraControl for Windows software supports the following features:
Run the software locally or remotely.
Create, save, rename, copy, and delete layouts.
Import or export layouts.
Position, re-size, crop, and label windows anywhere on the display wall.
Rename, crop, rotate, and apply color, text overlay, and de-interlacing filters to source
content.
Adjust source-specific hue, saturation, brightness, and contrast color correction
parameters.
Add and control external applications (such as VLC®, VNC®, and Microsoft®
PowerPoint®), Web pages, HTML5 sources, and images on the display wall.
Create layout schedules to automatically switch from one layout to another.
Identify Mura MPX controllers within the local subnet using UPnP (Universal Plug and
Play).
2.2 Hardware required
To run Matrox MuraControl for Windows, the following hardware is required:
Matrox Mura MPX Series hardware
USB dongle (software license)
5 Matrox MuraControl for Windows – User Guide3 Installing MuraControl software
This section describes how to install Matrox MuraControl for Windows.
3.1 Before you begin
To be able to install and run MuraControl, the following must be installed:
On the Mura system Matrox Network API
(where Mura MPX cards are Microsoft Windows 7 (64-bit) and Windows Server 2008 R2
installed)
Matrox driver version 2.04.01 or later*
On the client system Microsoft .NET Framework 4.0
(where MuraControl for Microsoft Windows XP (32-bit or 64-bit), Microsoft
Windows is installed)
Windows 7 (32-bit or 64-bit), Windows Server 2008 R2,
Microsoft Windows 8 (32-bit or 64-bit), and Microsoft
Windows 8.1 (32-bit or 64-bit)
* Depending on the driver version you’re using, certain options documented in this guide may not be available.
To run MuraControl for Windows, you must be using Matrox Mura MPX Series hardware.
3.1.1 Obtaining MuraControl software
Matrox MuraControl for Windows software is available for download on the Matrox Web site
(www.matrox.com/graphics/en/products/display_wall/mura_mpx_series/muracontrol/win
dows).
3.1.2 Installing MuraControl software
To install Matrox MuraControl for Windows on the remote system (client), launch
MuraControlSetup.msi, then follow the on-screen instructions.
3.1.3 USB dongle
A 21-day free trial of Matrox MuraControl for Windows is available for download. Following
the expiry of the 21-day free trial, you must purchase a software license in the form of a USB
dongle to continue using MuraControl for Windows software.
To purchase a software license, contact your Matrox representative.
Matrox MuraControl for Windows – User Guide 64 Getting started with MuraControl
This section describes how to access MuraControl software and provides an overview of the main
interface.
4.1 Accessing MuraControl
To access Matrox MuraControl:
Click the MuraControl icon ( ) on your desktop.
Click Start Æ All programs (or Programs) Æ Matrox Graphics Æ MuraControl for
Windows Æ MuraControl for Windows.
4.2 Connecting to the controller
To be able to run MuraControl, you’ll need to enter the IP address, port, and password (if one
was specified) of the controller you want to connect to. When you’re done, click OK.
Entering an IP address When you start MuraControl for the first time, you’ll be
prompted to manually enter the IP address of the
controller you want to connect to. If you don’t enter an IP
address, you’ll be prompted each time you start the
application until you enter a valid IP address. Once a valid
IP address is entered, the IP address is automatically saved.
If UPnP is enabled, the controllers currently on the subnet
will be automatically discovered. To connect to a
controller, select the controller from the drop-down list
that appears.
If you want to run MuraControl on the Mura controller,
enter “localhost” as your IP address.
Entering a port Enter the port address of the controller. If you never
changed the port on your Mura MPX controller, we
recommend leaving it at 23.
Entering a password If the controller you want to connect to is password
protected, MuraControl will use the password entered, if
one was specified. If the password specified is invalid, you’ll
be prompted to specify a new password.
To open MuraControl settings, click Settings.
7 Matrox MuraControl for Windows – User Guide4.3 Understanding the main interface
MuraControl features and controls are divided into categories on the main interface of Matrox
MuraControl.
The available categories are:
MuraControl – Connect to a controller and specify the settings for your MuraControl
software. (See “5 - MuraControl”, page 10.)
Layouts – Configure and manage your layout, specify the settings of your layout, and
make your layout active on the Mura MPX-based display wall. (See “6 - Layouts”, page
13.)
Windows – Manage your stream windows and modify the properties of your windows.
(See “7 - Windows”, page 18.)
Sources – Modify the settings for your sources. (See “8 - Sources”, page 24.)
View – Create grids and grid lines to help you better position your windows and
configure your layout. (See “9 - View”, page 33.)
Schedules – Schedule your layouts to change at specified times. (See “10 - Schedules”,
page 35.)
4.4 Understanding the canvas
The MuraControl canvas enables you to manually create your layout and to preview it before making
the layout active on your Mura MPX-based display wall. That is, you can use the canvas to manipulate
the layout of your displays and to visualize how your displays appear on your display wall.
4.4.1 Adjusting the settings of your layout
The area in the bottom right-hand corner of the canvas enables you to adjust the zoom level.
You can also view the display resolution and position of your window. To change the display
resolution and position of your window, see “7.3 - Settings”, page 19.
4.5 Using the canvas
This section describes how to use your canvas to manually configure your display wall layout. By
dragging your windows, you can rearrange your canvas to more closely match the physical
arrangement of your monitors.
Matrox MuraControl for Windows – User Guide 84.5.1 Shortcut menu
Use the shortcut menu to quickly modify your display wall layout.
To access the shortcut menu, right-click the windows on your layout. The menu items
include:
Delete Delete a window from your layout. This option also deletes
the marquee text from your layout.
Marquee Add a marquee to your display wall.
Play Play an application source.
Pause Pause an application source that’s playing.
Size Select a predefined size or specify a custom size for your
window, or choose to have your window fit your display
wall.
Source Select a source.
Source settings View and modify the settings of your input stream.
Window settings View and modify the settings of your window.
Z-order Select which windows are in the foreground and which are
in the background.
9 Matrox MuraControl for Windows – User Guide5 MuraControl
This section provides information on your MuraControl settings and explains how to connect to a
controller.
5.1 Connecting to the controller
IP address When you start MuraControl for the first time, you’ll be
prompted to manually enter the IP address of the controller you
want to connect to. If you don’t enter an IP address, you’ll be
prompted each time you start the application until you enter a
valid IP address. Once a valid IP address is entered, the IP
address is automatically saved.
If UPnP is enabled, the controllers currently on the subnet will
be automatically discovered. To connect to a controller, select the
controller from the drop-down list that appears.
If you want to run MuraControl on the Mura controller, enter
“localhost” as your IP address.
Port Enter the port address of the controller. If you never changed the
port on your Mura MPX controller, we recommend leaving it at
23.
Password If the controller you want to connect to is password protected,
MuraControl will use the password entered, if one was specified.
If the password specified is invalid, you’ll be prompted to specify
a new password.
5.1.1 Recent controllers
This lists the most recently used controllers. To connect to a recently used controller, click the
controller you want to open.
Matrox MuraControl for Windows – User Guide 105.2 MuraControl settings
MuraControl settings enable you to manage your windows and controllers.
Confirm window deletions This prompts for confirmation every time a window is deleted
from the layout.
Allow windows to overlap This enables windows to overlap one another.
Confirm window relocation This prompts for confirmation when a window is moved to
another location in the layout.
Start appliance with no If the appliance isn’t already started, enable this option to start
background (If not already the appliance without a background. Otherwise, the appliance
started) starts with the default black background.
Windows always on top (If supported) – Enable this to have
your MuraControl windows (your stream windows) always
stay on top of other windows. This option is supported only if
Start appliance with no background is enabled.
No window frames (If supported) – Enable this to remove the
window frames. This option is supported only if Start
appliance with no background is enabled.
Static capture (If supported) Enable this to prevent the automatic reconfiguration of streams.
Enabling this optimizes the capture process, but may affect
rendering performance.
Update window position This enables you to instantly see where the window is being
dynamically moved on the Mura MPX-based display wall.
Source to use when adding a You can select one of the following options:
window No source – No source used. A window is added and labeled
None.
Least used source – Use the least used source to the window
added.
Prompt – Prompt to select the source to use from a list of
sources.
11 Matrox MuraControl for Windows – User GuideSize and position of added Select how windows are scaled when they’re added to your
windows layout. You can select one of the following options:
Maintain aspect ratio of source – Use the aspect ratio of the
source for the window.
Maintain aspect ratio of output – Use the aspect ratio of the
output for the window.
Use mouse – Use your mouse cursor to manually size and
position the window.
Automatically reconnect to This enables you to automatically reconnect to the most recently
last controller used controller every time you start MuraControl.
Keyboard and mouse exit Define a key combination to exit the virtual keyboard and
key mouse on your display wall when playing an application source.
5.3 Stopping the appliance
Click Stop the appliance to stop your appliance. You’ll be prompted to confirm your selection.
5.3.1 Starting the current appliance again
Once your appliance has stopped, the software will be locked until you start the appliance again. To
start your appliance again, click Start the current appliance again.
5.3.2 Connecting to a different appliance
If you want to connect to a different appliance, click Connect to a different appliance. You’ll be
prompted to enter an IP address and port for the new appliance you want to connect to. You may also
be prompted to enter a password, if one was specified.
5.3.3 Stopping MuraControl
Click Stop MuraControl to stop and exit MuraControl software.
5.4 About
Provides information specific to your MuraControl software (such as the version).
5.5 Exit
Click Exit to exit and close MuraControl.
Matrox MuraControl for Windows – User Guide 126 Layouts
This enables you to configure and manage your layout, specify the settings of your layout, and make
your layout active on the Mura MPX-based display wall.
6.1 Layout management options
The following describes the basic functions of managing your layouts.
Creating Click the New ( ) icon, enter a name for your new layout,
then click OK. The name field can’t be left blank.
Renaming Click the Rename ( ) icon, enter a new name for your layout,
then click OK.
Copying Click the Copy ( ) icon, enter a name for the layout you want
to copy, then click OK.
Deleting Click the Delete ( ) icon, then click Yes to delete the layout.
Clearing Click the Clear ( ) icon, then click Yes to clear the windows
from a layout.
6.2 Settings
The settings enable you to change the appearance of your layout. To view these settings, click the
Settings ( ) icon.
6.2.1 Background
Note: Depending on the driver you’re using, certain options may not be available.
6.2.1.1 Background color
The background color of your layout. You can select one of the following options:
Custom Create a custom color setting using the color palette.
13 Matrox MuraControl for Windows – User Guide6.2.1.2 Images
Note: This option is available only if windows have been added to the layout.
The background image of your layout. Background images are used at their original
resolution and are neither scaled nor tiled on your layout.
To upload images to your appliance:
1 Enter a URI or browse to C:\ProgramData\Matrox Graphics Inc\Window Manager. (If
this folder is hidden, see your Windows documentation for information on how to show
hidden folders and files.)
2 Under Window Manager, create a folder called Images, and move your images to this
folder. (MuraControl software supports PNG and BMP file formats.)
After images have been uploaded to your appliance:
1 Launch MuraControl.
2 Under Layouts Æ Settings Æ Background, select the image you want to use, then enter
the Position (X, horizontal and Y, vertical) for your image.
3 When you’re done, click OK.
6.2.1.3 Blending type
Note: Depending on the blending type selected, the options available may change.
Select one of the following blending types:
Default The image is opaque. This is the default setting.
Solid The image is opaque.
Alpha blended The image is blended with the source content.
Source color key The image is opaque. The image content that matches the
source color key is transparent.
Source color key and The image is blended with the source content. The image
alpha blended content that matches the source color key is transparent.
Destination color key The content that matches the color key is replaced with the
corresponding pixels from the source content.
6.2.1.4 Color key
This can be either Source color key or Destination color key, depending on the blending type
selected.
Matrox MuraControl for Windows – User Guide 146.2.1.5 Transparency
Adjust the transparency level for your window.
6.2.2 Border
You can change the appearance of your window borders depending on your needs.
Style The border style for the windows in your layout. You can
select one of the following options:
None – No border is applied.
Solid – A solid border is applied.
Bumped – A rounded border is applied.
Color The RGB color of the window border. To select a color,
click the color button.
This setting has no effect if the border style is set to None.
Size The width, in pixels, of your window border.
This setting has no effect if the border style is set to None.
6.3 Changing the layout
MuraControl allows you to create and preview new layouts, and make them active only when you’re
ready to go live with your display wall layout.
6.3.1 Preview layout
The MuraControl canvas shows a preview of the layout you’re currently configuring. This
may not be the active layout. The preview shows the dimensions of each output, the setup of
your layout, and the windows in your layout.
6.3.2 Active layout
The active layout is the layout currently in use on the Mura MPX-based display wall.
6.3.3 Make preview layout active
Click the green check mark ( ) icon to set the preview layout as the active layout on the
display wall. While a layout is active, the check mark icon turns gray.
15 Matrox MuraControl for Windows – User Guide6.3.4 Show side panel
With this feature, you can quickly switch between layouts already created. Click the Show
side panel ( ) icon to view a list of your current layouts on the left-hand side of the screen.
When you select a layout from the side panel, the layout is automatically made active.
6.4 Locking the layout
Click the green lock ( ) icon to lock your layout. When a layout is locked, a red lock ( ) appears.
While a layout is locked, you can’t add, delete, resize, or move your windows. You can only select a
different source for your window.
6.5 Managing multiple layouts
This enables you to quickly copy or delete multiple layouts at a time.
6.6 Importing and exporting a layout
Use this option to import or export an existing layout, and apply those settings to another setup.
6.6.1 Exporting
To export an existing layout:
1 Click the Export ( ) icon.
2 Browse to the destination folder where you want to save your layout.
3 Enter a name for the layout file you want to export, then click Save.
6.6.2 Importing
To import an existing layout:
1 Click the Import ( ) icon.
2 Browse to the folder that contains the layout file.
3 Select the layout file you want to import, then click Open.
Matrox MuraControl for Windows – User Guide 166.7 Marquee
Use this to add, edit, and manage scrolling text (marquee) across your Mura MPX-based display wall.
6.7.1 Adding and deleting a marquee
To add a marquee:
1 Click the Marquee icon ( ).
2 Specify the options for your marquee.
3 When you’re done, click OK.
To delete a marquee:
1 Select the marquee window in your preview layout.
2 Right-click the window, then click Delete. You may be prompted to confirm your
change.
6.7.2 Marquee options
This enables you to create a marquee across the entire display wall.
To customize the look of your marquee, you can adjust the following settings:
Marquee text Type the text for your marquee.
Alignment The Top, Middle, or Bottom alignment of your marquee
text. The default is Top.
Height The height of the marquee text. The default is set to 10%
of the vertical resolution of the display wall.
Text color The RGB color used for the marquee. The default is white.
Transparent This enables the transparency for the marquee text.
Background color The RGB color used for the background. To select a color,
click the color button. The default is black.
Font name The font used for the marquee text. The default is Arial.
Scroll speed The scrolling speed of your marquee text. The default is 1.
Blink This enables your marquee text to blink.
Blink on and off This sets the blinking rate (on and off) for the marquee
text.
17 Matrox MuraControl for Windows – User Guide7 Windows
This section describes how to manage your windows and modify the properties of your windows.
7.1 Window management options
The following describes the basic functions of managing your windows.
Adding Click the Add ( ) icon. If no free space is available on the wall,
other windows will be resized and moved to make room for the
new window.
If the Use mouse option was selected, you can use your mouse
to add a window. For more information, see “5.2 - MuraControl
settings”, page 11.
Deleting Select the window you want to delete, then click the Delete
( ) icon.
7.2 Defining the Z-order of a window
If windows are overlapping, you may need to control which windows are in the foreground
and which are in the background.
Note: This option is available only if windows have been added to the layout.
Note: This option is also only available if the windows are overlapping. To enable
window overlapping, enable the Allow windows to overlap option. For more
information, see “5.2 - MuraControl settings”, page 11.
The options available in this menu vary depending on whether windows are over or under
the selected window.
Send to back Send the windows to the back layer of the windows.
Send backward Send the windows backward one layer of windows at a
time.
Bring to front Bring the windows to the front layer of the windows.
Bring forward Bring the windows forward one layer of windows at a time.
Matrox MuraControl for Windows – User Guide 187.3 Settings
The properties enable you to change the appearance of your windows. To view these settings, click the
Settings ( ) icon.
7.3.1 General
This enables you to adjust the general settings for your windows.
Label The name of your window.
Source The source for the stream in the window.
Left, Top Enter the position (Left, Top) of the window.
Width, Height Enter the display resolution (Width, Height) for your
window.
Maintain aspect ratio Enable this option to maintain the aspect ratio of your
window.
Scaling filter Choose a scaling filter for your window (Anisotropic,
Bilinear, Constant, Gaussian, Nearest, or Pyramidal). The
default is Bilinear.
7.3.2 Border
To customize the look of your window border, you can adjust the following settings:
Style The border for your window. Possible choices are:
Default – The border that was defined for your layout is
applied.
None – No border is applied.
Solid – A solid border is applied.
Bumped – A rounded border is applied.
Color The RGB color of your window border. This setting is
disabled if the border style is set to None. To select a color,
click the color button.
19 Matrox MuraControl for Windows – User GuideSize The width, in pixels, of your window border. This setting
is disabled if the border style is set to None.
7.3.3 Cropping
Use this to crop the content of your window. Enter the values, in pixels, to crop the Left,
Right, Top, and Bottom sides of your window.
Click Reset to restore window cropping settings to their default values.
7.3.4 Blending
Note: Depending on the driver you’re using, certain options may not be available.
Note: Depending on the blending type selected, the options available may change.
7.3.4.1 Blending type
Select one of the following blending types:
Default The image is opaque. This is the default setting.
Solid The image is opaque.
Alpha blended The image is blended with the source content.
Source color key The image is opaque. The image content that matches the
source color key is transparent.
Source color key and The image is blended with the source content. The image
alpha blended content that matches the source color key is transparent.
Destination color key The content that matches the color key is replaced with the
corresponding pixels from the source content.
7.3.4.2 Color key
This can be either Source color key or Destination color key, depending on the blending type
selected.
7.3.4.3 Transparency
Select the transparency level for your window.
Matrox MuraControl for Windows – User Guide 207.3.5 Text overlay
Note: Depending on the driver you’re using, certain options may not be available.
Provides full control of your text overlays by enabling you to adjust such settings as the color
of the text, the name and size of the font, the placement of the text, and the scroll speed.
7.3.5.1 Text overlay options
To customize the look of your text overlay, you can adjust the following settings:
Add, Delete To add a text overlay, click Add, then enter your text.
To delete a text overlay, select the text you want to delete,
then click Delete.
Alignment The placement of the text overlay. The possible values are:
Top left, Top center, Top right, Middle left, Middle center,
Middle right, Bottom left, Bottom center, and Bottom
right.
Text color The RGB color of the text overlay. To select a color, click
the color button.
Background mode The background mode for the text overlay. You can select
one of the following options:
Transparent – No background.
Opaque – Background is limited to behind the text.
Opaque full width – Background covers the entire width
of the window.
21 Matrox MuraControl for Windows – User GuideBackground color The RGB color used with an opaque background. If a
transparent background is used, this setting is disabled. To
select a color, click the color button.
Font name The font used for the text overlay.
Font size The size of the font used for the text overlay. The default
point size is 24.
Scale font Enable this option if you want to scale the font
proportionally to the size of the window.
Blending type Select one of the following blending types:
Default – The image is opaque. This is the default
setting.
Solid – The image is opaque.
Alpha blended – The image is blended with the source
content.
Source color key – The image is opaque. The image
content that matches the source color key is transparent.
Source color key and alpha blended – The image is
blended with the source content. The image content that
matches the source color key is transparent.
Destination color key – The content that matches the
color key is replaced with the corresponding pixels from
the source content.
Scroll speed The scroll speed for the text overlay, in the number of
pixels the text overlay is moved per frame per second. The
default is 0.
Scroll direction The scroll direction for the text overlay (Left to right or
Right to left).
Blink Enable this option if you want your text overlay to blink.
Blink on and off This sets the blinking rate (on and off) for the text overlay.
7.3.6 Image overlay
Note: This option is available only if windows have been added to the layout.
You can use an image as an overlay over the video input. The image overlay is used over the
video input at its original resolution.
To upload images to your appliance:
1 Enter a URI or browse to C:\ProgramData\Matrox Graphics Inc\Window Manager. (If
this folder is hidden, see your Windows documentation for information on how to show
hidden folders and files.)
Matrox MuraControl for Windows – User Guide 222 Under Window Manager, create a folder called Images, and copy your images to this
folder. (MuraControl software supports PNG and BMP file formats.)
After images have been uploaded to your appliance:
1 Launch MuraControl.
2 Under Windows Æ Settings Æ Image overlay, select the image you want to use, then
enter the Position (X, horizontal and Y, vertical).
3 When you’re done, click OK.
7.4 Pinning a window
When the window is pinned, the source maintains the same aspect ratio. Resizing the window crops
the source.
When the window isn’t pinned, the source scales to the size of the window. Resizing the window
doesn’t crop the source.
7.5 Size
Use this to select a predefined or a custom size for your window.
Predefined size This enables you to select a predefined size for your
window.
Custom size This enables you to specify the size of your window. When
you’re done, click OK.
Fit wall size This enables you to resize the window to fit your wall.
7.6 Sources
This shows the source for the stream in the window.
23 Matrox MuraControl for Windows – User Guide8 Sources
This section describes how to add, view, and modify the settings for your sources.
8.1 Source management options
The following describes the basic functions of managing your sources.
Selecting a source Select a source from the drop down menu.
Adding To add a source, see “Adding a source”, page 25.
Renaming To rename a source, click Rename, enter a new name for
your source, then click OK.
Deleting To delete a source, select the source you want to delete,
then click Delete.
Not all source types can be deleted.
Playing If an application source is added to a window, that window
is labeled with an icon to identify the type of source.
Depending on your application source, the following icons
may appear:
HTML5 ( )
Image ( )
PowerPoint ( )
Source touring ( )
VLC ( )
VNC ( )
Web page ( )
Depending on your source, the following options may also
be available:
PowerPoint presentation – Hover over your window
and click the Next ( ) or Previous ( ) button. To
pause your presentation, click the Pause ( ) button.
VLC stream – Hover over your window and click the
Play ( ) button. To pause your stream, click the
Pause ( ) button.
Matrox MuraControl for Windows – User Guide 248.2 Adding a source
Note: Depending on the driver you’re using, certain options may not be available.
The following provides information on how to add an application source to MuraControl.
8.2.1 HTML5
1 Click Add, then enter a name for your source.
2 Select HTML5 for the type of source you want to add, then click OK.
3 If necessary, adjust the settings, enter the URL and modify the Render mode for your
source.
4 When you’re done, click OK.
8.2.2 Image file
1 Click Add, then enter a name for your source.
2 Select Image for the type of source you want to add, then click OK.
3 If necessary, adjust the settings for your image.
4 Browse to the location of your file.
5 When you’re done, click OK.
8.2.3 PowerPoint presentation
1 Click Add, then enter a name for your source.
2 Select PowerPoint presentation for the type of source you want to add, then click OK.
3 Browse to the location of your file.
4 When you’re done, click OK.
8.2.4 Source touring
1 This feature enables you to quickly and efficiently cycle through multiple sources.
2 Click Add, then enter a name for your source.
3 Select Source touring for the type of source you want to add, then click OK.
25 Matrox MuraControl for Windows – User Guide4 A new dialog box will open. Select the Sources you want to use, then move them to the
Selected sources list.
5 Set the Interval speed, in seconds, to determine how fast you want your sources to cycle.
6 When you’re done, click OK.
8.2.5 VLC stream
1 Click Add, then enter a name for your source.
2 Select VLC stream for the type of source you want to add, then click OK.
3 Browse to the URI protocol where the VLC stream is located.
4 Adjust the volume for the file.
5 When you’re done, click OK.
8.2.6 VNC viewer
1 Click Add, then enter a name for your source.
2 Select VNC viewer for the type of source you want to add, then click OK.
3 Select either VNC configuration file or VNC server. If you select VNC configuration file,
choose the proper file. If you select VNC server, enter the name of the server.
4 When you’re done, click OK.
8.2.7 Web page
1 Click Add, then enter a name for your source.
2 Select Web page for the type of source you want to add, then click OK.
3 Enter the URL for the page you want to view.
4 When you’re done, click OK.
Matrox MuraControl for Windows – User Guide 268.3 Settings
The properties enable you to change the settings for your sources. To view these settings, click the
Settings ( ) icon.
8.3.1 General
This provides the general settings for your sources.
Note: Depending on the driver you’re using, certain options may not be available.
Note: Depending on the blending type selected, the options available may change.
Width and Height Specifies the width and height, in pixels, of your source.
These fields can’t be modified.
27 Matrox MuraControl for Windows – User GuideType Specifies the type of connection or source file used by the
stream. The possible types are:
Component ( )
Composite ( )
DVI ( )
HTML5 ( )
Image ( )
IP ( )
PowerPoint ( )
SDI ( )
Source touring ( )
S-Video ( )
VGA ( )
VLC ( )
VNC ( )
Web page ( )
No source ( )
Also, it specifies if the stream is interlaced or de-interlaced.
Rotation Change the orientation of your source. Choose from 0
degrees, 90 degrees clockwise, 180 degrees, and 90
degrees counterclockwise.
Stream filtering This indicates the de-interlacing option used for the input
source. The following de-interlacing options are
supported: Bob, Weave, Single field, and Adaptive.
Adaptive filtering isn’t supported while using an SDI
connection type.
Stream filtering options have no effect while a progressive
input signal is detected.
Color decimation When enabled, this reduces the colors of the stream from
RGB to YUV, and improves performance.
File or URI Browse to the proper folder or URI protocol path of your
source.
Detection filter Detect according to the type of connection (Composite,
S-Video, Component SD, Component HD, VGA, DVI or
HDMI, or SDI).
Phase adjustment This is the input phase adjustment for the selected stream.
Values range between 0 and 31. This option is supported
only with VGA sources.
Capture offsets Set the X or Y position of your capture. This option is
supported only with VGA capture.
Matrox MuraControl for Windows – User Guide 288.3.2 Cropping
Use this to adjust the size of your source. Enter the values, in pixels, to crop the Left, Right,
Top, and Bottom sides of your source.
Click Reset to restore window cropping settings to their default values.
8.3.3 Color correction
This enables you to adjust the color settings of your source.
To reset the values to their original levels, click Reset to default.
Hue Increase or decrease the tint or tone of the colors.
Saturation Increase or decrease the depth of the colors.
Brightness Increase or decrease how light or dark the colors appear.
Contrast Change the difference in brightness between the lightest
and darkest colors.
29 Matrox MuraControl for Windows – User Guide8.3.3.1 Text overlay
Note: Depending on the driver you’re using, certain options may not be available.
Provides full control of your text overlays by enabling you to adjust settings such as the color
of the text, the name and size of the font, the placement of the text, and the scroll speed.
To customize the look of your text overlay, you can adjust the following settings:
Add, Delete To add a text overlay, click Add, then enter your text.
To delete a text overlay, select the text you want to delete,
then click Delete.
Alignment The placement of the text overlay relative to the window.
The possible values are: Top left, Top center, Top right,
Middle left, Middle center, Middle right, Bottom left,
Bottom center, and Bottom right.
Text color The RGB color of the text overlay. To select a color, click
the color button.
Background mode The background mode for the text overlay. The default is
Transparent. You can select one of the following options:
Transparent – No background.
Opaque – Background is limited to behind the text.
Opaque full width – Background covers the entire width
of the video output.
Matrox MuraControl for Windows – User Guide 30Background color The RGB color used with an opaque background. If a
transparent background is used, this value has no effect. To
select a color, click the color button.
Font name The font used for the text overlay. You can only select a
font installed on your appliance.
Font size The size of the font used for the text overlay. The default
point size is 24.
Scale font Enable this option if you want to scale the font
proportionally to the size of the window.
Scroll speed The scroll speed for the text overlay, in the number of
pixels the text overlay is moved per frame per second. The
default is 0.
Scroll direction The scroll direction for the text overlay (Left to right or
Right to left).
Blink Enable this option if you want your text overlay to blink.
Blink on and off This sets the blinking rate (on and off) for the text overlay.
Blending type Select one of the following blending types:
Default – The image is opaque. This is the default
setting.
Solid – The image is opaque.
Alpha blended – The image is blended with the source
content.
Source color key – The image is opaque. The image
content that matches the source color key is transparent.
Source color key and alpha blended – The image is
blended with the source content. The image content that
matches the source color key is transparent.
Destination color key – The content that matches the
color key is replaced with the corresponding pixels from
the source content.
Color key Either Source color key or Destination color key,
depending on the blending type selected.
Transparency Select the transparency level of your text overlay.
31 Matrox MuraControl for Windows – User Guide8.3.4 Image overlay
You can use an image as an overlay over the video input. The image overlay is used over the
video input at its original resolution.
Note: This option is available only if an image has been uploaded to your appliance.
To upload images to your appliance:
1 Enter a URI or browse to C:\ProgramData\Matrox Graphics Inc\Window Manager. (If
this folder is hidden, see your Windows documentation for information on how to show
hidden folders and files.)
2 Under Window Manager, create a folder called Images, and copy your images to this
folder. (MuraControl software supports PNG and BMP file formats.)
After images have been uploaded to your appliance:
1 Launch MuraControl.
2 Under Sources Æ Settings Æ Image overlay, select the image you want to use, then enter
the Position (X, horizontal and Y, vertical) for your image.
3 When you’re done, click OK.
8.4 Inactive stream
This option lets you determine how an input source will behave when a connection is lost.
Action type Default – Displays a solid color (black).
Color fill – Displays a solid custom color.
Default image – Displays the default image.
Custom image – Displays a custom image.
None – No action occurs when the stream is inactive.
Action trigger Detection – When the stream is detected as being
inactive.
Inactivity – When the stream is redetected.
8.5 Show side panel
With this feature, you can quickly switch between sources already created. Click the Show side panel
( ) icon to view a list of your sources on the left-hand side of the screen. Selecting a source from
the side panel automatically applies it. You can also drag a source from the list to a window to apply
that source.
Matrox MuraControl for Windows – User Guide 329 View
This section explains how to create grids and grid lines to help you better position your windows and
configure your layout.
9.1 Show or hide
This enables you to show or hide the output lines, grid, and custom grid lines on your canvas.
9.2 Snap to
When you create a layout, this feature enables your windows to snap to an object in your layout when
you move your windows.
Windows This snaps the windows snap to one another.
Output lines This snaps the window to the lines of the output.
Center of output This snaps the window to the center of the output. The window
must be smaller than the output window.
Center of display wall This snaps the window to the center of the display wall.
Grid This snaps the window to the grid lines.
Custom grid lines This snaps the window to the grid lines you specified. For more
information, see “Grid lines”, page 34.
9.3 Grid
This enables you to add vertical and horizontal lines to your grid.
33 Matrox MuraControl for Windows – User Guide9.4 Grid lines
This option enables you to specify the exact position for your grid line.
To add a vertical or horizontal position for your grid line, click the Add ( ) icon, then enter the
position (in pixels).
To delete a custom grid line, click the Delete ( ) icon next to the grid line you want to delete.
9.5 Output labels
This option allows you to show or edit the labels of your outputs.
Show labels Enable the Show Labels option.
Edit labels Click Edit labels, enter a new name for the output you want to
edit, then click OK.
Matrox MuraControl for Windows – User Guide 3410 Schedules
Note: Depending on the driver you’re using, certain options may not be available.
This option enables you to schedule your layouts to automatically change at specified times.
From the Schedule list, select the schedule you want to use. If you don’t want to use a schedule, select
None.
10.1Recurring layouts
10.1.1Interval
Choose this to have selected layouts change at regular intervals.
1 Choose an existing schedule or click Add to create a new schedule.
2 Select Interval.
3 Set the Interval speed, in seconds, to determine how fast you want your layouts to change.
4 From the list of Layouts, select the layouts you want to use, then move them to the
Selected layout list.
5 When you’re done, click OK.
10.1.2Weekly
Choose this to have selected layouts change on scheduled days and times.
10.1.2.1Adding a new item to the schedule
1 Click the Add ( ) icon.
2 Set the Layout, Day, and Time. To change these settings, you can also click the Settings
( ) icon next to the item.
3 When you’re done, click OK.
10.1.2.2Deleting an item
To delete an item from the schedule, click the Delete ( ) icon next to the item.
35 Matrox MuraControl for Windows – User Guide10.1.2.3Renaming an item
To rename an item, click Rename, enter a new name for your item, then click OK.
10.2Scheduled layouts
The Calendar feature enables you to create a list of scheduled layouts.
10.2.1Adding a new item to the calendar
1 Click the Add ( ) icon.
2 Set the Layout, Day, and Time. To change these settings, you can also click the Settings
( ) icon next to the item.
3 When you’re done, click OK.
10.2.2Deleting an item
To delete an item from the schedule, click the Delete ( ) icon next to the item.
10.2.3Renaming an item
To rename an item, click Rename, enter a new name for your item, then click OK.
Matrox MuraControl for Windows – User Guide 3611 Troubleshooting
11.1Common problems and solutions
This section addresses common problems that could prevent you from using your system or product.
Problem Unable to connect to a controller
1Cause Communication to the controller isn’t being properly established.
1Solution Your Matrox MuraControl software communicates through the telnet port of the Mura
controller via TCP-IP. This means that an IP connection from the client needs to be
established with port 23 of the controller.
To ensure proper communication, we recommend you do the following:
Make sure the firewall on both your local and remote systems is properly configured.
Check the IP configuration of both your local and remote systems.
Check the physical or wireless network connection.
Check the configuration of the routers and switches between your local and remote
systems.
If problems persist, contact your network administrator.
37 Matrox MuraControl for Windows – User Guide12 Appendix – Creating a display wall
layout
Creating a display wall layout involves adding a new layout, adding one or more windows to your
layout, selecting a source for your windows, and making your layout active.
12.1Step-by-step configuration
This section takes you through the step-by-step configuration of your display wall layout.
12.1.1Create a new layout
When you start MuraControl for the first time, you’ll be prompted to create a new layout. To be able
to use MuraControl, at least one layout is required.
To create a new layout:
1 Under Layouts, click the New ( ) icon.
2 When prompted, enter a name for your new layout.
3 When you’re done, click OK.
Note: If you don’t enter a name for the layout, a default name is assigned. The default name
assigned to a layout is New layout. The name field can’t be left blank.
For specific information about layout settings and options, see “6 - Layouts”, page 13.
12.1.2Add a window
To add a new window to your layout:
1 Under Windows, click the Add ( )icon. If no free space is available on the display wall,
other windows will be resized and moved to make room for the new window.
2 Repeat for every window you want to add.
For specific information about window settings and options, see “7 - Windows”, page 18.
Matrox MuraControl for Windows – User Guide 3812.1.3Select your source
To select a source for your windows:
1 Select a window from your layout.
2 Under Windows, go to the Sources drop-down menu.
3 From the drop-down menu, select a source for your window.
For specific information about source settings and options, see “8 - Sources”, page 24.
12.1.4Make your preview layout active
When you’re done, click the green check mark ( ) icon to set the preview layout as the active layout
on the display wall.
39 Matrox MuraControl for Windows – User Guide13 Notes
13.1 General
This section provides more information on issues related to your software.
Universal Plug and Play (UPnP) is supported with Matrox driver version 2.03 or later.
13.2 Sources
This section provides more information on issues related to sources.
13.2.1VNC
MuraControl supports RealVNC viewer version 5.0.3 or later.
If you specify only a server name, the window automatically scales to fit the wall,
regardless of the aspect ratio of the VNC session.
13.2.2Microsoft PowerPoint
MuraControl supports Microsoft PowerPoint Viewer 2010 with Service Pack 1 only.
Matrox MuraControl for Windows – User Guide 4014 Customer support
14.1Matrox Web
Our Web site has product literature, press releases, technical material, a sales office list, trade show
information, and other relevant material. Visit the Matrox Graphics Web site at
www.matrox.com/graphics.
14.2Technical support
Matrox values your business and offers professional support for your Matrox product. If you have a
problem, we recommend you follow the procedure below for the quickest results.
1 Contact your integrator – This is usually the quickest and most effective method of
technical assistance. Your integrator is familiar with your complete system. In the case of
hardware warranty assistance, the product must be returned to the integrator, who will
return it to Matrox.
2 If your Matrox product was provided by your computer manufacturer, contact this
manufacturer. For contact information, see your computer documentation or contact
the vendor.
3 Direct Matrox technical support – If you still can’t resolve a problem (and your Matrox
product wasn’t provided by your computer manufacturer), you can get technical
assistance by contacting Matrox technical support at dwcsupport@matrox.com.
14.2.1Information we need
Please give a complete description of the problem, and include:
Matrox card serial number, model number, revision number, BIOS number, driver type
and version, and memory address at which the Matrox card is installed.
Computer brand and model name.
Monitor brand and model name.
Operating system, version, and service pack.
Brand and model of any other cards and devices installed on your system.
41 Matrox MuraControl for Windows – User Guide14.2.2Program specific problems
If a problem appears with a specific program, please give us the following information:
Display settings (color palette, display resolution, and so on) applied when the problem
occurs.
If possible, take note of the file and segment address that caused the problem.
Detailed steps known to cause the bug, so we can reproduce it.
Matrox MuraControl for Windows – User Guide 42You can also read