Pre-Installation Guide - January 26, 2021 | Version Server 2021 - For the most recent version of this document, visit our documentation website.
←
→
Page content transcription
If your browser does not render page correctly, please read the page content below
Pre-Installation Guide
January 26, 2021 | Version Server 2021

          For the most recent version of this document, visit our documentation website.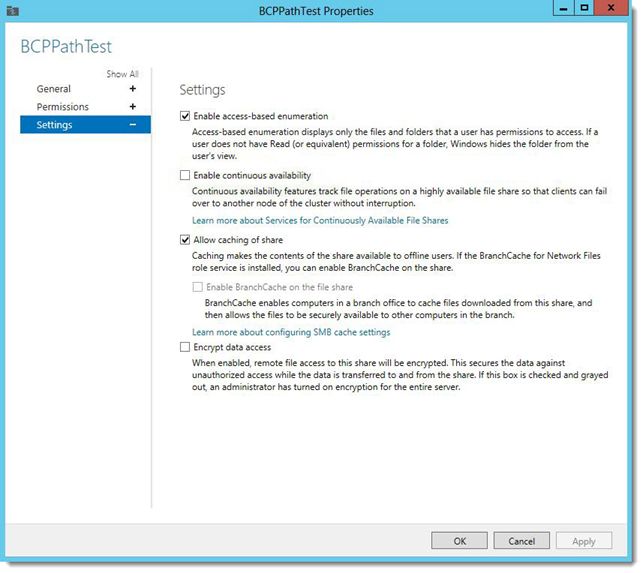
Table of Contents
 1 Pre-installation                                                               5
 2 Windows updates                                                                6
 3 Required certificates for Relativity                                           7
   3.1 Creating a self-signed certificate in PowerShell                           8
     3.1.1 Certificate requirements for message broker                            9
   3.2 Certificate requirements for Service Bus for Windows Server                9
 4 User and group accounts                                                    14
   4.1 Relativity service account                                             14
 5 Database server setup                                                      15
   5.1 Required software                                                      15
   5.2 Enable Microsoft DTC                                                   15
   5.3 Assign admin permissions to the Relativity service account             16
   5.4 Create SQL Server login                                                16
   5.5 Set authentication mode                                                16
   5.6 Create BCP share                                                       17
     5.6.1 Update the permissions on the BCPPath file share                   18
   5.7 Optionally configure an authentication token-signing certificate       19
     5.7.1 Pre-installation steps for a token-signing certificate             20
   5.8 Optionally restrict account permissions for third party applications   20
 6 Web server setup                                                           22
   6.1 Setting IIS options                                                    22
   6.2 IIS role service configuration                                         22
     6.2.1 IIS roles on Windows Server 2012 R2 and Windows Server 2016        22
   6.3 Enabling the WebSocket protocol                                        26
   6.4 Configuring log file options                                           26
     6.4.1 Log file options for Windows Server 2012 R2                        26
   6.5 Configuring SSL on a web server                                        30
     6.5.1 Obtaining a certificate for your web server                        30
     6.5.2 Installing a certificate on your web server                        30

                                         Pre-Installation Guide               2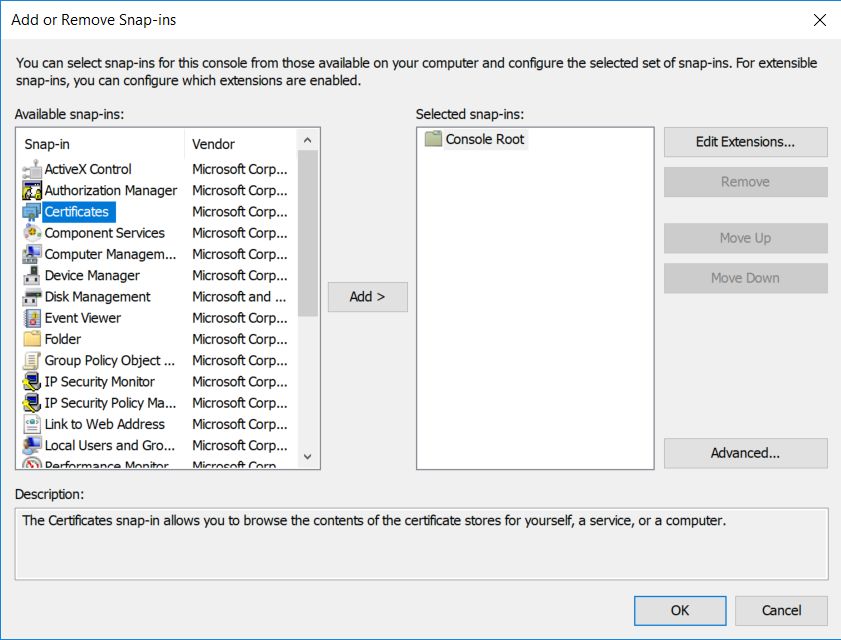
6.5.3 Configuring HTTPS site bindings                       30
   6.5.4 Updating the SSL setting on the IIS                   31
   6.5.5 Setting up HTTPS for Service Host Manager             32
7 Agent server setup                                           33
 7.1 Enabling Microsoft DTC                                    33
 7.2 Enabling HTTP activation                                  33
 7.3 Message broker options                                    35
   7.3.1 Service Bus for Windows Server                        35
   7.3.2 RabbitMQ                                              50
8 File (document) share or server                              59
 8.1 Create share                                              59
9 Cache location server                                        61
10 Analytics server setup                                      62
   10.0.1 Required software                                    62
 10.1 CAAT 4.5.0 and above                                     62
   10.1.1 Create installation index directory                  62
   10.1.2 Assign permissions to the analytics directories      62
   10.1.3 Required setup                                       63
 10.2 Elasticsearch server setup                               65
   10.2.1 Required software                                    65
11 Index share - dtSearch repository                           66
 11.1 Create share                                             66
12 SMTP server setup                                           67
13 Environment modification for processing or native imaging   68
14 Database server for processing or native imaging            69
 14.1 Required software                                        69
 14.2 Relativity Service Account                               69
 14.3 Create Invariant worker network file path share          69
15 Worker server for processing or native imaging              70
 15.1 Required software                                        70
 15.2 Required Microsoft Visual C++ redistributables           71

                                      Pre-Installation Guide   3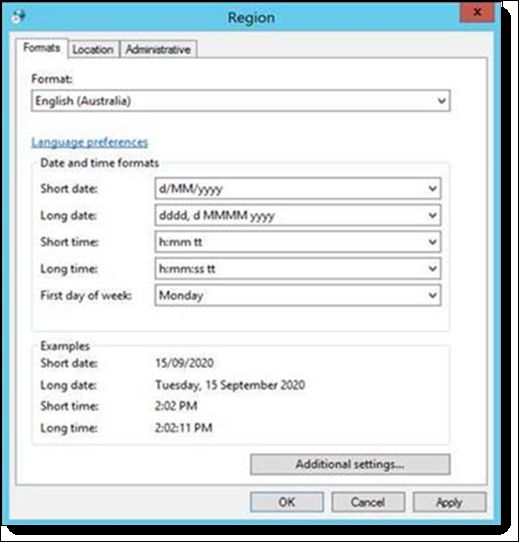
15.3 Relativity Service Account                                71
16 Obtaining applications for native imaging and processing      72
17 Default log file location                                     73
18 Post-installation considerations                              74
  18.1 User group for uploading documents                        74
  18.2 Relativity service account information                    74
  18.3 Post-installation steps for a token-signing certificate   74
  18.4 Logo customization                                        76
  18.5 Resource groups                                           76
  18.6 License keys                                              77
  18.7 Relativity instance name                                  77

                                        Pre-Installation Guide   4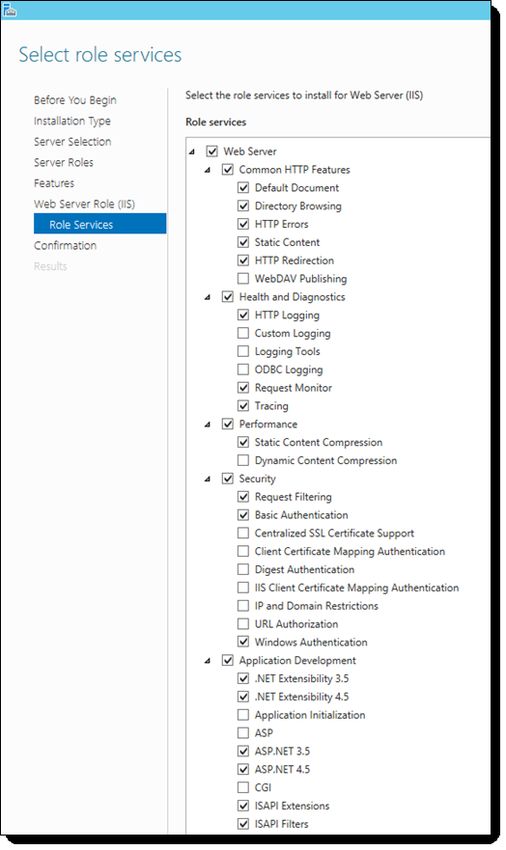
1 Pre-installation
You must complete the pre-installation process to ensure that your environment is configured with the
software, user accounts, directories, and other prerequisites required for an initial installation of Relativity.
In addition, the Relativity service bus requires that you either install and configure Service Bus for
Windows Server or RabbitMQ.
As you set up your environment, use the Installation accounts and directories list to record information
about your environment configuration that the installation process requires. You can download this
document from Pre-Installation on the Relativity Server2021 Documentation site.
For additional information, see the System Requirements and Environment Optimization guides.
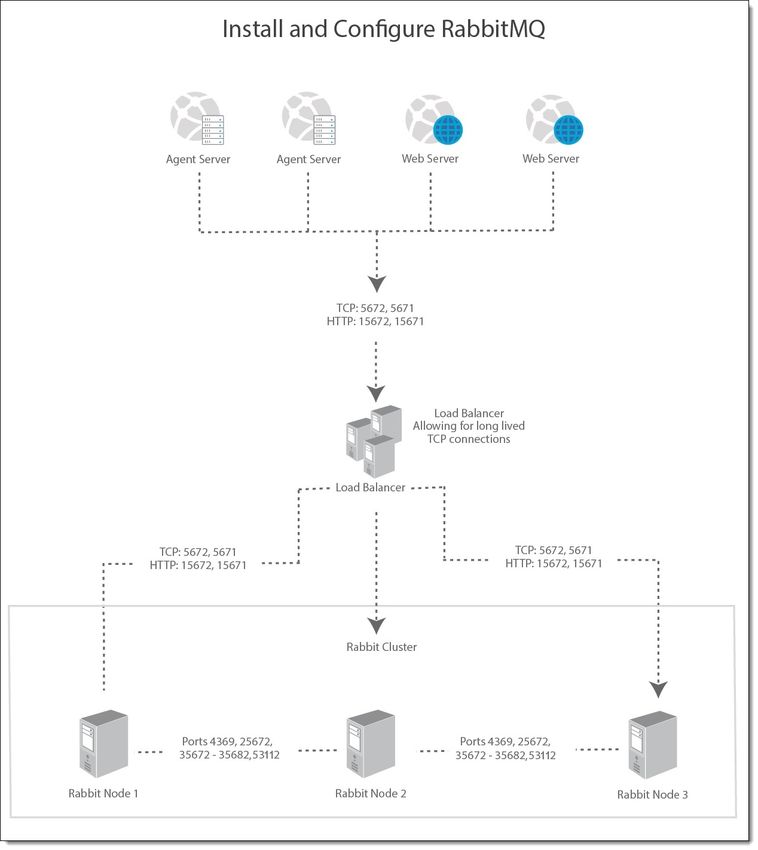
Note: If you use a firewall, refer to the Ports Diagram in the Relativity Community to ensure that you
configure your firewall correctly with Relativity.
Pre-Installation Guide 5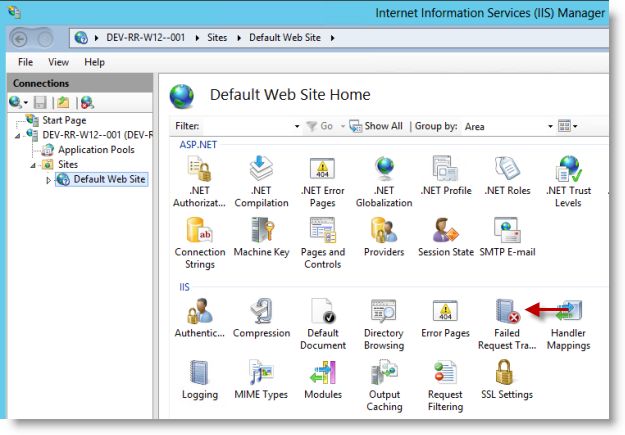
2 Windows updates
Install the latest Microsoft Windows Server Service Pack on all Relativity servers.
However, compatibility for higher .NET versions is not guaranteed and we do not recommend installing
higher .NET versions than what is listed as required by your Relativity version. Furthermore, install any
smaller security patches, Windows updates, etc. at your own discretion. We only test major service packs,
not every Microsoft update. Deploy any patches to your test instance of Relativity first. Ensure that a
rollback plan is in place if you discover any issues during deployment.
Ensure you disable the option to Install updates automatically on all Relativity servers. Apply any required
updates during a planned maintenance window.
After installing Windows updates, reboot your machines before attempting to install Relativity. Complete
this step to ensure that all Relativity components are properly installed. Incomplete Windows updates lock
system files, which may cause silent failures and prevent the proper installation of Relativity components.

                                          Pre-Installation Guide                                          6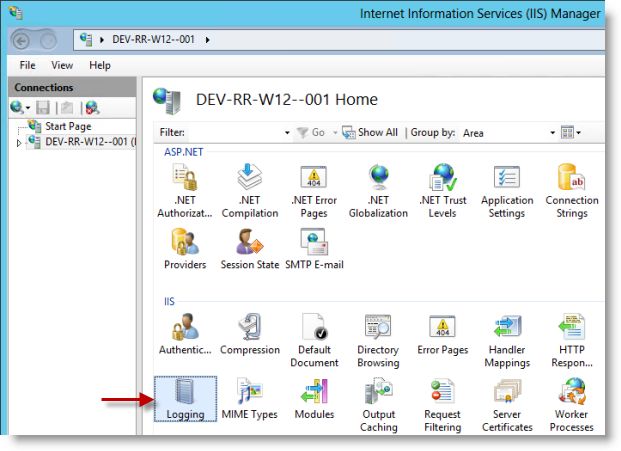
3 Required certificates for Relativity
Relativity verifies that all HTTPS services running in your environment have a trusted certificate. The
HTTPS services run on the following components of your Relativity installation, so they require that you
install valid certificates:

   n   Analytics server
   n   Components that connect to the Services API
   n   Components that use HTTPS to connect to the REST API
   n   Service Host Manager on all web and agent servers for running application-based Kepler services
   n   Viewer
   n   Web servers

 Note: For more information about required certificates and their corresponding Relativity servers, see
 All certificates used by Relativity servers on the Community site.

You need to add certificates to any server in your Relativity environment that is accessed by an HTTPS
service. By adding these certificates, you won't see warning messages and insecure-connection icons
displayed as you navigate to different components of your Relativity site. Use these guidelines for
installing certificates in your Relativity environment:

   n   If your Relativity site is exposed to the internet, install a certificate on any server that users can
       access with HTTPS services.
   n   If Relativity users access your web server with different internal and external names, install a
       second certificate for the internal name.
   n   If you use different internal and external URLs bound to the same IP address on your servers, install
       a second certificate on the server for the internal IP address. You may want to consider using
       Server Name Indication (SNI), which is an extension to the Transport Layer Security (TLS). For
       more information, see IIS 8.0 Server Name Indication (SNI): SSL Scalability on the Microsoft web-
       site (http://www.iis.net/learn/get-started/whats-new-in-iis-8/iis-80-server-name-indication-sni-ssl-
       scalability).

        Note: If you don't want to use SNI in your environment, then configure separate IP addresses on
        your web servers for internal and external URLS. You might not be able to use SNI if your IIS or
        web browser versions don't support it.

For information about generating certificates for servers in your Windows domain, see Public Key
Infrastructure Design Guidance on the Microsoft site
(http://social.technet.microsoft.com/wiki/contents/articles/2901.public-key-infrastructure-design-
guidance.aspx.) We recommend that you use the Standalone offline root CA referenced in this article.
For information on setting up HTTPS for the Service Host Manager on web and agent servers, see Service
Host Manager on the Relativity Server2021 Documentation site.
For information on enabling HTTPS for Invariant Kepler Services, see the Worker Manager Server
Installation Guide.

                                             Pre-Installation Guide                                             7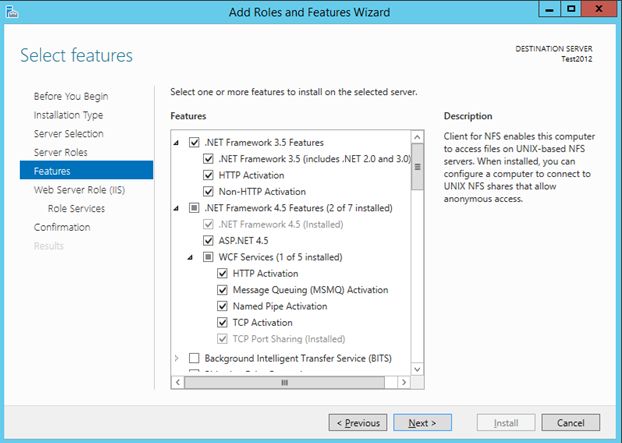
3.1 Creating a self-signed certificate in PowerShell
To create a self-signed certificate with PowerShell 4.0, perform the following steps:

  1. Open PowerShell.
  2. Ensure you’re running PowerShell in administrator mode (or else you’ll receive an error when
     attempting to create the certificate).
  3. Import the PKI module into PowerShell via the following command:

       Import-Module PKI

  4. Create the certificate through the following commands, where "FQDN" is the fully-qualified domain
     name.

       Note: If you're performing these steps as part of enabling HTTPS for Invariant Kepler Services,
       the fully-qualified domain name will be for the Queue Manager. For details, see the Worker
       Manager Server Installation Guide.

       Set-Location Cert:\LocalMachine

       New-SelfSignedCertificate -DnsName "FQDN" -CertStoreLocation Cert:\LocalMachine\My

  5. Confirm that you’ve created a certificate in the personal store. Your PowerShell display should
     resemble the following image:

  6. Create (or designate) a folder in your C drive to which you want to export the certificate, which you’ll
     do through the final “Export-Certificate” prompt included below. You’ll receive an error if that file
     path doesn’t exist.
  7. Export the certificate through the following commands:

       Set-Location Cert:\LocalMachine\My

          n   Doing this sets your location to the folder you just created the certificate in.

       Get-ChildItem

          n   This displays the thumbprint of all certificates in the folder you just created, including the one
              you just added. Make sure to copy the signature of the certificate you created and paste it into

                                            Pre-Installation Guide                                          8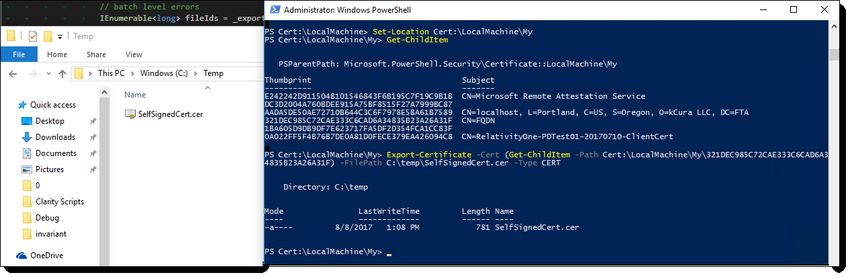
the following command.

        Export-Certificate -Cert (Get-ChildItem –Path Cert:\LocalMachine\My\CertificateSignature)     -
        FilePath C:\Temp\SelfSignedCert.cer -Type CERT

          n   Make sure you pasted the certificate signature you copied after running the Get-ChildItem
              command into this command, specifically in place of "CertificateSignature" above.

  8. Confirm that you successfully exported the certificate you created. Your PowerShell display and cor-
     responding folder should resemble the following image:

3.1.1 Certificate requirements for message broker
The Relativity service bus requires the installation of one of the following message brokers as a
prerequisite. To facilitate secure communication, the message broker requires a certificate. Depending on
the message broker you decide to use, complete the following steps:
Service Bus for Windows Server
Certificate requirements for RabbitMQ

3.2 Certificate requirements for Service Bus for Windows
Server
You can use one of the following options for obtaining a trusted certificate for Service Bus for Windows
Server:

   n   Use an existing certificate - You may already have a certificate for externally facing web servers.
       If the domain name for the certificate matches the fully qualified domain name (FQDN) of the ser-
       vice bus server, you can use this same certificate for both the web server and the service bus.
   n   Issue a certificate with an internal certificate authority - If you have access to an internal cer-
       tificate authority (CA), issue a certificate with the internal FQDN of your service bus server. The cer-
       tificate must include the following information:
          o   For any certificate, either the Subject Name, Subject Alternative Name, or both must be valid
              for each host in the farm.

                                           Pre-Installation Guide                                           9
o   Private and public key
          o   Valid start date, end date, and trust chain
          o   AT_KeyExchange set
          o   Corresponding CRL list for the signing authority
   n   Auto-generate a certificate - You can use the Service Bus Configuration tool to auto-generate the
       required certificate when you configure a new farm. If you use an Auto-Generated certificate, each
       host must be on the same domain. For more information, see Configuring Service Bus for Windows
       Server on page 41.
The certificate must include the following information:

   n   For any certificate, either the Subject Name, Subject Alternative Name, or both must be valid for the
       Fully Qualified Domain name that will be configured in Relativity.
   n   Private and public key
   n   Valid start date, end date, and trust chain
   n   Corresponding certificate for the authority that issued the certificate (not required if using a self-
       signed certificate).
   n   Certificate itself, the private key, and the certificate for the authority must be in the PEM format. For
       more information, see Convert certificates to PEM format.
You can use one of the following options for obtaining a trusted certificate for RabbitMQ:

   n   Using a certificate authority - if using a certificate authority complete the following:
          o   Request or generate a certificate with the required properties.
          o   If you are using an internal certificate authority that is not capable of generating the key and
              certificate in PEM format directly, generate and convert the certificate, the certificate’s private
              key, and the certificate authorities certificate to PEM format. For more information, see Con-
              vert certificates to PEM format.

          o   Self-signed certificate - There are several ways to generate a self-signed certificate includ-
              ing:
                  l   Powershell
                  l   OpenSSL - use the following script to directly generate the files in the PEM format:

                       Note: You need to update the inputs for the following script for your environment.

                       @echo off

                                                                                       REM IN YOUR OpenSSL FOLDER, SAVE THIS
                                                                                       REM AT COMMAND LINE IN YOUR OpenSSL F
                                                                                       REM IT WILL CREATE THESE FILES: HOSTN
                       t.pem, HOSTNAMEpfx.pfx

                                                                                       REM PLEASE UPDATE THE FOLLOWING VARIA
                                                                                       SET HOSTNAME=yourrabbitcluster

                                            Pre-Installation Guide                                              10
SET DOT=company.corp
SET COUNTRY=US
SET STATE=IL
SET CITY=Chicago
SET ORGANIZATION=PD
SET ORGANIZATION_UNIT=PD
SET EMAIL=admin@%HOSTNAME%.%DOT%
(
echo [req]
echo default_bits = 2048
echo prompt = no
echo default_md = sha256
echo x509_extensions = v3_req
echo distinguished_name = dn
echo:
echo [dn]
echo C = %COUNTRY%
echo ST = %STATE%
echo L = %CITY%
echo O = %ORGANIZATION%
echo OU = %ORGANIZATION_UNIT%
echo emailAddress = %EMAIL%
echo CN = %HOSTNAME%.%DOT%
echo:
echo [v3_req]
echo subjectAltName = @alt_names
echo:
echo [alt_names]
echo DNS.1 = *.%DOT%
echo DNS.2 = %HOSTNAME%.%DOT%
)>%HOSTNAME%.cnf
openssl req -new -x509 -newkey rsa:20
%HOSTNAME%Key.pem -days 3560 -out %HOSTNAME%Cert.pem -config %HOSTNAME%.cnf
openssl pkcs12 -inkey %HOSTNAME%Key.pem -in %HOSTNAME%Cert.pem -export -out
%HOSTNAME%pfx.pfx
Note: After updating the inputs at the beginning of the script for your environment,
this script can be used to directly generate a self-signed certificate in the PEM
format.
n Existing Certificate from the Certificate Store - RabbitMQ service doesn’t use the Windows Cer-
tificate Store. Instead, certificates have to be configured in the RabbitMQ advanced.config file.
You will need the certificate, private key, and CA certificate (or the same certificate for self-signed)
all in the PEM format. In order to export the certificates from the Window Certificate Store perform
the following steps:
Pre-Installation Guide 11n Open Run on your desktop, and enter MMC.exe.
n Click OK.
n In the Console window, click File > Add/Remove Snap-ins.
n Select Certificates under Available Snap-ins.
n Click Add.
n Select Computer Account and click Next.
n Select Local Computer and click Finish.
n Click OK.
Pre-Installation Guide 12n Right click the certificate you want to export and click All Tasks > Export.
n On Export Private Key select Yes, export the private Key.
n On Export File Format select Personal Information Exchange (.pfx).
n Select Include all certificates in the certification path if possible.
n Click Next.
n On Security select Password.
n Enter in a unique and secure password, you will need it for when converting the .PFX to a
.PEM
n Save the file in a secure location.
n For the Root Certificate Authority, export the cert as a .DER into a secure location.
Convert certificates to PEM format
The certificates in RabbitMQ must be in PEM format. There are multiple ways to convert certificates to the
PEM format. The following an example conversion done using OpenSSL:
1. If applicable, export the certificates from the Window Certificate Store. For more information. see
Export existing certificates for conversion to PEM format.
2. Using OpenSSL, complete the following steps convert the certificate to PEM format:
1. Save the private key as a PEM file:
openssl pkcs12 -in .pfx -out .pem -nodes -nocerts
2. Save the certificate as a PEM file:
openssl pkcs12 -in .pfx -out .pem -nodes -nokeys
3. Save the CA certificate as a PEM file, this step is not required for self-signed certificates:
openssl x509 -inform der -in .cer -out .pem
Note: For more information on using OpenSSL to convert the certificate to PEM format,
see How to convert a certificate into the appropriate format.
Pre-Installation Guide 134 User and group accounts
Configure the following user and group accounts in your environment.
4.1 Relativity service account
Make sure that the Relativity services account has local administrator privileges on each of the servers
where you want to install Relativity, since you must log in under this account when installing this software.
You can find additional requirements for this account under the sections describing how to configure
specific servers. For additional information about this account, see Relativity service account information
on page 74.
The Windows Service Component and the Relativity COM Plus Component run under the Relativity
Service Account. Verify that this account is configured as follows:
n Create account in Active Directory.
n Add account to the Administrators group on all machines running Relativity components.
n If using a workgroup, verify that the account has identical credentials on all Relativity servers.
Contact the Client Services team (support@relativity.com) for additional information about con-
figuring workgroups.
Pre-Installation Guide 145 Database server setup
Set up the database server by completing the steps in this section.
Note: The SQL sa account must exist with the name sa, and be enabled during installs.
5.1 Required software
The following software must be installed on the database server:
n Windows Server 2016
n SQL Server 2017 or SQL Server 2019*
n .NET Version 4.7 or .NET Version 4.6.2
n .NET Version 3.5
*Relativity only supports an in-place upgrade from SQL Server 2016 to SQL Server 2017. For any other
SQL Server upgrade please follow the EDDS migration Guide.
Notes:
n Relativity requires Full Text Search from the Database Engine Services feature as part of the SQL
Server installation.
n For information about the service bus and server software versions, see Compatibility con-
siderations for the Service Bus for Windows Server in the System Requirements guide.
5.2 Enable Microsoft DTC
Microsoft DTC must be enabled on the SQL Server along with the following configuration changes:
1. Add the Application Server role and select Distributed Transactions. Select Incoming Remote
Transactions and Outgoing Remote Transactions.
Note: As of Windows Server 2016 the Application Server role has been deprecated. Use the
Distributed Transaction Coordinator, if it is not present on your machine download the Microsoft
Distributed Transaction Coordinator (MSDTC) 2016 Management Pack for Microsoft System
Center located here, download.
2. Type dcomcnfg on your Start menu and press Enter to open Component Services.
3. Expand Component Services > Computers > My Computer > Distributed Transaction
Coordinator.
4. Right-click Local DTC and click Properties.
5. Click the Security tab.
Pre-Installation Guide 156. Select the following check boxes:
n Allow Remote Clients
n Allow Inbound
n Allow Outbound
7. Click Apply.
8. Click Yes to restart the MSDTC service.
9. Click OK.
5.3 Assign admin permissions to the Relativity service account
You must configure permissions for the Relativity service account on the SQL Server as part of the
database setup process. Make sure that the Relativity service account has local administrator and
Sysadmin permissions on the SQL Server.
5.4 Create SQL Server login
The following login must be added to the SQL Server environment. Set this account to Never Expire and
Not Enforce Password policy.
Note: The Relativity installer creates this SQL Server account if it doesn't already exist.
The EDDSDBO account is the login used by the owner of all objects in the EDDS system databases.
Follow these guidelines for configuring this account:
n Authenticate this user with SQL Server Authentication.
n Give this account only the following server roles:
o bulkadmin
o dbcreator
o public
n If you have multiple SQL Servers, create this account on each server with the same name, per-
missions, and credentials.
n Make sure that password for EDDSDBO account doesn't contain an equals sign (=), carats (< or >),
double quotes ("), parenthesis, curly braces ( { or } ), or semicolons (;).
5.5 Set authentication mode
After creating a SQL Server login, you must set the Windows authentication mode property on the server.
Complete the following steps to set the authentication mode:
1. Log in to Microsoft SQL Server Management Studio.
2. Right-click on your server in the Object Explorer, and then click Properties in the menu.
Pre-Installation Guide 163. On the Server Properties dialog box, click the Security page.
4. Under Server authentication, click SQL Server and Windows Authentication mode.
5. Click OK.
5.6 Create BCP share
Create a directory on the SQL Server in a location where the Relativity Service Account can read and
write. In addition, give SQL services permissions to read from this directory. For more information about
transferring data with BCPPath, see RDC transfer modes in the Desktop Client Guide or the Data Transfer
Guide. Follow these guidelines for setting up this directory:
n Make sure that this directory is an actual folder, not merely a drive letter.
n Confirm that the account running SQL has access to this directory. If it doesn't have access to this
folder, it can't create new cases. This directory is used for temporary files during imports, exports,
case creations, and dtSearch queries.
Pre-Installation Guide 17n Place this share on the drive housing the Backup files for optimal performance. This share should
be named BCPPath in every instance.
n If you have multiple SQL Servers, create this share on each server and use the BCPPath as the
share name on all servers.
n Make sure the account running the SQL services has rights to the BCPPath. Bulk import fails when
this account doesn't have these rights.
Note: Consider setting up an SQL Service Account (that is a domain account with local admin rights).
You should review the security requirements of your organization before setting up this account. To
create a SQL Server Service account available from Microsoft, see Configure Windows Service
Accounts and Permissions (http://msdn.microsoft.com/en-us/library/ms143504.aspx).
Complete the following steps to share the folder:
1. Right-click the folder and go to Properties.
2. Open the Sharing tab and click Share.
3. Enter the Relativity Service Account name (domain\account), and click Add.
4. Select the service account on the share list and set the Permission Level to a minimum of
Read/Write.
5. Click Share.
6. When the share completes, click Done.
7. On the Document Properties dialog box, select the Security tab.
8. Verify that the Relativity Service Account has Full Control security permissions to the folder itself.
5.6.1 Update the permissions on the BCPPath file share
In the Failover Cluster Manager, you must update the permission settings for the BCPPath file share to
ensure the case creation occurs properly on the failover cluster. When you create the BCPPath on a
clustered disk, verify that Enable continuous availability option isn't selected under Settings on the
BCPPath Properties page. See the sample settings on the following screen shot:
Pre-Installation Guide 18Note: You must configure this setting only for SQL Server 2012, 2014 and 2016.
5.7 Optionally configure an authentication token-signing cer-
tificate
When you run the Relativity installer, it automatically adds an authentication token-signing certificate,
named RelativityIdentityCertificate, to the certificate store on your primary database server. However, you
also have the option to use your own certificate rather than the one created by the Relativity installer.
Note: You only need to install an authentication token-signing certificate if you don’t want to use the
default certificate called provided by the Relativity installer.
Before you begin installing Relativity, you may want to configure the token-signing certificate in the store
on your primary database server. The other servers in your Relativity installation automatically retrieve
Pre-Installation Guide 19this certificate information from the EDDS database server, so you don’t need to configure their certificates
individually.
Note: For a clustered environment, you need to export a copy of your RelativityIdentityCertificate from
the primary database server, and install the certificate to each database server hosting the EDDS.
5.7.1 Pre-installation steps for a token-signing certificate
You may want to install your custom token-signing certificate on the database server before you install
Relativity in your environment. However, you can also complete these steps after installation.
Use this procedure to configure your certificate:
1. Obtain a signed certificate and install it on the certificate store on your primary database server.
2. Copy the thumbprint of the certificate for later use. You need this value to update the instance set-
ting after you install Relativity. See Post-installation steps for a token-signing certificate on page 74.
3. Install Relativity on the database and other servers. For more information, see Relativity installation
or Upgrading your primary SQL Server on the Relativity Server2021 Documentation site.
After you install Relativity complete the steps in Post-installation steps for a token-signing certificate on
page 74.
5.8 Optionally restrict account permissions for third party
applications
This section describes how to allow a user to execute worker operations in a user account that is
independent of the default account used in Processing. This user account can be configured without
admin level permissions in order to make the file conversions execute unmanaged code in a highly secure
fashion.
To restrict account permissions:
1. Create the desired user account on the worker machine(s) that will be doing work for Processing.
n The user account is not required to have permissions to access a file share or network.
n The user account does need to be able to read and write local temporary files.
n A single account name and password will be used for all workers in use by Invariant. This can
be a local user account created on each worker.
2. Store the user account name and password in the Relativity Secret Store so that Processing can
access them. This information can be configured in Secret Store either through the Invari-
antResponse.txt file used during installation or using the Secret Store client utility.
Note: The date format settings for this user account should be set up the same way as the
Relativity service account. For example, if a service account is set up with the date format of
DD/MM/YYYY, then the restricted user account must follow this format. Otherwise, applications
executed under the restricted user account can be affected by mismatched date formatting. To
verify your date format settings, see the regional format date and time configuration under the
Pre-Installation Guide 20worker(s) Windows settings.
Pre-Installation Guide 216 Web server setup
This section describes how to prepare your web server for installing Relativity. Install the following
software on the web server:
n Windows Server 2016 or Windows Server 2012 R2
n .NET Version 4.7 or .NET Version 4.6.2
n .NET Version 3.5
6.1 Setting IIS options
Make these updates on all web servers in your Relativity installation:
1. Install the required versions of the .NET Framework Full Profile on all web servers.
2. Configure the Legacy Unhandled Exception Policy on all web servers:
a. Browse to the following directory on your web server: C:\Win-
dows\Microsoft.NET\Framework64\v4.0.30319\
b. Open the Aspnet.config file in a text editor.
c. Locate the tag .
d. Set the enabled attribute to true. This sample code illustrates the attribute that you need to
update:
e. Save the changes to the file.
6.2 IIS role service configuration
Relativity requires that you configure several role services in the IIS. You also have the option of using a
full installation of the Web Server (IIS) role.
6.2.1 IIS roles on Windows Server 2012 R2 and Windows Server 2016
For the IIS on Windows Server 2012 R2 or Windows Server 2016, use this procedure to view the minimum
role service requirements for Relativity:
1. Open the Server Manager on Windows Server 2012 R2 or Windows Server 2016.
2. Click Manage to display a drop-down menu.
Pre-Installation Guide 223. Click Add Roles and Features. The Add Roles and Features wizard appears.
4. Click Next on the Before you begin dialog box.
5. Click Next on the Select installation type dialog box.
6. On the Select destination server dialog box, select Server Roles.
7. Select Web Server (IIS), and then click Install.
8. On the pop-up window, ensure that Include management tools (if applicable) is checked, and
then click Add Features.
9. Click Next to go to the Features page.
10. Review the following illustration for Features configuration settings:
11. Click Next to confirm the applicable Features.
Pre-Installation Guide 2312. Click Next on the Web Server Role (IIS) page.
13. On the Role Service page, review the following illustration for minimum role service requirements
for Relativity:
Pre-Installation Guide 24Pre-Installation Guide 25
14. Click Next to confirm the Role Services.
 15. Click Install.

6.3 Enabling the WebSocket protocol
If you are using Windows Server 2012 R2, Relativity requires that you have the WebSocket protocol
enabled on the IIS to support documentation conversion and imaging. Confirm that you have this protocol
enabled on your web server. If you don't currently have it enabled on the IIS, see the WebSocket
 page on the Microsoft web site for instructions about setting it up. It is available at this URL:
https://www.iis.net/configreference/system.webserver/websocket.

6.4 Configuring log file options
If you enabled logging on the IIS, you can avoid performance and other issues by limiting the size of log
files, as well as the number of trace files stored on the IIS. This section describes how to configure these
features in your environment for optimum performance.

6.4.1 Log file options for Windows Server 2012 R2
Use the instructions in this section to configure logging settings for Windows Server 2012 R2.

6.4.1.1 Setting file size for IIS requests log
Logging is a default role installed on the IIS and enabled in most environments. Use the following
instructions to set the maximum size for the log files:

   1. Open the Server Manager.
   2. On the Tools menu, select Internet Information Services (IIS) Manager.

                                           Pre-Installation Guide                                         26
3. Expand the server node to display the Features View.
4. Double-click the Logging icon to display the Logging page.
5. Update the maximum file size for your environment if necessary. The following illustration shows the
maximum file size used to restrict the log files from growing larger than 3 MB.
Pre-Installation Guide 276.4.1.2 Setting the file size for failed trace logging
If you manually installed the failed trace logging through the Role Services on your IIS, complete the
following steps to set the maximum number trace files stored.
1. Open the Server Manager.
2. On the Tools menu, select Internet Information Services (IIS) Manager.
3. Expand the server node to display the Features View.
4. Highlight the Default Web Site.
Pre-Installation Guide 285. Double-click the Failed Request Tracing icon to display the Failed Request Tracing Rules page.
6. Right-click on the rules to display a pop-up menu, and then click Edit Site Tracing.
7. Update the value in the Maximum number of trace files box. This value should be set no higher
than 500.
Pre-Installation Guide 296.5 Configuring SSL on a web server
Before installing Relativity, we recommend that you set up SSL on the IIS for your Relativity instance. This
configuration provides added security for the communication between the web server and the browser on
a client computer. Your browser uses this secure connection to verify that it is communicating with the
Relativity server. It also provides additional protection against the theft of cookies used to maintain a
session between the browser and the server.
Note: You aren't required to configure SSL on the web server hosting Relativity. If you decided not to
use HTTPS in your environment, you must set the CookieSecure instance setting to False before
logging in to Relativity, or you receive an error message. You can also complete this setup after
installation but before logging in to Relativity. For more information, see Instance setting table on the
Relativity Server2021 Documentation site.
The process for configuring SSL on your web server includes these steps:
n Obtaining a certificate for your web server below
n Installing a certificate on your web server below
n Configuring HTTPS site bindings below
n Updating the SSL setting on the IIS on the next page
n Setting up HTTPS for Service Host Manager on page 32
6.5.1 Obtaining a certificate for your web server
To set up SSL on your web server, you must obtain a certificate, which is digital identification document
used by the browser to authenticate the server. A server certificate contains detailed identification
information, such as the name of the organization affiliated with the server content, the name of the
organization that issued the certificate, and a public key used to establish an encrypted connection. It
provides a way for the browser to confirm the authenticity of web server content and the integrity of the
SSL-secured connection before transmitting information.
You can obtain a certificate from Microsoft Certificate Services or from a mutually trusted certification
authority (CA). A CA confirms your identity to ensure the validity of the information contained in your
certificate. In general, you must provide your name, address, organization, and other information.
Note: If you don't issue your server certificate through Microsoft Certificate Services, a third-party
certification authority must approve your request and issue your server certificate.
6.5.2 Installing a certificate on your web server
After obtaining an SSL certificate, install it in the certificate store on your web server. For more information,
see Import or export certificates and private keys on the Microsoft Windows website.
6.5.3 Configuring HTTPS site bindings
The IIS resets after you configure the HTTPS site bindings and update the SSL setting as described in the
following section.
Use these steps to configure HTTPS site bindings:
Pre-Installation Guide 301. Open the IIS Manager.
2. In the IIS Manager Connections pane, expand Sites.
3. Right -click on the Default Web Site, and then click Edit Bindings on the menu.
4. Click Add to display the Add Site Binding dialog box.
5. In the Type drop-down menu, select https.
6. In the SSL certificate drop-down menu, select your certificate.
7. Click OK. You now see https listed in the Type column.
8. Click Close.
6.5.4 Updating the SSL setting on the IIS
Use the following steps to configure SSL settings on the IIS:
1. Open IIS Manger.
2. Navigate to the Relativity virtual directory, and then select Relativity.
3. Double-click SSL Settings.
Pre-Installation Guide 314. Select Require SSL.
5. Click Apply in the Actions pane.
6.5.5 Setting up HTTPS for Service Host Manager
You also need to enable HTTPS for the Service Host Manager service, which must run on all web and
agent machines that use Relativity. For a detailed overview of this service and configuration steps, see
Service Host Manager on the Documentation Server2021 site.
Pre-Installation Guide 327 Agent server setup
An agent server performs background processing. It requires the following software:
n Windows Server 2016 or Windows Server 2012 R2
n .NET Version 4.7 or .NET Version 4.6.2
n .NET Version 3.5
In most environments, the Relativity installer automatically enables Microsoft DTC and HTTP activation.
You may require the following instructions if you need to troubleshoot your installation or if its configuration
requires you manually complete these steps.
7.1 Enabling Microsoft DTC
You must enable Microsoft DTC on the Agent server along with the following configuration changes:
1. Add the Application Server role and select Distributed Transactions. Select Incoming Remote
Transactions and Outgoing Remote Transactions.
Note: As of Windows Server 2016 the Application Server role has been deprecated. Use the
Distributed Transaction Coordinator, if it is not present on your machine download the Microsoft
Distributed Transaction Coordinator (MSDTC) 2016 Management Pack for Microsoft System
Center located here, download.
2. Type dcomcnfg on your Start menu , and then press Enter to open Component Services.
3. Expand Component Services > Computers > My Computer > Distributed Transaction
Coordinator.
4. Right-click Local DTC, and then click Properties.
5. Click the Security tab.
6. Select the following check boxes:
n Allow Remote Clients
n Allow Inbound
n Allow Outbound
7. Click Apply.
8. Click Yes to restart the MSDTC service.
9. Click OK.
7.2 Enabling HTTP activation
You must enable HTTP activation on your agent server as follows for Microsoft Windows Server 2012 R:
Pre-Installation Guide 331. Click Start > Administrative Tools > Server Manager.
2. In the Server Manager Dashboard, click Manage > Add Roles and Features.
3. In the Add Roles and Features, choose Server Selection.
4. Select the server running the agents is selected in the Server Pool box, and then click Next.
5. Click Features in the sidebar of the wizard.
6. Select the following checkboxes in the Feature box:
n .NET Framework 3.5 Features
Note: Ensure all checkboxes below .NET Framework 3.5 Features are checked.
n .NET Framework 4.5 Features
Note: Ensure all checkboxes below .NET Framework 4.5 Features are checked.
Make sure that HTTP Activation is installed and selected when you expand each of these sections.
7. Install any missing features are necessary.
8. When the installation is complete, expand .NET Framework 3.5 Features and .NET Framework
4.5 Features to verify that HTTP Activation is installed. See the following screen shot:
Pre-Installation Guide 347.3 Message broker options
The Relativity service bus requires that you install and configure a message broker before you install or
upgrade Relativity. Along with Service Bus for Windows Server, Relativity now supports RabbitMQ as an
alternative message broker. Depending on the message broker you decide to use, complete the following
steps:
n Service Bus for Windows Server
n RabbitMQ
7.3.1 Service Bus for Windows Server
Note: Microsoft has announced that it will not be making any future updates to Service Bus for Windows
Server. Additionally, Service Bus for Windows Server is only officially supported with Windows Server
2012 and SQL Server 2012. Relativity will continue to support Service Bus for Windows Server for the
near future.
You can perform an online installation for Service Bus for Windows Server that requires an internet
connection, or an offline installation that requires the internet only to download the installer. For additional
information, see the Relativity Service Bus guide.
Note: You can optionally install the Service Bus for Windows Server on multiple hosts.
The process for installing and configuring Service Bus for Windows Server includes these steps:
n Best practices for Service Bus for Windows Server below
n Pre-installation steps for Service Bus for Windows Server on the next page
n Online installation for Service Bus for Windows Server on page 37
n Offline installation for Service Bus for Windows Server on page 38
n Configuring Service Bus for Windows Server on page 41
7.3.1.1 Best practices for Service Bus for Windows Server
Use the following guidelines to optimize the Service Bus for Windows Server installation and farm setup:
n Service bus installation - For a typical installation, install Service Bus for Windows Server on a
server or VM that is accessible throughout your Relativity instance. Install the service bus on a
machine that meets these minimum requirements: CPU clock speed of 1.6GHz, a CPU core count
of 2 or more, and physical memory of 3.5 GB, although 6 GB is recommended. These same
guidelines also apply when installing the service bus on multiple hosts. See Best Practices Analyzer
(https://msdn.microsoft.com/en-us/library/dn441402.aspx).
n Node - A typical Relativity installation requires only a single node in a farm. For a multiple host install-
ation, ensure that you have an odd number of nodes, but don't exceed the maximum of five nodes.
Three nodes is a common configuration for most environments configured with multiple hosts.
While you can install the service bus on five nodes, determine if your Relativity installation requires
these additional nodes. They may result in unnecessary overhead for your environment.
Pre-Installation Guide 35Note: During installation or upgrade, the machine for the Relativity service bus must be a node in
the farm.
n SQL Server instance location - Any machine in the farm can host the service bus databases. We
recommend hosting the SQL instance on the Invariant database server. However, you can host it
on a SQL instance on a separate machine. The SQL Server instance used for the Service Bus for
Windows Server must meet the minimum requirements that Microsoft specifies in Prerequisites on
MSDN (https://msdn.microsoft.com/en-us/library/dn441411.aspx).in Prerequisites on MSDN.
n Message containers - For a typical Relativity installation with a single node, we recommend using
the default value of three message containers in the farm.For a multiple host environment,
Microsoft recommends using 2n message containers, where n is the number of nodes. For
example, if you install the service bus on three hosts, then you need six message containers.See
step 11 in Setting up a new farm on page 41.
To review the Microsoft recommendations for message containers, see Scaling on MSDN
(https://msdn.microsoft.com/en-us/library/dn441424.aspx).
n Message backing (SQL) high availability - Review the Microsoft recommendations for message
backing with high availability, which suggest using SQL mirroring or SQL AlwaysOn availability
groups. For more information, see Architecture overview on MSDN (https://msdn.-
microsoft.com/en-us/library/dn441428.aspx).
n Server roles - Install the Relativity service bus on a single machine that is a node in the Service Bus
for Windows Server farm. In a multiple host environment, install the Service Bus for Windows Server
on multiple machines that you want added to your farm. However, you only need to install the
Relativity service bus on single machine as in a typical installation. For more information, see
Relativity Installation.
Note: Make sure that you set up a farm and configure it before you run the Relativity installer.
The Relativity installer validates that your environment meets this requirement. See Configuring
Service Bus for Windows Server on page 41.
7.3.1.2 Pre-installation steps for Service Bus for Windows Server
Before installing Service Bus for Windows Server, complete the following prerequisites:
n Complete the pre-installation steps for Relativity, such as setting up user accounts and certificates.
For more information, see Certificate requirements for Service Bus for Windows Server on page 9.
n Ensure that you have the prerequisites for Service Bus for Windows Server. You need to meet these
requirements to set up your farm correctly. See Planning Your Deployment (https://msdn.-
microsoft.com/en-us/library/dn441415.aspx).
n For a typical installation, identify the server or VM where you want to install Service Bus for Windows
Server. To install the service bus on multiple hosts, identify the servers or VMs for this purpose. The
farm requires that you add an odd number of nodes, but you shouldn't exceed a maximum of five
nodes. For more information, see Best practices for Service Bus for Windows Server on the pre-
vious page.
Pre-Installation Guide 36Note: For a typical installation, install Service Bus for Windows Server on a server or VM that is
accessible throughout your Relativity instance. Install the service bus on a machine that meets
these minimum requirements: CPU clock speed of 1.6GHz, a CPU core count of 2 or more, and
physical memory of 3.5 GB, although 6 GB is recommended. These same guidelines also apply
when installing the service bus on multiple hosts. See Best Practices Analyzer
(https://msdn.microsoft.com/en-us/library/dn441402.aspx).
n Ensure that you install .NET 4.6.2 in your environment. You must install .NET 4.6.2 before you
install Service Bus 1.1 with TLS 1.2. It requires .NET 4.6.2.
7.3.1.3 Online installation for Service Bus for Windows Server
To perform an online installation, you must have an internet connection. This process includes
downloading the Microsoft Web Platform Installer (Web PI) and then installing the service bus on server or
VM in your Relativity environment. See Best practices for Service Bus for Windows Server on page 35.
Review the following installation considerations:
n For a typical installation, install Service Bus for Windows Server on a server or VM that is accessible
throughout your Relativity instance. Consider installing the service bus on the agent server where
you intend to run conversion agents. Follow these same guidelines when installing the service bus
on multiple hosts.
n In a multiple host environment, install the Service Bus for Windows Server on each machine that
you want added as a node in the farm. However, you only need to install the Relativity service bus
on single machine that is a node in the farm. For more information, see Relativity Installation.
n Notice that the installer for the Service Bus for Windows Server adds the database files for the ser-
vice bus to the default locations used by your SQL Server. These database locations differ from
those used for the Relativity databases specified in the RelativityResponse.txt file installation input
file.
You can use the default locations for the Service Bus for Windows Server databases. However, if
you want to change these locations, see View or Change the Default Locations for Data and Log
Files (SQL Server Management Studio) on the Microsoft website (https://msdn.microsoft.com/en-
us/library/dd206993.aspx).
If you don't have an internet connection, you can perform an offline installation. For more information, see
Offline installation for Service Bus for Windows Server on the next page.
Use the following steps to install Service Bus for Windows Server:
1. Download the Web PI from the Web Platform Installer Direct Downloads page (https://-
docs.microsoft.com/en-us/iis/install/web-platform-installer/web-platform-installer-direct-
downloads).
2. In the WebPI 5.0 section, click the appropriate link for your machine.
3. Locate the WebPlatformInstaller_amd64_en-US.msi that was downloaded by the installer. It
appears in the lower left corner of the browser, or in your download folder.
4. Double-click the file to launch the Web PI. When the Security Warning dialog box appears, click
Run.
Pre-Installation Guide 375. On the Spotlight tab, search for Service Bus 1.1 with TLS 1.2 Support.
(Click to expand)
6. Select Windows Azure Pack: Service Bus 1.1 with TLS 1.2 Support in the search results.
7. Click Add > Install.
8. Click I Accept to accept the license terms and start the installation.
9. When the installation process completes, click Finish. You have now installed Service Bus for Win-
dows Server.
10. Complete the steps for configuring the service bus. For more information, see Configuring Service
Bus for Windows Server on page 41.
7.3.1.4 Offline installation for Service Bus for Windows Server
To perform an offline installation, you only need an internet connection to download the installer. You can
then complete the offline installation process on server or VM in your Relativity environment. See Best
practices for Service Bus for Windows Server on page 35.
Review the following installation considerations:
n For a typical installation, install Service Bus for Windows Server on a server or VM that is accessible
throughout your Relativity instance. Consider installing the service bus on the agent server where
you intend to run conversion agents. Follow these same guidelines when installing the service bus
on multiple hosts.
n In a multiple host environment, install the Service Bus for Windows Server on each machine that
you want added as a node in the farm. However, you only need to install the Relativity service bus
on single machine that is a node in the farm. For more information, see Relativity Installation.
n Notice that the installer for the Service Bus for Windows Server adds the database files for the ser-
vice bus to the default locations used by your SQL Server. These database locations differ from
those used for the Relativity databases specified in the RelativityResponse.txt file installation input
file.
You can use the default locations for the Service Bus for Windows Server databases. However, if
you want to change these locations, see View or Change the Default Locations for Data and Log
Pre-Installation Guide 38Files (SQL Server Management Studio) on the Microsoft website (https://msdn.microsoft.com/en-
us/library/dd206993.aspx).
After you complete the installation, call the WebPICmd executable using the following command line
switches in a command prompt window:
n /list - displays a list of available products.
n /listoption: - acts as a sub-command used for filtering on a list.
n /install - installs products available through the Web PI.
n /offline - downloads the products for use offline. This command downloads products so you can be
installed later by running the /install command.
n /Products: - acts as a sub-command of both the /offline and /install commands. You can use it to
indicate which of the available products you want to download and install, respectively.
Downloading the Web Platform Installer
You need an internet connection to download the Web Platform Installer (Web PI) used to install the
Service Bus for Windows Server.
Use the following steps to download the installer:
1. On a machine with an internet connection, complete steps 1 - 4 listed in Online installation for Ser-
vice Bus for Windows Server on page 37. You should now have installed the Web PI on your
machine.
2. Verify that the WebPICmd.exe file was installed on your machine by locating it in the following
folder:
%ProgramFiles%\Microsoft\Web Platform Installer
3. Open a Windows PowerShell command prompt. Select Run as Administrator.
4. Run the following /list command to display ServiceBus_1_1 in a list of service bus products:
webpicmd /list /listoption:Available|?{ $_.Contains(“ServiceBus”) }
5. Use the following command to download the files for installing Service Bus 1.1 with TLS 1.2 Support:
webpicmd /offline /Products:"ServiceBus_1_1_TLS_1_2" /Path:C:\ServiceBusOfflineFiles
Pre-Installation Guide 396. Verify that PowerShell displays information about the products that are cached and processed, and
the feeds being built.
These processes succeeded if you see the message listed in the following screen shot. The path
command indicates where the files are downloaded. You can modify this path as necessary.
7. After the download completes, copy the entire /Path directory to the machines in your offline envir-
onment where you want to install Service Bus for Windows Server.
Installing Service Bus for Windows Server
For a typical Relativity installation, install the Service Bus for Windows Server on the machine that you
want added as a node in the farm. For a multiple host environment, repeat this installation process on all
the machines that you want added as nodes in the farm.
Use the following steps to install the service bus:
Pre-Installation Guide 401. Open a Windows PowerShell command prompt. Select Run as Administrator.
2. Change to the directory containing the installation files that you downloaded using the /offline com-
mand and copied to this machine. See step 7 in Downloading the Web Platform Installer on
page 39.
For example, if you download the files to a directory on your hard drive called
ServiceBusOfflineFiles, you would execute this command:
cd C:\ServiceBusOfflineFiles\
3. Run the following command to install Service Bus 1.1 with TLS 1.2 Support. Update the initial part of
the path displayed after the /xml command with the directory where your files are located. For
example, you would replace C:\ServiceBusOfflineFiles with your file path:
.\bin\WebpiCmd.exe /install /Products:"ServiceBus_1_1_TLS_1_2" /xm-
l:C:\ServiceBusOfflineFiles\feeds\latest\webproductlist.xml
4. Accept the licensing agreement to install the service bus.
5. After the installation completes, verify that you see a message like the one in the screen shot:
6. Complete the steps for configuring the service bus. For more information, see Configuring Service
Bus for Windows Server below.
7.3.1.5 Configuring Service Bus for Windows Server
After installing Service Bus for Windows Server, you need to complete several configuration steps, which
include setting up a new service bus farm. A farm consists of one or more servers, or nodes that use the
service bus. For troubleshooting information, see the Relativity Service Bus guide.
Setting up a new farm
You set up a new farm by adding a single server to it. After completing this process, you can optionally add
multiple hosts to the farm. For more information, see Optionally adding multiple servers to an existing farm
on page 46.
Note: Before you can add a server to a farm, you must install the Service Bus for Windows Server on it.
Pre-Installation Guide 41Use the following steps to set up a new farm:
1. Locate the Service Bus Configuration tool on your desktop. The service bus installer automatically
installs this tool for you.
2. Launch the Service Bus Configuration tool, and then click With Custom Settings.
3. Complete the fields in the Service Bus Configuration wizard. See Fields in Service Bus Con-
figuration wizard below.
4. After you set the fields in the wizard, click the to display a summary of the information used to con-
figure the service bus.
5. Click the to start the configuration process.
6. Set the DNS for the service bus farm. Execute the following commands with the Service Bus Power-
Shell tool. This DNS must match the name in the Issued to field on the certificate used for the ser-
vice bus.
Stop-SBFarm
Set-SBFarm -FarmDns 'YOUR_DNS'
Update-SBHost
Start-SBFarm
7. Verify that the service bus is configured properly by entering your URL into a web browser, and con-
firming that the following page is displayed. Use this format for the URL: https://:/.
Fields in Service Bus Configuration wizard
In the Service Bus Configuration wizard, you need to set the following fields, including the suggested or
required values for them.
Configure Farm Management Database
In this section, click the Advanced Options drop-down to display additional fields.
n SQL Server Instance - Enter the name or address of the SQL Server where you want to host the
SbManagementDB. This SQL instance hosts the databases for your farm.
n Enable SSL connection with the SQL Server instance - Optionally, click this checkbox to use
SSL.
n Authentication - Complete one of the following tasks to set up authentication for the SQL instance:
o Windows Authentication - Select this option if your instance supports Windows authen-
tication.
Pre-Installation Guide 42o SQL Server Authentication - Select this option to use SQL server authentication. Enter cre-
dentials in the User Name and Password fields for a Sysadmin account or the EDDSDBO
account.
n Use the above SQL Server instance and settings for all databases - Click this checkbox.
n Database Name - Optionally, update the name for your database. You can also just use the default
name, which is SbManagementDB.
n Test Connection - Click this button to ensure that you have enter the correct settings for your SQL
Server.
Configure Gateway Database
n SQL Server Instance - Don't modify the default setting for the Gateway database.
n Database Name - Don't modify the default name for the Gateway database.
n Test Connection - Click the button for the database instance. appears next to the server
instance when the installer verifies a connection.
Configure Message Container Database
n SQL Server Instance - Don't modify the default setting for the Message Container database.
n Database Name Prefix - Don't modify the default name for the Message Container database.
n Number of Containers - Enter a value for the number of containers. For a typical Relativity install-
ation with a single node, we recommend using the default value of three message containers in the
farm. For a multiple host environment, Microsoft recommends using 2n message containers, where
n is the number of nodes. For example, if you install the service bus on three hosts, then you need
six message containers. For more information, see Best practices for Service Bus for Windows
Server on page 35.
Note: If you previously configured the number of containers and need to update this value, see
Adding a new message container on page 48.
n Test Connection - Click this button for the database instance. appears next to the server
instance when the installer verifies a connection.
Configure Service Account
n User ID - Enter the user ID for the Relativity service account.
n Password - Enter the password for the Relativity service account.
Note: You must use the Relativity service account credentials for the service account on the
Service Bus for Windows Server. For more information, see User and group accounts on
page 14.
Configure Certificate
Use one of the following methods to configure a certificate. You can auto-generate a certificate.
Alternatively, you can use an existing certificate with the same domain as the FQDN of the service bus
Pre-Installation Guide 43You can also read