Drive Genius 3 User's Guide - Doc Rev: 0410-1
←
→
Page content transcription
If your browser does not render page correctly, please read the page content below
Drive Genius 3
                   User's Guide

Doc Rev: 0410-1
TABLE OF CONTENTS
1 Introduction..................................................................................................................... 4
   1.1 System Requirements............................................................................................. 5
   1.2 Latest version of the software................................................................................. 5
   1.3 Technical Support.................................................................................................... 5
   1.4 Contacting Prosoft Engineering...............................................................................5
   1.5 Drive Genius 3 Features..........................................................................................6
   1.6 Demo Version.......................................................................................................... 7

2 Installing and Starting Drive Genius 3............................................................................ 8
   2.1 Booting from DVD....................................................................................................8
   2.2 Installing Drive Genius 3..........................................................................................8
   2.3 Launching and Activating the Software................................................................... 9
   2.4 Selecting an Operation.......................................................................................... 10

3 DrivePulse™................................................................................................................. 11

4 Repair............................................................................................................................14

5 Defrag........................................................................................................................... 17

6 Duplicate....................................................................................................................... 20
  6.1 Volume Duplicate...................................................................................................21
  6.2 Device Duplicate....................................................................................................22
  6.3 Verifying Destination Copy.................................................................................... 23

7 DriveSlim™................................................................................................................... 24
  7.1 Slimming Plans...................................................................................................... 25
  7.2 Scanning the Volume for files to Slim....................................................................27
  7.3 Selecting Files to Archive or Delete.......................................................................28

8 Sector Edit.................................................................................................................... 32
   8.1 Sector Editing a Drive or Volume.......................................................................... 33
   8.2 Sector Editing a File.............................................................................................. 34

9 Shred.............................................................................................................................36
   9.1 Shredding a Volume or Drive................................................................................ 37
   9.2 Shredding Free Space...........................................................................................38
   9.3 Shredding a File or Folder..................................................................................... 39

10 Integrity Check............................................................................................................ 40

11 Benchtest.................................................................................................................... 44

DRIVE GENIUS 3 USER'S GUIDE                                                                                                     2

12 Scan............................................................................................................................ 47
  12.1 Spare Bad Blocks................................................................................................ 48
  12.2 Extended Scan.................................................................................................... 48

13 Information.................................................................................................................. 50

14 Initialize....................................................................................................................... 51

15 Repartition ..................................................................................................................53
  15.1 Resizing Partitions...............................................................................................55
    15.1.1 Shrinking Volumes....................................................................................... 55
    15.1.2 Expanding Volumes..................................................................................... 56
    15.1.3 Shifting Volumes.......................................................................................... 57
    15.1.4 Using Partition Shifting Before Expanding a Volume...................................59
  15.2 Creating and Deleting Volumes...........................................................................60
  15.3 Customize ...........................................................................................................62
  15.4 Hiding and Revealing Volumes........................................................................... 63

16 Drive Genius 3 Menu.................................................................................................. 64
  16.1 Preferences......................................................................................................... 64
  16.2 Expert Preferences..............................................................................................65
  16.3 Uninstall............................................................................................................... 66

17 Questions and Answers.............................................................................................. 67

18 License Agreement..................................................................................................... 70

DRIVE GENIUS 3 USER'S GUIDE                                                                                                      3
INTRODUCTION

1   Introduction
Thank you for purchasing Drive Genius 3™.
Drive Genius 3 is a collection of tools that help guard the data on your drive.
Drive Genius 3 is the next step in Prosoft Engineering's award winning drive
maintenance and management utilities. Drive Genius 3 improves on its powerful set of
utilities to optimize drive performance, protect data, and provide easy-to-use, yet
powerful features for your storage needs.
Drive Genius 3 introduces DrivePulse™, a utility to help monitor the performance and
health of all your hard drives. This monitoring system helps detect any potential
physical issues, volume corruption, and excessive volume fragmentation on your hard
drives. DrivePulse™ will alert you of possible issues before they become problems.
Drive Genius 3 can defragment a volume, analyze a volume and repair it if necessary.
Its testing capability goes a few steps above other drive utilities with media surface
scanning and long term data integrity checking. Drive Genius 3 can also measure the
throughput of the drives to see if they are performing up to par.
The powerful repartitioning feature enables you to resize your drive without
reformatting. Drive Genius 3 can be used to add, initialize and delete partitions from
your hard drive. Drive Genius 3 can do volume and device copying. Drive Genius 3 is
able to hide partitions from most users. In addition, Drive Genius 3 has the ability to
move a partition on the hard drive and even sports a sector editing function to edit the
data on any sector of the drive. Last but not least, Drive Genius 3 has shredding
features that erase drives securely per the Department of Defense's standard.

                              Drive Genius 3's tool palettes

DRIVE GENIUS 3 USER'S GUIDE                                                           4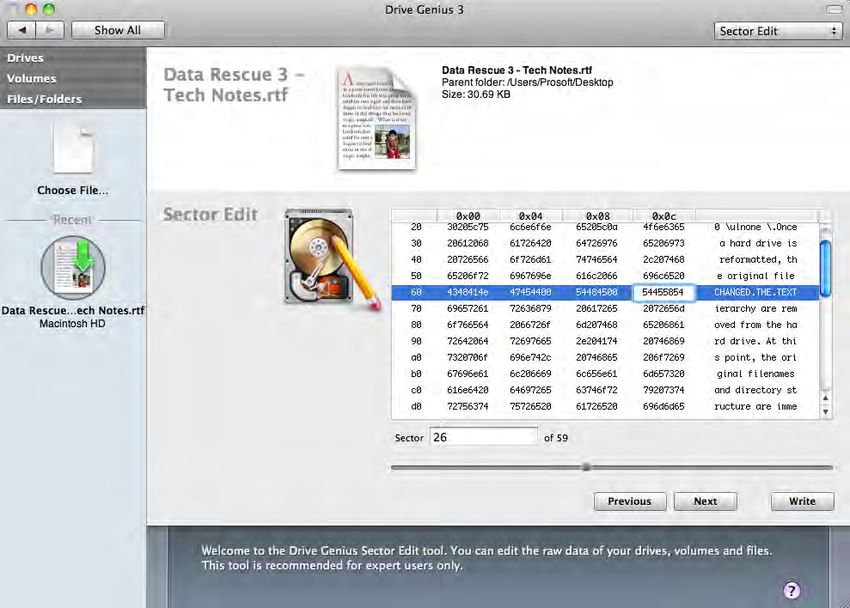
INTRODUCTION

1.1 System Requirements
Drive Genius 3 may be booted from the DVD to provide maintenance on your internal
hard drive or installed as an application on the Mac Operating System to be used on
your external hard drives.

Boot-Disc Requirements:                     Application Requirements:
   •   DVD Drive                                •   Requires Mac OS X v10.5.3 or
   •   512MB RAM minimum                            newer
                                                •   512MB RAM minimum
   •   Intel Processor
                                                •   Intel Processor

1.2 Latest version of the software
Check our website to find out if you have the latest version Drive Genius 3 at
www.prosofteng.com.
If you do not have the latest version of Drive Genius 3, you may download it from our
website: http://www.prosofteng.com/download.php?dg3

1.3 Technical Support
Our technical support is free and can be accessed by email, fax or phone. Please have
your serial number and version number ready before calling. If you have questions
about this user guide or using Drive Genius 3, please contact technical support:
   •   Support FAQs:        http://www.prosofteng.com/support
   •   Email Address:       contact@prosofteng.com
   •   Phone Number:        877-477-6763
   •   Fax Number:          (925) 426-6309
   •   Mailing Address:     Prosoft Engineering, Inc.
                            1599 Greenville Road
                            Livermore, CA 94550
   •   Support Hours:       Monday – Friday, 7AM – 5PM (PST)

1.4 Contacting Prosoft Engineering
If you have comments about Drive Genius 3 or wish to purchase a serial number,
please contact our sales department:
   •   Website: http://www.prosofteng.com/drivegenius3
   •   Email Address:     contact@prosofteng.com
   •   Phone Number:      (877) 477-6763

DRIVE GENIUS 3 USER'S GUIDE                                                         5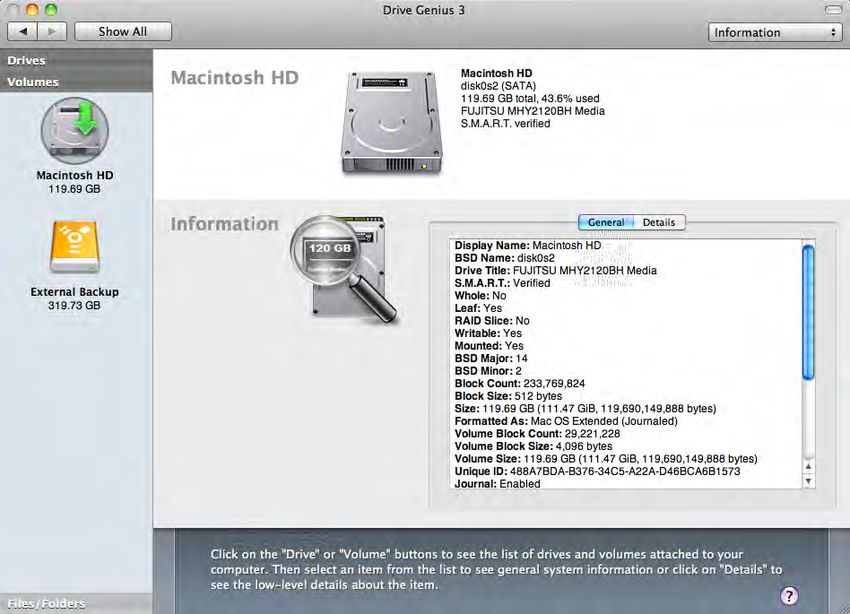
INTRODUCTION

1.5 Drive Genius 3 Features
Drive Genius 3 improves on its award winning utilities for the latest Mac Operating
Systems.
Drive Genius 3 optimizes drive performance, protects data, and provides easy to use
yet powerful features for your storage needs. Drive Genius 3 can monitor your hard
drives' performance, defragment a volume, analyze a drive and repair it if necessary. Its
testing capabilities go a few steps above other drive utilities with media surface
scanning and long term data integrity checking.
Drive Genius 3 includes powerful features that give the user greater flexibility and
control in setting up and managing your hard drives.

   •   Information: Detailed information on drive and volume structure.
   •   Defrag: Defragment OS X drives for optimum performance.
   •   DriveSlim™: Archive or delete large, duplicate and unusable files to save space.
   •   Repair: Analyze, Repair, and Rebuild OS X directory information.
   •   Benchtest: Benchtests for comparing drive performance.
   •   Scan: Surface scanning to test for media faults.
   •   DrivePulse™: Monitor your hard drives' reliability and performance.
   •   Integrity Check: Long range throughput tests for performance.
   •   Initialize: Format a comprehensive range of drives in OS X format.
   •   Repartition: Resize partitions without erasing them.
   •   Duplicate: Create high-speed backup clones of most devices.
   •   Shred: Securely erase drives using U.S. DoD specification algorithms.
   •   Sector Edit: Edit devices, volumes and files with the sector editor.
   •   Comprehensive Support including ATA, SATA, Firewire and USB drives.
   •   Streamlined User Interface allowing most operations to be accomplished in a few
       clicks.
   •   Bootable DVD-ROM support ranging from MacBooks to MacPros.

DRIVE GENIUS 3 USER'S GUIDE                                                            6
INTRODUCTION

1.6 Demo Version
Drive Genius 3 includes a Demo version to allow users to view the features of the
software.
For the purpose of the demo, Drive Genius 3 will allow usage of any read features, such
as viewing the fragmentation map or checking for catalog errors, but will prevent the
features from writing to the hard drive, such as repairing or optimizing the hard drive.
To use the Drive Genius 3 demo, click on Demo in the registration window. The demo
may be activated by purchasing a serial number from
http://www.prosofteng.com/drivegenius3.
The following features are not enabled in the trial version:

   •   Benchtest                                 •   Defragment
   •   Repartitioning                            •   Initialize
   •   Integrity Check                           •   Repair/Rebuild
   •   Duplicate                                 •   DriveSlim™ (Archive and Delete)
   •   Sector Edit                               •   DrivePulse™ (Monitoring)

DRIVE GENIUS 3 USER'S GUIDE                                                            7
INSTALLING AND STARTING DRIVE GENIUS 3

2    Installing and Starting Drive Genius 3
This chapter provides basic instructions on installing and starting Drive Genius 3. If you
are using Drive Genius 3 for the first time, you should read this chapter in detail.

2.1 Booting from DVD
Drive Genius 3 is provided on a bootable DVD to use its features on the internal hard
drive. If you wish to Repair, Defrag, or Duplicate your internal hard drive, you will need
to boot from the Drive Genius 3 DVD.
► ► To boot from Drive Genius 3:
  1. Insert the Drive Genius 3 DVD into the DVD Drive.
  2. Restart the computer holding the “C” key.
  3. Continue holding the “C” key until the Apple logo is displayed.

2.2 Installing Drive Genius 3
Drive Genius 3 may be installed on operating systems 10.5.3 and greater to provide
maintenance on secondary internal or external hard drives. Installing Drive Genius 3 will
activate DrivePulse™ and support “live” features for the internal volume such as Verify
and Scan. This will also allow you to utilize Drive Genius 3's features on any locally
attached hard drives without having to boot from the Drive Genius 3 DVD.
The following instructions are for users with a download version of Drive Genius 3.
► ► To install Drive Genius 3:
  1. From the location to which you downloaded Drive Genius 3, double-click on the
     Drive Genius 3 image (.dmg) file to mount it on your computer.
  2. Drag the Drive Genius 3 application file to your Applications folder of your hard
     drive.

DRIVE GENIUS 3 USER'S GUIDE                                                             8
INSTALLING AND STARTING DRIVE GENIUS 3

2.3 Launching and Activating the Software
Double-click on the application icon to run Drive Genius 3. At first launch, you will be
prompted to enter your serial number (sent to you by email, or provided on a card in
your DVD case).
This serial number will activate all features of Drive Genius 3. Please keep this number
in a safe place for reinstallation, upgrades, and technical support.

                                   Registration Window

DRIVE GENIUS 3 USER'S GUIDE                                                                9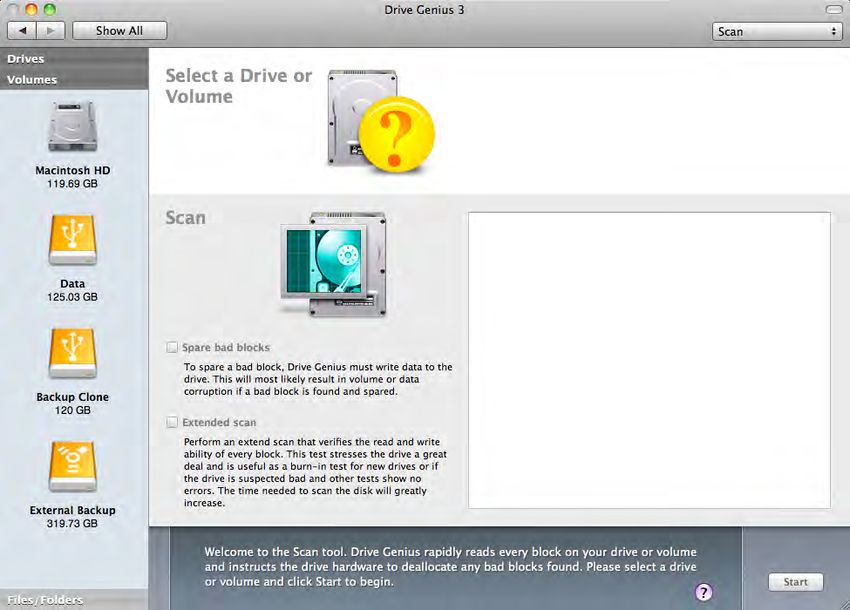
INSTALLING AND STARTING DRIVE GENIUS 3

2.4 Selecting an Operation
Most Drive Genius 3 functions require a three-step process to complete a task:
   1. Select an operation.
   2. Select a hard drive or volume in the main window.
   3. Select a parameter and apply it to the drive or volume.
On the main window, you can choose the Drive Genius 3 operation you wish to perform.
Select the task you want to perform by moving the mouse and clicking on one of the
icon buttons in the middle of the screen. Click on the green arrow to choose more
operations.

           Information, Defrag, Drive Slim, Repair, Scan, DrivePulse™, More
For operations such as copying, partition resizing, file archiving and sector editing, you
will need to enter information pertaining to the operation. Shredding, information,
benchtest, integrity checking, and initialize do not require any additional information.

           Back,Integrity Check, Initialize, Repartition, Duplicate, Shredding,
                                  Benchtest, Sector Edit

              Prosoft recommends backing-up your data before using many features in
              Drive Genius 3. Backing up on a regular basis is your best defense
              against data loss. Drive Genius 3 will prevent automatic sleep while a tool
              is running.

DRIVE GENIUS 3 USER'S GUIDE                                                            10
DRIVEPULSE™
3 DrivePulse™
Drive Genius 3 introduces DrivePulse™, a utility to automatically monitor the health of
your hard drives and volumes from the comfort of your desktop. DrivePulse™ will check
for fragmentation, volume errors, and physical issues on your hard drives. This is a low
resource process that will quickly test your hard drives when the computer is idle.
DrivePulse™ Window
To utilize the DrivePulse™ feature, you must install Drive Genius 3 into your boot
volume. This will allow you to set the DrivePulse™ options for monitoring your hard
drives:
• OFF/ON: Turn On/Off the DrivePulse™ feature within Drive Genius 3.
• Suspend while on battery power: Suspend DrivePulse™ from monitoring the
hard drive(s) if the machine is running on battery power. This is ideal for
MacBook® laptops that are not connected to a power source.
• Monitor external drives: Allow DrivePulse™ to monitor any locally attached
hard drives such as FireWire, USB, or eSata hard drives.
• Display alerts for critical conditions only: DrivePulse™ will only display an
alert if it detects serious volume errors or bad blocks on a hard drive.
DRIVE GENIUS 3 USER'S GUIDE 11DRIVEPULSE™
You may choose what type of issues DrivePulse™ will look for while the computer is
idle:
• Physical problems: DrivePulse™ performs a Scan on a disk to search for bad
blocks on the hard drive ensuring the physical integrity of the device.
DrivePulse™ is scheduled to Scan once a week.
• Volume consistency problems: DrivePulse™ performs a Verify on the volume
to assess the integrity of the catalog and directory structures. DrivePulse™ is
scheduled to perform a Volume verification once a day.
• Volume fragmentation: DrivePulse™ scans the volume catalog and its files to
determine the amount of fragmentation. DrivePulse™ is scheduled to check the
fragmentation status once a week.
DrivePulse™ Menu Item
When DrivePulse™ is On, the DrivePulse™ icon will appear in the top menu bar to
quickly view the status of any connected hard drives or volumes.
Status and Schedule Information with DrivePulse™
DRIVE GENIUS 3 USER'S GUIDE 12DRIVEPULSE™
Move the cursor over any hard drive or volume menu item to view the status of a hard
drive. This will show the S.M.A.R.T. Status, Fragmentation Status, and Volume
Consistency of the hard drive and the next scheduled time for the process to take place.
DrivePulse™ Prompts
DrivePulse™ will notify you with a prompt if there are any issues with your hard drives.
If you are experiencing S.M.A.R.T. Status problems, large amounts of fragmentation, or
issues with your volume catalog, a prompt will inform you to take action on your hard
drive.
Event Viewer Log
Selecting Event Viewer will display any information regarding DrivePulse's processes.
This provides a quick overview of the events taken place by DrivePulse™.
DrivePulse™ Preferences
Open Drive Genius is a quick shortcut to open the Drive Genius 3 application on your
desktop.
Preferences provides a shortcut to change the DrivePulse™ settings without having to
open Drive Genius. This will allow you to quickly disable any tests or settings for your
hard drives.
DRIVE GENIUS 3 USER'S GUIDE 13REPAIR
4 Repair
Repair is a tool for verifying and repairing most kinds of logical hard drive faults. It
analyzes the volume for a general overview and can repair/rebuild the volume. It can
also be used to fix Mac OS X file permissions on your boot volume.
Repair Window
Repair should be run whenever excessive system crashes occur. It also pays to run this
periodically as it is not unusual for minor faults to appear on a hard drive. Within the
Repair window, there are five functions available to help fix your hard drive.
DRIVE GENIUS 3 USER'S GUIDE 14REPAIR
Options for drive repair
• Verify: Check a volume for errors. Runs a general scan over the volume to
detect any errors.
• Repair: Check for and repair any found errors on a volume. Checks the volume
for any errors, and attempts to repair them if they are found. If the volume has
been having serious problems, it is recommended to repeat Repair until it reports
the errors have been fixed
• Rebuild: Rebuilds the drive table that holds the file information. This will rebuild
the portion of the drive (known as the Catalog B-Tree) that contains information
pertaining to the location of all the files on the volume. It is a separate utility from
the Verify and Repair functions and may be used separately to repair faulty
volumes. Since it rebuilds the structure based on the existing content of the rest
of the drive, it can potentially fix errors that Repair tools cannot.
• Repair Permissions: Correct the ownership and permissions according to Apple
specifications. Repair Permissions will correctly set the permissions to solve
most of the problems related to permissions on the individual files and folders.
Repair Permissions must be run from the bootable operating system it is
repairing, not from the DVD.
• Verify Preferences: Searches for possible errors with preference files. If any
errors are found, a button titled “Reveal in Finder” will point you to the damaged
file. To repair damaged preference files, delete the file using the Finder, and open
the associated application to create a new preference file.
Repair does not verify any physical media defects. Please use the Scan
function of Drive Genius 3 to check for media errors.
DRIVE GENIUS 3 USER'S GUIDE 15REPAIR
Repair Window
►► To Repair your drive:
1. Launch Drive Genius 3 or boot from the Drive Genius 3 DVD.
2. Click the Repair Icon.
3. Select the volume you wish to repair.
4. Choose the function you want to perform from the drop-down menu: Verify,
Repair, Rebuild, Repair Permissions, or Verify Preferences.
5. Click the Start button to proceed.
6. Click on the Cancel button to stop the current process.
The repair feature should not be used as a substitute for regular backups
of your important data.
DRIVE GENIUS 3 USER'S GUIDE 16DEFRAG
5 Defrag
Adding and deleting files to and from your hard drive will cause the drive to become
fragmented. When the OS writes files to the drive, it will look for empty space on the
hard drive to write data to. If the space is too small to fit the file, it will write part of the
data in one area and the remaining data to another area of the hard drive. This way no
disk space is wasted. However, this will cause the drive to slow down as it will need to
scan multiple parts of the hard drive to locate and read the file.
The more writing and deleting that is done to the hard drive, the more fragmented the
drive will be. The process will gradually have an impact on the hard drive's
performance. This is why using Drive Genius 3 to defragment your hard drive is an
excellent way to boost the performance of your computer. Drive Genius 3 puts all these
broken up pieces together into one continuous block with all of the empty space at the
end.
The Defrag feature displays information in two separate tabs: Volume Fragmentation
and File Fragmentation.
Defrag Window – Volume Fragmentation
DRIVE GENIUS 3 USER'S GUIDE 17DEFRAG
Volume Fragmentation will display a graphical representation for a quick overview for
the files laid across the volume to indicate how much fragmentation is across the hard
drive. Four different colors are displayed to indicate the usage of space:
• The red portion represents fragmented data
• The white portion represents free space
• The green portion represents used space that is not fragmented.
• The yellow portion represents reserved space required by the Mac operating
system that cannot be defragmented.
Defrag Window – File Fragmentation
File Fragmentation will display a list of the files that are fragmented on the hard drive.
This list will indicate which files are fragmented, how many fragments the file is split
into, and how much space the file uses. The more fragments the file is split into, the
longer it takes to access the file. If a file you regularly access is fragmented, you may
defragment the hard drive to improve the file's performance and accessibility.
DRIVE GENIUS 3 USER'S GUIDE 18DEFRAG
►► To Defragment your drive:
1. Launch Drive Genius 3 or boot from the Drive Genius 3 DVD.
2. Click the Defrag Icon.
3. Select the volume you wish to Defrag.
4. Click the Start button to proceed.
5. Click on the Cancel button to stop the current process.
Defrag in Process
It can take from half an hour to a day to defrag a high capacity volume
(depending on how fragmented it is). The end of the day is a great time to
perform this maintenance routine.
DRIVE GENIUS 3 USER'S GUIDE 19DUPLICATE
6 Duplicate
The Duplicate function copies all the information from the source drive to the
destination drive. A copy of the source drive is made to the destination, so if you backup
your startup drive, a bootable copy of it is created with all information such as file
permissions preserved.
Unlike most backup programs which copy file-by-file, Drive Genius 3 utilizes a method
called device copy. Using device copy enables you to retain every detail of the original
drive, from bootability to the icon locations. Device copy is also a lot faster than the
traditional file-by-file backup.
Drive Genius 3 supports duplication of drives and volumes. For drive copy, Drive
Genius 3 will duplicate an identical copy of the drive. For volume copy, an identical
volume is first duplicated, and then Drive Genius 3 will apply a proprietary resizing
technology to expand the volume size to the maximum, so no space is wasted.
Duplication can be used for copying one drive to another drive or to a disk image file.
Duplicate Window
DRIVE GENIUS 3 USER'S GUIDE 20DUPLICATE
Drive Genius 3 requires the source and the target devices to be
unmounted before proceeding with the duplication. To perform a Duplicate
of the main volume, you must boot from the Drive Genius 3 DVD or from a
secondary boot volume.
6.1 Volume Duplicate
The volume duplicate can only duplicate HFS+ volumes. The information on the target
drive will be replaced with the information on the source volume. If you want to archive
to a file instead, select “New Disk Image” as the destination. Drive Genius 3's volume
copy is designed to work with OS X volumes.
►► To Duplicate a volume:
1. Launch Drive Genius 3 or boot from the Drive Genius 3 DVD.
2. Click on the green arrow in the arena menu.
3. Click on the Duplicate Icon.
4. Click on the Volumes category, then select the volume you want to duplicate.
5. Select the target volume from the Destination list. You can also duplicate the
source volume to a Disk Image as your destination.
6. Click the Start button to proceed.
7. To cancel, click on the Cancel button. Note: Canceling the duplicate process
may result with an unmountable destination.
Selecting a volume to duplicate
DRIVE GENIUS 3 USER'S GUIDE 21DUPLICATE
6.2 Device Duplicate
Device duplication is useful when you need to have an identical image of the original
drive. The Device Duplicate will clone each sector of the hard drive, including the free
space, to retain the original directories for the files and partition map for multiple
volumes. Drive Genius 3 can even be used to clone Windows® or Linux drives.
Duplicating device to device
►► To Duplicate a device:
1. Launch Drive Genius 3 or boot from the Drive Genius 3 DVD.
2. Click on the green arrow in the arena menu.
3. Click on the Duplicate Icon.
4. Click on the Drives category, then select the hard drive you want to duplicate.
5. Select the target hard drive from the Destination list. You can also duplicate the
source hard drive to a Disk Image as your destination.
6. Click the Start button to proceed.
7. To cancel, click on the Cancel button. Note: Canceling the duplicate process
may result with an unmountable destination.
DRIVE GENIUS 3 USER'S GUIDE 22DUPLICATE
Drive Genius 3's Device Duplication function clones an exact image of the
original hard drive. The destination drive's existing partition scheme is
affected by the Duplication process. Since the Device Duplicate is copying
sector-by-sector, all data that was previously stored on the destination
disk will be replaced with the data from the source drive.
6.3 Verifying Destination Copy
Enabling Verify Destination Copy will have Drive Genius 3 compare the source and
destination once the Duplicate is complete. This feature is helpful when dealing with
hard drives that are experiencing potential hardware problems, such as bad blocks.
Using Verify Destination Copy will ensure your duplicate process has completed
successfully.
DRIVE GENIUS 3 USER'S GUIDE 23DRIVESLIM™
7 DriveSlim™
DriveSlim™ is a tool to help recover drive space by deleting or archiving large,
duplicate, or unused files. Through DriveSlim's various slimming plans, Drive Genius 3
will detect and recommend files that can be deleted from your system to help free
space on your hard drive. DriveSlim™ can help you determine what files can be deleted
when your hard drive gets near its full capacity.
DriveSlim™ Window
Prosoft recommends backing-up your data before using many features in
Drive Genius 3. Backing up on a regular basis is your best defense
against data loss.
DRIVE GENIUS 3 USER'S GUIDE 24DRIVESLIM™
“Slimming Plans” Options Screen
7.1 Slimming Plans
Each Slimming plan individually searches for files that can be deleted from the system
to save space. The Slimming Plan's Options Menu allows you to fine tune your
Slimming Plans and help filter out specific files from your hard drive. By adjusting the
sliders and checking various options, you will be able to locate any files that may be
bloating your hard drive.
• Large Files: Finds files that are greater than a set minimum size and have not
been accessed in a period of time you specify. The detected minimum size can
be from 5MB to 100MB. The period of time can be 0 to 365 days.
• Duplicate Files: Finds any files that are greater than a set minimum size that
have duplicates. The detected minimum size can be 0MB to 100MB. You have an
option to replace any duplicates with an alias pointing to the original file.
• Unused Localizations: Finds all localized resources for any applications and
allows you to specify what languages you want to keep. This will help delete any
unnecessary language files from your applications. You can select any other
languages to be kept by marking the selected language.
DRIVE GENIUS 3 USER'S GUIDE 25DRIVESLIM™
• Universal Binaries: A Universal Binary is a container for multiple application
binaries, each optimized for a specific CPU. For any given application, there are
up to 4 possible binaries in one file (Intel, Intel 64-bit, Power PC, PowerPC 64-
bit), which your machine uses to run the application. Intel-based Macs do not
need PowerPC binaries, and vice versa. DriveSlim detects and deletes any
unnecessary binaries that your computer hardware cannot run. If you are using a
32-bit system, you can choose to keep 64-bit binaries by enabling “Keep 64-bit
variants” in the Slim Options. If you are using a 64-bit system on Mac OS X 10.6
or greater, you can choose to keep 32-bit binaries by enabling “Keep 32-bit
variants”. At least one option must be enabled (64-bit or 32-bit).
• Cache/Temporary Items: Finds all cached and temporary files that have not
been accessed in a period of time you specify. The period of time can be set from
1 to 31 days.
Orphaned Files: For expert users only. Finds files that the system
determines are not associated with an application. Due to the nature of
applications using private file types, this search may find files that are
actively used by an application. Therefore, the results of the search
should be carefully reviewed before making a decision to delete files. It is
highly recommended to backup these files prior to deleting the files from the hard drive.
To enable Orphaned Files, go to the Drive Genius 3 menu and hold the Control and
Option keys to change the “Preferences” selection to “Expert Preferences”, select it and
enable “Expert Tools”.
DRIVE GENIUS 3 USER'S GUIDE 26DRIVESLIM™
Orphaned Files enabled
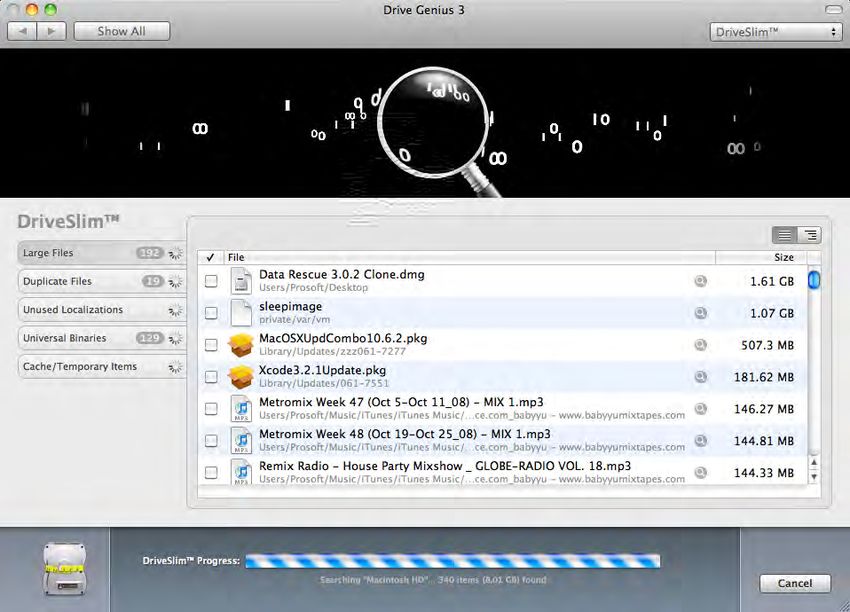
7.2 Scanning the Volume for files to Slim
DriveSlim™ will scan your hard drive and list the files that are occupying space based
on the settings you have chosen.
►► To Slim your drive:
1. Launch Drive Genius 3 or boot from the Drive Genius 3 DVD.
2. Click on the DriveSlim™ Icon.
3. Select the Volume you want to slim by highlighting it. You may narrow your
search on your hard drive by clicking on the “Choose a Folder” button. This will
have the slimming plans search specifically in the selected folder for files to
archive or delete.
4. Select the Slimming Plans you want to use by putting a check mark on the
Slimming Plan.
5. Click on the Change Options button to edit the slimming plans.
6. Move the sliders to adjust the size and days for the slimming plans you selected.
7. Click on the Done button to keep the selected options.
8. Click on the Start button to proceed.
9. To Cancel the scan process, click on the Cancel button.
DRIVE GENIUS 3 USER'S GUIDE 27DRIVESLIM™
Scanning the Volume for files to slim
7.3 Selecting Files to Archive or Delete
Once DriveSlim's scan is complete, a list of files will be provided that meet the criteria
based on the settings you have chosen. A list of files will be presented for each
slimming plan you selected. Although the files may meet the criteria you have specified,
it is your choice to remove any of the listed files. Be sure to thoroughly review the files
listed to prevent removing any important files you may be using.
DRIVE GENIUS 3 USER'S GUIDE 28DRIVESLIM™
Selecting Files to Delete
The list of files can be organized in alphabetical order by clicking on the “File” column
heading, or by size by clicking on the “Size” column heading. You may also view the
location of the files in the Finder by clicking on the Preview icon within the list. To
cancel using DriveSlim™, uncheck the selected files and click on the Cancel button.
Check mark any files you want to archive or delete and click on the Slim Drive button
to continue archiving or deleting files.
DRIVE GENIUS 3 USER'S GUIDE 29DRIVESLIM™
Confirming files to be archived, deleted, or modified
A confirmation window will appear listing all the files that have been selected to be
archived, deleted, or modified. Review the files you have selected to prevent loss of
files.
To delete a file from the list, highlight the file and click on the X icon.
By default, all selected files are archived into a compressed disk image stored in the ~/
Documents folder. Unmarking and marking the box Archive files to disk image will
prompt you for a new location to save the disk image. This feature sets up the files to
be easily saved onto a CD, DVD, or external drive for your backup.
Click on the Slim Drive button to proceed.
You may choose not to archive the files and delete them permanently by
un-checking Archive files to disk image. If you choose to delete the files
(instead of archiving the files), ensure you have a backup of the files.
DRIVE GENIUS 3 USER'S GUIDE 30DRIVESLIM™
DriveSlim Archiving Files to Disk Image
To cancel the Archive Process, click on the Cancel button. Drive Genius 3 will stop the
file in progress and continue to make an archive of the files that have already been
deleted.
► ► To Archive or Delete files:
1. Review the files listed in each Slimming Category and check mark any files you
want to archive or delete. You can check mark all files by clicking on the √
column heading.
2. Click the Slim Drive button to proceed archiving or deleting files.
3. A confirmation window will appear listing all the files that have been selected to
be archived, deleted, or modified. Choose to archive the files by marking
Archive files to disk image or remove the check mark to delete the selected
files.
4. Click the Slim Drive button to Archive or Delete the files.
DRIVE GENIUS 3 USER'S GUIDE 31SECTOR EDIT
8 Sector Edit
Drive Genius 3's Sector Edit allows expert users the ability to access and modify bits
and bytes of a file, volume or disk.
To perform a Sector Edit on your main boot volume, you must boot from the Drive
Genius 3 DVD or a secondary boot drive.
Sector Edit Window
Do not use this function unless you are extremely proficient with raw hex
data. Editing the data using Sector Edit may render your data files
unreadable, or even corrupt your drive.
DRIVE GENIUS 3 USER'S GUIDE 32SECTOR EDIT
8.1 Sector Editing a Drive or Volume
Sector Edit will change the data on any sector of a drive or volume.
►► To perform a low level Sector Edit on your Drive or Volume:
1. Launch Drive Genius 3 or boot from the Drive Genius 3 DVD.
2. Click on the green arrow.
3. Click on the Sector Edit icon.
4. Select the Drive or Volume you want to edit.
5. Navigate to the sector you want to edit by typing in the sector number in the
Sector _______ of n box, using the slider, or pressing the Previous and Next
buttons.
6. Highlight the byte or bytes you want to modify and type the new value.
7. Click on the Write button to apply the Sector Edit Modification.
Modifying the Values
DRIVE GENIUS 3 USER'S GUIDE 33SECTOR EDIT
8.2 Sector Editing a File
You may use Sector Edit to edit a file without booting to the Drive Genius 3 DVD by
launching the Drive Genius 3 application. A file may be selected by clicking on the
Choose a File button, or by dragging a file from the Finder to the Drive Genius 3 icon
on the Dock.
Choose File Category
►► To perform a low level Sector Edit on a file:
1. Launch Drive Genius 3.
2. Click on the green arrow.
3. Click on the Sector Edit icon.
4. Click on the Files/Folders category and click on Choose File...
5. Select the file or folder you want to shred from the Open prompt.
6. Navigate to the sector you want to edit by typing in the sector number in the
Sector _______ of n box, using the slider, or pressing the Previous and Next
buttons.
7. Highlight the byte or bytes you want to modify and type the new value.
8. Click on the Write button to apply the Sector Edit Modification.
DRIVE GENIUS 3 USER'S GUIDE 34SECTOR EDIT
Editing a File
DRIVE GENIUS 3 USER'S GUIDE 35SHRED
9 Shred
Drive Genius 3's Shred function is used for securely erasing the contents of a volume or
the whole drive. There are many reasons to perform a shredding operation instead of
simply dragging the files into the trash. For example:
• To avoid identity theft and protect your credit.
• Stop intellectual property theft.
• Permanently get rid of your data files so no one can recover them. For example,
a volume with adult oriented materials.
• Permanently delete any software that you are not going to be using on your new
machine since software licenses usually only apply to one computer.
• Most Government/large corporations require the drives to be securely erased
before disposing or transferring to other users
The only secure way to erase your drive is by overwriting the previous data patterns.
Drive Genius 3 has been written to conform to the United States Department of
Defense standards for drive sanitation.
Shred Window
DRIVE GENIUS 3 USER'S GUIDE 36SHRED
Shred overwrites the volume or the drive with 1 (Zeros), 3 (Random), or 7 pass (DoD)
and ensures all previous data will never be recoverable. Drive Genius also features a
35 pass (Gutmann) option, which overwrites every block of data 35 times. Drive Genius
3's Shredder function conforms to the U.S. Department of Defense standard for drive
sanitization (DoD 5220.22 M), and it works with IDE (ATA), SATA, SCSI, USB, and
Firewire hard drives.
Note: US Department of Defense in the clearing and sanitizing standard DoD 5220.22-
M recommends the approach “Overwrite all addressable locations with a character, its
complement, then a random character, verify for clearing and sanitizing information on
the writable media”.
Drive Genius 3 can shred a file, folder, volume or the whole drive. If you are shredding
your boot volume or your startup drive, you will need to boot the system from the Drive
Genius 3 DVD, or boot from another drive with Drive Genius 3 installed.
Drive Genius 3 also allows you to permanently erase the free space on your volume
making it impossible for anyone to retrieve old files you have previously deleted.
Shred Options
9.1 Shredding a Volume or Drive
Shredding a volume or drive will permanently remove all data. After the operation, a
newly initialized HFS+ partition will appear on the desktop.
When shredding a volume, you may choose to shred the unused space by enabling
Free Space Only. This will skip any active files and overwrite the free space of the drive
to prevent previous files from being found.
►► To Shred a Drive or Volume:
1. Launch Drive Genius 3 or boot from the Drive Genius 3 DVD.
2. Click on the green arrow.
3. Click on the Shred icon.
4. Select the volume or drive you want to shred.
5. Select the Shred Strength for erasing the volume or drive.
6. Click on the Start button to proceed.
7. To Cancel, click on the Cancel button.
DRIVE GENIUS 3 USER'S GUIDE 37SHRED
Shred in Process
9.2 Shredding Free Space
Drive Genius 3 allows you to permanently erase the free space on your volume in a
secure fashion making it impossible for anyone to retrieve old files you have previously
deleted. Technically, this process is achieved by first filling up your volume with
temporary files, and then writing a secure pattern over the files.
This process is particularly important if your hard drive is to be shared among a few
users, selling the computer, or disposing the hard drive.
Free Space Only Selection
DRIVE GENIUS 3 USER'S GUIDE 38SHRED
►► To Shred the free space of a Volume:
1. Click on the Volumes category.
2. Select the volume which has the free space you want to shred.
3. Make sure the Free Space Only checkbox is checked.
4. Click on the Start button.
If you have a big volume or slow machine, shredding free space can take
a while to finish. If you erase the free space on a disk or other device,
there is no way any file recovery programs will be able to retrieve your
deleted files up to that point.
9.3 Shredding a File or Folder
Shredding a file or folder conveniently allows you to select an individual file or directory
to be shredded. This can be done without emptying your current trash can and ensure a
sensitive file is immediately removed from your system. Shredding a folder will shred
all the corresponding files in the folder. It is highly recommended to backup the files
prior to shredding.
You can shred individual files and folders quickly by dragging the files or folders from
the Finder onto the Drive Genius 3 icon on your Dock. Furthermore, a shortcut is added
into the Finder's Services menu for quick access to Secure Erase.
Secure Erase Available through the Finder
►► To Shred a file or folder:
1. Launch Drive Genius 3.
2. Click the green arrow.
3. Click on the Shred icon.
4. Click on the Files/Folders category and click on Choose File...
5. Select the file or folder you want to shred from the Open prompt.
6. Select the Shred Strength for erasing the file.
7. Click on the Start button to begin shredding the file or folder.
8. To cancel, click on the Cancel button.
DRIVE GENIUS 3 USER'S GUIDE 39INTEGRITY CHECK
10 Integrity Check
Integrity Check is a suite of diagnostics designed to test the overall integrity of the disk
drive by writing and reading various block sizes to and from the drive. This test is ideal
to see the performance of rapidly writing and reading files over time such as a mailing
server. By simulating the reads and writes of data, you can see how your hard drive
performs with your data.
Integrity Check Window
The options within Integrity Check allow you to choose the transfer sizes of data, the
test duration, and the test type.
DRIVE GENIUS 3 USER'S GUIDE 40INTEGRITY CHECK
Transfer Size
The transfer size ranges from 2KiB to 16MiB. For setups such as a mail server or
accounting server, test the drive using the 2KiB block. Small block size help simulate
database servers, as they do lots of little searches and hardly ever read lots of data at a
time. Use a bigger block size if you use the drive for graphic intensive applications and
digital audio and video applications to properly test your hard drive's performance.
Test Duration
The length of the test can be varied from one minute to one day. The longer the duration
given to the test, the more reliable the results are. Start with smaller time frames and
give it a longer period to detect more subtle flaws.
DRIVE GENIUS 3 USER'S GUIDE 41INTEGRITY CHECK
Test Type
The test type will indicate whether a read or write test will be performed on the hard
drive.
• Sequential Read: measures how many single-block reads can be performed in
one second. This test is affected by read caching (the larger the read cache, the
faster the performance).
• Sequential Write: measures how many single-block writes can be performed in
one second. This test is affected by write caching (the larger the write cache, the
faster the performance).
• Random Read: measures drive performance for reads of blocks of data from 2
kilobytes to 16 megabytes. For small block sizes, seek time and rotational
latency are weighted more heavily. For large block sizes, the transfer rate is
weighted more heavily.
• Random Write: measures drive performance for writes of blocks of data from 2
kilobytes to 16 megabytes. For small block sizes, seek time and rotational
latency are weighted more heavily. For large block sizes, the transfer rate is
weighted more heavily.
Selecting a Graph Type
The graph type allows you to choose the way the data is displayed, as a bar graph, line
graph, or raw data.
DRIVE GENIUS 3 USER'S GUIDE 42INTEGRITY CHECK
Bar Graph
Each bar on the graph represents a write/read process and its transfer rate. Drive
Genius 3 represents each bar with a color to indicate the performance of the transfer
speed:
• Green: Fastest transfer rates (maximum speed).
• Blue: Average transfer speed.
• Red: Slowest transfer rates (minimum speed).
Drive Genius 3 will help update the colors of the bars as the Integrity Check progresses
to help determine the overall performance of the hard drive.
►► To use Integrity Check on a volume or drive:
1. Launch Drive Genius 3 or boot from the Drive Genius 3 DVD.
2. Click on the green arrow.
3. Click on the Integrity Check icon.
4. Select the volume or drive you want to test.
5. Select the options for type, size, and time.
6. Click on Start.
7. To cancel, click on the Cancel button.
DRIVE GENIUS 3 USER'S GUIDE 43BENCHTEST
11 Benchtest
Benchtest is a comparison tool to display the performance of your hard drive against
similar or different base machine configurations. Using Benchtest will allow you to see
how your machine compares to a base model computer to gauge the performance of
your hard drive. If your machine performs below the standards of a base model
computer, this may be a sign your hard drive is in need of maintenance such as a
Defrag.
To perform Benchtest on your boot volume, you must boot to the Drive Genius 3 DVD
or a secondary boot drive.
Benchtest Window
To get the most accurate test results, we recommend that you do not run
the Benchtest with other processes running in the background. Avoid
running other CPU intensive applications in the background as this may
also affect the results.
DRIVE GENIUS 3 USER'S GUIDE 44BENCHTEST
Depending on the speed of the drive and the CPU, it may take up to 10 minutes to
finish the test. The test data is updated as soon as each task is complete. The display
options within Benchtest allow you to choose the graph type, test type and the
comparison machine model.
Test Type
Drive Genius 3 will perform each test type to indicate the transfer rate for each size of
data. The test type will indicate whether a read or write test will be performed on the
hard drive. To display any of the tests, simply select it from the pop-up menu.
• Sequential read: measures how many times single-block reads can be
performed in one second. This test is affected by read caching (the larger the
read cache, the faster the performance).
• Sequential write: measures how many times single-block writes can be
performed in one second. This test is affected by write caching (the larger the
write cache, the faster the performance).
• Random read: measures drive performance for reads of blocks of data from 2
kilobytes to 16 megabytes.
• Random write: measures drive performance for writes of blocks of data from 2
kilobytes to 16 megabytes.
Comparison Window
Drive Genius 3 gives you the ability to compare your benchtest results with base lines
from various machine specifications. To select other drives for comparison, click on the
comparison drop-down menu. You may delete any previously saved benchtests by
selecting Edit from the comparison drop-down menu.
DRIVE GENIUS 3 USER'S GUIDE 45BENCHTEST
Screenshot of Bar Graph
The graph type allows you to choose the way the data is displayed, as a bar graph, line
graph, or raw data. For bar and line graphs, green represents your hard drive's
performance, while blue represents the selected comparison machine's performance.
• Bar Graph: For each data size, a pair of bars measures your hard drive's
transfer speed versus the selected machine's base line results.
• Line Graph: For each data size, a pair of plotted points will draw a line to
compare your hard drive's transfer speed versus the selected machine's base
line results.
• Raw Data: Displays numerical figures for each data size for the compared
machines.
When your benchtest completes, you may save your results by clicking on File and
selecting Save. This saves your results for you to create a baseline of your hard drive's
performance and use for comparison of your system overtime. You may select any
benchtests you have saved in the comparison drop-down list.
►► To use Benchtest on a volume or drive:
1. Launch Drive Genius 3 or boot from the Drive Genius 3 DVD.
2. Click on the green arrow.
3. Click on the Benchtest icon.
4. Select the volume or drive you want to test.
5. Select the options for graph type and comparison machine.
6. Click on Start. To cancel, click on the Cancel button.
7. Review the Benchtest's results. Select the test type to review each set of results.
8. Click on File and select Save to save your benchtest results.
DRIVE GENIUS 3 USER'S GUIDE 46SCAN
12 Scan
Scan is designed specifically to verify that every sector (block which can contain
information) on your volume or drive can be read correctly. Drive Genius 3 introduces
advanced features for performing extended scans and spare bad blocks to assist the
hard drive's internal mechanism to properly reallocate bad sectors.
Data on a hard drive is stored in a series of blocks. During normal operation every block
of the data should be able to be written to and read from again. However, a hard drive
can develop a problem where one or more blocks may lose storage capacity and
become unreadable. Surface scanning is a process of requesting a read on every block
on the drive in sequence and determining whether the drive reports an error on any of
these requests.
A standard scan will count the number of detected bad blocks to inform you of the hard
drive's physical sectors. The time required for a Scan test is dependent on the drive's
capacity, rotational speed, and the physical state of the hard drive. All the blocks on the
hard drive are read in sequential order.
Scan Window
DRIVE GENIUS 3 USER'S GUIDE 47SCAN
12.1 Spare Bad Blocks
Most current hard drives will automatically reallocate any bad blocks they come across
to another sector on the hard drive. Each hard drive has a set amount of space to
handle these bad blocks and reallocations.
If you suspect there are bad blocks on the volume or hard drive, you may enable Spare
Bad Blocks to allow Drive Genius 3 instruct the hard drive to dereference the bad
blocks. When Drive Genius 3 detects a bad block, it will attempt to read the information
for the bad block and write it back to the same block. This will indicate to the hard drive
that the sector is not available, which will require its internal mechanisms note the bad
sector and reallocate the data onto a different sector.
12.2 Extended Scan
Extended Scan will verify the read and write ability of every sector on the hard drive.
Unlike Spare Bad Blocks, which only writes for any found bad blocks, Extended Scan
will read from every block and write the data back onto the same block to force the hard
drive to reallocate any data from bad blocks. Enabling Extended Scan will greatly
increase the time needed to complete the scan.
This test is especially helpful to test the physical performance of the hard drive if you
have experienced a slow down in accessing data, or have acquired a used computer.
Screenshot of Scan in Progress
DRIVE GENIUS 3 USER'S GUIDE 48SCAN
Scan in Progress
►► To Scan your volume or drive:
1. Launch Drive Genius 3 or boot from the Drive Genius 3 DVD.
2. Click on the Scan icon.
3. Highlight the volume or drive you want to scan.
4. Enable the options for Spare Bad Blocks or Extended Scan if you want to
perform an in-depth scan.
5. Click on the Start button.
6. To cancel, click on the Cancel button.
DRIVE GENIUS 3 USER'S GUIDE 49INFORMATION
13 Information
Information provides technical details about your volumes and drives, such as total
blocks, partition ID and partition scheme information that expert users may find useful.
Displayed information may be saved into a text file by clicking on the File menu and
selecting Save.
Information Window
►► To get information on your volume or drive:
1. Launch Drive Genius 3.
2. Click on the Information icon.
3. Select the volume or drive you want to get Information about.
4. Click on the General or Details tab for switch between the information.
5. To save the information, click on the File menu and select Save.
DRIVE GENIUS 3 USER'S GUIDE 50INITIALIZE
14 Initialize
Drive Genius 3's Initialize feature is the easiest way to prepare a disk for general use.
Most hard drives are already formatted at the factory. However, many hard drives are
not ready for Mac use. Initialize will:
• Install the Apple driver
• Write a partition map
• Create a new volume and mount it to the desktop
Initializing will wipe out the first few thousand blocks of the drive in order to place a
device driver and the partition map on the drive. The rest of the drive is intact, but files
that were previously on the drive will not be accessible anymore. If you accidently
initialize a drive and it contains information you did not backup, you will need software
such as “Data Rescue” to recover the files.
If you are initializing your boot drive or you only have a single drive connected to your
system, you will need to boot the system from the Drive Genius 3 DVD.
When you are done initializing the drive, quitting Drive Genius 3 will shut down the
computer. To eject the Drive Genius 3 DVD, restart the computer, and press and hold
the mouse button. If initializing an external hard drive, select “Done” to exit the
operation.
Initialize Window
DRIVE GENIUS 3 USER'S GUIDE 51INITIALIZE
The Initialize window allows you to reformat the hard drive in two different Macintosh
formats:
• Apple Partition Map: This partition scheme is necessary for installing the Mac
Operating System based on PowerPC processors (such as G3, G4, and G5
machines). This format is recognized by all versions of the Mac Operating system
and can be used with Intel-Based Macintosh computers for storing data.
• GUID Partition Scheme: This partition scheme is necessary for installing the
Mac Operating System based on Intel processors (such as MacBooks, MacBook
Pros, or Mac Pro Desktop machines). This format is recognized by Mac
Operating System 10.4. and above.
Determine what machine type you will be using the hard drive for and select the
appropriate format to reformat the device.
The Volume Name field allows you to create the name of the volume once the Initialize
process is complete.
►► To initialize your drive:
1. Launch Drive Genius 3 or boot to the Drive Genius 3 DVD.
2. Click on the green arrow.
3. Click on the Initialize icon.
4. Select the drive you want to initialize.
5. Select the Apple Partition Map or GUID Partition Table depending on which Mac
you are using.
6. Type in a name for the volume in the Volume name field.
7. Click on the Start button to proceed.
8. To cancel, click on the Cancel button.
DRIVE GENIUS 3 USER'S GUIDE 52You can also read