Getting Started with Alveo Data Center Accelerator Cards - UG1301 (v1.8) February 5, 2021 - Xilinx
←
→
Page content transcription
If your browser does not render page correctly, please read the page content below
Getting Started with Alveo
Data Center Accelerator
Cards

UG1301 (v1.8) February 5, 2021
Revision History

Revision History
       The following table shows the revision history for this document.
                                  Section                                             Revision Summary
                                                        02/05/2021 Version 1.8
        General                                                    Updated example output logs to reflect Alveo U250-2RP
                                                                   platform.
        Chapter 1: Introduction                                    Updated platform information and introduced DFX
                                                                   terminology.
        XRT and Deployment Platform Installation Procedures on     Updated installation steps, as well as added an additional
        RedHat and CentOS                                          step to program the shell partition.
        XRT and Deployment Package Installation Procedures on      Updated installation steps, as well as added an additional
        Ubuntu                                                     step to program the shell partition.
        Appendix B: Creating a Vault Repository for CentOS         Clarified description.
                                                        11/24/2020 Version 1.7
        Chapter 1: Introduction                                    Updated platform information.
        Card Features                                              Added network interface information, updated electrical
                                                                   design power, as well as HBM and DDR4.
        Minimum System Requirements                                Updated operating system.
        Card Interfaces and Details                                Clarified description.
        XRT and Deployment Platform Installation Procedures on
        RedHat and CentOS                                          Updated installation steps for the Alveo U200 and U250
        XRT and Deployment Package Installation Procedures on      cards.
        Ubuntu
        Running lspci                                              Updated output log.
        Running xbmgmt flash --scan                                Updated description.
        Running xbmgmt partition                                   Added section.
        xbutil validate                                            Updated description and removed note about XRT
                                                                   installation on Ubuntu.
        Upgrade
        Downgrade
                                                                   Updated to reflect 2020.2 XRT.
        Upgrade
        Downgrade
        Upgrade from 2018.2 to 2018.3 in RedHat and CentOS
        Downgrade from 2018.3 to 2018.2 in RedHat and CentOS
        Upgrade from 2018.x to 2019.1 in RedHat and CentOS
        Downgrade from 2019.1 to 2018.x in RedHat and CentOS
        Upgrade from 2018.2 to 2018.3 in Ubuntu                    Removed sections.
        Downgrade from 2018.3 to 2018.2 in Ubuntu
        Upgrade from 2018.x to 2019.1 in Ubuntu
        Downgrade from 2019.1 to 2018.x in Ubuntu
        Generating the xbmgmt flash --update Command

UG1301 (v1.8) February 5, 2021                                                                               www.xilinx.com
                                                                                     Send Feedback
Getting Started with Alveo Accelerator Cards                                                                              2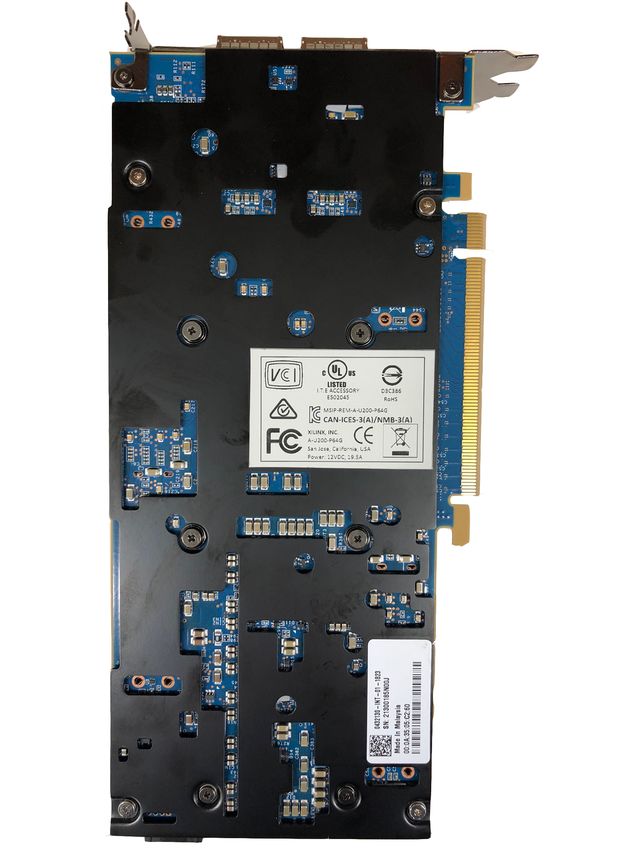
Revision History

                                  Section                                               Revision Summary
        Appendix C: Reverting the Card to Factory Image              Clarified description.
        Appendix D: Obtaining xbmgmt Command Options                 Added appendix.
                                                          08/18/2020 Version 1.6
        Card Features                                                Updated information.
        XRT and Deployment Package Installation Procedures on        Added a link to Xilinx Answer Record 75294.
        Ubuntu
        xbutil validate                                              Added a note about installing XRT on Ubuntu.
        Appendix E: Regulatory and Compliance Information            Added appendix.
                                                          06/03/2020 Version 1.5
        Chapter 1: Introduction                                      Updated the information.
        Card Features                                                Added new section.
        xbutil validate                                              Updated information about specifying -d.

                                                          12/18/2019 Version 1.4
        XRT and Deployment Package Installation Procedures on        Added a note about XRT installation.
        Ubuntu
        Chapter 7: Troubleshooting                                   Updated information about installing packages on RedHat
                                                                     and CentOS.
        Known Issues                                                 Added a known issue.
                                                        10/31/2019 Version 2019.2
        General                                                      Updated to the Vitis™ unified software platform throughout.
                                                                     Updated outputs throughout document.
        Qualified Servers                                            Provided the web link to the qualified servers.
        Chapter 4: Installing the Deployment Software                Replaced xbutil command with the new xbmgmt
                                                                     command for card flashing. Updated output logs.
        Known Issues                                                 Added a known issue.
        XRT and Deployment Platform Installation Procedures on
        RedHat and CentOS                                            Replaced xbutil command with the new xbmgmt
        XRT and Deployment Package Installation Procedures on        command for card flashing. Updated output logs.
        Ubuntu
        Running xbmgmt flash --scan                                  Replaced xbutil command with the new xbmgmt
                                                                     command when scanning card. Updated output logs.
        Appendix A: Changing XRT and Target Platform Versions        Replaced xbutil command with the new xbmgmt
                                                                     command for card flashing. Updated output logs.
        Appendix C: Reverting the Card to Factory Image              Added new appendix.
                                                        07/23/2019 Version 2019.1
        Upgrade from 2018.x to 2019.1 in RedHat and CentOS           Corrected answer record links
        Upgrade from 2018.2 to 2018.3 in RedHat and CentOS
        Upgrade from 2018.2 to 2018.3 in Ubuntu
        Downgrade from 2018.3 to 2018.2 in Ubuntu
        Upgrade from 2018.x to 2019.1 in Ubuntu
        Downgrade from 2018.3 to 2018.2 in RedHat and CentOS
        Chapter 1: Introduction

UG1301 (v1.8) February 5, 2021                                                                                 www.xilinx.com
                                                                                       Send Feedback
Getting Started with Alveo Accelerator Cards                                                                                3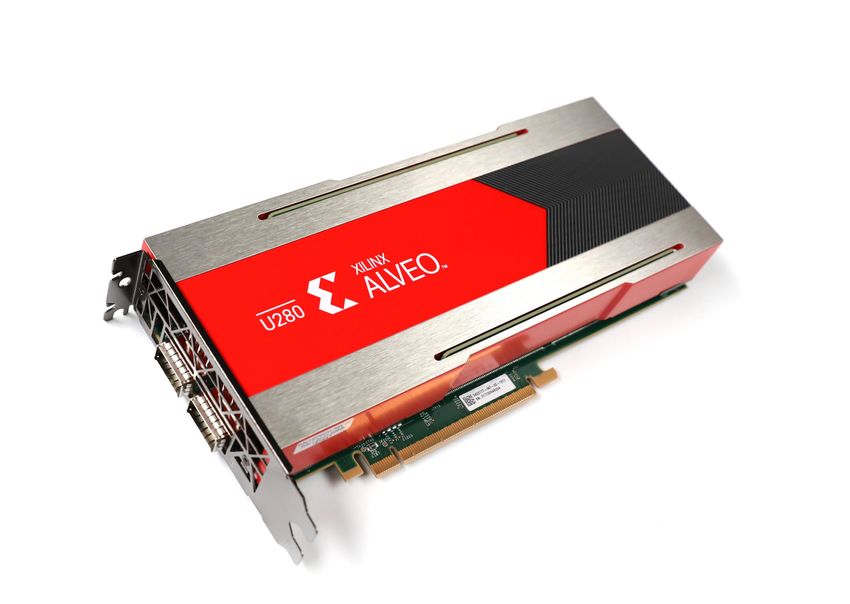
Revision History

                                  Section                                              Revision Summary
                                                        06/27/2019 Version 2019.1
        Qualified Servers                                            Updated server requirements.
                                                        06/24/2019 Version 2019.1
        General                                                      Added support for Alveo U280 production card.
        Appendix A: Changing XRT and Target Platform Versions        Updated upgrade and downgrade steps.
                                                        06/05/2019 Version 2019.1
        General                                                      Updated outputs throughout document.
        Qualified Servers                                            Updated table of validated servers.
        Card Interfaces and Details                                  Added information on status LEDs.
        Installing the Card                                          Added image of an installed Alveo card.
        Chapter 4: Installing the Deployment Software                Updated installation, upgrade, and downgrade flows for
                                                                     2019.1 release.
        Chapter 6: Next Steps                                        Added information on additional development resources.
        Chapter 7: Troubleshooting                                   Updated troubleshooting and known issues.
                                                          02/12/2019 Version 1.3
        General                                                      Added support for Alveo U280 ES card.
        Modifying the Installation on RedHat and CentOS, Modifying Updated instructions on upgrading and downgrading XRT
        the Installation on Ubuntu                                 and the deployment shell.
        Generating the xbmgmt flash --update Command                 Updated instructions.
                                                          01/23/2019 Version 1.2
        XRT and Deployment Platform Installation Procedures on       Updated instructions on running xbutil flash.
        RedHat and CentOS, XRT and Deployment Package
        Installation Procedures on Ubuntu
        Generating the xbmgmt flash --update Command                 Added new information on how to generate the options
                                                                     needed to run xbutil flash.
                                                          12/21/2018 Version 1.1
        Minimum System Requirements                                  Updated system requirements.
        XRT and Deployment Platform Installation Procedures on       Updated installation flow.
        RedHat and CentOS
        Modifying the Installation on RedHat and CentOS              Added new information on upgrading and downgrading
                                                                     deployment software.
        Modifying the Installation on Ubuntu                         Added new information on upgrading and downgrading
                                                                     deployment software.
        Known Issues                                                 Updated known issues.
        Appendix B: Creating a Vault Repository for CentOS           Added new appendix.
                                                          10/02/2018 Version 1.0
        Initial Xilinx release.                                      N/A

UG1301 (v1.8) February 5, 2021                                                                                 www.xilinx.com
                                                                                      Send Feedback
Getting Started with Alveo Accelerator Cards                                                                                4
Table of Contents
       Revision History...............................................................................................................2

       Chapter 1: Introduction.............................................................................................. 7
           Card Features...............................................................................................................................8
           Minimum System Requirements............................................................................................... 8
           Qualified Servers......................................................................................................................... 9

       Chapter 2: Accelerator Card Overview............................................................. 10
           Card Interfaces and Details......................................................................................................10
           Passive and Active Cooling Cards............................................................................................11

       Chapter 3: Card Installation Procedures......................................................... 13
           Safety Instructions.................................................................................................................... 13
           Before You Begin.......................................................................................................................15
           Installing the Card.....................................................................................................................15

       Chapter 4: Installing the Deployment Software......................................... 21
           XRT and Deployment Platform Installation Procedures on RedHat and CentOS............. 21
           XRT and Deployment Package Installation Procedures on Ubuntu................................... 25

       Chapter 5: Card Bring-Up and Validation........................................................29
           Running lspci............................................................................................................................. 29
           Running xbmgmt flash --scan................................................................................................. 30
           Running xbmgmt partition...................................................................................................... 31
           xbutil validate............................................................................................................................ 33

       Chapter 6: Next Steps.................................................................................................36

       Chapter 7: Troubleshooting.................................................................................... 37
           Known Issues............................................................................................................................. 38

       Appendix A: Changing XRT and Target Platform Versions....................40
           RedHat and CentOS.................................................................................................................. 40

UG1301 (v1.8) February 5, 2021                                                                                                   www.xilinx.com
                                                                                                    Send Feedback
Getting Started with Alveo Accelerator Cards                                                                                                  5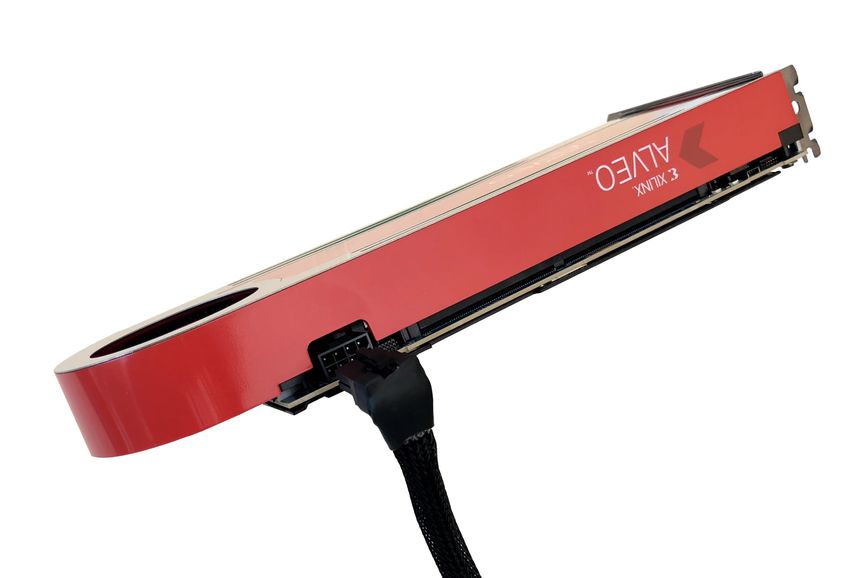
Ubuntu........................................................................................................................................41

       Appendix B: Creating a Vault Repository for CentOS...............................43

       Appendix C: Reverting the Card to Factory Image.................................... 45

       Appendix D: Obtaining xbmgmt Command Options............................... 47

       Appendix E: Regulatory and Compliance Information............................49
          CE Directives.............................................................................................................................. 49
          CE Standards.............................................................................................................................. 49
          Compliance Markings............................................................................................................... 50

       Appendix F: Additional Resources and Legal Notices..............................51
          Xilinx Resources.........................................................................................................................51
          Documentation Navigator and Design Hubs.........................................................................51
          References..................................................................................................................................52
          Please Read: Important Legal Notices................................................................................... 52

UG1301 (v1.8) February 5, 2021                                                                                                    www.xilinx.com
                                                                                                    Send Feedback
Getting Started with Alveo Accelerator Cards                                                                                                   6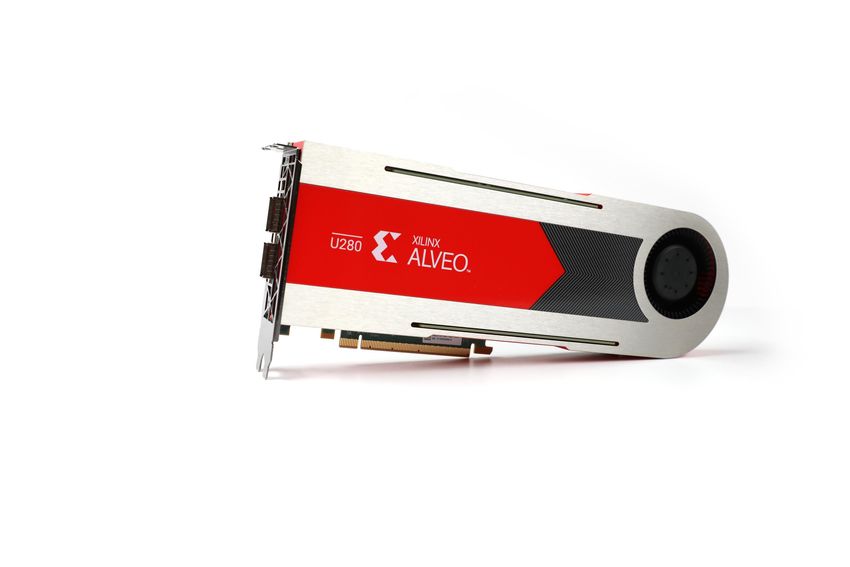
Chapter 1: Introduction

                                                                                      Chapter 1

Introduction
       This document provides hardware and software installation procedures for the U250 and the
       following two-stage Dynamic Function eXchange (DFX-2RP) Xilinx® Alveo™ data center
       accelerator card platform, initially supported by 2020.2 XRT. For more information, see Dynamic
       Function Exchange for more information on DFX platforms.

       • xilinx_u250_gen3x16_xdma_3_1_202020_1

       Installation procedures for the U200 and U280, as well as all other platforms on the U250 Alveo
       data center accelerator cards, must follow the instructions in v1.5 of Getting Started with Alveo
       Data Center Accelerator Cards (UG1301).

       The Alveo U200/U250/U280 data center accelerator cards are PCIe® Gen3 x16 compliant
       featuring the Xilinx Virtex® UltraScale+™ technology. These cards accelerate compute-intensive
       applications such as machine learning, data analytics, video processing, and more. The Alveo
       U200/U250/U280 data center accelerator cards are available in passive and active cooling
       configurations.

       Different system configurations are available for running, developing, and debugging applications
       on your Alveo accelerator cards:

       • Running Applications: To configure a system to run accelerated applications, install an Alveo
         card into a system as described in Chapter 3: Card Installation Procedures along with the
         required deployment software to support running applications as described in Chapter 4:
         Installing the Deployment Software.

       • Developing Applications: To develop FPGA accelerated applications, it is necessary to install
         both the deployment software and the development software. Development software
         installation, described in Chapter 6: Next Steps, consists of installing both a development
         target platform and the Vitis™ environment. This configuration does not have an Alveo card
         installed and is used for development along with debugging in emulation modes.

       • Running, Developing, and Debugging Applications: By installing the Alveo card along with
         both the deployment and development software on a single machine, you can configure a
         system for developing and running accelerated applications. With the card installed,
         developers can debug applications in both emulation modes and on the hardware.

UG1301 (v1.8) February 5, 2021                                                           www.xilinx.com
                                                                      Send Feedback
Getting Started with Alveo Accelerator Cards                                                          7
Chapter 1: Introduction

Card Features
       Features of the production Alveo U200/U250/U280 data center accelerator cards are listed in
       the following table.

       Table 1: Alveo U200/U250/U280 Features

             Card Component                          U200                           U250                           U280
        FPGA                             UltraScale+                      UltraScale+                   UltraScale+
                                         XCU200-2FSGD2104E                XCU250-2LFIGD2104E            XCU280-L2FSVH2892E
        DDR4                                                   64 gigabyte (GB)                               32 gigabyte (GB)
                                                                   4x DDR4 16 GB                               2x DDR4 16 GB
                                         2400 mega-transfers per second (MT/s), on 64-bit ECC DIMM
        HBM                                            –                               –                 8 GB, 32-pseudo channels
        Configuration Options            1 gigabit (Gb) Quad Serial Peripheral Interface (SPI) flash memory
                                         Micro-USB JTAG configuration port
        PCIe                             16-lane PCI Express
                                         PCIe Integrated Endpoint block connectivity
                                         Gen1, 2, or 3 up to x16                                        Gen1, 2, or 3 up to x16
                                                                                                        Gen4 x8
        Network Interface                         2x QSFP28                        2x QSFP28                      2x QSFP28
        I2C Bus                                        ✓                               ✓                              ✓
        Status LEDs                                    ✓                               ✓                              ✓
        Power Management                 Power management with system management bus (SMBus) voltage, current, and
                                         temperature monitoring
        Electrical Design Power          65W PCIe slot functional with PCIe slot power only
                                         140W PCIe slot functional with 110A max VCCINT current PCIe slot power and 6-pin PCIe AUX
                                         power cable connected
                                         215W PCIe slot functional with 160A max VCCINT current PCIe slot power and 8-pin PCIe AUX
                                         power cable connected1
        Flash Memory                     Onboard reprogrammable flash configuration memory
        UART                             UART access through the USB port
        Configuration                    UltraScale+ device configurable over USB/JTAG and Quad SPI configuration flash memory
        Notes:
        1.     Vitis unified software platform based applications are only designed to run with electrical design power at 215W.

Minimum System Requirements
       The minimum system requirements for running the Alveo™ U200/U250/U280 Data Center
       accelerator cards are listed in the following table.

UG1301 (v1.8) February 5, 2021                                                                                     www.xilinx.com
                                                                                           Send Feedback
Getting Started with Alveo Accelerator Cards                                                                                    8
Chapter 1: Introduction
Table 2: Minimum System Requirements
Component Requirement
Motherboard PCI Express® 3.0-compatible with one dual-width x16 slot.
System Power Supply 225W via PCI Express Slot connection and 8-pin PCI Express Auxiliary Power
cable.
Operating System Linux, 64-bit:
• Ubuntu 16.04, 18.04, 20.04
• CentOS 7.4, 7.5, 7.6, 7.7, 7.8, 8.1, 8.2
• RHEL 7.4, 7.5, 7.6, 7.7, 7.8, 8.1, 8.2
System Memory For deployment installations, a minimum of 16 GB plus application memory
requirements is required.
For development installations, a minimum of 64 GB of system memory is
required, but 80 GB is recommended.
Internet Connection Required for downloading drivers and utilities.
Hard disk space Satisfy the minimum system requirements for your operating system.
Licensing None required for application deployment.
For the application development environment, see Vitis Unified Software
Platform Documentation: Application Acceleration Development (UG1393).
For additional specifications and details on the acceptable environmental conditions, see Alveo
U200 and U250 Data Center Accelerator Cards Data Sheet (DS962) and Alveo U280 Data Center
Accelerator Cards Data Sheet (DS963).
Qualified Servers
A list of servers on which Alveo cards are fully qualified on can be found here:
https://www.xilinx.com/products/boards-and-kits/alveo/qualified-servers.html.
UG1301 (v1.8) February 5, 2021 www.xilinx.com
Send Feedback
Getting Started with Alveo Accelerator Cards 9Chapter 2: Accelerator Card Overview
Chapter 2
Accelerator Card Overview
Card Interfaces and Details
Alveo™ cards are available in both passive and active cooling configurations; see Passive and
Active Cooling Cards. The interfaces of each are identical, except the fan included on active
cooled cards. The card includes the following interfaces.
• A PCI Express® x16 card connector.
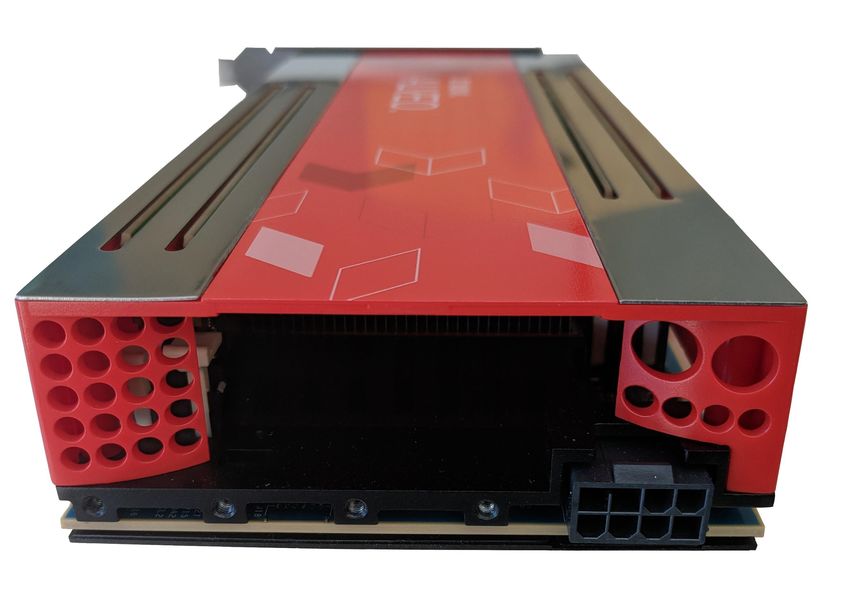
• A PCI Express auxiliary power connector. This 8-pin connector is shown in Figure 5 and is not
compatible with an ATX12V/EPS12V power cable source.
• Two QSFP28 interfaces. Currently these interfaces are not supported by the deployment
platform.
• A micro-USB connector for maintenance purposes.
• A fan for the active cooled card configuration.
WARNING! Hazardous moving parts. Keep away from fan blades.
ATTENTION! Pièces mobiles peuvent etre dangereuses. Éloignez-vous des lames du ventilateur.
WARNUNG! Gefährliche bewegliche Teile. Halten sie sich von Lüfterflügeln fern.
UG1301 (v1.8) February 5, 2021 www.xilinx.com
Send Feedback
Getting Started with Alveo Accelerator Cards 10Chapter 2: Accelerator Card Overview
Figure 1: Alveo Card Features
Fan
(for Active configuration only)
PCIe
Connector
Network
Interface
Micro-USB
Interface
Note: On the Alveo U280 card, the micro-USB is located on the opposite end of the card between the PCB
board and the enclosure.
Passive and Active Cooling Cards
Alveo™ cards are available in both active and passive cooling configurations, as shown in the
following figures. The passive cooling card is designed to be installed into a data center server,
where controlled air flow provides direct cooling. The active cooling card is designed to be
installed into a PC environment where the air flow is uncontrolled; consequently, this
configuration includes a heat sink and fan enclosure cover to provide appropriate cooling.
For card specifications, dimensions, list of card features, and block diagram see Alveo U200 and
U250 Data Center Accelerator Cards Data Sheet (DS962) and Alveo U280 Data Center Accelerator
Cards Data Sheet (DS963).
UG1301 (v1.8) February 5, 2021 www.xilinx.com
Send Feedback
Getting Started with Alveo Accelerator Cards 11Chapter 2: Accelerator Card Overview
Figure 2: Active Cooled Card Configuration
Figure 3: Passive Cooled Card Configuration
UG1301 (v1.8) February 5, 2021 www.xilinx.com
Send Feedback
Getting Started with Alveo Accelerator Cards 12Chapter 3: Card Installation Procedures
Chapter 3
Card Installation Procedures
To reduce the risk of fire, electric shock, or injury, always follow basic safety precautions.
CAUTION! You must always use an ESD strap or other antistatic device when handling hardware.
ATTENTION! Il est fortement recommandé d'utiliser un bracelet ESD ou autres dispositifs antistatiques.
VORSICHT! Beim Umgang mit Hardware müssen sie immer ein Erdungs Armband oder ein anderes
antistatisches Gerät verwenden.
Safety Instructions
Safety Information
To ensure your personal safety and the safety of your equipment:
• Keep your work area and the computer/server clean and clear of debris.
• Before opening the computer/system cover, unplug the power cord.
Dispositif de Sécurité
Pour assurer votre sécurité personnelle et la sécurité de votre équipement:
• Maintenez votre zone de travail et l'ordinateur/serveur propre et dégagé de débris.
• Avant d'ouvrir le capot de l'ordinateur/système, débranchez le cordon d'alimentation.
Sicherheitsinformation
Um ihre persönliche Sicherheit und die Sicherheit ihrer Ausrüstung zu gewährleisten:
• Halten sie ihren Arbeitsbereich und den Computer / Server sauber und frei von Ablagerungen.
• Ziehen sie vor dem Öffnen der Computer / Systemabdeckung das Netzkabel ab.
UG1301 (v1.8) February 5, 2021 www.xilinx.com
Send Feedback
Getting Started with Alveo Accelerator Cards 13Chapter 3: Card Installation Procedures
Electrostatic Discharge Caution
Electrostatic discharge (ESD) can damage electronic components when they are improperly
handled, and can result in total or intermittent failures. Always follow ESD-prevention procedures
when removing and replacing components.
To prevent ESD damage:
• Use an ESD wrist or ankle strap and ensure that it makes skin contact. Connect the equipment
end of the strap to an unpainted metal surface on the chassis.
• Avoid touching the card against your clothing. The wrist strap protects components from ESD
on the body only.
• Handle the card by its bracket or edges only. Avoid touching the printed circuit board or the
connectors.
• Put the card down only on an antistatic surface such as the bag supplied in your kit.
• If you are returning the card to Xilinx Product Support, place it back in its antistatic bag
immediately.
Attention aux Décharge Électrostatique (ESD)
L'ESD peut endommager les composants électroniques lorsqu'ils sont mal manipulés, et peut
entraîner des défaillances totales ou intermittentes. Suivez toujours les procédures de prévention
contre les ESD lors du retrait et remplacement des composants.
Pour prévenir les dommages dus aux ESD:
• Utilisez une sangle de poignet ou de cheville anti-ESD et assurez-vous qu'elle est en contact
avec la peau. Branchez l'extrémité du cable de la sangle à une surface métallique non peinte
du châssis et a la masse.
• Évitez de mettre en contact la carte de circuit imprimé ou les connecteurs avec vos vêtements.
La sangle de poignet protège la carte ou connecteurs contre les ESD du corps seulement.
• Manipulez la carte uniquement par son support ou par ses bords. Évitez de toucher la carte de
circuit imprimé ou les connecteurs.
• Ne posez la carte de circuit imprimé ou les connecteurs que sur une surface antistatique telle
que le sac anti-statique fourni avec la carte.
• Si vous retournez la carte a Xilinx, remettez-la dans son sac antistatique immédiatement.
Vorsicht Elektrostatische Entladung
Elektrostatische Entladung (ESD) kann elektronische Bauteile beschädigen, wenn sie
unsachgemäß behandelt werden, und es kann zu totalen oder zeitweiligen Ausfällen kommen.
Befolgen sie beim Entfernen und Austauschen von Komponenten stets die ESD-
Schutzmaßnahmen.
UG1301 (v1.8) February 5, 2021 www.xilinx.com
Send Feedback
Getting Started with Alveo Accelerator Cards 14Chapter 3: Card Installation Procedures
So verhindern sie ESD-Schäden:
• Verwenden sie einen ESD-Handgelenk-oder Knöchelriemen und stellen sie sicher, dass er
Hautkontakt hat. Verbinden sie das Ende des Riemens mit einer unlackierten Metalloberfläche
am Gehäuse.
• Berühren sie die Karte nicht mit ihrer Kleidung. Der Riemen schützt Komponenten nur vor
ESD am Körper.
• Fassen sie die Karte nur an der Halterung oder an den Kanten an. Berühren sie nicht die
Leiterplatte oder die Anschlüsse.
• Legen sie die Karte nur auf einer antistatischen Oberfläche ab, z.B. dem antistatischen Beutel
der mit dem Kit mitgeliefert wurde.
• Wenn sie die Karte an den Xilinx Product Support zurücksenden, legen Sie sie bitte sofort
wieder in den antistatischen Beutel.
Before You Begin
IMPORTANT! Alveo™ cards are delicate and sensitive electronic devices; equipment is to be installed by a
qualified technician only. This equipment is intended for installation in a Restricted Access Location.
IMPORTANT! Les cartes Alveo™ sont des appareils électronique sensibles et fragiles; l'équipement doit
être installé par un technicien certifié seulement. Cet équipement est destiné à être installé dans un lieu
d'accès restreint.
WICHTIG! Die Karten Alveo™ sind sensible und empfindliche elektronische Geräte. Das Gerät darf nur
von einem qualifizierten Techniker installiert werden. Dieses Gerät ist für die Installation an einem Ort mit
begrenztem Zugang vorgesehen.
• Verify that the minimum card space is available to install your card. Card specifications and
dimensions can be found in Alveo U200 and U250 Data Center Accelerator Cards Data Sheet
(DS962) and Alveo U280 Data Center Accelerator Cards Data Sheet (DS963).
• Check for card compatibility with the system. Also check for proper system requirements such
as power, bus type, and physical dimensions to support the card.
• Ensure that appropriate PCIe Auxiliary Power source is available, and not an ATX12V/EPS12V
power source.
Installing the Card
IMPORTANT! Do not unplug the Alveo™ AUX power connector while in the power-up state (hot-plug is
not allowed).
UG1301 (v1.8) February 5, 2021 www.xilinx.com
Send Feedback
Getting Started with Alveo Accelerator Cards 15Chapter 3: Card Installation Procedures
IMPORTANT! Ne débranchez pas le connecteur auxiliaire d'alimentation des cartes Alveo™ pendant
qu’elles sont sous-tension (“hot-plug” n'est pas autorisé).
WICHTIG! Trennen Sie den Alveo™-Stromanschluss-Stecker nicht im eingeschalteten Zustand (Hot-Plug
ist nicht zulässig).
The following procedure is a guide for the Xilinx® Alveo™ data center accelerator card
installation. Consult your computer documentation for additional information.
If you encounter any issues during installation, see Chapter 7: Troubleshooting and Known
Issues. Also see AR-71752 for additional known issues.
1. Host power supply must be disconnected.
2. For enclosed computers, open your computer by removing the casing.
3. If necessary, remove the two adjacent PCIe® slot covers corresponding to the PCIe x16 slot
in which you are installing the Alveo card.
4. Plug the Alveo card in the PCIe x16 slot on the motherboard.
5. Connect the AUX power connector to the Alveo card, ensure the plug is mechanically fixed
(with the click).
IMPORTANT! Operation of the Alveo cards only with AUX power connector is not allowed.
IMPORTANT! Le fonctionnement des cartes Alveo uniquement avec le connecteur auxiliaire n'est pas
autorisé.
WICHTIG! Der Betrieb von Alveo-Karten nur mit AUX Connector ist nicht zulässig.
The Alveo card has an 8-pin female PCIe AUX power connector. Depending on your server or
computer, an additional PCI Express auxiliary power cable or adapter may be needed. Consult
your computer documentation for additional information.
For actively cooled cards, connect the power cable to the AUX power connector at top of the
card as shown in the following figure.
UG1301 (v1.8) February 5, 2021 www.xilinx.com
Send Feedback
Getting Started with Alveo Accelerator Cards 16Chapter 3: Card Installation Procedures
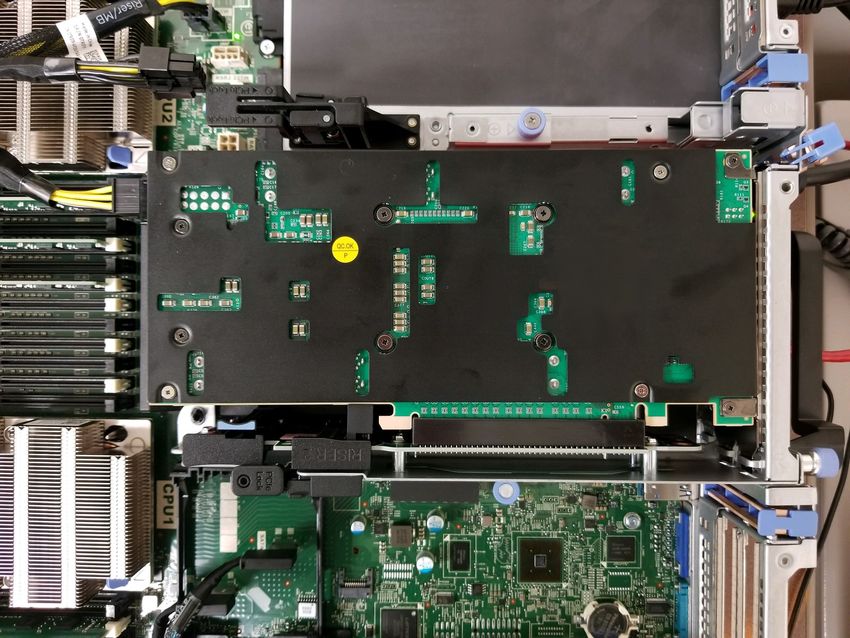
Figure 4: Connecting the Power Cable to Actively Cooled Cards
For passively cooled cards, connect the power cable to the AUX power connector at the side
of the card as shown in the following figure.
UG1301 (v1.8) February 5, 2021 www.xilinx.com
Send Feedback
Getting Started with Alveo Accelerator Cards 17Chapter 3: Card Installation Procedures
Figure 5: Connecting the Power Cable to Passively Cooled Cards
WARNING! Alveo cards are not compatible with an ATX12V/EPS12V power source. Do not force
connection to a CPU (ATX12V/EPS12V) power source. This will damage the Alveo card and void the
warranty.
ATTENTION! Les cartes Alveo ne sont pas compatibles avec une source d'alimentation ATX12V /
EPS12V. Ne forcez pas la connexion à une source d'alimentation CPU (ATX12V / EPS12V). Cela
endommagerait la carte Alveo et annulerait la garantie.
WARNUNG! Alveo-Karten sind nicht mit einer ATX12V / EPS12V-Stromquelle kompatibel.
Erzwingen Sie keine Verbindung zu einer CPU-Stromquelle (ATX12V / EPS12V). Dadurch wird die
Alveo-Karte beschädigt und die Garantie erlischt.
The power-supply can have an 8-pin or a 6-pin power connector configuration. Some power
supplies label this cable PCIe Auxiliary Power or VGA. These connector configurations are not
pin compatible with other power source types. Do not force a connection to any power
source other than PCIe Auxiliary Power.
IMPORTANT! Only 140W of power is available with the 6-pin connector (65 Watts from PCIe
connector with 12V source, and 75 Watts from the 6-pin AUX connector). 215W is available with the
8-pin connector (65 Watts from PCIe connector 12V source, and 150 Watts from the 8-pin AUX
connector).
UG1301 (v1.8) February 5, 2021 www.xilinx.com
Send Feedback
Getting Started with Alveo Accelerator Cards 18Chapter 3: Card Installation Procedures
IMPORTANT! La puissance de 140W est uniquement disponibles avec le connecteur 6-broches (65
Watts à partir de la source du connecteur PCIe 12V et 75 watts à partir du connecteur AUX à 6-
broches). 215W est disponible avec le connecteur à 8-broches (65 watts à partir de la source du
connecteur PCIe 12V et 150 Watts à partir du connecteur 8-broches).
WICHTIG! Mit dem 6-Pin-Anschluss stehen nur 140W zur Verfügung (65 Watt vom PCIe-Anschluss
mit 12 V-Quelle und 75 Watt vom 6-Pin-Anschluss). 215W ist mit dem 8-Pin-Anschluss erhältlich (65
Watt von 12V-PCIe-Anschluss und 150 Watt vom 8-Pin-Anschluss).
The following example shows a successfully installed active configuration Alveo card.
Figure 6: Installed Alveo Card
PCIe AUX
Power Cable
PCIe Edge
Connector
6. If you previously removed the computer casing, re-install the casing.
7. Connect the power cord and turn on the computer.
WARNING! Do not power-on a passively cooled card without adequate forced airflow across the card
with proper airflow direction, otherwise the card can be damaged. For more information, see Alveo
U200 and U250 Data Center Accelerator Cards Data Sheet (DS962) and Alveo U280 Data Center
Accelerator Cards Data Sheet (DS963).
UG1301 (v1.8) February 5, 2021 www.xilinx.com
Send Feedback
Getting Started with Alveo Accelerator Cards 19Chapter 3: Card Installation Procedures
8. To verify that the device has been installed correctly, enter the following Linux command in
the terminal:
$ sudo lspci -vd 10ee:
If the card is successfully installed and found by the operating system, a message similar to
the one below will be displayed.
This is a sample output for an installed Alveo U250 card:
65:00.0 Processing accelerators: Xilinx Corporation Device 5004
Subsystem: Xilinx Corporation Device 000e
Flags: bus master, fast devsel, latency 0, NUMA node 0
Memory at 380072000000 (64-bit, prefetchable) [size=32M]
Memory at 380074040000 (64-bit, prefetchable) [size=256K]
Capabilities: [40] Power Management version 3
Capabilities: [60] MSI-X: Enable+ Count=32 Masked-
Capabilities: [70] Express Endpoint, MSI 00
Capabilities: [100] Advanced Error Reporting
Capabilities: [1c0] #19
Capabilities: [400] Access Control Services
Capabilities: [410] #15
Capabilities: [480] Vendor Specific Information: ID=0020 Rev=0
Len=010
Kernel driver in use: xclmgmt
Kernel modules: xclmgmt
Note: If this card has previously been installed, the lspci output will be similar to the one shown in
Running lspci.
If you do not see a message similar to either of these, see Chapter 7: Troubleshooting.
UG1301 (v1.8) February 5, 2021 www.xilinx.com
Send Feedback
Getting Started with Alveo Accelerator Cards 20Chapter 4: Installing the Deployment Software
Chapter 4
Installing the Deployment Software
This chapter details the procedures for installing deployment software on RedHat/CentOS and
Ubuntu operating systems. All software installations use standard Linux RPM and Linux DEB
packages and require root access.
The deployment software consists of the following software packages:
• Xilinx® runtime (XRT): XRT provides the libraries and drivers for an application to run on
Alveo™ cards.
• Deployment platform: The deployment platform provides the firmware needed to run pre-
compiled applications. It cannot be used to compile or create new applications. To create new
applications, install the development software detailed in Chapter 6: Next Steps. While you
can also install the development software on a machine with an installed card, doing so is not
necessary to run applications.
For platform features and details, see Alveo Data Center Accelerator Card Platforms User Guide
(UG1120).
If you encounter any issues during installation, see Chapter 7: Troubleshooting and Known
Issues. See Xilinx Answer Record 71752 for additional known issues.
IMPORTANT! Root access is required for all software and firmware installations.
IMPORTANT! L'accès Root est requis pour toutes les installations logicielles et firmware.
WICHTIG! Root-Zugriff ist für alle Software- und Firmware-Installationen erforderlich.
XRT and Deployment Platform Installation
Procedures on RedHat and CentOS
Use the following steps to download and install the XRT and DFX-2RP deployment platforms.
DFX-2RP platforms consist of base and shell partitions. For more information, see Dynamic
Function Exchange in XRT Documentation.
UG1301 (v1.8) February 5, 2021 www.xilinx.com
Send Feedback
Getting Started with Alveo Accelerator Cards 21Chapter 4: Installing the Deployment Software
For details on upgrading or downgrading the XRT and deployment platform, see Appendix A:
Changing XRT and Target Platform Versions.
1. XRT installation requires Extra Packages for Enterprise Linux (EPEL) and a related repository.
If not already installed, install EPEL on your system by following the steps provided here.
2. Run the following two commands to install kernel headers and kernel development packages.
Ensure that uname is surrounded by backticks ( `) and not single quotes ('):
$ sudo yum install kernel-headers-`uname -r`
$ sudo yum install kernel-devel-`uname -r`
Note: If these yum commands fail because they cannot find packages matching your kernel version, set
up a Vault repository. For more information, see Appendix B: Creating a Vault Repository for CentOS.
3. After the previous command completes, reboot your machine.
4. Download both the XRT and deployment platform installation packages associated with your
card from the Getting Started tab on the Alveo U250 Product Page.
Note: For the U280 Alveo data center accelerator card, follow the instructions in v1.5 of Getting Started
with Alveo Data Center Accelerator Cards (UG1301).
5. Install the XRT installation package by running the following command from within the
directory where the XRT installation packages reside.
$ sudo yum install ./xrt*.rpm
This will install the XRT and its necessary dependencies. Follow the instructions when
prompted throughout the installation.
6. Extract the deployment platform installation packages into a single directory and from within
the directory run the following command to install the deployment packages.
$ sudo yum install ./xilinx*.rpm
After installing the deployment platform you will see the following message.
Partition package installed successfully.
Please flash card manually by running below command:
$ sudo /opt/xilinx/xrt/bin/xbmgmt flash --update --shell --
card
Alternatively, you can install the five deployment platform installation packages individually.
If this is the case, install them in the following order.
• Satellite controller firmware
• Card management firmware
• Base partition firmware
• Platform validation
• Shell partition firmware
UG1301 (v1.8) February 5, 2021 www.xilinx.com
Send Feedback
Getting Started with Alveo Accelerator Cards 22Chapter 4: Installing the Deployment Software
7. Flash the base firmware to the Alveo card using the command displayed in the output of the
previous step. It has the following format.
$ sudo /opt/xilinx/xrt/bin/xbmgmt flash --update --shell --card
The following command, described in Appendix D: Obtaining xbmgmt Command Options,
can be used for obtaining the base_name and card_bdf command options.
$ sudo /opt/xilinx/xrt/bin/xbmgmt flash --scan
8. You will be asked to confirm the update, as follows. Type y and press the Enter key.
Status: shell needs updating
Current shell:
Shell to be flashed:
Are you sure you wish to proceed? [y/n]:
Flashing will take up to 10 minutes.
IMPORTANT! Do not enter Ctrl + c in the terminal while the firmware is flashing as this can cause the
card to become inoperable.
IMPORTANT! N'entrez pas Ctrl + c dans le terminal lorsque le micrologiciel clignote, car cela pourrait
rendre la carte inutilisable.
WICHTIG! Geben Sie im Terminal nicht Strg + c ein, während die Firmware blinkt, da dies dazu führen
kann, dass die Karte nicht mehr funktioniert.
Successfully flashing a new card results in a message similar to the following. If the command
returns Card Not Found, perform a cold reboot, and retry. Otherwise, see Chapter 7:
Troubleshooting.
Updating shell on card[0000:65:00.0]
Bitstream guard installed on flash @0x1002000
Persisted 542227 bytes of meta data to flash 0 @0x7f7b9c1
Extracting bitstream from MCS data:
...........................
Extracted 27367156 bytes from bitstream @0x1002000
Writing bitstream to flash 0:
...........................
Bitstream guard removed from flash
Successfully flashed Card[0000:65:00.0]
1 Card(s) flashed successfully.
Cold reboot machine to load the new image on card(s).
If the card is up-to-date, you will see a message similar to the following.
Status: shell is up-to-date
Card(s) up-to-date and do not need to be flashed.
9. Cold boot your machine to load the new base firmware image on the FPGA.
IMPORTANT! Be sure to fully power OFF the machine and then power it ON again. The image will
not boot from flash if the machine is only rebooted.
UG1301 (v1.8) February 5, 2021 www.xilinx.com
Send Feedback
Getting Started with Alveo Accelerator Cards 23Chapter 4: Installing the Deployment Software
IMPORTANT! Assurez-vous d'éteindre complètement la machine, puis de la rallumer. L'image flash ne
démarrera pas si la machine n'est pas redémarrée.
WICHTIG! Schalten Sie das Gerät vollständig aus und wieder ein. Das Image startet nicht von Flash,
wenn der Computer nur neu gestartet wird.
10. Flash the Satellite Controller (SC) firmware to the Alveo card using the same command to
flash the base firmware. It has the following format:
$ sudo /opt/xilinx/xrt/bin/xbmgmt flash --update --shell --card
See Appendix D: Obtaining xbmgmt Command Options for obtaining the command options.
You will be asked to confirm the update, as follows. Type y and press the Enter key.
Status: SC needs updating
Current SC:
SC to be flashed:
Are you sure you wish to proceed? [y/n]: y
Flashing will take up to 5 minutes.
Successfully flashing the SC results in a message similar to the following. No reboot is
necessary.
Updating SC firmware on card[0000:65:00.0]
Stopping user function...
........................................
Successfully flashed Card[0000:65:00.0]
1 Card(s) flashed successfully.
If the card is up-to-date, you will see a message similar to the following.
Status: shell is up-to-date
Card(s) up-to-date and do not need to be flashed.
11. Program the shell partition using the following command.
$ sudo /opt/xilinx/xrt/bin/xbmgmt partition --program --name --card
Use the following command, described in Appendix D: Obtaining xbmgmt Command Options,
for obtaining the card_bdf and shell_name options.
$ sudo /opt/xilinx/xrt/bin/xbmgmt partition --scan
After programming the shell, an output similar to the following example will be displayed.
Programming PLP on Card [0000:65:00.0]...
Partition file: /opt/xilinx/firmware/u250/gen3x16/xdma-shell/
partition.xsabin
Program successfully
After the shell partition is programmed, it is not necessary to reprogram it unless the system
is warm or cold rebooted.
UG1301 (v1.8) February 5, 2021 www.xilinx.com
Send Feedback
Getting Started with Alveo Accelerator Cards 24Chapter 4: Installing the Deployment Software
IMPORTANT! Prior to running an application on DFX-2RP platform, it is necessary to first program
the shell partition on the card or the application will fail to detect the shell and will not run. See Xilinx
Answer Record 71915 for details.
The installation for deployment is now complete.
Related Information
Card Bring-Up and Validation
XRT and Deployment Package Installation
Procedures on Ubuntu
Use the following steps to download and install the XRT and DFX-2RP deployment platforms.
DFX-2RP platforms consist of base and shell partitions. For more information, see Dynamic
Function Exchange in XRT Documentation.
For details on upgrading or downgrading the XRT and deployment package, see Appendix A:
Changing XRT and Target Platform Versions.
1. Download both the XRT and deployment installation packages associated with your card
from the Getting Started tab on the Alveo U250 Product Page.
Note: For the U280 Alveo data center accelerator card, follow the instructions in v1.5 of Getting Started
with Alveo Data Center Accelerator Cards (UG1301).
2. Install the XRT installation package by running the following command from within the
directory where the XRT installation packages reside.
$ sudo apt install ./xrt*.deb
This will install the XRT along with any necessary dependencies. Follow the instructions
when prompted throughout the installation.
3. Extract the deployment platform installation packages into a single directory and from within
the directory run the following command to install the deployment packages.
$ sudo apt install ./xilinx*.deb
After installing the deployment platform you will see the following message.
Partition package installed successfully.
Please flash card manually by running below command:
$ sudo /opt/xilinx/xrt/bin/xbmgmt flash --update --shell --
card
UG1301 (v1.8) February 5, 2021 www.xilinx.com
Send Feedback
Getting Started with Alveo Accelerator Cards 25Chapter 4: Installing the Deployment Software
Alternatively, you can install the five deployment platform installation packages individually.
If this is the case, install them in the following order.
• Satellite controller firmware
• Card management firmware
• Base partition firmware
• Platform validation
• Shell partition firmware
4. Flash the base firmware to the Alveo card using the command displayed in the output of the
previous step. It has the following format.
$ sudo /opt/xilinx/xrt/bin/xbmgmt flash --update --shell --card
The following command, described in Appendix D: Obtaining xbmgmt Command Options,
can be used for obtaining the base_name and card_bdf command options.
$ sudo /opt/xilinx/xrt/bin/xbmgmt flash --scan
5. You will be asked to confirm the update, as follows. Type y and press the Enter key.
Status: shell needs updating
Current shell:
Shell to be flashed:
Are you sure you wish to proceed? [y/n]:
Flashing will take up to 10 minutes.
IMPORTANT! Do not enter Ctrl + c in the terminal while the firmware is flashing as this can cause the
card to become inoperable.
IMPORTANT! N'entrez pas Ctrl + c dans le terminal lorsque le micrologiciel clignote, car cela pourrait
rendre la carte inutilisable.
WICHTIG! Geben Sie im Terminal nicht Strg + c ein, während die Firmware blinkt, da dies dazu führen
kann, dass die Karte nicht mehr funktioniert.
Successfully flashing a new card results in a message similar to the one shown below. If the
command returns Card Not Found, perform a cold reboot, and retry. Otherwise, see
Chapter 7: Troubleshooting.
Updating shell on card[0000:65:00.0]
Bitstream guard installed on flash @0x1002000
Persisted 542227 bytes of meta data to flash 0 @0x7f7b9c1
Extracting bitstream from MCS data:
...........................
Extracted 27367156 bytes from bitstream @0x1002000
Writing bitstream to flash 0:
...........................
UG1301 (v1.8) February 5, 2021 www.xilinx.com
Send Feedback
Getting Started with Alveo Accelerator Cards 26Chapter 4: Installing the Deployment Software
Bitstream guard removed from flash
Successfully flashed Card[0000:65:00.0]
1 Card(s) flashed successfully.
Cold reboot machine to load the new image on card(s).
If the card is up-to-date, you will see a message similar to the following.
Status: shell is up-to-date
Card(s) up-to-date and do not need to be flashed.
6. Cold boot your machine to load the new base firmware image on the FPGA.
IMPORTANT! Be sure to fully power OFF the machine and then power it ON again. The image will
not boot from flash if the machine is only rebooted.
IMPORTANT! Assurez-vous d'éteindre complètement la machine, puis de la rallumer. L'image flash ne
démarrera pas si la machine n'est pas redémarrée.
WICHTIG! Schalten Sie das Gerät vollständig aus und wieder ein. Das Image startet nicht von Flash,
wenn der Computer nur neu gestartet wird.
7. Flash the Satellite Controller (SC) firmware to the Alveo card using the same command to
flash the base firmware. It has the following format:
$ sudo /opt/xilinx/xrt/bin/xbmgmt flash --update --shell --card
See Appendix D: Obtaining xbmgmt Command Options for obtaining the command options.
You will be asked to confirm the update, as follows Type y and press the Enter key.
Status: SC needs updating
Current SC:
SC to be flashed:
Are you sure you wish to proceed? [y/n]: y
Flashing will take up to 5 minutes.
Successfully flashing the SC results in a message similar to the one shown below. No reboot
is necessary.
Updating SC firmware on card[0000:65:00.0]
Stopping user function...
........................................
Successfully flashed Card[0000:65:00.0]
1 Card(s) flashed successfully.
If the card is up-to-date, you will see a message similar to the following.
Status: shell is up-to-date
Card(s) up-to-date and do not need to be flashed.
8. Program the shell partition using the following command.
$ sudo /opt/xilinx/xrt/bin/xbmgmt partition --program --name --card
UG1301 (v1.8) February 5, 2021 www.xilinx.com
Send Feedback
Getting Started with Alveo Accelerator Cards 27Chapter 4: Installing the Deployment Software
Use the following command, described in Appendix D: Obtaining xbmgmt Command Options,
for obtaining the card_bdf and shell_name options.
$ sudo /opt/xilinx/xrt/bin/xbmgmt partition --scan
After programming the shell, an output similar to the following example will be displayed.
Programming PLP on Card [0000:65:00.0]...
Partition file: /opt/xilinx/firmware/u250/gen3x16/xdma-shell/
partition.xsabin
Program successfully
After the shell partition is programmed, it is not necessary to reprogram it unless the system
is warm or cold rebooted.
IMPORTANT! Prior to running an application on DFX-2RP platform, it is necessary to first program
the shell partition on the card or the application will fail to detect the shell and will not run. See Xilinx
Answer Record 71915 for details.
The installation for deployment is now complete.
Related Information
Card Bring-Up and Validation
UG1301 (v1.8) February 5, 2021 www.xilinx.com
Send Feedback
Getting Started with Alveo Accelerator Cards 28Chapter 5: Card Bring-Up and Validation
Chapter 5
Card Bring-Up and Validation
After installing the XRT and deployment platform, the card installation can be verified using the
following commands, which are explained in more detail below.
• lspci
• xbmgmt flash
• xbmgmt partition
• xbutil validate
The lspci Linux command is used to confirm the card, is seen by the OS, as was done when
installing the card.
The additional commands use the xbmgmt and xbutil utilities included during the XRT package
installation. These utilities include multiple commands to validate and identify the installed
card(s) and report additional card details including memory, PCIe®, platform name, and system
information. See Vitis Unified Software Platform Documentation: Application Acceleration
Development (UG1393) for a detailed list of commands.
Set the environment to use the utilities by running the following command. Note that the
command is dependent on the command shell you are using.
Use the following command in csh shell:
$ source /opt/xilinx/xrt/setup.csh
Use the following command in bash shell:
$ source /opt/xilinx/xrt/setup.sh
Running lspci
1. Enter the following command:
$ sudo lspci -vd 10ee:
UG1301 (v1.8) February 5, 2021 www.xilinx.com
Send Feedback
Getting Started with Alveo Accelerator Cards 29Chapter 5: Card Bring-Up and Validation
2. If the card is successfully installed and found by the operating system, you will see a message
similar to the following. Note that for each card, there will be two physical functions found:
one for management and one for user. See https://xilinx.github.io/XRT/master/html/
platforms.html for additional details.
65:00.0 Processing accelerators: Xilinx Corporation Device 5004
Subsystem: Xilinx Corporation Device 000e
Flags: bus master, fast devsel, latency 0, NUMA node 0
Memory at 380072000000 (64-bit, prefetchable) [size=32M]
Memory at 380074040000 (64-bit, prefetchable) [size=256K]
Capabilities: [40] Power Management version 3
Capabilities: [60] MSI-X: Enable+ Count=32 Masked-
Capabilities: [70] Express Endpoint, MSI 00
Capabilities: [100] Advanced Error Reporting
Capabilities: [1c0] #19
Capabilities: [400] Access Control Services
Capabilities: [410] #15
Capabilities: [480] Vendor Specific Information: ID=0020 Rev=0
Len=010
Kernel driver in use: xclmgmt
Kernel modules: xclmgmt
65:00.1 Processing accelerators: Xilinx Corporation Device 5005
Subsystem: Xilinx Corporation Device 000e
Flags: bus master, fast devsel, latency 0, IRQ 64, NUMA node 0
Memory at 380070000000 (64-bit, prefetchable) [size=32M]
Memory at 380074000000 (64-bit, prefetchable) [size=256K]
Memory at 380060000000 (64-bit, prefetchable) [size=256M]
Capabilities: [40] Power Management version 3
Capabilities: [60] MSI-X: Enable+ Count=32 Masked-
Capabilities: [70] Express Endpoint, MSI 00
Capabilities: [100] Advanced Error Reporting
Capabilities: [400] Access Control Services
Capabilities: [410] #15
Capabilities: [480] Vendor Specific Information: ID=0020 Rev=0
Len=010
Kernel driver in use: xocl
Kernel modules: xocl
Running xbmgmt flash --scan
Use the xbmgmt flash --scan command to display and confirm the card's flashed base
firmware version and additional card details, including the card Bus:Device:Function (BDF).
1. Enter the following command:
$ sudo /opt/xilinx/xrt/bin/xbmgmt flash --scan
UG1301 (v1.8) February 5, 2021 www.xilinx.com
Send Feedback
Getting Started with Alveo Accelerator Cards 30Chapter 5: Card Bring-Up and Validation
For each card in the server, you will see an output similar to the following example.
Card [0000:65:00.0]
Card type: u250
Flash type: SPI
Flashable partition running on FPGA:
xilinx_u250_gen3x16_base_3,[ID=0x48810c9d17860ef5],[SC=4.6.6]
Flashable partitions installed in system:
xilinx_u250_gen3x16_base_3,[ID=0x48810c9d17860ef5],[SC=4.6.6]
The name of the base partition, ID, and SC firmware version running on the FPGA are found
under Flashable partition running on FPGA while the ones installed in the system
are found under Flashable partitions installed in system.
In this example, the BDF is 0000:65:00.0, the base partition on the FPGA and system are
identical (xilinx_u250_gen3x16_base_3), the ID is 0x48810c9d17860ef5 and the SC
version is 4.6.6.
2. Confirm the base partition under Flashable partition running on FPGA is identical
to the that under Flashable partitions installed in system.
If these versions do not match, perform a cold reboot, and retry.
Running xbmgmt partition
The xbmgmt partition command for Dynamic Function eXchange platforms supporting two
reconfigurable partitions (DFX-2RP) provides options to display the base and shell firmware
versions running on the card, as well as program the shell firmware.
1. Display the base firmware running on the card by entering the following command.
$ sudo /opt/xilinx/xrt/bin/xbmgmt partition --scan
For each card in the server, you will see an output similar to the following example.
Card [0000:65:00.0]
Partitions running on FPGA:
xilinx_u250_gen3x16_base_3
logic-uuid:
48810c9d17860ef53e9e529e8b14ce39
interface-uuid:
695718ec21a232e45e1afcb4e558e11f
Partitions installed in system:
xilinx_u250_gen3x16_xdma_shell_3_1
logic-uuid:
bd5fb8abab266c3265918257b5048e88
interface-uuid:
f2f6c5e1273e78948f2c4806221462f2
UG1301 (v1.8) February 5, 2021 www.xilinx.com
Send Feedback
Getting Started with Alveo Accelerator Cards 31Chapter 5: Card Bring-Up and Validation
Under Partitions running on FPGA it displays the base partition running on the FPGA
xilinx_u250_gen3x16_base_3. A shell partition will also be displayed if it has already
been programmed.
Under Partitions installed in system it displays available shell partition(s)
available to program on the FPGA. In this example, only one shell partition is available
xilinx_u250_gen3x16_xdma_shell_3_1.
The logic-uuid and interface-uuid are used by the system to ensure compatible base
and shell partitions are used for a given application.
If no shell partitions are displayed under Partitions installed in system, it implies
no shell partitions compatible with the base partition have been installed. Download and
install a compatible shell partition.
2. Enter the following command to program the shell partition on the FPGA.
$ sudo /opt/xilinx/xrt/bin/xbmgmt partition --program --name
--card
where is the name of the shell partition to be programmed to the card
identified with BDF .
In the previous example xilinx_u250_gen3x16_xdma_shell_3_1 will be programmed
to card with BDF 00:65:00.0. See Appendix D: Obtaining xbmgmt Command Options to
obtain the card_bdf and shell_name option.
An output similar to the following example will be displayed:
Programming PLP on Card [0000:65:00.0]...
Partition file: /opt/xilinx/firmware/u250/gen3x16/xdma-shell/
partition.xsabin
Program successfully
3. Enter the following command and confirm the shell partition displayed under Partitions
installed in the system and Partitions running on FPGA match.
$ sudo /opt/xilinx/xrt/bin/xbmgmt partition --scan
An output similar to the following example will be displayed.
Card [0000:65:00.0]
Partitions running on FPGA:
xilinx_u250_gen3x16_base_3
logic-uuid:
48810c9d17860ef53e9e529e8b14ce39
interface-uuid:
695718ec21a232e45e1afcb4e558e11f
xilinx_u250_gen3x16_xdma_shell_3_1
logic-uuid:
bd5fb8abab266c3265918257b5048e88
interface-uuid:
f2f6c5e1273e78948f2c4806221462f2
Partitions installed in system:
UG1301 (v1.8) February 5, 2021 www.xilinx.com
Send Feedback
Getting Started with Alveo Accelerator Cards 32You can also read