Installation and Maintenance Guide for the LS-DYNA Environment Software - from Oasys Ltd
←
→
Page content transcription
If your browser does not render page correctly, please read the page content below
Installation and Maintenance Guide for the
LS-DYNA Environment Software
from Oasys Ltd

                          Windows | Version 18.0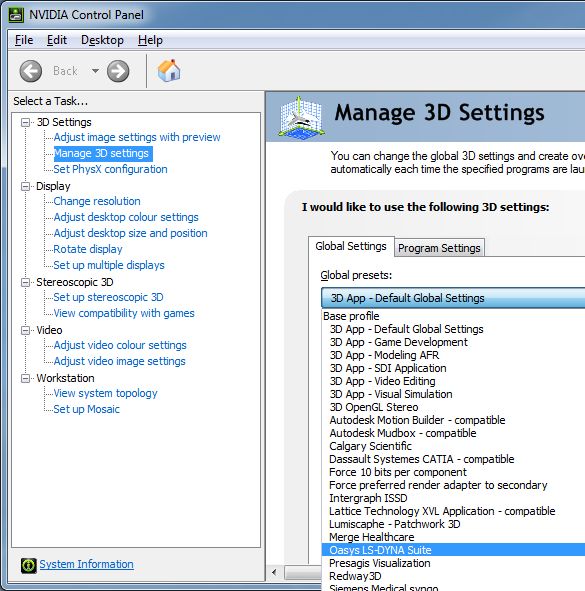
OASYS Ltd LS-DYNA ENVIRONMENT                                                                          Release 18.0
                                                                                           WINDOWS Installation Guide

Contents
                                                                                           Page

Contents                                                                                        1

Intended audience                                                                               3

1              IMPORTANT CHANGES FOR OASYS SUITE 18.0                                           4
               1.1               Licensing                                                      4
               1.2               Changes to Installation Organisation                           4
               1.3               Supported architecture                                         5

2              INSTALLATION ORGANISATION                                                        6
               2.1               Oasys Suite 18.0 Installation Organisation                    6
               2.2               Pre-Installation                                             11
               2.3               Single User / Single Machine Installation                    11
               2.4               Multiple Machine Network Installation                        17
               2.5               Multiple Machine Local Installation                          17
               2.6               Network command line Installation                            18

3              ENVIRONMENT VARIABLES                                                          22
               3.1               Environment Variables for licensing                          22
               3.2               Optional Environment Variables                               23
               3.3               Setting Environment Variables                                24

4              SETTING UP USER PREFERENCES                                                    26
               4.1               The ‘oa_pref’ file                                           26
               4.2               The Preferences Editor                                       27
               4.3               Locking Preferences                                          30

5              AUTOMATIC LICENSE TIMEOUTS                                                     31
               5.1               Configuring automatic timeouts                               31
               5.2               Interrogating LM-X license usage                             32

6              CUSTOMISING SHELL FOR LS-DYNA JOB SUBMISSION                                   32

7              TUNING THE GRAPHICS DRIVER                                                     33
               7.1               Finding out what graphics card and driver are installed      33
               7.2               Tuning an NVIDIA graphics card driver                        33
               7.3               Tuning an AMD / ATI graphics card driver                     35

8              THE LM-X LICENSING SYSTEM                                                      36
               8.1               Introduction                                                 36
               8.2               Installation                                                 36
               8.3               Operations                                                   46

Ove Arup & Partners Ltd | April 2021
                                                                                                              Page 1
OASYS Ltd LS-DYNA ENVIRONMENT Release 18.0
WINDOWS Installation Guide
8.4 Appendices 59
Ove Arup & Partners Ltd | April 2021
Page 2OASYS Ltd LS-DYNA ENVIRONMENT Release 18.0
WINDOWS Installation Guide
Intended audience
This document is written for the System Manager responsible for loading and maintaining the
Oasys Ltd LS-DYNA 18.0 Environment software. No special (engineering) knowledge of the
software is required.
Further information may be obtained from:
UK The Arup Campus
Blythe Valley Park
Solihull
B90 8AE
United Kingdom
Tel: +44 121 213 3399
Email : dyna.support@arup.com
China Arup China
37F-39/F Huaihai Plaza
1045 Huai Hai Road (M)
Xuhui District
Shanghai 200031
China
Tel: +86 21 3118 8875
Email: china.support@arup.com
India Arup India Pvt Ltd
10th floor, Western Dallas Center
Plot no. 83/1, Knowledge City
Rai Durg, Hyderabad-500032
Telangana, India
Tel: +91 40 69019797 / 98
Email: india.support@arup.com
USA Oasys Ltd
c/o 560 Mission Street Suite 700
San Francisco
CA 94105
United States
Tel: +1 415 940 0959
Email: us.support@arup.com
Web https://www.arup.com/dyna
or contact your local Oasys Ltd distributor.
Ove Arup & Partners Ltd | April 2021
Page 3OASYS Ltd LS-DYNA ENVIRONMENT Release 18.0
WINDOWS Installation Guide
1 IMPORTANT CHANGES FOR OASYS SUITE
18.0
1.1 Licensing
The Oasys Suite 18.0 uses LM-X from X-Formation for licensing.
LM-X is a well-known provider of licensing solutions and it is likely that many Oasys
customers already have an LM-X license service running for other CAE tools.
The Oasys Suite 18.0 software requires a new LM-X license server, which will be provided
by Oasys Ltd or your Oasys distributor. If you are using a floating license server, you will
need to install the LM-X license server software, which can be done as part of the Oasys
Suite 18.0 installation.
The Oasys Suite 18.0 LM-X license file and LM-X license daemons are backwards
compatible with the 17.x, 16.x and 15.x software releases. This means that any existing 17.x,
16.x and 15.x software will continue to work with new LM-X license files and servers.
We recommend that you update all your Oasys Suite license servers with the files
shipped with the Oasys Suite 18.0 software.
1.2 Changes to Installation Organisation
The installation directory structure and nomenclature use the same organisation as Oasys
Suite 17.x. Users of the 17.x release should find the description below familiar, users
migrating directly from an earlier release will find that some file names have changed and
should read this section carefully.
From Oasys Suite 14 onwards the software is only available for 64-bit architecture, however
we have retained the “_x64” suffix in the executable names both for backwards compatibility
and to make it clear that these are 64-bit executables.
1.2.1 Executable filenames now contain minor version numbers
Prior to Oasys Suite 14.0 the executable names only contained the major revision numbers,
for example primer18_x64.exe. Some users found that if a minor release, for example 18.1,
was issued this caused confusion because the executable name did not change, making it hard
to tell executables apart solely by their filenames; however other users preferred this system
since it meant that the generic filename was always the most up to date version.
To try to solve this problem, and to please both schools of thought, the file naming
convention has now been changed to include the minor version number:
name {major version} {_minor version} {_size} .exe
For example: primer18_0_x64.exe is PRIMER major release 18, minor release 0, 64 bit.
To preserve backwards compatibility with previous naming conventions, and to please those
preferring the old generic naming convention, hard links defining the generic names are also
created as part of the installation process.
For example: primer18_x64.exe primer18_0_x64.exe (where is a hard link)
Ove Arup & Partners Ltd | April 2021
Page 4OASYS Ltd LS-DYNA ENVIRONMENT Release 18.0
WINDOWS Installation Guide
If a minor version (e.g. 18.1) of major release 18 is issued in the future, and the files are
installed in the same directory then:
The new executables (e.g. primer18_1_x64.exe) will be distinct.
The hard links will be updated so that the generic name points to the most recent minor
release.
For example: primer18_x64.exe primer18_1_x64.exe
This updating of the hard links has consequences when one programme runs another, see the
next section on usage of generic names.
Please Note:
A “hard link” on Windows is not quite the same as a “symbolic link” on *nix operating
systems. On Windows a file exists as a collection of bytes with an address somewhere on a
disk, and every reference to that file is a “hard link”. A file must have at least one hard link
referring to it, which defines its name and location in a given folder. However, a file can have
any number of hard links, in any locations, pointing to it. All such links will look like the
original file, sharing the same attributes, since they all point to the same location in disk.
However, unlike usage on *nix operating systems there is no concept of “real file” and
“pointers to that real file”, on Windows all such links are equal. For more information consult
MSDN (search for “hard link” or “junction”) and see also the MS-DOS “mklink” command.
1.2.1.1 The software itself defaults to the generic names
Some pieces of Oasys software reference other programmes within the suite. For example:
• REPORTER can run PRIMER, D3PLOT and T/HIS,
• D3PLOT can run PRIMER and T/HIS
and so on.
Within the software the default names used for running the other executables are the generic
ones, i.e. no minor version suffix. For example, when REPORTER wishes to run PRIMER it
will, by default, run the executable name primer18_x64.exe.
This means that when a minor release is installed the default will be for the most recent
executable to run in this context. It is possible to override these defaults by using preferences,
see section 4
If you wish to segregate minor versions, for example you wish REPORTER 18.0 to run
PRIMER 18.0 and REPORTER 18.1 to run PRIMER 18.1, then it will be necessary to place
the new minor release in a separate installation directory.
Please contact Oasys Ltd for further information if you need more advice about this.
1.3 Supported architecture
From Oasys Suite 14.0 onwards the Oasys LS-DYNA software suite is only available in 64-
bit form for x86-64 hardware.
This means that all the executables, including the LM-X licensing software, will only run on
x86-64 hardware running a 64-bit operating system.
Oasys Suite 18.0 for Windows is suitable for and has been tested on Windows 10.
Ove Arup & Partners Ltd | April 2021
Page 5OASYS Ltd LS-DYNA ENVIRONMENT Release 18.0
WINDOWS Installation Guide
Note that support for Windows 7 has been deprecated as Microsoft is no longer supporting
Windows 7. As far as we are aware, the software runs on Windows 7.
2 INSTALLATION ORGANISATION
2.1 Oasys Suite 18.0 Installation Organisation
In Oasys Suite 18.0 an option is provided to separate a top-level “administration” directory
from the “installation” one where the executables are located.
For large installations on many machines this allows central configuration and administration
files to exist in one place only, but executables to be installed locally on users’ machines to
give better performance.
Oasys Suite 18.0 also allows for the following items to be configured:
• The location for user manuals and other documentation.
• The definition of a user’s home directory.
• The definition of the temporary directory for scratch files.
In addition, parsing of the “oa_pref” (preferences) file will now handle environment
variables, so that a generic preference can be configured to give a user-specific result, and
preferences may be “locked” so that those set at the administration level cannot be changed
by users.
These changes are entirely optional, and users performing a simple installation on a single
machine do not need to make any changes to their existing installation practice.
Here are some diagrams which illustrate how installation might be carried out in various
scenarios.
a) Single user installation on one machine
There is no need to worry about separating
administration and installation directories, and
the default installation of all files in and below
the single installation directory will suffice.
Ove Arup & Partners Ltd | April 2021
Page 6OASYS Ltd LS-DYNA ENVIRONMENT Release 18.0
WINDOWS Installation Guide
b) A few machines on a small network, each user has their own
machine
The top-level administration
directory can be installed on a
network server, possibly also
locating the manuals centrally.
Each user’s machine has its
own “installation” directory to
give good performance, but
there is no need to manage
home or temporary directories
centrally since each user
“owns” their machine.
If network performance is good
an alternative would be to
install executables on the
central server, meaning that
local OA_INSTALL
directories are not required.
c) Large corporate network
The top level oa_pref tile will
set the “home” directory for
users so that their home
directory is the same
regardless of the machine
they use.
Timing out of idle licenses is
managed centrally via the
“timeouts” file.
Corporate policies can also be
enforced if required by
“locking” preferences in the
top level oa_pref file.
Depending on network size &
performance executables and
manuals could be located on
each machine, or on local
server hubs, or centrally.
These configurations are not mandatory and are simply examples, you should choose the one
that suits your needs.
Note the “_xx” in OA_ADMIN_xx and OA_INSTALL_xx refers to a version number, i.e.
OA_ADMIN_18 for Oasys Suite 18.0. This suffix is not required, but it is recommended as it
Ove Arup & Partners Ltd | April 2021
Page 7OASYS Ltd LS-DYNA ENVIRONMENT Release 18.0
WINDOWS Installation Guide
will provide an easy way of organising parallel installations of future releases on a single
machine.
Note also that while the various directories (OA_ADMIN_xx, OA_INSTALL_xx,
OA_MANUALS, etc) can be defined by environment variables this is not recommended
because it is inflexible, and also it would not permit two different installations to have
different directories on the same machine.
It is recommended that the options in the top level oa_pref file to define these directories are
used instead, since this encapsulates the definitions in a single place, permits multiple
installations to co-exist on the same machine, and makes administration easier. See “oa_pref
file options” in the table below.
Ove Arup & Partners Ltd | April 2021
Page 8OASYS Ltd LS-DYNA ENVIRONMENT Release 18.0
WINDOWS Installation Guide
2.1.1 Details of director names
Directory Status Directory Content and purpose oa_pref file option
OA_ADMIN_xx Optional Top level configuration files.
(xx = 18 for Oasys Suite 18.0, thus
or OA_ADMIN_18)
OA_ADMIN Admin level oa_pref file
Other configuration files
Timeout configuration file
The generic version of this name,
OA_ADMIN will be searched for if no
release-specific version is set.
OA_INSTALL_xx Required All executables oasys*OA_INSTALL
Installation level oa_pref file
or
OA_INSTALL
OA_MANUALS Optional Specific directory for user manuals. If not oasys*manuals_dir
defined, then will search in:
OA_ADMIN_xx/manuals (xx = major
version number)
OA_INSTALL/manuals
OA_HOME Optional Specific "home" directory for user. If not oasys*home_dir
defined will use:
$HOME (Unix/Linux)
%USERPROFILE% (Windows)
OA_TEMP Optional Specific "temporary" directory for user. If oasys*temp_dir
not defined will use:
P_tmpdir (Unix/Linux)
%TEMP% (Windows)
OA_INSTALL_xx
Previously the software used the OA_INSTALL (renamed from OASYS) environment
variable to locate the directory the software was installed in.
On Windows this is no longer required as the software can work out its own installation
directory. If this environment variable is already set, we recommend that it should be
removed, as in some cases (where more than one version has been installed in different
directories) it can cause problems.
OA_ADMIN_xx
Ove Arup & Partners Ltd | April 2021
Page 9OASYS Ltd LS-DYNA ENVIRONMENT Release 18.0
WINDOWS Installation Guide
Users wishing to separate configuration and installation directories will be able to do so by
making use of the new top-level OA_ADMIN_xx directory (OA_ADMIN_18 for Oasys Suite
18.0).
If the OA_ADMIN_xx directory is used it will be necessary to set up an environment variable
of this name to refer to it, however this should normally be the only environment variable
required in the whole installation.
2.1.2 Dynamic configuration using the top level oa_pref file
While all the OA_... directories may be specified by environment variables of the same
name it is recommended that you do not do this, but instead use the facility to set non-
standard directory names dynamically using preferences in the top level oa_pref file.
For example:
Oasys Suite 18.0 Oasys Suite 18.1
Top level directory OA_ADMIN_18 Top level directory OA_ADMIN_181
oa_pref file in OA_ADMIN_18 contains: oa_pref file in OA_ADMIN_181 contains:
oasys*OA_INSTALL:
oasys*manuals_dir:
oasys*home_dir: versions, although they could be different if desired
oasys*temp_dir:
For example: If the Oasys Suite 18.0 software has been installed in C:\oasys18 , then:
oasys*OA_INSTALL: C:\oasys18
will enable all users’ installations to find their locally stored executables.
Pathnames using environment variables will be deconstructed during oa_pref file reading,
and this can be exploited to set user-specific paths using a generic definition. For example:
oasys*home_dir: H:\%USERNAME%
would set a Windows home directory for to H:\, superseding
the default %USERPROFILE% directory normally used on Windows.
2.1.3 The hierarchy of oa_pref file reading
The oa_pref preference file contains code-specific preferences that can be used to modify the
software behaviour.
This file can be located in multiple locations which are searched in following order:
Ove Arup & Partners Ltd | April 2021
Page 10OASYS Ltd LS-DYNA ENVIRONMENT Release 18.0
WINDOWS Installation Guide
OA_ADMIN_xx / OA_ADMIN Top level configuration
OA_INSTALL_xx /
Installation level
OA_INSTALL
OA_HOME User's personal "home" file
Current working directory File specific to the current directory (rarely used)
The rules for reading these files are:
• If a given directory does not exist, or no file is found in that directory, then no action is
taken. This is not an error.
• A more recently read definition supersedes one read earlier, therefore "local" definitions
can supersede "global" ones (unless they are locked).
• If two or more of the directories in the table above are the same, then that file is only read
once from the first instance.
More information about preferences, including the ability to “lock” them, is given in section
4.
2.1.4 Protection and ownership of installation directories
Oasys Suite does not require Administrator / Root privileges for installation, however on
Windows platforms authority to make registry entries will be required for installation.
It is recommended, but not required, that OA_ADMIN_xx and OA_INSTALL_xx directories
be protected “read and execute only” for unprivileged users. If top level preferences are to be
locked or idle time-outs configured, then write protection will be required to prevent users
from subverting these settings.
2.2 Pre-Installation
The Windows installer files can be downloaded from the following website:
https://www.oasys-software.com/dyna/downloads/oasys-suite/
A 64bit installer file is provided: oasys18_0_x64_setup.exe (Windows 10, 64-bit)
Double click on the executable to start the installation
2.3 Single User / Single Machine Installation
If you are installing the software on a single machine it is recommended that the software is
installed on a local disk.
2.3.1 Installation
Installation can either be done interactively or by doing a ‘silent’ command line install. For
more details on silent installs see section 2.5.1.
a) To start the installation process, double click on the installer file that you have
downloaded and unzipped. The installer will start.
Ove Arup & Partners Ltd | April 2021
Page 11OASYS Ltd LS-DYNA ENVIRONMENT Release 18.0
WINDOWS Installation Guide
Ove Arup & Partners Ltd | April 2021
Page 12OASYS Ltd LS-DYNA ENVIRONMENT Release 18.0
WINDOWS Installation Guide
b) Choose whether to install the software for all users (if running with administrator
privileges) or the current user.
c) Select an installation directory.
Ove Arup & Partners Ltd | April 2021
Page 13OASYS Ltd LS-DYNA ENVIRONMENT Release 18.0
WINDOWS Installation Guide
d) Choose if you want to create shortcut icons in the start menu and/or desktop.
e) If the option to create a start menu folder is selected, then choose the name of the folder
to create. The default will be “Oasys Ltd LS-DYNA Env 18.0 x64” but a new name can
be given, or an existing folder used by selecting it.
Ove Arup & Partners Ltd | April 2021
Page 14OASYS Ltd LS-DYNA ENVIRONMENT Release 18.0
WINDOWS Installation Guide
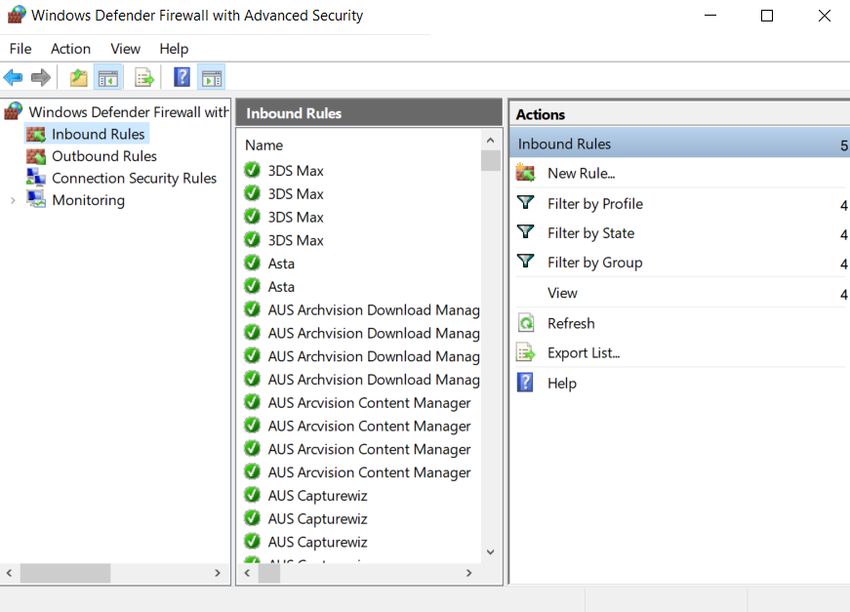
f) Choose with file extensions you want to associate with the software. The default
extensions are shown (ticked) below.
g) If running with Administrator privileges, choose whether you want to install the LM-X
server files. This is only required if you want this machine to be a license server.
Ove Arup & Partners Ltd | April 2021
Page 15OASYS Ltd LS-DYNA ENVIRONMENT Release 18.0
WINDOWS Installation Guide
h) The installer should then complete the installation without prompting for any more
information. Once finished press Close to finish the installation.
2.3.2 Post Installation
a) Setup Environment Variables
Required – Configure the Environment Variables for licensing (see section 3.1).
See section 3.2 for information on other optional Environment Variables.
b) Configure the preference file “oa_pref”, (see section 4).
c) Optional – Configure Oasys SHELL for submitting LS-DYNA analysis (see section
6).
2.3.3 File Associations
By default, the PC installation will automatically set up associations for the following file
extensions;
D3PLOT: .ptf, .ctf, .rlf, .dsf
PRIMER: .key, .dyn, .kby
REPORTER: .ort, .orr, .orp
T/HIS: .thf, .xtf, .tsf
Other extensions can be chosen as described above.
Ove Arup & Partners Ltd | April 2021
Page 16OASYS Ltd LS-DYNA ENVIRONMENT Release 18.0
WINDOWS Installation Guide
2.4 Multiple Machine Network Installation
Installing the software onto a network drive for access from multiple machines.
2.4.1 Installation
The easiest way to install onto a network is to:
1. Follow the same procedure as section 2.3 to install the software to a local directory
(including the post-installation setup below).
2. Copy the local installation directory to the network location.
3. Uninstall the local copy.
4. Run the installer in ‘network’ mode to add shortcuts and file associations.
2.4.2 Post Installation
a) Setup Environment Variables
Required – Configure the Environment Variables for licensing (see section 3.1)
Optional – Configure OA_ADMIN_xx if you want to configure a central network
directory containing preferences and license timeout information.
See section 3.2 for information on other optional Environment Variables.
b) Configure the preference file “oa_pref”, (see section 4)
c) Configure license timeout information (see section 5)
d) Optional – Configure Oasys SHELL for submitting LS-DYNA analysis (see section
6).
2.4.3 File Associations
To set up the file associations and icons the installer can be run in a ‘network’ command line
mode to add program shortcuts and file associations on all the machines that are going to
access the software. For more details see section 2.6.
2.5 Multiple Machine Local Installation
If you are going to install the software on multiple machines, then you can either:
a) Follow the interactive procedure outlined in section 2.3 for each machine.
b) Follow the ‘Multiple Machine Network Installation’ procedure outlined in section 2.4
for each machine.
c) Install the software in silent command line mode.
2.5.1 Silent Command line Installation
Instead of running the installer interactively it can be run in a silent command line mode by
doing:
Ove Arup & Partners Ltd | April 2021
Page 17OASYS Ltd LS-DYNA ENVIRONMENT Release 18.0
WINDOWS Installation Guide
oasys18_0_x64_setup.exe /S [any other args] /D=C:\path to install
The /S argument is required to do a silent install.
The /D argument specifies the installation directory. Note that if the installation directory
contains spaces it should NOT be quoted.
The /D argument must be the last argument.
Other command line options can be given. Please see the arguments marked with ‘#’ in
section 2.6 for more details. For example:
oasys18_0_x64_setup.exe /S /desktop=y /ext_k=y /D=C:\Test\oasys 18
2.5.2 Post Installation
a) Setup Environment Variables.
Required – Configure the Environment Variables for licensing (see section 3.1)
Optional – Configure OA_ADMIN_xx if you want to configure a central network
directory containing preferences and license timeout information.
See section 3.2 for information on other optional Environment Variables.
b) Configure the preference file “oa_pref” (see section 4) – If you have cloned an
installation you can skip this.
c) Configure license timeout information (see section 5).
d) Optional – Configure Oasys SHELL for submitting LS-DYNA analysis (see section
6).
2.5.3 File Associations
By default, the silent installation will automatically set up associations for the following file
extensions;
D3PLOT: .ptf, .ctf, .rlf
PRIMER: .key, .dyn
REPORTER: .ort, .orr, .orp
T/HIS: .thf, .xtf,
Other extensions can be chosen. Please see section 2.6 for more details.
2.6 Network command line Installation
The installer can be run in ‘network’ mode on the command line by using the /network
argument. This is intended for the case of the local machine running executables that are
installed on some network disk rather than locally.
Ove Arup & Partners Ltd | April 2021
Page 18OASYS Ltd LS-DYNA ENVIRONMENT Release 18.0
WINDOWS Installation Guide
It can be used to create icons and file associations on workstations without having to carry
out a complete installation on each machine. In addition to creating shortcuts and file
associations an entry can also be created in the Start Menu.
When the /network argument is used the Oasys LS-DYNA software and manuals are not
installed. Shortcuts and file associations are made. However, an uninstaller does need to be
made (so the shortcuts etc. can be uninstalled if necessary in the future) so some things will
still be installed on the machine.
If installing for all users, this location will default to C:\Program Files\Ove
Arup\v18.0_x64\.
If installing for the current user, it will default to
C:\Users\current.user\AppData\Roaming\Ove Arup\v18.0_x64\.
The installation folder on the local machine can be changed by giving the /D command line
argument.
The available arguments are shown below. Those marked with ‘#’ can also be given for silent
installs. See section 2.5.1 for more details.
/network=X:\path\installed Network location that software is installed in.
If the network directory contains spaces the path should NOT be quoted.
/D=local install path Specifies the local installation directory where the uninstaller
will be written (see above for default location). If the installation directory contains spaces it
Ove Arup & Partners Ltd | April 2021
Page 19OASYS Ltd LS-DYNA ENVIRONMENT Release 18.0
WINDOWS Installation Guide
should NOT be quoted.
If used the /D argument must be the last argument
/all Install the software for all users #.
(requires administrator privileges)
/user Install the software for the current user #
/desktop=(yes|no|y|n|true|false) Whether to install icons for software on desktop #
Default is false.
/startmenu=(yes|no|y|n|true|false) Whether to install entry in start menu #
Default is true.
/startmenufolder=folder name Folder name in start menu #
Default is Oasys Ltd LS-DYNA Env 18.0 x64.
If the folder name contains spaces it should NOT be quoted.
/server=(yes|no|y|n|true|false) Whether to install LM-X server files #.
Default is false.
/ext_xxx=(yes|no|y|n|true|false) Whether to associate extension with program #
The following extensions are valid for D3PLOT (Those marked with * are set by default):
/ext_ptf *
/ext_ctf *
/ext_rlf *
/ext_op2
/ext_fz
/ext_db
/ext_dem
/ext_d3 (for d3eigv, d3acs, d3ftg, …)
/ext_dsf *
The following extensions are valid for PRIMER (Those marked with * are set by default):
/ext_key *
/ext_dyn *
/ext_inc
/ext_inp
/ext_k
/ext_i
/ext_kby *
The following extensions are valid for REPORTER (Those marked with * are set by default):
/ext_ort *
/ext_orr *
/ext_orp *
The following extensions are valid for T/HIS (Those marked with * are set by default):
/ext_thf *
/ext_xtf *
/ext_cur
/ext_binout
Ove Arup & Partners Ltd | April 2021
Page 20OASYS Ltd LS-DYNA ENVIRONMENT Release 18.0
WINDOWS Installation Guide
/ext_binout0000
/ext_tsf *
For example, the command
oasys18_0_x64_setup.exe /network=P:\path\oasys 18
/all
/desktop=y
/startmenu=y
/ext_k=y
/ext_dyn=n
will
• set up desktop and start menu shortcuts
• associate files with extension .k with PRIMER
• remove the association for files with extension ‘.dyn’ from PRIMER
• for all users
• to software installed in remote location P:\path\oasys 18
This will be a “proper” installation on the local machine, with all the normal registry entries,
but the only files in the local directory will be the uninstaller. Any desktop icons and Start
menu entries will point to the appropriate executables in the network location.
To uninstall it use Control Panel, Apps and Features in the normal way.
Ove Arup & Partners Ltd | April 2021
Page 21OASYS Ltd LS-DYNA ENVIRONMENT Release 18.0
WINDOWS Installation Guide
3 ENVIRONMENT VARIABLES
3.1 Environment Variables for licensing
This section describes the process of creating environment variables for licensing.
3.1.1 Oasys Suite License
Either ARUP_LICENSE_PATH (preferred) or LMX_LICENSE_PATH can be used to locate
a valid license for the Oasys software. It is recommended that ARUP_LICENSE_PATH is
used as this can speed up the checkout of licenses on systems where LMX_LICENSE_PATH
is used to find other license servers as well.
3.1.1.1 Floating Network License
If the software will be run using a license server this variable should be set to point to the
license server machine using the machine's hostname:
ARUP_LICENSE_PATH = @hostname
or if a non-default port has been specified for the license server:
ARUP_LICENSE_PATH = port@hostname
If you are using a triad license server (known as High Availability Licensing or HAL for LM-
X) then you should specify all three license servers:
ARUP_LICENSE_PATH = port@host1;port@host2;port@host3
3.1.1.2 Fixed Stand-alone (node-locked) License
If the software will be using a node locked license file this variable should be set to point to
the location of the license file:
ARUP_LICENSE_PATH = \arup.lic
3.1.2 LSTC_FILE / LSTC_LICENSE_SERVER
On Windows machines LS-DYNA can use either a node-locked license or a floating network
license system:
3.1.2.1 Floating Network License
If a floating license system is to be used the variables LSTC_LICENSE_SERVER, and
LSTC_LICENSE should be set as follows.
LSTC_LICENSE_SERVER = hostname (of license server)
LSTC_LICENSE = network
Setting LSTC_INTERNAL_CLIENT to “off” forces LS-DYNA to use an external executable
“lstc_client” to communicate with the license server rather than the dyna executable itself.
The use of the external program has two potential benefits firstly it allows the latest version
of the licensing software to be used. Secondly licenses are returned quicker to the license
Ove Arup & Partners Ltd | April 2021
Page 22OASYS Ltd LS-DYNA ENVIRONMENT Release 18.0
WINDOWS Installation Guide
pool if the LS-DYNA executable terminates abnormally. To use the external program set the
environmental variable LSTC_INTERNAL_CLIENT to off and copy the program
lstc_client.exe to the same directory that holds the LS-DYNA executable:
LSTC_INTERNAL_CLIENT = off
If you are using a triad license server then you should specify all three license servers:
LSTC_LICENSE_SERVER = ‘(host1 host2 host3)’
3.1.2.2 Node-locked License
If a node-locked license is to be used for LS-DYNA, then the environment variable
LSTC_LICENSE should be set to local and the environmental variable LSTC_FILE should
be set to the full pathname of the license file. By default, this file should be called
'LSTC_FILE' and it should be located in the 'executables' directory.
LSTC_LICENSE = local
LSTC_FILE = \LSTC_FILE
3.2 Optional Environment Variables
After installing the software, the following optional environment variables can be set up:
OA_ADMIN_xx (only required if OA_ADMIN_xx is used)
MENU_AUTO_CONFIRM (optional)
FILE_EXIST_ACTION (optional)
ECHO_PREFERENCE (optional)
DISPLAY_WIDTH (optional)
DISPLAY_HEIGHT (optional)
We recommend that these variables are set up by a user with Administrator privileges to
ensure they apply to all users on the system.
3.2.1 OA_ADMIN_xx
If a top-level administration directory is to be used OA_ADMIN_18 (for Oasys Suite 18.0)
must be defined on all machines on which the software is to be run. This variable should be
set to the full pathname of the administration directory.
This variable is often used when replaying command files which, when recorded, pause and
ask the user to confirm things (e.g. warning messages). Possible options for this variable are
true, and false. If the variable is set (true) these will not pause and will behave as if the user
had pressed "OK" – meaning command files can play back without user intervention.
3.2.2 MENU_AUTO_CONFIRM
This variable is often used when replaying command files which, when recorded, paused and
asked the user to confirm things. (For example, HELP and Warning messages.) Possible
options for this variable are, true and false.
Ove Arup & Partners Ltd | April 2021
Page 23OASYS Ltd LS-DYNA ENVIRONMENT Release 18.0
WINDOWS Installation Guide
If the variable is set (true) then these will not pause and will behave as if the user had pressed
"OK" - meaning that command files can play back without user intervention. This variable
should only be set if the installation is intended solely for batch usage.
3.2.3 FILE_EXIST_ACTION
This variable controls the action to be taken when opening a file for output when the file
already exists. Possible options for this variable are none, overwrite and append.
Normally the user will be prompted for the action to be taken when a file selected for output
already exists. However, if this variable is set to overwrite or append the relevant action will
be taken automatically.
This is generally used when playing automatic post-processing batch scripts and should only
be set if this installation is intended solely for batch usage.
3.2.4 ECHO_PREFERENCE
If this variable is set to "1" any command line arguments used to start PRIMER, D3PLOT or
T/HIS will be echoed to the screen along with any settings read from preference files.
3.2.5 DISPLAY_HEIGHT / DISPLAY_WIDTH
The software uses system functions to obtain screen dimensions which are used to calculate
font sizes. Oasys Ltd have noticed that on some systems, the screen dimensions are not
reported correctly.
If fonts used by the Oasys software appear to be the wrong size these 2 variables can be used
to override the system calls to define the correct screen dimensions:
set DISPLAY_HEIGHT = (screen physical height in mm)
set DISPLAY_WIDTH = (screen physical width in mm)
3.3 Setting Environment Variables
To set these system variables, activate the control panel, using:
Ove Arup & Partners Ltd | April 2021
Page 24OASYS Ltd LS-DYNA ENVIRONMENT Release 18.0
WINDOWS Installation Guide
Windows 10
Start Control Panel
then select the System Icon:
followed by the ‘Advanced System
Settings”. In the window that appears then
select the “Advanced” tab followed by the
‘Environment Variables’ button.
This will bring up the window displayed on
the right.
To set up a new Environment Variable press
‘New’ and a new menu will appear.
In the New User Variable dialogue box enter the variable’s name in the ‘variable’ field
followed by the value in the ‘value’ field then select OK to create the new variable.
Finally, after setting up all the new variables, select Apply followed by OK to dismiss the
System Properties menu.
Ove Arup & Partners Ltd | April 2021
Page 25OASYS Ltd LS-DYNA ENVIRONMENT Release 18.0
WINDOWS Installation Guide
4 SETTING UP USER PREFERENCES
4.1 The ‘oa_pref’ file
This file contains code-specific preferences that can be used to modify the behaviour of the
software suite. It is optional and, where entries (or the whole file) are omitted, programs will
revert to their default settings.
4.1.1 ‘oa_pref’ naming convention and locations
The preferences are stored in a file called "oa_pref". This file can exist in multiple locations
which are searched in the following order:
1. The optional administration directory defined by the environmental variable
($OA_ADMIN or $OA_ADMIN_xx - where xx is the release number).
2. The site-wide installation directory defined by the environment variable
($OA_INSTALL_xx).
3. The user's home directory $OA_HOME which defaults to %USERPROFILE% on
Windows.
4. The current working directory
(see Section 2 for an explanation of the directory structure).
All four files are read (if they exist) with the last preference read being the one used; this
means the file can be customised for a particular job or user if necessary.
Files do not have to exist in any of these locations; if none exists the programme defaults will
be used.
%USERPROFILE% on Windows is usually:
C:\users\ on Windows 10
Issuing the "set" command from an MS-DOS prompt will show the value of this and other
variables.
Typically, the following should be set:
• Organisation-wide options in the version in $OA_ADMIN_xx and/or $OA_INSTALL.
• User-specific options in $HOME / %USERPROFILE%.
• Project-specific options in the current working directory.
4.1.2 File Format
The file contains preferences for:
• All the software (lines commencing oasys*)
• SHELL (lines commencing shell*)
• THIS (lines commencing this*)
• D3PLOT (lines commencing d3plot*)
• PRIMER (lines commencing primer*)
• REPORTER (lines commencing reporter*)
Ove Arup & Partners Ltd | April 2021
Page 26OASYS Ltd LS-DYNA ENVIRONMENT Release 18.0
WINDOWS Installation Guide
All lines take the format:
* : .
The general copy of the preference file should be present in the $OA_ADMIN_xx and/or
$OA_INSTALL_xx directory. This should contain the preferences most suitable for all
software users on the system.
An individual's specific preferences file can be stored in the individual's home area or
$OA_HOME. This can be used to personally customise the software to the individual's needs.
Whenever a program with preferences in the oa_pref file is fired up, the program will take
preferences in the following order:
1. from the general preference file in the $OA_ADMIN_xx directory (if it exists)
2. then the $OA_INSTALL_xx directory
3. then from the file in the user's home area ($OA_HOME)
4. then from the current working directory
Preferences defined in the general oa_pref file can be superseded by an entry of the same
name in the user's personal file but they can't be removed by it.
Preferences can be locked. If a preference is locked it cannot be changed in an oa_pref file in
a more junior directory. To lock a preference, use the syntax 'program#' rather than
'program*'.
An example of the file is shown below to illustrate the content of the file
# Preferences file for software.
#
# Preferences for SHELL
shell*queue_cpu: 0
#
# Preferences for THIS
this*laser_paper_size: A4
#
# Preferences for D3PLOT
d3plot*overlay_colour: grey
#
# Preferences for PRIMER
primer*overlay_mode off
An example of a locked preference would be:
primer#background_colour: white
Note usage of “#” instead of “*”.
4.2 The Preferences Editor
The editor can be accessed from within the SHELL or from within D3PLOT, T/HIS,
PRIMER or REPORTER. The preference settings for each program are listed in the
appropriate manual.
Ove Arup & Partners Ltd | April 2021
Page 27OASYS Ltd LS-DYNA ENVIRONMENT Release 18.0
WINDOWS Installation Guide
4.2.1 The Preferences Editor Layout
The preferences editor window is divided into two frames with a menu bar across the top.
4.2.2 Menu Bar
File options:
Save/Save as… : Save current preference settings. This will save the personal
oa_pref file in the user's home directory. Only those preferences which differ
from the preferences saved in the general oa_pref file will be saved.
Exit: Exit the preferences editor without saving.
Edit options:
Check Preferences: Checks the current preferences for any
errors. These errors will be listed in a separate window
detailing the preferences with the errors and the nature of
those errors.
Expand all branches: Expands the categories in the left-
hand-frame.
Collapse all branches: Collapses the categories in the left-
hand-frame.
Reset all: Resets all values.
Reset all to OA_INSTALL values: Resets all values to the defaults stored in the main
$OA_INSTALL preference file.
Ove Arup & Partners Ltd | April 2021
Page 28OASYS Ltd LS-DYNA ENVIRONMENT Release 18.0
WINDOWS Installation Guide
4.2.3 The Preferences Editor Left Hand Frame
The left-hand frame will contain the names of all preferences
available to set. Preferences will be listed under the headings:
PRIMER, D3PLOT, T/HIS, REPORTER and SHELL according
to which program they are applicable to.
These categories can be expanded to reveal their respective
preferences/contracted to hide their preferences by clicking on the
box to the left of the respective category, alternatively, use the edit
drop down menu and select Expand all branches or collapse all
branches.
Means that the option has been read from your
Green
$HOME/$USERPROFILE file.
Means that the option has been read from the
Red
$OA_INSTALL file.
Means that the option had been read from the
Magenta
$OA_ADMIN file.
Preferences which aren't highlighted indicate preferences that haven't been set.
Preferences in bold type indicate preferences which haven't been assigned the default value.
A list of all the preferences available and their default value can be found in any oa_pref file
written by the preferences editor.
4.2.4 The Preferences Editor Right Hand Frame
The right-hand frame will contain information about the currently selected preference and
provides the opportunity to edit this preference:
• Name: States the name of the currently selected preference.
• Type: Specifies the type of variable applicable to this preference.
• Default: States the default value of the preference.
• Description: Provides a brief description of the function performed by this preference.
• Active tab: Highlighted in Green when the preference has been assigned a value. Press
this tab to activate/ deactivate the currently selected preference. If the currently selected
preference was defined in the general oa_pref file, deselecting this will bring up an error
message as it is not possible to deselect preferences stored in the general oa_pref file.
• Value: States the currently selected value for the preference. Clicking on the arrow to the
left of this box brings up a drop-down menu which lists the possible values this
preference can take and allows the user to select one of these values.
Ove Arup & Partners Ltd | April 2021
Page 29OASYS Ltd LS-DYNA ENVIRONMENT Release 18.0
WINDOWS Installation Guide
4.3 Locking Preferences
Preferences can be locked. Beside each option in the preference editor is a padlock symbol. If
the symbol is green then the option is unlocked, if it is red then it is locked. If a preference
option has been locked in a file that the user cannot modify then an error message will be
generated if the user tries to edit that option.
If a user manually edits the "oa_pref" file to try and set an option that has been locked in
another preference file, then the option will be ignored in the user’s preference file.
An unlocked preference is defined in the oa_pref file by:
* :
A locked preference replaces the “*” with a “#”, thus:
# :
Ove Arup & Partners Ltd | April 2021
Page 30OASYS Ltd LS-DYNA ENVIRONMENT Release 18.0
WINDOWS Installation Guide
5 AUTOMATIC LICENSE TIMEOUTS
5.1 Configuring automatic timeouts
Each application can be setup to exit automatically if it remains idle for a specified time.
When the application exits it will automatically release any licenses that are being used and
return them to the pool of free licenses.
The automatic license timeouts are controlled by a file called ‘timeouts’ located in the
directory defined by the OA_ADMIN_xx or OA_INSTALL_xx environment variable.
The format of this file is:
()
e.g.
#
primer 60 5 80
d3plot 60 5 50
this 60 5
#
The times are defined in minutes. The idle time should be > 0 and the grace period should be
≥ 0, both times are required.
The “%age in use” column is optional and may be omitted. If defined it should be a value in
the range 1 to 100 which is a percentage of licenses in use for that product. The timeout
process will only take effect if more than this percentage of licenses are in use, meaning that
if usage is below this percentage a session will be allowed to remain open indefinitely.
If this column if omitted an implicit value of 0% is assumed, meaning that timeouts will
occur regardless of the number of licenses checked out for that product.
Any line in the file starting with ‘#’, ‘%’ or ‘$’ is counted as a comment line.
Blank lines are ignored.
Input is not case-sensitive.
Input is free format, but each programme’s settings must be on a single line.
When the idle time is exceeded a warning message will be displayed within the application’s
master window. This message will be displayed for the grace period specified; the application
will be terminated if no response is detected. Giving a response resets both and
counters so that a further must elapse before a further warning is issued.
If programs terminate due to a license timeout the following occurs:
• PRIMER: a copy of any models currently loaded will be saved in the user’s home area or
$OA_HOME if defined.
• D3PLOT: will just exit.
• T/HIS: will just exit.
In all cases, the controlling terminal window receives a message explaining what has
happened and why, and this terminal window will remain mapped on Windows systems.
Ove Arup & Partners Ltd | April 2021
Page 31OASYS Ltd LS-DYNA ENVIRONMENT Release 18.0
WINDOWS Installation Guide
The warning notice is displayed within the master window of the application, not on the
desktop. This is intentional to prevent users starting the application to grab a license then
iconising/minimising it until they need it as the warning message will not be seen if the
application is minimised.
Note that the timeouts file must be write-protected against users either by protecting the file
or the directory in which it exists, otherwise users will be able to change the file content.
Automatic timeouts are only active if this “timeouts” file is present, and then only for
products with entries in the file. If it is not defined, or a product does not have an entry, no
timeouts will take place and sessions will be allowed to remain open indefinitely.
5.2 Interrogating LM-X license usage
The LM-X utility “lmxendutil” is shipped as part of the standard installation and will be
installed in the same directory as the other executables.
The status of license usage can be listed at any time by using the command
‘$OA_INSTALL_xx/lmxendutil -licstat’, which will list all licenses checked out from
servers known to this machine.
Further commands are available: the command ‘$OA_INSTALL_xx/lmxendutil –help’ will
list all the available options, and you will find full information about this and other aspects of
LM-X licensing in the document $OA_INSTALL_xx/manuals/lmxuser/LMX-end-users-
guide-202002.pdf.
6 CUSTOMISING SHELL FOR LS-DYNA JOB
SUBMISSION
In addition to accessing the Oasys Suite software, the Oasys SHELL can be used to submit
LS-DYNA jobs. To use the SHELL to submit LS-DYNA the following should be configured:
1. General Submission Options
2. The versions of LS-DYNA available
3. Queuing Options
4. MPI commands for MPP submission
For more details on how to perform all of these please see the Oasys SHELL manual.
Ove Arup & Partners Ltd | April 2021
Page 32OASYS Ltd LS-DYNA ENVIRONMENT Release 18.0
WINDOWS Installation Guide
7 TUNING THE GRAPHICS DRIVER
Oasys Suite software makes intensive use of 3D graphics, putting a lot of stress on the
graphics card. High-performance workstations and PCs tend to have one of the following
cards installed:
• NVIDIA Quadro series, or sometimes GeForce (really a gaming card)
• AMD/ATI FirePRO series, or sometimes Radeon (really a gaming card)
It is our experience that as of late 2015 the up to date drivers for these cards will work
satisfactorily with Oasys Suite software without further tuning.
If you experience problems the first step should be to install the most recent graphics driver
for your card, which can be found at:
NVIDIA http://www.nvidia.com (Choose “Drivers”)
AMD/ATI http://www.amd/com (Choose “Drivers + support”)
If you still experience problems, typically visual artefacts and/or “stuttery” animation
performance, the diagnostic process below may help. However, the advice below is only
relevant for older (say pre 2013) cards and drivers and it is recommended that you contact
Oasys Ltd for help and advice.
7.1 Finding out what graphics card and driver are installed
It is recommended that if your graphics driver is significantly out of date that you consider
upgrading it to a more recent version. This is not mandatory, and if the machine is working
well there is a strong case for “if it isn’t broken, don’t fix it”; but certainly, the first step to be
taken if graphics problems arise is to upgrade an out of date driver.
Windows 10:
• Right-click on the desktop background, select Display Settings.
• Click on Display Adapter Properties, or if this not present on Advanced display settings,
followed by Display Adapter Properties.
7.2 Tuning an NVIDIA graphics card driver
From Oasys Suite 12.1 onwards Oasys Ltd software installs application-specific settings in
NVIDIA graphics drivers, meaning that these are used instead of the default settings. This
process happens automatically, and no user intervention should be required.
If you experience problems your first step should be to update your graphics driver, and you
should only go through the process below if that is not possible, or if your card is old (say pre
2013).
Ove Arup & Partners Ltd | April 2021
Page 33OASYS Ltd LS-DYNA ENVIRONMENT Release 18.0
WINDOWS Installation Guide
Right click anywhere on the desktop background and select NVIDIA Control Panel.
From the “Select a task” tree on the left-hand side of this panel select:
3D Settings, Manage 3D settings.
You should then see a figure like that shown below.
The default setting for NVIDIA drivers is “3D App – Default Global Settings” as shown
here, which works well for benchmark tests but is normally not satisfactory for real world
engineering applications.
By using the pop down button to the right of this you will see a list of possible settings,
which are predefined configurations for a range of software.
In the example, the option “Oasys LS-DYNA suite” is available as shown here, but this may
not be available in older driver software, in which case we would recommend the use of
“Dassault Systems Catia – compatible” instead.
You need to choose whether to configure the driver for all applications on this machine
(Global settings) or for just selected applications (Program settings).
It is our experience that on a machine used for CAE work the best and simplest approach is to
use Global settings, since the Oasys (or Catia) settings will work satisfactorily for most CAE
programmes. Any applications which already have specific settings defined for them, see the
list under Program settings, will use those anyway, so by defining global settings you are
simply setting the default for any applications that do not have a specific entry.
Ove Arup & Partners Ltd | April 2021
Page 34OASYS Ltd LS-DYNA ENVIRONMENT Release 18.0
WINDOWS Installation Guide
However, if you wish to make the setting application-specific you will need to use Program
settings, add the specific Oasys software to the list, and select the correct settings.
7.3 Tuning an AMD / ATI graphics card driver
No application specific tuning options are available for Oasys Ltd software on AMD/ATI
graphics drivers.
If you experience problems your first step should be to upgrade your graphics driver, and if
that doesn’t work contact Oasys Ltd for advice.
Ove Arup & Partners Ltd | April 2021
Page 35OASYS Ltd LS-DYNA ENVIRONMENT Release 18.0
WINDOWS Installation Guide
8 THE LM-X LICENSING SYSTEM
Starting from Oasys Suite 17.0, the software switched from Flexera FLEXlm to X-Formation
LM-X for licensing. FLEXlm is not used for Oasys licensing from version 18.0 onwards.
For Oasys Suite 18.0 the software has been compiled using version 4.9.24 of LM-X.
Oasys Suite's LM-X licensing is also backwards-compatible with Oasys Suite versions 15.x,
16.x and 17.x.
The following details show how to configure the LM-X license manager for Oasys Suite
18.0.
8.1 Introduction
If you are using a node-locked license that does not require a floating license server, please
refer to section 8.2.6 directly.
If you are using LM-X floating license server, please start from the Installation-Preparation
section and follow the guide.
Useful cross-references of terminologies between LM-X and the previous FLEXlm system
are included in Appendices.
8.2 Installation
This section details the installation process of the LM-X Licensing System.
8.2.1 Preparation
This section summarises the preparatory steps to install and run the LM-X license server on
Windows:
• Determine the OS platform for the license server.
• Check the system requirements for the license server.
• Check the system requirements for the license server.
• Obtain a valid floating license file for the license server HostID.
• Download, install and configure the LM-X license server software to serve the floating
license.
8.2.2 Supported Platforms
Oasys Suite's LM-X license server software is available for 64-bit Windows and Linux
systems. All the files needed to install LM-X license server can be obtained from the Oasys
Suite website. By default, a floating server license will be provided for a physical machine.
8.2.2.1 Compatibility with other license server software
Besides running Oasys Suite's LM-X license server, you can also run multiple other LM-X
license servers (for other software) on the same physical machine. You just need to specify
different unique TCP ports for each LM-X server, in the configuration (.cfg) files.
Ove Arup & Partners Ltd | April 2021
Page 36OASYS Ltd LS-DYNA ENVIRONMENT Release 18.0
WINDOWS Installation Guide
LM-X license server also does not interfere with FLEXlm-based license server, if they have
different unique server TCP ports specified.
8.2.3 System Requirements
This section details the system requirements for running LM-X License Server.
8.2.3.1 System Requirements for LM-X License Server
• CPU
Generally, the LM-X license server will use very little CPU resource.
• Disk Storage Space
The LM-X license server software requires about 50 MB of disk storage space to install.
Generally, a minimum of 500 MB of storage space should be sufficient to store license server
log files.
• Memory
The system RAM used by LM-X license server varies, with typical memory usage in the
order of 100s of MB.
• Network
Modern networks running via Ethernet or high-speed WiFi should be sufficient. The license
server uses TCP/IP for server-client communications, and only uses one specified TCP port
for these purposes. The default port is 6200 and can be changed in the configuration file.
• Multiple Server and High Availability Licensing (HAL)
LM-X supports both HAL and multiple-server lists. HAL requires three configured servers,
with a quorum of two active servers needed to serve up the pool of floating licenses. This
allows one of the three machines to go down without affecting license availability.
Multiple license servers can also be used to divide up the total floating license pool, and
Oasys Suite clients can access the licenses via a server list specified in the client machine's
environment variable.
8.2.4 Obtaining HostID
For floating server license, this will be the computer that will act as the LM-X license server.
For node-locked license, this will be the computer(s) where the Oasys Suite software will be
used.
To generate this information, run `lmxendutil -hostid` (lmxendutil tool from the LM-X End-
users Tools package) on the computer of interest. lmxendutil can be downloaded for
Windows here.
Ove Arup & Partners Ltd | April 2021
Page 37OASYS Ltd LS-DYNA ENVIRONMENT Release 18.0
WINDOWS Installation Guide
Example:
lmxendutil -hostid
LM-X End-user Utility
Copyright (C) 2002-2019 X-Formation. All rights reserved.
ETHERNET: ens5
HostID: 0A1B2C3D4E5F
HOSTNAME: computer
HostID: computer
USERNAME: pcuser
HostID: pcuser
An alternative method is to run lmxconfigtool.exe GUI tool (download link for Windows
here), and check the HostID tab, where the HostID info can be saved to file.
Send the full text output generated (like the example above) to your Oasys Suite distributor
with your license request, noting whether it is for node-locked license or for floating server
license.
8.2.5 Installing LM-X License Server on Windows
On Windows, you will need admin rights to install and setup the LM-X license server
software as a Windows Service to auto-start during server reboot. If you do not have such
rights, or do not want to setup LM-X license server auto-start, you can choose to skip the
relevant steps during the installation process.
Network traffic on the port used by the LM-X license server (defaults to TCP port 6200) will
need to be allowed. You may need to enable such network traffic on both the license server
and the Oasys Suite client machines if you have any firewall or security software running.
Ove Arup & Partners Ltd | April 2021
Page 38You can also read