Secure Web Application Development - Sample Teaching Modules Li-Chiou Chen and Lixin Tao Pace University
←
→
Page content transcription
If your browser does not render page correctly, please read the page content below

Secure Web Application Development

             Sample Teaching Modules

            Li-Chiou Chen and Lixin Tao

                       Pace University

                             June, 2011

  Update materials are available at http://csis.pace.edu/~lchen/sweet/.
S e c u r e W e b A p p l i c a t i o n D e v e l o p m e n t | ii

                                       Copyright

Copyright© 2009-2011 Lixin Tao (ltao@pace.edu) and Li-Chiou Chen
(lchen@pace.edu), Pace University. Permission is granted to copy, distribute and/or
modify this document under the terms of the GNU Free Documentation License, Version
1.3 or any later version published by the Free Software Foundation. A copy of the license
is available at http://www.gnu.org/copyleft/fdl.html.

                                  Acknowledgement

The authors would like to acknowledge the support from the National Science
Foundation’s Course Curriculum, and Laboratory Improvement (CCLI) program under
Grant No. 0837549. Any opinions, findings, and conclusions or recommendations
expressed in this material are those of the author(s) and do not necessarily reflect the
views of the National Science Foundation.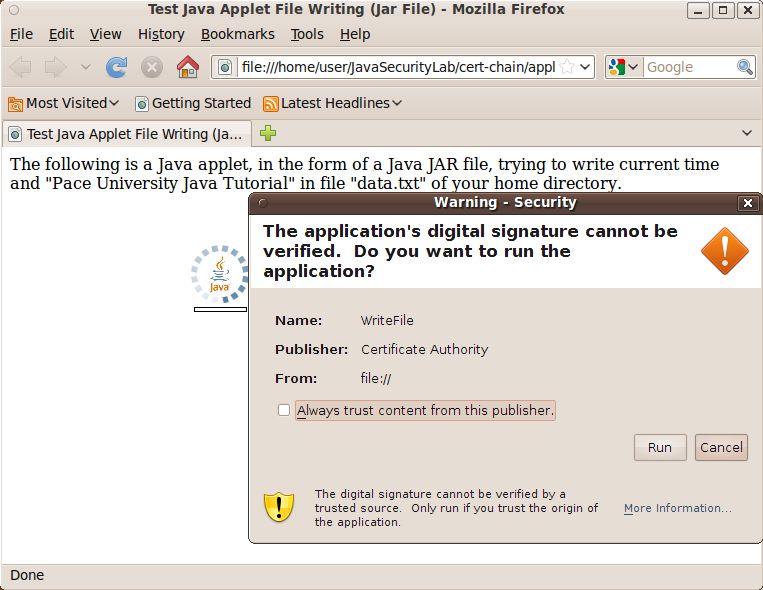
S e c u r e W e b A p p l i c a t i o n D e v e l o p m e n t | iii

                                                         Contents

      Copyright .................................................................................................................. ii
      Acknowledgement .................................................................................................... ii
      Contents ................................................................................................................... iii
1.   Introduction ................................................................................................................. 1
2.   Virtual Machine Setup for Laboratory Exercises ....................................................... 3
      Exercise 2.1: Virtual Machine Installation ............................................................... 3
      Exercise 2.2: Boot up Linux Virtual Machine .......................................................... 3
      Exercise 2.3: Basic Linux Commands ...................................................................... 5
      Exercise 2.4 Turn off Virtual Machines ................................................................... 6
3.   Web Server Security Testing ...................................................................................... 7
      Security Practices for Software Verification ............................................................ 7
      Software Security Testing ......................................................................................... 7
      Laboratory Exercises ................................................................................................ 8
      Exercise 3.1 Setup the Proxy Server ......................................................................... 8
      Exercise 3.2 Crawling Web Pages and Hidden Web Directories ............................. 9
      Exercise 3.3 Scanning For Known Vulnerabilities ................................................. 10
      Exercise 3.4 Accessing More Hidden Pages........................................................... 11
      Exercise 3.5 Privilege Elevation via Parameter Tampering ................................... 12
      Exercise 3.6 Compromising Passwords .................................................................. 13
4.   Java Security ............................................................................................................. 15
      Basic Terminology .................................................................................................. 16
      Java Security Framework ........................................................................................ 17
      Key Management .................................................................................................... 19
      Laboratory Exercises .............................................................................................. 19
      Exercise 4.1 Reviewing Java Security Framework ................................................. 20
      Exercise 4.2 Creating Public/Private Keys and Digital Certificates ....................... 21
      Exercise 4.3 Securing File Exchange with Java Security Utilities ......................... 24
      Exercise 4.4 Granting Special Rights to Applets Based on Code Location ........... 26
      Exercise 4.5 Creating a Certificate Chain to Implement a Trust Chain.................. 34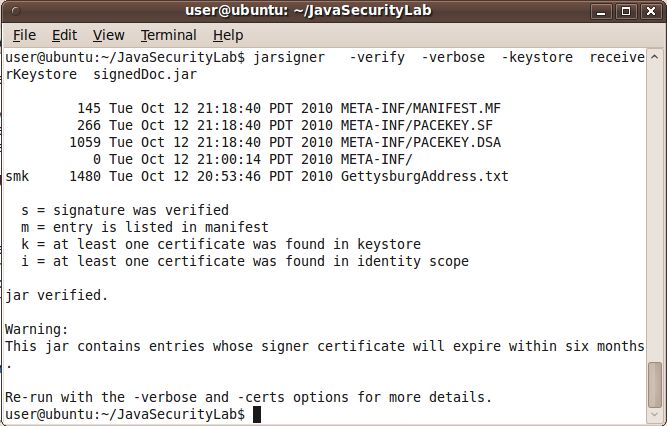
Secure Web Application Development| 1
1. Introduction
This manual discusses security issues in web application development and demonstrates a
set of teaching modules in this area through hands-on exercises. These teaching modules
are developed by a research project called SWEET (Secure WEb dEvelopment
Teaching). The computing environment needed for the exercises is pre-configured in
Ubuntu Linux virtual machines, included in the DVD attached with the manual. This
manual will begin with instructions to utilize the Ubuntu virtual machine and then
provide sample exercises in both web server security testing and Java security.
SWEET features virtualized web servers and a development platform that allows
instructors to teach the security issues in web application development using stand-alone
computers in either Windows or MacOS. It includes teaching modules consisted of the
lecture materials and hands-on exercises. Instructors can visit the SWEET project website
at http://csis.pace.edu/~lchen/sweet/ to download the most recent teaching materials
developed by the project. For further course adoption support, instructors are welcome to
contact either Li-Chiou Chen (lchen@pace.edu, 914-7733907) or Lixin Tao
(ltao@pace.edu) at Pace University.
The DVD in the manual includes the following sub-directories:
Modules: All SWEET teaching modules including hands-on laboratory exercises.
The modules cover the following topics:
Introduction to Web Technologies: The module covers HTML form and its
various supported GUI components; URL structure and URL rewrite; HTTP
basic requests; the four-tiered web architecture and web server architecture
and configuration; session management with cookies, hidden fields, and
server session objects; Java servlet/JSP web applications. Laboratory
exercises guide students to setup a web server and observe HTTP traffic via a
web proxy.
Introduction to Cryptography: This module covers basic concepts of private
key encryption, public key encryption, hash function, digital signature and
digital certificates. Laboratory exercises guide students to perform private key
and public encryption using GPG on an Ubuntu Linux virtual machine.
Secure Web Transactions: The module covers Secure Socket Layer (SSL)
protocols; certificate authority and X.509; certification validation and
revocation; online certification status protocol; OpenSSL utilities. Laboratory
exercises guide students to configure SSL on a web server and to create and
sign server certificates.
Web Application Threat Assessment: The lecture covers attacks exploiting
vulnerabilities occurred during construction of web application, such as SQL
injection, cross site scripting (XSS), and poor authentication. Laboratory
exercises guides students to understand various vulnerabilities and
countermeasures via a preconfigured vulnerable web server utilizing OWASP
WebGoat.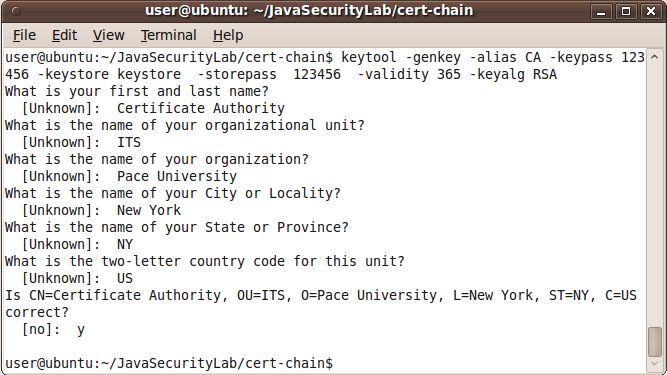
Secure Web Application Development| 2
Web Server Security Testing: The lecture covers application penetration
testing; web server load balancing; and distributed denial of service attacks.
Laboratory exercises guide students to conduct penetration testing to an
intentionally vulnerable web server on a local virtual machine, BadStore.com.
Vulnerability Management: The lecture covers basic concepts on software
vulnerability database and vulnerability discovery. The countermeasures to
two web specific vulnerabilities, SQL injection and XSS, are discussed.
Laboratory exercises guide students to investigate and to modify the Perl CGI
script of a web server that has both the SQL injection and XSS vulnerabilities.
Introduction to Web Services: The lecture covers service-oriented
computing and architecture; web service for integrating heterogeneous
information systems across the networks; service interface methods and
method invocation data with XML dialects WSDL and SOAP. Laboratory
exercises guide students to configure and secure a simple web service
application.
Java Security: This lecture introduces the concepts and tools for supporting
Java security framework and key management. The laboratory exercises guide
students to review Java security framework, secure file exchange using Java
security API and keys, and protect their computers from insecure Java
applications.
VM: SWEET virtual machines in Ubuntu.
Ubuntu VM for SWEET (ubuntu10tm.zip): This virtual machine includes all
the software and configurations that are needed to run the exercises in the
tutorials and the SWEET teaching modules. It includes Ubuntu Linux 10 with
Apache, Tomcat, Java, WebGoat, Badstore, ZAP, Paros, OpenSSL and other
security software.
Ubuntu VM basic (ubuntu10.zip): A clean-slat Ubuntu Linux 10 virtual
machine with no additional web applications and security tools. Students can
learn to install web applications and tools from scratch.
Tutorials: Linux tutorial and HTML tutorial. The two tutorials introduce students
to web application development and Linux. Students with limited background in
these two areas can learn the fundamental concepts in a nutshell.
Linux Tutorials: This tutorial introduces students to basic concepts in Linux
utilizing an Ubuntu Linux virtual machine. Laboratory exercises guide
students to be familiar with basic commands and applications in Ubuntu
Linux.
HTML-XML Tutorials: This tutorial provides the fundamental concepts of
Web computing, XHTML and Cascading Style Sheets. It also explains how
HTTP protocol supports Web browser and Web server interactions and
different ways of maintaining session data. Laboratory exercises guide
students to build simple web pages using HTML-XML and to observe HTTP
transactions.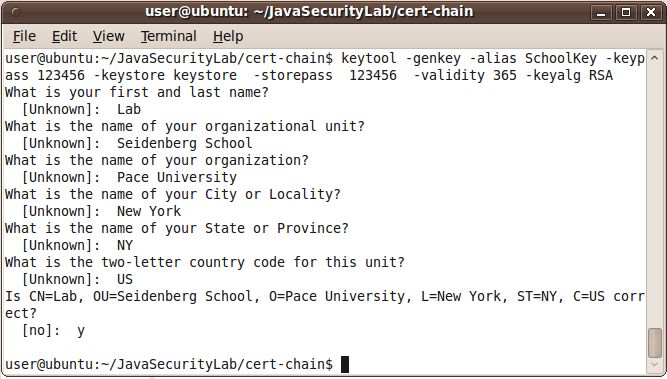
Secure Web Application Development| 3

   2. Virtual Machine Setup for Laboratory Exercises

Exercise 2.1: Virtual Machine Installation

1. Download and install either VMware player (for Windows) or VMware Fusion (for
   MacOS) from http://downloads.vmware.com/.
2. Copy all DVD materials to your computer where you will run the exercises.
   Alternatively, you can download updated materials from
   http://csis.pace.edu/~lchen/sweet/.
3. On your computer, under the folder VM, extract unbuntu10tm.zip to obtain the virtual
   machine.

Exercise 2.2: Boot up Linux Virtual Machine

1. After VMware Player (or VMware Fusion) is installed, run the software and you
   should see a blue VMware Player Window pops up. Click on “Open a Virtual
   Machine” and select “Ubuntu10tm.vmx” from the “ubuntu10tm” folder under the
   ubuntu10tm folder.
2. Click on “play virtual machine”. When being asked “Did you move this virtual
   machine, or did you copy it?” check “copy it”.
3. When being asked “Would you like an attempt to be made to connect this virtual
   device every time you power on the virtual machine?”, press “No” to avoid
   connecting to a virtual floppy.
4. When being asked if you would like to download VMware tools for Linux, answer
   “remind me later.” Linux will boot up in about 2-3 minutes.
5. Login Linux using username “ubuntu10tm” and password “123456”. After logging
   in, you will see Ubuntu 10 GNOME interface. The virtual machine runs Linux as if it
   is an independent computer. Actually, the Linux is run in the memory of the
   computer and simulate another physical machine that the virtual machine (VM) was
   created.
Secure Web Application Development| 4
6. Once you logging in the system, you will see the Linux desktop, which looks like the
screen below.
7. Below are some basic skills to use a virtual machine
To start directing mouse and keyboard input to a running virtual machine, type
Ctr+g or click anywhere in the virtual machine window.
To start directing mouse and keyboard input to the host PC, type Ctr+Alt.
To get the logon window for Windows, use Ctr+Alt+Insert, instead of
Ctr+Alt+Delete.
Scroll the bar on the right and at the bottom of the virtual machine window to see
a wider screen.
To transfer files between the host and a running Windows virtual machine, just
drag-and-drop the files.
USB disk is also a convenient way for transferring files between the host PC and
a virtual machine. Inserting a USB disk to your PC when the virtual machine is
active will attach the USB disk to the virtual machine.
8. Check out the menu bar for Linux GUI on the top panel of the window. The menu bar
includes Applications (similar to Windows Start Panel), Places (all devices and
storages), and System (Linux system functions).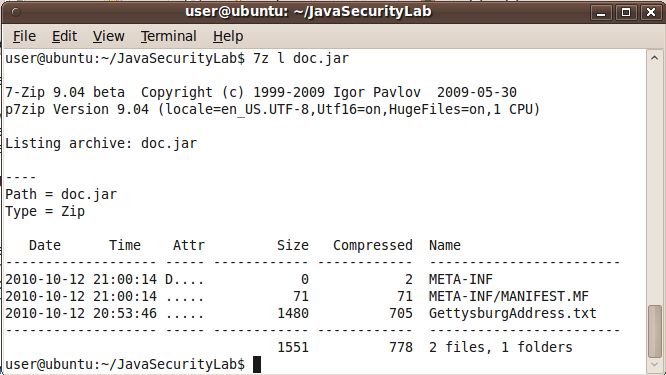
Secure Web Application Development| 5

Exercise 2.3: Basic Linux Commands
1. Click on Applications, Accessories and Terminal (You may need to scroll the
   window down to see Terminal if your screen is not big enough).
2. It opens up a Linux command prompt like the screen below.

3. Try Linux commands under the command prompt “user@ubuntu~$” (we will use $
   referring the command prompt for all the instructions below). We will practice
   several basic Linux commands. For more Linux commands, please read the Linux
   Tutorial.
4. Try the following to see the files in this directory.
         $ls -al
   Question 1: What are your results from “ls –al”? Copy and past the last three lines
below.
   Question 2: What does each line above mean? Please explain it. (Hint: In Linux, if
   you do not what a command mean, simply type “man command-name” to figure it
   out. For example, in this case, you can type “man ls”)
Secure Web Application Development| 6
Exercise 2.4 Turn off Virtual Machines
1. If you plan to continue the exercises, you come back later for instructions to turn off
the virtual machine once you are done. Otherwise, turn off your virtual machine as
instructed in this exercise.
2. After finishing the exercise, you should reset and close all applications, which may
include the following:
Firefox proxy setting should be reset so that it stops using the proxy server.
Otherwise you would not be able to visit web sites without running the proxy
server at port 8088. To do so, Launch your Firefox web browser, and follow its
menu item path “Edit|Preferences|Advanced|network Tab|Settings button” to
reach the “Connection Settings” window. Check the “Use System Proxy Settings”
checkbox.
Close all applications, such as Firefox, ZAP, Paros, Web Scarab, etc.
Close Terminal Windows (type “exit” under command line.)
3. Click on the power button on the VM and turn it off.
Secure Web Application Development| 7

    3. Web Server Security Testing

Security Practices for Software Verification

Security practices in OpenSAMM1 are incorporated in four stages of software
development: governance, construction, verification, and deployment. This document
will introduce the security practices to be performed in the verification stage and provide
laboratory exercises illustrating some of the practices. Based on OpenSAMM,
verification is focused on

“the processes and activities related to how an organization checks and tests artifacts
produced throughout software development. This typically includes quality assurance
work such as testing, but it can also include other review and evaluation activities.”

The purpose of verification is to inspect the software for security vulnerabilities before it
is deployed. The security practices for this stage include design review, code review and
security testing. All three practices are used to identify specific security vulnerabilities
embedded in the software but each examines the software at a different level respectively.
Design review assesses the design and architecture of the software while code review
examines the source codes and security testing inspects the software at the runtime
environment. Design review includes reviewing the software design for potential security
risks and attacks, examining security mechanisms embedded in the design, and reviewing
data-flow diagrams to protect sensitive information assets. Code review includes
reviewing source codes against a list of security requirements, applying automatic code
review tools and customizing code review for application specific concerns. Security
testing include testing software security using test cases derived from known security
requirements, conducting penetration testing and utilizing automatic tools for testing
application specific concerns. We will focus on the activities and tools that can be used to
conduct these security testing.

Software Security Testing

Security testing assesses a software system from attackers’ perspective. It evaluates if
your software performs as it is not supposed to do and if its security mechanism works as
it is supposed to be. For example, when testing the security of a web server, the tester
needs to evaluate the security mechanisms utilized by the server, such as HTTPS for
server authentication and login method for client authentication, and to assess if the
server is subject to vulnerabilities such SQL injection or cross site scripting.
The most commonly used security testing method is penetration testing, which discovers
software vulnerabilities by breaking into it. In this case, testers assume the role of
attackers to create testing scenarios based on their knowledge to break into the software

1
  The Open Web Application Project (OWASP), Software Assurance Maturity Model, Version 1.0,
released March 25, 2009, , available at http://www.opensamm.org/.
Secure Web Application Development| 8
system using customized scripts or automatic tools. The effectiveness of penetration
testing in terms of uncovering vulnerabilities depends on the experience of the testers
since the development of the testing scenarios could be objective.
Fault injection and fuzzing are two common methods for conducting penetration testing.
Both fault injection and fuzzing utilize unexpected inputs to observe how a software
system would perform. While fault injection specifically crafts malformed inputs based
pre-defined threat models or error handling paths, fuzzing enumerates all possible inputs,
either valid or invalid. These two terms sometimes are used interchangeably in the
industry.
Web application security testing involves examining the security of HTTP and HTTPS
protocols, reviewing input validations and error handling, and evaluating authentication
methods and the vulnerabilities of web protocols used, such as XML related protocols.
OWASP’s Application Security Verification Standard2 provides a guideline for putting
web application verification in place. There are various automatic tools to conduct web
application security testing, such as SPIKE Proxy3, WebScarab4, Paros5, BurpIntruder6,
and ZAP7 etc.
Laboratory Exercises
From this lab, you will learn about
How to discover vulnerabilities, such as authentication weakness or hidden
pages, on a web server
Investigate fixes to these vulnerabilities
Exercise 3.1 Setup the Proxy Server
We will investigate the web traffic between your browser and the BadStore.net using a web proxy
called ZAP on a same virtual machine. All web communication between the browser and the Web
server will be sent to ZAP (the proxy server) first before it reaches the appropriate destination.
We will be browsing BadStore.net or investigate its vulnerabilities.
Step 1: Make sure Tomcat server is not running, otherwise go to Select Applications >
Accessories > Terminal. Run following command in the terminal window to shut down tomcat
tomcat-stop
2
The standard is available at
http://www.owasp.org/index.php/OWASP_Application_Security_Verification_Standard_%28ASVS%29.
3
Available at http://www.immunitysec.com/resources-freesoftware.shtml.
4
Available at http://www.owasp.org/index.php/Category:OWASP_WebScarab_Project.
5
Available at http://www.parosproxy.org/.
6
Available at http://www.portswigger.net/intruder/.
7
Available at http://code.google.com/p/zaproxy/.Secure Web Application Development| 9
Step 2: Open a Firefox browser to browse BadStore.net by typing the IP address of the VM in
Exercise I in the URL e.g http:// IP ADDRESS/badstore (DO NOT browse www.badstore.net
directly since it will redirect you to original website if you have an Internet connection).
Step3: We will then use ZAP to investigate the web traffic. To start ZAP, run these commands in
the terminal window:
cd ~/tools/zap
sh zap.sh
The Java-based ZAP will execute and you will be greeted with its interface.
Step4: Now, you will need to change the proxy server settings in Firefox to redirect the web
traffic to the proxy server. The proxy server is run under localhost (127.0.0.1) and port 8088.
1) Go back to your browser. Select Edit > Preferences > Advanced > Network Tab > Settings.
2) Select the Manual Proxy Configuration radio button.
3) Enter these values into the fields: HTTP: 127.0.0.1 Port: 8088
4) If there are any values in the No Proxy For: text field, delete them. This is important to make
the proxy work successfully.
Step5: Refresh your browser. You should see that ZAP has intercepted the transactions between
the browser and the Badstore site. You have just enabled all HTTP traffic generated by Firefox to
be sent to the running ZAP proxy server which can analyze HTTP traffic before it is sent off to its
final destination.
Exercise 3.2 Crawling Web Pages and Hidden Web Directories
In order for an attacker to successfully plan and execute an attack, the attacker
must know the website’s layout and all the pages that might be available for exploitation.
While manual web crawling is an option, it is a very time consuming process. An
automated web crawler application will speed up the mapping process significantly.
1. You will use ZAP to crawl the BadStore website IP address so you can see what
pages are available.
2. Switch to the ZAP application and click File > New Session and click OK to
have ZAP start a new session and purge itself from any logged content.
3. In the Sites panel on the left will be all the websites that ZAP is logging. It is
currently blank, change to the Firefox application and refresh BadStore web page
(You may have to clear recent browsing history first to reload the page. Tools >
Clear Recent History)S e c u r e W e b A p p l i c a t i o n D e v e l o p m e n t | 10
4. Switch back to ZAP and you will see an arrow next to Sites that is point to the
right. Click the arrow to un-collapse the logged websites. You will see the IP
address of BadStore website.
5. Click on the small arrow on the left of the Badstore IP address to collapse
everything on this site. You should be able to see badstore as a sub-directory.
Right click on badstore and select Attack and Spider site to crawl through the
Badstore site.
6. Once crawling has begun, the main ZAP window will begin to populate with web
pages and images that are hosted within BadStore.
In the bottom pane of the main screen, you will see a URL found during crawl:
panel. Notice that it is located under the Spider tab near the bottom.
7. Looking through the entries, you will notice that most the web cgi pages are
located in the /cgi-bin/ directory but some are not. List one other directory that
ZAP had crawled and one file under this directory
Directory name:__________________
File name: __________________
8. Briefly explain what information one might obtain by crawling a web site.
___________________________________________________
9. What is the potential risk for a web site being crawled?
_______________________________________________________________
Exercise 3.3 Scanning For Known Vulnerabilities
In the previous exercise, you have mapped BadStore.net; in this exercise you will
execute a vulnerability scan on BadStore.net.
1. In the ZAP Sites panel, right click on BadStore. Click on Attack and Active Scan Site.S e c u r e W e b A p p l i c a t i o n D e v e l o p m e n t | 11
2. Once the scan is finished, the results can be viewed on the bottom panel of the ZAP
application under the Alerts tab. Click on the Alerts tab to see the vulnerabilities
discovered.
3. The vulnerabilities are called alerts and are classified as High, Low, and Medium. List
two vulnerabilities from the report and explain the countermeasures to fix them.
10. Vulnerability 1:
__________________________________________________________
Countermeasure 1: ___________________________________________________
Vulnerability 2:
__________________________________________________________
Countermeasure 2:
______________________________________________________
4. Not all web crawlers and web vulnerability scanners are as robust. Commercial web
crawlers and vulnerability scanners may perform a much more complete crawl and may
list more potential vulnerabilities.
Exercise 3.4 Accessing More Hidden Pages
Looking at the BadStore.net webpage structure you will find nothing that really
stands out. This is because there is a hidden webpage which provides the administrative
console. Web crawlers will only crawl the pages that are available through links. The
process of finding these hidden web pages is called Forced Browsing and there are
special tools to perform this task automatically. The process can also be done manually
but can be very time consuming. For the sake of time, the hidden administrative webpage
is provided to you in this exercise.
1. The hidden webpage reside under the cgi-bin directory of BadStore.net. For an attacker
to be able to discover this hidden webpage he/she would need to understand URL
structure and syntax and all the technologies that comprise a web application.
2. Since most of the links on the left panel of BadStore.net have the same URL prefix, the
only part of the URL that is changed is what follows after action=
3. What do you think happens when you append admin to action= ?S e c u r e W e b A p p l i c a t i o n D e v e l o p m e n t | 12
If you are browsing Badstore.com on a different VM, browse
http:// IP ADDRESS /cgi-bin/badstore.cgi?action=admin
4. What is the result of this URL ?
5. List 3 actions that administrators can take.
__a.________________________________________________________
__b.________________________________________________________
__c.________________________________________________________
6. Select an action and click Do It. What happens?
__________________________________________________________
7. Somehow we must gain administrative privileges to perform these actions. The ability to
perform these actions is very lucrative to attackers. The ability to gain administrative
privileges will be demonstrated in the next exercise.
Exercise 3.5 Privilege Elevation via Parameter Tampering
In this exercise you will examine the vulnerability present with parameters that
are set and sent from the client to the server. This vulnerability was not present in the
ZAP vulnerability assessment. You will capture a server request that is sent when you
register for an account. You will modify that hidden parameter that is contained in the
request to escalate your account from the users privilege group to the administrators
privilege group.
1. With Firefox on the BadStore.net webpage, visit the Login/Register link in the left pane.
2. You are going to register for a new account, but before you register you are going to
switch to ZAP and configure the application proxy to capture the register HTTP request
as it leaves the browser so that you are able to manipulate the request’s parameters before
it continues to the BadStore.net server.
3. In ZAP, click on the set break bottom (the green round button under the top menu ).
The button will change from green to red once set. This will trap any request that is sent
from the Firefox browser.S e c u r e W e b A p p l i c a t i o n D e v e l o p m e n t | 13
4. Go back to the BadStore.net website and start filling out the registration form to Register
for a New Account. Write down your registration information below for reference.
Full Name: _________________________________________________
Email Address: _________________________________________________
Password: _________________________________________________
5. Once every field is filled, click Register and switch back to ZAP.
6. Once you switch back to ZAP, clicking on the break tab, you will see the register HTTP
request that was intercepted by ZAP. There will be a hidden Parameter Name “role”. Its
current value is “U”, which refers to regular user privilege. Replace “U” with “A” and
uncheck the Trap request checkbox. Hit Continue (the blue right arrow under the top
menu) to let the HTTP request reach the server.
(Note: if you put the view in tabular view, and change the role to "A" it will not register,
but if you leave it in Raw View and just scroll down to the role section and change the
"U" to an "A" it works.)
7. Switch back to the BadStore.net website. Everything looks the same but the Welcome
banner, which welcomes whatever account you had created. So how do you use your
newly escalated administrative rights? Go back to the hidden administrative page.
Exercise 3.6 Compromising Passwords
You have access to all the administrative abilities listed on the secret
administration page. In this exercise you will concentrate on the Show Current Users
ability. You will be compromising user’s passwords to create a backdoor.
1. Having your account privileges escalated, visit the hidden administrator’s web page.
http:// IP ADDRESS /cgi-bin/badstore.cgi?action=admin
2. From the drop down menu, select Show Current Users and click Do It.
3. You have just hit the jackpot. You will see all the registered user’s email addresses,
hashed passwords, password hints, full names and roles.
4. You want to get the account passwords for all the other administrative users since regular
users (role U) and suppliers (role S) are trivial.S e c u r e W e b A p p l i c a t i o n D e v e l o p m e n t | 14
5. List the password hash of the administrator.
Password Hash: _______________________________________________
6. The passwords are hashed using the MD5 algorithm. MD5 is known as a weak hash
function than can be easily cracked using the hash databases. There are many freeware
programs that will try MD5 hashes of common words and compare them to the MD5
hash that you provide in order to find a match. Once you find a match you know that you
have cracked the password.
7. There is an online MD5 cracker that has the world’s largest MD5 hash database. Visit
http://www.cmd5.org/default.aspx if you have an Internet connection. Otherwise, use the
table below to crack the MD5 hashes that you have recorded above.
Password MD5 hash
welcome 40be4e59b9a2a2b5dffb918c0e86b3d7
admin123 0192023a7bbd73250516f069df18b500
apple 1f3870be274f6c49b3e31a0c6728957f
Welcome 83218ac34c1834c26781fe4bde918ee4
badpass123 909d49a643874753d1a68ea87f379925
8. What is the password? ________________
9. Go back to Login/Register page on Badstore site. Use “admin” as the email address and
the password you discovered before to login. You should be able to login as the “Master
System Administrator”.
10. Explain briefly how the MD5 cracker works in order to crack the above password.
__________________________________
11. Explain briefly the vulnerability of the web server which you have just exploited in this
exercise.
_____________________________________________________________________
12. Explain briefly how you exploit the vulnerability in this exercise.
_____________________________________________________________________
13. Describe a countermeasure to fix the vulnerability.
_____________________________________________________________________S e c u r e W e b A p p l i c a t i o n D e v e l o p m e n t | 15
4. Java Security
Java is a popular programming language for server-side computing for two main reasons.
First it is among the first languages that support the more efficient light-weight threads,
instead of the heavy-weight processes, to support multi-tasking and multi-processor
computing which have important impact on server performance. Second as an interpreted
language it could check each bytecode instruction for security vulnerabilities just before
the instruction is scheduled to run. At the same time Java is also popular on client
platforms. Java JRE plug-ins enable web browsers to run Java applets to extend browser
functionality, and standalone Java applications provide GUI-rich services running
directly on the operating systems. This tutorial introduces the concepts and tools for
supporting Java security.
Since the Java applets are downloaded from the web and not explicitly activated by the
users, they introduce severe security concerns. By default all applets always run under the
constraints of a Java security manager. The example constraints for applets include
Applets cannot access user computer resources like keyboard and files.
Applets can only communicate with the web site from which they were
downloaded.
In this tutorial you will learn how to assign special rights to secure applets so they could
provide more functionality.
On the other hand, by default Java applications are usually activated by the users and thus
considered safe and not constrained by the Java security manager. But if an application is
downloaded from the web, we would not be sure of its security. In this tutorial you will
learn how to run such stand-alone applications under the supervision of the Java security
manager so you could control which resources of yours could be used by the applications.
In the tutorial “Introduction to Cryptography” you learned how to use GPG (GNU
version of PGP) to generate public/secret keys and digital signatures to secure data
communications. Java has utilities to accomplish the similar tasks. Java also has
application programming interfaces (API) to secure applications. In this tutorial you will
learn how to secure your applets and applications with Java security utilities, and review
sample Java code to see how selected security tasks could be accomplished with the Java
APIs.
Question 1: Why is Java popular for server-side or enterprise computing?
Question 2: What are the main differences between Java applications and Java applets?
Question 3: Why the Java platform normally trusts applications but not applets?
Question 4: What are the differences between Java utilities and Java API?S e c u r e W e b A p p l i c a t i o n D e v e l o p m e n t | 16 Basic Terminology Encryption/decryption algorithms are the basic tools for computer security. To encrypt a plain document, we need a key, which is a small piece of fixed-length data. The encryption algorithm reads the plain document and a key and produces the encrypted document. The decryption algorithm reads the encrypted document and a corresponding key to regenerate the original plain document. There are two categories of encryption/decryption algorithms. The symmetric or secret key algorithms use the same key for encryption and decryption. These algorithms are more efficient for encrypting/decrypting large volume of data. The public key algorithms use a pair of public and private keys: if a document is encrypted by one of the two keys, the other key can be used to decrypt the document. These algorithms are mainly for secret key exchange, identity authentication and data validation. For a person to distribute a document secretly, he could first generates a pair of private/public keys as his own identity (he could reuse these keys), use the private key to encrypt the document, and send the encrypted document and the public key to the receiver. The receiver then can use the public key to decrypt the document, and be assured that the document is from the sender (identity authentication) and the document has not been modified (data validation). But here we assume that the public key itself has been distributed in a secure way, which is normally implemented with digital signatures and certificates explained below. Sometimes the document contents are public, and we just need to assure the document receiver that the document is originated from the right sender and it has not been modified along the way. In this case you could use digital signatures to achieve sender identity authentication and data validation without the time-consuming encryption/decryption process for the document itself. The document is first transformed by a hash function (typically MD5 or SHA1) into a fixed-length short sequence of bytes, called a fingerprint, so that each byte of the fingerprint depends on many characters of the document and any change to the document would change the fingerprint with high probability. The fingerprint is then encrypted with the sender’s private key into a fixed- length digital signature. As long as the receiver gets a copy of the plain document, its digital signature, and the sender’s public key, the sender could reproduce the fingerprint from the digital signature and the sender’s public key, generate his own copy of fingerprint from the plain document, and compare the two fingerprints. If they are the same, the document was originated from the sender and it has not been compromised along the way. Otherwise the document should not be trusted. Now we can consider the earlier problem of how we could securely distribute the public keys, a critical step in identity authentication and data validation. A digital certificate is used to certify the identity and public key of a digital signer, who is a person or a company and needs to assure other people of the authenticity of his documents or applications). A certificate is a small record containing the digital signer’s public key and identity information (work unit, company, address), and the digital signature of the public key and identity information generated with a private key of the certifier, the person or
S e c u r e W e b A p p l i c a t i o n D e v e l o p m e n t | 17

company that certifies the authenticity of information in this certificate. If the certifier is
the digital signer himself, the certificate is self-certified and it does not authenticate the
information in the certificate. If the certifier is another person or company trusted by a
user of the certificate, then the user’s trust to the certifier can now be used to authenticate
the information in the certificate. A few certificate authority (CA) companies, including
VeriSign and GTE, are set up and supposed to be trusted by the public, and their self-
certified certificates are distributed to user computers as trusted certificates either by
software (OS or application) installation, or by the user’s agreement. To distribute his
public key to the public, a signer generates a self-certified certificate containing his
public key and identity information, sends it with payment to one of the CAs to apply for
certifying the certificate by the CA for a period of time (six month or longer). The CA
would verify the signer’s information, replace the self-certified certificate with the one
certified by the CA, and send it back to the signer for distribution. The trust chain
described here could be extended: If A certifies B, B certifies C, and C certifies D; and
the user trusts A, then the user can trust B, C and D too.

From the above discussion you can see that the key/certificate management is critical to
the security of a computer.

Question 5:    What is identity authentication?

Question 6:    What is data validation?

Question 7:    What is the most important task in computer security based on cryptography?

Question 8:    What is the difference between a fingerprint and a signature of a document?

Question 9:    What is the difference between a public key and its digital certificate?

Java Security Framework

A computer may have multiple users. Each user has its own home folder. Let us assume
that a user John has login name “john”. If the computer runs Windows, John has
“C:\users\john” as his home folder, which has “file://C:/users/john” as its URL. If the
computer runs Linux, John has “/home/john” as his home folder, which has
“file:///home/john” as its URL.

When you install Java JDK on a Linux computer, the folder holding the JDK installation
is called the Java home (we represent it with [Java home] in this document), and the
folder “jre” nested inside the Java home is called the Java JRE (Java runtime
environment) home (we represent it with [JRE home] in this document). If you install
Java JDK on a Windows computer, by default your Java home folder is “C:\Program
Files\Java\jdk1.x_y” (where x and y specify version numbers); if you also see a folder
“C:\Program Files\Java\jre#” (where # is a number), your Java JRE home folder is
“C:\Program Files\Java\jre#” (replacing # with the actual digit). Most Java utilities for
S e c u r e W e b A p p l i c a t i o n D e v e l o p m e n t | 18

security management are in folder “[Java home]/bin”, so it is important to include this
“bin” folder in the operating system “PATH” value. Most Java security policy related
files are in folder “[JRE home]/lib/security”.

The security manager is the main mechanism for Java to assign access rights to Java
programs. All applets always run under the control of the Java security manager and there
is no way to opt out. A Java application, Java program that runs outside of a web
browser, by default doesn’t run under the control of a security manager so it has full
rights on the computer. If you don’t completely trust this application, you should run the
application under the control of the Java security manager with a Java command-line
switch as shown below:

   Java         -Djava.security.manager               [Java Class Name]

Following the principle of separating policies from the mechanisms, the Java security
manager does not hard code access rights to Java programs. When an applet or a
application using Java security manager starts, Java security manager first reads file
“[JRE home]/lib/security/java.security” to find where to load the java security policy files
in the order specified by lines similar to

   policy.url.1=file:${java.home}/lib/security/java.policy
   policy.url.2=file:${user.home}/.java.policy

where the value of “policy.url.1” specifies the default security policy in file “[JRE
home]/lib/security/java.policy” (SUN chose a bad name “java.home” to indicate what we
call JRE home) for all users; and the value of “policy.url.2” specifies that the security
policy in file “[user home]/.java.policy” (don’t forget the leading period); if user name is
“john”, “[user home]” is “home/john” or “~” on a Linux computer, and “C:\users\john”
on a Windows computer) for a particular user. You could also insert lines like

   policy.url.3=file:${user.home}/john.policy

to add the extra Java policy files with decreasing priority. A policy file loaded later could
override policies specified in a policy file loaded earlier.

While you are not supposed to modify file “[JRE home]/lib/security/java.policy”, you
could freely modify file “[user home]/.java.policy” to modify existing policies and add
new policies. The contents of Java security policy files have strict syntax requirements so
it is easier to use the graphic user interface of Java utility “policytool” to review, edit,
insert and delete policies.

Question 10:   What is the home folder of user on the ubuntu10 VM? How to write it in URL
format?

Question 11: What is your home folder on your Windows PC if your login name is “john”?
How to write is in URL format?
S e c u r e W e b A p p l i c a t i o n D e v e l o p m e n t | 19
Question 12: What is the difference between Java JRE and Java JDK?
Question 13: Which folder holds the most important Java security files?
Question 14: Which file specifies the location of your Java security policy files?
Question 15: Which is your default personal Java security policy file?
Question 16: Which Java utility is for helping you create Java security policy files?
Question 17: What is the Java security manager? When is it used?
Key Management
Java maintains public/private key pairs and digital certificates in keystore files with any
file names and at any file system locations. A computer can have multiple keystore files.
You can use Java utility “keytool” to create a new public/private key pair and insert it
into an existing keystore file, or create a new keystore file first if necessary. A keystore
file is protected by a keystore password. Each public/private key pair in the keystore is
also protected by its own key password, which could be the same as the keystore
password. When you create a new public/private key pair, you assign an alias or
nickname to the pair for you later referring to the pair.
For more information on Java security, please visit the “Java SE Security” page at
http://www.oracle.com/technetwork/java/javase/tech/index-jsp-136007.html.
Question 18: Where are public/private keys normally stored?
Question 19: Which Java utility helps you maintain keystores?
Laboratory Exercises
In this lab you will
1. Learn and practice how to review your current Java policies;
2. Learn and practice how to create a Java applet, observe how it is limited in
accessing system resources, and create a policy to enable it to access some system
resources;
3. Learn and practice how to run a Java application with Java security manager, and
create a policy to enable it to access some system resources;
4. Learn and practice how to use a Java utility to create public/private key pairs and
digital certificates;S e c u r e W e b A p p l i c a t i o n D e v e l o p m e n t | 20
Exercise 4.1 Reviewing Java Security Framework
1. Start a terminal window in home folder ~ with menu item
“Applications|Accessories|Terminal”.
2. Run “cd ~/JavaSecurityLab” to change the work folder to “~/JavaSecurityLab”.
3. Run “gedit GetProperties.java” to review the source code of file
“GetProperties.java” as shown below:
class GetProperties {
public static void main(String[] args) {
String s;
try {
s = System.getProperty("os.name", "not specified");
System.out.println(" Your operating system is: " + s);
s = System.getProperty("java.version", "not specified");
System.out.println(" Your Java version is: " + s);
s = System.getProperty("user.home", "not specified");
System.out.println(" Your user home directory is: " + s);
s = System.getProperty("java.home", "not specified");
System.out.println(" Your JRE installation directory is: " +
s);
s = System.getProperty("java.ext.dirs", "not specified");
System.out.println(" Your Java extension directories are: " +
s);
} catch (Exception e) {
System.err.println("Caught exception: " + e);
}
}
}
“os.name”, “java.version”, “user.home”, “java.home” and “java.ext.dirs” are Java
property names for OS name, Java version, user home folder, Java JRE home
folder, and Java extension folders. Method “String System.getProperty(String
name, String defaultValue)” returns the value of the specified Java property name,
or the default value if the property name is not defined.
4. Run “javac GetProperties.java” to compile the source code into bytecode file
“GetProperties.class”.
5. Run “java GetProperties” to execute file “GetProperties.class”. You will see the
following printout:
Your operating system is: Linux
Your Java version is: 1.6.0_16
Your user home directory is: /home/user
Your JRE installation directory is:
/home/user/tools/jdk1.6.0_16/jre
Your Java extension directories are:
/home/user/tools/jdk1.6.0_16/jre/lib/ext:/usr/java/packages/lib/ext
6. Click on menu item “Places|Home Folder” to launch the file explorer, and click to
drill down to folder “/home/user/tools/jdk1.6.0_16/jre/lib/security”.S e c u r e W e b A p p l i c a t i o n D e v e l o p m e n t | 21
7. Right-click on file “java.security” and choose “Open with gedit” to review the
contents of the file. Scroll to find the following two lines.
policy.url.1=file:${java.home}/lib/security/java.policy
policy.url.2=file:${user.home}/.java.policy
8. Right-click on file “java.policy” and choose “Open with gedit” to review the
contents of the file. The following first “grant” statement
grant codeBase "file:${{java.ext.dirs}}/*" {
permission java.security.AllPermission;
};
grants all permission to all Java Jar files in Java extension folders. The second
“grant” statement enables all Java programs to read selected Java properties.
Java has two folders for extending its functions. Folder “[JRE home]/lib/ext” is
for holding Jar files (zipped Java classes) used when these classes are not found in
the standard Java library. The folder “[JRE home]/lib/endorsed” is for holding Jar
files overriding the same named classes in the standard Java library.
9. Run “cd ~” to change work folder to be the user home folder. Run “ls -alg” to
verify that there is no file “.java.policy” in the user home folder yet.
Question 20: What are the two major vulnerabilities of Java security framework?
Question 21: How should you resolve the vulnerabilities of Java security framework?
Exercise 4.2 Creating Public/Private Keys and Digital Certificates
1. Launch the Ubuntu VM with username “user” and password 12345678.
2. Start a terminal window in home folder ~ with menu item
“Applications|Accessories|Terminal”.
3. Run “cd ~/JavaSecurityLab” to change the work folder to “~/JavaSecurityLab”.
4. Run Java utility “keytool” as in the following line (on the same line, no line
break) to create a pair of public/private keys, assign alias “PaceKey” to this pair
of keys, assign key password “Seidenberg” to this air of keys, create a new
keystore file “PaceKeystore” and set its keystore password to be “Pace” if there is
no such a file in the current folder yet, access keystore file “PaceKeystore” with
keystore password “PaceUniversity”, and insert the new key pair in the keystore.
keytool -genkey -alias PaceKey -keypass Seidenberg -keystore
PaceKeystore -storepass PaceUniversityS e c u r e W e b A p p l i c a t i o n D e v e l o p m e n t | 22
When prompted, enter “John Smith” as first and last names, “Seidenberg” for
organizational unit, “Pace University” as organization, “New York” as city, “NY”
as state, “US” as name of two-letter country code, and “y” to confirm your
information. The information that you just entered interactively is called your
distinguished-name information. Since you don’t have a keystore file
“PaceKeystore” in the current folder, this file is created in the current folder. This
command also stored in this keystore a pair of new public/private keys and a self-
certified digital certificate that includes the public key and the distinguished-name
information. This certificate will be valid for 90 days, the default validity period if
you don’t specify a –validity option. The certificate is associated with the
public/private key pair in a keystore entry referred to by the alias “PaceKey”.
user@ubuntu:~/JavaSecurityLab$ keytool -genkey -alias PaceKey -
keypass Seidenberg -keystore PaceKeystore -storepass PaceUniversity
What is your first and last name?
[Unknown]: John Smith
What is the name of your organizational unit?
[Unknown]: Seidenberg
What is the name of your organization?
[Unknown]: Pace University
What is the name of your City or Locality?
[Unknown]: New York
What is the name of your State or Province?
[Unknown]: NY
What is the two-letter country code for this unit?
[Unknown]: US
Is CN=John Smith, OU=Seidenberg, O=Pace University, L=New York,
ST=NY, C=US correct?
[no]: y
If you don’t specify the keystore file name, “keytool” will use the default file “[user
home]/.keystore”.
5. Run the following command to export a copy of your newly generated public key,
with alias “PaceKey”, in a self-certifying digital certificate file “PaceKey.cer”.
keytool -export -keystore PaceKeystore -alias PaceKey -file
PaceKey.cer
“keytool” will ask you for the keystore password “PaceUniversity”, and then
generate the new certificate file “PaceKey.cer”.
user@ubuntu:~/JavaSecurityLab$ keytool -export -keystore
PaceKeystore -alias PaceKey -file PaceKey.cer
Enter keystore password: PaceUniversity
Certificate stored in file
6. Run “keytool -printcert -file PaceKey.cer” to review the contents of the certificate
in file “PaceKey.cer”, and “keytool” will print out the following information:S e c u r e W e b A p p l i c a t i o n D e v e l o p m e n t | 23
user@ubuntu:~/JavaSecurityLab$ keytool -printcert -file PaceKey.cer
Owner: CN=John Smith, OU=Seidenberg, O=Pace University, L=New York,
ST=NY, C=US
Issuer: CN=John Smith, OU=Seidenberg, O=Pace University, L=New York,
ST=NY, C=US
Serial number: 4ca4dd45
Valid from: Thu Sep 30 11:56:05 PDT 2010 until: Wed Dec 29 10:56:05
PST 2010
Certificate fingerprints:
MD5: CA:09:3C:EC:12:D9:5D:20:E8:1E:6A:FB:88:CE:B2:18
SHA1:
F7:CD:4B:18:66:55:C8:2B:BB:9E:AD:92:A8:DF:54:9A:F7:96:93:E7
Signature algorithm name: SHA1withDSA
Version: 3
Note the certificate fingerprints in MD5 and SHA1 formats. If you send this
certificate to a friend, you could both run this command to find the fingerprints of
this certificate, and compare them to see whether the certificate (signed public
key) has been compromised in transit.
7. If you were doing the real work, you may now contact one of the CAs, send it
your self-signed certificate file “PaceKey.cer” with your payment, and the CA
will verify your distinguished-name information and send back to you your digital
certificate signed by the CA. The CA certified certificate is the one that you are
supposed to distribute to your partners. In this tutorial we skip this step and just
distribute the self-certified certificate in file “PaceKey.cer”.
8. In the real situation, your digital certificate should be distributed to your partners,
and imported to your partners’ keystores. In this tutorial you will also act as your
partner. You will import the newly generated digital certificate in file
“PaceKey.cer” into a new keystore file named “receiverKeystore” in the current
folder with the following command
keytool -import -alias Pace -file PaceKey.cer -keystore
receiverKeystore
Upon being asked for keystore password, enter “123456”. When being asked
whether you trust this certificate, respond with “y” for yes.
user@ubuntu:~/JavaSecurityLab$ keytool -import -alias Pace -file
PaceKey.cer -keystore receiverKeystore
Enter keystore password: 123456
Re-enter new password: 123456
Owner: CN=John Smith, OU=Seidenberg, O=Pace University, L=New York,
ST=NY, C=US
Issuer: CN=John Smith, OU=Seidenberg, O=Pace University, L=New York,
ST=NY, C=US
Serial number: 4ca4dd45
Valid from: Thu Sep 30 11:56:05 PDT 2010 until: Wed Dec 29 10:56:05
PST 2010
Certificate fingerprints:
MD5: CA:09:3C:EC:12:D9:5D:20:E8:1E:6A:FB:88:CE:B2:18S e c u r e W e b A p p l i c a t i o n D e v e l o p m e n t | 24
SHA1:
F7:CD:4B:18:66:55:C8:2B:BB:9E:AD:92:A8:DF:54:9A:F7:96:93:E7
Signature algorithm name: SHA1withDSA
Version: 3
Trust this certificate? [no]: y
Certificate was added to keystore
Question 22: What is the more secure way to run keytool to generate the public/private keys?
Exercise 4.3 Securing File Exchange with Java Security Utilities
In this lab you study how to use the public/private keys and the digital certificate in the
last lab to securely send a document. The receiver of the document should be able to
verify that the document was from the right person (identity authentication), and the
document has not been modified in transit (data validation).
First let us recall what you have done in your second lab in this tutorial. You have created
a pair of public/private keys in keystore file “~/JavaSecurityLab/PaceKeystore”, assigned
alias “PaceKey” to this pair of keys, exported the self-signed digital certificate for the
public key, imported the digital certificate for the public key into another keystore file
“~/JavaSecurityLab/receiverKeystore”, and assigned alias “Pace” to this certificate. In
this lab the imaginary document sender will use the private key with alias “PaceKey” in
keystore file “~/JavaSecurityLab/PaceKeystore” to sign the Jar file of a sample
document, and the imaginary document receiver will perform identity authentication and
data validation for the received document using the public key with alias “Pace” in
keystore file “~/JavaSecurityLab/receiverKeystore”.
1. Launch the Ubuntu VM with username “user” and password 123456.
2. Start a terminal window in home folder ~ with menu item
“Applications|Accessories|Terminal”.
3. Run “cd ~/JavaSecurityLab” to change work folder to “~/JavaSecurityLab”.
4. Run “more GettysburgAddress.txt” to review its contents. You use file
“GettysburgAddress.txt” as example of a secret document for file exchange.
5. Run “jar cvf doc.jar GettysburgAddress.txt” to generate a Jar file “doc.jar” for
transmission.
6. Run “7z l doc.jar” to review the contents of file “doc.jar” (“l” is for listing).You can also read