KOFAX ECOPY SHARESCAN - HIGH AVAILABILITY DEPLOYMENT GUIDE VERSION: 6.4.0 DATE: 2021-02-16
←
→
Page content transcription
If your browser does not render page correctly, please read the page content below
Kofax eCopy ShareScan
High Availability Deployment Guide
Version: 6.4.0

Date: 2021-02-16

©   2021 Kofax. All rights reserved.

Kofax is a trademark of Kofax, Inc., registered in the U.S. and/or other countries. All other trademarks
are the property of their respective owners. No part of this publication may be reproduced, stored, or
transmitted in any form without the prior written permission of Kofax.
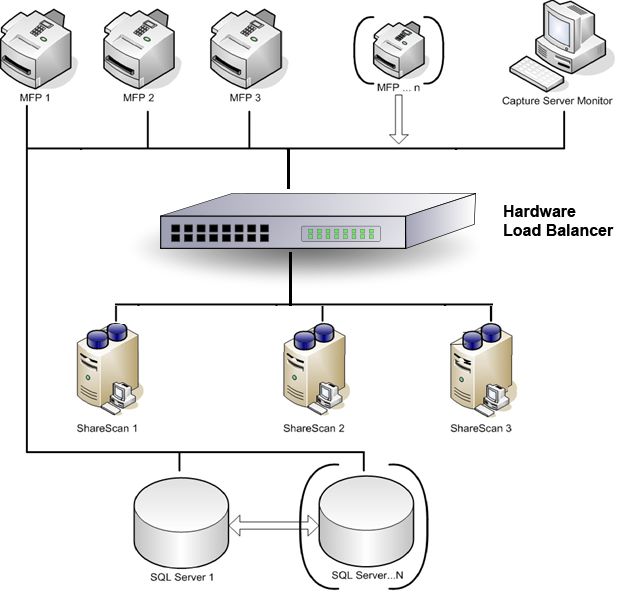
Table of Contents
  Preface.......................................................................................................................................................... 5
            Training............................................................................................................................................... 5
            Getting help with Kofax products....................................................................................................... 5
  Chapter 1: Introduction.............................................................................................................................. 7
            About eCopy ShareScan....................................................................................................................7
            Load balancing across multiple ShareScan servers..........................................................................8
  Chapter 2: Cluster and host topology...................................................................................................... 9
            Reference setup of Citrix Netscaler 10.5 with policy-based routing................................................ 11
            Failure trigger events........................................................................................................................15
            System failure operation...................................................................................................................15
            Failure symptoms............................................................................................................................. 15
            Configuration checklist......................................................................................................................16
                      System requirements............................................................................................................. 16
                      ShareScan requirements....................................................................................................... 18
                      Capture server monitor requirements....................................................................................19
            Network environment recommendations (in case of MS NLB)........................................................ 19
            General recommendations to support high availability.................................................................... 19
                      High availability prerequisites (in case of MS NLB).............................................................. 20
            Benefits of an eCopy ShareScan high availability deployment........................................................20
  Chapter 3: Deployment overview............................................................................................................ 21
            MFP fleet.......................................................................................................................................... 21
            Server setup..................................................................................................................................... 21
                      MSNLB cluster setup for high availability............................................................................. 21
                      NLB environment setup when using a hardware load balancer............................................23
            Upgrade eCopy ShareScan in a high availability environment........................................................23
            HTTPS communication on web-based devices............................................................................... 24
                      Creating self-signed server certificates................................................................................. 24
                      Certificate Manager................................................................................................................24
                      Create HTTPS certificates for your high availability setup....................................................25
                      Generate a certificate and install it under Tomcat................................................................ 26
            Install the certificate on the ShareScan Manager computer............................................................28
  Chapter 4: Certificate creation for ShareScan.......................................................................................31
            XCA software installation................................................................................................................. 31
            Create the CA certification............................................................................................................... 31

                                                                                                                                                                    3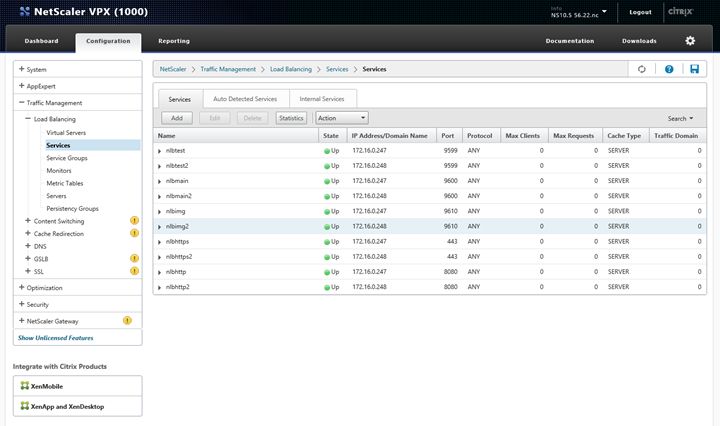
Kofax eCopy ShareScan High Availability Deployment Guide

              Create a certificate for the ShareScan Manager............................................................................. 33
              Export a certificate for the ShareScan Manager..............................................................................36
              Export CA......................................................................................................................................... 37
     Chapter 5: High availability considerations........................................................................................... 38
              Hardware failure............................................................................................................................... 38
              Software failure.................................................................................................................................38
              Risk and limitations.......................................................................................................................... 39
     Chapter 6: Load balancing across multiple ShareScan servers..........................................................40
     Chapter 7: Configuration, troubleshooting, and testing.......................................................................44
              Verify the high availability setups with the ShareScan Troubleshooter............................................45
              Determine actual device request..................................................................................................... 47
              Exporting trace in a high availability environment........................................................................... 48
              Using the ShareScan Troubleshooter tool with hardware load balancers....................................... 48
     Chapter 8: How to install and configure NLB cluster on Windows server......................................... 50
              Install NLB feature on all NLB nodes.............................................................................................. 50
              Configure NLB on NODE 1 (PL2008-01).........................................................................................50
              Unicast vs Multicast..........................................................................................................................51
                        In the unicast method............................................................................................................51
                        In the multicast method......................................................................................................... 52
              Port rules.......................................................................................................................................... 52
              Configure NLB for NODE 2 (PL2008-02)........................................................................................ 54
              Testing...............................................................................................................................................54
     Chapter 9: Frequently asked questions................................................................................................. 56
     Chapter 10: Glossary................................................................................................................................ 57
              Capture Server Monitor.................................................................................................................... 57
              Cluster...............................................................................................................................................57
              Convergence.....................................................................................................................................57
              Drainstop...........................................................................................................................................57
              Heartbeat.......................................................................................................................................... 57
              High availability support................................................................................................................... 58
              Load balancing support.................................................................................................................... 58
              Node..................................................................................................................................................58
              Virtual device.................................................................................................................................... 58

                                                                                                                                                                     4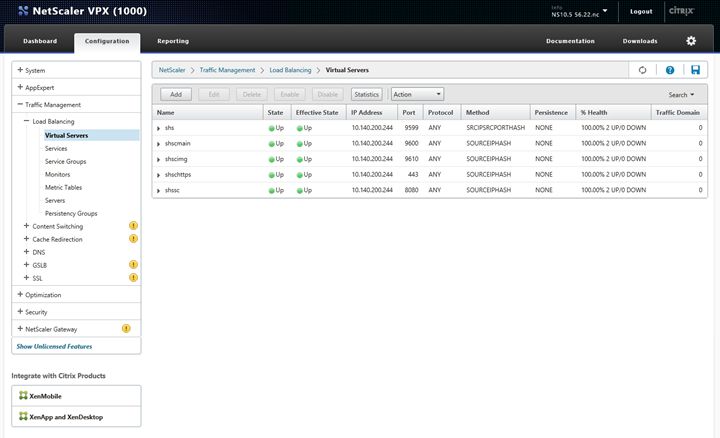
Preface

   The Kofax eCopy ShareScan software extends the capabilities of digital copiers and scanners. When
   installing and setting up a ShareScan system, you must be familiar with the scanning device that you will
   use with ShareScan, the ShareScan software components, and the basic installation and configuration
   workflow.

   This guide is intended for administrators responsible for the initial installation, configuration, and licensing
   of eCopy ShareScan. For the device-specific Pre-Installation Checklist (PICL), see the applicable vendor-
   specific Pre-Installation Checklist and Sizing Guide. For information pertaining to the ShareScan pre-
   installation, see this guide. For configuration and Administration Console usage, see the Administration
   Console Help (accessible via pressing F1 on the Administration Console).

   This document is written under the assumption that readers are familiar with working within a server-client
   architecture and environment.

Training
   Kofax offers both classroom and computer-based training to help you make the most of your eCopy
   ShareScan solution. Visit the Kofax website at www.kofax.com for details about the available training
   options and schedules.

Getting help with Kofax products
   The Kofax Knowledge Base repository contains articles that are updated on a regular basis to keep you
   informed about Kofax products. We encourage you to use the Knowledge Base to obtain answers to your
   product questions.

   To access the Kofax Knowledge Base, go to the Kofax website and select Support on the home page.

    Note The Kofax Knowledge Base is optimized for use with Google Chrome, Mozilla Firefox or Microsoft
    Edge.

   The Kofax Knowledge Base provides:
   • Powerful search capabilities to help you quickly locate the information you need.
     Type your search terms or phrase into the Search box, and then click the search icon.
   • Product information, configuration details and documentation, including release news.
     Scroll through the Kofax Knowledge Base home page to locate a product family. Then click a product
     family name to view a list of related articles. Please note that some product families require a valid
     Kofax Portal login to view related articles.

                                                                                                                      5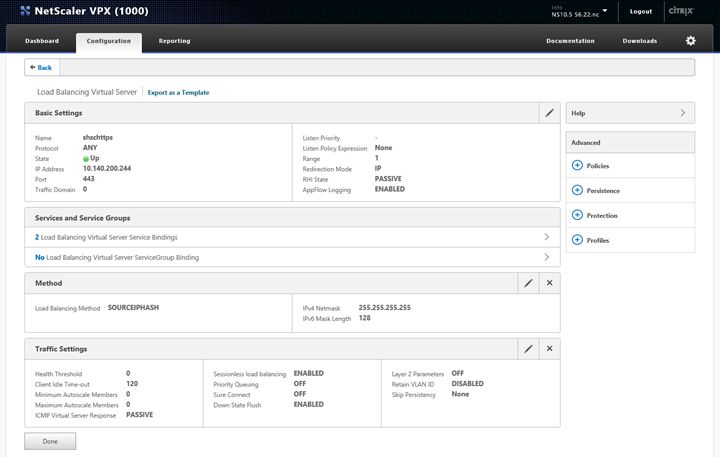
Kofax eCopy ShareScan High Availability Deployment Guide

     • Access to the Kofax Customer Portal (for eligible customers).
       Click the Customer Support link at the top of the page, and then click Log in to the Customer Portal.
     • Access to the Kofax Partner Portal (for eligible partners).
       Click the Partner Support link at the top of the page, and then click Log in to the Partner Portal.
     • Access to Kofax support commitments, lifecycle policies, electronic fulfillment details, and self-service
       tools.
       Scroll to the General Support section, click Support Details, and then select the appropriate tab.

                                                                                                               6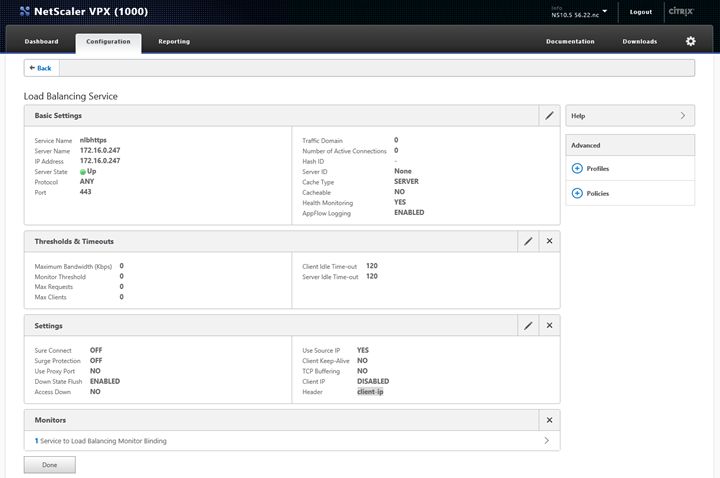
Chapter 1

Introduction

    This document describes how to deploy eCopy ShareScan to achieve high availability and load balancing,
    or both, and details its advantages.

    For information about setting up a load balanced cluster, refer to the relevant Microsoft Knowledge Base
    articles:
    • When using Microsoft Network Load Balancer: http://technet.microsoft.com/en-us/library/
       cc739506(v=ws.10).aspx
    • When using a hardware load balancer or other solution hosted in a server other than the ShareScan
       servers: The installation and configuration guide of your hardware load balancer and the ShareScan
       Reference Setup Guide respective to the hardware load balancer.

    Important Different network appliances offering load balancer features have plenty of modes and
    options to configure, and they are also affected by the circumstances and policies of the hosting
    IT infrastructure. To find a way for enabling the installation of ShareScan behind a (hardware) load
    balancer, we provide compatibility testing of ShareScan in a certain configuration, enabling proper
    ShareScan operation. This testing and compatibility declaration does not cover all the modes and
    features of the load balancer (network appliance), but until the necessary requirements are met, an
    expert administrator of the given network appliance will likely be able to configure the system in other
    ways.

    The basic features ShareScan requires from a load balancer:
    • TCP requests (including HTTPS request) reaching the ShareScan server nodes behind the load
      balancer must preserve the source IP address of the client initiating the request.
    • TCP connections must be persisted in a client IP basis.

    Important Verify the support portal for the latest set of Reference Setup Guide documents available for
    supported or recommended load balancers.

About eCopy ShareScan
    eCopy ShareScan is an MFP document capture solution that enables MFP users to engage their business
    systems and processes by completely automating document capture processes. As a result, eCopy
    ShareScan simplifies MFP capture workflows and enables users with advanced imaging capabilities.

    The eCopy ShareScan software extends the capabilities of digital copiers and scanners. When installing
    and setting up a ShareScan system, you must be familiar with the scanning devices that you will use with
    ShareScan, the ShareScan software components, and the basic installation and configuration workflow.

                                                                                                               7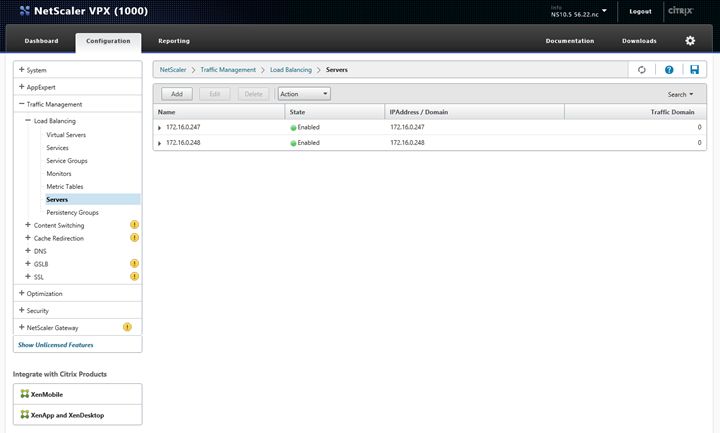
Kofax eCopy ShareScan High Availability Deployment Guide

     This document is written under the assumption that you are familiar with working in a server-client
     architecture and environment.

     If you are about to install or upgrade to ShareScan, consult the Kofax eCopy ShareScan Installation
     Guide.

Load balancing across multiple ShareScan servers
     Multiple ShareScan servers with a common database and a shared work folder can be configured (as part
     of a NLB Cluster or without it) to provide load balancing features, regarding the document building and
     OCR phases of the workflow.

     This guide is intended for system administrators who are responsible for carrying out such a deployment.

                                                                                                                8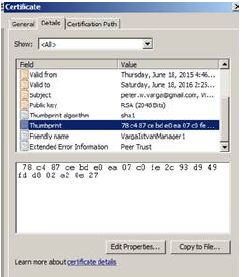
Chapter 2
Cluster and host topology
Figure 1: System diagram with MS NLB
The same figure properly depicts the different supported scenarios from the point of view of high
availability and load balancing, because the server/network topology is the same, but different
configuration settings are applied to achieve the desired behavior.
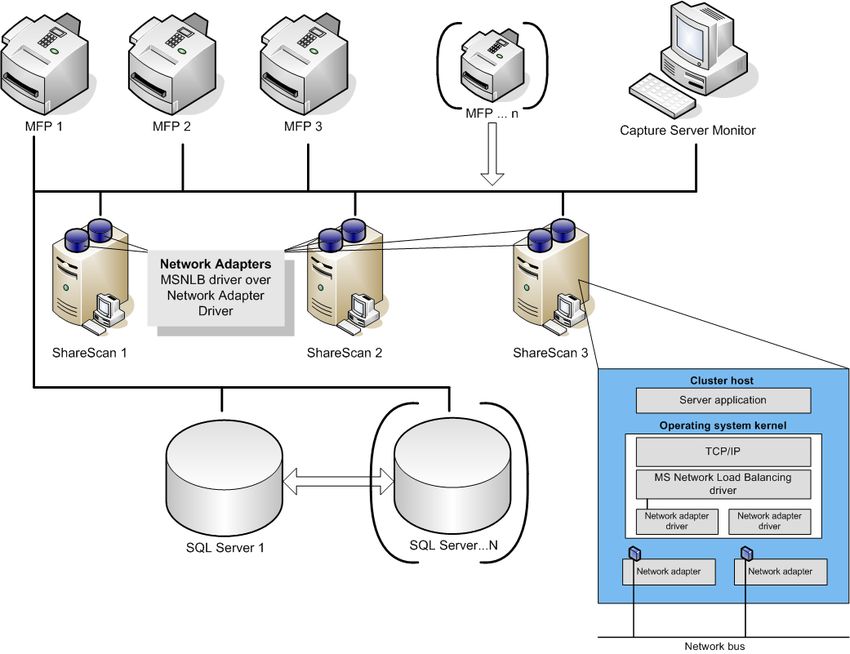
If a hardware load balancer is used instead of MS NLB, the system diagram changes as shown below:
9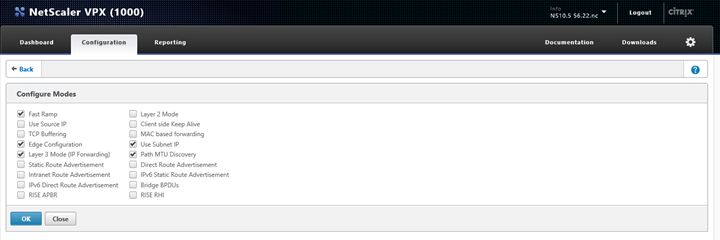
Kofax eCopy ShareScan High Availability Deployment Guide

     Figure 2: System diagram with a hardware load balancer

     The SQL Server Cluster (SQL Server 1, SQL Server N) is visible to the ShareScan servers as a single
     SQL Server. See the Microsoft SQL Server documentation for details.
       1. High availability is enabled via a network load balancing cluster
          In this case, servers ShareScan 1...N (node) form a network load balancing cluster.
          This basically means that the cluster is seen by the devices behind the same cluster IP address (in
          terminology of different vendors it is often referred as Virtual IP) and the ShareScan configuration
          database contains only a single ShareScan Manager entry - all the ShareScan Managers (1...N) use
          the same configuration data.
          When an MFP is added to the system, its configuration points to the common cluster IP address;
          when the ShareScan application is started on the MFP, the requests are sent to the cluster IP
          address.
          With the proper configuration option used (in MS NLB it is called single node affinity mode) for the
          particular communication ports, NLB Cluster makes a static assignment between the MFP and one of

                                                                                                            10
Kofax eCopy ShareScan High Availability Deployment Guide
the ShareScan servers (1..N), based on its internal algorithm, aiming to evenly distribute the devices
across the nodes.
This assignment is in effect until a node is taken away from the cluster or a node is added (back) to
the cluster.
A node is taken away, for example, when the load balancer or the Capture Server Monitor detects
that the OS, the network or ShareScan is non-functional on a particular node.
Also, this setup enables simplified management of a bigger fleet of MFP devices: since the cluster
is stored as a single Manager in the ShareScan database, all the devices connected to the multi-
manager cluster can be managed in a single Administration Console.
2. ShareScan Document creator and OCR Load Balancing
This feature ensures that the document creation and OCR processes are executed on multiple
servers, distributing the jobs across all the available ShareScan Manager Computers. This happens
via using a common job queue and a shared work folder. This feature can be enabled in any case
when multiple Managers are connecting to the same SQL Server Database.
Whenever a workflow execution reaches the point when the final document (PDF, DOC, DOCX,
and so on) is to be produced, data describing the document (source file paths, metadata, document
format, and so on) are put into a job queue, stored in the database, and a notification is sent to the
Managers in the system. One of the Managers with a free document creator fetches a job from the
database job queue, processes it and then it sends a notification to the originator about the job
completion.
Note The Shared Output Creator does not work in a Workgroup environment. This scenario is not
supported due to the limitations of the Windows operating system when used in a workgroup.
3. Both #1 and #2 are enabled
This setup is able to provide high availability and optimal usage at the same time.
Reference setup of Citrix Netscaler 10.5 with policy-based routing
High availability mode setup was introduced with ShareScan 5.2 SP2. The only QA certified setup of that
version was based on Microsoft Network Load Balancer.
With ShareScan 5.4 SP2 a compatibility testing was performed with other load balancer products, like
Citrix Netscaler 10.5.
The basic feature / mode ShareScan requires from a load balancer:
• TCP requests (including HTTPS request) reaching the ShareScan server nodes behind the load
balancer must preserve the source IP address of the client initiating the request.
• TCP connections must be persisted on a client IP basis. (This means that until the number of
ShareScan server nodes is the same, TCP connections from a given client should go to a certain
ShareScan server node – this method is called SOURCEIPHASH in the Netscaler terminology.) It is not
a requirement that the “Persistence” feature of NetScaler or any other load balancer should be used.
The following sample screens indicate the settings used in the reference environment:
(These settings are about the service called ‘shschttps’ on port 443, and this is enough to be used for a
web based – like HP - device when the secure communication is enabled, but the other services on other
11Kofax eCopy ShareScan High Availability Deployment Guide
ports have the same settings.) For the complete port list necessary to configure for a particular device
vendor, consult the particular device vendor Kofax eCopy ShareScan Installation Guide.
12Kofax eCopy ShareScan High Availability Deployment Guide
13Kofax eCopy ShareScan High Availability Deployment Guide
14Kofax eCopy ShareScan High Availability Deployment Guide
Failure trigger events
MS NLB detects the hardware, OS, and network level issues basically by sending and checking internal
network messages to the cluster nodes (so-called heartbeat messages). In case of not receiving the
proper messages, it brings the failing node offline (Stopped state).
Hardware load balancer systems are able to detect the network issues and often able to perform basic
level check, such as opening a port on the monitored server or sending a test request and check the
response.
The Capture Server Monitor (if installed) performs a basic level functional check of the ShareScan
Manager Service, by executing simple simulated scanning and document creation workflow and storing
the result document in a local folder.
It is not able to detect any issues with the following:
• Session Logon Service (for example, domain controlled or AD problem)
• Cost Recovery or ID services
• Any issues with connecting backend systems (for example, a document management backend or
Exchange server being down)
System failure operation
When the system fails on a node, another node takes over its role. The failed node does not automatically
return to the cluster, but the administrator must manually set it back online in the administrative tool of the
network load balancer.
Detection of the failure can happen by:
• The network load balancer system itself (network errors, in case of MS NLB, sever OS level errors)
• If the load balancer has some monitoring features, it can detect if a service behind a port is not
responding properly
• CSM, as it is able to perform basic level ShareScan functional test. If ShareScan services are not
responding in a timely manner or errors are detected, this triggers the failure event.
Failure symptoms
Failure symptoms on the device connected to a server that has a problem include:
• Stopped scanning
• Device screen refreshed to Main screen
• Device screen refreshed to the Session Logon Screen (if SSO is enabled)
• Displaying ShareScan error messages
• Displaying a Connection Error or Communication Error screen
15Kofax eCopy ShareScan High Availability Deployment Guide
Any error messages that appear need to be acknowledged by clicking the Connect button, which causes
a device to reconnect to a properly working server node.
Successful reconnection can be completed if the failing node is detected and brought offline by the
Capture Server Monitor (if installed) or by the network load balancer.
This detection process may take some time (from 10 seconds to several minutes), so repeated clicks on
the Connect button may be necessary.
Occasionally, all data processed on the particular server regarding the currently processed job may be
lost, depending on workflow phase where the failure happened.
If Cost Recovery or ID Services integration is also in place, a system failure may trigger an automatic
logoff and a repeated login process and workflow restart may be necessary.
Functional advantages
• Even distribution of the MFP devices across multiple managers, providing static load balancing
• Single Administration Console to manage the whole fleet connected to the cluster, no need to maintain
several Managers separately
• Capture server monitor installation and configuration inside / outside the cluster
• Convergence time insured by NLB driver to complete ongoing jobs
Configuration checklist
The following high availability function requirements must be fulfilled for proper operation:
1. An installed and configured NLB Cluster.
2. An installed and configured ShareScan in cluster mode.
3. Recommended: An installed and configured Capture Server Monitor to ensure that the whole
ShareScan server is verified periodically, and with at least one CSM Agent outside the cluster.
System requirements
At least two server machines with supported server operating systems (same version on all nodes) with
MSNLB Cluster support.
Important High availability functionalities do not work if the server operating systems are hosted in
VMware Workstation.
When MS NLB is used:
• Two Network Interface Cards - unicast/multicast mode (multicast is the preferred protocol); single NIC is
not supported.
• IPv4 is supported only (IPv6 is recommended to be disabled on all network adapters used for the
cluster) QoS is recommended to be disabled on all network adapters used for the cluster purposes.
• MSNLB Cluster driver must be installed overthe network adapter driver (that is, the MSNLB Cluster
feature must be enabled in the Windows Server OS).
16Kofax eCopy ShareScan High Availability Deployment Guide
• MSNLB Cluster can be configured by Network Load Balancing Manager tool that is part of the Windows
server OS.
• When the Capture Server Monitor is installed onto a cluster node, additional static IP addresses will
be necessary on the NIC used for non-cluster purposes (2nd NIC). For details, see the Capture Server
Monitor Configuration Guide.
• After the MSNLB Cluster setup is ready, the IP / name of the cluster shall be added to the DNS as well.
• Having a proper DNS entry for the fixed IPs of the nodes used on the NIC which is used for the cluster.
Consult with the ShareScan Reference Setup Guide for the hardware load balancer.
The following interface metric values must be specified in Microsoft Windows 2016 NLB and Microsoft
Windows 2012 NLB server environments:
NON-NLB – 'LOCAL' connection: Interface metric=20
NLB – 'LOCAL' connection: Interface metric=50
17Kofax eCopy ShareScan High Availability Deployment Guide
Important
• Changing MSNLB Cluster properties may cause unexpected results and full system unavailability. In
case of any change, make sure the new settings are supported, and in case of unexpected behavior
the original values can be reset. Some of the cluster setting changes may take effect only after some
minutes of delay.
• Make sure you add the cluster IP or name to the DNS after the cluster configuration, as it may cause
issues in the process. Registering the cluster by its name to DNS is optional, because ShareScan
uses only the IP address of the cluster.
ShareScan requirements
ShareScan (or higher), same version on all nodes.
Centralized common SQL database residing on a server which is not functioning as a ShareScan
Manager node in the cluster. For information on supported SQL database versions, see the eCopy
ShareScan Installation Guide or eCopy ShareScan Technical Specifications.
18Kofax eCopy ShareScan High Availability Deployment Guide
Note
• It is recommended to have a SQL cluster instead of a single SQL server, as a single SQL server
would be a single point of failure. For full system high availability, a SQL cluster is required (but it is
not enforced by ShareScan; for testing purposes a single SQL server is appropriate). ShareScan is
able to support MS SQL clusters, with no limitation (any number of nodes).
• Parallel editing of Administration Console data from several Manager computers connecting to the
same database is not recommended. Since all the configuration settings are stored for the 'virtual
server' represented by the cluster IP (and cluster host name) all the Administration Consoles (on the
distinct server nodes) manage the same settings. Therefore, there is no point to manage the settings
from multiple Administration Consoles.
Capture server monitor requirements
For details, see the Capture Server Monitor Configuration Guide.
Network environment recommendations (in case of MS NLB)
The network switch the cluster nodes directly connect to should be able to handle the amount of network
traffic caused by the image transfer between the MFPs and the cluster nodes.
If the number of cluster nodes is higher and the MFPs are used intensively (concurrently), a proper
network system design is recommended to avoid packet flooding (or switch flooding). Depending on the
selected NLB setup, packet flooding can be avoided by:
• Adding a network hub between the switch port and the NLB server nodes (when Unicast mode is used)
• In case of Multicast (preferred), different network devices or vendors have specific recommendations to
configure their devices properly for this type of usage.
In any case, consult the network switch documentation and the vendor’s recommendations for the
Microsoft NLB setup.
Note
• On the actual switch it may be necessary to enable Multicast mode. Consult your network device
documentation and involve the network administrator of your system in the planning of the cluster
deployment.
• High availability for Fuji-Xerox devices is only supported with Unicast enabled.
General recommendations to support high availability
For a high availability implementation, a fully set up and configured MS SQL cluster environment is
recommended.
In Windows Service Control Manager, you can enable different actions for the ShareScan Manager and
ShareScan Agent service. (On the Recovery tab of the dialog opening when you right-click the ) While
19Kofax eCopy ShareScan High Availability Deployment Guide
unexpected service stoppage is not a probable scenario, it is recommended to enable the automatic
service restart in case of a failure with a 1 minute delay since the services are highly fault-tolerant.
In concordance with your system policy, you may decide also to use the Run a program option of the
Recovery tab (for example, to send a notification email or to perform other action).
High availability prerequisites (in case of MS NLB)
Multicast UDP traffic must be enabled or supported on the subnet to which the non-cluster enabled
network adapter (NIC) connects (UDP port 9650).
It is required to provide a notification mechanism between the cluster nodes.
Benefits of an eCopy ShareScan high availability deployment
Deploying eCopy ShareScan with a high availability has a number of advantageous functions:
• In case of failure, no immediate manual intervention is needed; failing servers are automatically put
offline
• With the CSM installed:
• Automatic notification of server failure
• Possibility of integration with system management software (via action command scripts) features
become available as well.
Note The high availability setup in a NLB environment does not ensure that the jobs being processed at
the time of the failure will be recovered and finished after the successful failover. However, scanned files
are preserved for these incomplete jobs to prevent data loss, and can be accessed via the Job Monitor
web application.
20Chapter 3
Deployment overview
The following chapter contains information on the various tasks associated with installing ShareScan.
MFP fleet
Before you start, ensure that MFP devices in your fleet are supported by ShareScan.
Ensure that your MFP fleet is ready for an ShareScan deployment. Determine what device vendors
are represented in your fleet and consult the corresponding vendor-specific ShareScan Pre-Installation
Checklist and Sizing Guides. Depending on your models, a Device Configuration Guide may also be
available to help you prepare your MFPs for working with ShareScan.
Server setup
MSNLB cluster setup for high availability
1. Ensure that you have the eCopy ShareScan installer ready with the proper licenses.
21Kofax eCopy ShareScan High Availability Deployment Guide
2. Have at least two physically different computers ready for a ShareScan installation in a standard
MSNLB Cluster environment with unique, fixed IP addresses. These machines (your dedicated
ShareScan Manager Computers) must meet the following requirements:
• ShareScan deployment / system requirements, since they make up the nodes in your cluster.
• MSNLB Cluster Computer requirements (http://technet.microsoft.com/en-us/library/
hh831698.aspx).
Note For more information on clusters, see the relevant Microsoft resources and guidance:
http://technet.microsoft.com/en-us/library/cc770558.aspx. For information on ShareScan system
requirements, see either the vendor specific eCopy ShareScan Pre-Installation Checklist and
Sizing Guide or the eCopy ShareScan Installation Guide.
• Type: REG_SZ.
• Default value: ''.
• Hive: HKEY_LOCAL_MACHINE\SOFTWARE\Wow6432Node\Kofax\ShareScan
\ShareScanManager.
• Description: If this value is defined, then the manager will be listening on this IP address in case
the ClusterName is defined in the NLB environment.
Note If the virtual server nodes of the cluster reside on the same physical host (VMWare or Hyper-
V) the setup is possible and the system will be operational. However, in case of a hardware failure
it may happen that all nodes hosted on the same hardware stop, resulting in an inoperable system.
For that reason it is recommended to have nodes at least on two physical hardware.
3. Have a failover-capable Microsoft SQL cluster (recommended) ready to provide the database for
your ShareScan installation (a single SQL server instance with proper backup can be sufficient for
disaster recovery solutions, but for a hot failover solution you may need a SQL cluster with at least 2
nodes).
4. Ensure that the MSNLB Cluster server feature is installed on all would-be nodes (servers). (This is an
essential part of the supported Windows Server versions.)
5. Set up your cluster in a standard way using the MSNLB Cluster server feature. Consult the MSNLB
Cluster product documentation on how to do this: http://technet.microsoft.com/en-us/library/
cc732149.aspx.
6. Recommended: Use the ShareScan TroubleShooter Tool to run a pre-installation check on all
(would-be) Manager Computers.
7. Install eCopy ShareScan on each server.
8. After a successful installation, you have to specify three registry settings for eCopy ShareScan to
work in cluster mode; the ClusterName should be specified as the Fully Qualified Domain Name
(FQDN).
9. Click Finish when the Install Shield Wizard Completed screen appears.
Hints
To change cluster IP (in MS NLB), the recommended process is the following:
1. Delete all the devices from ShareScan.
2. Stop all ShareScan related services.
3. Change the IP in the MS NLB Manager, and in the ManagerIP registry setting.
22Kofax eCopy ShareScan High Availability Deployment Guide
4. Without starting any of the ShareScan services, start the Administration Console, and confirm that
there was an IP change.
5. Perform the necessary modifications in the network device (switch) configurations, if needed.
6. Re-add the devices to ShareScan.
As the process is complex, we recommend performing a fleet deployment only if the cluster IP is decided
and considered to be final.
NLB environment setup when using a hardware load balancer
Consult the white paper or ShareScan Reference Setup Guide respective to your load balancer, published
via the eCopy support web site.
Upgrade eCopy ShareScan in a high availability environment
If you want to upgrade eCopy ShareScan in a high availability environment without any down time, follow
these directions:
1. Step 1
• Choose a time period when the ShareScan system is not heavily loaded.
• Use the node drain stop (or equivalent) option in the NLB manager tool to take the selected node
offline.
• Make sure that all jobs are successfully completed (by using the ShareScan Job Monitor web
application).
• Stop all ShareScan services.
• Upgrade via the Copy current catalog to perform the upgrade on the following one: option of the
installer on the current node and specify a name for the new ShareScan database (for example,
eCopyShareScan_).
• Test functionality with the local simulator.
• Do not bring the node in the NLB Manager tool online/active.
2. Step 2
• Use the node drain stop (or equivalent) option in the NLB Manager tool to take the selected node
offline.
• Make sure that all jobs are successfully completed (by using the ShareScan Job Monitor web
application).
• Stop all ShareScan services.
• Upgrade via the Use a different exisiting ShareScan catalog option of the installer on the current
node and select the catalog name specified during the upgrade of the first node (from the step 1).
• Test functionality with the local simulator.
• Do not bring the node in the MS NLB Manager tool online/active.
Repeat Step 2 on the remaining nodes until half of the nodes are upgraded to 6.4.
If the first half of the nodes are upgraded, the old nodes (still on on earlier ShareScan version)
should be stopped via node drain stop (in MS NLB Manager tool). When all earlier ShareScan
version nodes are in drainstop/stopped state, turn on the nodes, making sure that each of them
works without any issues.
23Kofax eCopy ShareScan High Availability Deployment Guide
HTTPS communication on web-based devices
For successful HTTPS communication on web-based devices, a self-signed server certificate must be
generated, exported, and imported on all other nodes.
Creating self-signed server certificates
Since ShareScan uses a self-signed server certificate based on the IP address of the server and this
certificate is of an unknown Certification Authority, certain vendor MFPs may display warning messages
after an SSL Communication is initiated. To avoid these messages, create a self-signed certificate based
on the Fully Qualified Domain Name (FQDN) of the server and install it as a root certificate on the MFP
device.
Certificate Manager
The Certificate Manager is an add-on tool for eCopy ShareScan, which allows you to manage the
certificates required by some devices.
The Certificate Manager tool is installed in the Tools folder of the ShareScan installation (%programfiles%
\Kofax\ShareScan\Server\Tools when using the default installation path), and can be launched by double-
clicking on the CertificateManager.exe file.
When started, the Certificate Manager displays the following buttons in its window; depending on your
configuration, the first option (Configure Tomcat server.xml may not be available):
• Configure Tomcat server.xml: This option allows you to customize the cryptographic protocols and
ciphers used by ShareScan on a port-by-port basis via editing the server.xml file used by the Tomcat
component of eCopy ShareScan. Clicking this button displays a new window, listing all ports currently
used by eCopy ShareScan, and the cryptographic protocols assigned for the specific port, if that port
uses SSL or TLS. You can use the server.xml item in the top-left corner to create a backup of the
server.xml file you are using, or you can load a previously saved server.xml.
To modify the protocols and ciphers assigned to a port, do the following:
1. Click on the port whose properties you want to modify.
2. Click the Edit button on the upper-right part of the window. A new screen is displayed, showing the
currently used protocols and ciphers.
3. Under Enabled protocols, select the cryptographic protocols you want to use.
4. Under Enabled Ciphers, select the ciphers you want to use. For ease of use, a number of filter
options are included with the tool, and can be accessed via button push (for example, Remove
weak ciphers, Select Java 6 ciphers, Remove ciphers using CBC encoding, and so forth).
5. Click OK to save the changes.
• Re-generate certificate: This option allows you to recreate your digital certificate. To create the
certificate, you have to enter either the IP address (Discover IP button) or Fully Qualified Domain
Name (Discover FQDN button) to the displayed field under Certificate Common Name, then click the
Generate button on the lower-right part of the window.
• Backup certificate: Click this button to create a backup of your existing certificate. A Browse window is
displayed, where you can select the location and filename of the certificate to be saved. Back up your
24Kofax eCopy ShareScan High Availability Deployment Guide
certificates if you have imported your certificates manually to your Konica Minolta devices (to prevent
the warning from popping up), and do not want to repeat the process.
Also, the recommended workflow when upgrading from an earlier ShareScan version is to back up your
certificate, perform the upgrade of ShareScan, then restore the certificate.
• Restore certificate: Click this button to restore a certificate. A Browse window is displayed, where you
can locate the certificate to be restored.
Create HTTPS certificates for your high availability setup
1. Perform the following steps on one of the ShareScan nodes:
a. Use the Re-Generate Certificate option of the Certificate Manager tool. Use the MS NLB
cluster IP or the FQDN that is registered in the DNS for the cluster.
b. Use the Backup certificate option to save the newly created certificate.
c. Restart the Apache Tomcat service.
d. Copy the created backup file to all the other ShareScan nodes or to a shared network folder
accessible from all the other nodes.
2. Perform the following steps on the remaining ShareScan nodes:
a. Use the Restore certificate feature of the Certificate Manager tool.
b. Restart the Apache Tomcat service.
3. With these steps, the same certficate will be installed on all ShareScan nodes.
25Kofax eCopy ShareScan High Availability Deployment Guide
Generate a certificate and install it under Tomcat
1. Generate your Certification Authority (CA):
• Create a 2048-bit key to be used when creating your CA.
• In a command prompt, type openssl genrsa –des3 –out ca.key 2048
• Supply a pass phrase for ca.key. The pass phrase is requested whenever you use the CA
certificate.
• This creates a file called ca.key, containing your certificate authority private key.
• Create the CA certificate request.
• In a command prompt, type openssl req -new -x509 -days 4000 -key ca.key -out
ca.cer
• Enter the pass phrase you used in the previous step. Also, you are prompted to complete
certain fields, for example, country and locality name. Ensure that you complete the Common
Name field, which must be an FQDN (Fully Qualified Domain Name).
• The output CA certificate is generated in the ca.cer file.
26Kofax eCopy ShareScan High Availability Deployment Guide
2. Generate a Server Certificate:
• Create a 2048-bit key to be used when creating server (Tomcat) certificate.
• In a command prompt, type openssl genrsa -des3 -out server.key 2048
• Supply a pass phrase. The pass phrase is requested whenever you use this certificate so make
sure you remember it.
• This creates a file called server.key containing your server private key.
• Create the server certificate request.
• In a command prompt, type openssl req –extensions ssl_server –new –key
server.key – extensions usr_cert –out server.csr
• Enter the pass phrase for the server.key that you used in step 1.
•
Important The Common Name must match the FQDN/IP of the web server.
• This openssl command creates the server certificate request server.csr
• Sign the certificate signing request with the self-created certificate authority that you made earlier.
• In a command prompt, type openssl x509 –req –startdate –days 365 –
in server.csr –CA ca.cer –CAkey ca.key –extensions usr_cert –out
server.crt –CAcreateserial –CAserial ca.srl
• Enter the pass phrase for ca.key that you used in step 1.
• This creates the server certificate server.crt.
• The first time you use your CA to sign a certificate, you can use the -CAcreateserial option.
This option creates a file (ca.srl) containing a serial number. You are probably going to create
more certificates, and the next time you will have to do that use the -CAserial option (and no
more -CAcreateserial) followed by the name of the file containing your serial number. This file
is incremented each time you sign a new certificate. This serial number will be readable using
27Kofax eCopy ShareScan High Availability Deployment Guide
a browser (once the certificate is imported to a pkcs12 format). And we can have an idea of the
number of certificate created by a CA.
• Important: By using the -startdate parameter, you are signing the certificate against the current
date and time. Make sure that your environment has the correct date, time, and timezone setup.
• Generate a .PFX file / PKCS#12 certificate.
• In a command prompt, type openssl pkcs12 –export –in server.crt –inkey
server.key – certfile ca.cer –name FQDN/IP defined in the server
Common Name field –out serverCert.pfx
• Enter enter the pass phrase for server.key that you used in step 1.
• Enter an export password.
• This creates the serverCert.pfx file.
3. Install the Server Certificate in Tomcat:
• Copy the serverCert.pfx under Tomcat9/conf directory.
• Convert pfx dile to jks file.
In a command prompt, type keytool –importkeystore –srckeystore serverCert.pfx –
srcstoretype pkcs12 –destkeystore eCopy.key –deststoretype JKS
• Create a certificate.
• In a command prompt, type keytool –export –alias the Common Name used in 2.b
– keystore eCopy.key –file “..\webapps\ROOT\eCopy.cer”
• Then type keytool –export –alias the Common Name used in 2.b –keystore
eCopy.key – file “..\webapps\ROOT\eCopy.der”
• Finally type keytool –export –alias the Common Name used in 2.b –keystore
eCopy.key –rfc –file “..\webapps\ROOT\eCopy.pem”
Install the certificate on the ShareScan Manager computer
Verify that you have completed the following prerequisites:
• Certificate for ShareScan manager computer.
• CA certificate.
• Server certificate file (Manager-hostname.p12 ) – and password for accessing the private key.
• WinHTTP Certificate config tool installer, winhttpcertcfg.msi, downloadable from Microsoft.
• winhttpcertcfg.msi
28Kofax eCopy ShareScan High Availability Deployment Guide
• https://www.microsoft.com/en-us/download/details.aspx?id=19801.
1. Install the ShareScan Manager certificate on the ShareScan Manager computer:
a. Start MMC.
b. Select File > Add/Remove snap-in .
c. Select Certificates, then press Add.
d. On the Certificates snap-in panel, select Computer account.
e. On Select Computer panel, select Local computer: (the computer this console is running
on), then Finish.
Import CA certificate
f. Select the Trusted Root Certification Authorities container.
g. Click on the Certificates sub-container.
h. Right-click on All tasks > Import .
i. Select CA certificate, then click Next > Next > Finish .
j. Do not change the “Certificate store” = “Trusted Root Certification Authorities”.
k. Finish adding the certificate and click OK on the notification popup.
Import Server certificate file (for example, "managername.qa.local.p12")
l. Select the Trusted People container.
m. Right-click on All tasks > Import .
n. Select the Server certificate file.
o. Enter the password of the certificate.
p. Do not change the “Certificate store” = “Trusted People”.
q. Finish adding the certificate and click OK on the notification popup.
2. Create a registry setting called “SslCertificateThumbprint” for ShareScan, with the certificate`s
thumbprint. The SslCertificateThumbprint identifies the certificate which the ShareScan manager
should use. Obtain server certificate thumbprint.
a. Using MMC, go to Trusted People > certificates container.
b. Click on the certificate, which you imported in step 1.
c. Select the Details tab.
d. Click on the Thumbprint field.
29Kofax eCopy ShareScan High Availability Deployment Guide
e. Copy the Thumbprint value.
f. Paste to a text editor and remove all spaces from the thumbprint value (replace all spaces to
"nothing").
g. Start Regedit.
h. Go to HKEY_LOCAL_MACHINE\SOFTWARE\Wow6432Node\Kofax\ShareScan
\ShareScanManager.
i. Create new string value: Name = SslCertificateThumbprint.
j. Set Value= Thumbprint_value, without spaces.
3. Grant access right to certificate, for “Network Service" or for the account, which runs the ShareScan
Manager service.
a. Install winhttpcertcfg.msi.
b. Open a command prompt as an administrator.
c. Go to C:\Program Files (x86)\Windows Resource Kits\Tools\.
d. Run the following command: WinHttpcertCfg.exe -g -c LOCAL_MACHINE
\TrustedPeople -s "SS server hostname FQDN" -a "Network Service". Or
if the ShareScan Manager service running account is customized, for example, “Domain
\SSManager”, then use this account name in the command: WinHttpcertCfg.exe -g -c
LOCAL_MACHINE\TrustedPeople -s "W2k8x64R2-XY-QA.qa.local" -a “Domain
\SSManager”.
e. Restart ShareScan Manager.
30Chapter 4
Certificate creation for ShareScan
XCA software installation
1. Install the XCA software (http://sourceforge.net/projects/xca/).
2. Launch XCA.
3. Create a new database.
Create the CA certification
1. Select Certificates tab.
2. Select New certificate.
3. Fill the following fields.
4. Click the Generate a New Key button (RSA, 2048 bit).
31Kofax eCopy ShareScan High Availability Deployment Guide
5. Select Extensions tab.
6. Select Certification Authority as Type.
32Kofax eCopy ShareScan High Availability Deployment Guide
7. Click OK.
Create a certificate for the ShareScan Manager
1. Go to the Certificate signing requests tab.
2. Click New Request.
3. Select HTTPS_Server as Template for the new certificate on the Source.
33Kofax eCopy ShareScan High Availability Deployment Guide
4. Fill the following fields.
Important You have to define the computer host name in the commonName field (where the
ShareScan manager runs).
5. Click the Generate a New Key button (RSA, 2048 bit).
34Kofax eCopy ShareScan High Availability Deployment Guide
6. Click OK.
7. The certificate appears in the Certification signing request window.
8. Right-click on that and choose Sign.
35Kofax eCopy ShareScan High Availability Deployment Guide
9. Select HTTPS_server Template and select your CA for signing (Use this Certificate for signing).
10. Your signed certification will appear in the Certificates window as well (Under your CA).
Export a certificate for the ShareScan Manager
1. Go to the Certifications tab.
2. Select your certificate for the ShareScan Manager (created in steps 11 – 21).
3. Click Export.
4. Select a destination folder and use PKCS #12 export format.
5. Enter a password for using the private key. You will need this password when the certificate is
imported to the ShareScan machine.
36Kofax eCopy ShareScan High Availability Deployment Guide
Export CA
1. Go to the Certifications tab again.
2. Select your CA certificate.
3. Click Export.
4. Select a destination folder and use DER export format.
37Chapter 5
High availability considerations
In case of eCopy ShareScan deployment with a high availability support, hardware and software failures
are the two major failure categories.
Hardware failure
Hardware failures prevent the network card from sending heartbeat messages to the cluster. Typical
hardware failure scenarios include electric power loss, mainboard or CPU malfunction, memory error and
so on. These types of issues are detected by the MSNLB Cluster technology through the loss of network
connectivity.
When a node misses five consecutive heartbeat messages, the MSNLB Cluster manager detects the
lack of signal and starts a convergence process. During convergence, the MSNLB Cluster re-assigns
all connections between the healthy nodes and clients, the same way it happens when a client wants to
connect to a node for the first time. The state of all the servers in MSNLB Cluster Configuration Utility is
changed to 'Convergence' which means that distribution procedure of devices is started from scratch. This
is an automatic process.
When convergence is finished, users can continue working.
To ensure that the operations and workflows happen (on healthy nodes) at the very moment of the
convergence process, there is a configurable delay preserving connections. Only after the pre-set delay is
configured are the active connections re-arranged. (The setting referred is on the Port rule dialog, and the
recommended value is 5 minutes.)
Similarly, hardware load balancers are able to detect the basic availability of the server hardware and
networking infrastructure by pinging the server and opening TCP connections, as configured in the load
balancer (typically these checks are called 'monitoring').
Software failure
Software failures are ShareScan related errors: network load balancers (both MS NLB and hardware load
balancers) are unable to detect higher software (ShareScan) level errors, hence the need for the Capture
Server Monitor, which is able to send commands to the MS NLB Cluster and alert the administrator
through email.
When using a hardware load balancer, the CSM enables integration with these (to let CSM turn off a
server node if necessary) is possible by running a custom command script.
38Kofax eCopy ShareScan High Availability Deployment Guide
Risk and limitations
eCopy ShareScan has the following limitations:
Folder or Email watch* Not Supported via Capture Server Monitor
ScanStation** Not Supported for HA; LB (without HA) is supported on
ScanStation
High Availability via NLB clustering Not supported if Cost Recovery v2 integration is used
Note * Watcher workflows are fail-safe by design, if more than one ShareScan Managers are installed
and watching the same folder or email inbox. In this setup, jobs are restarted when they are not
completed within a preset time window.
** ScanStation is not supported in cluster environment
39Chapter 6
Load balancing across multiple ShareScan
servers
Document creation and OCR are the most resource-consuming phases in a scanning, document
processing and storing workflow.
To ensure the shortest delivery time of the documents, distribution of the document processing tasks on
multiple servers is a recommended technique, also called load balancing.
To enable this feature in ShareScan, do the following:
Note It is recommended that you install ShareScan in a custom installation mode, specifying custom
accounts to run the Manager and the Agent services. If you do so, you can avoid the step 2; you only
have to follow the instructions in step 1, and grant full rea/write access to these custom (domain)
accounts on the shared work folder specified in the ScannedFilesLocation advanced setting (detailed
below).
1. Launch the ShareScan Administration Console application. For the particular configuration tasks
your deployment requires, press F1 in the Console window to access product Help. Should you wish
to take advantage of load balancing capabilities, specify the following three advanced settings:
a. Select the Home tab in the Administration Console and click Settings in the System group.
b. Scroll down to the Advanced header, select the field Advanced ShareScan Settings and click
the ... button on the right.
c. Click OK in the Warning window and proceed with care.
d. Expand the node Shared manager settings. Scroll down to Workerqueuemanagersharejobs,
and set its value to TRUE (if set to TRUE, all the Managers running on different servers check
the common job queue, stored in the shared database if there is a document to process / OCR.
Click Save and close and then OK on the warning message.
e. Collapse this node and expand the one that shows the name and IP address of the Manager.
Locate the setting ScannedFilesLocation and specify a valid path. Specify a UNC path
representing a shared network folder. Mapped drives (with a drive letter) are not possible to
use here. All servers in system must have access to this shared folder (Read/Write access for
the account running the ShareScan Manager and Agent service). To change the default (local)
service accounts to a domain account, see next list item.
f. Locate the OutputCreatorReuseWorkerProcess setting, which should be set to False. You might
also want to review or set the MaxNumberOfOutputCreators value. Its value can be an integer
number to specify how many parallel processes can be used for OCR/document creation. The
scaling and recommended hardware documentation has some proposed values for different
40You can also read