Pacemaker 1.1 Clusters from Scratch - Creating Active/Passive and Active/Active Clusters on Fedora - Andrew Beekhof
←
→
Page content transcription
If your browser does not render page correctly, please read the page content below
Pacemaker 1.1
    Clusters from Scratch
Creating Active/Passive and Active/Active Clusters on Fedora

                     Andrew Beekhof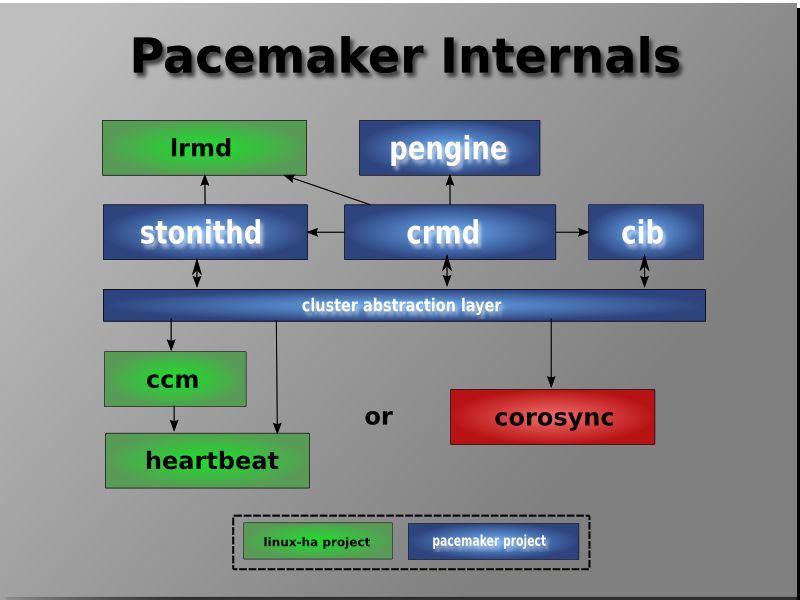
Clusters from Scratch

Pacemaker 1.1 Clusters from Scratch
Creating Active/Passive and Active/Active Clusters on Fedora
Edition 5

Author                                      Andrew Beekhof                            andrew@beekhof.net
Translator                                  Raoul Scarazzini                          rasca@miamammausalinux.org
Translator                                  Dan Frîncu                                df.cluster@gmail.com
                                            Rasto Levrinc                             rasto.levrinc@gmail.com

Copyright © 2009-2012 Andrew Beekhof.

The text of and illustrations in this document are licensed under a Creative Commons Attribu-
                                                       1
tion–Share Alike 3.0 Unported license ("CC-BY-SA") .

In accordance with CC-BY-SA, if you distribute this document or an adaptation of it, you must provide
the URL for the original version.

In addition to the requirements of this license, the following activities are looked upon favorably:
1. If you are distributing Open Publication works on hardcopy or CD-ROM, you provide email notifica-
    tion to the authors of your intent to redistribute at least thirty days before your manuscript or media
    freeze, to give the authors time to provide updated documents. This notification should describe
    modifications, if any, made to the document.

2. All substantive modifications (including deletions) be either clearly marked up in the document or
   else described in an attachment to the document.

3. Finally, while it is not mandatory under this license, it is considered good form to offer a free copy
   of any hardcopy or CD-ROM expression of the author(s) work.

The purpose of this document is to provide a start-to-finish guide to building an example active/passive
cluster with Pacemaker and show how it can be converted to an active/active one.

The example cluster will use:
1. Fedora 17 as the host operating system

2. Corosync to provide messaging and membership services,

3. Pacemaker to perform resource management,

4. DRBD as a cost-effective alternative to shared storage,

5. GFS2 as the cluster filesystem (in active/active mode)

Given the graphical nature of the Fedora install process, a number of screenshots are included. How-
ever the guide is primarily composed of commands, the reasons for executing them and their expected
outputs.

1
    An explanation of CC-BY-SA is available at http://creativecommons.org/licenses/by-sa/3.0/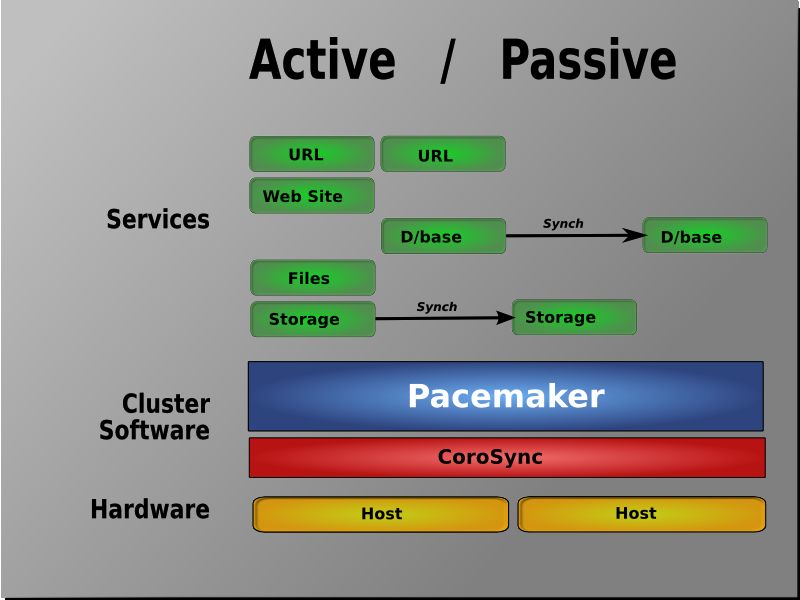
Table of Contents
1. Read-Me-First                                                                                                                            1
     1.1. The Scope of this Document ........................................................................................               1
     1.2. What Is Pacemaker? ....................................................................................................           1
     1.3. Pacemaker Architecture ................................................................................................           2
           1.3.1. Internal Components ..........................................................................................            4
     1.4. Types of Pacemaker Clusters .......................................................................................               6

2. Installation                                                                                                                             9
      2.1. OS Installation ............................................................................................................. 9
      2.2. Post Installation Tasks ................................................................................................ 12
            2.2.1. Networking ...................................................................................................... 12
            2.2.2. Leaving the Console ........................................................................................ 13
            2.2.3. Security Shortcuts ............................................................................................ 13
            2.2.4. Short Node Names .......................................................................................... 13
            2.2.5. NTP ................................................................................................................ 14
      2.3. Before You Continue .................................................................................................. 14
            2.3.1. Finalize Networking .......................................................................................... 15
            2.3.2. Configure SSH ................................................................................................ 15
      2.4. Cluster Software Installation ........................................................................................ 16
            2.4.1. Install the Cluster Software .............................................................................. 16
      2.5. Setup ......................................................................................................................... 17
            2.5.1. Preparation - Multicast ..................................................................................... 17
            2.5.2. Notes on Multicast Address Assignment ............................................................ 18
            2.5.3. Configuring Corosync ....................................................................................... 19

3. Pacemaker Tools                                                                                                             21
     3.1. Using Pacemaker Tools .............................................................................................. 21

4. Verify Cluster Installation                                                                                                              23
     4.1. Start the Cluster .........................................................................................................       23
     4.2. Verify Corosync Installation .........................................................................................            24
     4.3. Verify Pacemaker Installation ......................................................................................              25

5. Creating an Active/Passive Cluster                                                                                                       27
     5.1. Exploring the Existing Configuration ............................................................................                 27
     5.2. Adding a Resource .....................................................................................................           28
     5.3. Perform a Failover ......................................................................................................         30
           5.3.1. Quorum and Two-Node Clusters .......................................................................                      31
           5.3.2. Prevent Resources from Moving after Recovery ................................................                             32

6. Apache - Adding More Services                                                                                                            35
     6.1. Forward .....................................................................................................................     35
     6.2. Installation ..................................................................................................................   35
     6.3. Preparation ................................................................................................................      35
     6.4. Enable the Apache status URL ...................................................................................                  36
     6.5. Update the Configuration ............................................................................................             36
     6.6. Ensuring Resources Run on the Same Host ................................................................                          38
     6.7. Controlling Resource Start/Stop Ordering .....................................................................                    39
     6.8. Specifying a Preferred Location ...................................................................................               40
     6.9. Manually Moving Resources Around the Cluster ...........................................................                          41
           6.9.1. Giving Control Back to the Cluster ....................................................................                   42

7. Replicated Storage with DRBD                                                                                                       45
     7.1. Background ................................................................................................................ 45

                                                                                                                                            iii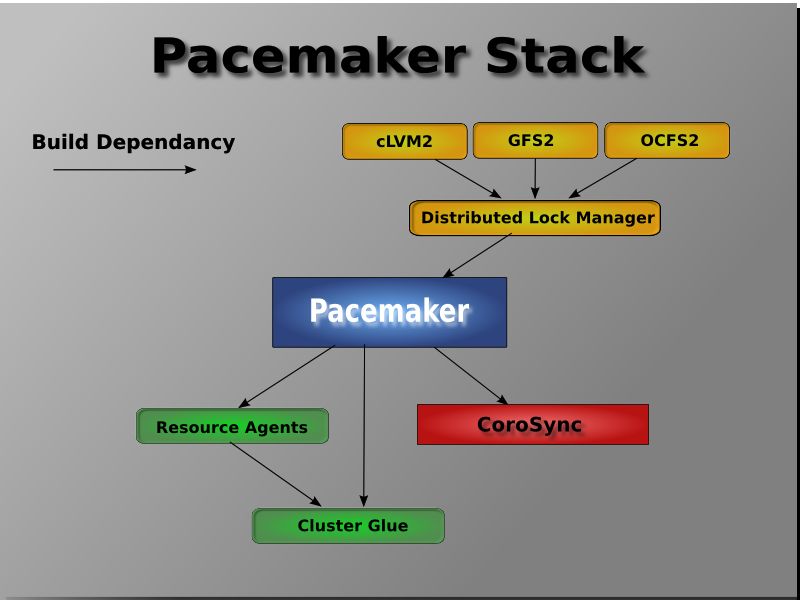
Clusters from Scratch

       7.2. Install the DRBD Packages .........................................................................................          45
       7.3. Configure DRBD ........................................................................................................      46
             7.3.1. Create A Partition for DRBD .............................................................................            46
             7.3.2. Write the DRBD Config ....................................................................................           47
             7.3.3. Initialize and Load DRBD .................................................................................           48
             7.3.4. Populate DRBD with Data ................................................................................             48
       7.4. Configure the Cluster for DRBD ..................................................................................            49
             7.4.1. Testing Migration .............................................................................................      50
8. Conversion to Active/Active                                                                                                           51
     8.1. Requirements .............................................................................................................     51
           8.1.1. Installing the required Software ........................................................................              51
     8.2. Create a GFS2 Filesystem ..........................................................................................            51
           8.2.1. Preparation ......................................................................................................     51
           8.2.2. Create and Populate an GFS2 Partition ............................................................                     52
     8.3. Reconfigure the Cluster for GFS2 ...............................................................................               54
     8.4. Reconfigure Pacemaker for Active/Active .....................................................................                  54
           8.4.1. Testing Recovery .............................................................................................         56
9. Configure STONITH                                                                                                                     57
     9.1. What Is STONITH ......................................................................................................         57
     9.2. What STONITH Device Should You Use ......................................................................                      57
     9.3. Configuring STONITH .................................................................................................          57
     9.4. Example ....................................................................................................................   57
A. Configuration Recap                                                                                                                   59
    A.1. Final Cluster Configuration .........................................................................................           59
    A.2. Node List ...................................................................................................................   59
    A.3. Cluster Options ..........................................................................................................      59
    A.4. Resources .................................................................................................................     60
         A.4.1. Default Options ...............................................................................................          60
         A.4.2. Fencing ..........................................................................................................       61
         A.4.3. Service Address ..............................................................................................           61
         A.4.4. DRBD - Shared Storage ..................................................................................                 62
         A.4.5. Cluster Filesystem ...........................................................................................           62
         A.4.6. Apache ...........................................................................................................       62
B. Sample Corosync Configuration                                                                                                         65
C. Further Reading                                                                                                                       67
D. Revision History                                                                                                                      69
Index                                                                                                                                    71

iv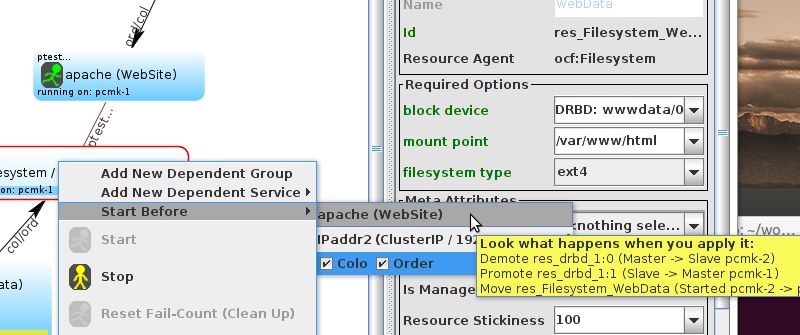
List of Figures
1.1.   Conceptual Stack Overview .................................................................................................. 3
1.2.   The Pacemaker Stack .......................................................................................................... 4
1.3.   Internal Components ............................................................................................................ 5
1.4.   Active/Passive Redundancy .................................................................................................. 6
1.5.   N to N Redundancy ............................................................................................................. 7
9.1.   Obtaining a list of STONITH Parameters ............................................................................. 58
9.2.   Sample STONITH Resource ............................................................................................... 58

                                                                                                                                       v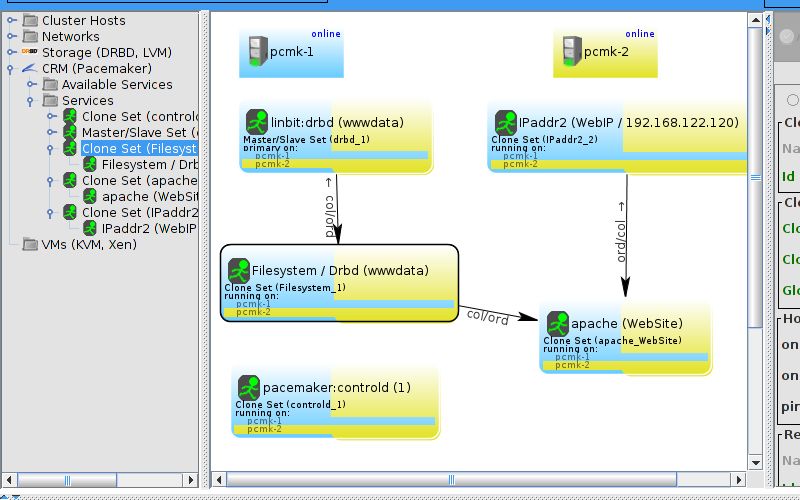
vi
Chapter 1.

Read-Me-First

Table of Contents
1.1. The Scope of this Document ................................................................................................       1
1.2. What Is Pacemaker? ............................................................................................................   1
1.3. Pacemaker Architecture ........................................................................................................   2
      1.3.1. Internal Components .................................................................................................     4
1.4. Types of Pacemaker Clusters ...............................................................................................       6

1.1. The Scope of this Document
Computer clusters can be used to provide highly available services or resources. The redundancy of
multiple machines is used to guard against failures of many types.

This document will walk through the installation and setup of simple clusters using the Fedora distribu-
tion, version 17.

The clusters described here will use Pacemaker and Corosync to provide resource management and
messaging. Required packages and modifications to their configuration files are described along with
the use of the Pacemaker command line tool for generating the XML used for cluster control.

Pacemaker is a central component and provides the resource management required in these systems.
This management includes detecting and recovering from the failure of various nodes, resources and
services under its control.

When more in depth information is required and for real world usage, please refer to the Pacemaker
         1
Explained manual.

1.2. What Is Pacemaker?
Pacemaker is a cluster resource manager. It achieves maximum availability for your cluster services
(aka. resources) by detecting and recovering from node and resource-level failures by making use of
the messaging and membership capabilities provided by your preferred cluster infrastructure (either
Corosync or Heartbeat).

Pacemaker’s key features include:

• Detection and recovery of node and service-level failures

• Storage agnostic, no requirement for shared storage

• Resource agnostic, anything that can be scripted can be clustered

• Supports STONITH for ensuring data integrity

• Supports large and small clusters

• Supports both quorate and resource driven clusters

1
    http://www.clusterlabs.org/doc/

                                                                                                                                       1
Chapter 1. Read-Me-First

• Supports practically any redundancy configuration

• Automatically replicated configuration that can be updated from any node

• Ability to specify cluster-wide service ordering, colocation and anti-colocation

• Support for advanced service types

    • Clones: for services which need to be active on multiple nodes

    • Multi-state: for services with multiple modes (eg. master/slave, primary/secondary)

• Unified, scriptable, cluster management tools.

1.3. Pacemaker Architecture
At the highest level, the cluster is made up of three pieces:

• Non-cluster aware components (illustrated in green). These pieces include the resources them-
  selves, scripts that start, stop and monitor them, and also a local daemon that masks the differences
  between the different standards these scripts implement.

• Resource management Pacemaker provides the brain (illustrated in blue) that processes and re-
  acts to events regarding the cluster. These events include nodes joining or leaving the cluster; re-
  source events caused by failures, maintenance, scheduled activities; and other administrative ac-
  tions. Pacemaker will compute the ideal state of the cluster and plot a path to achieve it after any
  of these events. This may include moving resources, stopping nodes and even forcing them offline
  with remote power switches.

• Low level infrastructure Corosync provides reliable messaging, membership and quorum information
  about the cluster (illustrated in red).

2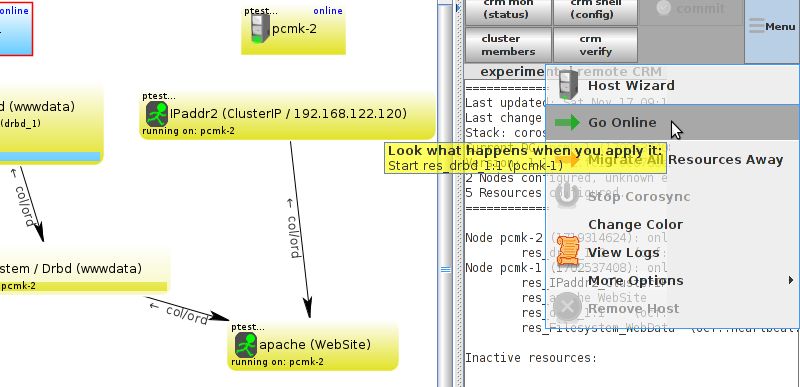
Pacemaker Architecture

Figure 1.1. Conceptual Stack Overview

                                                                                                                         2
When combined with Corosync, Pacemaker also supports popular open source cluster filesystems.

Due to recent standardization within the cluster filesystem community, they make use of a common
distributed lock manager which makes use of Corosync for its messaging capabilities and Pacemaker
for its membership (which nodes are up/down) and fencing services.

2
 Even though Pacemaker also supports Heartbeat, the filesystems need to use the stack for messaging and membership and
Corosync seems to be what they’re standardizing on. Technically it would be possible for them to support Heartbeat as well,
however there seems little interest in this.

                                                                                                                              3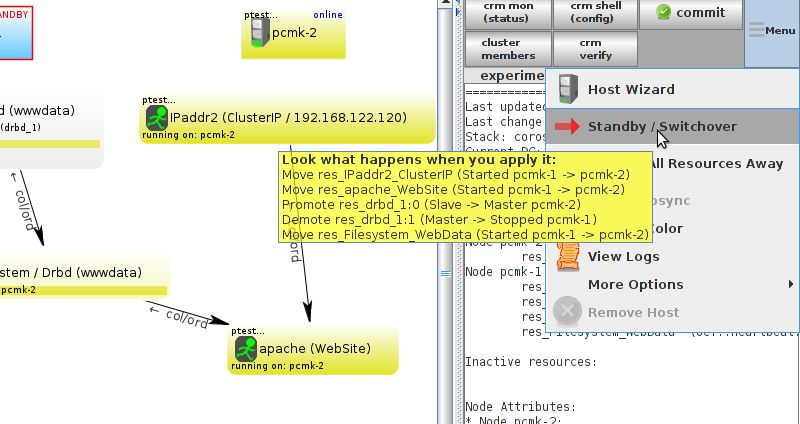
Chapter 1. Read-Me-First

Figure 1.2. The Pacemaker Stack

1.3.1. Internal Components
Pacemaker itself is composed of four key components (illustrated below in the same color scheme as
the previous diagram):

• CIB (aka. Cluster Information Base)

• CRMd (aka. Cluster Resource Management daemon)

• PEngine (aka. PE or Policy Engine)

• STONITHd

4
Internal Components

Figure 1.3. Internal Components

The CIB uses XML to represent both the cluster’s configuration and current state of all resources in
the cluster. The contents of the CIB are automatically kept in sync across the entire cluster and are
used by the PEngine to compute the ideal state of the cluster and how it should be achieved.

This list of instructions is then fed to the DC (Designated Co-ordinator). Pacemaker centralizes all
cluster decision making by electing one of the CRMd instances to act as a master. Should the elected
CRMd process, or the node it is on, fail… a new one is quickly established.

The DC carries out the PEngine’s instructions in the required order by passing them to either the LR-
Md (Local Resource Management daemon) or CRMd peers on other nodes via the cluster messaging
infrastructure (which in turn passes them on to their LRMd process).

The peer nodes all report the results of their operations back to the DC and based on the expected
and actual results, will either execute any actions that needed to wait for the previous one to complete,
or abort processing and ask the PEngine to recalculate the ideal cluster state based on the unexpect-
ed results.

In some cases, it may be necessary to power off nodes in order to protect shared data or complete
resource recovery. For this Pacemaker comes with STONITHd. STONITH is an acronym for Shoot-
The-Other-Node-In-The-Head and is usually implemented with a remote power switch. In Pacemak-
er, STONITH devices are modeled as resources (and configured in the CIB) to enable them to be eas-
ily monitored for failure, however STONITHd takes care of understanding the STONITH topology such
that its clients simply request a node be fenced and it does the rest.

                                                                                                        5
Chapter 1. Read-Me-First
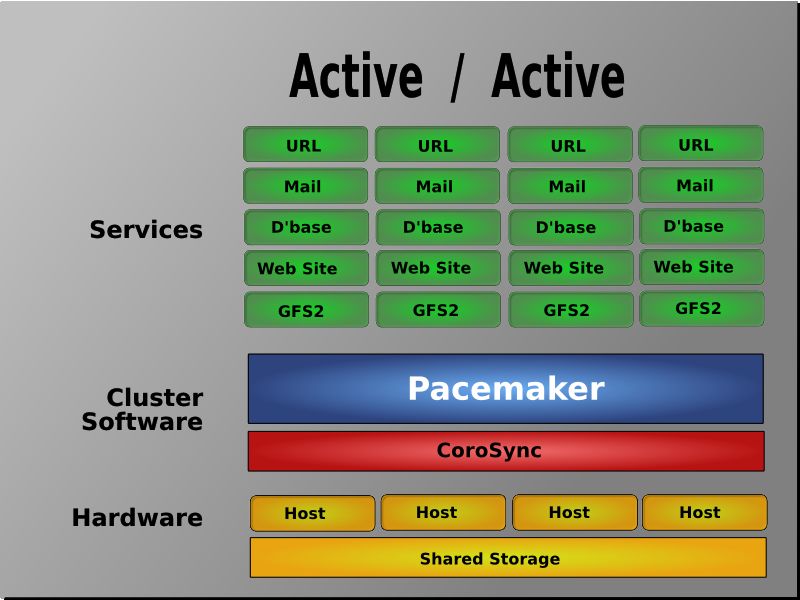
1.4. Types of Pacemaker Clusters
Pacemaker makes no assumptions about your environment, this allows it to support practically any re-
3
dundancy configuration including Active/Active, Active/Passive, N+1, N+M, N-to-1 and N-to-N.
In this document we will focus on the setup of a highly available Apache web server with an Ac-
tive/Passive cluster using DRBD and Ext4 to store data. Then, we will upgrade this cluster to Ac-
tive/Active using GFS2.
Figure 1.4. Active/Passive Redundancy
3
http://en.wikipedia.org/wiki/High-availability_cluster#Node_configurations
6Types of Pacemaker Clusters
Figure 1.5. N to N Redundancy
78
Chapter 2.

Installation

Table of Contents
2.1. OS Installation ..................................................................................................................... 9
2.2. Post Installation Tasks ........................................................................................................ 12
      2.2.1. Networking .............................................................................................................. 12
      2.2.2. Leaving the Console ................................................................................................ 13
      2.2.3. Security Shortcuts ................................................................................................... 13
      2.2.4. Short Node Names .................................................................................................. 13
      2.2.5. NTP ........................................................................................................................ 14
2.3. Before You Continue .......................................................................................................... 14
      2.3.1. Finalize Networking ................................................................................................. 15
      2.3.2. Configure SSH ........................................................................................................ 15
2.4. Cluster Software Installation ................................................................................................ 16
      2.4.1. Install the Cluster Software ...................................................................................... 16
2.5. Setup ................................................................................................................................. 17
      2.5.1. Preparation - Multicast ............................................................................................. 17
      2.5.2. Notes on Multicast Address Assignment ................................................................... 18
      2.5.3. Configuring Corosync ............................................................................................... 19

2.1. OS Installation
Detailed instructions for installing Fedora are available at http://docs.fedoraproject.org/en-US/Fedo-
ra/17/html/Installation_Guide/ in a number of languages. The abbreviated version is as follows…

Point your browser to http://fedoraproject.org/en/get-fedora-all, locate the Install Media section
and download the install DVD that matches your hardware.
                                          1
Burn the disk image to a DVD and boot from it, or use the image to boot a virtual machine.
                                                                                                                  2                         3
After clicking through the welcome screen, select your language, keyboard layout and storage type
                                                 4
Assign your machine a host name. I happen to control the clusterlabs.org domain name, so I will use
that here.

1
  http://docs.fedoraproject.org/en-US/Fedora/16/html/Burning_ISO_images_to_disc/index.html
2
  http://docs.fedoraproject.org/en-US/Fedora/16/html/Installation_Guide/sn-keyboard-x86.html
3
  http://docs.fedoraproject.org/en-US/Fedora/16/html/Installation_Guide/Storage_Devices-x86.html
4
  http://docs.fedoraproject.org/en-US/Fedora/16/html/Installation_Guide/sn-Netconfig-x86.html

                                                                                                                                             9
Chapter 2. Installation
Important
Do not accept the default network settings. Cluster machines should never obtain an IP address
via DHCP.
When you are presented with the Configure Network advanced option, select that option be-
fore continuing with the installation process to specify a fixed IPv4 address for System eth0. Be
sure to also enter the Routes section and add an entry for your default gateway.
If you miss this step, this can easily be configured after installation. You will have to navigate to
system settings and select network. From there you can select what device to configure.
5
You will then be prompted to indicate the machine’s physical location and to supply a root password.
6
7
Now select where you want Fedora installed. As I don’t care about any existing data, I will accept the
default and allow Fedora to use the complete drive.
5
http://docs.fedoraproject.org/en-US/Fedora/16/html/Installation_Guide/s1-timezone-x86.html
6
http://docs.fedoraproject.org/en-US/Fedora/16/html/Installation_Guide/sn-account_configuration-x86.html
7
http://docs.fedoraproject.org/en-US/Fedora/16/html/Installation_Guide/s1-diskpartsetup-x86.html
10OS Installation
Important
By default Fedora uses LVM for partitioning which allows us to dynamically change the amount of
space allocated to a given partition.
However, by default it also allocates all free space to the / (aka. root) partition which cannot be
dynamically reduced in size (dynamic increases are fine by-the-way).
So if you plan on following the DRBD or GFS2 portions of this guide, you should reserve at least
1Gb of space on each machine from which to create a shared volume. To do so select the Re-
view and modify partitioning layout checkbox before clicking Next. You will then be
given an opportunity to reduce the size of the root partition.
8
Next choose which software should be installed. Change the selection to Minimal so that we see
everything that gets installed. Don’t enable updates yet, we’ll do that (and install any extra software we
need) later. After you click next, Fedora will begin installing.
Go grab something to drink, this may take a while.
Once the node reboots, you’ll see a (possibly mangled) login prompt on the console. Login using root
and the password you created earlier.
Note
From here on in we’re going to be working exclusively from the terminal.
8
http://docs.fedoraproject.org/en-US/Fedora/16/html/Installation_Guide/s1-pkgselection-x86.html
11Chapter 2. Installation
2.2. Post Installation Tasks
2.2.1. Networking
Bring up the network and ensure it starts at boot
# service network start
# chkconfig network on
Check the machine has the static IP address you configured earlier
# ip addr
1: lo: mtu 16436 qdisc noqueue state UNKNOWN
link/loopback 00:00:00:00:00:00 brd 00:00:00:00:00:00
inet 127.0.0.1/8 scope host lo
inet6 ::1/128 scope host
valid_lft forever preferred_lft forever
2: eth0: mtu 1500 qdisc pfifo_fast state UP qlen 1000
link/ether 52:54:00:d7:d6:08 brd ff:ff:ff:ff:ff:ff
inet 192.168.122.101/24 brd 192.168.122.255 scope global eth0
inet6 fe80::5054:ff:fed7:d608/64 scope link
valid_lft forever preferred_lft forever
Now check the default route setting:
[root@pcmk-1 ~]# ip route
default via 192.168.122.1 dev eth0
192.168.122.0/24 dev eth0 proto kernel scope link src 192.168.122.101
If there is no line beginning with default via, then you may need to add a line such as
GATEWAY=192.168.122.1
to /etc/sysconfig/network and restart the network.
Now check for connectivity to the outside world. Start small by testing if we can read the gateway we
configured.
# ping -c 1 192.168.122.1
PING 192.168.122.1 (192.168.122.1) 56(84) bytes of data.
64 bytes from 192.168.122.1: icmp_req=1 ttl=64 time=0.249 ms
--- 192.168.122.1 ping statistics ---
1 packets transmitted, 1 received, 0% packet loss, time 0ms
rtt min/avg/max/mdev = 0.249/0.249/0.249/0.000 ms
Now try something external, choose a location you know will be available.
# ping -c 1 www.google.com
PING www.l.google.com (173.194.72.106) 56(84) bytes of data.
64 bytes from tf-in-f106.1e100.net (173.194.72.106): icmp_req=1 ttl=41 time=167 ms
--- www.l.google.com ping statistics ---
1 packets transmitted, 1 received, 0% packet loss, time 0ms
rtt min/avg/max/mdev = 167.618/167.618/167.618/0.000 ms
12Leaving the Console
2.2.2. Leaving the Console
The console isn’t a very friendly place to work from, we will now switch to accessing the machine re-
motely via SSH where we can use copy&paste etc.
First we check we can see the newly installed at all:
beekhof@f16 ~ # ping -c 1 192.168.122.101
PING 192.168.122.101 (192.168.122.101) 56(84) bytes of data.
64 bytes from 192.168.122.101: icmp_req=1 ttl=64 time=1.01 ms
--- 192.168.122.101 ping statistics ---
1 packets transmitted, 1 received, 0% packet loss, time 0ms
rtt min/avg/max/mdev = 1.012/1.012/1.012/0.000 ms
Next we login via SSH
beekhof@f16 ~ # ssh -l root 192.168.122.11
root@192.168.122.11's password:
Last login: Fri Mar 30 19:41:19 2012 from 192.168.122.1
[root@pcmk-1 ~]#
2.2.3. Security Shortcuts
To simplify this guide and focus on the aspects directly connected to clustering, we will now disable the
machine’s firewall and SELinux installation.
Warning
Both of these actions create significant security issues and should not be performed on machines
that will be exposed to the outside world.
Important
TODO: Create an Appendix that deals with (at least) re-enabling the firewall.
# setenforce 0
# sed -i.bak "s/SELINUX=enforcing/SELINUX=permissive/g" /etc/selinux/config
# systemctl disable iptables.service
# rm '/etc/systemd/system/basic.target.wants/iptables.service'
# systemctl stop iptables.service
2.2.4. Short Node Names
During installation, we filled in the machine’s fully qualifier domain name (FQDN) which can be rather
long when it appears in cluster logs and status output. See for yourself how the machine identifies it-
self:
# uname -n
13Chapter 2. Installation
pcmk-1.clusterlabs.org
# dnsdomainname
clusterlabs.org
The output from the second command is fine, but we really don’t need the domain name included in
the basic host details. To address this, we need to update /etc/sysconfig/network. This is what it should
look like before we start.
# cat /etc/sysconfig/network
NETWORKING=yes
HOSTNAME=pcmk-1.clusterlabs.org
GATEWAY=192.168.122.1
All we need to do now is strip off the domain name portion, which is stored elsewhere anyway.
# sed -i.sed 's/\.[a-z].*//g' /etc/sysconfig/network
Now confirm the change was successful. The revised file contents should look something like this.
# cat /etc/sysconfig/network
NETWORKING=yes
HOSTNAME=pcmk-1
GATEWAY=192.168.122.1
However we’re not finished. The machine wont normally see the shortened host name until about it re-
boots, but we can force it to update.
# source /etc/sysconfig/network
# hostname $HOSTNAME
Now check the machine is using the correct names
# uname -n
pcmk-1
# dnsdomainname
clusterlabs.org
2.2.5. NTP
It is highly recommended to enable NTP on your cluster nodes. Doing so ensures all nodes agree on
9
the current time and makes reading log files significantly easier.
2.3. Before You Continue
Repeat the Installation steps so far, so that you have two Fedora nodes ready to have the cluster soft-
ware installed.
For the purposes of this document, the additional node is called pcmk-2 with address
192.168.122.102.
9
http://docs.fedoraproject.org/en-US/Fedora/17/html-single/System_Administrators_Guide/index.html#ch-
Configuring_the_Date_and_Time
14Finalize Networking
2.3.1. Finalize Networking
Confirm that you can communicate between the two new nodes:
# ping -c 3 192.168.122.102
PING 192.168.122.102 (192.168.122.102) 56(84) bytes of data.
64 bytes from 192.168.122.102: icmp_seq=1 ttl=64 time=0.343 ms
64 bytes from 192.168.122.102: icmp_seq=2 ttl=64 time=0.402 ms
64 bytes from 192.168.122.102: icmp_seq=3 ttl=64 time=0.558 ms
--- 192.168.122.102 ping statistics ---
3 packets transmitted, 3 received, 0% packet loss, time 2000ms
rtt min/avg/max/mdev = 0.343/0.434/0.558/0.092 ms
Now we need to make sure we can communicate with the machines by their name. If you have a DNS
server, add additional entries for the two machines. Otherwise, you’ll need to add the machines to /etc/
hosts . Below are the entries for my cluster nodes:
# grep pcmk /etc/hosts
192.168.122.101 pcmk-1.clusterlabs.org pcmk-1
192.168.122.102 pcmk-2.clusterlabs.org pcmk-2
We can now verify the setup by again using ping:
# ping -c 3 pcmk-2
PING pcmk-2.clusterlabs.org (192.168.122.101) 56(84) bytes of data.
64 bytes from pcmk-1.clusterlabs.org (192.168.122.101): icmp_seq=1 ttl=64 time=0.164 ms
64 bytes from pcmk-1.clusterlabs.org (192.168.122.101): icmp_seq=2 ttl=64 time=0.475 ms
64 bytes from pcmk-1.clusterlabs.org (192.168.122.101): icmp_seq=3 ttl=64 time=0.186 ms
--- pcmk-2.clusterlabs.org ping statistics ---
3 packets transmitted, 3 received, 0% packet loss, time 2001ms
rtt min/avg/max/mdev = 0.164/0.275/0.475/0.141 ms
2.3.2. Configure SSH
SSH is a convenient and secure way to copy files and perform commands remotely. For the purposes
of this guide, we will create a key without a password (using the -N option) so that we can perform re-
mote actions without being prompted.
Warning
Unprotected SSH keys, those without a password, are not recommended for servers exposed to
the outside world. We use them here only to simplify the demo.
Create a new key and allow anyone with that key to log in:
Creating and Activating a new SSH Key
# ssh-keygen -t dsa -f ~/.ssh/id_dsa -N ""
15Chapter 2. Installation Generating public/private dsa key pair. Your identification has been saved in /root/.ssh/id_dsa. Your public key has been saved in /root/.ssh/id_dsa.pub. The key fingerprint is: 91:09:5c:82:5a:6a:50:08:4e:b2:0c:62:de:cc:74:44 root@pcmk-1.clusterlabs.org The key's randomart image is: +--[ DSA 1024]----+ |==.ooEo.. | |X O + .o o | | * A + | | + . | | . S | | | | | | | | | +-----------------+ # cp .ssh/id_dsa.pub .ssh/authorized_keys Install the key on the other nodes and test that you can now run commands remotely, without being prompted Installing the SSH Key on Another Host # scp -r .ssh pcmk-2: The authenticity of host 'pcmk-2 (192.168.122.102)' can't be established. RSA key fingerprint is b1:2b:55:93:f1:d9:52:2b:0f:f2:8a:4e:ae:c6:7c:9a. Are you sure you want to continue connecting (yes/no)? yes Warning: Permanently added 'pcmk-2,192.168.122.102' (RSA) to the list of known hosts.root@pcmk-2's password: id_dsa.pub 100% 616 0.6KB/s 00:00 id_dsa 100% 672 0.7KB/s 00:00 known_hosts 100% 400 0.4KB/s 00:00 authorized_keys 100% 616 0.6KB/s 00:00 # ssh pcmk-2 -- uname -n pcmk-2 # 2.4. Cluster Software Installation 2.4.1. Install the Cluster Software Since version 12, Fedora comes with recent versions of everything you need, so simply fire up the GUI and run: 16
Setup

Now install the cluster software on the second node.

2.5. Setup

2.5.1. Preparation - Multicast
                                              10
Choose a port number and multi-cast                address. http://en.wikipedia.org/wiki/Multicast_address

10
     http://en.wikipedia.org/wiki/Multicast

                                                                                                               17
Chapter 2. Installation
Be sure that the values you chose do not conflict with any existing clusters you might have. For this
document, I have chosen port 4000 and used 239.255.1.1 as the multi-cast address.
2.5.2. Notes on Multicast Address Assignment
There are several subtle points that often deserve consideration when choosing/assigning multicast
11
addresses.
1. Avoid 224.0.0.x
Traffic to addresses of the form 224.0.0.x is often flooded to all switch ports. This address range
is reserved for link-local uses. Many routing protocols assume that all traffic within this range will
be received by all routers on the network. Hence (at least all Cisco) switches flood traffic within
this range. The flooding behavior overrides the normal selective forwarding behavior of a multi-
cast-aware switch (e.g. IGMP snooping, CGMP, etc.).
2. Watch for 32:1 overlap
32 non-contiguous IP multicast addresses are mapped onto each Ethernet multicast address.
A receiver that joins a single IP multicast group implicitly joins 31 others due to this overlap. Of
course, filtering in the operating system discards undesired multicast traffic from applications, but
NIC bandwidth and CPU resources are nonetheless consumed discarding it. The overlap occurs
in the 5 high-order bits, so it’s best to use the 23 low-order bits to make distinct multicast streams
unique. For example, IP multicast addresses in the range 239.0.0.0 to 239.127.255.255 all map
to unique Ethernet multicast addresses. However, IP multicast address 239.128.0.0 maps to the
same Ethernet multicast address as 239.0.0.0, 239.128.0.1 maps to the same Ethernet multicast
address as 239.0.0.1, etc.
3. Avoid x.0.0.y and x.128.0.y
Combining the above two considerations, it’s best to avoid using IP multicast addresses of the
form x.0.0.y and x.128.0.y since they all map onto the range of Ethernet multicast addresses that
are flooded to all switch ports.
4. Watch for address assignment conflicts
12 13
IANA administers Internet multicast addresses . Potential conflicts with Internet multicast ad-
14 15
dress assignments can be avoided by using GLOP addressing (AS required) or administra-
16
tively scoped addresses. Such addresses can be safely used on a network connected to the In-
ternet without fear of conflict with multicast sources originating on the Internet. Administratively
17
scoped addresses are roughly analogous to the unicast address space for private internets . Site-
local multicast addresses are of the form 239.255.x.y, but can grow down to 239.252.x.y if need-
ed. Organization-local multicast addresses are of the form 239.192-251.x.y, but can grow down to
239.x.y.z if needed.
11
This information is borrowed from, the now defunct, http://web.archive.org/web/20101211210054/http://29west.com/docs/TH-
PM/multicast-address-assignment.html
12
http://www.iana.org/
13
http://www.iana.org/assignments/multicast-addresses
14
http://www.ietf.org/rfc/rfc3180.txt
15
http://en.wikipedia.org/wiki/Autonomous_system_%28Internet%29
16
http://www.ietf.org/rfc/rfc2365.txt
17
http://www.ietf.org/rfc/rfc1918.txt
18Configuring Corosync
For a more detailed treatment (57 pages!), see Cisco’s Guidelines for Enterprise IP Multicast Address
18
Allocation paper.
2.5.3. Configuring Corosync
In the past, at this point in the tutorial an explanation of how to configure and propagate corosync’s /
etc/corosync.conf file would be necessary. Using LCMC greatly simplifies this process by generating
corosync.conf across all the nodes in the cluster with a single click.
The final /etc/corosync.conf configuration on each node should look something like the sample in Ap-
pendix B, Sample Corosync Configuration.
Important
Pacemaker used to obtain membership and quorum from a custom Corosync plugin. This plugin
also had the capability to start Pacemaker automatically when Corosync was started.
Neither behavior is possible with Corosync 2.0 and beyond as support for plugins was removed.
Instead, Pacemaker must be started as a separate job/initscript. Also, since Pacemaker made
use of the plugin for message routing, a node using the plugin (Corosync prior to 2.0) cannot talk
to one that isn’t (Corosync 2.0+).
19
Rolling upgrades between these versions are therefor not possible and an alternate strategy
must be used.
18
http://www.cisco.com/en/US/tech/tk828/technologies_white_paper09186a00802d4643.shtml
19
http://www.clusterlabs.org/doc/en-US/Pacemaker/1.1/html/Pacemaker_Explained/ap-upgrade.html
1920
Chapter 3.

Pacemaker Tools

Table of Contents
3.1. Using Pacemaker Tools ...................................................................................................... 21

3.1. Using Pacemaker Tools
In the dark past, configuring Pacemaker required the administrator to read and write XML. In true
UNIX style, there were also a number of different commands that specialized in different aspects of
querying and updating the cluster.

All of that has been greatly simplified with the creation of unified command-line shells (and GUIs) that
hide all the messy XML scaffolding.

These shells take all the individual aspects required for managing and configuring a cluster, and packs
them into one simple to use command line tool.

They even allow you to queue up several changes at once and commit them atomically.

There are currently two command-line shells that people use, pcs and crmsh. This edition of Clusters
from Scratch is based on lcmc. Start by taking some time to familiarize yourself with what it can do.

           Note

   Although lcmc has the ability to manage all aspects of the cluster (both corosync and pacemak-
   er), it does not require any specific cluster stack to be in use.

  # lcmc

                                                                                                                                21
22
Chapter 4.

Verify Cluster Installation

Table of Contents
4.1. Start the Cluster ................................................................................................................. 23
4.2. Verify Corosync Installation ................................................................................................. 24
4.3. Verify Pacemaker Installation .............................................................................................. 25

4.1. Start the Cluster
Now that corosync is configured, it is time to start the cluster. The menu items below will start corosync
and pacemaker on both nodes in the cluster.

                                                                                                                                       23
Chapter 4. Verify Cluster Installation 4.2. Verify Corosync Installation The first thing to check is if cluster communication is happy, for that we use corosync-cfgtool. 24
Verify Pacemaker Installation

We can see here that everything appears normal with our fixed IP address, not a 127.0.0.x loopback
address, listed as the id and no faults for the status.

If you see something different, you might want to start by checking the node’s network, firewall and
selinux configurations.

Next we check the membership and quorum APIs:

All good!

4.3. Verify Pacemaker Installation
Check the logs and crm_mon.

Next, check for any ERRORs during startup - there shouldn’t be any.

                                                                                                       25
Chapter 4. Verify Cluster Installation 26
Chapter 5.

Creating an Active/Passive Cluster
Table of Contents
5.1. Exploring the Existing Configuration ....................................................................................          27
5.2. Adding a Resource .............................................................................................................    28
5.3. Perform a Failover .............................................................................................................   30
      5.3.1. Quorum and Two-Node Clusters ...............................................................................               31
      5.3.2. Prevent Resources from Moving after Recovery ........................................................                      32

5.1. Exploring the Existing Configuration
When Pacemaker starts up, it automatically records the number and details of the nodes in the cluster
as well as which stack is being used and the version of Pacemaker being used.

This is what the base configuration should look like.

Before we make any changes, its a good idea to check the validity of the configuration.

As you can see, the tool has found some errors.

                                                                                                                                        27
Chapter 5. Creating an Active/Passive Cluster
1 2
In order to guarantee the safety of your data , the default for STONITH in Pacemaker is enabled.
However it also knows when no STONITH configuration has been supplied and reports this as a prob-
lem (since the cluster would not be able to make progress if a situation requiring node fencing arose).
For now, we will disable this feature and configure it later in the Configuring STONITH section. It is im-
portant to note that the use of STONITH is highly encouraged, turning it off tells the cluster to simply
pretend that failed nodes are safely powered off. Some vendors will even refuse to support clusters
that have it disabled.
To disable STONITH, we set the stonith-enabled cluster option to false.
With the new cluster option set, the configuration is now valid.
Warning
The use of stonith-enabled=false is completely inappropriate for a production cluster. We use it
here to defer the discussion of its configuration which can differ widely from one installation to the
next. See Section 9.1, “What Is STONITH” for information on why STONITH is important and de-
tails on how to configure it.
5.2. Adding a Resource
The first thing we should do is configure an IP address. Regardless of where the cluster service(s)
are running, we need a consistent address to contact them on. Here I will choose and add
192.168.122.120 as the floating address, give it the imaginative name ClusterIP and tell the cluster to
check that its running every 30 seconds.
1
If the data is corrupt, there is little point in continuing to make it available
2
A common node fencing mechanism. Used to ensure data integrity by powering off "bad" nodes
28Adding a Resource
Important
The chosen address must not be one already associated with a physical node
The other important piece of information here is ocf:heartbeat:IPaddr2.
This tells Pacemaker three things about the resource you want to add. The first field, ocf, is the stan-
dard to which the resource script conforms to and where to find it. The second field is specific to OCF
resources and tells the cluster which namespace to find the resource script in, in this case heartbeat.
The last field indicates the name of the resource script.
Finally, if you want to see all the resource agents available for a specific ocf provider (the IPaddr2 part
of ocf:heartbeat:IPaddr2), run
29Chapter 5. Creating an Active/Passive Cluster Now verify that the IP resource has been added and display the cluster’s status to see that it is now active. 5.3. Perform a Failover Being a high-availability cluster, we should test failover of our new resource before moving on. First, find the node on which the IP address is running. 30
Quorum and Two-Node Clusters

Shut down Pacemaker and Corosync on that machine.

There are three things to notice about the cluster’s current state. The first is that, as expected, pcmk-1
is now offline. However we can also see that ClusterIP isn’t running anywhere!

5.3.1. Quorum and Two-Node Clusters
This is because the cluster no longer has quorum, as can be seen by the text "partition WITHOUT
quorum" in the status output. In order to reduce the possibility of data corruption, Pacemaker’s default
behavior is to stop all resources if the cluster does not have quorum.

A cluster is said to have quorum when more than half the known or expected nodes are online, or for
the mathematically inclined, whenever the following equation is true:

    total_nodes < 2 * active_nodes

Therefore a two-node cluster only has quorum when both nodes are running, which is no longer the
                                                                                           3
case for our cluster. This would normally make the creation of a two-node cluster pointless , howev-

3
    Actually some would argue that two-node clusters are always pointless, but that is an argument for another time

                                                                                                                      31
Chapter 5. Creating an Active/Passive Cluster
er it is possible to control how Pacemaker behaves when quorum is lost. In particular, we can tell the
cluster to simply ignore quorum altogether.
After a few moments, the cluster will start the IP address on the remaining node. Note that the cluster
still does not have quorum.
Now simulate node recovery by restarting the cluster stack on pcmk-1 and check the cluster’s status.
Note
In the dark days, the cluster may have moved the IP back to its original location (pcmk-1). Usual-
ly this is no longer the case.
5.3.2. Prevent Resources from Moving after Recovery
In most circumstances, it is highly desirable to prevent healthy resources from being moved around
the cluster. Moving resources almost always requires a period of downtime. For complex services like
Oracle databases, this period can be quite long.
32Prevent Resources from Moving after Recovery
To address this, Pacemaker has the concept of resource stickiness which controls how much a service
prefers to stay running where it is. You may like to think of it as the "cost" of any downtime. By default,
Pacemaker assumes there is zero cost associated with moving resources and will do so to achieve
4
"optimal" resource placement. We can specify a different stickiness for every resource, but it is often
sufficient to change the default.
4
It should be noted that Pacemaker’s definition of optimal may not always agree with that of a human’s. The order in which
Pacemaker processes lists of resources and nodes creates implicit preferences in situations where the administrator has not ex-
plicitly specified them
3334
Chapter 6.

Apache - Adding More Services

Table of Contents
6.1.   Forward .............................................................................................................................     35
6.2.   Installation ..........................................................................................................................   35
6.3.   Preparation ........................................................................................................................      35
6.4.   Enable the Apache status URL ...........................................................................................                  36
6.5.   Update the Configuration ....................................................................................................             36
6.6.   Ensuring Resources Run on the Same Host ........................................................................                          38
6.7.   Controlling Resource Start/Stop Ordering ............................................................................                     39
6.8.   Specifying a Preferred Location ..........................................................................................                40
6.9.   Manually Moving Resources Around the Cluster ..................................................................                           41
        6.9.1. Giving Control Back to the Cluster ............................................................................                   42

6.1. Forward
Now that we have a basic but functional active/passive two-node cluster, we’re ready to add some real
services. We’re going to start with Apache because its a feature of many clusters and relatively simple
to configure.

6.2. Installation
Before continuing, we need to make sure Apache is installed on both hosts. We also need the wget
tool in order for the cluster to be able to check the status of the Apache server.

6.3. Preparation
First we need to create a page for Apache to serve up. On Fedora the default Apache docroot is /var/
www/html, so we’ll create an index file there.

 # cat
Chapter 6. Apache - Adding More Services
My Test Site - pcmk-2
END
6.4. Enable the Apache status URL
In order to monitor the health of your Apache instance, and recover it if it fails, the resource agent
used by Pacemaker assumes the server-status URL is available. Look for the following in /etc/httpd/
conf/httpd.conf and make sure it is not disabled or commented out:
6.5. Update the Configuration
At this point, Apache is ready to go, all that needs to be done is to add it to the cluster. Lets call the re-
1
source WebSite. We need to use an OCF script called apache in the heartbeat namespace , the only
required parameter is the path to the main Apache configuration file and we’ll tell the cluster to check
once a minute that apache is still running.
1
Compare the key used here ocf:heartbeat:apache with the one we used earlier for the IP address: ocf:heartbeat:IPaddr2
36Update the Configuration
After a short delay, we should see the cluster start apache
Wait a moment, the WebSite resource isn’t running on the same host as our IP address!
37Chapter 6. Apache - Adding More Services
Note
If you see the WebSite resource has failed to start, then you’ve likely not enabled the status URL
correctly.
You can check if this is the problem by running:
wget http://127.0.0.1/server-status
If you see Connection refused in the output, then this is indeed the problem. Check to en-
sure that Allow from 127.0.0.1 is present for the block.
6.6. Ensuring Resources Run on the Same Host
To reduce the load on any one machine, Pacemaker will generally try to spread the configured re-
sources across the cluster nodes. However we can tell the cluster that two resources are related and
need to run on the same host (or not at all). Here we instruct the cluster that WebSite can only run on
the host that ClusterIP is active on.
To achieve this we use a colocation constraint that indicates it is mandatory for WebSite to run on
the same node as ClusterIP. The "mandatory" part of the colocation constraint is indicated by using a
score of INFINITY. The INFINITY score also means that if ClusterIP is not active anywhere, WebSite
will not be permitted to run.
Note
If ClusterIP is not active anywhere, WebSite will not be permitted to run anywhere.
Important
Colocation constraints are "directional", in that they imply certain things about the order in which
the two resources will have a location chosen. In this case we’re saying WebSite needs to be
placed on the same machine as ClusterIP, this implies that we must know the location of
ClusterIP before choosing a location for WebSite.
38Controlling Resource Start/Stop Ordering
6.7. Controlling Resource Start/Stop Ordering
When Apache starts, it binds to the available IP addresses. It doesn’t know about any addresses we
add afterwards, so not only do they need to run on the same node, but we need to make sure Clus-
terIP is already active before we start WebSite. We do this by adding an ordering constraint.
39Chapter 6. Apache - Adding More Services 6.8. Specifying a Preferred Location Pacemaker does not rely on any sort of hardware symmetry between nodes, so it may well be that one machine is more powerful than the other. In such cases it makes sense to host the resources there if it is available. To do this we create a location constraint. In the location constraint below, we are saying the WebSite resource prefers the node pcmk-1 with a score of 50. The score here indicates how badly we’d like the resource to run somewhere. 40
Manually Moving Resources Around the Cluster
Wait a minute, the resources are still on pcmk-2!
Even though we now prefer pcmk-1 over pcmk-2, that preference is (intentionally) less than the re-
source stickiness (how much we preferred not to have unnecessary downtime).
To see the current placement scores, you can use resource tool-tips
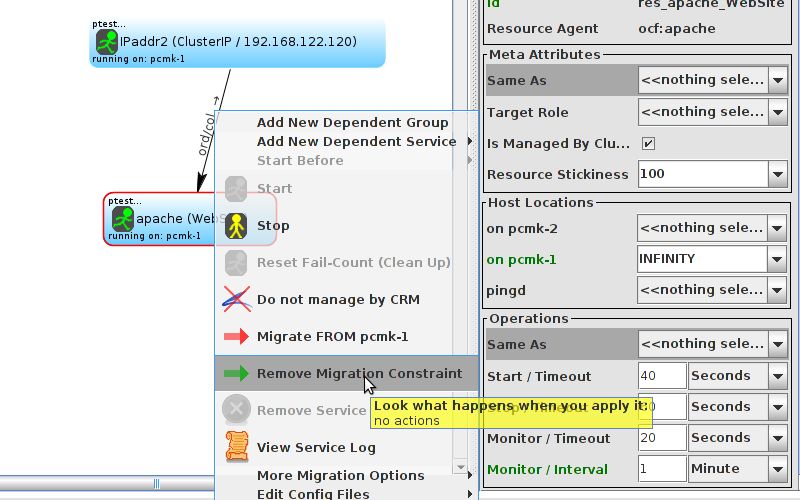
6.9. Manually Moving Resources Around the Cluster
There are always times when an administrator needs to override the cluster and force resources to
move to a specific location. Underneath we use location constraints like the one we created above,
happily you don’t need to care.
41Chapter 6. Apache - Adding More Services 6.9.1. Giving Control Back to the Cluster Once we’ve finished whatever activity that required us to move the resources to pcmk-1, in our case nothing, we can then allow the cluster to resume normal operation with the unmove command. Since we previously configured a default stickiness, the resources will remain on pcmk-1. Note that the constraint is now gone. If we check the cluster status, we can also see that as expected the resources are still active on pcmk-1. 42
You can also read


