Security Guidelines SIP Media Gateways and SBCs - Reference Guide
←
→
Page content transcription
If your browser does not render page correctly, please read the page content below
Reference Guide
AudioCodes Family of Media Gateways and Session Border Controllers (SBCs)

Security Guidelines
SIP Media Gateways and SBCs

Version 7.2
Reference Guide                                                                                                           Contents

                                              Table of Contents

1   Introduction......................................................................................................... 7
    1.1    Security Threats..................................................................................................... 7
    1.2    AudioCodes Security Solution................................................................................ 9
2   Separate Network Traffic ................................................................................. 11
    2.1    Identify Trusted and Un-trusted Networks ............................................................ 11
    2.2    Implement Physical Network Separation using Ethernet Port Groups .................. 11
3   Implement Layer 3/4 (Network) Firewall ......................................................... 13
    3.1    Block Unused Network Ports ............................................................................... 13
    3.2    Define VoIP Traffic Firewall Rules ....................................................................... 13
4   Secure Management Access ........................................................................... 15
    4.1    Change Default Management User Login Passwords .......................................... 15
    4.2    Implement LDAP-based User Authentication and Authorization........................... 16
    4.3    Implement RADIUS-based Management User Authentication ............................. 16
    4.4    Implement Two-Way Authentication with X.509 Certificates ................................ 17
    4.5    Secure HTTP Access using HTTPS..................................................................... 18
    4.6    Secure Telnet Sessions ....................................................................................... 18
    4.7    Secure CLI Sessions by SSH .............................................................................. 19
    4.8    Define Web, Telnet, and SSH Authorized Access List ......................................... 19
    4.9    Secure SNMP Interface Access ........................................................................... 20
           4.9.1     Prefer SNMPv3 over SNMPv2 ................................................................................ 20
           4.9.2     Secure SMNPv2 Access ......................................................................................... 20
    4.10 Secure LDAP Communication ............................................................................. 21
5   Secure SIP using TLS (SIPS) ........................................................................... 23
    5.1    Use Strong Authentication Passwords ................................................................. 23
    5.2    Use TLS Version 1.1 and/or 1.2 ........................................................................... 23
    5.3    Use TLS for SIP Interfaces and Block TCP/UDP Ports ........................................ 24
    5.4    Use TLS for Routing Rules .................................................................................. 24
    5.5    Implement X.509 Certificates for SIPS (TLS) Sessions ........................................ 25
    5.6    Use an NTP Server .............................................................................................. 26
6   Implement LDAP-based Conditional Call Routing......................................... 27

7   Define SIP Message Blacklist/Whitelist .......................................................... 29

8   Monitor and Log Events ................................................................................... 31
    8.1    Implement Dynamic Blacklisting of Malicious Activity (IDS) ................................. 31
    8.2    Enable Syslog ...................................................................................................... 32
    8.3    Enable Logging of Management-Related Events ................................................. 33

Version 7.2                                                    3                                            Gateways & SBCs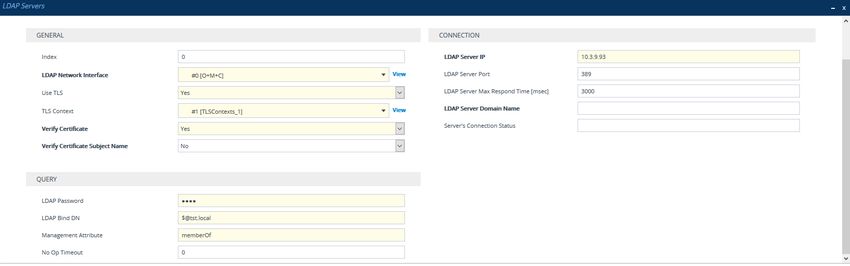
Recommended Security Guidelines

     8.4    Enable Call Detail Records .................................................................................. 34
9    SBC-Specific Security Guidelines................................................................... 35
     9.1    General Guidelines .............................................................................................. 35
     9.2    Secure Media (RTP) Traffic using SRTP.............................................................. 35
     9.3    Implement SIP Authentication and Encryption ..................................................... 36
            9.3.1     Authenticating Users as an Authentication Server ................................................. 36
            9.3.2     Authenticating Users by RADIUS Server ................................................................ 37
            9.3.3     Authenticating SIP Servers as an Authentication Server........................................ 37
            9.3.4     Enforce SIP Client Authentication by SIP Proxy ..................................................... 37
            9.3.5     Enforce SIP Digest Authentication by IP PBX ........................................................ 38
     9.4    Secure Routing Rules .......................................................................................... 38
            9.4.1     Classify by Classification Rules versus Proxy Set .................................................. 38
            9.4.2     Define Strict Classification Rules ............................................................................ 39
            9.4.3     Block Unclassified Calls .......................................................................................... 40
            9.4.4     Allow Calls Only with Specific SIP User-Agent Header Value ................................ 40
            9.4.5     Define Strict Routing Rules ..................................................................................... 41
     9.5    Define Call Admission Control Rules ................................................................... 41
     9.6    Define Maximum Call Duration ............................................................................ 42
     9.7    Secure SIP User Agent Registration .................................................................... 42
            9.7.1     Configure Identical Registration Intervals ............................................................... 42
            9.7.2     Limit SBC Registered Users per IP Group, SIP Interface or SRD .......................... 43
            9.7.3     Block Calls from Unregistered Users ...................................................................... 43
            9.7.4     Block Registration from Un-Authenticated New Users ........................................... 43
     9.8    Authenticate SIP BYE Messages ......................................................................... 44
     9.9    Use SIP Message Manipulation for Topology Hiding ........................................... 44
     9.10 Define Malicious Signatures................................................................................. 45
10 Gateway-Specific Security Guidelines ........................................................... 47
     10.1 Block Calls from Unknown IP Addresses ............................................................. 47
     10.2 Enable Secure SIP (SIPS) ................................................................................... 47
     10.3 Define Strict Routing Rules .................................................................................. 48
     10.4 Define Call Admission Control ............................................................................. 48
     10.5 Define Maximum Call Duration ............................................................................ 48
11 Network Port Assignment ................................................................................ 49

Reference Guide                                                   4                                    Document #: LTRT-30218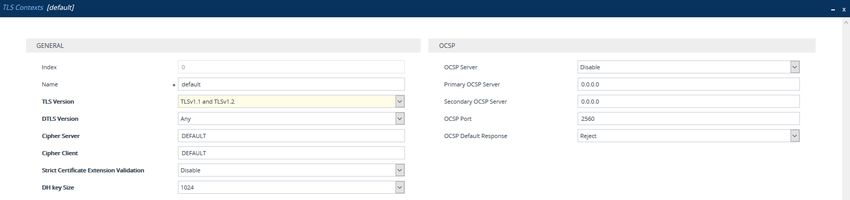
Reference Guide                                                                                   Notices

                                                Notice
      Information contained in this document is believed to be accurate and reliable at the time of
      printing. However, due to ongoing product improvements and revisions, AudioCodes cannot
      guarantee accuracy of printed material after the Date Published nor can it accept
      responsibility for errors or omissions. Updates to this document can be downloaded from
      https://www.audiocodes.com/library/technical-documents.
                            This document is subject to change without notice.

                                   Date Published: January-13-2021

WEEE EU Directive
           Pursuant to the WEEE EU Directive, electronic and electrical waste must not be disposed of
           with unsorted waste. Please contact your local recycling authority for disposal of this product.

Customer Support
           Customer technical support and services are provided by AudioCodes or by an authorized
           AudioCodes Service Partner. For more information on how to buy technical support for
           AudioCodes products and for contact information, please visit our website at
           https://www.audiocodes.com/services-support/maintenance-and-support.

Stay in the Loop with AudioCodes

Abbreviations and Terminology
           Each abbreviation, unless widely used, is spelled out in full when first used.
           Throughout this manual, unless otherwise specified, the term device refers to AudioCodes
           products.

Version 7.2                                         5                                  Gateways & SBCs
Recommended Security Guidelines

Document Revision Record

    LTRT                                              Description

   30208       Initial document release for Version 7.2.
   30209       Corporate logo and URLs updated.
   30211       Network port assignment updated.
   30212       Screenshots and paths of Web-based management tool updated for 7.2.252; secure
               SIP chapter updated.
   30213       Changing default ports and disabling telnet recommendations; SSH enabled b default
   30215       LDAP section promoted.
   30218       SSL 3.0 removed and TLS 1.3 added; cross-reference fixed; classification last rule
               deny removed

Documentation Feedback
           AudioCodes continually strives to produce high quality documentation. If you have any
           comments (suggestions or errors) regarding this document, please fill out the Documentation
           Feedback form on our website at https://online.audiocodes.com/documentation-feedback.

Reference Guide                                   6                        Document #: LTRT-30218
Reference Guide 1. Introduction
1 Introduction
This document provides recommended security guidelines for safeguarding your network and
your AudioCodes device against malicious attacks.
Note:
• This document provides only recommended security guidelines; your network
architecture may require additional and/or different security measures.
• The document includes partial configuration; for detailed configuration, refer to the
device's User's Manual.
• The document may refer to AudioCodes products not included in Version 7.2.
See the Release Notes Ver. 7.2 for a list of the supported products.
1.1 Security Threats
AudioCodes devices are commonly located at the demarcation point between safe (trusted)
and unsafe (un-trusted) networks. A typical example of an un-trusted network would be a SIP
trunk connected to an Internet Telephony Service Provider (ITSP) network; the trusted
network would be the internal LAN. The figure below illustrates this basic concept of trusted
and un-trusted networks.
Figure 1: Trusted and Un-trusted Networks
Attacks on your network from the un-trusted network may include the following:
Denial of Service (DoS) attacks: Malicious attacks designed to cripple your VoIP
network by overloading it with calls or service requests.
Overload events: In addition to purposeful DoS attacks, non-malicious periods of
intense activity can also cause an increase in call signaling rates that exceed what
your infrastructure can support, resulting in network conditions that are similar in effect
Version 7.2 7 Gateways & SBCsRecommended Security Guidelines
to DoS attacks. Successful attacks resulting in contact center downtime can result in
lost revenue and diminished customer satisfaction.
Network abuse and fraud: Malicious intrusion or service theft may take the form of an
unauthorized user gaining access to your VoIP network by mimicking an authorized
user or seizing control of a SIP proxy and initiating outbound calls to the PSTN for free.
Another possibility is using a compromised endpoint to redirect or forward calls for
eavesdropping.
Viruses and malware: Computer viruses, worms, Trojan horses, and other malware
can infect user agent phones and SIP-based ACD infrastructure - just as they can
computers and servers - and degrade performance or completely disrupt service. As
devices become more sophisticated with distinct operating systems, malware also
serves as a way to subjugate devices and launch DoS attacks that piggyback
encrypted links.
Identity theft: Phishing and "man-in-the-middle" can be used to acquire caller
identification information to gain unauthorized access to services and information.
Theft by phone (or service theft), whereby access to your corporate phone system is
attempted by users posing as legitimate ones can sky-rocket your corporation's phone
bill.
Eavesdropping: The ability to listen to or record calls is easier on VoIP networks than
on PSTN. This is a concern not only because of personal privacy violations, but also
because sensitive information can be compromised and exploited.
Spam over Internet Telephony (SPIT): The delivery of unsolicited calls or voicemails
can inundate networks, annoy subscribers, and diminish the usefulness of VoIP
networks.
These threats can exist, for example, at the following main IP network border points:
Interconnect: SIP trunks to ITSPs, using SIP signaling for inbound and outbound
calls.
Trusted access: Private, managed IP networks that connect service providers'
residential, enterprise, or mobile subscribers (as part of an emerging federation of
trusted networks).
Un-trusted access: Unmanaged Internet for connections to work-at-home agents or
inbound callers.
Reference Guide 8 Document #: LTRT-30218Reference Guide 1. Introduction
1.2 AudioCodes Security Solution
The AudioCodes device provides a comprehensive package of security features that handles
the following two main security areas:
Securing the Service: Secures the call services it provides by implementing
separation and defense of different network entities (e.g., SIP Trunk, softswitch, and
users). This is accomplished by the following:
• Physical separation of networks
• SRDs for each SIP entity (user agent)
• IP Groups for each SIP entity (user agent)
Securing the Device:
• Management - ensuring that only authorized users can access the device's
management interface
• Defense against attacks on the device regarding SIP signaling and media (RTP)
Due to the vast number and types of potential attacks (some described in the previous
section), security of your trusted VoIP network should be your paramount concern. The
device provides a rich set of features to support perimeter defense for protecting your trusted
network from the un-trusted ones. However, the device's security features and capabilities
are only effective if implemented correctly. Improper use of the device for perimeter defense
may render the overall security solution ineffective, thereby exposing your network to multiple
threats.
The benefits of an IP-based telephony network are quite clear, but so are the threats and
security implications that need to be addressed. The IP borders of the IP telephony network
are the attack points and it is the AudioCodes security solutions that are designed to help
safeguard your trusted network from such threats.
Version 7.2 9 Gateways & SBCsRecommended Security Guidelines
This page is intentionally left blank.
Reference Guide 10 Document #: LTRT-30218Reference Guide 2. Separate Network Traffic
2 Separate Network Traffic
This chapter provides recommendations for separating network traffic.
2.1 Identify Trusted and Un-trusted Networks
It is crucial that you identify the trusted network (i.e., your local LAN) and the un-trusted
network (i.e., public Internet – WAN) in the environment in which the device is deployed.
There may be multiple un-trusted networks in a single deployment environment. For example,
far-end WAN users and a SIP trunk with an ITSP may represent two un-trusted networks.
Once identified, you need to handle the un-trusted networks with extreme caution in order to
safeguard your trusted network from malicious attacks from them. One of the main
precautions is to separate your trusted network from the un-trusted network, using different
logical configuration entities such as SRDs etc. The precautions and security guidelines are
described in detail in subsequent sections.
2.2 Implement Physical Network Separation using
Ethernet Port Groups
For the devices mentioned in the note above, you can physically separate the network traffic
by Ethernet ports, using Ethernet Groups. Each Ethernet Group can include up to two
physical Ethernet ports. The Ethernet Device defines the VLAN per Ethernet Group. The
Ethernet Device is then assigned to the network interface as an Underlying Device. The
following procedure provides an example of assigning different ports per traffic type.
1. Assign ports to different Ethernet Groups in the Ethernet Groups table (Setup menu >
IP Network tab > Core Entities folder > Ethernet Groups):
Figure 2-1: Assigning Ports to Ethernet Groups
2. Configure VLAN IDs per Ethernet Group in the Ethernet Devices table (Setup menu >
IP Network tab > Core Entities folder > Ethernet Devices):
Figure 2-2: Assigning VLANs to Ethernet Groups
Version 7.2 11 Gateways & SBCsRecommended Security Guidelines
3. Assign the Ethernet Devices (VLANs) to the different traffic network interfaces in the IP
Interfaces table (Setup menu > IP Network tab > Core Entities folder > IP Interfaces):
Figure 2-3: Assigning Ethernet Devices (VLANs) to IP Interfaces
Reference Guide 12 Document #: LTRT-30218Reference Guide 3. Implement Layer 3/4 (Network) Firewall
3 Implement Layer 3/4 (Network) Firewall
This section discusses Layer 3/4 (Network) firewall recommendations. By default, there are
no firewall rules and this exposes the device to security risks. Therefore, configuring firewall
rules is highly recommended to protect the device from external attacks.
3.1 Block Unused Network Ports
It is highly recommended that you disable network ports that are not used in your deployment.
For example, if you are not using Trivial File Transfer Protocol (TFTP) in your network, then
you should disable this network port application.
3.2 Define VoIP Traffic Firewall Rules
For packets whose source IP addresses are known, it is recommended to define VoIP firewall
rules that allow receipt of calls or packets from this network and block all calls from elsewhere.
These rules can be defined per source IP address, port, protocol, and network IP interface.
If an incoming packet is received from an invalid source (as defined in the firewall), the call
or packet is discarded.
Below is a list of recommended guidelines when configuring the VoIP firewall:
Add firewall rules per network interface: It is recommended to define firewall rules
for packets from source IP addresses received on the OAMP interface and each SIP
Control (SIP) interface (defined in the Multiple Interface table). A less recommended
alternative is to define a single rule that applies to all interfaces (by setting the 'Use
Specific Interface' parameter to 'Disable').
Define bandwidth limitation per rule: For each IP network interface, it is advised to
define a rate-limiting value (byte rate, burst bytes and maximum packet size).
Bandwidth limitation prevents overloading (flooding) of your network and thereby,
helps in preventing attacks such as DoS on your device (on each network).
Define rules as specific as possible: Define the rules as detailed as possible so that
they block only the intended traffic.
Add an ICMP firewall rule: ICMP is typically used for pinging. However, malicious
attackers can send over-sized (floods) ICMP packets to a specific network address.
Therefore, it is recommended to define a rule for limiting these packets.
Add a rule to block all traffic: You must define a firewall rule that blocks all incoming
traffic (i.e., block all protocol traffic from all source IP addresses and ports for all
interfaces). This rule must be the last rule listed in the table, so that rules above it that
allow specific traffic are valid (otherwise, all traffic is blocked).
Warning: If the 'Prefix Length' field on the Firewall Settings page is set to "0", the rule
will apply to all IP addresses, regardless of whether an IP address is specified in the
'Source IP' field. Thus, if you need to apply a rule to a specific IP address, ensure that
you also set the 'Prefix Length' field to a value other than "0".
Version 7.2 13 Gateways & SBCsRecommended Security Guidelines
The Layer 3-4 VoIP traffic firewall rules are configured in the Firewall table (Setup menu >
IP Network tab > Security folder > Firewall). The table below shows a configuration example
of firewall rules:
Configuration Example of Firewall Rules in the Firewall Table
Index Rule
Parameter
1 2 3 4 5
Match
Source IP 12.194.231.76 12.194.230.7 0.0.0.0 192.0.0.0 0.0.0.0
Prefix Length 16 16 0 8 0
Start Port / End Port 0-65535 0-65535 0-65535 0-65535 0-65535
Protocol Any Any icmp Any Any
Use Specific Interface Enable Enable Disable Enable Disable
Interface Name WAN WAN None Voice None
Action
Byte Rate 0 0 40000 40000 0
Burst Bytes 0 0 50000 50000 0
Action Upon Match Allow Allow Allow Allow Block
Rules 1 and 2: Typical firewall rules that allow packets ONLY from specified IP
addresses (e.g., proxy servers). Note that the prefix length is configured.
Rule 3: A more "advanced” firewall rule - bandwidth rule for ICMP, which allows a
maximum bandwidth of 40,000 bytes/sec with an additional allowance of 50,000 bytes.
If, for example, the actual traffic rate is 45,000 bytes/sec, then this allowance would be
consumed within 10 seconds, after which all traffic exceeding the allocated 40,000
bytes/sec is dropped. If the actual traffic rate then slowed to 30,000 bytes/sec, the
allowance would be replenished within 5 seconds.
Rule 4: Allows traffic from the LAN voice interface and limits bandwidth.
Rule 5: Blocks all other traffic.
Reference Guide 14 Document #: LTRT-30218Reference Guide 4. Secure Management Access
4 Secure Management Access
This section provides guidelines to secure access to the device's management interface.
4.1 Change Default Management User Login Passwords
To secure access to the device's Web management interface, please adhere to the following
recommended guidelines:
The device is shipped with a default Security Administrator access-level user
account whose username is "Admin" and password is "Admin". This user has full read-
write access privileges to the device. It is recommended to change the default
password to a hard-to-hack string. You can change the username and password on
the Local Users table (Setup menu > Administration tab > WEB & CLI folder > Local
Users):
Figure 4: Changing Default Password of Security Administrator User
The device is shipped with a default Monitor access-level user account whose
username is "User" and password is "User". This user only has read access privileges
to the device. The read access privilege is also limited to certain Web pages. However,
this user can view certain SIP settings such as proxy server addresses. Therefore, to
prevent an attacker from obtaining sensitive SIP settings that could result in possible
call theft etc., either delete this user account or change its default login password to a
hard-to-hack string. This is done in the Local Users table (Setup menu >
Administration tab > WEB & CLI folder > Local Users):
Figure 5: Changing Password of Monitor User Level
If you have deployed multiple devices, use a unique password for each device.
Change the login password periodically (for example, once a month).
Version 7.2 15 Gateways & SBCsRecommended Security Guidelines
4.2 Implement LDAP-based User Authentication and
Authorization
It is highly recommended that you implement a third-party, LDAP server in your network for
authenticating and authorizing the device's management users (Web and CLI). This can be
done by using an LDAP-compliant server such as Microsoft Active Directory (AD). When a
user attempts to log in to one of the management platforms, the device verifies the login
username and password with AD. The device can also determine the user's management
access level (privileges) based on the user's profile in the AD. This is configured in the LDAP
pages located under Setup menu > IP Network tab > RADIUS & LDAP folder.
An alternative to using an LDAP server is to use a RADIUS server, as discussed in the next
section.
4.3 Implement RADIUS-based Management User
Authentication
It is highly recommended that you implement a third-party, RADIUS server in your network
for authenticating Web / Telnet management users and thereby, preventing unauthorized
access. RADIUS allows you to define different passwords for different interface users, with
centralized management of the password database. When RADIUS is used, logging into the
Web / Telnet interfaces is performed through the RADIUS server. The device verifies the
authenticity of the user name and password with the RADIUS server.
An alternative is to use an LDAP server, as discussed in the previous section.
RADIUS functionality is enabled on the Authentication Server page (Setup menu >
Administration tab > WEB & CLI folder > Authentication Server):
Figure 6: Enabling RADIUS for Web User Authentication
'Enable RADIUS Access Control': select Enable.
'Use RADIUS for Web/Telnet Login': select Enable.
RADIUS authentication servers (IP address, port and 'secret' password for authenticating the
device with the RADIUS server) are configured in the RADIUS Servers table (Setup menu >
IP Network tab > RADIUS & LDAP folder > RADIUS Servers).
Figure 7: Configuring RADIUS Servers for Management User Authentication
Reference Guide 16 Document #: LTRT-30218Reference Guide 4. Secure Management Access
4.4 Implement Two-Way Authentication with X.509
Certificates
It is recommended to use two-way authentication (in addition to HTTPS) between the device's
Web server and the management station (i.e., computer) accessing it. Authentication is
performed and connection to the Web interface is subsequently allowed only if the following
conditions are met:
The management station possesses a client certificate from a Certification Authority
(CA).
The CA certificate is listed in the device's Trusted Root CA Store.
Otherwise, the connection is rejected. Therefore, this prevents unauthorized access to the
Web management tool.
Note:
• Implementation of two-way authentication requires a third-party security equipment
vendor, CA server, and security administrator personnel. These should create
certificates and deploy them to all the computers in the organization.
• The device is supplied with a working TLS configuration consisting of a unique self-
signed server certificate. Replace this certificate with one provided by your security
administrator. For more information, refer to the User's Manual.
To configure client-server, two-way authentication using X.509 certificates:
1. Install a client certificate on the management station (your network administrator should
provide you with a certificate).
2. Install your organization's CA certificate on the management station.
3. Open the TLS Contexts table (Setup menu > IP Network tab > Security folder > TLS
Contexts).
4. In the TLS Contexts table, add a new TLS Context or select the required TLS Context
row, and then click the Trusted Root Certificates link located at the bottom of the TLS
Contexts page.
5. Click the Import button, browse to and select the Root CA certificate file (in base64-
encoded PEM format), and then click OK to import the file:
Figure 8: Importing CA Certificate to CA Store
Version 7.2 17 Gateways & SBCsRecommended Security Guidelines
6. Since X.509 certificates have an expiration date and time, the device must be configured
to use Network Time Protocol (NTP) to obtain the current date and time. Without the
correct date and time, client certificates cannot operate.
7. Ensure that client certificates for HTTPS connections are required, by configuring the
'Require Client Certificates for HTTPS connection' parameter to Enable on the Web
Settings page (Setup menu > Administration tab > WEB & CLI folder > Web Settings):
4.5 Secure HTTP Access using HTTPS
It is recommended to allow access to the Web interface through HTTPS only. In addition, it
is recommended to block port 80. This is done on the Web Settings page (Setup menu >
Administration tab > WEB & CLI folder > Web Settings), by configuring the 'Secured Web
Connection (HTTPS)' parameter to HTTPS Only (reset device for setting to take effect):
Figure 9: Securing Access to Web Interface using HTTPS
4.6 Secure Telnet Sessions
It's recommended to disable access through Telnet, but if you do require the use of Telnet
and your management software provides a secure Telnet application, then use a secured
Telnet connection (i.e., Transport Layer Security / TLS). TLS protects Telnet traffic from
network sniffing. This is done on the CLI Settings page (Setup menu > Administration tab
> WEB & CLI folder > CLI Settings):
Figure 10: Securing Telnet with TLS
'Embedded Telnet Server': Enable Secured.
'Telnet Server TCP Port': Change the default TCP port (if required). The configuration
is applicable for access from the LAN.
Reference Guide 18 Document #: LTRT-30218Reference Guide 4. Secure Management Access
4.7 Secure CLI Sessions by SSH
It is recommended to employ Secure SHell (SSH) for accessing the device's CLI. SSH is the
de-facto standard for secure CLI. SSH 2.0 is a protocol built above TCP, providing methods
for key exchange, authentication, encryption, and authorization. By default, SSH uses the
same username and password as the Telnet and Web server.
SSH is enabled on the CLI Settings page (Setup menu > Administration tab > WEB & CLI
folder > CLI Settings):
Figure 11: Securing SSH (CLI) Sessions
'Enable SSH Server': Enable.
'Server Port': If necessary, you may change the default TCP port used for SSH,
although this is not recommended. Note that this is applicable for access from the
LAN.
For additional security, you can configure a public key for RSA key negotiation (instead of or
in addition to using a username and password) when accessing through SSH.
4.8 Define Web, Telnet, and SSH Authorized Access List
Allow only user-defined LAN IP addresses to access the Web, Telnet, and SSH based
management interfaces. The device denies access from undefined IP addresses. To do this,
configure allowed IP addresses on the Access List page (Setup menu > Administration tab
> WEB & CLI folder > Access List):
Figure 12: Authorized IP Addresses for Accessing Web / Telnet / SSH Interfaces
Note:
• The first authorized IP address in the list must be your computer's (terminal) IP
address; otherwise, access from your computer will be denied.
• The Web / Telnet / SSH authorized access list concerns OSI Layer 5 (Session).
However, you can also add firewall rules for Layer 3 (Network) and Layer 4
(Transport) with bandwidth limitation to limit access to management interfaces (see
Section 3.1).
Version 7.2 19 Gateways & SBCsRecommended Security Guidelines
4.9 Secure SNMP Interface Access
This section discusses recommended security guidelines relating to Simple Network
Management Protocol (SNMP).
4.9.1 Prefer SNMPv3 over SNMPv2
It is recommended to use SNMP Version 3 (SNMPv3) instead of SNMPv1 and SNMPv2c, if
possible. SNMPv3 provides secure access to the device using a combination of
authentication (MD5 or SHA-1) and encryption (DES, 3DES, AES-128, AES-192, or AES-
256) of packets over the network. It is also recommended that you periodically change the
SNMPv3 authentication and privacy keys.
SNMPv3 users are configured in the SNMPv3 Users table (Setup menu > Administration
tab > SNMP folder > SNMP V3 Users), as shown in the figure below:
Figure 13: SNMPv3 Users
4.9.2 Secure SMNPv2 Access
If you are using SNMPv2, change the community strings from their default values as they
can easily be guessed by hackers. The default read-write community string is "private" and
the read-only is "public".
In addition, by default, the SNMPv2 agent accepts SNMP Get and Set requests from any IP
address if the correct community string is used in the request. Therefore, to enhance security
with SNMPv2, implement Trusted Managers. A Trusted Manager is an IP address
(management station) from which the SNMP agent accepts and processes Get and Set
requests. It is also recommended that you periodically change these SNMP community string
values.
SNMPv2 community strings are configured on the SNMP Community Settings page
(Setup menu > Administration tab > SNMP folder > SNMP Community Settings):
Figure 14: SNMPv2 Community Strings
Reference Guide 20 Document #: LTRT-30218Reference Guide 4. Secure Management Access
SNMPv2 management stations are configured in the SNMP Trusted Managers table
(Setup menu > Administration tab > SNMP folder > SNMP Trusted Managers):
Figure 15: SNMPv2 Trusted Managers
4.10 Secure LDAP Communication
If you are using LDAP-based login management (username-password) or LDAP-based SIP
routing in your deployment, it is recommended to employ TLS for secure device
communication with the LDAP server. This ensures that the device encrypts the username
and password sent to the LDAP server.
TLS for LDAP communication is configured in the LDAP Servers table (Setup menu > IP
Network tab > RADIUS & LDAP folder > LDAP Servers):
Figure 16: Configuring Secure LDAP Server Communication
'Use TLS': Select Yes.
'TLS Context': Select the TLS Context (configured in the TLS Contexts table).
Version 7.2 21 Gateways & SBCsRecommended Security Guidelines
This page is intentionally left blank.
Reference Guide 22 Document #: LTRT-30218Reference Guide 5. Secure SIP using TLS (SIPS)
5 Secure SIP using TLS (SIPS)
It is crucial that you implement the TLS-over-TCP protocol to best secure the device's SIP
signaling connections. TLS provides encryption and authentication of SIP signaling for your
VoIP traffic, preventing tampering of calls. Use it whenever possible for far-end users and
ITSPs.
The device's TLS feature supports the following:
TLS: TLS 1.0, TLS 1.1, TLS 1.2, and TLS 1.3
DTLS: DTLS 1.0 and DTLS 1.2
Cipher: TLS cipher suites for server and client roles (per OpenSSL syntax)
Authentication: X.509 certificates
Certificate revocation checking: OCSP (CRLs are currently not supported)
Receipt of wildcards ('*') in X.509 Certificates when establishing TLS connections.
These wildcards can be part of the CN attribute of the Common Name field or the
DNSName attribute of the Subject Alternative Name field.
Recommended security guidelines for ensuring TLS for SIP signaling are described in the
subsequent subsections.
5.1 Use Strong Authentication Passwords
Always use strong authentication passwords, which are more difficult to detect than weak
ones. A strong password typically includes at least six characters with a combination of upper
and lower-case letters, numbers and symbols.
5.2 Use TLS Version 1.1 and/or 1.2
It is recommended to use the highest TLS version possible that is supported by all your
network entities to achieve the best communication security, based on cryptographic
algorithms. The device accepts only connections that adhere to the specified TLS version.
It is also recommended not to configure the device to use any TLS version (Any TLS 1.x).
However, if some network entities use a lesser TLS version and some use a higher TLS
version (e.g., TLS 1.3), then you need to configure the device to use any version.
The TLS version is configured for TLS Contexts in the TLS Contexts table (Setup menu > IP
Network tab > Security folder > TLS Contexts), using the 'TLS Version' parameter. The
example below assumes that the highest TLS versions supported by the network entities are
1.1 and 1.2.
Figure 17: Configuring TLS Version
Version 7.2 23 Gateways & SBCsRecommended Security Guidelines
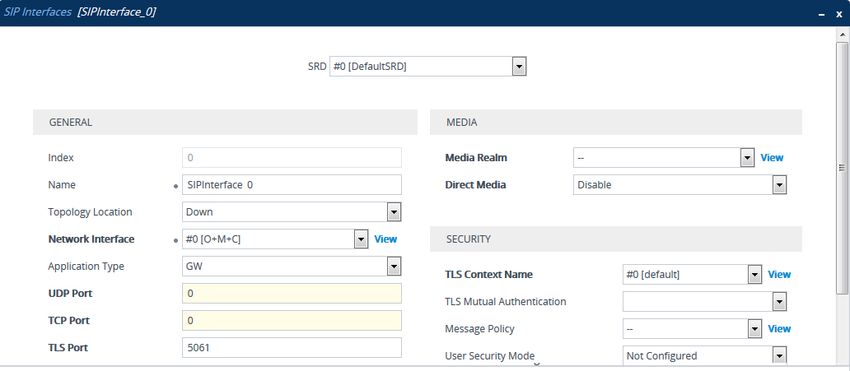
5.3 Use TLS for SIP Interfaces and Block TCP/UDP Ports
Each port can be vulnerable to attacks. Therefore, it is highly recommended that your SIP
interfaces use only TLS. When configuring your SIP Interfaces, define the TLS port number,
but set the UDP and TCP ports to zero ("0"). This configuration blocks (disables) the UDP
and TCP ports. In other words, to disable UDP and TCP ports, you must define SIP
Interfaces. In addition, to increase security, define only SIP Interfaces that are necessary.
SIP Interfaces are configured on the SIP Interfaces table (Setup menu > Signaling & Media
tab > Core Entities folder > SIP Interfaces). The figure below shows an example of a SIP
Interface configured for the Voice network interface (LAN) where the UDP and TCP ports set
to "0".
Figure 18: SIP Interface using only TLS Port
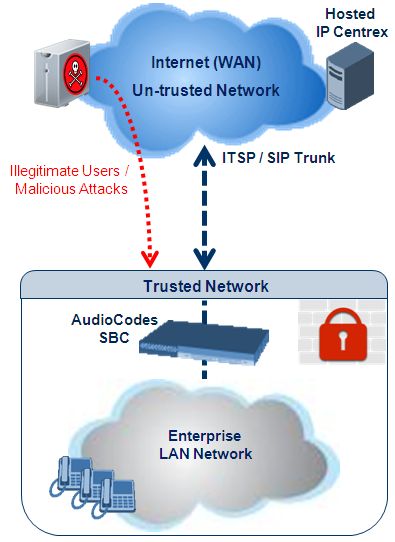
5.4 Use TLS for Routing Rules
It is recommended that your routing rules use TLS only as the transport type. This is
configured in the IP-to-IP Routing table (Setup menu > Signaling & Media tab > SBC folder
> Routing > IP-to-IP Routing), by configuring the 'Destination Transport Type' parameter to
TLS:
Reference Guide 24 Document #: LTRT-30218Reference Guide 5. Secure SIP using TLS (SIPS)
Figure 19: IP-to-IP Routing Rule using SIP over TLS
5.5 Implement X.509 Certificates for SIPS (TLS) Sessions
It is highly recommended to implement the X.509 certificate authentication mechanism for
enhancing and strengthening TLS. X.509 is an ITU-T standard for Public Key Infrastructure
(PKI).
The device supports the configuration of multiple TLS certificates, referred to as TLS
Contexts. TLS Contexts are assigned to Proxy Sets and/or SIP Interfaces, thereby enabling
specific calls to use specific TLS certificates.
The device is shipped with a working TLS configuration (TLS Context ID 0), consisting of a
unique Self-Signed Server Certificate. Self-Signed Certificate is the simplest form of an X.509
Certificate that is issued by the device itself without the use of any certificate signer (CA).
The Self-Signed Certificate consists of the Public Key of the device that is signed by the
Private Key of the device itself. However, use of this certificate is strongly discouraged.
The Self-Signed Certificate is typically used in testing environments or for a low-scale
deployment where solution security may be sacrificed in favor of simplified configuration
procedures. The Self-Signed Certificate does not utilize CA trust relationships and its
authenticity cannot be reliably verified. Instead, you should establish a PKI for your
organization (provided by your security administrator) and use certificates signed by genuine
CAs.
In a typical PKI scheme, Certificates are issued by a CA and provide an attestation by the
CA that the identity information and the public key belong together. Each party has a list of
Trusted Root Certificates – certificates of the CAs (or their roots) that are well-known and
trusted by the party. When the certificate from the other party is received, its signing entity
(CA) is compared with the Trusted Root Certificates list and if a match is found, the certificate
is accepted.
Version 7.2 25 Gateways & SBCsRecommended Security Guidelines
The device uses the following files to implement X.509 PKI:
Private Key File: This file contains a private key that is used to perform decryption. It
is the most sensitive part of security data and should never be disclosed to other
entities.
Certificate File: This file contains a digital signature that binds together the Public Key
with identity information. The Certificate may be issued by a CA or self-signed (issued
by the device itself, which is not recommended – see above).
Trusted Root Certificate File: This file is the certificate of the Trusted Root CA used
to authorize certificates received from remote parties, based on the identity of the CA
that issued it. If the root certificate of this CA matches one of the Trusted Root
Certificates, the remote party is authorized.
5.6 Use an NTP Server
It is recommended to implement a third-party NTP server so that the device receives the
correct current date and time. This is necessary for validating certificates of remote parties.
It is also recommended to enable the device to authenticate and validate messages received
from the NTP server. Authentication is done using an authentication key with the MD5
cryptographic hash algorithm. NTP messages that are received without authentication are
ignored.
The NTP server is configured on the Time & Date page (Setup menu > Administration tab
> Time & Date home icon):
Figure 5-20: NTP Server and Authentication Configuration
Reference Guide 26 Document #: LTRT-30218Reference Guide 6. Implement LDAP-based Conditional Call Routing
6 Implement LDAP-based Conditional Call
Routing
It is recommended that you implement a third-party, LDAP server in your network for
determining whether a call from a specific source is permitted to be routed to its destination.
This setup uses Call Setup rules, configured in the Call Setup Rules table, to define a
condition-based script that queries an LDAP server for the caller's number (for example) in a
specific LDAP attribute. If the number exists, the device routes the call to the destination;
otherwise, the call is dropped. The device executes a Call Setup rule upon the receipt of an
incoming call (dialog) at call setup, if a matching routing rule exists in the IP-to-IP Routing
table, before the routes the call to its destination.
For configuring the LDAP server for LDAP-based routing, use the LDAP-related items located
under the RADIUS & LDAP folder (Setup menu > IP Network tab > RADIUS & LDAP folder).
For configuring Call Setup rules, use the Call Setup Rules table (Setup menu > Signaling &
Media tab > SIP Definitions folder > Call Setup Rules). The below Call Setup rule example
routes the incoming call only if the source number of the incoming call exists in the AD server.
The device queries the AD server for the attribute record, "telephoneNumber" whose value
is the same as the received source number (e.g., "telephoneNumber=4064"). If such an
attribute is found, the device routes the call to the destination as specified in the IP-to-IP
Routing table. If the query fails (i.e., source number doesn't exist in AD server), the device
rejects the call.
Figure 6-1: Call Setup Rule for Conditional LDAP-based Routing
Note: Make sure that you implement secure LDAP communication, as discussed in
Section Secure LDAP Communication.
Version 7.2 27 Gateways & SBCsRecommended Security Guidelines
This page is intentionally left blank.
Reference Guide 28 Document #: LTRT-30218Reference Guide 7. Define SIP Message Blacklist/Whitelist
7 Define SIP Message Blacklist/Whitelist
It is recommended to configure SIP message policy rules for blocking (blacklist) unwanted
incoming SIP messages or allowing (whitelist) receipt of desired messages. This allows you
to define legal and illegal characteristics of a SIP message.
SIP message policy is helpful against VoIP fuzzing (also known as robustness testing), which
sends different types of packets to its "victims" for finding bugs and vulnerabilities. For
example, the attacker might try sending a SIP message containing an oversized parameter
or too many occurrences of a parameter.
Each SIP message policy rule can be configured with, for example, maximum message
length, header length, body length, number of headers, and number of bodies. Each rule is
then set as a blacklist or whitelist.
The SIP message policy rules are configured in the Message Policies table (Setup menu >
Signaling & Media tab > Message Manipulation folder > Message Policies). Below shows
a configured policy that defines maximum SIP messages to 32,768 characters, maximum
header length to 512 characters, and bodies to 1024 characters. Invalid requests are
rejected. Only INVITE and BYE requests are permitted.
Figure 7-1: Configured Message Policy Rule
Version 7.2 29 Gateways & SBCsRecommended Security Guidelines
This page is intentionally left blank.
Reference Guide 30 Document #: LTRT-30218Reference Guide 8. Monitor and Log Events
8 Monitor and Log Events
It is highly recommended that you log and monitor device events (including device operations
and calls). The importance of monitoring device events is that you can quickly detect
unauthorized access and subsequently take counter measures to effectively terminate the
attacker before any potential damage is done to your network.
8.1 Implement Dynamic Blacklisting of Malicious Activity
(IDS)
It is important to configure the Intrusion Detection System feature (IDS) to enable the device
to detect malicious attacks targeted on the device (e.g., DoS, SPAM, and Theft of Service).
It is crucial to be aware of any attacks to ensure that the legitimate call service is maintained
at all times. If any user-defined attacks are identified, the device can do the following:
Block (blacklist) remote hosts (IP addresses / ports) considered as malicious. The
device automatically blacklists the malicious source for a user-defined period after
which it is removed from the blacklist.
Send SNMP traps to notify of the malicious activity and/or whether an attacker has
been added to or removed from the blacklist.
The IDS configuration is based on IDS Policies, where each policy can be configured with a
set of IDS rules. Each rule defines a type of malicious attack to detect and the number of
attacks (alarm threshold) during an interval (threshold window) before an SNMP trap is sent.
Each policy is then applied to a target under attack (SIP Interface) and/or source of attack
(Proxy Set and/or subnet address).
For configuring IDS, use the tables under the Intrusion Detection folder (Setup menu >
Signaling & Media tab > Intrusion Detection folder).
Below is an example of an IDS rule for identifying DoS attacks from ITSP:
1. IDS Policy "ITSP DoS" configured (highlighted):
Table 8-1: Configured IDS Policy Name in IDS Policy Table
2. IDS Rules configured for "ITSP DoS" IDS policy:
Table 8-2: Configured Rules in IDS Rule Table
Version 7.2 31 Gateways & SBCsRecommended Security Guidelines
3. IDS Policy assigned to a specific SIP interface and subnet:
Table 8-3: Applying IDS Policy to Elements in IDS Match Table
8.2 Enable Syslog
The device supports generation and reporting of Syslog messages and SNMP traps to
external logging servers. It is crucial that you enable one or both these features (preferably
Syslog) so that you can monitor events on your device. In addition, as the device does not
retain logged reports (SNMP is limited), it is recommended that you ensure that your Syslog
server saves all logged events for future analysis and reference.
Syslog configuration is done on the Syslog Settings page (Troubleshoot menu >
Troubleshoot tab > Logging folder > Logging Settings):
Figure 2: Enabling Syslog Server
Reference Guide 32 Document #: LTRT-30218Reference Guide 8. Monitor and Log Events
8.3 Enable Logging of Management-Related Events
Through Syslog you can log and monitor management-related events to help you detect and
identify unauthorized management-related activities such as:
Unauthorized Web login attempts (attempts to access the Web interface with a false or
empty user name or password)
Access to restricted Web pages such as the page on which firewall rules are defined
Modifications to parameter values (for example, deletion of firewall rules, allowing
future unauthorized access)
Modifications to "sensitive" parameters - changes made to important parameters such
as IP addresses
Unauthorized SIP messages (logged SIP messages)
This is configured on the Syslog Settings page (Troubleshoot menu > Troubleshoot tab >
Logging folder > Logging Settings):
Figure 3: Enabling Logging of Management Events to a Syslog Server
Version 7.2 33 Gateways & SBCsRecommended Security Guidelines
8.4 Enable Call Detail Records
Call Detail Records (CDR) provide vital information on SIP calls made through the device.
This information includes numerous attributes related to the SIP call such as port number,
physical channel number, source IP address, call duration, and termination reason. The
device can be configured to generate and report CDRs for various stages of the call
(beginning, initial connection, and end of the call). Once generated, the CDR logs are sent to
a user-defined logging server.
This is configured on the Advanced Parameters page (Troubleshoot menu > Troubleshoot
tab > Call Detail Record folder > Call Detail Record Settings):
Figure 4: Enabling CDR Generation
Note: Syslog must be enabled for the CDR feature.
Reference Guide 34 Document #: LTRT-30218Reference Guide 9. SBC-Specific Security Guidelines
9 SBC-Specific Security Guidelines
This section provides basic SBC security guidelines that should be implemented in your
network deployment.
Note: This section is applicable only to AudioCodes Session Border Controllers (SBC).
9.1 General Guidelines
It is crucial that you separate trusted from un-trusted networks:
Separate un-trusted networks from trusted networks, by using different SRDs, IP
Groups, SIP Interfaces, and SIP Media Realms (with limited port range).
Similarly, separate un-trusted networks from one another. In particular, far-end users
must be separated from the ITSP SIP trunk, using a different SRD, IP Group, SIP
interface, and Media Realms. This separation helps in preventing attacks targeted on
far-end user ports from affecting other users.
For un-trusted networks, use strict classification rules over vague rules. For example, if
the ITSP's proxy IP address, port and host name are known, then use them in the
classification rules. This ensures that all other potentially malicious SIP traffic is
rejected.
Unclassified packets must be discarded (rejected).
9.2 Secure Media (RTP) Traffic using SRTP
It is recommended to use Secured RTP (SRTP) for encrypting the media (RTP and RTCP)
path and thereby, protecting the VoIP traffic. The device supports SRTP according to RFC
3711. SRTP performs a Key Exchange mechanism (according to RFC 4568). This is done
by adding a 'crypto' attribute to the SDP. This attribute is used (by both sides) to declare the
supported cipher suites and to attach the encryption key. If negotiation of the encryption data
is successful, the call is established. The device's SRTP feature supports various suites such
as AES_CM_128_HMAC_SHA1_32.
Globally (all calls): Media Security page (Setup menu > Signaling & Media tab >
Media folder > Media Security) by setting the 'Media Security' parameter to Enable.
Figure 5: Enabling SRTP Globally
Per specific calls using IP Profile: SRTP is enforced on the SBC legs of an IP
Profile (Setup menu > Signaling & Media tab > Coders & Profiles folder > IP
Profiles). For each IP Profile associated with a leg, configure the 'SBC Media Security
Mode' parameter to SRTP. This enforces the SBC legs to negotiate only SRTP media
lines; RTP media lines are removed from the incoming SDP offer \ answer.
Figure 6: Enabling SRTP per SBC Leg using IP Profiles
Version 7.2 35 Gateways & SBCsRecommended Security Guidelines
9.3 Implement SIP Authentication and Encryption
It is paramount that your network implements authentication and encryption to secure the
network and ensure integrity and confidentiality of sensitive communications over un-trusted
networks. Some of the main authentication and encryption guidelines are discussed in the
subsequent sections.
9.3.1 Authenticating Users as an Authentication Server
Instead of relying on external, third-party authentication servers, the device can be configured
to act as an Authentication server, performing authentication and validation challenges with
SIP user agents. The SIP method (INVITE or REGISTER) on which it challenges can be
defined. If the message is received without an Authorization header, the device challenges
the client by sending a 401 or 407 SIP response. The client then resends the request with an
Authorization header containing its username and password. The device validates the SIP
message and if it fails, the message is rejected and the device sends a 403 "Forbidden"
response. If the SIP message is validated, the device verifies identification of the UA by
checking whether the username and password received from the user is correct. The
usernames and passwords are obtained from the User Information table. If after three
attempts the UA is not successfully authenticated, the device sends a 403 "Forbidden"
response. The device can also perform authentication on behalf of its UAs with an external
third-party server.
To setup the SBC as an Authentication server, you need to do the following:
1. Configure the following parameters for the User-type IP Group of the UAs (Setup menu
> Signaling & Media tab > Core Entities folder > IP Groups):
Figure 7: Configuring SBC as Authentication Server for User-type IP Group
• 'Authentication Mode': select SBC as Server.
• 'Authentication Method List': enter "INVITE\REGISTER".
2. Configure the authentication usernames and passwords of the users:
a. Enable the SBC User Info feature, by configuring the 'User-Information Usage'
parameter to Enable on the Proxy & Registration page (Setup menu > Signaling
& Media tab > SIP Definitions folder > Proxy & Registration):
Figure 8: Enabling User Info File
Note: Make sure that your device's License Key provides far-end users support
("FEU"); otherwise, this parameter will not be displayed.
b. Add users with authentication usernames and passwords in the SBC User Info
table (Setup menu > Signaling & Media tab > SBC folder > User Information):
Figure 9: Configured User in SBC User Info Table
Reference Guide 36 Document #: LTRT-30218Reference Guide 9. SBC-Specific Security Guidelines
9.3.2 Authenticating Users by RADIUS Server
Instead of authenticating calls locally by the device, digest authentication of SIP users can
be done by a RADIUS server (according to RFC 5090). In this way, the device offloads the
MD5 calculation (validation) to a RADIUS server, where the device is classed as a RADIUS
client.
To implement this, the following configuration is required:
1. Configure the RADIUS sever (IP address, port and shared secret password) in the
RADIUS Servers table (Setup menu > IP Network tab > RADIUS & LDAP folder >
RADIUS Servers):
Figure 10: Configured RADIUS Server for User Authentication in RADIUS Servers Table
2. Configure the SBCServerAuthMode parameter to 1 to enable authentication by a RFC
5090 compliant RADIUS server.
9.3.3 Authenticating SIP Servers as an Authentication Server
It is recommended to enable the device to authenticate remote SIP servers (for example,
Proxy servers). This provides protection from rogue SIP servers, preventing unauthorized
usage of the device's resources and functionality. The device authenticates remote servers
by challenging them with a user-defined username and password that is shared with the
remote server. From such a challenge, the device can confirm the server's identity as being
genuine. The type of SIP message (e.g., INVITE) to authenticate must also be defined.
SIP server authentication is configured per IP Group in the IP Groups table, enabling unique
authentication handling per specific server:
Figure 11: Configured SIP Server Authentication by SBC in IP Groups Table
9.3.4 Enforce SIP Client Authentication by SIP Proxy
When the device is located between a SIP client and a third-party SIP proxy server and SIP
Digest Authentication is used, the device relays authentication messages between these
entities. Although the device gathers and maintains some information in its registration
database (Address of Record / AOR) it does not actively participate in the authentication
process. Instead, it is the SIP proxy that handles and enforces SIP client authentication.
Therefore, it is imperative that your SIP proxy server be configured to enforce SIP client
authentication.
Version 7.2 37 Gateways & SBCsYou can also read