Microsoft Translator Hub User Guide
←
→
Page content transcription
If your browser does not render page correctly, please read the page content below

Microsoft Corporation

Microsoft Translator Hub User Guide

August 2014

Last Updated: August 28, 2014
1. Contents
1.        Introduction   3
     1.1 Audience        3
     1.2 How This Guide Is Organized      3
2.        Microsoft Translator Hub Concepts     3
     2.1 Workspace       4
     2.2 Workspace Identifier    4
     2.3 Project 6
     2.4 Parallel and Monolingual documents     6
     2.5 Document Formats and Document Naming Convention. 8
     2.6 Training        9
     2.7 Sentence Alignment in Parallel Documents       10
     2.8 User Roles      11
3.        Building a Translation System   13
     3.1 Create a Workspace      14
     3.2 Setup Project   15
       3.2.1     Create Project 15
       3.1.2     Invite Members 18
     3.3 Conduct Trainings       19
       3.3.1     Setup Training 19
       3.3.2     Using Dictionaries       30
       3.3.3     Multilingual Dictionaries      32
       3.3.4     Auto-selection of Testing and Tuning data   32
       3.3.5     Evaluate Results         32
       3.3.6     Best Practices 36
     3.4 Share, Translate & Improve       38
       3.4.1     Request Deployment       38
       3.4.2     Test Translations        39
       3.4.3     Improve Translations     40
4.        Managing & Tracking    47
     4.1 Changing Workspace Name and Organization name       47
     4.2 Browsing Projects       47
     4.3 Remove Project 47
     4.4 Manage Documents        48
     4.5 Manage Members          50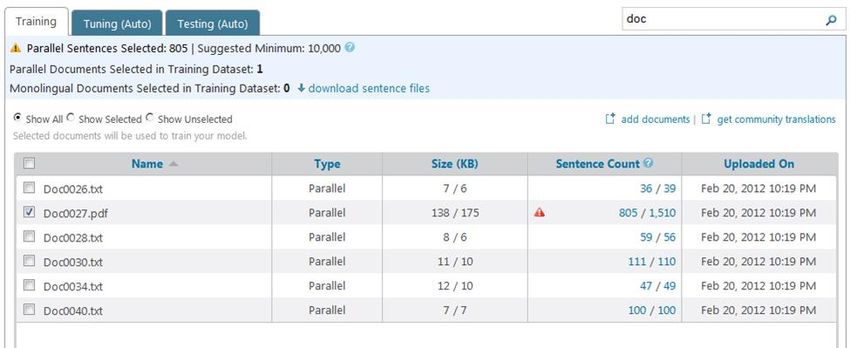
4.6 Request Language       51
5.        Appendix       53
     5.1 FAQs    53
     5.2 Microsoft Translator APIs   59
     5.3 Glossary        60
1. Introduction
Until now, automatic language translation has been at the behest of a few major providers. As a result,
the number of covered languages is limited to less than 100, compared to the more than 7,000
languages currently in use around the world. This limits the native speakers’ access to the global
knowledge base and puts increasing pressure on the adoption of non-indigenous languages – simply
because that is what is most readily available with today’s technology.
Microsoft Translator Hub empowers businesses and communities to build, train, and deploy customized
automatic language translation systems – bringing better and specialized translation quality to
established languages, as well as the many languages of the world that are not yet supported by major
translation providers.
Powered by Windows Azure™, Microsoft Translator Hub is an extension of the Microsoft Translator
platform and service.
With Microsoft Translator Hub, businesses can build customized translations that are scoped to their
company’s offerings and terminology. Language communities can build translation systems that can
result in increased community access to global information, while having the added benefit of sharing
local knowledge about a smaller language’s culture with the rest of the world, ensuring the long-term
vibrancy of smaller languages for future generations.
Microsoft Translator Hub User Guide will now take you through the step-by-step process of building your
custom translation system using the Microsoft Translator Hub, referred to as the Hub from here on.

1.1 Audience
This guide will benefit any person who is interested in building a custom translation system using the
Hub. A background in machine translation is not essential to use the Hub.

1.2 How This Guide Is Organized
This guide is organized into following key sections
    1. The first section titled “Microsoft Translator Hub Concepts” introduces you to the fundamental
        concepts of the Hub and key terms that will be used throughout this document.
    2. The second section is about “Building a Translation System”. It covers topic such as how to
        create a project and then train your translation system with documents available to you. It
        offers guidance on the kind of documents supported and how to select documents for tuning
        and testing the translation system. It introduces you to the features available in Hub to evaluate
        the quality of the translation system. Finally, it covers the topics of deploying the translation
        system, sharing it with a broader audience and enabling people outside of your project to help
        improve the quality of the translation system.
    3. The third section, “Managing & Tracking” shows how you can remove existing projects, unused
        documents and change roles of existing users or remove them.
    4. Finally, the “Appendix” section answers frequently asked questions and offers information on
        how to access the custom translation system using Microsoft Translator APIs. For novice users, it
        also has a glossary of commonly used terms in the area of machine translation.

2. Microsoft Translator Hub Concepts
This section introduces you to the fundamental concepts of the Hub and key terms that will be used
throughout this document.
2.1 Workspace
Microsoft Translator Hub is a set of online services that deliver a workspace to enable creation of
customized translation systems.

For every single organization or community that uses Microsoft Translator Hub, a separate logical
instance of a workspace is created. This workspace is identified by a unique name which is known as the
Workspace Name and has a unique ID known as the Workspace ID.

Any community or organization can create a workspace simply by visiting the Microsoft Translator Hub
web site. The person creating the workspace is the owner of the workspace. An Owner can then invite
more people to be a part of this workspace instance and can designate them either as Co-owners or
Reviewers. The permissions associated with each role are further discussed in Section 2.5

The concept of workspace is illustrated in Figure 1.

           Microsoft Translator Hub

              Workspace instance for                      Workspace instance for
              Contoso                                     Fabrikam

                                     Workspace instance for
                                     Hmong community

                  Contoso                     Hmong                        Fabrikam
                                              community

Data in one workspace is not visible to users belonging to another workspace.
For example, data in Contoso’s workspace is not visible to users belonging to Hmong community’s
workspace or Fabrikam’s workspace. This robust design logically isolates each workspace’s data from
the other and your data is always safe.

2.2 Workspace Identifier
The Hub lists your workspace identifier (workspace ID) under the settings menu, between Workspace
Name and Organization. The workspace ID is a fixed value, assigned by the Hub. The workspace ID helps
you to connect Adobe Experience Manager to your custom trained translation systems.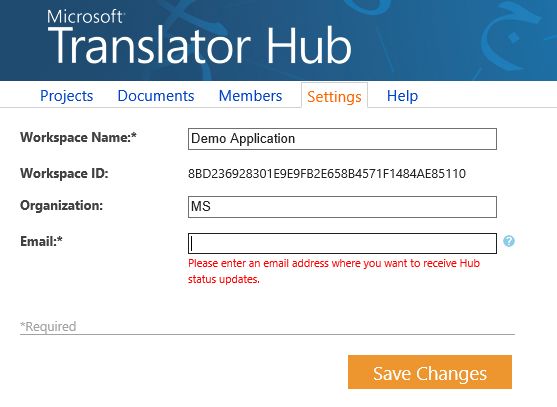
The workspace ID is the central component of the category ID, for using Hub systems programmatically
via the Microsoft Translator API. See the Hub API guide for details.

2.3 Project
Within a workspace instance, you can create a number of translation projects for translating from one
language to another. The language to translate from is called the Source language and the language to
translate to is called the Target language. If you are building a domain specific translation system, Hub
allows you to associate a Category like Sports or Medicine with your project. Hub also allows you to
associate a Project Label with your project. The Project Label will help distinguish one project with the
same language pair and category from another project with the same language pair and category.
A project in Hub is uniquely identified by Source Language, Target Language, Category and a Project
Label.

2.4 Parallel and Monolingual documents
To build a translation system for your project, you need to assemble a set of documents. These
documents can be of two types
    1. Parallel documents:
        This refers to a pair of documents in your set, both containing the same information. One
        document in the pair contains sentences in the source language and another document in the
        pair contains sentences in the target language.
        Parallel documents are used by the system
        - To learn how words, phrases and sentences are commonly mapped between the two
             languages.
        - To learn how to process the appropriate context depending on the surrounding phrases, and
             as a result a particular word may not always translate the same way.
As a best practice, ensure that there is a 1:1 sentence correspondence between the source and target
language versions of the documents.

Example of parallel HTML documents
Description of the 2007 Office suite SP3 and of Office Language Pack 2007 SP3 in 3 languages
http://support.microsoft.com/kb/2526086/en-us
http://support.microsoft.com/kb/2526086/hi-in
http://support.microsoft.com/kb/2526086/es-es

Description of Office 2010 SP1 in 2 languages
http://support.microsoft.com/kb/2460049
http://support.microsoft.com/kb/2460049/he

Enable or disable ActiveX settings in Office files in 2 languages
http://office.microsoft.com/hi-in/excel-help/HA010354314.aspx
http://office.microsoft.com/en-us/excel-help/enable-or-disable-activex-settings-in-office-files-
HA010354314.aspx

Trusted documents
http://office.microsoft.com/hi-in/excel-help/HA010354384.aspx?CTT=3
http://office.microsoft.com/zh-cn/publisher-help/HA010354384.aspx?redir=0
http://office.microsoft.com/en-us/publisher-help/trusted-documents-HA010354384.aspx?redir=0
Example of parallel Microsoft Word documents
http://www.microsoft.com/india/casestudies/ServeFileResource.aspx?4000027700
http://www.microsoft.com/india/casestudies/ServeFileResource.aspx?4000027702
http://www.microsoft.com/india/casestudies/ServeFileResource.aspx?4000027703
2. Monolingual documents:
This refers to target language documents in your set for which you do not have a corresponding
source language document containing the same information.
Monolingual documents help a translation system decide which of the considered alternative
translations is more accurate, more natural-sounding, and more in-tune with the context in the
examples of the target language.
If your project is domain specific, your documents, both parallel and monolingual should be consistent in
terminology with that category. The quality of the resulting translation system depends on the no. of
sentences in your document set and the quality of the sentences. The more examples your documents
contain on diverse usages for a word, the better job it can do during the translation of something it has
not seen before.
We recommend that you have a minimum of 10,000 parallel sentences to start with and then keep
adding more parallel content to improve the quality of your translation system.
Microsoft requires that documents uploaded to the Hub do not violate a third party’s copyright or
intellectual properties. For more information, please see the Terms of Use.
Documents uploaded are private to each workspace. Sentences extracted from your documents are
stored separately in your workspace’s repository as plain Unicode text files and are available for you to
download. The number of sentences extracted from each document is reported as Extracted Sentence
Count in the Hub.2.5 Document Formats and Document Naming Convention.
You can use documents in any of the following formats to build your translation system in Hub.
- XLIFF (XLF, XLIFF)
- TMX (TMX)
- LCL (LocStudio generated files)
- Microsoft Word documents (DOCX)
- Adobe Acrobat files (PDF)
- HTML files (HTML, HTM)
- UTF-16 and UTF-8 encoded text files (TXT, ALIGN). The extension “.ALIGN” is a special
extension that you can use if you know that the sentences in the document pair are
perfectly aligned and hence you would like the Hub to skip sentence alignment on that
document pair.
In order to detect parallel documents in your set, the Hub requires that you follow a document naming
convention
“_.ext”
where
“document name” is the name of your document
“language code” is the Windows three letter abbreviation (TLA) for the language which indicates that
the document contains sentences in that language. The language code information is displayed in the
Upload Document dialog. A mapping of the languages to the language codes is available in the Microsoft
Translator Hub API guide
“ext” refers to the extension of document that should belong to one of supported document formats.
Note that there must be an underscore (_) before the language code.
Documents can be uploaded one at a time or they can be grouped together into a single zip file and
uploaded. The Hub supports popular zip file formats (ZIP, GZ and TGZ).
If the zip file has a nested folder structure, Hub prefixes the folder names to the document names when
it is displayed in the UI.2.6 Training
If you have assembled the documents required to build a translation system for your project, you can
setup trainings in the Hub.
Training is used by the Hub to understand what documents you want to use to build the translation
system and how you want to use these documents. When setting up Trainings, Hub allows you to
partition your documents under 3 mutually exclusive data sets
1. Training data set:
Sentences of parallel and monolingual documents included in this set are used by the Hub as the
basis for building your translation system.
2. Tuning data set:
Sentences of parallel documents included in this set are used by the Hub to tune the translation
system for optimal results.
The tuning set is used to set all parameters of the translation system to the optimal values. Care
should be taken to compose the tuning set carefully because Tuning has a major influence over
the quality of the translations produced. Tuning enables the translation system to provide
translations that are closest to the samples you provide in the tuning dataset. Only bilingual
documents can be part of the tuning data set. You do not need more than 2500 sentences as
tuning set. Recommendation is to select the tuning set manually, in order to achieve the most
representative selection of sentences.
When you let the system choose the tuning set automatically, it will use a random subset of
sentences from your bilingual training documents, and exclude these sentences from the
training material itself.
3. Testing data set:
Sentences of parallel documents included in this set are used to compute the BLEU (Bilingual
Evaluation Understudy) score of your translation system. This score tells you how accurate are
the translation done by the translation system resulting from this training compared to the
reference target language sentences in the test data set.
Hence, as a best practice, this set should include parallel documents where the target language
sentences are the most accurate translations of the corresponding source language sentences in
the pair.
Only bilingual documents can be part of the testing data set. You do not need more than 2500
sentences as testing set.
When you let the system choose the testing set automatically, it will use a random subset of
sentences from your bilingual training documents, and exclude these sentences from the
training material itself.
You can train multiple systems within a project and compare the resulting BLEU scores across all the
training runs.
During the training execution, sentences present in parallel documents are paired or aligned and Hub
reports the no. of sentences it was able to pair as the Aligned Sentence Count in each of the data sets.
For a training run to succeed, the table below shows the minimum # of extracted sentences and aligned
sentences required in each data set. Please note that the suggested minimum # extracted sentences is
much higher than the suggested minimum # of aligned sentences to take into account the fact that the
sentence alignment may not be able to align all sentences extracted.Data set Suggested minimum Suggested minimum Maximum aligned sentence
extracted sentence count aligned sentence count count
Training 10,000 2,000 No upper limit.
Tuning 2,000 500 2,500
Testing 2,000 500 2,500
2.7 Sentence Alignment in Parallel Documents
Microsoft Translator Hub learns translations one sentence at a time, by reading a sentence, the
translation of this sentence, and then aligning words and phrases in these two sentences to each other.
This enables it to create a map of the words and phrases in one sentence, to the equivalent words and
phrases in the translation of this sentence in the other language. Alignment tries to ensure that the
system trains on sentences that are actually translations of each other.
Microsoft Translator Hub will automatically align the sentences in bilingual documents with the same
base name you uploaded. It will fail doing correct sentence alignment when the number of sentences in
the documents differ, or when the documents you supply are in fact not 100% translations of each
other. You can perform a cursory check by verifying the number of extracted sentences: if they differ by
more than 5%, you may not have a parallel document.
If you know you have parallel documents, you may override the sentence alignment by supplying pre-
aligned text files: You can extract all sentences from both documents into text file, organized one
sentence per line, and upload with a “.align” extension. The “.align” extension signals Microsoft
Translator Hub that it should skip sentence alignment.2.8 User Roles
There are 4 user roles in Hub
1. Owner:
Owner is a generally the first person from the organization or community who receives an
invitation from Microsoft to use the Hub and later invites Co-owners and Reviewers to join.
Owner has the permission to do all the activities that can be done by Co-owners and Reviewers.
2. Co-owner:
Co-owner is a person who is either invited by the Owner of the workspace or another Co-owner
in the same workspace.
A Co-owner is authorized to do the following activities in addition to the activities that can be
done by a Reviewer.
- Create and remove projects
- Conduct Trainings
- Clone Trainings
- Upload and remove documents
- Invite Reviewers and Co-owners to the workspace
- Change the role of an existing person from Co-owner to Reviewer or Reviewer to Co-owner.
- Assign Reviewers to review translations of sentences in the test data set.
- Request for deployment of a translation system resulting from a successful training run.
- Invite Community Members to post-edit sentences translated by custom translation system
belonging to the workspace instance.
- Approve/Reject alternative translations submitted for deployed translation systems.
- Remove other co-owners or reviewers from the workspace.
3. Reviewer:
Reviewer is a person who is either invited by the Owner or Co-owner of the workspace.
A Reviewer is authorized to do the following activities
- Review translations of sentences in the test data set and submit review comments
- Test Translations of deployed translation systems.
- Review documents containing sentences translated by deployed custom translation system
belonging to the workspace instance & submit alternate translations
4. Community Member:
This role refers to a person who is not a part of the workspace and who has been invited by the
Owner or Co-owner to review documents translated using the deployed translation system and
to submit alternate translations. This role is useful if you want to share selected documents
containing generic sentences with a set of people without assigning them a Reviewer role.
Owners, Co-owners and Reviewers need to sign in with Windows Live ID to perform the authorized
tasks. If you are using multiple Live ID accounts, please be sure to uncheck “Keep me signed in” in the
login page, so that you will be prompted to use the intended account with the Microsoft Translator Hub.
Or invite your other accounts as members into your project.
Community Members have the option to submit alternate translations as anonymous users or
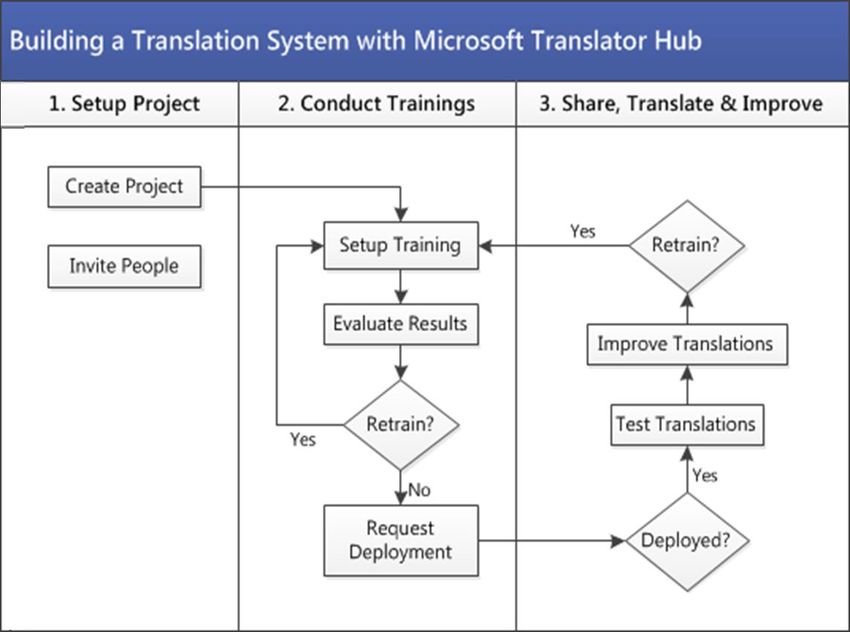
authenticated users.3. Building a Translation System This section takes you through step-by-step process of building a translation system using the Hub. The figure below shows all the steps involved. Each step is further described below.
3.1 Create a Workspace
Anyone can create a workspace. To create a workspace, visit https://hub.microsofttranslator.com, and
choose “Build a translation system”.

At this point, you will have to sign in with your Microsoft Account (formerly Live ID), or create a new
Microsoft Account. If you have a Hotmail or Outlook email address, you already have a Microsoft
Account.
When logged in, you are transferred to your existing workspace, if you have one, or you get the chance
to create a new one, or you can join an existing one, if an owner of that workspace has invited you.
3.2 Setup Project
An owner or co-owner can create projects. We recommend starting with two: one for translating from a
source language to the target language and one in the other direction of the same language pair.
Create Project
1. In the Projects tab, select Add Project.
2. The system shows the Create Project page.
Enter the appropriate data into the following fields:
Project Name (required): Give your project a unique, meaningful name. It is not
necessary to mention the languages within the title, though you may find that useful.
Project Label (optional): The Project Label will help distinguish one project with the
same language pair and category from another project with the same language pair and
category.
Description: Write a short summary about the project.
Source Language (required): Select the language that you are translating from.
Target Language (required): Select the language that you are translating to.
Category: Select the category that is most appropriate for your project. The category
describes the terminology and style of the documents you intend to translate.
For example, the field of Technology has a number of specific terms and requirements that
require special attention. For example, a word like “cloud” may have very different meaning in
the field of technology than in meteorology. If you just want to work on generic languagesupport, choose “general”. The category selection serves only to identify your purpose, but has,
as of now, no influence on the behavior during training or translation.
Category Descriptor: Use this field to better describe the particular field or industry in
which you are working. For example, if your category is Medicine, you might add a
particular topic, such a surgery, or pediatrics. Use this to qualify the category even
further.
Note: If a desired language is not available, click the Request a new language link. See section 4.5
3. Click Create Project.Once you have successfully created a new project, you can proceed to setup the training or inviting new members.
Invite Members
To invite people to become members of the workspace follow the steps given below.
1. Go to the Members tab, select Invite New Member.
2. In the Invite Member page, enter the following information:
Name
Email Address
Role (select Reviewer or Co-Owner)
Edit Message as needed
3. Click Send Invitation.3.3 Conduct Trainings
Setup Training
1. To setup training, select the project from Projects tab and go to Project Details page. Click Train
New System.
2. This opens up the Train system page. Each system has a unique name. The Hub generates a default name
which you can replace with a more descriptive name.
While loading this page, the Hub will search your workspace’s document repository for
documents which have a language code in the document name that matches with the language
code of the source or target language for this training.
If documents are found, Hub will display them on this page as Parallel or Monolingual and by
default include them in your training dataset. Parallel documents will be paired, so only one
document name appears in the list. Please see the box titled “How Hub displays documents in
the document selection grid?” for an example of how Hub displays documents in the document
selection grid
How Hub displays documents in the document selection grid?
Assume you have the following documents
File1_enu.txt
File1_deu.txtFile1_fra.txt
File2_enu.txt
File2_deu.txt
File3_deu.txt
a. If you are training an English German system, Hub will scan the workspace’s
document repository for all documents with “enu” and “deu” in the Document name
and display the following documents in the Document selection grid.
File1.txt and File2.txt as parallel documents
File3.txt as monolingual German document.
b. If you are training French English system, Hub will scan the workspace’s document
repository for all documents with “fra” and “enu” in the Document name and display
the following documents in the Document selection grid.
File1.txt as parallel document
File2.txt as monolingual English document
c. If you are training French German system, Hub will scan the workspace’s document
repository for all documents with “fra” and “deu” in the Document name and display
the following documents in the Document selection grid.
File1.txt as parallel document
File2.txt and File3.txt as monolingual German documents.
If documents are not found, you will need to upload your documents now.
Please refer to Section 2.3 for more information on Parallel and Monolingual documents and
Section 2.4 for Document Naming Convention.3. By default the option to Use Microsoft models is checked in the Training tab. The effect of using
this option depends on whether the source language and target language for the training are
currently supported by Microsoft Translator.
Source Target Use Impact
Language Language Microsoft
supported supported Models
checked
Y Y Y The trained system will make use of the
Language Model and Translation model already
built by Microsoft
N Y Y The trained system will make use of the
Language Model for the Target Language
N N Y No impact.
Y N Y No impact
Using Microsoft models in training the system may make your translations more accurate and
more fluent.
4. To upload documents, click on the add documents link.
5. This opens up the Upload Documents dialog
6. Browse to the location of your documents and select the document or zip file you want to
upload.
7. Click Upload. Hub will initiate the upload process.8. If it is zip file, the Hub extracts all documents from the zip. For each document, it runs certain
data validations and then extracts sentences from it into a sentence file
Observe in the screenshot below, the documents named Doc005_enu.pdf and Doc006_enu.docx
do not have a corresponding document in Hmong (mww). Hence these documents will be
treated as monolingual documents for the purpose of this training, unless the user uploads the
other document in the pair at a later point in time.9. When the upload completes, click on Close.
10. Hub will refresh the grid on the Train system page, displaying the names of the files uploaded,
whether it is parallel or monolingual, the file size and sentence count for each document.
For parallel documents the size and sentence count values are displayed using “/” to separate
the values for the source language version of the document and target language version of the
document.
For example, in the screenshot below, the Hmong version of Doc0025.pdf is 58 KB in size with
58 sentences in it and the English version of Doc0025.pdf is 54 KB in size with 49 sentences in it.
Each page displays 25 items. Use the paging controls to page through the list.
You will see a “New” icon next to all documents that are uploaded in the last 24 hours.11. It may happen that the sentence count for a parallel or monolingual document does not match
your expectations. In some cases, Hub will alert you if it detects a huge difference in the
sentence count values for parallel documents.
You will see a yellow warning icon if the difference in sentence counts between the documents
in the pair is greater than 10%, but less than 50% of the lower of the sentence count in the pair.
You will see a red warning icon if the difference in sentence counts between the documents in
the pair is greater than 50% of lower of the sentence count in the pair.
In such cases, you can select these documents in the grid and click on download sentence files
link at the bottom of the grid. This will download a zip file containing the sentences extracted
from each document in the pair. You can make corrections if desired and re-upload the
document.
12. You can also click on the sentence count value for a given document to view the sentences
extracted for a given document. This is just a read-only view.13. If the results of sentence extraction look good, you can use the checkboxes to include/exclude
the documents in the training data set. If you have a lot of documents, use the search box to
look for them by name. As you select the documents, Hub will update the values for “Parallel
Sentences Selected”, “Parallel Documents Selected in Training Dataset” and “Monolingual
Documents selected in the Training Dataset”. You will see a green tick mark next to “Parallel
Sentences Selected” as soon as the no. of parallel sentences selected exceeds the suggested
minimum of 10,000.
14. If you are using Microsoft Translator Widget with Collaborative Translations enabled for your
web sites, Microsoft Translator Hub can fetch the translations submitted by your community for
content hosted on these sites. To get these translations click get community translations link to
open up the Get Community Translations dialog.If you do not have a Client ID and Client secret, you will have to visit
https://datamarket.azure.com/developer/applications/. Sign in with Live ID and click Register. In
the "Register your application" page, enter data in the required fields. Note down the Client ID
and Client secret.
After you submit the Client ID and Client secret, Hub will lookup CTF store and get sentences
submitted using the widget hosted on your site by your community for this language pair. These
sentences will be stored in a file named “AlternateCommunityTranslations--.align” as
shown below.
15. With documents selected in the Training data set, click on the Tuning tab to select documents in
the Tuning data set. By default Auto selection is enabled. This allows Hub to randomly select
approximately 5% of the aligned sentences from the Training data set and consider them for
tuning. For a training to succeed, Hub requires to have a minimum of 500 sentences in the
Tuning data set. With auto selection, the Hub ensures that sentences used in the Tuning data set
are not used to train the translation system.16. If you want to manually select documents for the Tuning data set, click the Manual selection
option. The Hub will display all documents that have not yet been selected in the Training data
set and Testing data set. If you cannot find documents in this list, you should switch to either
Training tab or Testing tab, unselect the desired document from that set and come back to the
Tuning tab.
You should select a parallel document for which the extracted sentence count is equal. For
example, in the screenshot below Doc0010.txt has 1,653 sentences in both the source language
version and the target language version. Assuming the sentences in this document are well
translated, sentences in Doc0010.txt are suitable for inclusion in tuning data set. In the manual
selection mode, The Tuning tab currently allows you to select only one document. If you want to
combine sentences from different documents, we recommend that you create a separate
document containing such sentences and use it here.
To switch back to Auto selection, you can click on auto select Tuning Data.
17. Having selected documents in the Tuning data set, click on the Testing tab to select documents
in the Testing data set. By default Auto selection is enabled. This allows Hub to randomly select
approximately 5% of the aligned sentences from the Training data set and consider them for
testing. For a training to succeed, Hub requires to have a minimum of 500 sentences in the
Testing data set. With auto selection, the Hub ensures that sentences used in the Testing data
set are not used to train the translation system.18. If you want to manually select documents for the Testing data set, click the Manual selection
option. The Hub will display all documents that have not yet been selected in the Training data
set and Tuning data set. If you cannot find documents in this list, you should switch to either
Training tab or Tuning tab, unselect the desired document from that set and come back to the
Testing tab.
In the testing data set, you should select a set of parallel documents for which the extracted
sentence count is equal or almost equal. For example, in the documents selected in the
screenshot below are good candidates for inclusion in the Testing data set.
To switch back to Auto selection, you can click auto select Testing Data.
19. With the Training, Tuning and Testing data sets well defined, you are now ready to train your
translation system for this language pair. To start the training, click on the Start Training button.
If you want to save it and modify the training configuration, you can click Save link.
20. Before proceeding to execute the training, the Hub will alert you if it finds any issues with the
documents selected in the Training, Tuning or Testing data set and also recommend fixes. You
can either ignore the warning or fix the issues and then resubmit the training.21. After your training is submitted for execution, it may take up to several hours to build your
translation system depending upon the amount of data included in the training. The status will
show as “In Training” on the Project Details page and you can see the more details about the
Training by clicking on the System name in the Project Details page.Using Dictionaries
You can specify a dictionary of terms that Microsoft Translator should use in translation, in addition to
your training data for the translation system.
Use of a dictionary has the potential of degrading the quality of the translations. Here are some
guidelines and hints:
Training documents showing the terms used in context are better than a plain dictionary. Terms
used in sentence form teach the system the correct inflection and agreement, better than a
dictionary can.
The dictionary maps the dictionary term or phrase exactly to the given translated form.
Try to minimize the dictionary to the terms that the system does not already learn from the
training documents.
The dictionary works well for compound nouns like product names (“Microsoft SQL Server”),
proper names (“City of Hamburg”), or features of the product (“pivot table”). It doesn’t work
equally well for verbs or adjectives, because these are typically highly inflected. Avoid dictionary
entries for anything but compound nouns.
Both sides of the dictionary are case sensitive. Each casing situation requires an individual entry
into the dictionary.
You may create dictionary entries for longer phrases and expressions. In fact, entries of 2 words
or longer typically have better effects on the translation than single word entries.
Chinese and Japanese are relatively safe with a glossary. Most other languages have a richer
morphology (more inflections) than English, so they will suffer if there is a glossary entry for a
term or phrase that the system already translates correctly.
To use a dictionary, follow the steps listed here.
1. Create a dictionary of terms using Microsoft Excel.
a. Create an Excel file. In this release, Hub supports only “.xlsx” files created using Excel
2007 and later. This file contains a list of source-language terms and a list of
corresponding target-language equivalents in the first sheet of the Workbook. Other
sheets in the workbook will be ignored.
b. In cell A1 of the first sheet, enter the 3 letter or 2 letter ISO language code for the
source language (eg: “enu” or “en” for English)
c. In cell B1 of the first sheet, enter the 3 letter or 2 letter ISO language code for the target
language (eg: “esn” or “ es” for Spanish)
d. Enter the source language terms in Column A, and the equivalent translations for these
terms in the target Language in Column B. HTML tags in the dictionary will be ignored.
The image below shows an Excel file containing a dictionary of terms mapped from
English to Spanish.2. Save the Excel workbook.
3. Upload the dictionary file to Hub and start the training.
a. Sign in to Hub and on the Setup Training, click the Dictionary tab.
b. Click add documents link and upload the Excel file created in Step 1.
c. After the upload completes, the Excel file will appear in the Dictionary tab as shown
below. Select the files listed in the Dictionary tab in order to use the terms defined in
those files in your training.
d. Select Training data and click Start TrainingMultilingual Dictionaries
You can create dictionaries for a specific source language and multiple target languages. To do that,
simply add additional columns to the Excel sheet, as columns C, D, E and so on, following the same
guidelines as above, with a language ID in row 1.
Once you uploaded this Excel file into your workspace, you can use it in any project for the respective
language pair, and the Hub will automatically use the appropriate language column. Column A is always
the source language, and columns B to ZZ are target languages.
Auto-selection of Testing and Tuning data
Here is how auto-selection of Testing and Tuning data works in the Hub.
1. If a segment in tuning data is identical to a segment in training data, the segment is removed
from training data.
2. If a segment in tuning data is identical to a segment in testing data, the segment is removed
from testing data.
3. If a segment in tuning data and testing data is identical to a segment in training data, the
segment is removed from training and testing data.
4. If a segment in testing data is identical to a segment in training data, the segment is removed
from training data.
Evaluate Results
When the training is complete, you will receive an e-mail. You can then sign in to the Hub. Below are
the steps to evaluate and act on the results.
1. Navigate to Projects tab.
2. Click on a project name to open the Project Details page. Click on the name of the system
trained to open the page that shows the latest status of the training.
3. The Status field shows the latest status for the training. The Duration field shows how long it
took to train the system starting from the time the training request was submitted till the
training completed.
If the training has succeeded, the BLEU Score field shows a value indicating how well the
machine translation correlates to human judgment. For all trainings conducted after 6-July-
2012, Hub shows how the trained system compares with Microsoft general domain translation
system by displaying a delta of the BLEU scores between the two systems. As seen below, the
score of the system trained is 8.16 points lower than Microsoft’s General Domain system for the
language pair. You may consider adding more training data or train the system with Microsoft
Models and see if it improves the BLEU score.
4. If the training fails, click on the Training name to view more information. For example, you might
see:Status: Training failed:
Number of sentences in the training set is too small.
This indicates that the system is not able to produce a useable translation system based on the
small amount of data provided and you should find additional documents.
5. Each of the three tabs shows the Aligned Sentence Count and Extracted Sentence Count.
Hub displays 3 sentence counts.
a. Extracted sentence count: Count of sentences extracted from the document
b. Aligned sentence count: Count of sentences aligned
c. Used sentence count: No. of sentences used in building the system after excluding
sentences that overlap with tuning or testing set.
NOTE: For trainings conducted before 6-July-2012, aligned sentence count will be the same as
used sentence count.
6. If you notice a large difference between the aligned and extracted sentence counts, you have
the option to download the files and inspect them. To do so, click the checkbox next to the
document(s) and click download sentence files to download a zip file containing the extracted
sentence files and aligned sentence files corresponding to the document(s).
7. For a training that succeeds, you can click Evaluate Results link. This will open the Evaluate
results page that shows the machine translation of sentences that were a part of the test
dataset.8. The table on the Review Translations page has two columns - one for each language in the pair.
The column for the source language shows the sentence to be translated. The column for the
target language contains two sentences in each row. The first sentence, tagged with "Ref:", is
the reference translation of the source sentence as given in the test dataset. The second
sentence, tagged with "MT:", is the automatic translation of the source sentence done by the
translation system built after the training was conducted.
9. Click Download Translations link to download a zip file containing the machine translations of
source sentences in the test data set.
This zip file contains 4 files.
a. BaselineMT_Dataset_.txt: Contains machine translations
of source language sentences in the target language done by Microsoft’s general
domain system.
b. MT_Dataset_.txt: Contains machine translations of
source language sentences in the target language done by the system trained with
user’s data.
c. Ref_Dataset_.txt: Contains user provided translations of
source language sentences in the target language
d. Src_Dataset_.txt: Contains sentences in the source
language
10. Navigate through the list of sentences using the paging controls and compare the machine
translation against the original translation.
11. Click the Assign Reviewers to invite Reviewers and Co-owners to review the translations for this
training.12. If you would like to retrain the system using new documents, click Clone link. This will create a
copy of the existing system. You can now modify the training configuration and resubmit it.Best Practices
You can use auto option for selecting testing and tuning data set for the first couple of trainings
for a language pair. Then download the auto-generated tuning/test set from the Training results
page. Review the downloaded sentences and modify them if required. We recommend that you
switch to using the manual option for selecting tuning and testing datasets so that for over a
period of time the comparisons can be done as you vary the training data while keeping the
tuning and testing data under unchanged.
In order to compare consecutive trainings for the same systems, it is important to keep the
tuning set & testing set constant. This is particularly relevant for trainings where the parallel
sentence count is under 100,000 sentences. This set should be made up of sentences you think
most accurately reflects the type of translations you expect the system to perform.
If you elect to manually select your tuning data set, it should be drawn from the same pool of
data as the test set, but not overlapping. There should not be a duplication of sentences
between training and tuning.
When you engage in a series of training runs you are likely to receive differing BLEU scores for a
given same language pair. Though BLEU is not a perfect metric for accuracy, there is a very high
likelihood that the system with a higher score may provide the better translations. It is best to
test the system or have bilingual reviewers evaluate the accuracy of a particular training.
When you clone an existing training, we recommend that you only make changes to the training
data set. In order to train a system that is comparable to the previous one, it is important to
leave the tuning and testing data sets unchanged. That way, the newly trained system will be
tested against the same set of sentences.
A higher BLEU score often indicates that a translation matches the target language more closely.
Don’t be disappointed if your scores aren’t reaching 100 (the maximum). Even human
translators are unable to reach 100% accuracy. For ideographic and complex languages you will
get a lot of utility out of a score between 15 and 20, for most Latin-based languages a score of
30 gets you into a desirable range.
When using dictionaries, try to reduce the dictionary to the terms that are absolutely necessary
to regulate. In a second pass further reduce the entries to the ones that don’t come out right in
a majority of test cases, and let the system do choose the best option for the ones that comes
out right, mostly.
If the auto-selected sentences in tuning data set or testing data set are not of a suitable quality
in the last trained system, Hub offers an option to reset the tuning data and testing data in the
new training, which forces the system to resample the tuning and testing data. If you add a large
number of documents to Training data set, remember to check the Reset checkbox so that the
test set and tuning set are resampled.3.4 Share, Translate & Improve
This section describes how you can test the translation system you have created and then share it with
people from your community so as to further improve the quality of your translation system.
Request Deployment
It may take several trainings in order to create an accurate translation system for your project.
After a set of systems have been trained, go to the Project Details page and select one with a good BLEU
score. You may want to consult with reviewers before deciding that the quality of translations is suitable
for deployment.
In the Request Deployment page of the selected system, click on Request Deployment
An email will be sent to Microsoft Translator Hub team with details of the training and information
required to process the deployment. Please allow around 6 business days for the deployment request to
be processed. You will receive an email confirming the availability of your translation system as soon as
the deployment has taken place.
The status of a training for which a translation system has been deployed appears as “Deployed”.Test Translations
After the translation system generated by your training has been deployed, you will receive an email
from mthubsup@microsoft.com.
To verify the translation system after deployment
1. Click Projects tab.
2. From the Projects list, select the Project for which the translation system has been deployed and
select the translation system with status as "Deployed". Go to the Test system page.
3. Enter the test sentence into the From box. Click Translate.
The translation of the source sentence(s) will be displayed in the To box. Note that the Category of this
deployed project is listed at the bottom on this screen.Improve Translations
After the translation system generated by your training has been deployed and you have verified it using
the Test Translations page, you can share documents translated using the translation system with your
community and invite them to post-edit translations to further improve the quality of the system.
3.3.3.1 Engage Your Community
1. Click Projects tab.
2. From the Projects list, select the Project for which the translation system has been deployed and
select the translation system with status as "Deployed". Go to the Translate documents page.
3. Click Add documents and upload documents containing sentences in the source language to be
translated to the target language. If Hub finds a source language document in the repository
without a corresponding target language pair having the same base name, that document will
not be shown in the list of available documents for translation.
4. You can click on the name of document to preview how the deployed translation system
translates source language sentence in the document to the target language. The source
language will be on the left, and the target language will be on the right. Mouse over the
translation you wish to update, and then click Improve Translation. Type in your suggested
changes, and then click the Submit button. If you are intending to share this document with
users Community Members (See section 2.6), who are not a part of the workspace, please
review the document to ensure that it does not contain sensitive information.5. To share the document you have previewed, select it and click Share 6. The document will now be listed under Shared Documents. Documents listed in the Shared Documents tab are visible to all Reviewers in this workspace. Reviewers can click the document name to open up the Review Documents page and submit alternate translations. To stop sharing a document, click the stop sharing link in the Shared Documents tab. 7. If there are a lot of documents listed in it, use the search feature to locate the document, select it and click on email to invite a Community Member to review the document. 8. In the Send Email dialog, type in the email address of the community members.
9. Click Send.

10. Click OK.
3.3.3.2 Approve/Reject Translations
Owners/Co-owners can review and approve the alternate translations submitted by reviewers and
community members for sentences belonging to documents that were shared with them as described in
the section Engage Your Community
Hub has a feature that allows owners/co-owners to do instant live corrections on translations such that they will
show up & replace automated translations. This means that the deployed translation system will respond with
approved community translation when available. For people familiar with professional translation tools, this is
equivalent to applying a translation memory to the input document or sentences. It is important for owners/co-
owners to periodically use this feature for projects with deployed translation systems.
1. Click Projects tab.
2. From the Projects list, select the Project for which the translation system has been deployed and
select the translation system with status as "Deployed". Go to the Review Corrections page.
3. For each translation submitted by a reviewer, you can select any one of three options by moving
the mouse over the translation
If you believe the translation is appropriate and correct, select Approve. Approved
translations have a green colored font.
i. Translations approved by the Owner/Co-owner get a rating of 8.
ii. Translations approved by Reviewer get a rating of 6.
If you believe the translation is not appropriate or correct, select Reject. Rejected
translations have a grey colored font.
i. Translations rejected by the Owner/Co-owner get a rating of -8
ii. Translations rejected by the Reviewer get a rating of -6.
If you wish to edit the translation, select Edit.4. To bulk approve translations, click Suggested radio button. Suggested list shows translations
that have been selected as the best translation and have received a positive rating between +1
to +4. Use the checkbox to select translations suggested and click on the Approve checked.
5. Reported list shows translations that have been marked as offensive resulting in a negative
rating between -1 to -4.
Once you have received sufficient feedback from your reviewers, you can decide to re-train your
translation system based on reviewer inputs or additional data you may have uploaded.3.3.3.3 Re-train with Community Translations
To re-train your translation system with community inputs, please follow the steps given below.
1. Go Projects tab
2. From the Projects list, select the Project for which the translation system has been deployed and
select the translation system with status as "Deployed". Go to the Review Corrections page.
3. Click Download Community Translations.
4. Hub will connect to Microsoft Collaborative Translation Framework store, retrieve all the
alternate translations submitted by your community and show you the Download Community
Translations dialog
5. Click Download Sentence File to download a zip file containing these translations.
6. Open the zip file.7. The downloaded zip file contains two parallel documents. Notice that these documents follow
the document naming convention (Section 2.4) that is required by the Hub.
a. ApprovedCommunityTranslations.align: This contains all sentence pairs for which
translations are approved by the workspace owner/co-owner.
b. AlternateCommunityTranslations.align: This contains all sentence pairs for which
translations have not yet been approved by the workspace owner/co-owner.
8. You can review the sentences in these documents, correct them if required and re-upload them
for use in your training. Since these documents already follow the naming convention, there is
no need to rename the documents.
9. You can include the community submitted documents in any of the data sets – Training, Tuning
or Testing. Please refer to Section 3.2.1 for further information of setting up the training.4. Managing & Tracking
4.1 Changing Workspace Name and Organization name
To change the name of the workspace, follow the steps given below
1. Go to Settings tab
2. Edit the Workspace Name or Organization Name.
3. Click the Save button.
4.2 Browsing Projects
To view projects in your workspace, follow the steps given below
4. Go to Projects tab
5. You will see a listing of all projects in your workspace instance sorted in the reverse
chronological order.
6. By default, Hub displays 5 projects per page. If you have more than 5 projects, you can select to
see 10 or 15 or all projects in a single page.
4.3 Remove Project
To remove a project
1. Go to Projects tab
2. For a selected project in the list, click on the Remove Project link
3. You will be presented with a confirmation dialog. Click OK to proceed or Cancel to abort.
4. Please note that removing a project cannot be undone.4.4 Manage Documents
Manage Documents page allows you to see all the documents present in your workspace’s document
repository and delete documents that are not in use.
1. Go to Documents tab.
2. Hub displays Used Documents tab with a list of all documents that have either been used in a
training or shared with the community for review.
3. Click Unused Documents tab. You will see a list of documents that have been uploaded but are
not used. These documents can be safely deleted by selecting them and clicking on Remove
selected documents.4. The search box in at the top of the grid allows you to search by document name. You can search by the three letter language code. For eg: mww to see a list of all Hmong language files present in the workspace’s document repository. You can further sort by any of the column.
4.5 Manage Members
As co-owner and owner, you can manage membership of the workspace.
1.     Go to Members tab

   2. The system displays a list of all users of the workspace along with the roles assigned to them.
   3. As Owner/co-owner, you can select a role from the Role drop-down, change the role of an
      existing member and click Save Changes
   4. To remove an existing member, select a person from the list and click Remove Selected
      Member(s). You will see a confirmation dialog to confirm the deletion. Click OK to proceed with
      it or Cancel to abort.
4.6 Request Language
MT Hub might not support the language that you want to use in your project. However, you can request
a new language for your project.
1. At the time of Creating a project, if you cannot find the language in the list, select Request New
Language.
2. This brings up a form
3. Enter the appropriate data into the following fields:
New Language (required): enter the language that is missing from the MT Hub
database of translated languages.
Tell Us More: give as many details about the specific language, including region,
dialects, etc.
4. Click on Submit Request.5. You should receive an email from MT Hub Support verifying your request for a new language. An email is sent to the Microsoft Translator team and they will contact your workspace owner when the language becomes available.
5. Appendix

5.1 FAQs
Q: Are the documents in my workspace visible to people outside the workspace? What is the document
retention policy?
A: Information generated and stored as a result of your project from the Hub belongs to you, but may be
stored for an indefinite period of time. Documents uploaded by you are only visible to authorized users
in your workspace. Your data will not be shared with anyone, except the people and organizations who
are tasked with the quality assurance of the Translator service. It is protected from access by anyone
else. We may use your data for translation to derive statistical and quantitative information about the
text being translated, in order to build and apply the most appropriate models to optimize the
translation.
For more information, please see the Terms of Use.

Q: What are the minimum requirements for training a language pair that is not yet supported by
Microsoft Translator?
A: Microsoft Translator Hub will fail if there are less than 10,000 sentences of parallel data. In order to
achieve a very basic level of understandability you will generally need 10,000 or more sentences.

Q: What are the minimum requirements for building a category customization in a supported language
pair?
A: If you are allowing the use of Microsoft models in your training setup, the minimum is the tuning set
and the test set. This will give a minimal improvement for your documents at best. In order to improve
further, you can add parallel material, or target language material, or both. More material is generally
better, but try to stick to the category and terminology you want to improve.

Q: I selected ‘Technology’ category when creating a project. When I train the system for this project and
check the option “Use Microsoft Models”, will the training use Microsoft’s Technology model?
A: No. At this moment the choice of “Use Microsoft models” always invokes the general training data,
same as Bing Translator. The category selection serves only to identify your purpose, but has, as of now,
no influence on the behavior during training or translation. That will change in an upcoming release.

Q: What if I am from a country that is not supported by Microsoft Azure Datamarket?
A: There are a number of possibilities to work around this for your project. Please contact
mtlic@microsoft.com for more information.

Q: What if I have documents in Word 97-2003 DOC format? Can I use them in a training?
A: You will need to use OFC.exe which is a free download included with "Microsoft Office Compatibility
Pack for Word, Excel, and PowerPoint File Formats"
(http://www.microsoft.com/download/en/details.aspx?id=3) and convert the DOC files to DOCX.
If you have Word 2007/2010, you can use it to convert DOC files to DOCX and then upload the
documents.

Q: How can I opt out of the Hub?
A: This depends on your role in the workspace you belong to. To opt out of the Hub, Co-owners can
delete themselves, while Reviewers need to request the co-owners to remove them from the
You can also read