Adobe Bridge CC Help - Adobe Help Center
←
→
Page content transcription
If your browser does not render page correctly, please read the page content below
Adobe® Bridge® CC Help
Legal notices

Legal notices
For legal notices, see http://help.adobe.com/en_US/legalnotices/index.html.

                                                            Last updated 3/8/2018
iii

Contents
Chapter 1: Introduction to Bridge
New features summary . . . . . . . . . . . . . . . . . . . . . . . . . . . . . . . . . . . . . . . . . . . . . . . . . . . . . . . . . . . . . . . . . . . . . . . . . . . . . . . . . . . . . . . . . . . . . . . . .1
System requirements | Bridge                             . . . . . . . . . . . . . . . . . . . . . . . . . . . . . . . . . . . . . . . . . . . . . . . . . . . . . . . . . . . . . . . . . . . . . . . . . . . . . . . . . . . . . . . . . . .6
Adobe Bridge workspace                           . . . . . . . . . . . . . . . . . . . . . . . . . . . . . . . . . . . . . . . . . . . . . . . . . . . . . . . . . . . . . . . . . . . . . . . . . . . . . . . . . . . . . . . . . . . . . 10
Import photos using Photo Downloader                                           . . . . . . . . . . . . . . . . . . . . . . . . . . . . . . . . . . . . . . . . . . . . . . . . . . . . . . . . . . . . . . . . . . . . . . . . . . . . . . 16
Organize content and assets using Adobe Bridge                                                 . . . . . . . . . . . . . . . . . . . . . . . . . . . . . . . . . . . . . . . . . . . . . . . . . . . . . . . . . . . . . . . . . . . . . . 23

Chapter 2: Work with assets
Create PDF contact sheet in the Output workspace                                                  . . . . . . . . . . . . . . . . . . . . . . . . . . . . . . . . . . . . . . . . . . . . . . . . . . . . . . . . . . . . . . . . . . . . 24
View and manage files in Adobe Bridge                                        . . . . . . . . . . . . . . . . . . . . . . . . . . . . . . . . . . . . . . . . . . . . . . . . . . . . . . . . . . . . . . . . . . . . . . . . . . . . . . . 34
Work with metadata in Adobe Bridge                                       . . . . . . . . . . . . . . . . . . . . . . . . . . . . . . . . . . . . . . . . . . . . . . . . . . . . . . . . . . . . . . . . . . . . . . . . . . . . . . . . . 40
Work with the Adobe Bridge cache                                     . . . . . . . . . . . . . . . . . . . . . . . . . . . . . . . . . . . . . . . . . . . . . . . . . . . . . . . . . . . . . . . . . . . . . . . . . . . . . . . . . . . 47
Start Adobe Bridge                   . . . . . . . . . . . . . . . . . . . . . . . . . . . . . . . . . . . . . . . . . . . . . . . . . . . . . . . . . . . . . . . . . . . . . . . . . . . . . . . . . . . . . . . . . . . . . . . . . . . 50
Adjust Adobe Bridge Content panel display                                            . . . . . . . . . . . . . . . . . . . . . . . . . . . . . . . . . . . . . . . . . . . . . . . . . . . . . . . . . . . . . . . . . . . . . . . . . . . 51
Preview and compare images in Adobe Bridge                                                 . . . . . . . . . . . . . . . . . . . . . . . . . . . . . . . . . . . . . . . . . . . . . . . . . . . . . . . . . . . . . . . . . . . . . . . . 54
Use keywords in Adobe Bridge                               . . . . . . . . . . . . . . . . . . . . . . . . . . . . . . . . . . . . . . . . . . . . . . . . . . . . . . . . . . . . . . . . . . . . . . . . . . . . . . . . . . . . . . . . 57
Use collections in Adobe Bridge                                . . . . . . . . . . . . . . . . . . . . . . . . . . . . . . . . . . . . . . . . . . . . . . . . . . . . . . . . . . . . . . . . . . . . . . . . . . . . . . . . . . . . . . 59
Stack files in Adobe Bridge                        . . . . . . . . . . . . . . . . . . . . . . . . . . . . . . . . . . . . . . . . . . . . . . . . . . . . . . . . . . . . . . . . . . . . . . . . . . . . . . . . . . . . . . . . . . . . 61
Automate tasks in Adobe Bridge                                 . . . . . . . . . . . . . . . . . . . . . . . . . . . . . . . . . . . . . . . . . . . . . . . . . . . . . . . . . . . . . . . . . . . . . . . . . . . . . . . . . . . . . . 63
Preview dynamic media files in Adobe Bridge                                              . . . . . . . . . . . . . . . . . . . . . . . . . . . . . . . . . . . . . . . . . . . . . . . . . . . . . . . . . . . . . . . . . . . . . . . . . 65

Chapter 3: Publish
Publish assets to Adobe Portfolio                                . . . . . . . . . . . . . . . . . . . . . . . . . . . . . . . . . . . . . . . . . . . . . . . . . . . . . . . . . . . . . . . . . . . . . . . . . . . . . . . . . . . . . 67

Chapter 4: Keyboard shortcuts
Adobe Bridge keyboard shortcuts                                  . . . . . . . . . . . . . . . . . . . . . . . . . . . . . . . . . . . . . . . . . . . . . . . . . . . . . . . . . . . . . . . . . . . . . . . . . . . . . . . . . . . . . 70

Chapter 5: Adobe Camera Raw
Manage Camera Raw settings . . . . . . . . . . . . . . . . . . . . . . . . . . . . . . . . . . . . . . . . . . . . . . . . . . . . . . . . . . . . . . . . . . . . . . . . . . . . . . . . . . . . . . . . . 72
Rotate, crop, and adjust images                              . . . . . . . . . . . . . . . . . . . . . . . . . . . . . . . . . . . . . . . . . . . . . . . . . . . . . . . . . . . . . . . . . . . . . . . . . . . . . . . . . . . . . . . 76
Repair images with the Enhanced Spot Removal tool in Camera Raw                                                                     . . . . . . . . . . . . . . . . . . . . . . . . . . . . . . . . . . . . . . . . . . . . . . . . . . . 78
Radial Filter in Camera Raw                          . . . . . . . . . . . . . . . . . . . . . . . . . . . . . . . . . . . . . . . . . . . . . . . . . . . . . . . . . . . . . . . . . . . . . . . . . . . . . . . . . . . . . . . . . . . 81
Automatic perspective correction in Camera Raw                                                 . . . . . . . . . . . . . . . . . . . . . . . . . . . . . . . . . . . . . . . . . . . . . . . . . . . . . . . . . . . . . . . . . . . . . . 85
Create panoramas                    . . . . . . . . . . . . . . . . . . . . . . . . . . . . . . . . . . . . . . . . . . . . . . . . . . . . . . . . . . . . . . . . . . . . . . . . . . . . . . . . . . . . . . . . . . . . . . . . . . . . 89

Chapter 6: Adobe Stock Contributor

                                                                                        Last updated 3/8/2018
1

Chapter 1: Introduction to Bridge

New features summary
                      The October 2017 release of Adobe Bridge CC rolls out exciting new features for designers, digital photographers,
                      and creative professionals. Read on for a quick introduction to these features and links to resources offering more
                      information.

                      For a summary of features introduced in earlier releases of Adobe Bridge CC, see Feature summary | Adobe Bridge
                      CC | earlier releases .

Publish assets to Adobe Portfolio
      New in this release of Adobe Bridge CC
Using the Publish panel, you can now create an Adobe Portfolio project from within Adobe Bridge and show your
creative work to the world. You can upload RAW and JPEG images, audio, and video files as Portfolio project.

Publish panel

                                                Last updated 3/8/2018
2
Introduction to Bridge

Publish to Adobe Portfolio

    For more information, see Publish assets to Adobe Portfolio.

Native Output workspace to create a PDF contact sheet
       New in this release of Adobe Bridge CC
A new workspace named Output has been introduced in Adobe Bridge CC. You can now use Output workspace to
create PDF contact sheet of your assets using predefined and custom templates.

A Output Preview panel B Output Settings panel C Output workspace D Export to PDF button E Content panel F Filter and Collection panels
G Favorites and Folders panels

                                                    Last updated 3/8/2018
3
Introduction to Bridge

    To know more about the feature, see Create PDF contact sheet in the Output workspace.

UI enhancements in the Publish to Adobe Stock workflow
      Enhanced in this release of Adobe Bridge CC
Publishing to Adobe Stock Contributor is an existing feature in Bridge. The user interface for uploading your images
to Adobe Stock Contributor has been improved in this release.

Publish panel

Publish to Adobe Stock Setup

    To know more, see .

New filter criteria in the Filter panel
      Enhanced in this release of Adobe Bridge CC
In this release of Bridge CC, the following new filter criteria have been introduced in the Filter panel:
• Author Name: Show files based on the selected author name.
• Color Profile: Show files based on the selected color profile.
• Bit Depth: Show files based on the selected bit depth.

                                              Last updated 3/8/2018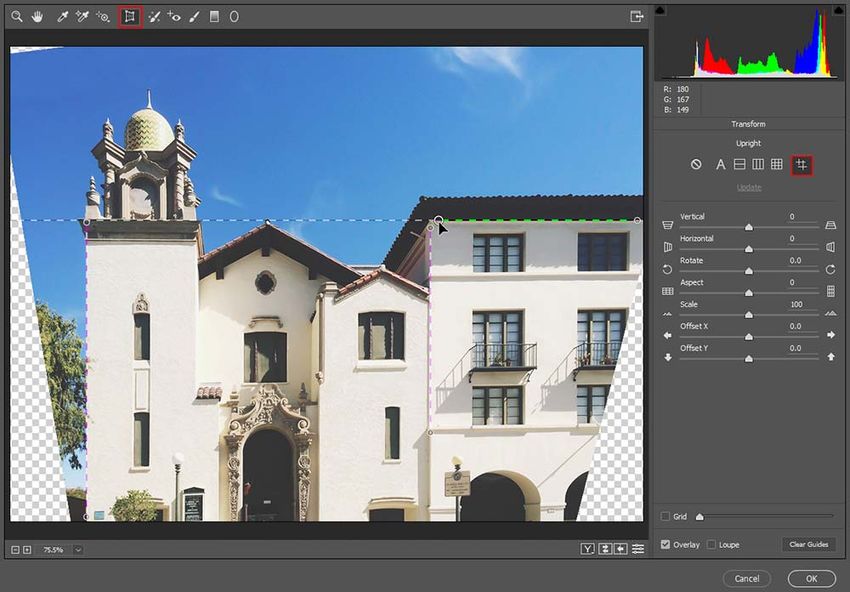
4
Introduction to Bridge

Filter panel

    To know more, see Filter files.

Improved File Info dialog
      Enhanced in this release of Adobe Bridge CC
The improved File Info dialog (File > File Info) is now similar to the one available in Photoshop CC. When you edit
metadata in the Metadata panel or assign keywords to a file, the same information is displayed in the File Info dialog,
and vice-versa.

                                             Last updated 3/8/2018
5
Introduction to Bridge

File info dialog

Support for CEP Extensions
       New in this release of Adobe Bridge CC
Bridge CC now supports Common Extensibility Platform (CEP). You can create and run HTML5\CSS based
Extensions in Bridge CC 2018 version 8.0 and later. To access the Extensions in Bridge, from the menu bar choose
Window > Extensions.
Developer who want to create their own CEP Extensions for Bridge can refer to the document CEP
Extensions Cookbook for Bridge for detailed instructions. Visit https://github.com/Adobe-CEP to find Bridge CEP
related resources.

Improved scrolling experience
      Enhanced in this release of Adobe Bridge CC
In this release of Bridge CC, major improvements have been made in the scrolling performance when you browse
through assets in the Content panel.

Issues fixed in Bridge CC v8.0.1 (December 2017)

Fixes for customer-reported issues
    Fixed the issue where Bridge crashes while choosing File > Import From Device option from the menu bar.
(macOS-only)        Fixed the issue where Bridge crashes when launched from Dock. (macOS-only)          Fixed the
Bridge freezing issue when navigating to a folder containing video files.  Fixed the crash issue when switching from
the Output workspace to the Essential workspace directly after changing a field's value in the Output Settings panel.
(Windows-only)

                                            Last updated 3/8/2018
6
Introduction to Bridge

System requirements | Bridge

Bridge CC (October 2017 release) system requirements
Release date: October 18, 2017
Version: 8.0

Windows
• Intel® Core™2 Duo or AMD Athlon® 64 processor; 2 GHz or faster processor
• Microsoft® Windows® 7 with Service Pack 1, Windows 8.1, or Windows 10*
• 2 GB of RAM (8 GB recommended)
• 2 GB of available hard-disk space for 32-bit installation; 2.1 GB of available hard-disk space for 64-bit installation;
  plus additional free space required during installation (cannot install on removable flash storage devices)
• 1024x768 display (1280x800 recommended) display with 16-bit color and 512 MB of VRAM (1 GB recommended)
• OpenGL 2.0–capable system
• Internet connection and registration are necessary for required software activation, validation of subscriptions, and
  access to online services.†
* October 2017 release of Bridge CC is not supported on Windows 10 version 1507.

macOS
• Multicore Intel processor with 64-bit support
• Mac OS X v10.11 (El Capitan), macOS v10.12 (Sierra), or macOS v10.13 (High Sierra)**
• 2GB of RAM (8 GB recommended)
• 2GB of available hard-disk space for installation; additional free space required during installation (cannot install
  on a volume that uses a case-sensitive file system or on removable flash storage devices)
• 1024x768 display (1280x800 recommended) display with 16-bit color and 512 MB of VRAM (1 GB recommended)
• OpenGL 2.0–capable system
• Internet connection and registration are necessary for required software activation, validation of subscriptions, and
  access to online services.†
** October 2017 release of Bridge CC is not supported on case-sensitive Apple File System (APFS) drive.
† NOTICE to USERS. Internet connection, Adobe ID and acceptance of license agreement required to activate and use
this product. This product may integrate with or allow access to certain Adobe or third-party hosted online services.
Adobe online services, including the Adobe Creative Cloud service, are available only to users 13 and older and require
agreement to additional terms and Adobe's online privacy policy. The applications and online services are not available
in all countries or languages, may require user registration, and may be subject to change or discontinuation without
notice. Additional fees or membership charges may apply.
Dansk Deutsch English Español Français Français** Hebrew** Hungarian
Italiano Nederlands Norwegian Polish Português (Brasil) Suomi Svenska Turkish
Ukrainian čeština Русский ????** ??? ???? ???? ???

                                              Last updated 3/8/2018
7
Introduction to Bridge

** Arabic and Hebrew supported in a Middle Eastern version with full right-to-left language support, Arabic/Hebrew
features, and an English interface; also in a North African French (Français*) version with full right-to-left language
support, Arabic/Hebrew features, and a French interface.

Bridge CC 2017 version 7.0 system requirements

Windows
• Intel® Core™2 Duo or AMD Athlon® 64 processor; 2 GHz or faster processor
• Microsoft® Windows® 7 with Service Pack 1, Windows 8.1, or Windows 10
• 2 GB of RAM (8 GB recommended)
• 2 GB of available hard-disk space for 32-bit installation; 2.1 GB of available hard-disk space for 64-bit installation;
  plus additional free space required during installation (cannot install on removable flash storage devices)
• 1024x768 display (1280x800 recommended) display with 16-bit color and 512 MB of VRAM (1 GB recommended)
• OpenGL 2.0–capable system
• Internet connection and registration are necessary for required software activation, validation of subscriptions, and
  access to online services.**

macOS
• Multicore Intel processor with 64-bit support
• Mac OS X v10.10 (64-bit), Mac OS X v10.11 (64-bit), or macOS v10.12
• 2GB of RAM (8 GB recommended)
• 2GB of available hard-disk space for installation; additional free space required during installation (cannot install
  on a volume that uses a case-sensitive file system or on removable flash storage devices)
• 1024x768 display (1280x800 recommended) display with 16-bit color and 512 MB of VRAM (1 GB recommended)
• OpenGL 2.0–capable system
• Internet connection and registration are necessary for required software activation, validation of subscriptions, and
  access to online services.**
**NOTICE to USERS. Internet connection, Adobe ID and acceptance of license agreement required to activate and use
this product. This product may integrate with or allow access to certain Adobe or third-party hosted online services.
Adobe online services, including the Adobe Creative Cloud service, are available only to users 13 and older and require
agreement to additional terms and Adobe's online privacy policy. The applications and online services are not available
in all countries or languages, may require user registration, and may be subject to change or discontinuation without
notice. Additional fees or membership charges may apply.

Language versions
Dansk Deutsch English Español Français Français* Hebrew* Hungarian
Italiano Nederlands Norwegian Polish Português (Brasil) Suomi Svenska Turkish
Ukrainian čeština Русский ????* ??? ???? ???? ???
* Arabic and Hebrew supported in a Middle Eastern version with full right-to-left language support, Arabic/Hebrew
features, and an English interface; also in a North African French (Français*) version with full right-to-left language
support, Arabic/Hebrew features, and a French interface.

                                              Last updated 3/8/2018
8
Introduction to Bridge
Bridge CC 2015 version 6.3 system requirements
Windows
• Intel® Core™2 Duo or AMD Athlon® 64 processor; 2 GHz or faster processor
• Microsoft® Windows® 7 with Service Pack 1, Windows 8.1, or Windows 10
• 2 GB of RAM (8 GB recommended)
• 2 GB of available hard-disk space for 32-bit installation; 2.1 GB of available hard-disk space for 64-bit installation;
plus additional free space required during installation (cannot install on removable flash storage devices)
• 1024x768 display (1280x800 recommended) display with 16-bit color and 512 MB of VRAM (1 GB recommended)
• OpenGL 2.0–capable system
• Internet connection and registration are necessary for required software activation, validation of subscriptions, and
access to online services.**
Mac OS
• Multicore Intel processor with 64-bit support
• Mac OS X v10.9, v10.10 (64-bit), or v10.11 (64-bit)
• 2GB of RAM (8 GB recommended)
• 2GB of available hard-disk space for installation; additional free space required during installation (cannot install
on a volume that uses a case-sensitive file system or on removable flash storage devices)
• 1024x768 display (1280x800 recommended) display with 16-bit color and 512 MB of VRAM (1 GB recommended)
• OpenGL 2.0–capable system
• Internet connection and registration are necessary for required software activation, validation of subscriptions, and
access to online services.**
**NOTICE to USERS. Internet connection, Adobe ID and acceptance of license agreement required to activate and use
this product. This product may integrate with or allow access to certain Adobe or third-party hosted online services.
Adobe online services, including the Adobe Creative Cloud service, are available only to users 13 and older and require
agreement to additional terms and Adobe's online privacy policy. The applications and online services are not available
in all countries or languages, may require user registration, and may be subject to change or discontinuation without
notice. Additional fees or membership charges may apply.
Language versions
Dansk Deutsch English Español Français Français* Hebrew* Hungarian
Italiano Nederlands Norwegian Polish Português (Brasil) Suomi Svenska Turkish
Ukrainian čeština Русский ????* ??? ???? ???? ???
* Arabic and Hebrew supported in a Middle Eastern version with full right-to-left language support, Arabic/Hebrew
features, and an English interface; also in a North African French (Français*) version with full right-to-left language
support, Arabic/Hebrew features, and a French interface.
Bridge CC version 6.2 system requirements
Last updated 3/8/20189
Introduction to Bridge
Windows
• Intel® Core™2 Duo or AMD Athlon® 64 processor; 2 GHz or faster processor
• Microsoft® Windows® 7 with Service Pack 1, Windows 8.1, or Windows 10
• 2 GB of RAM (8 GB recommended)
• 2 GB of available hard-disk space for 32-bit installation; 2.1 GB of available hard-disk space for 64-bit installation;
plus additional free space required during installation (cannot install on removable flash storage devices)
• 1024x768 display (1280x800 recommended) display with 16-bit color and 512 MB of VRAM (1 GB recommended)
• OpenGL 2.0–capable system
• Internet connection and registration are necessary for required software activation, validation of subscriptions, and
access to online services.**
Mac OS
• Multicore Intel processor with 64-bit support
• Mac OS X v10.9, v10.10 (64-bit), or v10.11 (64-bit)
• 2GB of RAM (8 GB recommended)
• 2GB of available hard-disk space for installation; additional free space required during installation (cannot install
on a volume that uses a case-sensitive file system or on removable flash storage devices)
• 1024x768 display (1280x800 recommended) display with 16-bit color and 512 MB of VRAM (1 GB recommended)
• OpenGL 2.0–capable system
• Internet connection and registration are necessary for required software activation, validation of subscriptions, and
access to online services.**
**NOTICE to USERS. Internet connection, Adobe ID and acceptance of license agreement required to activate and use
this product. This product may integrate with or allow access to certain Adobe or third-party hosted online services.
Adobe online services, including the Adobe Creative Cloud service, are available only to users 13 and older and require
agreement to additional terms and Adobe's online privacy policy. The applications and online services are not available
in all countries or languages, may require user registration, and may be subject to change or discontinuation without
notice. Additional fees or membership charges may apply.
Language versions
Dansk Deutsch English Español Français Français* Hebrew* Hungarian
Italiano Nederlands Norwegian Polish Português (Brasil) Suomi Svenska Turkish
Ukrainian čeština Русский ????* ??? ???? ???? ???
* Arabic and Hebrew supported in a Middle Eastern version with full right-to-left language support, Arabic/Hebrew
features, and an English interface; also in a North African French (Français*) version with full right-to-left language
support, Arabic/Hebrew features, and a French interface.
Last updated 3/8/201810
Introduction to Bridge
Adobe Bridge workspace
Workspace overview
The Adobe Bridge workspace consists of three columns, or panes, that contain various panels. You can adjust the Adobe
Bridge workspace by moving or resizing panels. You can create custom workspaces or select from several preconfigured
Adobe Bridge workspaces.
Video resources:
• What is Bridge?
• Customize the Bridge workspace
Adobe Bridge workspace
A Application bar B Path bar C Favorites panel & Folders panel (tabbed) D Collections panel E Filter panel F Selected item G Thumbnail
slider H View options I Metadata panel J Keywords panel K Preview panel L Publish panel M Quick Search box N Standard workspaces
O Content panel
Last updated 3/8/201811
Introduction to Bridge
The following are the main components of the Adobe Bridge workspace:
Application bar Provides buttons for essential tasks, such as publishing to Adobe Stock and Adobe Portfolio, creating
PDF contact sheet, navigating the folder hierarchy, switching workspaces, and searching for files.
Path bar Shows the path for the folder you’re viewing and allows you to navigate the directory.
Favorites panel Gives you quick access to frequently browsed folders.
Folders panel Shows the folder hierarchy. Use it to navigate folders.
Filter panel Lets you sort and filter files that appear in the Content panel.
Collections panel Lets you create, locate, and open collections and smart collections.
Content panel Displays files specified by the navigational menu buttons, Path bar, Favorites panel, Folders panel, or
Collections panel.
Publish panel Lets you upload content to Adobe Stock and Adobe Portfolio from within the Bridge CC. See and
Publish assets to Adobe Portfoliofor details. To view this panel in any workspace, choose Window > Publish Panel.
Preview panel Displays a preview of the selected file or files. Previews are separate from, and typically larger than, the
thumbnail image displayed in the Content panel. You can reduce or enlarge the preview by resizing the panel.
Metadata panel Contains metadata information for the selected file. If multiple files are selected, shared data (such as
keywords, date created, and exposure setting) is listed.
Keywords panel Helps you organize your images by attaching keywords to them.
Output panel Contains options for creating PDF contact sheet. Appears when the Output workspace is selected. For
more information, see Create PDF contact sheet in the Output workspace.
Search Adobe Stock
In addition to searching for assets in Bridge or on your computer, you can also use the Quick Search box (on the right
side of the Application bar) to search for high-quality Adobe Stock illustrations, vectors, and photos. When you search,
the results appear on the Adobe Stock website in your default web browser. To know more about Adobe Stock, see
Adobe Stock Learn & Support .
To switch your search between Adobe Stock search and Windows (Win)/Spotlight (Mac) search options, use the drop-
down list in the Quick Search box.
Last updated 3/8/201812
Introduction to Bridge
Adjust panels
You can adjust the Adobe Bridge window by moving and resizing its panels. However, you can’t move panels outside
the Adobe Bridge window.
? Do any of the following:
• Drag a panel by its tab into another panel.
• Drag the horizontal divider bar between panels to make them larger or smaller.
• Drag the vertical divider bar between the panels and the Content panel to resize the panels or Content panel.
• To show or hide all panels except the center panel, Press Tab (the center panel varies depending on the workspace
you’ve chosen).
• Choose Window, followed by the name of the panel you want to display or hide.
• Right-click (Windows) or Control-click (Mac OS) a panel tab and choose the name of the panel you want to
display.
Work with Favorites
• To specify Favorites preferences, choose Edit > Preferences (Windows) or Adobe Bridge CC > Preferences
(Mac OS). Click General, and select desired options in the Favorite Items area of the Preferences dialog box.
• To add items to Favorites, do one of the following:
• Drag a file or folder to the Favorites panel from Windows Explorer (Windows), the Finder (Mac OS), or the
Content or Folders panel of Adobe Bridge.
• Select a file, folder, or collection in Adobe Bridge and choose File > Add To Favorites.
To remove an item from the Favorites panel, select it and choose File > Remove From Favorite. Or right-click (Windows)
or Control-click (Mac OS) the item and choose Remove From Favorites from the context menu.
Select and manage workspaces
An Adobe Bridge workspace is a certain configuration or layout of panels. You can select either a preconfigured
workspace or a custom workspace that you have previously saved.
By saving various Adobe Bridge workspaces, you can work in (and quickly switch between) different layouts. For
example, use one workspace to sort new photos and another to work with footage files from an After Effects
composition.
Adobe Bridge provides the following preconfigured workspaces:
Metadata Displays the Content panel in List view, along with the Favorites, Metadata, and Filter panels.
Essentials Displays the Favorites, Folders, Filter, Collections, Content, Preview, Metadata, and Keywords panels.
Filmstrip Displays thumbnails in a scrolling horizontal row (in the Content panel) along with a preview of the currently
selected item (in the Preview panel). Also displays the Favorites, Folders, Filter, and Collections panels.
Keywords Displays the Content panel in Details view, along with the Favorites, Keywords, and Filter panels.
Note: In Mac OS, pressing Command+F5 to load the Keywords workspace starts Mac OS voice-over by default. To load the
Preview workspace by using the keyboard shortcut, first disable the voice-over shortcut in Mac OS Keyboard Shortcuts
preferences. For instructions, see Mac OS Help.
Preview Displays a large Preview panel; a narrow, vertical Content panel in Thumbnails view; and the Favorites,
Folders, Filter, and Collections panels.
Last updated 3/8/201813
Introduction to Bridge
Light Table Displays only the Content panel. Files are displayed in Thumbnails view.
Folders Displays the Content panel in Thumbnails view, along with the Favorites, and Folders panels.
• To select a workspace, choose Window > Workspace, and then choose the desired workspace. Or, click one of the
workspace buttons in the Adobe Bridge application bar.
Drag the vertical bar to the left of the workspace buttons to show more or fewer buttons. Drag the buttons to rearrange
their order.
• To save the current layout as a workspace, choose Window > Workspace > New Workspace. In the New Workspace
dialog box, enter a name for the workspace, specify options, and then click Save.
• To delete or restore a custom workspace, choose Window > Workspace, and then choose one of the following
commands:
Delete Workspace Deletes the saved workspace. Choose the workspace from the Workspace menu in the Delete
Workspace dialog box, and click Delete.
Reset Workspace Restores the currently selected saved workspace to its default settings.
Reset Standard Workspace Restores the default settings for the Adobe pre-defined workspaces (Essentials, Output, and
so on)
Adjust brightness and colors
Brighten or darken the Adobe Bridge background and specify accent colors in General preferences. To open
preferences, choose Edit > Preferences (Windows) or Adobe Bridge > Preferences (Mac OS).
• To brighten or darken the background, go to the General panel of the Preferences dialog box and do the following:
• Drag the User Interface Brightness slider to make the Adobe Bridge background darker or lighter.
• Drag the Image Backdrop slider to make the background of slideshows and of the Content and Preview panels
darker or lighter.
• To specify accent colors, go to the General panel of the Preferences dialog box and choose a color from the Accent
Color menu.
Manage color
If you use Adobe Creative Cloud, you can use Adobe Bridge CC to automatically synchronize color settings across
applications. This synchronization ensures that colors look the same in all color-managed Adobe applications.
If color settings are not synchronized, a warning message appears at the top of the Color Settings dialog box in each
application. Adobe recommends that you synchronize color settings before you work with new or existing documents.
1 Do one of the following:
• Choose Edit > Color Settings.
• Press Control+Shift+K (Windows) or Command+Shift+K (macOS).
2 Select a color setting from the list, and click Apply.
Note: Select Show Expanded List of Color Settings Files to expand the list.
Last updated 3/8/201814
Introduction to Bridge
Change language settings
Adobe Bridge can display menus, options, and tool tips in multiple languages. You can also specify that Adobe Bridge
use a specific language for keyboard shortcuts.
1 Choose Edit > Preferences (Windows) or Adobe Bridge > Preferences (Mac OS), and click Advanced.
2 Do either or both of the following:
• Choose a language from the Language menu to display menus, options, and tool tips in that language.
• Choose a language from the Keyboard menu to use that language keyboard configuration for keyboard
shortcuts.
3 Click OK, and restart Adobe Bridge.
The new language takes effect the next time you start Adobe Bridge.
Enable startup scripts
You can enable or disable startup scripts in Adobe Bridge preferences. Scripts listed vary depending on the
Creative Suite® components you’ve installed. Disable startup scripts to improve performance or to resolve
incompatibilities between scripts.
1 Choose Edit > Preferences (Windows) or Adobe Bridge > Preferences (Mac OS), and click Startup Scripts.
2 Do any of the following:
• Select or deselect the desired scripts.
• To enable or disable all scripts, click Enable All or Disable All.
• Click Reveal My Startup Scripts to go to Adobe Bridge Startup Scripts folder on your hard drive.
HiDPI and Retina display support
HiDPI monitors and Apple's Retina displays allow more pixels to be displayed on your screen. To take advantage of
advancements in high-resolution display technologies, Adobe Bridge CC includes native support for high-resolution
monitor displays running on Windows and Mac OS X (for example, the MacBook Pro with Retina display).
Bridge CC is aware of different monitor dots per inch (DPI) settings. When you are working on a HiDPI monitor set
at a DPI of 150% or higher, Bridge's user interface automatically scales to 200% so that you continue to see sharp and
clear UI elements, readable font size, and crisp icons across a wide variety of DPI display settings.
Note: Bridge supports a minimum screen resolution of 2560 x 1600. Working on HiDPI monitors with screen resolution set
below 2560 x 1600 truncates the Bridge user interface and some of the items may not fit on the screen.
User interface scaling preferences (Windows only)
With High DPI support enabled on Windows, the Bridge user interface scales to 200% on HiDPI monitors. However,
Bridge also allows you to manually set the scaling preference:
1 Choose Edit > Preferences > Interface.
2 In the Preferences dialog, click Interface.
Last updated 3/8/201815
Introduction to Bridge
3 Select a User Interface Scaling option. You can choose any of the following:
Auto (Default) Automatically scales the Bridge user interface to the following percentages based on the DPI setting
of the display monitor:
• 200% at DPI >= 150%
• 100% at DPI < 150%
100% Opens Bridge app at 100% scaling. Choose this option to revert to the pre-HiDPI look.
200% Opens Bridge app at 200% scaling. Choose this option when working on HiDPI monitors.
Note: Choosing 200% scaling option when working on non-HiDPI monitors truncates/cuts the user interface.
4 Click OK. Relaunch Bridge.
The scaling takes effect the next time you start Adobe Bridge.
Restore preferences
Numerous program settings are stored in the Adobe Bridge preferences file, including display, Adobe Photo
Downloader, performance, and file-handling options.
Restoring preferences returns settings to their defaults and can often correct unusual application behavior.
1 Press and hold the Ctrl key (Windows) or the Option key (Mac OS) while starting Adobe Bridge.
2 In the Reset Settings dialog box, select one or more of the following options:
Reset Preferences Returns preferences to their factory defaults. Some labels and ratings may be lost. Adobe Bridge
creates a preferences file when it starts.
Purge Entire Thumbnail Cache Purging the thumbnail cache can help if Adobe Bridge is not displaying thumbnails
properly. Adobe Bridge re-creates the thumbnail cache when it starts.
Last updated 3/8/201816
Introduction to Bridge
Reset Standard Workspaces Returns Adobe predefined workspaces to their factory default configurations.
3 Click OK, or click Cancel to open Adobe Bridge without resetting preferences.
Import photos using Photo Downloader
Get photos from camera
Note: Before you begin importing your images using Photo Downloader, make sure that you have updated Bridge to the
latest version. To check for updates, choose Help > Updates. To know how to update your app, see Update Creative Cloud
apps .
1 Connect your camera, card reader, or mobile device to the computer using a supported cable.
Note: (macOS only) On your Mac machine, you can configure Adobe Bridge to automatically open Photo Downloader
when a camera is connected to the computer. Choose Adobe Bridge > Preferences. In the Behavior area of the General
panel, select When A Camera Is Connected, Launch Adobe Photo Downloader. Then, click OK.
2 Do one of the following:
• (Windows) Click Download Images - Use Adobe Bridge in the AutoPlay window, or choose File > Get Photos
From Camera.
• (macOS) In Adobe Bridge, choose File > Get Photos From Camera.
3 A new Adobe Bridge CC Photo Downloader window appears. In this window, choose the name of the device from
the Get Photos From menu.
Last updated 3/8/201817
Introduction to Bridge
Adobe Bridge Photo Downloader
Note: If the Get Photos From drop-down in the Photo Downloader window doesn't list your connected device or displays
'No Valid Files Found' message after selecting your device, read the following instructions for the type of device that you
want to connect:
• Make sure that your device is turned on and you are using a supported USB cable.
Note: (iDevices)
• When connecting an Apple mobile device to a Mac machine, if you see a Trust this Computer alert, unlock your
device and tap Trust.
• When connecting an Apple mobile device to a Windows machine, if you see an Allow this device to access photos
and videos alert, unlock your device and tap Allow. In the Photo Downloader window, choose Refresh from
the Get Photos From drop-down.
Note: (Android devices)
• When connecting an Android mobile device to a Mac or Windows machine, if you see a USB For alert on your
device, unlock your device and choose any one of the available USB connection modes — MTP, PTP, USB mass
transfer.
• If you don't see the USB For alert, you can manually change the mode in your device. Go to your device Settings
> USB Settings > Mode. If you can't locate this setting, refer to the device manufacturer's documentation for your
device.
Last updated 3/8/201818
Introduction to Bridge
• After selecting the USB transfer mode, choose Refresh from the Get Photos From drop-down in the Photo
Downloader window, .
Note: (Digital cameras)
• See the device manufacturer's documentation for connecting your camera to a computer.
4 To view thumbnails of the images saved on device, click Advanced Dialog at the lower-right corner of the window.
The Advanced Dialog allows you to select the media files that you want to import and also provides more import
options.
(Advanced Dialog) Adobe Bridge CC - Photo Downloader
To remove a photo from the import batch, click the check box below the photo thumbnail to deselect it in Advanced
Dialog. By default, all the photos are selected.
5 Save Options
Location:
To change the default folder location where Bridge imports the selected media files, click the Browse button
(Windows) or the Choose button (Mac OS) next to Location, and specify a new location.
6 Create Subfolder(s):
Last updated 3/8/201819
Introduction to Bridge
To import the photos into subfolder(s) within the Location specified above, select an option from the Create
Subfolder(s) drop-down list.
• None doesn't create any subfolders and the photos are stored at the folder location specified above.
• Custom Name creates a subfolder with the name you type.
• Today’s Date creates a subfolder named with the current date.
• Shot Date creates a subfolder named with the date and time you shot the photo. You can choose from any of the
date format options available in the drop-down list.
7 Rename Files:
To rename the files as you import them, choose an option from the Rename Files menu. All the photos in the import
batch share the same name based on Today's Date, Shot Date, and Custom Name, or a combination of Shot Date and
Custom Name. Each photo also has a unique number attached at the end.
• If you do not want to rename your imported files, you can choose Do Not Rename Files from the drop-down list.
• If you want to rename the files based on the sub-folder name that you specified in the previous step, choose Same
As Subfolder Name from the drop-down list.
The Example text below the Rename Files option displays how the renamed files will look like based on the options
that you've selected.
To preserve the camera’s original filename in XMP metadata for later reference, check Preserve Current Filename
In XMP. For more details, see Work with metadata in Adobe Bridge.
(macOS only) In the Rename Files drop-down list, choose Advanced Rename to rename the files based on a custom
combination of Text, New Extension, Preserved Filename, Sequence Number, Sequence Letter, Date Time, and
Metadata. Choosing this option opens Photo Downloader - Advanced Rename window where you can create your
custom combination.
(macOS only) Photo Downloader - Advanced Rename
Last updated 3/8/201820
Introduction to Bridge
In the New Filenames section:
• Click (+) button to add a custom field and choose the type of custom field from the drop-down list - Text, New
Extension, Preserved Filename, Sequence Number, Sequence Letter, Date Time, and Metadata. Depending on
the custom field that you've chosen, additional options appear corresponding to that field.
• To remove a custom field, click (-) button.
In the Options section:
• You can select Windows and Unix options so that the renamed files are compatible on these operating systems.
The Preview section displays how the renamed files (New filename) will look like based on the custom fields
combination that you've created.
8 Advanced Options
Open Adobe Bridge Opens Adobe Bridge after you import photos.
Select Convert To DNG Converts Camera Raw files to DNG as you import them. Click the Settings button to open
DNG Conversion Settings window (explained below). To know more about DNG format, read Digital Negative
(DNG) .
Delete Original Files Deletes the original photos from your camera, card reader, or mobile device after they’re
imported.
Save Copies To Saves copies of photos as you import them at a specified location.
Specify DNG Conversion Settings when importing images into Bridge
• JPEG Preview: Choose Medium size or Full Size to generate JPEG previews of the converted DNG images. If you
do not want to generate JPEG previews, choose None from the drop-down list.
Last updated 3/8/201821
Introduction to Bridge
• Compressed (lossless): Select this option reduce the file size of the converted image.
• Image Conversion Method: Choose Preserve Raw Image to maximize the amount of data preserved in the
converted DNG file. Otherwise, choose Convert to Linear Image.
• Embed Original Raw File: Select this option to embed your camera raw file (non-DNG) raw file inside the DNG
file. This creates a larger DNG file, but it allows the original raw file to be extracted later if needed.
9 Apply Metadata
(Optional) To apply metadata, choose Basic Metadata from the Template to Use drop-down list. Then, type
information in the Creator and Copyright text boxes.
Any custom metadata template that you've created in Bridge is also available in the Template To Use menu. For
related details, see Work with metadata templates.
10 Click Get Media. The photos appear in Adobe Bridge.
Note: If you had selected the Open in Adobe Bridge check box, Bridge automatically opens the location where you have
imported the media files and displays your photos or subfolders within this location in the Content panel.
Import from device on macOS
On macOS, Bridge provides an additional option File > Import From Device to import media from devices. This
option, which has limited import settings, can be used as an alternate to File > Get Photos From Camera option when
you are working on macOS.
For devices connected in PTP or MTP mode (such as camera or Android-based devices)
Change the device mode from PTP/MTP to USB mode/Mass storage mode and then connect the device to your
computer.
Note: For instructions on how to change the mode, see the documentation provided by the manufacturer of the device.
Adobe Bridge now detects the device and you can begin importing media from the device. The steps are mentioned
below.
For iDevices (such as iPad or iPhone)
1 Connect your iDevice to your computer.
2 Click File > Import From Device. The dialog that appears automatically recognizes the connected device.
3 Select the media that you want to import, select the location where you want to Import To, and click Download.
Last updated 3/8/201822
Introduction to Bridge
Import from device on macOS
The selected media files are imported to Adobe Bridge.
4 The selected media files are imported to Adobe Bridge. By default, the media files in Bridge are imported to
/Users//Pictures. You can locate this folder in the Folders panel.
Last updated 3/8/201823
Introduction to Bridge
Organize content and assets using Adobe Bridge
Adobe Bridge, which is a part of Adobe Creative Cloud, lets you organize the assets you use to create content for print,
web, and video. Adobe Bridge keeps native Adobe files (such as PSD and PDF) and non-Adobe files available for easy
access. You can drag assets into your layouts, projects, and compositions as needed, preview files, and even add
metadata (file information), making the files easier to locate.
File browsing From Adobe Bridge you can view, search, sort, filter, manage, and process image, page layout, PDF, and
dynamic media files. You can use Adobe Bridge to rename, move, and delete files; edit metadata; rotate images; and run
batch commands. You can also view files and data imported from your digital still or video camera. See View and
manage files.
Camera raw If you have Adobe Photoshop or Adobe Lightroom, you can open camera raw files from Adobe Bridge and
save them. You can edit the images directly in the Camera Raw dialog box without starting Photoshop or Lightroom,
and copy settings from one image to another. If you don’t have Photoshop installed, you can still preview the camera
raw files in Adobe Bridge. See Introduction to Camera Raw .
Color management You can use Adobe Bridge to synchronize color settings across color-managed Adobe Cloud
components. This synchronization ensures that colors look the same in all Adobe Creative Cloud apps. See .
Last updated 3/8/201824
Chapter 2: Work with assets
Create PDF contact sheet in the Output workspace
Note: Beginning with the October 2017 release of Bridge CC, the following updates have been made:
• A new Output workspace has been introduced to generate PDF contact sheet natively in Bridge.
• The legacy Adobe Output Module plug-in (shipped separately) to create PDF contact sheet and web galleries is no
longer supported and the functionality to create web galleries has been discontinued in the latest version of Bridge.
• The Adobe Output Module (AOM) plug-in works only with Bridge CC November, 2016 (version 7.0) and earlier
releases. To install AOM for an earlier version of Bridge, see Install Adobe Output Module .
The new Output workspace in Adobe Bridge CC allows you to create PDF contact sheets of one of more images. In the
Output workspace, you begin by choosing a template for your PDF contact sheet in the Output Settings panel on the
right. Then, you drag images from the Content panel (bottom) to Canvas in the Output Preview panel (center). You can
choose to customize various output settings?document, grid and margins, header and footer, watermark, and PDF
properties?and also save your custom template for reuse later. The settings that you apply in the Output Settings panel
are readily rendered in the Output Preview panel. Finally, you're ready to export a PDF output.
Output workspace
A Output Preview panel B Output Settings panel C Output workspace D Export to PDF button E Content panel F Filter and Collection panels
G Favorites and Folders panels
Last updated 3/8/201825
Work with assets
Output Preview panel
The Output Preview panel displays a preview of the PDF contact sheet with your photos aligned in rows and columns.
Any modification in the Output Settings panel is rendered in the Output Preview panel instantaneously. You can drag
photos from the Content panel at the bottom of the screen onto the canvas in the Output Preview panel.
Output Settings panel
You can use the Output Settings panel to choose a predefined template or customize the template for the PDF contact
sheet. You can customize settings such as Document, Grid and Margin, Header and Footer, Watermark, and PDF
Properties. The changes you make in this panel are rendered in the Output Preview panel instantaneously.
Create a PDF contact sheet
1 Click Output in standard workspace.
2 Do one of the following in the Output Settings panel:
• Select a predefined template from the Template drop-down. The default template is 2 x 2 Cells.
• Select Custom in the Template drop-down and specify settings in Document, Grid and Margin, Header and
Footer, Watermark, and PDF Properties accordions. To know about the settings, see Apply output settings.
Note: If you choose a predefined template and then make any change in the Output Settings panel, the template is
changed to Custom. The changes in the Output Settings panel are rendered in the Output Preview
panel instantaneously.
3 Drag images from the Content panel to the canvas in the Output Preview panel.
In a Preview document (Output workspace) containing more than one media assets, you can drag a single asset or
a selection of assets (both contiguous and non-contiguous) to a new location within the Preview document. While
dragging to reorder, a colored highlight appears indicating the new drop location. The selection can be dropped at
the start of the page, end of the page, or between other media assets.
4 (Optional) You can do any of the following in the canvas:
• Rotate an image: To rotate an image, click an image and then click or icon.
• Remove an image: To remove an image from the canvas, click an image and then click Remove.
• Show guides: To show guides, select the Show Guides check box in the Output Preview panel.
• Reset content: To reset the content of the contact sheet, click Reset button in the Output Preview panel.
5 Click Export to PDF in the Output Preview panel.
Apply output settings
• Template
• Template
• Grid and Margins
• Header and Footer
• Watermark
• PDF Properties
Last updated 3/8/201826
Work with assets
Template
You can choose from predefined templates or create your own template to create a PDF contact sheet. You can also
choose a predefined template and then customize it according to your requirement.
• Template: Shows the list of predefined and custom templates.
• Save Template : Saves a custom template.
• Delete Selected Template : Deletes a custom template selected in the Template drop-down.
• Quick access menu for preference : Shows the quick access to the output preference options .
Document
You can specify the page settings of a PDF contact sheet. The Document accordion in the Output Settings panel shows
the following settings:
• Page size: Shows the page size options for PDF contact sheet.
• Width / Height: Specifies the width and height of the page in pixel, inches, centimeter, and millimeter.
• Orientation: Specifies page orientation as landscape or portrait .
Last updated 3/8/201827
Work with assets
• Background Color: Specifies the background color for the PDF contact sheet. You can use the standard color box or
the Eyedropper tool to choose the background color. For more information on using the Eyedropper tool,
see Use Eyedropper tool to choose color .
• Resolution: Shows the resolution of the PDF contact sheet in Pixel Per Inch (PPI).
• Image Quality: Specifies the image quality in the PDF contact sheet.
• Thumbnail Placement: Shows the options for image placement in the PDF contact sheet. You can place the images
across rows (left to right) or columns (top to bottom).
• Rotate Thumbnail for Best Fit: Rotates the thumbnail of the image to fit in a cell.
• Repeat One Photo Per Page: Keeps one image per page in the PDF contact sheet.
• Include Filename: Includes the filename of the image in the PDF contact sheet.
• Include File Extension: Includes the filename extension of the image in the PDF contact sheet.
• Filename font formatting: Specifies font formatting such as font, font color, font size, and font style.
Grid and Margins
You can specify layout of your contact sheet by specifying rows and columns. The Grid and Margins accordion in
the Output Settings panel shows the following settings:
• Grid Layout: Lets you set the grid layout for the contact sheet. You can specify the number of rows and columns.
Last updated 3/8/201828
Work with assets
• Cell Spacing: Lets you set the spacing between two cells. You can specify the vertical and horizontal space between
two cells.
• Cell Size: Specifies the size of the cells in centimeter. You can select auto spacing to let Adobe Bridge CC set the
spacing between two cells.
• Margins: Specifies the left, right, top, and bottom margin for the cells in the contact sheet. You can click icon to
link the margin of right/left and top/bottom.
Last updated 3/8/201829
Work with assets
Header and Footer
You can add header, footer, and page number to your contact sheet. The Header and Footer accordion in the Output
Settings panel shows the following settings:
• Header settings:
• Include Header: Enables the header setting for the contact sheet.
• Text: Enter the text that you want to display in the PDF header.
Last updated 3/8/201830
Work with assets
• Text alignment: Use the left , center , and right alignment icons to adjust the text position in the
header.
• Text formatting: Select the font, font Size, and font style for the header text from the corresponding drop-down
lists. You can choose the font color from the standard color box or use the Eyedropper tool to pick a color.
For more information on using the Eyedropper tool, see Use Eyedropper tool to choose color .
• Header Size: Drag the Header Size slider to adjust the area designated to the header in the Preview document.
• Divider Size: Drag the Divider Size slider to adjust the width of the divider that appears in the header area. You
can set any value from 0 pt through 5 pt.
• Divider Color: Choose a color for the divider from the color box or use the Eyedropper tool to pick a
color. For more information on using the Eyedropper tool, see Use Eyedropper tool to choose color.
• Footer Settings:
• Include Footer: Enables the footer setting for the contact sheet.
• Text: Enter the text that you want to display in the PDF footer.
• Text alignment: Use the left , center , and right alignment icons to adjust the text position in the footer.
• Text formatting: Select the font style, font size, and font weight for the footer text from the corresponding drop-
down lists. You can choose the font color from the standard color box or use the Eyedropper tool to pick a
color. For more information on using the Eyedropper tool, see Use Eyedropper tool to choose color.
• Footer Size: Drag the Footer Size slider to adjust the area designated to the header in the Preview document.
• Divider Size: Drag the Divider Size slider to adjust the width of the divider that appears in the footer area. You
can set any value from 0 pt through 5 pt.
• Divider Color: Choose a color for the divider from the color box or use the Eyedropper tool to pick a
color. For more information on using the Eyedropper tool, see Use Eyedropper tool to choose color.
• Page number:
• Include Page Number: Enables the page numbering for the contact sheet.
• Location: Select any one of the options from the Location drop-down list to display the page number - Header
Left, Header Center, Header Right, Footer Left, Footer Center, or Footer Right.
• Text formatting: Select the font style, font size, and font weight for the page numbering from the corresponding
drop-down lists. You can choose the font color from the standard color box or use the Eyedropper tool to
pick a color. For more information on using the Eyedropper tool, see Use Eyedropper tool to choose color.
Last updated 3/8/201831
Work with assets
Watermark
You can add text or image watermark to your contact sheet. The Watermark accordion in the Output Settings panel
shows the following settings:
• No Watermark: By default, the No Watermark radio button is selected.
• Text Watermark: Select the Text Watermark radio button to add a text watermark to the contact sheet.
• Text: Enter the text that you want to display as the watermark.
• Text formatting: Select the font style, font Size, and font weight for the watermark text from the corresponding
drop-down lists.
• Image Watermark: Select the Image Watermark radio button to add an image as watermark to the contact sheet.
Click Select File and upload an image.
• Placement: Any placement settings that you choose are applied on the text watermark or the image watermark,
depending on the radio button option that you’ve selected.
• Type: In Type drop-down, select whether you want to place the text/image watermark on the media assets
currently added in the preview document or on each page of the preview document.
Last updated 3/8/201832
Work with assets
• Rotation: In Rotation text field, enter any value from 0 through 359. The text/image watermark rotates by
specified degrees on the Preview document.
• Position: In the Position field, choose any option in the anchor widget to position the text/image watermark on
the media assets or on the preview document.
• Margins: Use the Horizontal Margin or Vertical Margin slider to adjust the horizontal or vertical offset of the
text/image watermark.
• Scale: Scaling is applicable only for an image watermark. Use the Scale slider to adjust the scaling of the image
watermark.
• Opacity: Use the Opacity slider to adjust the opacity of the watermark
PDF Properties
You can secure your PDF contact sheet and specify the playback settings. The PDF Properties accordion in the Output
Settings panel shows the following security and playback settings:
• Security:
• Open Password: If enabled, the recipient needs to type this password to open the generated PDF contact sheet.
• Permission Password: If enabled, the recipient needs to type this password to change permission settings in the
generated PDF. This password is not required to open the document in Reader or Acrobat. This password is
required only to change the restriction that you've set.
• Disable Printing: If selected, sets printing restriction in the generated PDF. To change the printing permission
setting, the recipient needs the Permissions Password. This option is enabled only when you set the permission
password.
Last updated 3/8/201833
Work with assets
• Playback:
• Open in Full Screen Mode: Opens the generated PDF in the full screen mode. The PDF fills the entire screen,
and the Acrobat menu bar, toolbar, and window controls are hidden.
• Automatically Advance to the Next Page: If selected, the PDF pages advance automatically in the full screen
mode at every set number of seconds specified in the Duration (seconds) field.
• Duration: Duration of playback for each page in seconds.
• Loop After Last Page: If selected, the PDF document pages advance continuously, returning to the first page after
the last.
• Transition: Select a transition effect to display when viewing the PDF in full screen mode. If you do not want to
apply any transition effects, select None from the drop-down. The Direction and Speed fields are disabled when
you set Transition as None.
• Direction: Determines the flow of the selected page transition on the screen, such as Down, Left, Horizontal, and
so on. The available options vary according to the transition.
• Speed: Select the required speed option for the transition effect that you’ve selected.
Use Eyedropper tool to choose color
You can use the Eyedropper tool to sample a color from anywhere on the screen.
1 Click the Eyedropper tool next to any color setting.
2 Keep the mouse button pressed, drag anywhere on the screen. The color selection box changes dynamically as you
drag.
3 Release the mouse button to pick the color.
Save a custom template
You can specify your own settings in the Output Settings panel and save it as a template.
1 Do one of the following:
• Select a predefined template from the Template drop-down.
• Select Custom from the Template drop-down.
2 Apply required settings in the Output Settings panel. When you choose a predefined template and make changes in
Output Settings, the template is changed to Custom.
To know about the settings, see Apply output settings.
3 Click icon next to the Template drop-down.
4 Specify the name of the template and click Save.
Note: You can select a custom template from the Template drop-down and then delete it by clicking icon.
Output preferences
1 Do one of the following:
• (Windows) Click Edit > Preferences > Output. Alternatively, press Ctrl+K.
• (macOS) Click Adobe Bridge CC > Preferences >Output. Alternatively, press Command+K.
Note: You can use the Quick Access menu in the Output Settings panel to quickly set the preferences.
Last updated 3/8/2018You can also read