OWNCLOUD USER MANUAL THE OWNCLOUD TEAM - VERSION 10.3, MAY 13, 2020 - OWNCLOUD DOCUMENTATION
←
→
Page content transcription
If your browser does not render page correctly, please read the page content below
ownCloud User Manual
             The ownCloud Team

       Version 10.3, May 13, 2020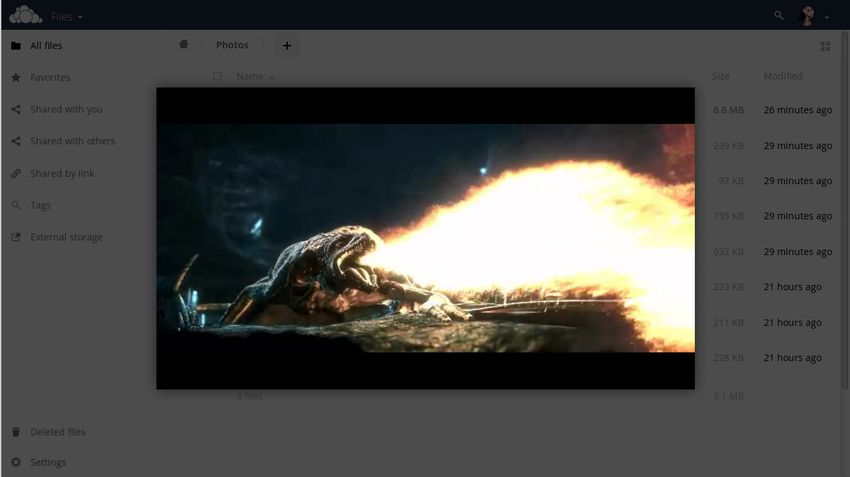
Table of Contents
Introduction. . . . . . . . . . . . . . . . . . . . . . . . . . . . . . . . . . . . . . . . . . . . . . . . . . . . . . . . . . . . . . . . . . . . . . . . . . . . . 1
What’s New in ownCloud . . . . . . . . . . . . . . . . . . . . . . . . . . . . . . . . . . . . . . . . . . . . . . . . . . . . . . . . . . . . . . . . . 1
WebUI Overview . . . . . . . . . . . . . . . . . . . . . . . . . . . . . . . . . . . . . . . . . . . . . . . . . . . . . . . . . . . . . . . . . . . . . . . . . 1
Apps . . . . . . . . . . . . . . . . . . . . . . . . . . . . . . . . . . . . . . . . . . . . . . . . . . . . . . . . . . . . . . . . . . . . . . . . . . . . . . . . . . 56
Contacts & Calendar . . . . . . . . . . . . . . . . . . . . . . . . . . . . . . . . . . . . . . . . . . . . . . . . . . . . . . . . . . . . . . . . . . . . 76
Troubleshooting . . . . . . . . . . . . . . . . . . . . . . . . . . . . . . . . . . . . . . . . . . . . . . . . . . . . . . . . . . . . . . . . . . . . . . . . 81
Have You Found a Mistake In The Documentation? . . . . . . . . . . . . . . . . . . . . . . . . . . . . . . . . . . . . . . . . . 84
Introduction
Welcome to ownCloud: your self-hosted file sync and share solution.
ownCloud is an open source file sync and share software for everyone from individuals
operating the free ownCloud Server edition, to large enterprises and service providers
operating the ownCloud Enterprise Subscription. ownCloud provides a safe, secure,
and compliant file synchronization and sharing solution on servers that you control.
You can share one or more files and folders on your computer, and synchronize them
with your ownCloud server. Place files in your local shared directories, and those files
are immediately synchronized to the server and to other devices using the ownCloud
Desktop Sync Client, Android app, or iOS app. To learn more about the ownCloud
desktop and mobile clients, please refer to their respective manuals:
• ownCloud Desktop Client
• ownCloud Android App
• ownCloud iOS App
What’s New in ownCloud
• Option to hide or expose hidden files in the Web GUI
• Requires to use at least desktop client version 2.0 by default.
WebUI Overview
Introduction
You can access your files with the ownCloud Web interface, as well as: create, preview,
edit, delete, share, and re-share files.
Your ownCloud administrator has the option to disable these features. If
any of them are missing on your system ask your server administrator.
Introduction | 1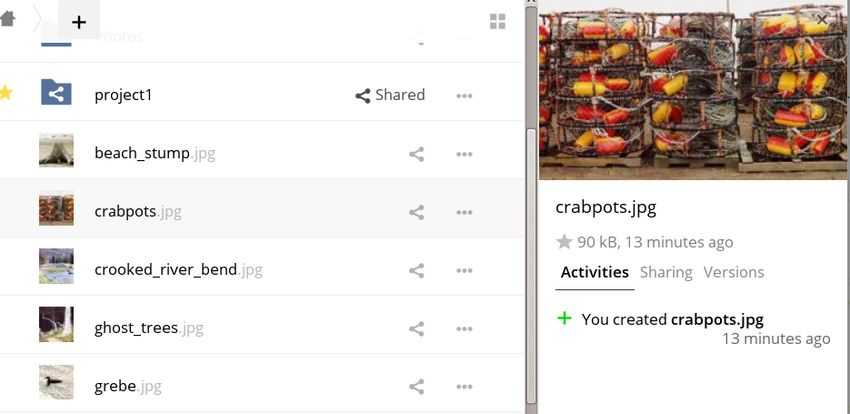
File Controls
When you mouseover, or hover over, a file in the Files view, as in the image below,
ownCloud displays three file controls. These are:

1. Marking Favorites
2. Sharing Files
3. The Overflow Menu

Marking Favorites

Click the star to the left of the file icon to mark it as a favorite. You can quickly find all
of your favorites with the Favorites filter on the left sidebar.

Sharing Files

The sharing files control is a shortcut to the file and folder sharing functionality within
ownCloud. ownCloud sharing supports:

• Sharing files and folders with users or groups
• Creating public link shares with hyperlinks
• Listing recipients of existing shares
• Deleting existing shares

The Overflow Menu

The Overflow Menu allows you to:

2 | WebUI Overview
• Display File Details
 • Rename Files
 • Download Files
 • Delete Files

Display File Details

When you display details about a file, by clicking btn:[Details] in the Overflow Menu, a
set of tabs (or views) are available. These are:

View                   Description

Details                This shows details about a file, such as its name, size, and when it was
                       created or last updated. To know more, refer to the Details section.

Activity               This shows a history of activity on the file, such as when it was
                       created, updated, and shared. To know more, refer to the Activity
                       section.

Sharing                It’s here that shares are managed. To know more, refer to the Sharing
                       Files section.

Version                This shows a history of all the versions of the file. This is not available
                       for folders. To know more, refer to the Version Control section.

You can see an example of the Activity view in the image below.

                                                                                  WebUI Overview | 3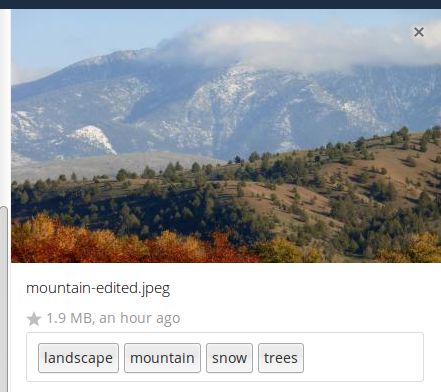
Rename Files

To rename a file, click menu:Rename[] in the Overflow Menu. The file’s current name
will be displayed in an editable text box. Change the name, click kbd:[Enter], and the
file will be renamed. If you don’t want to rename it, click kbd:[esc] and the file name
will be left as is.

Download Files

To download a file, click menu:Download[] in the Overflow Menu.

Delete Files

To delete a file, click menu:Delete[] in the Overflow Menu.

The Web Interface
You can connect to your ownCloud server using any Web browser; just point it to your
ownCloud server and enter your username and password. Supported Web browsers
are:

 • Edge (current version on Windows 10)
 • IE11 or newer (except Compatibility Mode)
 • Firefox 60 ESR or newer
 • Chrome 66 or newer
 • Safari 10 or newer

4 | WebUI Overview
Some apps like files_external or encryption will disable the Stay logged
in checkbox.
Navigating the Main User Interface
By default, the ownCloud Web interface opens to your Files page. You can add,
remove, and share files, and make changes based on the access privileges set by you
(if you are administering the server) or by your server administrator.
The ownCloud user interface contains the following fields and functions:
• Apps Selection Menu: Located in the upper left corner, click the arrow to open a
dropdown menu to navigate to your various available apps.
• Apps Information Field: Located in the left sidebar, this provides filters and tasks
associated with your selected app. For example, when you are using the Files apps
you have a special set of filters for quickly finding your files, such as files that have
been shared with you, and files that you have shared with others. You’ll see
different items for other apps.
• Application View: The main central field in the ownCloud user interface. This field
displays the contents or user features of your selected app.
• Navigation Bar: Located over the main viewing window (the Application View),
this bar provides a type of breadcrumbs navigation that enables you to migrate to
higher levels of the folder hierarchy up to the root level (home).
• New Button: Located in the Navigation Bar, the btn:[New] button enables you to
create new files, new folders, or upload files.
You can also drag and drop files from your file manager into the
ownCloud Files Application View to upload them to ownCloud.
Currently, the only Web browsers that support drag-and-drop folders
are Chrome and Chromium.
• Search Field: Click on the btn:[magnifier] in the upper right hand corner of to
search for files.
• Personal Settings Menu: Click on your ownCloud btn:[username], located to the
right of the Search field, to open your Personal Settings dropdown menu. Your
Personal page provides the following settings and features:
WebUI Overview | 5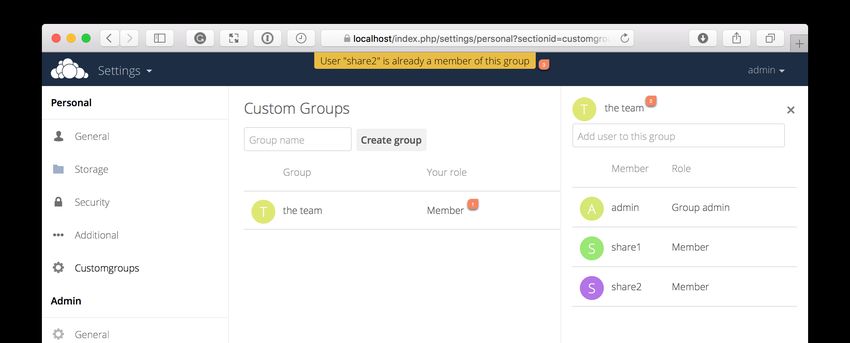
◦ Links to download desktop and mobile apps
    ◦ Re-run the First Run Wizard
    ◦ Server usage and space availability
    ◦ Password management
    ◦ Name, email, and profile picture settings
    ◦ Manage connected browsers and devices
    ◦ Group memberships
    ◦ Interface language settings
    ◦ Manage notifications
    ◦ Federated Cloud ID
    ◦ Social media sharing buttons
    ◦ SSL certificate manager
    ◦ ownCloud Version information

See userpreferences section to learn more about these settings.

Personal Settings
As a user, you can manage your personal settings. To access them:

1. Click on your username in the top, right-hand corner of the WebUI of your
   ownCloud instance.

   The Personal Settings Menu opens.

   Personal Settings Menu

2. Then, click menu:Personal[] from the drop down menu.

6 | WebUI Overview
The options listed in the Personal Settings page depend on the
applications that are enabled by the administrator.
Some of the features you will see include the following:
• Usage and available quota
• Manage your profile picture
• Full name You can make this anything you want, as it is separate from your
ownCloud login name, which is unique and cannot be changed
• Email address
• Lists your Group memberships
• Manage your password
• Choose the language for your ownCloud interface
• Links to desktop and mobile apps
• Manage your Activity stream and notifications
• Default folder to save new documents to
• Your Federated sharing ID
• Social sharing links
• ownCloud version
WebUI Overview | 7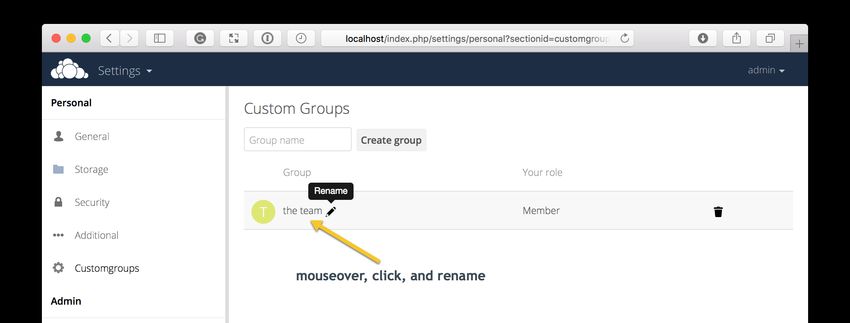
General Settings

In the general settings, you can do the following:

 • Set:
    ◦ Your profile picture
    ◦ The language for your user account
 • Update your personal data:
    ◦ Full name
    ◦ Email address
    ◦ Password
 • View:
    ◦ The amount of storage you have used
    ◦ The groups that you are a member of
    ◦ Your federated cloud id
    ◦ The current version of ownCloud
 • Download the desktop, android, and iOS app

Managing Your Profile Picture

Changing Your Profile Picture

There are two options to set your profile picture:

 • You can upload an image; or
 • Select an existing profile picture

Upload a Profile Picture

To upload an image click the "Upload new"        button, which opens a file browser,
through which you can choose an image to upload. After you’ve chosen an image, you
will then be able to crop the uploaded image, if required, to just the segment of the

8 | WebUI Overview
image that you want to use for your profile picture. You can see an example in the
screenshot below.
Figure 1. Crop the new profile picture
When you’re happy with the image, click btn:[Choose as profile picture], and the
image will be set as your profile picture.
the image can be a maximum of 20MB in size.
Select a Profile Picture
To select a profile picture, click the Select from Files button and the profile
picture chooser will open. From there, pick the profile picture that you want and click
btn:[Choose].
WebUI Overview | 9Figure 2. Choose a new profile picture Remove Your Profile Picture To remove a custom profile picture, click the Remove Profile button. After that, the image will revert to the default image, present when you first logged in. Update Your Full Name To update (or change) your full name, amend the existing text in the text box below “Full name”. After a few seconds, your full name will be auto-saved. Figure 3. Successfully updated full name If the full name cannot be changed, you will see a notification, as in the example below. 10 | WebUI Overview
Figure 4. Problem updating full name
Update Your Email Address
To update your email address, change the address in the text box below “Email” and
click btn:[Set email].
Update Your Password
Figure 5. Update current password.
To change your password, under Password, enter your current password in the first
password field (with the placeholder text “Current password”) and your new password
in the second password field (with the placeholder text “New password”), and then
click btn:[Change password].
Password changes automatically log out all connected
browsers/devices.
Set the Language
Figure 6. Change profile’s language
To change the language for your user account, pick the desired language from the
dropdown under Language. The new language will be auto-saved shortly after you
select it.
External Storage
If your ownCloud administrator has enabled External Storage, and how they have
configured external storage, then in this section you will be able to add one or multiple
external storages.
Figure 7. User Storage Settings
To configure one or more external storages, please refer to the External Storage
WebUI Overview | 11documentation. Sharing Figure 8. User Sharing Settings This section allows you to set whether or not you want to: • Automatically accept new incoming local user shares • Allow finding you via autocomplete in share dialog. To enable either, check the respective checkbox. This section also allows for configuring Federated Cloud Sharing. Security The security settings page allows for: • Managing CORS white-listed domains • Viewing and deleting user sessions • Creating new app passcodes CORS White-listed Domains Figure 9. CORS (Cross-origin Resource Sharing) configuration section The CORS (Cross-origin resource sharing) white-listed domains section lists zero or more domains which the ownCloud instance is allowed to request resources from, in addition to the current domain, for your user account. By default, as in the screenshot above, no domains will be listed. If you want to add one, or more, add them, one at a time, in the Domain text field, and click btn:[Add]. You will then seem list listed, as in the screenshot below. To remove one, or more, click the trashbin icon next to the relevant domain name. 12 | WebUI Overview
Figure 10. CORS Configuration Section with white-listed domains

You will then be prompted to confirm if you want to remove the domain. If you do,
click btn:[Yes]. If you do not, click btn:[No].

Sessions

Figure 11. Sessions section

The sessions section, which you can see an example of below, lists all your current
user sessions, across web, desktop, and mobile clients. Specifically, it lists the browser
user agent string and the time of the most recent activity. If you want to log a session
out, then click the Disconnect button at the far right of the relevant session.

App Passwords / Tokens

Figure 12. App password / tokens section

This section lets you give an app or device permissions to access your ownCloud
account. App passwords are a security measure which let you hide your actual
password. To create one, insert the app name in the App name text field, and click
btn:[Create new app passcode].

1. Create new app password / token image::personal-settings/security/create-new-app-
   password-token.png[]

As you can see in the screenshot above, a username and password/token will be

                                                                         WebUI Overview | 13
generated, and the app will be listed in the apps list in this section.
Make sure you either securely store the username and password /
token or ensure that the receiver does, because once you click
btn:[Done] the username and password / token will longer be
discoverable.
If you want to revoke access for a device or app, click the trash bin icon next to its
name in the apps list.
No confirmation of revocation is requested. Once you click the trash bin
icon, the apps access is revoked.
Navigating the WebUI
Introduction
Navigating through folders in ownCloud is as simple as clicking on a folder to open it
and using the back button on your browser to move to a previous level. This section
walks you through how to navigate the ownCloud UI.
Create and Upload Files and Directories
At the top of the Files view is a navigation bar. This contains links to uploading new
files, and creating new files and folders.
To upload or create new files or folders directly in an ownCloud folder click on the
btn:[New] button in the navigation bar (this is the + button). There, as in the image
above, you can see links to:
• btn:[Upload a new file] This uploads files from your computer into ownCloud. You
can also upload files by dragging and dropping them from your file manager.
• btn:[Create a new text file] This creates a new text file and adds the file to your
current folder.
• btn:[Create a new folder] This creates a new folder in the current folder.
Select Files or Folders
14 | WebUI OverviewYou can select one or more files or folders by hovering over them (as in the image
below) and clicking on their checkboxes. To select all files in the current directory,
click on the checkbox located at the top of the files listing.
When you select multiple files, you can delete all of them, or download them as a ZIP
file by using the btn:[Delete] or btn:[Download] buttons that appear at the top.
If the btn:[Download] button is not visible, the administrator has
disabled this feature.
Filter the Files View
The left sidebar on the Files page contains several filters for quickly sorting and
managing your files.
Option Description
All files The default view; displays all files that you have access to
Favorites Files or folders marked with the yellow star
Shared with Displays all files shared with you by another user or group
you
Shared with Displays all files that you have shared with other users or groups
others
Shared by Displays all files that are shared by you via public link
link
External Files that you have access to on external storage devices and services
Storage such as Dropbox, Google, and Amazon S3
WebUI Overview | 15Move Files
You can move files and folders by dragging and dropping them into any directory.
Play Videos
You can play videos in ownCloud with the Media Viewer app, by clicking once on the
file. Please note, video streaming by the ownCloud Media Viewer depends on your web
browser and the video’s format.
If your ownCloud administrator has enabled video streaming, and it
doesn’t work in your Web browser, it may be a browser-related issue.
See Mozilla’s Browser Compatibility Guide for supported multimedia
formats in Web browsers.
Settings
The Settings gear icon, in the lower left-hand corner of the ownCloud window, allows
you to show or hide hidden files in your ownCloud Web interface. These are also called
dotfiles, because they are prefixed with a dot, e.g. .mailfile.
The dot tells your operating system to hide these files in your file browsers, unless you
choose to display them. Usually, these are configuration files, so having the option to
hide them reduces clutter.
Preview Files
ownCloud can display thumbnail previews for images, MP3 covers, and text files, if
this is enabled by your server administrator. You can also display uncompressed text,
OpenDocument, videos, and image files in the ownCloud embedded viewers by
clicking on the file name. There may be other file types you can preview if your
ownCloud administrator has enabled them. If ownCloud cannot display a file, it will
start a download process and downloads the file to your computer.
16 | WebUI OverviewComments
Introduction
In ownCloud, you can add one or more comments on both files and folders. This
section describes how to add, edit, and delete comments.
You can navigate directly to the comments pane for a file by using the
URL: https://your.owncloud.domain/f/??
details=commentsTabView, and substituting for the file’s id.
Add Comments
Use the Details view, in The Overflow Menu, to add and read comments on any file or
folder. Comments are visible to everyone who has access to the file or folder. To add a
comment, as in the example below, click the btn:[Comments] tab in the Details view,
write a comment in the New Comment field, and click btn:[Post].
Edit Comments
To edit an existing comment on a file or folder, hover the mouse over the comment and
you will see a pencil icon appear. By clicking on the pencil, the btn:[Edit Comment]
field will appear, pre-filled with the comment text. Change the text as necessary and
click btn:[Save]. If you change your mind, just click btn:[Cancel].
WebUI Overview | 17Delete Comments
To delete an existing comment on a file or folder, as with editing comments, hover the
mouse over the comment and you will see a pencil icon appear. Click the pencil, and a
rubbish bin icon appears on the far right-hand side of the comment author’s name,
above the btn:[Edit Comment] text field. Click the btn:[rubbish bin], and the comment
will be deleted after a few seconds.
Custom Groups
Introduction
In previous versions of ownCloud, if you wanted to share a file or a folder with more
than one person, you had to share it either with many people individually, or share to
one or more groups. However, you could only share with groups which your ownCloud
administrator had already created.
This wasn’t the most efficient way to work. To address that, as of ownCloud 10.0, you
can now create your own groups on-the-fly, through a feature called "Custom Groups".
Here’s how to use it.
Creating Custom Groups
Assuming that your ownCloud administrator’s already enabled custom groups; under
the admin menu, in the top right-hand corner, click btn:[Settings] (1). Then, in the
main menu on the settings page, in "Personal" section, click the option:
btn:[Customgroups] (2). This will take you to the "Custom Groups" admin page.
To create a new custom group, in the text field at the top where you see the
placeholder text: "Group name", add the group name and click btn:[Create group].
After a moment or two, you’ll see the new custom group appear in the groups list.
Please be aware of two things:
1. Custom groups are visible only to members of the group, but not to
anyone outside the group; and
2. ownCloud administrators can see and modify all custom groups of an
instance.
Managing Group Members
18 | WebUI OverviewTo add or remove users in a custom group, click your role (1), which will likely be
"Member" (at least at first), and you’ll see a panel appear on the right-hand side
listing the group’s users and their roles. In the "Add user to this group field" at the
top of the panel (2), start typing the name of the user that you want to add.
After a moment or two, you’ll see a list of users that match what you’ve typed appear
(if there are any) in a popup list. Click the one that you want, and they’ll be added to
the group. Finally, you’ll see a confirmation at the top of the page (3), indicating that
the user’s been added to the custom group.
Members can only use a group for sharing, whereas group admins can
manage a group’s members, change a group’s name, change members’
roles, and delete groups.
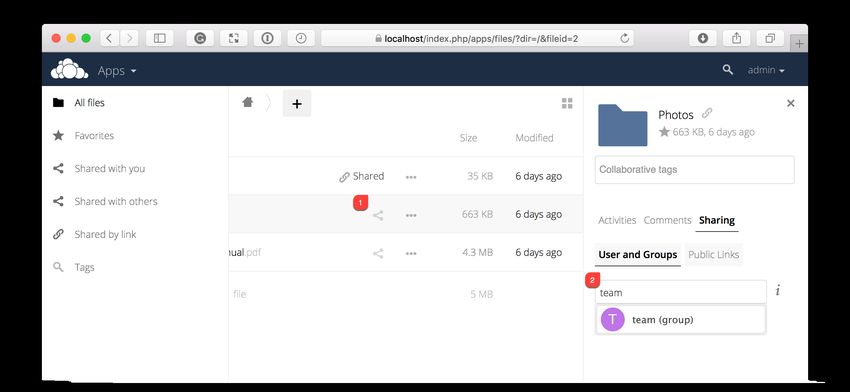
Sharing with the Group
To share a file or folder with your custom group, open the sharing panel (1). Then, in
the "User and Groups" field (2), type part of the name of the custom group and wait a
moment or two.
The name of the group should be displayed in a popup list, which you can see in the
screenshot above. Click on it, and the file or folder will then be shared with your
custom group with all permissions initially set.
WebUI Overview | 19Changing Group Names If you want to change the name of the custom group, mouseover the group’s name in the custom groups list, where you will see a pencil appear to the right of the existing name. Click it, and a text field will appear, pre-populated with the existing name. Change the name and click enter, and the name will be changed. Files This section covers how to work with and user files when using ownCloud. Accessing ownCloud Files Using WebDAV Introduction ownCloud fully supports the WebDAV protocol, and you can connect and synchronize with your ownCloud files over WebDAV. In this chapter you will learn how to connect Linux, Mac OS X, Windows, and mobile devices to your ownCloud server via WebDAV. Before we get into configuring WebDAV, let’s take a quick look at the recommended way of connecting client devices to your ownCloud servers. ownCloud Desktop and Mobile Clients The recommended method for keeping your desktop PC synchronized with your ownCloud server is by using the ownCloud Desktop Client. You can configure the ownCloud client to save files in any local directory you want, and you choose which directories on the ownCloud server to sync with. The client displays the current connection status and logs all activity, so you always know which remote files have been downloaded to your PC, and you can verify that files created and updated on your local PC are properly synchronized with the server. The recommended method for syncing your ownCloud server with Android and Apple iOS devices is by using the ownCloud mobile apps. To connect to your ownCloud server with the ownCloud mobile apps, use the base URL and folder only: example.com/owncloud In addition to the mobile apps provided by ownCloud, you can use other apps to connect to ownCloud from your mobile device using WebDAV. WebDAV Navigator is a good (proprietary) app for Android devices, iPhones, and BlackBerry devices. The URL to use on these is: 20 | WebUI Overview
example.com/owncloud/remote.php/webdav
WebDAV Configuration
If you prefer, you may also connect your desktop PC to your ownCloud server by using
the WebDAV protocol rather than using a special client application. Web Distributed
Authoring and Versioning (WebDAV) is a Hypertext Transfer Protocol (HTTP) extension
that makes it easy to create, read, and edit files on Web servers. With WebDAV you can
access your ownCloud shares on Linux, Mac OS X and Windows in the same way as
any remote network share, and stay synchronized.
In the following examples, You must adjust example.com/ to the URL
of your ownCloud server installation.
Accessing Files Using Linux
You can access files in Linux operating systems using the following methods.
Nautilus File Manager
Use the davs:// protocol to connect the Nautilus file manager to your ownCloud share:
davs://example.com/owncloud/remote.php/webdav
If your server connection is not HTTPS-secured, use dav:// instead of
davs://.
WebUI Overview | 21Accessing Files with KDE and Dolphin File Manager To access your ownCloud files using the Dolphin file manager in KDE, use the webdav:// protocol: webdav://example.com/owncloud/remote.php/webdav You can create a permanent link to your ownCloud server: 1. Open Dolphin and click btn:[Network] in the left hand column. 2. Click on the icon labeled btn:[Add a Network Folder]. The resulting dialog should appear with WebDAV already selected. 22 | WebUI Overview
3. If WebDAV is not selected, select it.
4. Click btn:[Next].
5. Enter the following settings:
    ◦ Name: The name you want to see in the Places bookmark, for example
      ownCloud.
    ◦ User: The ownCloud username you used to log in, for example admin.
    ◦ Server: The ownCloud domain name, for example example.com (without
      https:// or http://).
    ◦ Folder: Enter the path owncloud/remote.php/webdav.

6. (Optional) Check the btn:[create] icon checkbox for a bookmark to appear in the
   menu:Places[] column.
7. (Optional) Provide any special settings or an SSL certificate in the btn:[Port &
   Encrypted] checkbox.

Creating WebDAV Mounts on the Linux Command Line

You can create WebDAV mounts from the Linux command line. This is useful if you
prefer to access ownCloud the same way as any other remote filesystem mount. The
following example shows how to create a personal mount and have it mounted
automatically every time you log in to your Linux computer.

1. Install the davfs2 WebDAV filesystem driver, which allows you to mount WebDAV
   shares just like any other remote filesystem. Use this command to install it on
   Debian/Ubuntu:

     sudo apt-get install davfs2

2. Use this command to install it on CentOS, Fedora, and openSUSE:

                                                                       WebUI Overview | 23
sudo yum install davfs2
3. Add yourself to the davfs2 group (this will be effective after the next login):
sudo usermod -aG davfs2
4. Then create an owncloud directory in your home directory for the mountpoint, and
.davfs2/ for your personal configuration file:
mkdir ~/owncloud
mkdir ~/.davfs2
5. Copy /etc/davfs2/secrets to ~/.davfs2:
sudo cat /etc/davfs2/secrets > ~/.davfs2/secrets
6. Make the permissions read-write owner only:
chmod 600 ~/.davfs2/secrets
7. Add your ownCloud login credentials to the end of the secrets file, using your
ownCloud server URL and your ownCloud username and password:
/home//owncloud
8. Add the mount information to /etc/fstab:
https://example.com/owncloud/remote.php/webdav
/home//owncloud davfs user,rw,auto 0 0
9. Then test that it mounts and authenticates by running the following command. If
you set it up correctly you won’t need root permissions:
mount ~/owncloud
10. You should also be able to unmount it:
umount ~/owncloud
Now every time you login to your Linux system your ownCloud share should
automatically mount via WebDAV in your ~/owncloud directory. If you prefer to mount
it manually, change auto to noauto in /etc/fstab.
24 | WebUI OverviewKnown Issues
Problem: Resource Temporarily Unavailable
Solution
If you experience trouble when you create a file in the directory, edit
/etc/davfs2/davfs2.conf and add:
use_locks 0
Problem: Certificate Warnings
Solution
If you use a self-signed certificate, you will get a warning. To change this, you need to
configure davfs2 to recognize your certificate. Copy mycertificate.pem to
/etc/davfs2/certs/. Then edit /etc/davfs2/davfs2.conf and uncomment the line
servercert. Now add the path of your certificate as in this example:
servercert /etc/davfs2/certs/mycertificate.pem
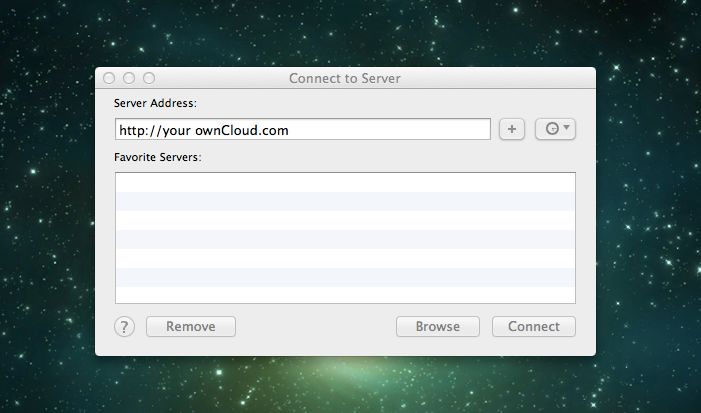
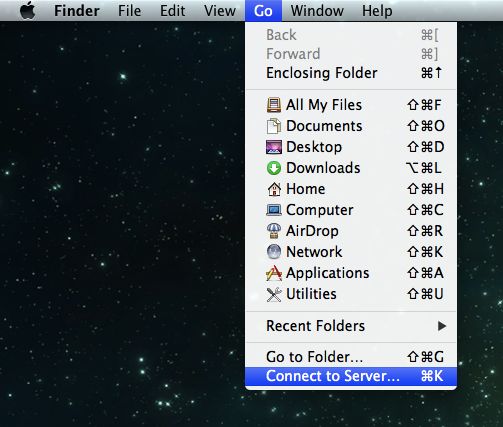
Accessing Files Using Mac OS X
The Mac OS X Finder suffers from a series of implementation problems
and should only be used if the ownCloud server runs on Apache and
mod_php. You can use a tool like ocsmount to mount without those
issues.
To access files through the Mac OS X Finder:
1. Choose menu:Go[Connect to Server].
The "Connect to Server" window opens.
2. Specify the address of the server in the Server Address field.
WebUI Overview | 25For example, the URL used to connect to the ownCloud server from the Mac OS X
Finder is:
https://example.com/owncloud/remote.php/webdav
3. Click btn:[Connect].
The device connects to the server.
For added details about how to connect to an external server using Mac OS X,
check the wikihow documentation
26 | WebUI OverviewAccessing Files Using Microsoft Windows
It is best to use a suitable WebDAV client from the WebDAV Project page .
If you must use the native Windows implementation, you can map ownCloud to a new
drive. Mapping to a drive enables you to browse files stored on an ownCloud server
the way you would files stored in a mapped network drive.
Using this feature requires network connectivity. If you want to store your files offline,
use the ownCloud Desktop Client to sync all files on your ownCloud to one or more
directories of your local hard drive.
Prior to mapping your drive, you must permit the use of Basic
Authentication in the Windows Registry. The procedure is documented
in KB841215 and differs between Windows XP/Server 2003 and
Windows Vista/7. Please follow the Knowledge Base article before
proceeding, and follow the Vista instructions if you run Windows 7.
Mapping Drives With the Command Line
The following example shows how to map a drive using the command line. To map the
drive:
1. Open a command prompt in Windows.
2. Enter the following line in the command prompt to map to the computer Z drive,
where is the URL to your ownCloud server:
net use Z: https:///remote.php/webdav /user:youruser
yourpassword
Example:
net use Z: https://example.com/owncloud/remote.php/webdav /user:youruser
yourpassword
"" The computer maps the files of your ownCloud account to the drive letter Z. ""
Though not recommended, you can also mount the ownCloud server
using HTTP, leaving the connection unencrypted. If you plan to use
HTTP connections on devices while in a public place, we strongly
recommend using a VPN tunnel to provide the necessary security.
An alternative command syntax is:
net use Z: \\example.com@ssl\owncloud\remote.php\dav /user:youruser
yourpassword
Mapping Drives With Windows Explorer
To map a drive using the Microsoft Windows Explorer:
1. Migrate to your computer in Windows Explorer.
2. Right-click on btn:[Computer] entry and select btn:[Map network drive…] from the
drop-down menu.
WebUI Overview | 273. Choose a local network drive to which you want to map ownCloud.
4. Specify the address to your ownCloud instance, followed by /remote.php/webdav.
For example:
https://example.com/owncloud/remote.php/webdav
For SSL protected servers, check Reconnect at logon to ensure
that the mapping is persistent upon subsequent reboots. If you want
to connect to the ownCloud server as a different user, check
Connect using different credentials.
5. Click the btn:[Finish] button.
Windows Explorer maps the network drive, making your ownCloud instance
available.
Accessing Files Using Cyberduck
Cyberduck is an open source FTP and SFTP, WebDAV, and Amazon S3 browser
designed for file transfers on Mac OS X and Windows.
This example uses Cyberduck version 4.2.1.
To use Cyberduck:
1. Specify a server without any leading protocol information. For example:
`example.com`
28 | WebUI Overview2. Specify the appropriate port. The port you choose depends on whether or not your
ownCloud server supports SSL. Cyberduck requires that you select a different
connection type if you plan to use SSL. For example:
80 (for WebDAV)
443 (for WebDAV (HTTPS/SSL))
3. Use the More Options drop-down menu to add the rest of your WebDAV URL into
the `Path' field. For example:
remote.php/webdav
Now Cyberduck enables file access to the ownCloud server.
Accessing public link shares over WebDAV
ownCloud provides the possibility to access public link shares over WebDAV.
To access the public link share, open:
https://example.com/owncloud/public.php/webdav
in a WebDAV client, use the share token as username and the (optional) share
password as password.
menu:Settings[Administration > Sharing > Allow users on this server to
send shares to other servers] needs to be enabled in order to make this
feature work.
Known Problems
Problem: Windows Does Not Connect Using HTTPS.
Solution 1
The Windows WebDAV Client might not support Server Name Indication (SNI) on
encrypted connections. If you encounter an error mounting an SSL-encrypted
ownCloud instance, contact your provider about assigning a dedicated IP address for
your SSL-based server.
Solution 2
The Windows WebDAV Client might not support TSLv1.1 / TSLv1.2 connections. If you
have restricted your server config to only provide TLSv1.1 and above the connection to
your server might fail. Please refer to the WinHTTP documentation for further
information.
Problem: The File Size Exceeds the Limit Allowed and Cannot be Saved
You receive the following error message:
Error 0x800700DF: The file size exceeds the limit allowed and cannot be
saved.
WebUI Overview | 29Solution
Windows limits the maximum size a file transferred from or to a WebDAV share may
have. You can increase the value FileSizeLimitInBytes in
HKEY_LOCAL_MacHINE\SYSTEM\CurrentControlSet\Services\WebClient\Para
meters by clicking on btn:[Modify].
To increase the limit to the maximum value of 4GB, select Decimal, enter a value of
4294967295, and reboot Windows or restart the WebClient service.
Problem: Accessing your files from Microsoft Office via WebDAV fails
Solution
Known problems and their solutions are documented in the KB2123563 article.
Problem: WebDAV Drive in Windows Using Self-Signed Certificate
Cannot map ownCloud as a WebDAV drive in Windows using self-signed certificate.
Solution
1. Go to the your ownCloud instance via your favorite Web browser.
2. Click through until you get to the certificate error in the browser status line.
3. View the cert, then from the Details tab, select Copy to File.
4. Save to the desktop with an arbitrary name, for example myOwnCloud.cer.
5. Start, Run, MMC.
6. menu:File[Add/Remove Snap-In].
7. Select menu:Certificates[Add > My User Account > Finish > OK].
8. Dig down to Trust Root Certification Authorities, Certificates.
9. Right-Click menu:Certificate[Select All Tasks > Import].
10. Select btn:[Save Cert] from the Desktop.
11. Select Place all Certificates in the following Store, click btn:[Browse],
12. Check the Box that says menu:Show Physical Stores[].
Expand out Trusted Root Certification Authorities.
select Local Computer, click btn:[OK] to complete the Import.
13. Check the list to make sure it shows up.
You will probably need to Refresh before you see it.
Exit MMC.
14. Open Browser, select Tools, Delete Browsing History.
15. Select all but In Private Filtering Data, complete.
16. Go to Internet Options, Content Tab, Clear SSL State.
17. Close browser, then re-open and test.
Problem: Upload Large Files or Upload Takes Long
You cannot download more than 50 MB or upload large Files when the upload takes
longer than 30 minutes using Web Client in Windows 7.
Solution
Workarounds are documented in the KB2668751 article.
30 | WebUI OverviewProblem: The Network Name Cannot be Found
Error 0x80070043 "The network name cannot be found." while adding a network
drive.
Solution
Make Windows service WebClient start automatically:
1. Open menu:Control Panel[Administrative Tools > Services].
2. Find WebClient service.
3. Right-click on it and choose Properties.
4. Select Startup type: Automatic.
5. Click btn:[OK] button.
Or in command prompt (as Admin):
sc config "WebClient" start=auto
sc start "WebClient"
More details can be found here.
Accessing Files Using cURL
Since WebDAV is an extension of HTTP cURL can be used to script file operations.
To create a folder with the current date as name:
curl -u user:pass -X MKCOL
"https://example.com/owncloud/remote.php/dav/files/USERNAME/$(date '+%d-%b-
%Y')"
To upload a file error.log into that directory:
curl -u user:pass -T error.log
"https://example.com/owncloud/remote.php/dav/files/USERNAME/$(date '+%d-%b-
%Y')/error.log"
To move a file:
curl -u user:pass -X MOVE --header 'Destination:
https://example.com/owncloud/remote.php/dav/files/USERNAME/target.jpg'
https://example.com/owncloud/remote.php/dav/files/USERNAME/source.jpg
To get the properties of files in the root folder:
WebUI Overview | 31curl -X PROPFIND -H "Depth: 1" -u user:pass
https://example.com/owncloud/remote.php/dav/files/USERNAME/ | xml_pp
/owncloud/remote.php/webdav/
Tue, 13 Oct 2015 17:07:45 GMT
163
11802275840
"561d3a6139d05"
HTTP/1.1 200 OK
/owncloud/remote.php/webdav/welcome.txt
Tue, 13 Oct 2015 17:07:35 GMT
163
"47465fae667b2d0fee154f5e17d1f0f1"
text/plain
HTTP/1.1 200 OK
To get the file id of a file, regardless of location, you need to make a PROPFIND
request. This request requires two things:
1. A PROPFIND XML element in the body of the request method.
2. The path to the file that you want to find out more about
Here’s an example PROPFIND XML element, which we’ll store as propfind-fileid.xml.
32 | WebUI OverviewYou could pass this directly to the Curl request. However, it can often
be easier to create, maintain, and to share, if it’s created in a
standalone file.
With the file created, make the request by running the following Curl command:
curl -u username:password -X PROPFIND \
-H "Content-Type: text/xml" \
--data-binary "@propfind-fileid.xml" \
'http://localhost/remote.php/dav/files/admin/Photos/San%20Francisco.jpg'
This will return an XML response payload similar to the following example. It contains
the relative path to the file and the fileid of the file.
/remote.php/dav/files/admin/Photos/San%20Francisco.jpg
4
HTTP/1.1 200 OK
The example above’s been formatted for readability, using xmllint,
which is part of libxml2. To format it as it is listed above, pipe the
previous command to xmllint --format -.
Sharing Files
Introduction
Clicking the share icon on any file or folder opens the Details view on the right, where
the Share tab has focus.
Sharing Status Icons
Any folder that has been shared is marked with the Shared overlay icon. Public link
shares are marked with a chain link. Un-shared folders are blank.
WebUI Overview | 33If your ownCloud server is the Enterprise edition, you may also have access to Sharepoint and Windows Network Drive file shares. These have special status icons. An icon with a red plugin and background means you have to enter a login to get access to the share. Creating Shares To share a file or folder, immediately below the Share tab, you will see a text field. In this field, you can enter any number of users (whether local to your ownCloud server or remote) or groups who you would like to share the file or folder with. If username auto-completion is enabled, when you start typing the user or group name ownCloud will automatically complete it for you, if possible. 34 | WebUI Overview
From 10.0.8, user and group name search results are dependent on a
new configuration setting, called user.search_min_length (it is set to 4
by default). This setting helps to aid search performance but requires
that search terms contain at least the defined number of characters.
Consequently, search terms shorter than the defined number of
characters will not return a list of matches. However, they will return
an existing user or group with a name of the same length as the search
term.
After a file or folder has been shared, Share Permissions can be set on it. In the image
below, you can see that the directory "event-Photos" is shared with the user "pierpont",
who can share, edit, create, change, and delete the directory.
You can navigate directly to the sharing pane for a file by using the
URL: https://your.owncloud.domain/f/??details=shareTabView,
and substituting for the file’s id.
What Happens When Share Recipients Move Files and Folders?
If a share recipient has "can edit" privileges and moves files or folders out of the
share, ownCloud stores a backup copy of the moved file/folder in the Deleted Files
(Trash) of the share’s owner. The user who moved the file/folder out of the share still
has the original copy there, along with its attached metadata.
That way, the files/folders are not permanently lost. By clicking the btn:[Restore] link,
next to the respective file or folder, ownCloud will restore these files/folders to their
original location.
WebUI Overview | 35 Restoring files restores the backup copy for all users, including the
user that originally moved them, into the original folder.
Sharing Files with Guest Users
Users can also share files and folders with guest users. To do so, your ownCloud
administrator will need to have installed the Guest application.
If it’s already installed, in the User and Groups field of the Sharing panel, type the
email address of a user who is not already a user in your ownCloud installation. You
will then see a popup appear with the suffix (guest), as in the screenshot below.
After you do that, the content will be shared with the user with all permissions
applied, except for the ability to share with other users.
36 | WebUI OverviewUpdating Shares
To change any of the properties of a share, again, you first need to view the Share tab.
From there, you can:
• Delete a user’s access to a share
• Give more users access to a share
• Change a user’s share permissions
• Add or remove password protection
• Set or remove a share’s expiration date
This functionality is already described in other parts of this documentation and won’t
be specifically covered here.
Deleting Shares
Despite the name of this section, you don’t actually delete a share. Rather what you do
is remove the access of user’s to whom it’s already been shared with. When all users
access to a shared resource has been removed, the resource is no longer shared.
To do that, you need to click on the btn:[rubbish bin] icon, on the far right-hand side of
the name of each user it’s been shared with, who should no longer have access to it.
Renaming Shares
Both the sharer and all share recipients can rename a share at any time. However,
when one user renames a share, it only renames their version; no other users see the
new share name. Essentially, the share name remains the same for all other users.
In case that’s a little unclear, step through the following scenario:
User Jenny creates a directory called "Growth Projects 2019" and
shares it with James, Peter, and Sarah. A week later, James
renames the share to "Growth Projects 2019 — Draft!". James
sees the share with the new name, but Jenny, Peter, and Sarah
continue seeing the share with its original name ("Growth Projects
2019").
This feature may seem a little strange; however, it provides flexibility for all users to
manage their files and folders as they see fit.
WebUI Overview | 37Password Protecting Files
It’s also possible to password protect shared files and folders. If you want to do so,
then you need to enable this functionality. Specifically, click the checkbox labeled
btn:[Password protect] under the "Share Link" section.
When you do so, you’ll see a password field appear. In there, add the password that
the user will need to enter to access the shared resource and press the return key.
Using Private Links
Another way to access a file or folder is via a private link. It’s a handy way of creating
a permanent link for yourself or to point others to a file or folder, within a share, more
efficiently. To access the private link, in the Sharing Panel for a file or folder, next to its
name you’ll see a small link icon (1), as in the screenshot below.
If you click it, a new textbox will appear above the "Collaborative tags" field,
populated with the link’s URI (2).
Only people who have access to the file or folder can use the link.
Changing The Share Expiration Date
In older versions of ownCloud, you could set an expiration date on both local and
public link shares. Since the most recent version three, key, changes have been made:
• You can only set an expiration date on public link shares
• Local shares do not expire when public link shares expire
• A local share can only be "expired" (or deleted) by clicking the btn:[trash can] icon
38 | WebUI OverviewCreating or Connecting to Federation Share Links
Federated Cloud Sharing allows you to mount file shares from remote ownCloud
servers, and manage them just like a local share. In ownCloud 8 the process for
creating a new sharing link is easier and more streamlined. See Using Federation
Shares to learn to how to create and connect to new Federated Cloud shares.
Share Permissions
Shares can have a combination of the following five permission types:
Permission Definition
can share Allows the users you share with to re-share
can edit Allows the users you share with to edit your shared files, and to
collaborate using the Documents app
create Allows the users you share with to create new files and add them to
the share
change Allows uploading a new version of a shared file and replacing it
delete Allows the users you share with to delete shared files
Creating Drop Folders
As of ownCloud version 10.0.2, users can create upload-only, public shares (otherwise
known as "Drop Folders"). Drop Folders allow users to upload files to a central
location, but don’t allow them to either see or change any existing files, which already
have been uploaded.
WebUI Overview | 39To create one: 1. View the sharing panel of the folder that you want to share as a Drop Folder, select menu:Public Links[Create public link]. 2. As with other shares, provide the name in the "Link Name" field. 3. Check btn:[Allow editing], un-check btn:[Show file listing], and then un-check btn:[Allow editing]. 4. Finally, click btn:[Save] to complete creation of the share. Now, as with other public links, you can copy the link to the share and give it out, as and when necessary. Using Drop Folders 40 | WebUI Overview
When users open the share link, they will see a page where they can either click to
select files to share, or drag-and-drop files directly to share them. After the file’s been
successfully uploaded, they’ll see (where possible) a preview of the file that has been
uploaded.

Tagging Files

Introduction

In ownCloud, you can assign one or more tags to files and folders. To do so, go to the
"Details" view, inside The Overflow Menu.

There, you’ll see a text field, with the placeholder text "Collaborative tags" if no tags
have yet been added, below the file’s icon, name, and other details.

In that field, type the tag’s name. If you want to use multiple words, there is no need
to use single or double-quotes. Type as many words as you want for the tag name.
When you press the return key your tag will be saved.

WebUI Overview | 41 All tags are collaborative tags, so they are shared by all users on your
ownCloud server.
When you place the cursor inside the tags field, and as you type the tag name, a list of
the collaborative tags will appear. If you type a new tag name, the visible tags list will
be filtered, based on the text that you’ve typed.
If you see a tag in the list which is what you had intended to type, or is a better fit than
what you had in mind, click on it, and it will be added to the file or folder’s tag list.
This can save you a lot of time and effort.
Untag a File or Folder
If a file or folder is already tagged, the tag names in the popup list will have a check
mark to the left of the tag’s name. To remove that tag from the file or folder, click the
tag’s name. You will see that the check mark disappears.
Edit Tags
To edit a tag, click the pencil icon on the far right-hand side of the tag’s name, in the
tags popup list. This will display a text box, containing the tag’s name. Be sure that
you want to change the tag’s name, as it will be updated for all users.
Delete Tags
To delete a tag, as above, click the pencil icon on the far right-hand side of the tag’s
name, in the tags popup list. Next to the text box containing the tag’s name, you will
also see a delete icon.
Click this to remove the tag from the collaborative tag’s list. As with renaming a tag,
remember that deleting a tag removes it for all users. So please be sure that you want
to do this.
Filter By Tag
To filter by tag, use the Tags filter on the left sidebar of the Files page. There are
42 | WebUI Overviewthree types of tags:
Tag Description
Visible All users may see, rename, and apply these tags to files and folders
Restricted Tags are assignable and editable only to the users and groups which
have permission to use them. Other users can filter files by restricted
tags, but cannot tag files with them or rename them. The tags are
marked (restricted)
Invisible Visible only to ownCloud admins
When you use the Tag filter on your Files page you’ll see something like the following
image. If you do not have Admin rights then you will not see any invisible tags.
Encrypting Your ownCloud Files
Introduction
ownCloud includes an Encryption app, and when it is enabled by your ownCloud
administrator all of your ownCloud data files are automatically encrypted. Encryption
is server-wide, so when it is enabled you cannot choose to keep your files unencrypted.
You don’t have to do anything special, as it uses your ownCloud login as the password
for your unique private encryption key. Just log in and out and manage and share your
files as you normally do, and you can still change your password whenever you want.
Its main purpose is to encrypt files on remote storage services that are connected to
your ownCloud server, such as Dropbox and Google Drive. This is an easy and
seamless way to protect your files on remote storage. You can share your remote files
through ownCloud in the usual way, however you cannot share your encrypted files
directly from Dropbox, Google Drive, or whatever remote service you are using,
because the encryption keys are stored on your ownCloud server, and are never
exposed to outside service providers.
If your ownCloud server is not connected to any remote storage services, then it is
better to use some other form of encryption such as file-level or whole disk encryption.
Because the keys are kept on your ownCloud server, it is possible for your ownCloud
admin to snoop in your files, and if the server is compromised the intruder may get
access to your files. (Read How ownCloud uses encryption to protect your data to
learn more.)
Using Encryption
ownCloud encryption is pretty much set it and forget it, but you have a few options you
can use.
When your ownCloud admin enables encryption for the first time, you must log out and
then log back in to create your encryption keys and encrypt your files. When
WebUI Overview | 43encryption has been enabled on your ownCloud server you will see a yellow banner on
your Files page warning you to log out and then log back in.
When you log back in it takes a few minutes to work, depending on how many files you
have, and then you are returned to your default ownCloud page.
You must never lose your ownCloud password, because you will lose
access to your files. However, there is an optional recovery option that
your ownCloud administrator may enable; see the Recovery Key
Password section (below) to learn about this.
Sharing Encrypted Files
Only users who have private encryption keys have access to shared encrypted files and
folders. Users who have not yet initialized their private encryption keys will not have
access to encrypted shared files; they will see folders and filenames, but will not be
able to open or download the files. They will see a yellow warning banner that says:
"" Encryption App is enabled but your keys are not initialized, please log-out and log-in
again.` ""
Share owners may need to re-share files after encryption is enabled; users trying to
access the share will see a message advising them to ask the share owner to re-share
the file with them. For individual shares, un-share and re-share the file. For group
shares, share with any individuals who can’t access the share. This updates the
encryption, and then the share owner can remove the individual shares.
Recovery Key Password
If your ownCloud administrator has enabled the recovery key feature, you can choose
to use this feature for your account. If you enable "Password recovery" the
administrator can read your data with a special password. This feature enables the
administrator to recover your files in the event you lose your ownCloud password. If
the recovery key is not enabled, then there is no way to restore your files if you lose
your login password.
44 | WebUI OverviewChange Private Key Password
This option is only available if your log-in password, but not your encryption password,
was changed by your administrator. This can occur if your ownCloud provider uses a
external user back-end (for example, LDAP) and changed your login password using
that back-end configuration. In this case, you can set your encryption password to
your new login password by providing your old and new login password. The
Encryption app works only if your login password and your encryption password are
identical.
Managing Deleted Files
Introduction
When you delete a file in ownCloud, it is not immediately deleted permanently.
Instead, it is moved into the trash bin. It is not permanently deleted until you manually
delete it, or when the Deleted Files app deletes it to make room for new files.
Find your deleted files by clicking on the btn:[Deleted files] button on the Files page of
the ownCloud Web interface. You’ll have options to either restore or permanently
delete files.
Quotas
Deleted files are not counted against your storage quota. Only files that originate with
users count against their quotas, not files shared with them that originate from other
users. (See webgui/quota to learn more about quotas.)
What Happens When Shared Files Are Deleted
Deleting files gets a little complicated when they are shared files, as this scenario
illustrates:
1. User1 shares a folder "test" with User2 and User3
2. User2 (the recipient) deletes a file/folder "sub" inside of "test"
3. The folder "sub" will be moved to the trashbin of both User1 (owner) and User2
(recipient)
4. But User3 will not have a copy of "sub" in her trash bin
When User1 deletes "sub" then it is moved to User1’s trash bin. It is deleted from
User2 and User3, but not placed in their trash bins.
When you share files, other users may copy, rename, move, and share them with other
people, just as they can for any computer files; ownCloud does not have magic powers
to prevent this.
WebUI Overview | 45How the Deleted Files app Manages Storage Space To ensure that users do not run over their storage quotas, the Deleted Files app allocates a maximum of 50% of their currently available storage quota to deleted files. If your deleted files exceed this limit, ownCloud deletes the oldest files (files with the oldest timestamps from when they were deleted) until it meets the memory usage limit again. ownCloud checks the age of deleted files every time new files are added to the deleted files. By default, deleted files stay in the trash bin for 180 days. The ownCloud server administrator can adjust this value in the config.php file by setting the trashbin_retention_obligation value. Files older than the trashbin_retention_obligation value will be deleted permanently. Additionally, ownCloud calculates the maximum available space every time a new file is added. If the deleted files exceed the new maximum allowed space ownCloud will expire old deleted files until the limit is met once again. Large File Uploads When uploading files through the web client, ownCloud is limited by PHP and Apache configurations. By default, PHP is configured for only 2 megabyte uploads. As this default upload limit is not entirely useful, we recommend that your ownCloud admin increase the ownCloud variables to sizes appropriate for users. Modifying certain ownCloud variables requires administrative access. If you require larger upload limits than have been provided by the default (or already set by your administrator): • Contact your administrator to request an increase in these variables • Refer to the section in the Admin Documentation that describes how to manage file upload size limits. Public Link Shares With ownCloud X (10.0), we introduced the ability to create multiple public links per file or folder. This offers a lot of flexibility for creating different kinds of share links for a single file or folder, such as different passwords, expiry dates, and permissions. As of ownCloud version 10.0.2 you can create Drop Folders, where users can upload files to a central location, but not be able to change any existing ones, nor see other files which already have been uploaded. Creating Public Link Shares To create a public link share, first view the Sharing Panel of the file or folder that you want to create a public link share for. Then, click the btn:[Public Links] button, and then click btn:[Create public link]. After you do, the public link share dialog will appear, which you can see below. 46 | WebUI Overview
You can also read