Avaya B179 SIP Conference Phone - Installation and Administration Guide
←
→
Page content transcription
If your browser does not render page correctly, please read the page content below
Avaya B179 SIP Conference Phone
Installation and Administration Guide

                                        16-603915 Issue 6
                                        June 2012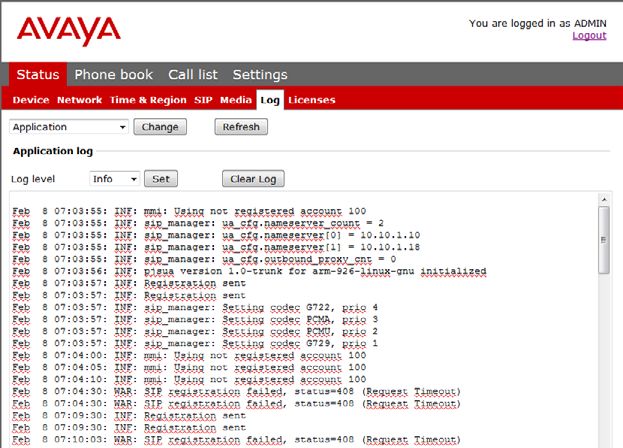
Avaya B179 SIP Conference Phone                                               Installation and Administration Guide

ABOUT THIS DOCUMENT

© 2011 Avaya Inc.
All Rights Reserved.

Notice
While reasonable efforts have been made to ensure that the information in this document is complete and
accurate at the time of printing, Avaya assumes no liability for any errors. Avaya reserves the right to make
changes and corrections to the information in this document without the obligation to notify any person or
organization of such changes.

Documentation disclaimer
Avaya shall not be responsible for any modifications, additions, or deletions to the original published version
of this documentation unless such modifications, additions, or deletions were performed by Avaya. End User
agree to indemnify and hold harmless Avaya, Avaya’s agents, servants and employees against all claims,
lawsuits, demands and judgments arising out of, or in connection with, subsequent modifications, additions or
deletions to this documentation, to the extent made by End User.

Link disclaimer
Avaya is not responsible for the contents or reliability of any linked Web sites referenced within this site or
documentation(s) provided by Avaya. Avaya is not responsible for the accuracy of any information, statement
or content provided on these sites and does not necessarily endorse the products, services, or information
described or offered within them. Avaya does not guarantee that these links will work all the time and has no
control over the availability of the linked pages.

Warranty
Avaya provides a limited warranty on this product. Refer to your sales agreement to establish the terms of the
limited warranty. In addition, Avaya’s standard warranty language, as well as information regarding support for
this product, while under warranty, is available to Avaya customers and other parties through the Avaya Support
Web site: http:/www.avaya.com/support. Please note that if you acquired the product from an authorized Avaya
reseller outside of the United States and Canada, the warranty is provided to you by said Avaya reseller and not
by Avaya.

Licenses
THE SOFTWARE LICENSE TERMS AVAILABLE ON THE AVAYA WEBSITE, HTTP://SUPPORT.AVAYA.COM/
LICENSEINFO/ ARE APPLICABLE TO ANYONE WHO DOWNLOADS, USES AND/OR INSTALLS AVAYA
SOFTWARE, PURCHASED FROM AVAYA INC., ANY AVAYA AFFILIATE, OR AN AUTHORIZED AVAYA RESELLER
(AS APPLICABLE) UNDER A COMMERCIAL AGREEMENT WITH AVAYA OR AN AUTHORIZED AVAYA
RESELLER. UNLESS OTHERWISE AGREED TO BY AVAYA IN WRITING, AVAYA DOES NOT EXTEND THIS
LICENSE IF THE SOFTWARE WAS OBTAINED FROM ANYONE OTHER THAN AVAYA, AN AVAYA AFFILIATE OR
AN AVAYA AUTHORIZED RESELLER, AND AVAYA RESERVES THE RIGHT TO TAKE LEGAL ACTION AGAINST
YOU AND ANYONE ELSE USING OR SELLING THE SOFTWARE WITHOUT A LICENSE. BY INSTALLING,
DOWNLOADING OR USING THE SOFTWARE, OR AUTHORIZING OTHERS TO DO SO, YOU, ON BEHALF
OF YOURSELF AND THE ENTITY FOR WHOM YOU ARE INSTALLING, DOWNLOADING OR USING THE
SOFTWARE (HEREINAFTER REFERRED TO INTERCHANGEABLY AS “YOU” AND “END USER”), AGREE TO
THESE TERMS AND CONDITIONS AND CREATE A BINDING CONTRACT BETWEEN YOU AND AVAYA INC. OR
THE APPLICABLE AVAYA AFFILIATE (“AVAYA”).
Avaya grants End User a license within the scope of the license types described below. The applicable number
of licenses and units of capacity for which the license is granted will be one (1), unless a different number
of licenses or units of capacity is specified in the Documentation or other materials available to End User.
“Designated Processor” means a single stand-alone computing device. “Server” means a Designated Processor
that hosts a software application to be accessed by multiple users. “Software” means the computer programs
in object code, originally licensed by Avaya and ultimately utilized by End User, whether as stand-alone
products or pre-installed on Hardware. “Hardware” means the standard hardware originally sold by Avaya and
ultimately utilized by End User.

License types
Concurrent User License (CU). End User may install and use the Software on multiple Designated Processors
or one or more Servers, so long as only the licensed number of Units are accessing and using the Software at

                                                         2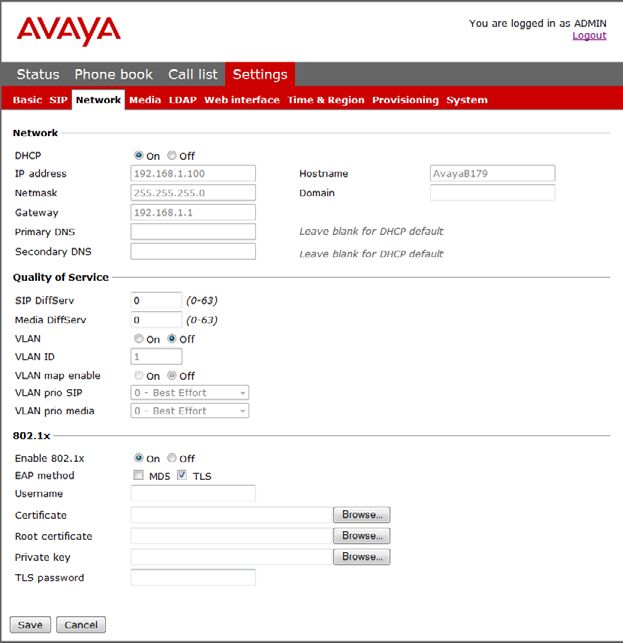
Avaya B179 SIP Conference Phone                                                Installation and Administration Guide

ABOUT THIS DOCUMENT

any given time. A “Unit” means the unit on which Avaya, at its sole discretion, bases the pricing of its licenses
and can be, without limitation, an agent, port or user, an e-mail or voice mail account in the name of a person
or corporate function (e.g., webmaster or helpdesk), or a directory entry in the administrative database utilized
by the Software that permits one user to interface with the Software. Units may be linked to a specific, identi-
fied Server. CPU License (CP). End User may install and use each copy of the Software on a number of Servers
up to the number indicated by Avaya provided that the performance capacity of the Server(s) does not exceed
the performance capacity specified for the Software. End User may not re-install or operate the Software on
Server(s) with a larger performance capacity without Avaya’s prior consent and payment of an upgrade fee

Copyright
Except where expressly stated otherwise, no use should be made of materials on this site, the Documentation(s)
and Product(s) provided by Avaya. All content on this site, the documentation(s) and the product(s) provided by
Avaya including the selection, arrangement and design of the content is owned either by Avaya or its licensors
and is protected by copyright and other intellectual property laws including the sui generis rights relating to the
protection of databases. You may not modify, copy, reproduce, republish, upload, post, transmit or distribute in
any way any content, in whole or in part, including any code and software. Unauthorized reproduction, trans-
mission, dissemination, storage, and or use without the express written consent of Avaya can be a criminal, as
well as a civil, offense under the applicable law.

Third-party components
Certain software programs or portions thereof included in the Product may contain software distributed under
third party agreements (“Third Party Components”), which may contain terms that expand or limit rights to use
certain portions of the Product (“Third Party Terms”). Information regarding distributed Linux OS source code
(for those Products that have distributed the Linux OS source code), and identifying the copyright holders of
the Third Party Components and the Third Party Terms that apply to them is available on the Avaya Support
Web site: http://www.avaya.com/support/Copyright/.

Preventing toll fraud
“Toll fraud” is the unauthorized use of your telecommunications system by an unauthorized party (for example,
a person who is not a corporate employee, agent, subcontractor, or is not working on your company’s behalf).
Be aware that there can be a risk of toll fraud associated with your system and that, if toll fraud occurs, it can
result in substantial additional charges for your telecommunications services.

Avaya fraud intervention
If you suspect that you are being victimized by toll fraud and you need technical assistance or support, call
Technical Service Center Toll Fraud Intervention Hotline at +1-800-643-2353 for the United States and
Canada. For additional support telephone numbers, see the Avaya Support Web site: http://www.avaya.com/
support/. Suspected security vulnerabilities with Avaya products should be reported to Avaya by sending mail
to: securityalerts@avaya.com.

Trademarks
The trademarks, logos and service marks (“Marks”) displayed in this site, the documentation(s) and product(s)
provided by Avaya are the parties. Users are not permitted to use such Marks without prior written consent
from Avaya or such third party which may own the Mark. Nothing contained in this site, the documentation(s)
and product(s) should be construed as granting, by implication, estoppel, or otherwise, any license or right
in and to the Marks without the express written permission of Avaya or the applicable third party. Avaya is a
registered trademark of Avaya Inc. All other trademarks are the property of their respective owners.

Downloading documents
For the most current versions of documentation, see the Avaya Support Web site: http://www.avaya.com/
support

Contact Avaya Support
Avaya provides a telephone number for you to use to report problems or to ask questions about your product.
The support telephone number is 1-800-242-2121 in the United States. For additional support telephone
numbers, see the Avaya Web site: http://www.avaya.com/support

                                                         3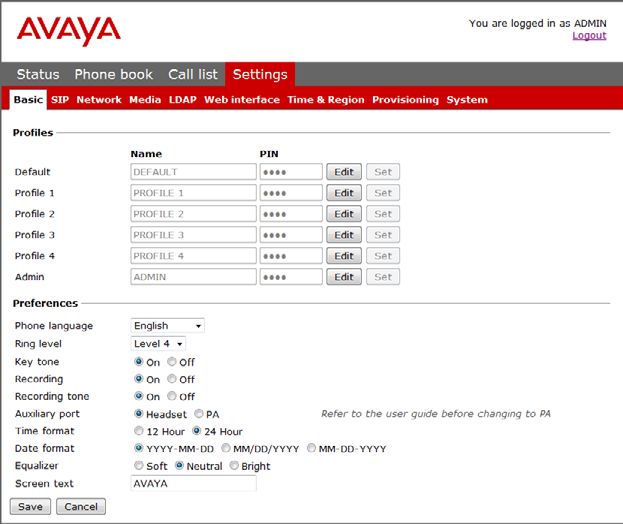
Avaya B179 SIP Conference Phone                             Installation and Administration Guide

ABOUT THIS DOCUMENT

This document only includes setup, registration of accounts and configuration. The use
of the conference phone is described in the Avaya B179 SIP Conference Phone - Quick
Reference Guide (16-603916) and the Avaya B179 SIP Conference Phone - User Guide
(16-603918). The latest version of all documentation can be downloaded from support.
avaya.com.
Please note that there are also supporting Application Notes describing the steps to
configure the Avaya B179 SIP Conference Phone to work with certain systems and also
how to configure the systems (eg. administer SIP extensions).

                                            4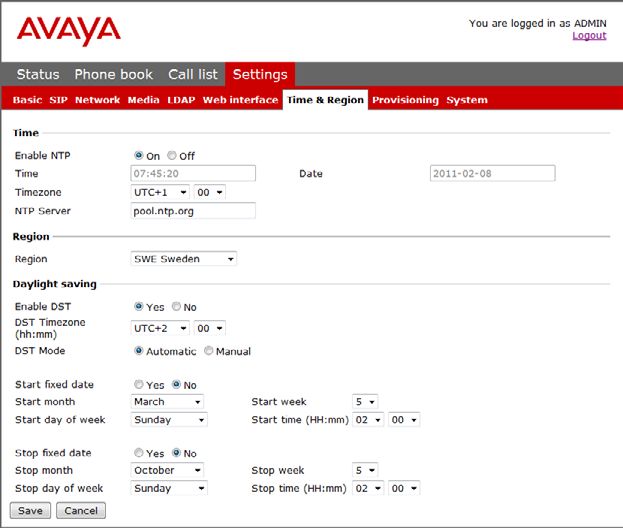
Avaya B179 SIP Conference Phone                                                         Installation and Administration Guide

CONTENT

Description                                                                       2
Display information and web interface                                             3
Display screen.................................................................3
Navigation and selection in menus....................................4
Using the web interface....................................................6
Installation                                                                      7
Connecting.....................................................................7
Obtaining a network address ............................................8
Login..............................................................................8
Software upgrade and basic settings.................................9
Registering an account...................................................12
Settings                                                                        14
Login............................................................................14
Basic............................................................................14
SIP............................................................................... 17
Network........................................................................23
Media...........................................................................26
LDAP...........................................................................29
Web interface................................................................31
Time & Region..............................................................32
Provisioning..................................................................33
System.........................................................................34
Headset and PA installation and settings                                        35
Connecting a wireless headset........................................35
Connecting a PA interface box........................................36
PA settings...................................................................37
Hard system recovery                                                            39
Provisioning – upgrade and configuration                                        40
Firmware upgrade on a single phone................................40
Using a configuration file................................................42
Using a device management server..................................48
Upgrading in IP Office...................................................52
How to do a downgrade .................................................52
Managing phone book and conf. guide                                             53
Importing and exporting contacts....................................53
Importing and exporting conference groups......................54
Checking status and logs                                                        55
Device..........................................................................55
Network........................................................................55
Time & Region..............................................................56
SIP...............................................................................56
Media...........................................................................57
Log..............................................................................58
Technical data                                                                  60

                                                                   1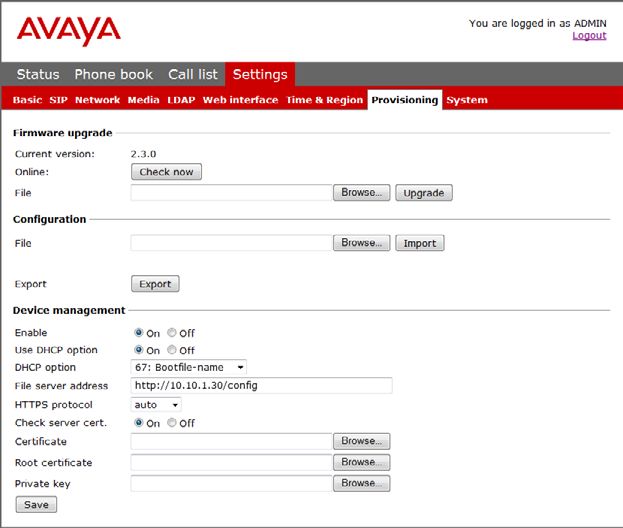
Avaya B179 SIP Conference Phone Installation and Administration Guide
DESCRIPTION
Speaker Microphone Display screen Keypad LEDs
Flashing blue Incoming call
Steady blue light Call in progress
Flashing red On hold,
microphone and
speakers turned off
Steady red light Mute,
microphone turned
off
Network cable port
SD memory card port
Expansion
microphone
port
AUX port
Maintenance Security lock port
Clean the equipment with
a soft, dry cloth. Never use
liquids.
Power supply port
Expansion microphone port
UP ARROW Menu DOWN ARROW
Navigation in menus Settings Navigation in menus
Display of call list Display of call list
Cancel OK
No/end/back Yes/confirm choice
Start/stop Answer/connect new line
recording
During a call: Press to call
Increase volume a new person
Hang up/end line
Decrease volume
Conference
Automatic dialling of
Mute conference groups
(See note on page 54)
One press of this button
will always connect all par-
Alphanumerical buttons ties to a conference call
Hold
Hold down a button for 2 seconds
to open the phonebook Line selection
Some Avaya B179 have a different keypad with other symbols. This does not affect the functions of the buttons.
2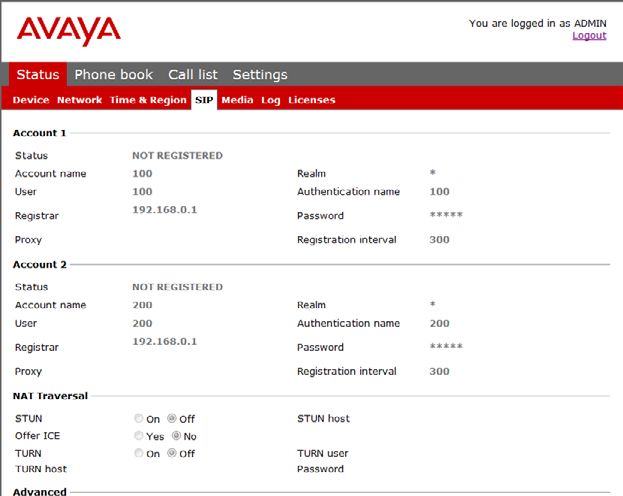
Avaya B179 SIP Conference Phone                                                      Installation and Administration Guide

DISPLAY INFORMATION AND WEB INTERFACE

DISPLAY SCREEN
On Hook
Press          to display this screen.
                                                  Date
                                                  Time
                                                  Display text (can be changed)
                                                         Registered
                                                         Not registered
                                                  Account name (can be changed)

Off Hook
Press          to display this screen.

                                                  Information text (see below)
                                                  Phone lines (L1–L4)
                                                  Line status (see below)
                                                  Call duration
                                                  Secure connection (see page 20)

Line status:
      Line free (Before account name – telephone not registered)
      Line connected (Before account name – telephone registered)
      Line on hold (“HOLD” displayed on the screen – all calls on hold)
      Line (called party) busy
      Own line put on hold by other party
      Recording call
      Secure connection

Information text displays one of the following:
•     Number or name of each phone line
      (The name will be displayed if a number is in the phone book)
•     Explanation of what you should do (For example ENTER NUMBER)
•     Status (For example        when you place all calls on hold)

Line menu
Press          to switch to and from this menu.

                                              Line/number/name
                                              New line
                                              Option for creating or splitting conference calls

                                                                  3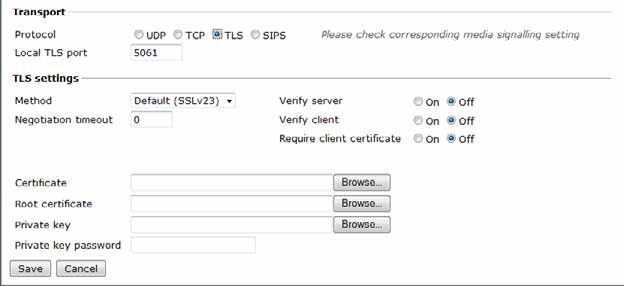
Avaya B179 SIP Conference Phone Installation and Administration Guide
DISPLAY INFORMATION AND WEB INTERFACE
Menu
Press to switch to and from a menu.
Current menu
Submenu
Marked option – open by pressing OK button
Scrolling list
(indication of where the marked option is in the list or menu)
List of setting options:
Existing settings
Marked option – select by pressing OK button
List of names:
Marked name – select by pressing OK button
NAVIGATION AND SELECTION IN MENUS
Press .
Select the option you want from the menu using the arrow buttons.
Confirm by pressing OK to select the marked option.
Cancel the setting or go back one level in the menu by pressing .
Quit the menu by pressing again.
Note that after you have made changes to a setting, you must press OK to activate the
setting.
It is possible to open a menu option directly by pressing the number button that cor-
responds to the position of the option in the menu (e.g. 2 to open PHONE BOOK and
then 3 to select EDIT CONTACT).
Writing style in instructions
In the instructions, > SETTINGS (6) means you should:
Press .
Mark the SETTINGS option using the arrow buttons and confirm by pressing OK to
open the menu (or press button number 6).
Correspondingly, Phone book > Conference Guide in the web interface means you should
select Menu Phone book and the Conference Guide tab.
4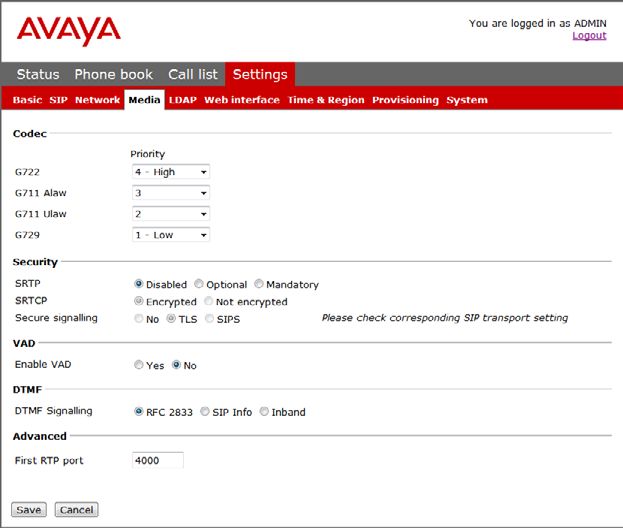
Avaya B179 SIP Conference Phone                                                                             Installation and Administration Guide

DISPLAY INFORMATION AND WEB INTERFACE

Menu tree
      1                    2                  3                   4                   5                    6              7             8
   PROFILES           PHONE BOOK    EXT. PHONE BOOK       CONF GUIDE             RECORDING              SETTINGS        SYSTEM        STATUS

    DEFAULT              SEARCH                                SEARCH             PLAYBACK                BASIC         RESTART       ACCOUNTS
                         CONTACT                               GROUP                FILE

    PROFILE 1              ADD                                  ADD                RENAME               ADVANCED        REBOOT        NETWORK
                         CONTACT                               GROUP                 FILE

    PROFILE 2              EDIT                                 EDIT                 ERASE                              FACTORY         NAT
                         CONTACT                               GROUP                  FILE                BASIC          RESET       TRAVERSAL
                                                                                                        SETTINGS
    PROFILE 3             ERASE                                ERASE                 ERASE                                             MEDIA
                         CONTACT                               GROUP                  ALL               LANGUAGE
    PROFILE 4            ERASE                                 ERASE              SETTINGS                                              TIME
                          ALL                                   ALL                                     KEY TONE
                         STATUS                                STATUS              STATUS                                              DEVICE
                                                                                                        RING LEVEL

                                                                                                        EQUALIZER

                                                                                                        AUX PORT

                                                                                                           PA

                                                                                                          TIME
                                                                                                         FORMAT

                                                                                                          DATE
                                                                                                         FORMAT

                                                                                                         SCREEN
                                                                                                          TEXT

                                                                                                         DEFAULT

Menu tree, advanced settings
The advanced settings are protected by administrator’s PIN code. The default value is 1234.

   SETTINGS

     BASIC

   ADVANCED     PIN

                  ACCOUNTS         NETWORK           NAT                 MEDIA               TIME              REGION       WEB
                                                  TRAVERSAL                                                              INTERFACE

                      ACCOUNT 1        IP               STUN              CODEC                NTP

                      ACCOUNT 2     ETHERNET          OFFER ICE            VAD            TIME DATE

                      TRANSPORT                                            DTMF           TIME ZONE
                                      VLAN                              SIGNALLING

                                                                        SECURITY             DAYLIGHT
                                     802.1X                                                   SAVING
                                      AUTH

                                                                          SRTP               G722

                                   ENABLE/
                                   DISABLE                              SIGNALLING           PCMA
                                   ACCOUNT

                                     EDIT                                                    PCMU
                                   ACCOUNT

                                                                                             G729

    The simplest way to make settings and edit contacts is using a PC and the Avaya
    B179 web interface.

                                                                            5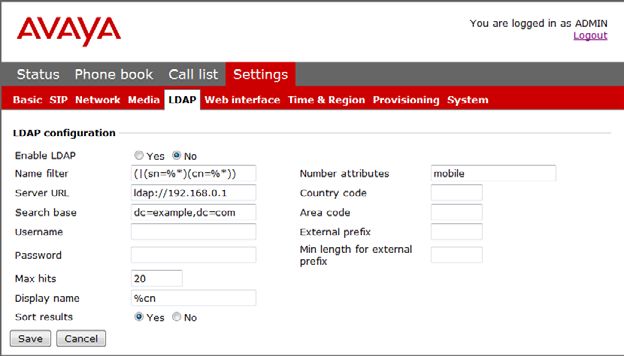
Avaya B179 SIP Conference Phone Installation and Administration Guide
DISPLAY INFORMATION AND WEB INTERFACE
USING THE WEB INTERFACE
You can use the web browser of a PC connected to the same network to manage contacts,
conference groups and settings in the Avaya B179.
For security reasons, recordings can only be managed directly on the Avaya B179. All
other settings that can be made directly on the Avaya B179 can also be made via the web
interface. It is also possible to import and export contacts and conference groups, name
user profiles and change PIN codes, which can only be done via the web interface. The
administrator can also view logs, update software and create a configuration file.
The default setting for the PIN code is 0000 for the user account (Default, Profile 1,
Profile 2, Profile 3 and Profile 4) and 1234 for the administrator’s account (Admin). We
recommend that you change the PIN codes in order to protect the settings. The code may
consist of eight digits. The administrator can always view and change the PIN codes to the
user accounts. The administrator’s PIN code can only be reset with a complete reset to
factory settings.
Checking IP address
Press and select the sub menu STATUS > NETWORK (8,2).
Check the conference phone’s network address under the heading IP ADDRESS.
Use this address to log into the web server in the conference phone.
Login
Log into the web server in Avaya B179 by entering the phone’s network address in
your computer’s web browser.
Select Admin as Profile and enter your PIN.
6 6Avaya B179 SIP Conference Phone Installation and Administration Guide
INSTALLATION
The printed Installation Guide provides brief and simplified installation instructions. The
guide includes the basic settings for a quick start and works in most cases.
CONNECTING
Connect the Avaya B179 to the network as illustrated below.
Plug the Avaya B179 into the mains using the power adapter as illustrated below.
The Avaya B179 can be driven directly from the network (Power over Ethernet,
Class III) if the network supports this.
Place the conference phone in the middle of the table.
The Avaya B179 must obtain a network address and be registered in a SIP PBX before it
can be used. The easiest way to register an account and make the settings in the Avaya
B179 is using a computer connected to the same network and via the integrated web
server.
7Avaya B179 SIP Conference Phone Installation and Administration Guide
INSTALLATION
OBTAINING A NETWORK ADDRESS
Connecting to a network with DHCP
See “Check IP address” under “USING THE WEB INTERFACE” on page 6.
Connecting to a network with static IP addresses
You need the IP address, host name, domain, netmask, gateway, DNS 1, and DNS 2. The
host name can be set freely. The domain and secondary DNS can be left blank.
Press and select SETTINGS > ADVANCED (6,2).
Enter the PIN code.
The default code is 1234.
Select NETWORK (2)
Select STATIC IP.
Enter values for the IP ADDRESS.
Enter three digits (begin with 0 if necessary), press OK, enter three digits, and so on.
Enter HOST NAME
Default is avaya.
Enter DOMAIN
Enter NETMASK
Enter GATEWAY
Enter DNS 1
Enter DNS 2
The display shows DONE.
LOGIN
See “Login” under “USING THE WEB INTERFACE” on page 6.
8Avaya B179 SIP Conference Phone Installation and Administration Guide
INSTALLATION
SOFTWARE UPGRADE AND BASIC SETTINGS
The following settings should be done during installation.
See page 48 about Device management if you are responsible for installing or upgrad-
ing many phones.
Note that all settings on the Basic tab also affect the user profile Default. Other user
profiles can be changed individually. The settings on the Basic tab, except the name and
PIN for Admin, can be modified by any user. Other settings require a login as Admin.
Upgrade software
See the heading “PROVISIONING – UPGRADE AND CONFIGURATION” on page 40 for a
detailed description and upgrading options.
Select Settings > Provisioning.
Click on Check Now.
Compare the latest version with the current version (shown on the web page).
If you want to upgrade, select the desired version in the list box and click on Upgrade.
The browser window and the display on the Avaya B179 shows that the upgrade has begun.
The download and installation can take several minutes. Do not interrupt the upgrade
and do not disconnect plugs to the Avaya B179 during the upgrade. Interrupting the
upgrade may render the conference phone inoperable.
When installation is complete, the text “Upgrade Complete. The unit will be reboot-
ed.” is shown in your browser, and after a while you hear the Avaya music signature,
which indicates that the conference phone has started.
9Avaya B179 SIP Conference Phone Installation and Administration Guide
INSTALLATION
Setting time and region
Select Settings > Time & Region.
Select the time zone and, if you wish, correction for DST (Daylight saving).
It is also possible to set the time and date manually or choose a different time server.
Select the region where you are.
This setting affects the frequency and duration of the signaling tones (ring signal, busy
tone, etc).
Save the setting.
The Avaya B179 reboots with the new settings.
10Avaya B179 SIP Conference Phone Installation and Administration Guide
INSTALLATION
Changing the language
Select Settings > Basic.
Select the desired language in the list box after Language and save the setting.
Note, this only affects the phone language, not the web interface.
Changing the PIN
We recommend that you change the PIN code for Admin from the default setting to
protect the settings. Make a note of the new PIN code and keep it in a safe place. The
administrator’s PIN code can only be reset by a full factory reset!
Select Settings > Basic and click the Edit button on the Admin line.
Enter a new PIN.
The PIN code may consist of 8 digits.
Click on the Set and Save buttons.
11Avaya B179 SIP Conference Phone Installation and Administration Guide
INSTALLATION
REGISTERING AN ACCOUNT
The conference phone supports two accounts. The second account is a fallback account
that is automatically used if the phone fail to register to the main account. Note that this
account then will be used as long as the fallback account is available. If the phone fails to
register to the fallback account, it will try to use the main account again.
To register your phone, you must have access to the account information and all neces-
sary settings that the SIP PBX requires.
See the heading “SIP” on page 17 for a detailed description of all settings.
Select Settings > SIP.
12Avaya B179 SIP Conference Phone Installation and Administration Guide
INSTALLATION
Click Yes at Enable account under Main account.
Enter the account information you have received.
Account name can be chosen freely and is the name or phone number you want to
appear in the phone display.
Leave the default values if you have no other information.
Select a method of NAT traversal if you have received this information.
Select a different transport protocol if you have received this information. See page
20 about using a secure transport protocol.
Save the settings by clicking the Save button.
The Avaya B179 responds by showing REGISTERING. If registration is successful, your selected
account name will appear at the bottom of the display screen next to a shaded square.
Make media settings
Select a different codec priority, if you do not accept the default settings. See page
26.
Select a SRTP option if you need a secure media protocol. See page 27. Note that this
also requires a corresponding transport setting on the SIP tab.
13Avaya B179 SIP Conference Phone Installation and Administration Guide
SETTINGS
Almost all settings can be done directly on the Avaya B179. See “NAVIGATION AND
SELECTION IN MENUS” on page 4 for using the menu system. We explain how to make
settings using the web interface as this is the easiest method.
For safety reasons, recordings can only be managed directly on the Avaya B179. All
other settings can be changed via the web interface. The web interface also allows you
to import and export contacts and conference groups, rename user profiles and change
PIN codes. As an administrator, you can also study logs, upgrade the software and
create an XML based configuration file for easier management of a set of phones.
LOGIN
See “USING THE WEB INTERFACE” on page 6 for a description of how to log in to the
web server in the Avaya B179.
BASIC
Select Settings > Basic.
14Avaya B179 SIP Conference Phone Installation and Administration Guide
SETTINGS
These settings affect the Admin and Default profiles. To change the basic settings of a
user profile, you need to log in with that profile.
Profiles – edit name and PIN
We recommend that you change the PIN code from the default setting to protect the
settings.
Select Settings > Basic and click the Edit button on the account you want to change.
Enter a new PIN code.
The PIN code may consist of 8 digits.
You can also choose to change the name of a user profile.
Click on the Set and Save buttons.
Make a note of the new PIN code and keep it in a safe place.
The administrator’s PIN code can only be reset with a complete reset to factory set-
tings!
Language
Select phone language using the list box and click on the Save button.
On phone: > SETTINGS > BASIC > LANGUAGE (6,1,1).
Ring level
There are six volume levels plus a silent mode. You will hear the ring tone for each level
you select. If you select silent mode, only the blue LEDs on the phone flash when an
incoming call is received.
Select level using the list box and click on the Save button.
On phone: > SETTINGS > BASIC > RING LEVEL (6,1,3).
Key tone
You can select whether or not you want a tone to be heard when you press a button.
Select On or Off and click on the Save button.
On phone: > SETTINGS > BASIC > KEY TONE (6,1,2).
Recording
It is possible to turn off the recording feature. This setting can only be done by the admin-
istrator and affects all profiles.
Select On or Off and click on the Save button.
15Avaya B179 SIP Conference Phone Installation and Administration Guide
SETTINGS
Recording tone
A short beep is heard every 20 seconds so that all the parties in the call know it is being
recorded. This feature can be turned off.
Select On or Off and click on the Save button.
On phone: > RECORDING TONE > SETTINGS (5,5).
Settings when connecting external equipment (Aux)
The Avaya B179 can be connected to a wireless headset or an external PA system. An
optional PA interface box is required for PA system connection.
Select the PA option to activate features for external microphone mixer and PA
system.
Do not select the PA option unless a PA system is connected. This option turns off the
internal microphone and internal speakers as default. The HEADSET option may be
selected whether or not a headset is connected.
Time format
Select 12 hour or 24 hour and click on the Save button.
On phone: > SETTINGS > BASIC > TIME FORMAT (6,1,7).
Date format
Select date format and click on the Save button.
On phone: > SETTINGS > BASIC > DATE FORMAT (6,1,8).
Equalizer
The sound reproduction can be adjusted to the required pitch (SOFT, NEUTRAL or
BRIGHT).
Select Soft, Neutral or Bright and click on the Save button.
On phone: > SETTINGS > BASIC > EQUALIZER (6,1,4).
Screen text
The text on the display screen is shown when the Avaya B179 is in stand-by mode (on
hook).
Enter your new text in the text box and click on the Save button.
On phone: > SETTINGS > BASIC > SCREEN TEXT (6,1,9).
16Avaya B179 SIP Conference Phone Installation and Administration Guide
SETTINGS
SIP
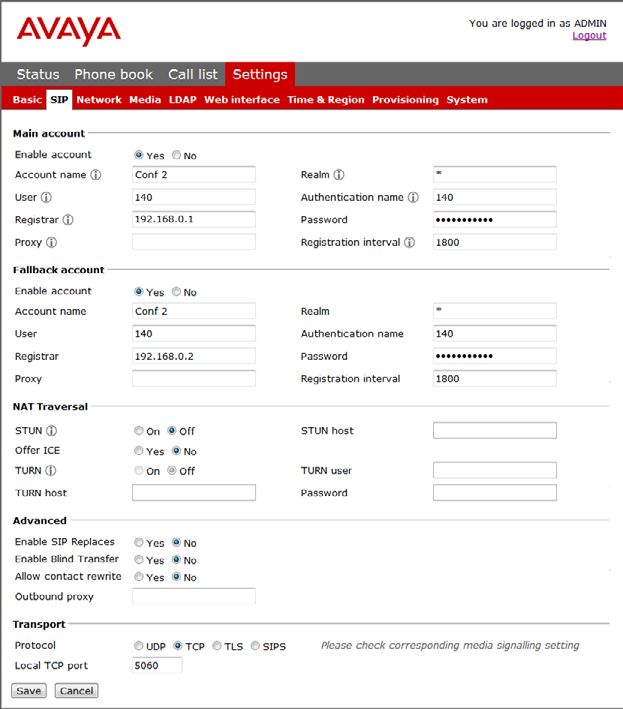
Select Settings > SIP
The conference phone supports two accounts. The second account is a fallback account
that is automatically used if the phone fail to register to the main account. Note that this
account then will be used as long as the fallback account is available. If the phone fails to
register to the fallback account, it will try to use the main account again.
Main account and Fallback account
Enable account It is possible to store account information for future use, but
temporarily disable it.
17Avaya B179 SIP Conference Phone Installation and Administration Guide
SETTINGS
Account name This is the name displayed on the screen. It can be set according
to company standards.
User The account (customer) name.
Registrar Shall contain the IP address or the public name of the SIP server
where the account is registered (e.g. 10.10.1.100 for a local SIP
server or sip.company.net for a public VoIP service provider)
Proxy Shall contain the proxy server used for Internet communication, if
any. Can be left blank.
Realm The protection domain where the SIP authentication (name and
password) is valid. This is usually the same as the registrar. If left
blank, or marked with a “*”, the phone will respond to any realm.
If specified, the phone will only respond to the specific realm when
asked for credentials.
Authentication name The name used for the Realm authentication. This may be the
same as the user name, but must be filled in.
Password The password used for the Realm authentication.
Registration Interval This is a request to the SIP server for when the registration should
expire. Avaya B179 automatically renews the registration within the
time interval if the phone is still on and connected to the server.
The default value is 1800 seconds.
On phone: > SETTINGS > ADVANCED > (PIN) > ACCOUNTS (6,2,1).
Nat traversal
NAT (Network Address Translation) is a firewall or router function that operates by rewriting
the IP addresses in the IP headers as packets pass from one interface to the other. When
a packet, for example, is sent from the inside, the source IP address and port are rewrit-
ten from the private IP address space into the address space on the outside (Internet).
NAT rewrites the addresses but leaves the packets themselves untouched. This kind of
translation works fine for many protocols, but causes a lot of trouble for SIP packets that
contain address information in their content (for example an INVITE request from one IP
address to another).
NAT traversal solves this problem, providing a “view from the outside” that makes it pos-
sible to replace the IP address in the SIP requests with the address shown on the other
side of the firewall.
Note that in some cases NAT traversal is not necessary. Some public service providers
of IP telephony keep track of the actual IP address used to register a phone, and the one
used in the SIP requests from the same phone, and then replaces the addresses in the
SIP messages.
18Avaya B179 SIP Conference Phone Installation and Administration Guide
SETTINGS
STUN STUN (Simple Traversal of UDP through NATs) is a protocol that
assists devices behind a NAT firewall or router with their packet
routing. STUN is commonly used in real-time voice, video, messag-
ing, and other interactive IP communication applications..
The protocol allows applications operating through a NAT to discov-
er the presence and specific type of NAT and obtain the mapped
(public) IP address (NAT address) and port number that the NAT
has allocated for the application’s User Datagram Protocol (UDP)
connections to remote hosts. The protocol requires assistance from
a 3rd-party network server (STUN server).
STUN should be activated if an external SIP server cannot connect
to the Avaya B179 behind a firewall NAT function and the SIP
server supports STUN. A suitable STUN server is usually provided
by the VoIP service provider.
Note: STUN might also be referred to as Session Traversal Utilities
for NAT.
STUN host The IP address or public name of the STUN server.
Offer ICE ICE (Interactive Connectivity Establishment), is a STUN addition
that provides various techniques to allow SIP-based VoIP devices to
successfully traverse the variety of firewalls that may exist between
the devices. The protocol provides a mechanism for both endpoints
to identify the most optimal path for the media traffic to follow.
TURN TURN (Traversal Using Relay NAT ) TURN is an extension of the
STUN protocol that enables NAT traversal when both endpoints are
behind symmetric NAT. With TURN, media traffic for the session
will have to go to a relay server. Since relaying is expensive, in
terms of bandwidth that must be provided by the provider, and
additional delay for the media traffic, TURN is normally used as a
last resort when endpoints cannot communicate directly.
TURN User User authentication name on the TURN server.
TURN host The IP address or public name of the TURN server.
Password User authentication password on the TURN server.
On phone: > SETTINGS > ADVANCED > (PIN) > NAT TRAVERSAL (6,2,3).
Advanced
Enable SIP Replaces Default is Yes. Setting this option to No, will instruct the PBX not
to use the SIP replace header. Some PBXes try to take over the
bridging functionality from Avaya B179 using this command, which
causes the calls to interrupt.
19Avaya B179 SIP Conference Phone Installation and Administration Guide
SETTINGS
Enable Blind Transfer Default is Yes. Setting this option to No, will disable the transfer
function ( > TRANSFER) during a call. This may be used if the
PBX does not support blind transfer.
Allow contact rewrite Default is Yes. When enabled, the B179 will store the IP address
from the response of the register request. If a change is detected,
the phone will unregister the current sip URI (contact), and update
the sip URI with the new address.
Transport
The transport setting only concerns the protocol to be used for SIP messages between the
devices involved. These settings do not include the media (the actual call). The settings
on the Media tab should be set accordingly.
Note that if you choose to use a secure connection, both units must support it. Otherwise
they cannot negotiate a connection. If an incoming call demands a secure TLS or SIPS
connection, the Avaya B179 uses the appropriate protocol even if you have set the phone
to use UDP.
Protocol UDP (User Datagram Protocol) is a protocol on the transport layer
in the Internet Protocol Suite. It is a stateless protocol for short
messages – datagrams. Stateless implies that it does not establish
any connection between sender and receiver in advance. UDP
does not guarantee reliability or ordering in the way that TCP does.
Datagrams may arrive out of order or go missing without notice.
The advantages it offers are speed and efficiency.
UDP is the default protocol for SIP.
TCP (Transmission Control Protocol) is a protocol on the transport
layer in the Internet Protocol Suite. TCP is the standard protocol
for Internet communication. TCP keeps track of all individual
packets of data, ensuring that they reach the receiver and are put
together properly. TCP is not the default protocol for SIP, because
it is slower and uses more bandwidth than UDP.
With UDP and TCP, SIP packets travel in plain text. TLS (Transport
Layer Security) is a cryptographic protocol that provides security
and data integrity for communications over TCP/IP networks. TLS
encrypts the datagrams of the transport layer protocol in use. The
secure connection may be to the end device or to the first server
(usually the SIP server where the phone is registered). There is
no guarantee that there is a secure channel to the end point, but
because the SIP server is the only part receiving the user authenti-
cation, this is still a rather secure solution.
20Avaya B179 SIP Conference Phone Installation and Administration Guide
SETTINGS
SIPS (Secure SIP) is a security measure that uses TLS to provide
an encrypted end-to-end channel for the SIP messages. To use SIPS,
however, both VoIP devices and the SIP server must support it.
Even if Transport is set to TLS or SIPS, the Avaya B179 still accepts incoming UDP or
TCP signalling.
On phone: > SETTINGS > ADVANCED > (PIN) > ACCOUNTS > TRANSPORT (6,2,1,3).
TLS Settings
If you select TLS or SIPS under the transport setting, this additional setting appears on
the page.
It may be possible to use secure communication without a certificate and make changes
to these settings. In some cases, if you choose TLS or SIPS, the SIP server requires a
certificate for user/client verification. This should be specified in the account information.
Youcan further increase security by requiring verification of the server, or the client when
the Avaya B179 acts as a server for incoming calls.
Method The TLS includes a variety of security measures. The methods are
defined in the versions of the standard (SSL, SSL v2, SSL v3, TLS
v1, TLS v2). The default method is SSLv23, which accepts both
SSL v2 and v3.
Negotiation timeout The TLS settings are negotiated during a call setup (both incoming
and outgoing). If this negotiation does not succeed within the
specified time (seconds) the negotiation is aborted. Timeout is
disabled with 0 (zero).
Verify client When set to On, the Avaya B179 will activate peer verification for
incoming secure SIP connections (TLS or SIPS).
21Avaya B179 SIP Conference Phone Installation and Administration Guide
SETTINGS
Require client certificate
When set to On, the Avaya B179 rejects incoming secure SIP
connections (TLS or SIPS) if the client does not have a valid
certificate.
Verify server When the Avaya B179 is acting as a client (outgoing connections)
using secure SIP (TLS or SIPS) it will always receive a certificate
from the peer. If Verify server is set to On, the Avaya B179 closes
the connection if the server certificate is not valid.
Certificate Here you can upload a certificate to the Avaya B179 to be used for
TLS or SIPS communication.
A certificate is a file that combines a public key with information
about the owner of the public key, all signed by a trusted third
party. If you trust the third party, then you can be sure that the
public key belongs to the person/organization named in that file.
You can also be sure that everything you decrypt with that public
key is encrypted by the person/organization named in the certifi-
cate.
Root certificate The public key in the root certificate is used to verify other certifi-
cates. A root certificate is only needed if you have selected client
or server verification.
A root certificate is signed by the same public key that is in the
certificate, a so-called “self-signed” certificate. A typical root
certificate is one received from a Certificate Authority.
Private key Here you can upload a private key to the Avaya B179 to be used for
TLS or SIPS communication.
A private key is one of the keys in a key-pair used in asymmetric
cryptography. Messages encrypted using the public key can only be
decrypted using the private key.
Private key password The password used for encryption of the private key, if it is
encrypted.
22Avaya B179 SIP Conference Phone Installation and Administration Guide
SETTINGS
NETWORK
Select Settings > Network.
DHCP Dynamic Host Configuration Protocol is used by network devices
(clients) to obtain the parameters necessary for operation in the IP
network. This protocol reduces system administration workload, al-
lowing devices to be added to the network with little or no manual
configuration.
DHCP should be set to On if no other information is given. When
set to On, all information on this page will be set automatically.
IP address IP address of the device (Avaya B179). The address is provided by
the network administrator or service provider if DHCP is not in use.
Hostname Set to avaya as default. Can be changed to suitable name.
23Avaya B179 SIP Conference Phone Installation and Administration Guide
SETTINGS
Netmask Usually set to 255.255.255.0 to limit network traffic to the
subnet.
Domain The domain where the device is located. May be left blank.
Gateway The device or server used for Internet communication.
Primary DNS The address to the primary DNS (Domain Name System) server - a
program or computer that maps a human-recognisable name to its
computer-recognisable identifier (IP address).
Secondary DNS The address of an optional secondary DNS server.
On phone: > SETTINGS > ADVANCED > (PIN) > NETWORK (6,2,2).
Quality of Service
Quality of service is used in IP networks to provide different priority to different applica-
tions, users, or to guarantee a certain level of performance to a critical data flow such as
voice or video. Differentiated Services or DiffServ is a networking architecture that speci-
fies a simple mechanism for classifying network traffic using a 6-bit field in the header of
the IP packets. VLAN (Virtual LAN) is a technology to logically divide a physical network
into several logical nets and thus to differentiate traffic.
SIP DiffServ Enter a value between 0 and 63 to prioritize the SIP messages.
Media DiffServ Enter a value between 0 and 63 to prioritize the media packets
(voice).
VLAN By enabling this option, all communication to and from Avaya B179
is done via the VLAN specified under VLAN ID. Note that this
VLAN also must be used to communicate with Avaya B179 via the
web interface.
VLAN ID The ID number to be used for the IP telephony VLAN.
VLAN map enable Enabling VLAN priority mapping from the DiffServ setting.
VLAN prio SIP Set a value between 0 and 7 to prioritize the SIP messages in the
VLAN.
VLAN prio media Set a value between 0 and 7 to prioritize the media packets in the
VLAN.
On phone: > SETTINGS > ADVANCED > (PIN) > NETWORK > ETHERNET > VLAN (6,2,2,2,1).
24Avaya B179 SIP Conference Phone Installation and Administration Guide
SETTINGS
802.1x
IEEE 802.1X is an IEEE Standard for port-based Network Access Control and is part of
the IEEE 802.1 group of networking protocols. It provides an authentication mechanism
to devices wishing to attach to a LAN or WLAN.
Enable 802.1x By enabling this option, Avaya B179 asks an authentication server
for permission when connected to the LAN.
EAP method Select which EAP (Extensible Authentication Protocol) method to
use: MD5 or TLS.
Username The device identity in the network.
MD5 password Password for the device identity when using MD5.
Certificate Here you can upload a certificate to the Avaya B179 to be used for
authentication when using TLS.
Root certificate The public key in the root certificate is used to verify other certifi-
cates when using TLS.
Private key Here you can upload a private key to the Avaya B179 to be used for
authentication when using TLS.
TLS password The password used for encryption of the private key when using
TLS.
On phone: > SETTINGS > ADVANCED > (PIN) > NETWORK > ETHERNET > 802.1X AUTH
(6,2,2,2,2).
25Avaya B179 SIP Conference Phone Installation and Administration Guide
SETTINGS
MEDIA
Select Settings > Media.
The media settings determine how audio is sent between the devices. The devices negoti-
ate via SIP before a call is connected. All devices must support the same media types,
codecs and security settings.
Codec
Codecs are used to convert an analog voice signal to a digitally encoded version and vice
versa. Codecs vary in the sound quality they deliver and the bandwidth required. The
Avaya B179 supports the most common codecs and each codec can be given a prec-
edence depending on your requirements for high quality audio or low bandwidth use.
The priority can be set to from 4 (high) to 1 (low) or 0 (disabled)
G722 G.722 is an ITU-T standard codec that provides 7 kHz wideband audio
at a data rate within 64 kbit/s. It offers greately improved speech
quality compared with older narrowband codecs such as G.711, but
requires a high quality network connection between the devices.
26Avaya B179 SIP Conference Phone Installation and Administration Guide
SETTINGS
G711 Alaw G.711 is an ITU-T standard codec that uses audio companding.
Companding algorithms reduce the dynamic range of an audio
signal. In analog systems, this can increase the signal-to-noise
ratio achieved during transmission and, in the digital domain, can
reduce the quantization error.
Two main compression algorithms are defined in the standard,
the µ-law algorithm (used in North America and Japan) and A-law
algorithm (used in Europe and the rest of the world).
G711 Ulaw See G711 µ-law above.
G729 G.729 is an ITU-T standard codec that operates at 8 kbit/s. It is
mostly used in VoIP applications with low bandwidth requirement.
On phone: > SETTINGS > ADVANCED > (PIN) > MEDIA > CODEC (6,2,4,1).
Security
The media in VoIP calls is usually sent using the RTP protocol (Real-time Transport
Protocol). RTP is a standardized packet format for delivering audio and video over the
Internet.
SRTP (Secure Real-time Transport Protocol) is an extension of RTP to provide encryption,
message authentication and integrity for the audio and video streams.
All devices must support SRTP to establish a connection. It is therefore possible to set
SRTP as disabled, optional or mandatory.
RTCP can be used to control the RTP session. When using SRTP, the same security-
related features are added to the control protocol. SRTCP (Secure Real Time Control
Protocol) can be either encrypted or not encrypted.
SRTP If set to disabled, the media is sent using RTP. Note that despite
this setting, the Avaya B179 will still use a secure channel if the
opposite device demands it.
If set to optional or mandatory, a padlock will be shown in the
bottom right-hand corner of the screen. If the other devices sup-
port SRTP, the padlock will be locked. Otherwise, an open padlock
will be displayed.
If set to mandatory, the call will not be connected if the other
devices do not support SRTP.
SRTCP Is automatically used when SRTP is enabled. Can be set to use
encryptation or not.
27Avaya B179 SIP Conference Phone Installation and Administration Guide
SETTINGS
Secure signalling The SIP messages (signalling) and the SRTP cipher key are sent
on a different channel than the media and are not affected by the
RTP/SRTP setting. To ensure a secure connection, the signalling
must be secured using TLS or SIPS, see page 20. Note that the
SIP transport setting must be set accordingly.
On phone: > SETTINGS > ADVANCED > (PIN) > MEDIA > SECURITY (6,2,4,4).
VAD
Voice Activity Detection (speech detection) is a technique used in speech processing to
detect the presence or absence of human speech in regions of audio. In VoIP applications,
VAD is mainly used to avoid unnecessary coding and transmission of silence packets,
saving on computation and network bandwidth.
On phone: > SETTINGS > ADVANCED > (PIN) > MEDIA > VAD (6,2,4,2).
DTMF
DTMF (Dual-tone multi-frequency) signalling is used for telephone signalling over the line
to the phone switch or PBX.
If the device itself generates the tones and they are sent in the voice-frequency band, the
method is called Inband. This is not the best method when using VoIP. Low bit rate co-
decs may corrupt the signalling tones and make it difficult for the switch to identify them.
RFC 2833 is a method of carrying DTMF signals in RTP packets using a separate RTP
payload format. With this method a PSTN gateway reproduces the DTMF tones sent from
the end device.
With SIP Info the DTMF signals are sent as SIP requests. The SIP switch creates the
tones if the call is transferred to the PSTN.
Use RFC 2833 or SIP Info as preferred methods. Switch to inband only if you encounter
problems using DTMF signalling with your PBX/SIP switch.
On phone: > SETTINGS > ADVANCED > (PIN) > MEDIA > DTMF SIGNALLING (6,2,4,3).
Advanced
First RTP port If the RTP packets must be directed to a specific port series, the
first port number is set here.
28Avaya B179 SIP Conference Phone Installation and Administration Guide
SETTINGS
LDAP
Select Settings > LDAP.
Avaya B179 has support for an external phone book, which means it can communicate
with a directory server using LDAP (Lightweight Directory Access Protocol). The built in
search function dynamically filters the content from the LDAP database, based on the
search characters the user enter.
To make the LDAP phone book available, the administrator has to activate and configure
the LDAP feature.
Enable LDAP The LDAP feature is disabled by default because it has to be
configured.
Name filter Defines how the entered search characters are used. The filter is
designed conforming to the string representation of LDAP search
filters described in RFC2254. The character % in the filter string
will be replaced with the search character entered by the user.
Example:
(|(sn=%*)(cn=%*)) - All entries with the search characters in the
beginning of the sn OR cn attribute are presented to the user.
Server URL The IP address of the LDAP server host. Supports ldap and ldaps.
Search base The DN (distinguished name) of the search base
Example:
dc=domain, dc=com.
Username Leave this field blank if the LDAP server does not require a username.
29Avaya B179 SIP Conference Phone Installation and Administration Guide
SETTINGS
Password Leave this field blank if the LDAP server does not require username
and password.
Max hits The maximum number of hits to return for each LDAP search.
Display name Specifies how the search hits shall be presented on the display in
Avaya B179.
Example:
%cn - shows the cn attribute.
%givenName %sn - shows the givenName attribute and the sn
attribute with a space in between.
Sort results Sorts the search hits based on the Display name.
Number attributes Here you define the attributes that shall be displayed for a selected
search hit.
Example:
mobile telephoneNumber - shows the mobile phone number and
office phone number on separate rows for the selected Display
name. (Refer to the LDAP administrator for the actual names of the
fields in the LDAP database.)
Country code By entering the country code where the phone is located, the coun-
try code in any phone number attribute is ignored, if it is identical.
Area code By entering the area code where the phone is located, the area
code in any phone number attribute is ignored, if it is identical.
External prefix If a special prefix is needed to dial external numbers, it should
be added here. Use this if you for example need to dial 0 to get a
dialing tone.
Min length for external prefix
Restricts the external prefix to be added only if the phone number
is longer than the min length. This makes it possible to use short
internal numbers.
Exact length for no external prefix
The external prefix in not added if the phone number has exactly
the entered length.
Number prefix for no external prefix
All numbers that starts with this number will not have the external
prefix added. Useful if you know that all internal numbers start
with a certain number.
30Avaya B179 SIP Conference Phone Installation and Administration Guide
SETTINGS
WEB INTERFACE
Select Settings > Web interface.
The web server in the Avaya B179 supports secure connections using HTTPS.
Enable HTTPS Set Enable HTTPS to On if you need a secure communication
between the PC used for setup and the phone.
Certificate To use HTTPS you need to upload a certificate to the phone.
On phone: > SETTINGS > ADVANCED > (PIN) > WEB INTERFACE (6,2,7).
31Avaya B179 SIP Conference Phone Installation and Administration Guide
SETTINGS
TIME & REGION
Select Settings > Time & Region.
Time
Enable NTP NTP (Network Time Protocol) is a protocol for distributing the
Coordinated Universal Time (UTC) by means of synchronizing the
clocks of computer systems over packet-switched, variable-latency
data networks.
Time This field shows the actual time if NTP is enabled. Otherwise enter
the correct time (hh:mm:ss) and save the setting.
Date This field shows the actual date if NTP is enabled. Otherwise enter
the correct date (yyyy-mm-dd) and save the setting.
Timezone Select the UTC time zone in your country.
32Avaya B179 SIP Conference Phone Installation and Administration Guide
SETTINGS
Daylight saving Select the Yes radio button if DST (Daylight Saving Time or
Summer Time) is currently used in your country. Note that this
setting only adjusts the time by one hour and does not change the
time automatically when the DST starts and ends.
NTP Server The NTP pool is a dynamic collection of networked computers that
volunteer to provide highly accurate time via NTP to clients world-
wide. These computers are part of the pool.ntp.org domain and
part of several subdomains divided by geographical zones. They are
distributed to NTP clients via round robin DNS.
On phone: > SETTINGS > ADVANCED > (PIN) > TIME (6,2,5).
Region
Select the region where you are. This setting determines the signalling (disconnect tone,
busy tone, etc).
On phone: > SETTINGS > ADVANCED > (PIN) > REGION (6,2,6).
Daylight saving
Enable DST Select the Yes radio button if DST (Daylight Saving Time or
Summer Time) is used in your country.
DST Timezone Select the offset from UTC time when daylight saving is in use.
DST Mode When set to Automatic, OmniTouch 4135 IP uses dates stored
in the phone to adjust for DST. When set to Manual, you need to
manually set the offset two times a year.
Start/Stop fixed date Set to Yes if DST changes the same date every year in your coun-
try. Then select the time and date it changes.
Set to No if DST changes a specific week and day each eyar. (For
instance third sunday in March.) Then select the month, week and
time it changes.
PROVISIONING
See “PROVISIONING – UPGRADE AND CONFIGURATION” on page 40.
33Avaya B179 SIP Conference Phone Installation and Administration Guide
SETTINGS
SYSTEM
Select Settings > System.
Application restart
The Restart button restarts the phone application. This takes less than 30 seconds.
On phone: > SYSTEM > RESTART (7,1).
System reboot
The Reboot button reboots the conference phone. The starting procedure may take about
two minutes.
On phone: > SYSTEM > REBOOT (7,2).
Factory reset
The Reset button resets the Avaya B179 to factory default settings. All personal settings,
including account information, are erased.
On phone: > SYSTEM > FACTORY RESET (7,3).
Hard reset to factory settings
See page 39 about resetting the phone if you have forgotten the Admin PIN code.
34Avaya B179 SIP Conference Phone Installation and Administration Guide
HEADSET AND PA INSTALLATION AND SETTINGS
CONNECTING A WIRELESS HEADSET
Connect the headset to the Aux port on Avaya B179.
The microphones from the Avaya B179 and the wireless headset will work simultaneously
and transmit the call to other participants in the phone conference.
Please refer to the headset manual for further information.
Turning off the internal speakers when using a headset
The internal speakers can be turned off temporarily if you wish to use the Avaya B179 as
a personal telephone with a headset.
During a call, select > HEADSET.
Select YES when asked “SPEAKER OFF?”.
The speakers come on automatically when the call is ended.
35Avaya B179 SIP Conference Phone Installation and Administration Guide
HEADSET AND PA INSTALLATION AND SETTINGS
CONNECTING A PA INTERFACE BOX
The Avaya B179 can be connected to an external PA system using a PA interface box.
2.5 m connection cable To mixer/microphone To amplifier/speakers
PA interface box
AUX port
Always disconnect the power supply from the
electrical outlet before disconnecting or connec-
ting equipment to the Avaya B179.
Connect the PA-box to the AUX port on Avaya B179 with the included cable.
Connect the external amplifier to the RCA connector marked with a speaker.
Connect the microphone mixer to the RCA connector marked with a microphone.
Changing the auxilary port setting
Select Settings > Basic.
Select PA under the heading Auxilary port to aktivate the functions for external micro-
phones and speaker system.
Click on Save.
Do not select the PA option unless a PA system is connected. This option turns off the
internal microphone and internal speakers as default.
On phone: > SETTINGS > BASIC > AUX PORT (6,1,5).
36You can also read