CYLANCEOPTICS ADMINISTRATOR GUIDE - BLACKBERRY DOCS
←
→
Page content transcription
If your browser does not render page correctly, please read the page content below
CylanceOPTICS™
Administrator Guide

Product: CylanceOPTICS (used with CylancePROTECT)          Global Headquarters
Document: CylanceOPTICS Administrator Guide. This          400 Irvine Spectrum Drive, Irvine, CA 92618
guide is a succinct resource for analysts,
administrators, and customers who are reviewing or         Professional Services Hotline
evaluating the product.
                                                           +1-877-97DEFEND • +1-877-973-3336
Document Release Date: v2.5 rev1, June 2020
                                                           Corporate Contact
About BlackBerry Cylance®: BlackBerry Cylance
                                                           +1-914-CYLANCE • +1-914-295-2623
develops artificial intelligence to deliver prevention-
first, predictive security products and smart, simple,     Email
secure solutions that change how organizations
                                                           sales@cylance.com
approach endpoint security. BlackBerry Cylance
provides full-spectrum predictive threat prevention and    Website
visibility across the enterprise to combat the most
                                                           https://www.cylance.com
notorious and advanced cybersecurity attacks, fortifying
endpoints to promote security hygiene in the security      To Open a Support Ticket
operations center, throughout global networks, and
even on employees’ home networks. With AI-based            https://support.cylance.com — Click on Submit
malware prevention, threat hunting, automated              a Ticket
detection and response, and expert security services,      To View Knowledge Base and
BlackBerry Cylance protects the endpoint without
                                                           Announcements
increasing staff workload or costs.
                                                           Login to https://support.cylance.com
Copyright: © 2020 BlackBerry Cylance Inc. All Rights
Reserved.                                                  To Request a Callback from BlackBerry
                                                           Cylance Support
                                                           +1-866-699-9689

.
TABLE OF CONTENTS
Contents

  Table of Contents                                                                    3
  Overview                                                                             8
   How It Works                                                                        8
   Technology Overview                                                                 9
   Architecture Overview                                                               9

  System Requirements                                                                 10
   CylanceOPTICS Version                                                              10
   CylancePROTECT Version                                                             10
   Operating Systems                                                                  10
      Windows Desktop                                                                 10
      Windows Server                                                                  11
      macOS                                                                           12
   CPU                                                                                12
   Memory                                                                             12
   Available Disk Space                                                               12
   Browsers Supported                                                                 13
   Additional Requirements                                                            13
   Network                                                                            13
   Firewall                                                                           14
   Proxy                                                                              14
   Access the Registry                                                                15
   Disable Proxy Bypass                                                               15

   Windows API and Signed Files                                                       16

  Installation and Upgrade                                                            17
   Download Install File                                                              17
   Windows Installation                                                               17
   Directory Locations (default)                                                      17
   Windows Services                                                                   18
   Windows Command Line Options                                                       18
   macOS Installation                                                                 19
   Directory Locations (default)                                                      19
   macOS Command Line Options                                                         19
   macOS Secure Kernel Extension Loading                                              20

                                   CylanceOPTICS Administrator Guide, v2.5 rev1, June 2020 | 4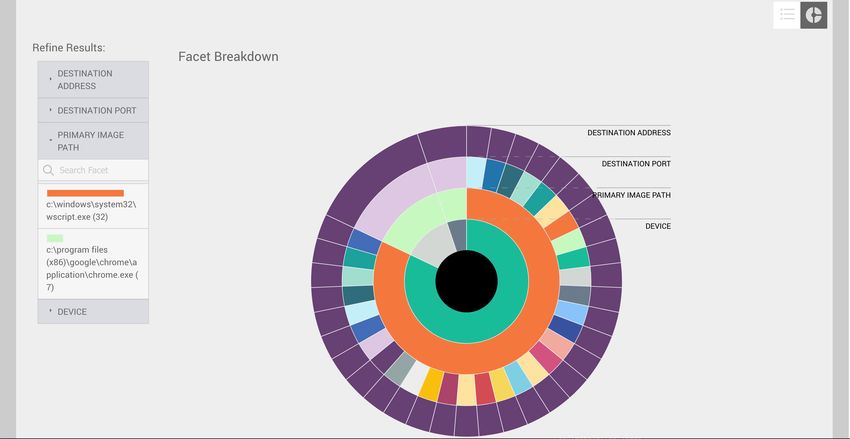
Upgrading to v2.5                                                                     21
 Uninstalling CylanceOPTICS                                                            22
 Uninstall - Windows                                                                   22
    To Uninstall CylanceOPTICS Using Add/Remove Programs                               22
    To Uninstall CylanceOPTICS from the Command Line for Non-Interactive Uninstallation 23
 Uninstall - macOS                                                                     24

Using CylanceOPTICS                                                                    25
 Edit a Policy                                                                         25
    Configurable Sensor Descriptions                                                   26
    Things to Know about the CylanceOPTICS Policy                                      26
 Device Drawer                                                                         27
 Package Playbook                                                                      27
    About Package Playbooks                                                            28
    Create a Package Playbook                                                          28
    Clone a Package Playbook                                                           29
    Associate a Package Playbook with a Detection Rule                                 29
    Package Playbook Execution Confirmation                                            30
    Package Playbook Endpoint Behavior                                                 31
 InstaQuery                                                                            31
 Start an InstaQuery                                                                   32
 View InstaQuery Results and Previous Queries                                          33
 Descriptions                                                                          34
 InstaQuery Results Summary                                                            34
 InstaQuery Results - Artifact Type: DNS                                               34

 InstaQuery Results - Artifact Type: File                                              35
 InstaQuery Results - Artifact Type: Powershell Trace                                  35
 InstaQuery Results - Artifact Type: Process                                           36
 InstaQuery Results - Artifact Type: Network Connection                                36
 InstaQuery Results - Artifact Type: Registry                                          37
 InstaQuery Results - Artifact Type: Windows Events                                    37
 InstaQuery Results - Artifact Type: WMI                                               37
 Global Quarantine                                                                     38
 Download File                                                                         39
 InstaQuery Facet Breakdown                                                            40

                                   CylanceOPTICS Administrator Guide, v2.5 rev1, June 2020 | 5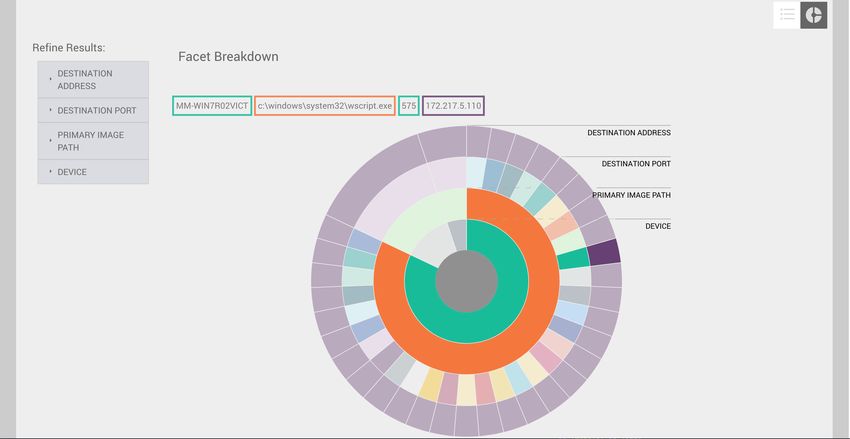
Lockdown an Endpoint                                                                      43
About Lockdown                                                                            43
Lockdown an Endpoint                                                                      43
Unlock an Endpoint                                                                        45
Show Download History                                                                     46
View Focus Data                                                                           46
About Focus Data                                                                          46
Threats and Activities                                                                    47

Export Historical List View                                                               48
Pivot Queries                                                                             48
Detections                                                                                49
Detection Environment Overview                                                            50
First Time Using Detection Rule Sets                                                      50
Detection Rule Sets                                                                       51
Apply a Detection Rule Set To a Policy                                                    51
Descriptions for Detection Rule Set Options                                               52
Detection Tab                                                                             52
Detection Event Status                                                                    52
Delete Detection Events                                                                   53
Detection Details Page                                                                    53
View Artifacts of Interest                                                                53
Create a Detection Note                                                                   54
Lockdown a Device                                                                         54
Export Details to JSON                                                                    55

False Positive Detections                                                                 55
Changing the Status on the Detections Page                                                55
Changing the Status on the Detection Details Page                                         56
Detection Exceptions                                                                      57
Create a Detection Exception from the Detection Details Page                              57
Create a Detection Exception from the Detection Exceptions Page                           59
Add Exception to Detection Rule Set                                                       59
Custom Rules                                                                              60
View Detection Rules                                                                      60
   To view a list of Detection Rules                                                      60

                                       CylanceOPTICS Administrator Guide, v2.5 rev1, June 2020 | 6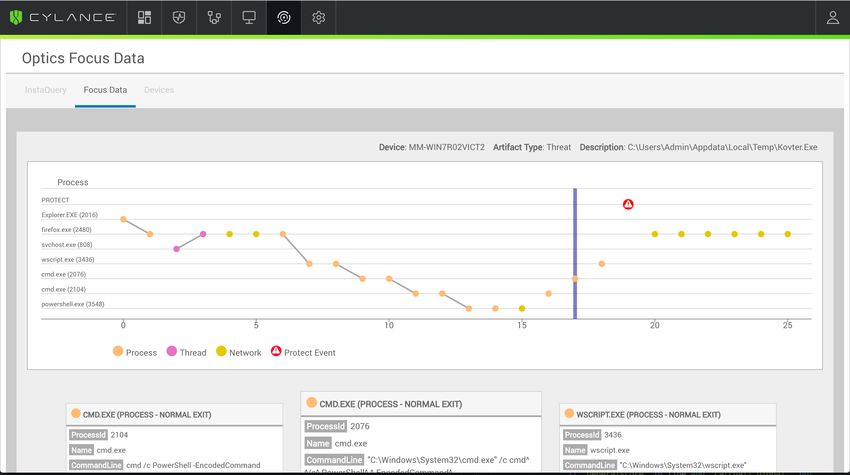
Edit, Clone, Export, and Delete Custom Rules                                        60
 Custom Rule Editor                                                                  61
 Exclusion Rules and Performance Tuning                                              62
 Detection Rule Set Best Practices                                                   63
 Remote Response                                                                     63
    Why Remote Response is not available for a device:                               64
    Initiating a Remote Response Session                                             64
    Remote Response Terminal                                                         65

    Reserved Commands                                                                65
    Audit Logs                                                                       66
    Examples for Remote Response                                                     66

Context Analysis Engine                                                              68
 Context Analysis Engine Custom Rule Builder                                         68
    States                                                                           70
    Function                                                                         70
    Field Operators                                                                  71
    Operands (Facet Value Extractors)                                                75
    Path Value Extractors                                                            78
    Actions                                                                          78
    Paths                                                                            82
    Filters                                                                          83

Appendix                                                                             85
 List of Responses                                                                   85
 Configurable Sensors                                                                86

    Things to Know Before Enabling Sensors                                           86
    Enhanced Introspection Sensors                                                   86

                                  CylanceOPTICS Administrator Guide, v2.5 rev1, June 2020 | 7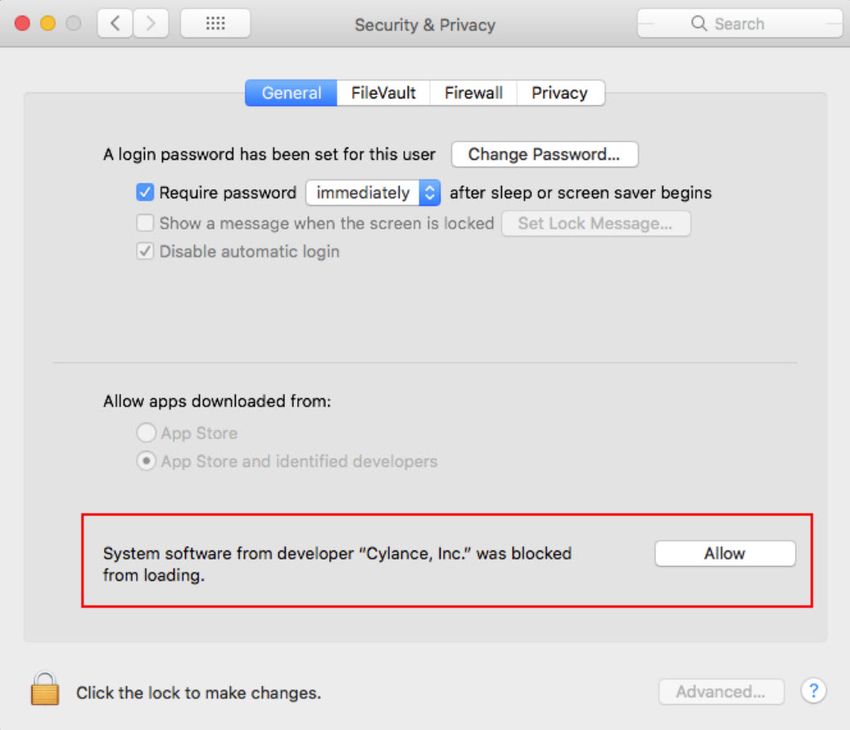
OVERVIEW
   This guide covers using the Cylance Console, installing the CylanceOPTICS Agent, and how to
   configure both products. Best practices are included, where applicable.

   How It Works
   CylanceOPTICS is installed alongside CylancePROTECT on each endpoint and is controlled and
   managed from within the same Cylance Console.

      1. CylanceOPTICS will store forensically pertinent data in a secure database on each
           endpoint locally.

      2. This data is retrieved on-demand through performing what is known as an InstaQuery
           (IQ) or uploaded automatically when a CylancePROTECT event occurs, depending upon
           policy settings.

      3. The data is then correlated and ultimately presented as Focus Views within the console.
           Focus Views contain the correlated chain of events displayed visually as well as in full
           detail.

      4. Additional remediation actions can be taken on endpoints based upon the results
           returned from an IQ or Focus View.

   CylanceOPTICS stores, retrieves, correlates, and presents the following artifacts and supporting
   details:

       n   DNS: When a domain resolution is requested and answered.

       n   File: When non-empty files are created, modified, deleted, or renamed.

       n   Network: Information about IP addresses, ports, and associated events.

       n   Powershell: When a Powershell command or script is executed.

       n   Process: When processes are created or modified.

       n   Registry Alterations to the Windows registry surrounding persistent events.

       n   Thread: When processes are injected or spawned from another process.

       n   Windows Events: When specific security-relevant Windows Events occur.

       n   WMI: When the Windows Management Instrumentation (WMI) queries are executed.

                                          CylanceOPTICS Administrator Guide, v2.5 rev1, June 2020 | 8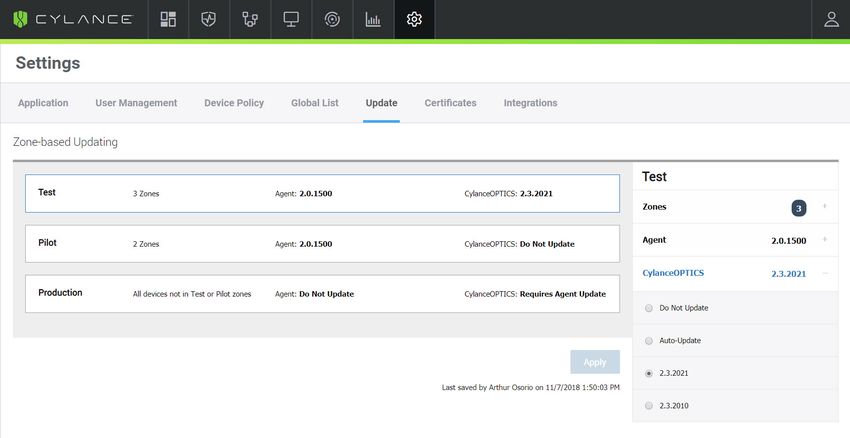
Technology Overview
CylanceOPTICS operates by deploying sensors into the endpoint's operating system at various
levels and against various subsystems to collect a diverse set of disparate information, then
aggregates that information into a localized data store to track, alert upon, and respond to,
complex malicious situations as they unfold. CylanceOPTICS connects to a cloud-based
analytics backend infrastructure through a lightweight communications network that enables
users, using the Cylance Console, to command and query CylanceOPTICS in real time, against
their local data store of forensic data.

CylanceOPTICS consists of the following components:

    n   Endpoint Service (integrated with the endpoint agent of CylancePROTECT - A
        .NET/Mono 4.5 service with native and managed sensors that observe, interpret, catalog,
        and provide interfaces into endpoint events.

    n   Communication Network - A mesh-like network bridging thousands of endpoints
        together with a communications management framework, delivering real time interaction
        and awareness.

    n   Data Analytics Backend - A highly scalable backend that delivers rich interpretations of
        endpoint data, as well as an API-first approach to endpoint management.

    n   CylanceOPTICS Microsite in Management Console - An ever-evolving front-end
        delivering powerful views and capabilities from inside endpoints directly to security
        professionals.

Architecture Overview
   1. Enterprise Endpoints and Endpoint Architecture - When CylanceOPTICS is
        installed, sensors are deployed to collect system level events that are transformed and
        stored locally on the endpoint. Any events that take place after CylanceOPTICS is
        installed can have commands executed against it (see below).

   2. Commands and Policies - From the console, users can investigate and issue
        commands to perform actions on the endpoints. Examples of this include returning query
        results from the endpoint database through InstaQuery or Focus Views. Commands can
        also be issued to take actions on that endpoint, like returning a file to the console for
        analysis or locking down a device from all network activity.

   3. CylanceOPTICS Data - The device sends requested data to the AI engine, which
        dynamically scales to perform aggregation, enrichment, and correlation.

                                           CylanceOPTICS Administrator Guide, v2.5 rev1, June 2020 | 9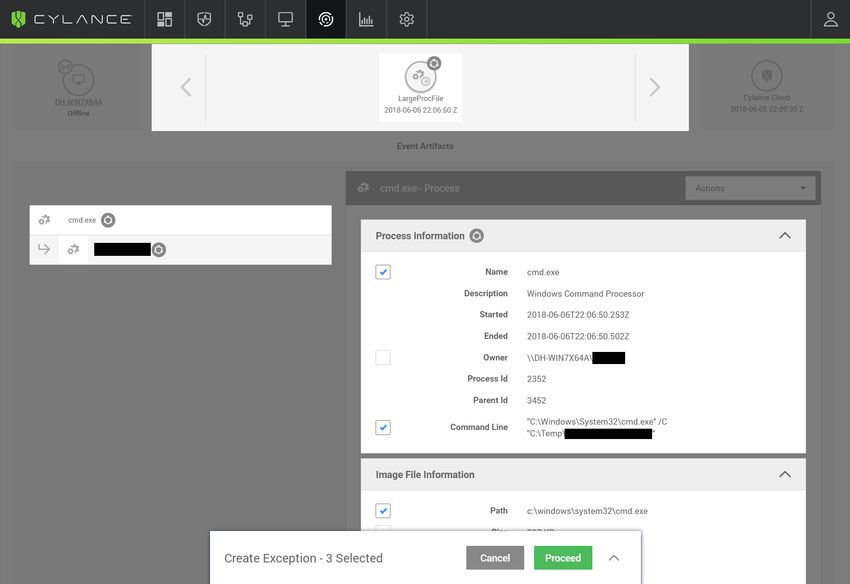
SYSTEM REQUIREMENTS
   CylanceOPTICS Version
    n   CylanceOPTICS version 2.3.2020 or higher required to configure communication through
        a proxy server only

    n   CylanceOPTICS version 2.4.2100 or higher is required to enable Configurable Sensors in
        a Device Policy

            l   For Desktops and Laptops, Configurable Sensors requires Windows 10 or higher.

            l   For Servers, Configurable Sensors requires Windows Server 2016 or higher.

                IMPORTANT: See "Configurable Sensors" on page 86 for recommendations and
                details for using this feature.

   CylancePROTECT Version
    n   CylancePROTECT Agent version 1400 or higher

    n   CylancePROTECT Agent version 1468 or higher required for Custom Endpoint
        Notifications

   Operating Systems

   Windows Desktop
    n   Windows 7 (32-bit and 64-bit)

            l   KB4054518 must be installed on Windows 7 (32-bit and 64-bit) systems. For more
                information, read the KB article here.*

    n   Windows 7 Embedded (32-bit and 64-bit)

            l   KB4054518 must be installed on Windows 7 Embedded (32-bit and 64-bit)
                systems. For more information, read the KB article here.*

    n   Windows 8 and 8.1 (32-bit and 64-bit)

                                        CylanceOPTICS Administrator Guide, v2.5 rev1, June 2020 | 10
n Windows 10 (32-bit and 64-bit)
l Anniversary Update (v1607, Redstone)
l Creators Update (v1703, Redstone 2)
l Fall Creators Update (v1709, Redstone 3)
l April 2018 Update (v1803, Redstone 4), requires CylanceOPTICS version 2.2.1012
or higher
l October 2018 Update (v1809, Redstone 5), requires CylanceOPTICS version
2.2.2021 or higher
l May 2019 Update (v1903, Redstone 6), requires CylanceOPTICS version 2.3.2060
or higher
l Configurable Sensors for Agent version 2.4.2100 or higher requires Windows 10 or
higher
Windows Server
Windows Server requires CylanceOPTICS version 2.2 or higher
n Windows Server 2008 R2 (64-bit)
l KB4054518 must be installed on Windows Server 2008 R2 (64-bit) systems that
use CylanceOPTICS v2.2 or higher. For more information, read the KB article
here.*
n Windows Server 2012 (64-bit)
n Windows Server 2012 R2 (64-bit)
n Windows Server 2016 (64-bit)
l Configurable Sensors for Agent version 2.4.2100 or higher requires Windows
Server 2016 or higher
* Cylance Support does not provide assistance in searching and implementation of any Microsoft
related KB's or other 3rd party patches. For any issues with finding or implementing Microsoft
related KB's, please reach out to Microsoft for assistance.
Note: Server Core installation is not supported.
CylanceOPTICS Administrator Guide, v2.5 rev1, June 2020 | 11macOS
CylanceOPTICS for macOS requires CylancePROTECT Agent version 1480 or higher
n Mac OS X Yosemite (10.10)
n Mac OS X El Capitan (10.11)
n macOS Sierra (10.12)
n macOS High Sierra (10.13)
n macOS Mojave (10.14), requires CylancePROTECT Agent version 1510 or higher, and
CylanceOPTICS version 2.3.2021 or higher
n macOS Catalina (10.15) requires CylancePROTECT Agent version 1560 or higher, and
CylanceOPTICS version 2.4.2100.5401 or higher
Note: macOS High Sierra (10.13) includes a new security feature that requires users to approve
new 3rd party kernel extensions. Read "macOS Secure Kernel Extension Loading" on page 20
for more information.
Note: If you are running macOS Catalina (10.15) or higher and have installed
CylancePROTECT, it is required that you enable Full Disk Access on your macOS system. If
Full Disk Access is not enabled, Cylance products will be unable to process files secured by
user data protection. Starting with macOS Catalina (10.15), this now includes the user’s
Desktop, Downloads, and Documents folders. Read the macOS - Full Disk Access
Requirements article for more information.
CPU
n Intel Core i5 processor or higher (or equivalent) is recommended
l 4 threads (2 cores + hyper-threading) or 4 cores
Memory
n 4GB
Available Disk Space
n At least 1GB is recommended
l CylanceOPTICS data stored locally can be over 100MB per day for busier
systems.
CylanceOPTICS Administrator Guide, v2.5 rev1, June 2020 | 12Browsers Supported
n Google Chrome (latest version) - recommended
n Mozilla Firefox (latest version)
n Microsoft Edge (latest version)
n Microsoft Internet Explorer (version 11 with latest updates)
Additional Requirements
n .NET Framework 4.5 SP1 or higher (Windows only)
n Internet connection to register the product
n Local administrator rights to install the product
Network
CylanceOPTICS communicates over secure websockets (WSS) and must be able to establish
this connection directly. For organizations that manage network traffic, like using a proxy, there
are some Cylance hosts that the agent must be allowed to communicate with to properly
display data in the Console. See the CylancePROTECT Administrator Guide for hosts specific to
the Agent. For CylanceOPTICS, allow the following hosts (based on your region):
n Asia-Pacific Northeast:
l cement-apne1.cylance.com
l cylance-optics-files-apne1.s3.amazonaws.com
l opticspolicy-apne1.cylance.com
l content-apne1.cylance.com
n Asia-Pacific Southeast:
l cement-apse2.cylance.com
l cylance-optics-files-apse2.s3.amazonaws.com
l opticspolicy-au.cylance.com
l content-apse2.cylance.com
CylanceOPTICS Administrator Guide, v2.5 rev1, June 2020 | 13n North America:
l cement.cylance.com
l cylance-optics-files-use1.s3.amazonaws.com
l opticspolicy.cylance.com
l content.cylance.com
n Europe Central:
l cement-euc1.cylance.com
l cylance-optics-files-euc1.s3.amazonaws.com
l opticspolicy-euc1.cylance.com
l content-euc1.cylance.com
n South America:
l cement-sae1.cylance.com
l cylance-optics-files-sae1.s3.amazonaws.com
l opticspolicy-sae1.cylance.com
l content-sae1.cylance.com
Firewall
No on-premises software is required to manage endpoints. Agents are managed by and report
to the console. Port 443 (HTTPS) is used for communication and must be open on the firewall
in order for the agents to communicate with the console. The console is hosted by Amazon
Web Services (AWS) and doesn’t have any fixed IP addresses. Alternatively, you can allow
HTTPS traffic to *.cylance.com.
Proxy
CylanceOPTICS is proxy aware and will query the .NET framework to see if a proxy is available.
CylanceOPTICS will use the proxy settings and attempt to communicate; first as the Local
System, then as the currently logged in user. There is also a registry edit (see the
CylancePROTECT Administrator Guide) that configures the proxy settings for the
CylancePROTECT Agent, these configuration settings will be used by CylanceOPTICS as well.
This method requires that the proxy accept unauthorized requests out. If authentication is
required, then this registry setting cannot be implemented.
CylanceOPTICS Administrator Guide, v2.5 rev1, June 2020 | 14Proxy support for CylanceOPTICS is configured through a registry entry, using the same process
as configuring proxy support for CylancePROTECT. When a proxy is configured, CylanceOPTICS
will use the IP address and port in the registry entry for all outbound communication to Cylance
servers.
Access the Registry
1. In the Registry Editor, navigate to
HKEY_LOCAL_MACHINE\SOFTWARE\Cylance\Desktop
2. Create a new String Value (REG_SZ):
a. Value Name = ProxyServer
b. Value Data = proxy settings (For example, http://123.45.67.89:8080)
In authenticated environments, CylanceOPTICS follows the same procedure as
CylancePROTECT and attempts to use the credentials of the currently logged in user to
communicate out to the Internet. If an authenticated proxy server is configured and a user is
not logged onto the device, CylanceOPTICS cannot authenticate to the proxy and cannot
communicate with the Console.
Disable Proxy Bypass
CylanceOPTICS is designed to maintain a connection to the Cylance cloud services. If a proxy
server is configured and the Agent cannot communicate with the Cylance cloud services, the
CylanceOPTICS Agent will attempt a direct connection to the cloud, bypassing the proxy server
configuration. This can cause problems in organizations that want the Agent to only
communicate through the proxy server. Starting with CylanceOPTICS version 2.3.2020, this
proxy bypass feature can be disabled. This must be done before CylanceOPTICS is installed.
Note: The DisableProxyBypass is only supported on Windows systems.
n Create a registry string value (REG_SZ) located at
HKLM\SOFTWARE\Cylance\Optics\, with a Value Name set to DisableProxyBypass
and the Value Data set to True.
n If this key is present, the CylanceOPTICS Agent will always attempt to establish a
connection through the configured proxy server.
CylanceOPTICS Administrator Guide, v2.5 rev1, June 2020 | 15Windows API and Signed Files
When CylanceOPTICS creates a detection event that involves a signed file as one of the
Artifacts, it will use a command from the Windows API to validate the signature/certificate. This
command will generate traffic to an Online Command Status Protocol (OCSP) server with the
validation request. The address of the server is determined by Windows, so the address may be
different for different environments.
If your proxy is showing attempts to send external traffic to unauthorized addresses and you
have a signed file as part of a CylanceOPTICS Detection Event, then check if the unauthorized
address belongs to an OCSP server. If it is an OCSP server, users should update their proxy
settings or allow communication with the OCSP server.
CylanceOPTICS Administrator Guide, v2.5 rev1, June 2020 | 16INSTALLATION AND UPGRADE
Download Install File
1. Login to the Console as an Administrator.
2. Select Settings > Application.
Figure 1: Download CylanceOPTICS Installer
3. Download the CylanceOPTICS installer.
Windows Installation
Note: CylancePROTECT Agent 1400 or higher must be installed on the endpoint before
installing CylanceOPTICS for Windows.
1. On the endpoint, double-click CylanceOPTICSSetup.exe. CylanceOPTICS can also be
deployed using a group policy or other software management system.
2. Click Install.
3. Click Close when installation is complete. A system restart is not required (in rare cases,
when Windows performs updates as part of the installation, a system restart is required).
To verify the CylanceOPTICS installation, right-click the Agent icon in the system tray,
then select About. The information includes the CylancePROTECT version and the
CylanceOPTICS version.
Directory Locations (default)
n Install directory: C:\Program Files\Cylance\Optics
n Data directory: C:\ProgramData\Cylance\Optics
CylanceOPTICS Administrator Guide, v2.5 rev1, June 2020 | 17n Log File Directory: C:\ProgramData\Cylance\Optics\Log
Note: CylanceOPTICS retains a maximum of 10 log files, with a maximum size of 100MB per
log file. The total number of days collected in the log files depends on the amount of data
collected.
Windows Services
n CyOptics - The user-mode service that is the CylanceOPTICS product.
l Display Name: Cylance Optics
l Service Name: CyOptics
l Path: C:\Program Files\Cylance\Optics\CyOptics.exe
n CyOpticsDrv - The driver service that supports CyOpticsDrv.sys.
l Display Name: CyOpticsDrv
Windows Command Line Options
CylanceOPTICS Windows installation supports command-line options, including the following:
n INSTALLFOLDER=
Allows users to define where CylanceOPTICS is installed on the endpoint.
For example, CylanceOPTICSSetup.exe INSTALLFOLDER=C:\Apps\Cylance\
n OPTICSROOTDATAFOLDER=
Allows users to define where CylanceOPTICS stores the local database, configuration,
and log files.
For example, CylanceOPTICSSetup.exe
OPTICSROOTDATAFOLDER=C:\Storage\Cylance\
n -q or -quiet
To perform a quiet installation, without any user intervention.
n -s or -slient
To perform a silent installation, without any user intervention.
n -q and -s are the same thing.
n -l, log
To capture log files during installation. For example, CylanceOPTICSSetup.exe -l
c:\temp\install.log
n -uninstall
To uninstall the product.
CylanceOPTICS Administrator Guide, v2.5 rev1, June 2020 | 18macOS Installation
Note: CylancePROTECT Agent 1480 or higher must be installed on the endpoint before
installing CylanceOPTICS for macOS.
1. On the endpoint, double-click the CylanceOPTICS installation package. If you use the
DMG, you must open the DMG, then double-click the PKG.
2. Click Continue.
3. Click Install. A password might be required.
4. Click Close when the installation is complete. To verify the CylanceOPTICS installation,
right-click the agent icon in the system tray, then select About. The information includes
the CylancePROTECT version and the CylanceOPTICS version.
Directory Locations (default)
n Install directory: /Application/Cylance
n Data directory: /Library/Application Support/Cylance/Optics
n Log File directory: /Library/Application Support/Cylance/Optics/Log
Note: CylanceOPTICS retains a maximum of 10 log files, with a maximum size of 100MB per
log file. The total number of days collected in the log files depends on the amount of data
collected.
macOS Command Line Options
n Install: sudo installer -pkg CylanceOPTICS.pkg -target /
n Install (Verbose, Troubleshooting): sudo installer -verboseR -dumplog -pkg
CylanceOPTICS.pkg -target /
n Uninstall: sudo /Applications/Cylance/Optics/Uninstall\
CylanceOPTICS.app/Contents/MacOS/Uninstall\ CylanceOPTICS
n Uninstall (No UI): sudo /Applications/Cylance/Optics/Uninstall\
CylanceOPTICS.app/Contents/MacOS/Uninstall\ CylanceOPTICS -noui
n Start Service: sudo launchctl load /Library/LaunchDaemons/com.cylance.cyoptics_
service.plist
n Stop Service: sudo launchctl unload /Library/LaunchDaemons/com.cylance.cyoptics_
service.plist
Note: A system reboot might be required after running the command.
CylanceOPTICS Administrator Guide, v2.5 rev1, June 2020 | 19Note: For macOS Catalina - when installing the CylanceOPTICS Agent using Terminal, a DYLD
warning might display. This warning does not impact the installation. This warning is generated
by the operating system, not by the CylanceOPTICS installer.
macOS Secure Kernel Extension Loading
Starting with macOS High Sierra (10.13), an Apple security feature requires users to approve
new third-party kernel extensions. If an unapproved extension tries to load, the extension is
blocked and macOS displays an alert. Once approved by the user, the extension will load
without any issues. This Apple feature is also called Gatekeeper.
Until the extension is approved, the Cylance shield displays a red dot. Clicking on the shield
icon and selecting Show Details displays a message stating "Driver Failed to Connect. Device
Not Protected."
For more information, including Enterprise deployments, see the macOS High Sierra Secure
Kernel Extension Loading knowledge base article.
Note: This affects new CylanceOPTICS installations on macOS High Sierra (or higher). This will
not affect CylanceOPTICS installed on macOS endpoints that are then upgraded to macOS
High Sierra (or higher).
1. In the System Extension Blocked message, click Open Security Preferences. Or go to
System Preferences > Security & Privacy.
2. Click Allow.
Figure 2: CylanceOPTICS Extension Blocked
CylanceOPTICS Administrator Guide, v2.5 rev1, June 2020 | 20Figure 3: Security & Privacy Allow Button
Upgrading to v2.5
It is recommended that users take a phased rollout strategy for CylanceOPTICS. The best
practice for this is to set the production zone for zone-based updating (located on the Settings
> Update page in the Console) to Do Not Update.
To update endpoints in the test or pilot zones, set the CylanceOPTICS version to the latest
version or select Auto-Update, which will automatically push out updates to all endpoints in a
zone as the endpoints become available (online).
CylanceOPTICS Administrator Guide, v2.5 rev1, June 2020 | 21Figure 4: Zone-based Updating for Production
Uninstalling CylanceOPTICS
Uninstalling CylanceOPTICS also removes all CylanceOPTICS focus data and log files from the
device. To uninstall CylancePROTECT, see the CylancePROTECT Administrator Guide.
Important
n Uninstalling CylanceOPTICS will result in a loss of all CylanceOPTICS data on that
device, including CylanceOPTICS log files. If you are troubleshooting, you should save
the CylanceOPTICS log files to a different location prior to uninstalling the product.
n CylanceOPTICS must be uninstalled before uninstalling CylancePROTECT.
Uninstall - Windows
There are two methods for uninstalling CylanceOPTICS.
To Uninstall CylanceOPTICS Using Add/Remove
Programs
This is the recommended method for most users.
1. Log in to the endpoint for which you want to remove CylanceOPTICS.
2. Open Programs and Features. For example, click Start > Control Panel > Uninstall
a program.
CylanceOPTICS Administrator Guide, v2.5 rev1, June 2020 | 223. Select CylanceOPTICS, then click Uninstall.
4. When the uninstall process completes, click Close.
To Uninstall CylanceOPTICS from the Command Line
for Non-Interactive Uninstallation
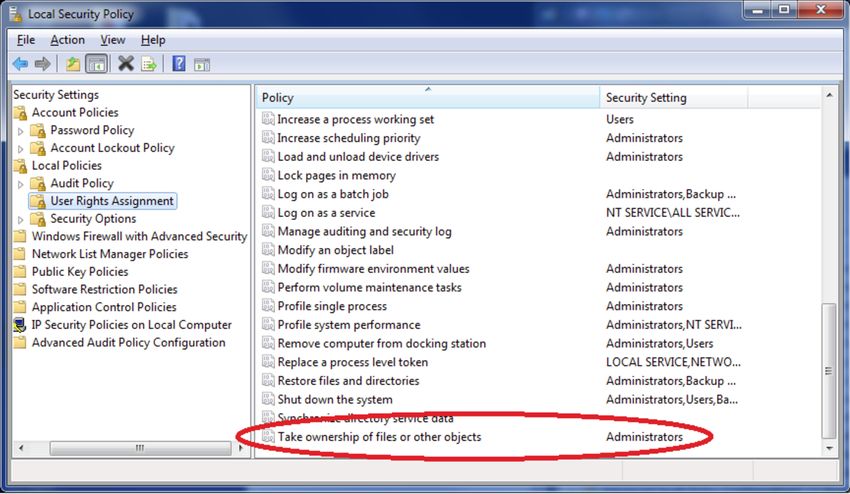
1. The user uninstalling CylanceOPTICS must take ownership of the files and directories
owned by the local system. If done by an administrator, it is required that Windows
policy allows for administrators to take ownership of files and directories.
2. To check if administrators have such privileges:
a. Launch secpol.msc.
b. Select User Rights Assignment, under Local Policies.
c. Scroll to the bottom of the list and make sure Take ownership of files or other
objects is set to Administrators.
Figure 5: Local Security Policy
3. The following command is an example for a non-interactive uninstall. It is best not to
navigate to the CylanceOPTICS program directory because that directory needs to be
deleted. By including the absolute path in the command, it can be run from any
directory.
Example:
C:\Program Files\Cylance\Optics\CyOpticsUninstaller.exe --use_cli -t v20
CylanceOPTICS Administrator Guide, v2.5 rev1, June 2020 | 23Uninstall - macOS
1. Log in to the endpoint for which you want to remove CylanceOPTICS.
2. Open Finder, then select Applications.
3. Expand Cylance, expand Optics, then double-click Uninstall CylanceOPTICS.
4. Click Yes.
5. Type the user password, then click OK.
CylanceOPTICS Administrator Guide, v2.5 rev1, June 2020 | 24USING CYLANCEOPTICS
Edit a Policy
Once CylanceOPTICS has been enabled in a policy, the agent starts collecting events and
storing that data on the device. The default policy allocates up to 1,000MB of storage space on
each device running CylanceOPTICS. When the storage space is exhausted, CylanceOPTICS
will purge the oldest data and overwrite it with the most current events.
The amount of storage space allowed can be configured in a policy. The setting goes from
500MB to 1,000MB.
1. Login to the Console.
2. Select Settings > Device Policy.
3. Create a new policy or edit an existing policy.
4. Select CylanceOPTICS Settings.
5. Select the CylanceOPTICS checkbox to enable CylanceOPTICS.
6. Select the CylanceOPTICS features you want to enable.
n Threats - Auto Upload: Automatically uploads threat-related Focus Data from
the Agent to the Console. If this is not enabled, then an administrator must click
Request Focus Data in the Console to retrieve the data.
n Memory Protection - Auto Upload: Automatically uploads memory-related
Focus Data from the Agent to the Console. If this is not enabled, then an
administrator must click Request Focus Data in the Console to retrieve the data.
n Configurable Sensors: Allows the CylanceOPTICS Agent to record additional
events (beyond the standard Process, File, Network, Registry, and Thread events).
Note: Enabling Configuration Sensors may reduce the length of time that data is
stored in the local CylanceOPTICS database.
n Set the maximum storage reserved on the device for use by
CylanceOPTICS: Sets the maximum amount of storage CylanceOPTICS can use
on the device. The capacity range is from 500MB to 1,000MB.
n Enable CylanceOPTICS Desktop Notifications: Enabled desktop notifications
on the device.
n Detection Settings: Allows selecting a Detection Set for the policy.
CylanceOPTICS Administrator Guide, v2.5 rev1, June 2020 | 257. Click Save.
Configurable Sensor Descriptions
IMPORTANT: See "Configurable Sensors" on page 86 for recommendations and details for
using this feature.
Configurable Description
Sensor
Advanced Ability for the CylanceOPTICS Agent to record commands, arguments, scripts, and
Powershell content entered directly into the Powershell Console and the Powershell Integrated
Visibility Scripting Environment (ISE).
Advanced WMI Ability for the CylanceOPTICS Agent to record additional Windows Management
Visibility Instrumentation (WMI) attributes and parameters.
DNS Visibility Ability for the CylanceOPTICS Agent to record DNS requests, responses, and
associated data fields such as Domain Name, Resolved Addresses, and Record
Type made by processes.
Enhanced Ability for the CylanceOPTICS Agent to record data fields associated with Portable
Portable Executable (PE) files such as File version, Import functions, and Packer types.
Executable
Parsing
Enhanced Ability for the CylanceOPTICS Agent to record process information from the Win32
Process and API and Kernel Audit messages to detect forms of process hooking and injection.
Hooking
Visibility
Private Network Ability for the CylanceOPTICS Agent to record network connections within the RFC
Address Visibility 1918 and RFC 4193 address spaces.
Windows Event Ability for the CylanceOPTICS Agent to record Windows Security Events and their
Log Visibility associated attributes.
Things to Know about the CylanceOPTICS Policy
Starting with version 2.3.2021, CylanceOPTICS will not automatically start collecting data once
installed. In the Cylance Console, CylanceOPTICS is not automatically enabled in a policy.
Administrators must enable CylanceOPTICS for new policies.
n The CylanceOPTICS ON / OFF checkbox (under CylanceOPTICS Settings) only controls
data collection.
n If CylanceOPTICS is OFF (checkbox is unchecked) and Auto Upload for Focus Data
(Threats or Memory Protection) is still enabled, Auto Upload of Focus Data will continue.
CylanceOPTICS Administrator Guide, v2.5 rev1, June 2020 | 26Auto Upload must be disabled (checkboxes are unchecked) for each category in order to
stop Auto Upload of Focus Data.
Device Drawer
The CylanceOPTICS Device Drawer provides some details about the device. To view the Device
Drawer, click on the device name link. The Device Drawer appears as a slide-out information
window. The Device Drawer contains the following details about the endpoint:
Note: The CylanceOPTICS Devices page does not display devices that have been offline for
more than 90 days.
n CylanceOPTICS Version: Shows the CylanceOPTICS version installed on the endpoint.
n Device Name: Shows the name of the endpoint.
n Hostname: Shows the hostname for the endpoint.
n IP Address: Shows all IP addresses identified for the endpoint.
n Select Action: Shows which actions can be performed on the endpoint from the Device
Drawer.
l Lockdown: Allows administrators to lockdown the endpoint.
l Package Deploy: Allows administrators to deploy a CylanceOPTICS package to
the endpoint.
n Status: Shows if the endpoint is online or offline.
n Zones: Shows all zones assigned to the endpoint.
Package Playbook
Refract Packages are currently required to be executed via the user-interface or an API call.
This creates a situation where there can be a potentially significant lag time between when an
incident occurs, and an analyst or incident responder is able to send a package execution
command to affected endpoints. The lag time introduced by this could lead to gaps in critical
forensic information relevant to an incident investigation.
Package Playbooks implement a mechanism to automatically execute Refract Packages on
endpoints as part of the Automated Response Action framework, such that users on Cylance's
products can configure their Detection Rule Sets to execute a specified set of Refract Packages
upon the successful trigger of a single or multiple Context Analysis Engine Rules.
CylanceOPTICS Administrator Guide, v2.5 rev1, June 2020 | 27About Package Playbooks
n A Package Playbook is a group of Refract Packages (Cylance packages and custom
packages).
n A Package Playbook can contain up to 20 packages.
n A tenant can have up to 100 Package Playbooks.
n A Package Playbook cannot be added to another Package Playbook.
n Apply up to 10 Package Playbooks per Detection Rule.
n Package Playbook content is stored on the endpoint; this allows execution even if the
endpoint is offline.
n Package Playbook execution will not interfere with more immediate Response Actions,
like Terminate Process, Suspend Process, Delete Files, and Logoff Users.
n Using a Package Playbook allows administrators to change one playbook and have it
affect all Detection Rules associated with that playbook.
Create a Package Playbook
1. Log in to the Console, then select CylanceOPTICS.
2. Select Configurations > Package Playbooks.
3. Click Create Playbook.
4. Type a name for the playbook.
5. Optionally, type a description. This can state the purpose of the playbook and help
identify it for use when adding it to a Detection Rule Set.
6. Select a Collection Type. This is where the files are saved. By default, the files are
saved on the endpoint.
7. Add a package to the playbook. Click Add Another Package to add more packages to
the playbook.
CylanceOPTICS Administrator Guide, v2.5 rev1, June 2020 | 288. Optionally, type in a command-line argument to use with the selected package.
Figure 6: Package Playbook Settings
9. Click Save.
Clone a Package Playbook
Cloning a Package Playbook allows you to keep the original and modify a clone to suit your
needs.
1. Log in to the Console, then select CylanceOPTICS.
2. Select Configuration > Package Playbooks.
3. For the playbook you want to duplicate, click Clone.
4. Type a name for the playbook. By default, (clone) is added to the end of the existing
name.
Note: For remote Collection Types (for example, SFTP), a password or key is required.
You can change the Collection Type to Local, which does not require a password or key.
5. Click Next.
6. Add or remove packages. Add optional command line arguments.
7. Click Save.
Associate a Package Playbook with a Detection Rule
1. Login to the Console, then select CylanceOPTICS.
2. Select Configuration > Detection Rule Sets.
CylanceOPTICS Administrator Guide, v2.5 rev1, June 2020 | 293. Create or edit a rule set.
4. Expand a rule set. For each rule within a set, you should see Exceptions, Response, and
Playbooks as drop-down lists.
Figure 7: Adding a Playbook to Detection Rule
5. Select a playbook to associate it with a rule.
6. Click Confirm.
Package Playbook Execution Confirmation
If a Detection Rule triggers the execution of a Package Playbook, the Detection Details page of
the event will show a confirmation.
CylanceOPTICS Administrator Guide, v2.5 rev1, June 2020 | 30Figure 8: Confirmation a Package Playbook was executed
Package Playbook Endpoint Behavior
When a Detection Rule triggers and it has a Package Playbook associated to it, the Playbook
will begin to execute on the endpoint and run all the associated Packages. The results will be
uploaded to the defined collection location once the execution has finished.
InstaQuery
InstaQuery provides the ability to search online devices for system artifacts stored locally by
CylanceOPTICS - files, registry key persistence points, processes, etc. Users can investigate
incidents, or hunt for potential threats, and then take appropriate remediation actions.
InstaQuery searches are zone based; unzoned devices cannot be searched through the
interface.
InstaQuery allows users to search for an artifact by facet - an attribute of that artifact. Users
can query endpoints for Indicators of Compromise from threat intelligence sources, investigate
running processes, and visualize data to show distribution of artifacts and associated metadata.
Note: Console administrators can see all InstaQuery results in their organization. Zone
managers and users can only see the query results they have created.
CylanceOPTICS Administrator Guide, v2.5 rev1, June 2020 | 31Start an InstaQuery
1. In the Console, select CylanceOPTICS. The InstaQuery tab displays.
2. Add the required information for the query.
a. Type a search term (required). You can also select exact matching to restrict the
search results.
b. Select an artifact (required).
c. Select a facet (required).
d. Select a zone or zones (required). When selecting zones, you can see the total
number of endpoints in the zone and the number of endpoints online (for that
zone). If a zone has no online endpoints, you cannot select it for an InstaQuery.
With no online endpoints, the InstaQuery would return no results.
Note: If from the time you select a zone for an InstaQuery to when you run the
query, all the online endpoints go offline, the InstaQuery will return no results.
Figure 9: Number of Endpoints in a Zone
e. Type a name for the query (required).
CylanceOPTICS Administrator Guide, v2.5 rev1, June 2020 | 32Figure 10: InstaQuery Settings
View InstaQuery Results and Previous Queries
Expand the previous queries section. This displays the original results of the query. This does
not re-run the query.
1. In the Console, select CylanceOPTICS.
2. Expand the Previous Queries section.
3. Select an existing InstaQuery.
Figure 11: InstaQuery Results
Note: Data retention is 30 days for CylanceOPTICS data, including the InstaQuery results.
CylanceOPTICS Administrator Guide, v2.5 rev1, June 2020 | 33Descriptions
The following tables provide short descriptions for each InstaQuery result or facet.
InstaQuery Results Summary
InstaQuery Description
Result
Artifact The type of item for which the search is being conducted.
Date Created The date the InstaQuery was created.
Description The description of the InstaQuery.
Devices Queried The total number of endpoints associated with the query.
Devices The number of endpoints that responded to the query request.
Responded
Devices with The total number of endpoints that matched the query.
Results
Facet The artifact attribute for which the search is being conducted.
Name The name of the InstaQuery.
Term The specific value for which the search is being conducted.
Total Results The total number of artifacts returned from the query.
Zones The zones included in the query. Only endpoints in these zones are included in
this query.
InstaQuery Results - Artifact Type: DNS
Facet Description
Question Address The IP address to query.
Question Entropy The randomness to query.
"How random is this question?"
Question Name The domain name to query.
"Has mydomain.net been seen?"
Question Type The record type to query.
Record Value The domain name resolution to query.
CylanceOPTICS Administrator Guide, v2.5 rev1, June 2020 | 34Facet Description
"Has a domain ever resolved to this?"
Response Address The IP address to query.
Response Entropy The randomness to query.
"How random is this response?"
Response Type The record type to query.
InstaQuery Results - Artifact Type: File
Facet Description
Created The date the file was created.
Device The name of the endpoint upon which the file was found.
MD5 The MD5 hash for the file.
Owner The name of the user that owns the file.
Path The path to the file.
SHA256 The SHA256 hash for the file.
InstaQuery Results - Artifact Type: Powershell
Trace
Facet Description
Entropy The randomness to query.
"How random was the script text?"
Event ID The Event ID to query.
"Show me all matches for Event ID 4101."
Is Content Truncated Query whether or not the content is truncated.
Original Size The original size of the script to query.
Payload The text to query for in the payload.
"Has a payload or module executed with this text in it?"
Script Block Text The text to query for in the script block.
"Has a script executed with this text in it?"
CylanceOPTICS Administrator Guide, v2.5 rev1, June 2020 | 35InstaQuery Results - Artifact Type: Process
Facet Description
Command Line The command used to initiate the process.
Device The name of the endpoint upon which the process was found.
Image MD5 The MD5 hash for the file.
Image Path The path to the process executable file.
Name The name of the process.
Owner The owner of the process.
State Date The date and time the process was started.
InstaQuery Results - Artifact Type: Network
Connection
Results displayed for the network connections are filtered if the connection is entirely localized
to certain IP ranges, such as the following:
n Private
n Linklocal
n Non-routable
n Multi-cast
n Loopback
Facet Description
Destination The IP address to which the source is connecting.
Address
Note: All queries are run on destination IP addresses only.
Destination Port The port number the source IP address is trying to use to connect to the
destination.
Device The name of the endpoint.
Image Path The path to the process executable file.
Process Name The name of the process related to the Network Connection.
CylanceOPTICS Administrator Guide, v2.5 rev1, June 2020 | 36InstaQuery Results - Artifact Type: Registry
Note: From the InstaQuery results page, a user can take further response actions under the
Action row, as well as discard a query, which will remove it from the Previous Queries list.
Facet Description
Device The name of the endpoint.
File MD5 The MD5 hash for the file.
File Path The file path to the extracted registry key, value, or value contents.
Is Persistence Point CylanceOPTICS monitors persistence points in the registry.
Path The path to the registry hive.
Value Name The registry value.
InstaQuery Results - Artifact Type: Windows
Events
Facet Description
Class The class ID to query.
"Show me all Logon / Logoff events."
Event ID The Event ID to query.
"Show me all matches for Event ID 4624."
Provider ID The security provider ID to query.
"Show me all events from the Security / Audit provider."
InstaQuery Results - Artifact Type: WMI
Facet Description
Checksum The checksum to query.
Consumer Text The text to query.
"Has a WMI consumer text been created with this text in it?"
Entropy The randomness to query.
"How random was the consumer text?"
Event ID The Event ID to query.
CylanceOPTICS Administrator Guide, v2.5 rev1, June 2020 | 37Facet Description
"Show me all matches for Event ID 5861."
Is Content Truncated Query whether or not the content is truncated.
Name Space The name space to query.
"Has a payload or module executed with this text in it?"
Operation The operation to query.
"Has a WMI operation executed with this text in it?"
Original Size The original size of the artifact to query.
Originating Machine Name The machine name to query.
Global Quarantine
From an InstaQuery, you can globally quarantine a file. This action is only available to
administrators in the Cylance Console.
1. Log in to the Console, then select CylanceOPTICS.
2. Select InstaQuery.
3. View a previous query..
4. From the InstaQuery Results page, click the Actions menu.
5. Select Global Quarantine, type in a reason for quarantining the file, then click Confirm
Quarantine.
Successful global quarantine of a file displays a pop-up and an icon in the Path column.
Hovering over the icon displays the file status as Globally Quarantined. If an error occurs, an
error pop-up displays, and the quarantined icon does not display in the Path column.
This file will now be visible in the Global List > Global Quarantine section of the Console,
and if executed, will show up as a threat in the Protection page and the Threats section of the
Device Details page.
CylanceOPTICS Administrator Guide, v2.5 rev1, June 2020 | 38Figure 12: Global Quarantine success message
Figure 13: Global Quarantine error message
Download File
Any file can be downloaded from an InstaQuery results page. If path information is available for
files associated with other artifact types, those files can also be retrieved. The file is
compressed and password-protected to ensure it is not accidentally executed. This action is only
available to administrations in the Cylance Console.
A successful download file request displays a Download File button. The file may be unavailable
if the endpoint is offline or the file is removed from the endpoint.
The file size limit for file retrieval is 50MB.
Note: Data retention is 30 days for CylanceOPTICS data, including successful download
requests.
1. Log in to the Cylance Console, then select CylanceOPTICS.
2. Select InstaQuery.
3. View a previous query.
4. From the InstaQuery Results page, click the Actions menu.
CylanceOPTICS Administrator Guide, v2.5 rev1, June 2020 | 39Figure 14: Request file download
5. If this is the first time downloading the file, click Request File Download. The button
changes to File Pending as the request is processed.
6. Click Download File when the file is ready. The Download File windows displays.
7. Click Confirm Download. The file is downloaded as a password protected, compressed
file. The password is infected.
Figure 15: Confirm download of a file
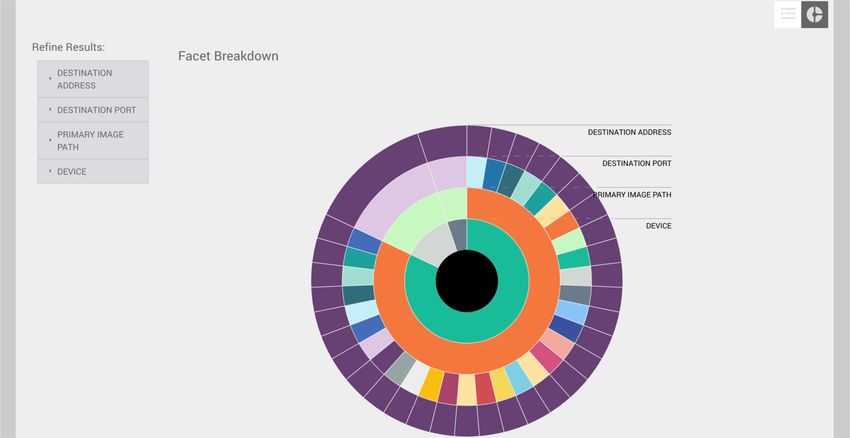
InstaQuery Facet Breakdown
The InstaQuery (IQ) Facet Breakdown provides a visual display of the different facets and
allows a user to follow the relational path of the different facets identified.
Visualizing data in a sunburst model can be useful for finding suspicious activity in datasets that
may be difficult to observe in other formats. For example, when hunting for suspicious network
connections across an entire environment or multiple device zones, data patterns and anomalies
may be difficult to quickly identify because of the sheer volume and complexity of data that
needs to be analyzed. The following images show how a user can interact with the InstaQuery
CylanceOPTICS Administrator Guide, v2.5 rev1, June 2020 | 40Facet Breakdown sunburst chart to quickly locate suspicious activity by visualizing and filtering
complex technical data.
The images used for this example were generated by using an InstaQuery to search an entire
CylanceOPTICS deployment for connections to a specific IP address. The results of this
InstaQuery were automatically visualized into the sunburst diagram with the following facets:
Device, Primary Image Path, Destination Port, and Destination Address.
Note: Data retention is 30 days for CylanceOPTICS data, including the InstaQuery results.
Figure 16: IQ Facet Breakdown - All Results Displayed
As a user begins to observe patterns in the sunburst chart, they can hover over any of the
different facets to display their associated values. In the image below, the outermost facet is
selected, allowing the user to observe the name of the device where the connection was
recorded, the path to the file that initiated the network connection, the port number being used
in the connection, and the IP address of the remote system. As each relevant facet is hovered
over, its associated parent facets are also highlighted to help the user draw a visual relationship
between the data points. In this example, we can see that one device and one parent process
were responsible for most connections to the IP address in question. We can also see that
many different network ports were used to connect to this IP address from the associated host,
something that differs from the other two host facets present in the sunburst.
CylanceOPTICS Administrator Guide, v2.5 rev1, June 2020 | 41Figure 17: Hovering over IQ Results
A similar result can be achieved by utilizing the Refine Results menus. Each of the Facet
Menus contains the unique values and number of occurrences for each facet that is present in
the sunburst chart. In the example below, a user can see that there were two processes
responsible for connections to this IP address: Google Chrome and Wscript.
Figure 18: Refining IQ Results
Clicking a facet value in the Refine Results menu will cause the sunburst chart to automatically
filter to only display directly related facets. This is particularly useful for filtering out irrelevant or
uninteresting data in large datasets to help create a more focused analysis environment.
CylanceOPTICS Administrator Guide, v2.5 rev1, June 2020 | 42Figure 19: Filtering IQ Results
Lockdown an Endpoint
With CylanceOPTICS, administrators can quickly isolate an infected (or potentially infected)
endpoint to stop Command and Control (C2) activity, exfiltration of data, or lateral movement of
malware. The CylanceOPTICS Lockdown feature gives administrators time to investigate the
endpoint or physically remove the endpoint from the network. This action is only available to
administrators in the Cylance Console.
Lockdown disables the network capabilities of the device (LAN and Wi-Fi) for a period of time,
from five minutes to 96 hours. If desired, the device can be unlocked prior to the selected
lockdown end time using the unlock key. See Unlock an Endpoint.
About Lockdown
n When an endpoint lockdown time has expired, it can take up to two minutes for that
endpoint to display as connected on the Devices page.
n CylancePROTECT Agent 1440 and higher will display a notification on the endpoint when
it has been placed into a Lockdown.
Lockdown an Endpoint
1. Log in to the Console, then select CylanceOPTICS.
2. Select Devices. A list of endpoints displays. Search for a device name to filter the list.
3. Click the Actions menu.
CylanceOPTICS Administrator Guide, v2.5 rev1, June 2020 | 434. Click Lockdown Device. The Lockdown - Network Isolation window displays.
Figure 20: Actions Available on Endpoints
5. Select a lockdown period. This can range from five minutes up to 96 hours.
Figure 21: Set Lockdown Period
6. Click Confirm Lockdown. The endpoint status shows that it is locked down and the
duration before the endpoint is automatically unlocked.
Figure 22: Lockdown Information
Once an endpoint is locked down, the CylanceOPTICS status column displays a red icon.
A lockdown can also be initiated from any InstaQuery result, which will re-direct to the Devices
page, filtered to the endpoint associated with the artifact.
CylanceOPTICS Administrator Guide, v2.5 rev1, June 2020 | 44Unlock an Endpoint
Unlocking an endpoint, before the lockdown expires, is a manual process. This manual process
requires direct access to the endpoint and the unlock key.
1. Log in to the Console, then select CylanceOPTICS.
2. Select Devices.
3. Search for and select the device to unlock.
4. Click the Actions menu.
Figure 23: Actions available on endpoints
5. Click Show Unlock Key. Use this key on the locked down endpoint. Each unlock key is
unique to each locked down endpoint.
Figure 24: Show the Unlock Key
6. On the endpoint, start an administrator Command Prompt and type in the following:
For Windows:
l Navigate to the CylanceOPTICS executable folder. The default location for
CyOptics.exe is: C:\Program Files\Cylance\Optics
l CyOptics.exe control --password "unlock_key" unlock -a
l Replace "unlock_key" with the Unlock Key in step 5.
For macOS:
l cd /Library/Application\ Supprt/Cylance/Optics/CyOptics.app/Contents/Resources
l sudo ../MacOS/CyOptics control --password 'OpticsPassword' unlock -net
l Replace 'OpticsPassword' with the Unlock Key in step 5.
CylanceOPTICS Administrator Guide, v2.5 rev1, June 2020 | 45Show Download History
Administrators can see which files have been downloaded and who requested the download.
Note: Data retention is 30 days for CylanceOPTICS data, including the Download History.
1. Log in to the Console, then click CylanceOPTICS.
2. Click Devices.
3. Click Show Download History. A list of files downloaded displays.
4. To return to the list of devices, click Hide Download History.
Download History Description
Device Name The name of the endpoint on which the file was found.
Downloaded By The email address of the user who downloaded the file.
Downloaded On The date and time the file was retrieved from the endpoint.
File The name of the file.
View Focus Data
Focus Data provides an information trail starting with the first event related to the artifact from
an InstaQuery result or a CylancePROTECT event.
There are multiple ways to view Focus Data. The Focus Data tab on the CylanceOPTICS page
shows a table of previously requested Focus Views from InstaQuery searches and
CylancePROTECT events. If auto-focus is not enabled, focus views for CylancePROTECT
events must be requested from the Device Details page, under Threats and Activities. See
below.
Note: Data retention is 30 days for CylanceOPTICS data, including Focus Data.
About Focus Data
n The time for CylanceOPTICS to return Focus Data results is directly proportional to the
size of the data being queried. More generic queries will take longer to return results.
This is also dependent on the network traffic and bandwidth on the customers' network.
n If Auto-Focus is enabled in the policy associated with a device, the View Data link in the
Focus View column will link to the Focus View for the most recent threat. In cases where
these detonations take place over multiple minutes, Focus Views from these previous
threats are visible in the Focus Data tab in CylanceOPTICS.
CylanceOPTICS Administrator Guide, v2.5 rev1, June 2020 | 46Focus Description
Data
Artifact Type The artifact from either the InstaQuery search or the CylancePROTECT event.
Created The date on which the Focus View was requested.
Date
Descriptions Facet value of the query, the name of the associated file from an exploit attempt, or the
path for a threat.
Devices The name of the device associated with the Focus View.
Focus Data The link to view the Focus Data.
Figure 25: Focus Data Table
Administrators can see all Focus Views, while zone managers and users can only see Focus
Views for devices in the zones to which they are assigned.
If a Focus View has been requested for an artifact in an InstaQuery, the Focus View can also
be viewed from those query results.
Threats and Activities
In the Console, the Focus View column is displayed on the Device Details page and will have a
link to the CylanceOPTICS Focus Data. If auto-upload is not enabled in the device policy, then
an administrator must click the Request Focus Data link to initiate retrieving the data.
Depending on the amount of data, it could take several minutes before the Focus Data is
available. When the Focus Data is ready, the link will change from Data Pending to View
Focus Data.
CylanceOPTICS Administrator Guide, v2.5 rev1, June 2020 | 47After clicking the View Data link, the Focus Data page displays the timeline of events related to
the threat.
Figure 26: Focus Data Results
Export Historical List View
The Historical List View can be exported as a CSV file so data can be filtered using a
spreadsheet program, like Microsoft Excel.
n On the Focus View page, click the Table View button (upper-right).
n Once in Table View, click the Export Results button.
Figure 27: Export a Historical List View
Pivot Queries
When viewing a Focus View, you can create an InstaQuery for an Artifact or Facet in the Focus
View. Artifacts and Facets that can have Pivot Queries run against them have a UI button, that
when clicked, will present an action to create an InstaQuery.
CylanceOPTICS Administrator Guide, v2.5 rev1, June 2020 | 48You can also read