Best Practices - Installation Guide Siding and Trim Products - Version 9 - April 2018 - James Hardie Pros
←
→
Page content transcription
If your browser does not render page correctly, please read the page content below

James Hardie® Siding Products

                         Best Practices – Installation Guide
                         Siding and Trim Products
                         Version 9 - April 2018

                         HardiePlank    ®

                         HardieShingle
Engineered for Climate
                                            ®
                     ®

                         HardiePanel    ®

                         HardieTrim ®

                         HardieSoffit   ®
HardieZone          ®
                        – Engineered     for Climate®
James Hardie, the undisputed leader in fiber cement has always made the world’s most resilient siding, and now we have
made it even better. For the first time, siding has been engineered for climate. So you get the right board for the right climate.
We call it the HardieZone® System.

We took the 8 climatic variables – that affect long term performance of the exterior into account and by combining them
determined climate zones throughout North America. We found common variables between certain zones which led us to
engineer James Hardie siding products for specific climates.

The development of these two products is a result of a heavy investment in R&D and our proprietary technology and
manufacturing processes and culminates in the evolution of 7th generation fiber cement – Engineered for Climate.

                     For climate zones 1-5                                              For climate zones 6-10

The HZ5® product is engineered to perform in climates with           The HZ10® products are specifically engineered to perform
seasonal temperature variations, freezing temperatures and           in climates with, high humidity, hot dry conditions and high
snow and ice.                                                        levels of rainfall.

This guide provides the best practice guidelines for installing the HardieZone product for your zone. Specific details and
helpful hints that pertain to your zones are included in order to facilitate your installation process. If you are unsure about
which zone your job is located in and which HardieZone product and installation instructions to use, then please visit our
website at jameshardie.com for the zip code tool.

                                                                 2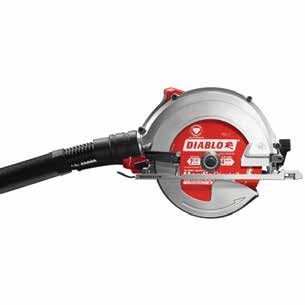
James Hardie® Products
Installation Guide

 FOREWORD
James Hardie, the world leader in the manufacturing and development of fiber-cement building products, has produced
this Installation Guide to help builders and contractors with the installation of James Hardie® siding and trim products,
including James Hardie products with ColorPlus® Technology.

   The first sections of this manual provide a general product description and information about safe practices, and
proper tools for working with James Hardie siding and trim products. Sections that follow describe design and general
installation information for specific James Hardie products. The appendix addresses the installation of James Hardie
siding products in less common construction practices (e.g. concrete construction).

   This manual must be read in conjunction with project drawings and specifications, applicable building codes, and
relevant compliance documents. The details in this manual provide guidance on how to comply with James Hardie’s
installation requirements and need to be reviewed by all parties who are responsible for installing James Hardie products
on a project.

   This manual is subject to periodic re-examination and revision. For information on the current status of
these documents please check the James Hardie website, www.jameshardie.com. The reader is responsible
for ensuring that they are using the most up-to-date information.

 TELEPHONE DIRECTORY

Technical Services 800-942-7343

Warranty 866-375-8603

                                                               3
Table of Contents

FOREWORD...............................................................................................3                     Butting to Mortar or Masonry..............................................................21
GENERAL PRODUCT INFORMATION......................................................6                                           Clearances.........................................................................................21
       Jobsite Storage of James Hardie® Products.........................................6                                   Siding to Ground Clearance...............................................................22
       Importance of Keeping James Hardie Products Dry..............................6                                        Siding to Flashing Clearance..............................................................22
		            Open Joints Due to Shrinkage......................................................6                            Siding and Trim to Solid Surfaces.......................................................23
		            Difficulty in Handling.....................................................................6                   Clearances for Sheltered Areas...........................................................23
		Staining........................................................................................6                          Clearance Requirement Examples................................................ 24-26
       Proper Handling of James Hardie Products..........................................7
                                                                                                                      GENERAL FASTENER REQUIREMENTS...............................................27
WORKING SAFELY WITH JAMES HARDIE PRODUCTS........................8                                                           Pneumatic Fastening..........................................................................27
       Minimize and Manage Silica Dust.........................................................8
       Work Safe: Product Cutting Instructions...............................................8                        FINISHING................................................................................................28
       Cutting Station Set Up..........................................................................9                     Finishing James Hardie® Siding and Trim Products.............................28
		            Clean Up and Disposal of Debris..................................................9                             ColorPlus® Touch-Up..........................................................................28
                                                                                                                             ColorPlus Products with Protective Laminate Sheet............................29
TOOLS FOR CUTTING AND FASTENING FIBER-CEMENT..................10                                                             Caulk..................................................................................................29
       Shears................................................................................................10              Repair Patching..................................................................................29
       Circular Saws.....................................................................................10                  Back Priming/Back Sealing................................................................29
       Hepa Vacuums...................................................................................11                     Maintenance................................................................................. 30-31
       Power Miter Saws..............................................................................11
       Saw Blades........................................................................................11
       Jig Saws............................................................................................12         HardieWrap®
       Drilling Fiber Cement..........................................................................12              HARDIEWRAP® PRODUCTS DESCRIPTION.........................................32
       Lap Gauges.......................................................................................12            INSTALLATION OF HARDIE WRAPS......................................................33
       Joint Flashing.....................................................................................13                 HardieWrap® Flashing Guide for Typical Penetration...........................34
       Power Nailers and Direct-to-Steel Fastening Tools..............................13                                     HardieWrap® Pro-Flashing Guide for Windows...................................34
       Nail Guns and ET&F Guns..................................................................14                           Storage..............................................................................................35
       Useful Hand Tools..............................................................................14                     General Requirement..........................................................................35
                                                                                                                             HardieWrap® Flex Flashing Stretchable Sill Flashing............................36
GENERAL INSTALLATION REQUIREMENTS........................................15                                                  Window Installation............................................................................36
       Framing and Sheathing......................................................................16                         Side Jamb Flashing............................................................................37
       Water-Resistive Barrier.......................................................................17                      Head Flashing....................................................................................37
       Staging...............................................................................................17              Circular Windows...............................................................................38
       Flashing..............................................................................................17              HardieWrap® Installation Requirements......................................... 39-44
       Roof-to-Wall Flashing.........................................................................18
       Gutters...............................................................................................18
       Valley Flashing....................................................................................19          HardieTrim®
       Penetrations.......................................................................................19          HARDIETRIM® PRODUCTS DESCRIPTION...........................................45
       Hose Bibs..........................................................................................20          INSTALLATION OF HARDIETRIM 4/4, 5/4 & NT3™ BOARDS.................. 46
       Hot Air Vents......................................................................................20                 Concealed Fastening..........................................................................46
       Lights and Electrical Outlets...............................................................21                        Trimming Corners...............................................................................46
       Wires, Conduits or Other Fixed Pipes.................................................21                               Trim Applications for Windows, Door & Other Openings.....................47
       Air Conditioners, Service Panels and Other Wall Mounted Devices.....21                                                Band Boards......................................................................................47

                                                                                                                  4
Fastener Table....................................................................................48                Face Nailing........................................................................................88
     Outside Corners.................................................................................49                  Staggering the Butt Joints..................................................................88

     Inside Corners....................................................................................49                Joint Flashing.....................................................................................89

     Band Board........................................................................................50                Joint Placement and Treatment..........................................................89
                                                                                                                         Continuing the Installation...................................................................90
     HardieTrim Board Fastener Specifications...........................................50
                                                                                                                         Installing HardiePlank Siding on Gable Walls................................. 90-91
     Window and Door Trim.......................................................................51
                                                                                                                         HardiePlank Siding Fastener Specifications........................................91
     Installing Rake and Fascia Board........................................................52
                                                                                                                         HardiePlank Lap Siding Installation Requirements......................... 92-95
     Drip Edge...........................................................................................52
INSTALLATION OF HARDIETRIM® BATTENS........................................53
     Getting Started...................................................................................53
                                                                                                                   HardieShingle®
     HardieTrim Battens Fastener Specifications........................................53
                                                                                                                   HARDIESHINGLE® SIDING PRODUCT DESCRIPTION.........................96
     Horizontal Joint Treatment..................................................................54
                                                                                                                   INSTALLATION OF HARDIESHINGLE SIDING.......................................97
     5/4 & 4/4 HardieTrim HZ10® Installation Requirements................. 55-63
                                                                                                                         Individual Shingles..............................................................................97
     5/4 & 4/4 HardieTrim HZ® Installation Requirements..................... 64-72
                                                                                                                         Shingle Fastener Specifications..........................................................97
                                                                                                                         Shingle Panels....................................................................................98
                                                                                                                         Installing Direct to 7/16 in Sheathing...................................................99
HardieSoffit®                                                                                                            Half-Round Shingle Panels......................................................... 99-100
HARDIESOFFIT® PANEL PRODUCT DESCRIPTION.............................73
                                                                                                                         HardieShingle Siding Installation Requirements......................... 101-108
INSTALLATION OF HARDIESOFFIT® PANELS.......................................74
     Installation of HardieSoffit Panels – Soffit Framing...............................74
     Joint Treatment for HardieSoffit Panels...............................................74
                                                                                                                   HardiePanel®
     Framing Prep for Soffit Panels............................................................75
                                                                                                                   HARDIEPANEL® VERTICAL SIDING PRODUCT DESCRIPTION...............109
     Cutting 45° Hip Roof Soffits................................................................75
                                                                                                                   INSTALLATION OF HARDIEPANEL VERTICAL SIDING......................110
     Installing Frieze Boards.......................................................................76
                                                                                                                         Getting Started.................................................................................110
     Treatment Options for the Siding/Soffit Juncture.................................76
                                                                                                                         Vertical Joint Treatment....................................................................111
     Insect Screen.....................................................................................76
                                                                                                                         HardiePanel Siding Fastener Specifications......................................111
     HardieSoffit Fastener Specifications....................................................76
                                                                                                                         Horizontal Joint Treatment................................................................112
     Beaded Porch Panel Framing.............................................................77
                                                                                                                         Windows, Doors, and Other Wall Penetrations.................................113
     Joint Treatment for Beaded Porch Panel.............................................77
                                                                                                                         HardiePanel Vertical Siding Installation Requirements............... 114-116
     Handling During Installation................................................................78

     Siding Beaded Porch Panel Joint.......................................................78
     HardieSoffit Panels Installation Requirements................................ 79-81
                                                                                                                   APPENDIX A – ADDITIONAL INFORMATION.............................. 117-125
     HardieSoffit Beaded Porch Panel Installation Requirements.......... 82-84
                                                                                                                   APPENDIX B – ESTIMATING......................................................... 126-128
                                                                                                                   APPENDIX C – GLOSSARY OF BUILDING TERMS..................... 129-130
                                                                                                                   APPENDIX D – CODE REFERENCES...................................................131
HardiePlank®                                                                                                       ESR-1844 & ESR-2290 ONLINE REPORTS..........................................132
HARDIEPLANK® LAP SIDING PRODUCT DESCRIPTION....................85
INSTALLATION OF HARDIEPLANK LAP SIDING..................................86
     Install a Starter Strip...........................................................................86
     Installing the Planks............................................................................87
     Plank Alignment at Corners................................................................87
     Handling.............................................................................................87
     Blind Nailing.......................................................................................88

                                                                                                               5
Information

                                 General Product Information
  Product
  General
Working
 Safely

                                  JOBSITE STORAGE OF JAMES HARDIE® PRODUCTS
                                                                                                                   1.1
                                 The James Hardie family of siding and trim products, including
Cutting and
 Fastening

                                 James Hardie® products with ColorPlus® Technology, should be stored in
 Tools for

                                 their original packaging in a garage, shed, or in some other covered area
                                 protected from weather whenever possible. These products must be kept
                                 covered on a pallet off of the ground; they must never be stored in direct
Requirements
 Installation
   General

                                 contact with the ground.
                                                                                                                  James Hardie products stored in their original
                                                                                                                  packaging.

                                 If James Hardie products are stored outside they
Requirements

                                                                                        1.2
                                 should be protected with an additional waterproof
  Fastener
  General

                                 covering. All scrap siding and trim pieces, cutoffs
                                 or material left on scaffolding must be covered
                                 and protected from the elements. If James Hardie
Finishing and
Maintenance

                                 products become saturated, they must be laid on
                                 a flat surface and allowed to dry completely prior
                                 to installation.
Boards/Battens Weather Barrier
                HardieWrap®

                                                                                       If stored outside protect with an additional waterproof covering.

                                                                                        ! WARNING
 HardieTrim®

                                                                                        James Hardie products should not be rolled-off or dumped-off of
                                                                                       the truck during delivery to the jobsite. James Hardie recommends
                                                                                             using a fork lift to off load material or unloading by hand.
HardieSoffit®
   Panels

                                  IMPORTANCE OF KEEPING JAMES HARDIE PRODUCTS DRY
HardiePlank®

                                 James Hardie siding and trim products must be kept dry at all times prior to installation. If products become saturated
 Lap Siding

                                 before they are installed, the following problems may occur:

                                 OPEN JOINTS DUE TO SHRINKAGE
HardieShingle®

                                 If installed wet, joints between planks may open up requiring repair or replacement. Under normal environmental
    Siding

                                 conditions fiber cement has significantly greater dimensional stability than wood or vinyl-based exterior products.

                                 DIFFICULTY IN HANDLING
                                 Saturation increases the weight and flexibility of fiber-cement products, making them difficult to handle.
Vertical Siding
HardiePanel®

                                 STAINING
                                 Staining is a deposit of soluble salts, usually white in color, which sometimes appears on the surface of masonry
                                 or concrete construction.
Appendix/
Glossary

                                                                                        ! WARNING
                                                                                            James Hardie is not responsible for damage due to improper
2290 Report
ESR-1844 &

                                                                                                      storage and handling of its products.

                                                                                        6
Information
                                                                                                                             Product
                                                                                                                             General
                                                                                                                               Working
                                                                                                                                Safely
 PROPER HANDLING OF JAMES HARDIE®
                                ® PRODUCTS
                                 PRODUCTS
                                                                    1.3
To help avoid injury and product damage, lap siding, trim

                                                                                                                           Cutting and
                                                                                                                            Fastening

                                                                                                                            Tools for
and soffit material should always be carried on edge.
James Hardie recommends that these products be car-
ried by two people whenever possible with each person
positioned near the end of the load. To carry a plank solo,

                                                                                                                           Requirements
                                                                                                                            Installation
                                                                                                                              General
a person should hold it on edge in the middle with arms
spread apart for maximum support of the product. Lifting
or carrying lap siding or trim flat may break or bend the

                                                                                                                           Requirements
product.

                                                                                                                             Fastener
                                                                                                                             General
James Hardie recommends that two people always carry            One person should hold planks on edge in the middle with
                                                                arms spread apart for maximum support of the product
panel products. Workers should hold the panel near each
end and on edge. Because of reduced visibility when han-

                                                                                                                               Finishing and
                                                                                                                               Maintenance
                                                                    1.4
dling panel products, take extra care to avoid damaging
the corners and edges of the panel.

                                                                                                                               Weather Barrier Boards/Battens
                                                                                                                                HardieWrap®
       TIP: When handling panel products, manufactured panel
         carriers or caddies can give workers better control.

                                                                                                                               HardieSoffit®    HardieTrim®
                                                                                                                                  Panels
                                                                                                                               HardiePlank®
                                                                                                                                Lap Siding
                                                                Two people should always carry panel products.

            WARNING
                                                                                                                               HardieShingle®
  !
                                                                                                                                   Siding
 Carrying James Hardie® ColorPlus® siding products flat may cause excessive
                  bending, which can damage the finish.
                                                                                                                               Vertical Siding
                                                                                                                               HardiePanel®

 1.5

   WRONG                                             WRONG
                                                                                                                               Appendix/
                                                                                                                               Glossary
                                                                                                                               2290 Report
                                                                                                                               ESR-1844 &

                                                                7
Information
Working Safely with James Hardie® Products
Product
General
Working
Safely
MINIMIZE AND MANAGE SILICA DUST
Silica is the most common mineral found on earth. It is the main component of beach sand and is used to make glass
Cutting and
Fastening
and household products such as cleansers and polishes. Silica is also found in many everyday building materials:
Tools for
tile, concrete, granite countertops, drywall compound, masonry bricks, pavers, etc. It is a very durable material and
contributes to the stability of fiber cement.Cutting or grinding silica containing materials with high speed saws or
grinders can generate very fine (respirable) dust. Over time, long-term occupational over-exposure to respirable silica
Requirements
Installation
General
dust can cause lung diseases including silicosis, lung cancer and other health issues.
OSHA sets exposure limits for dust, chemicals and other materials that employees may be exposed to at work or
on a jobsite. These exposure limits cover dust from all types of materials, including: stone, brick, concrete, drywall,
Requirements
Fastener
wood, and wood composites.OSHA requires employers to take specific actions to protect workers on construction
General
sites based on the amount of silica dust they are exposed to. The updated OSHA standard reduces the permissible
exposure limit (PEL) for silica dust by about 80% – from 250 μg/m³ to 50 μg/m³ – over an 8-hour period.
Finishing and
Maintenance
If you have concerns about dust exposure or compliance with OSHA regulations, please contact James Hardie at
1-800-942-7343, or consult with a qualified industrial hygienist (IH). A directory of independent IH consultants can be
found at www.aiha.org.
Boards/Battens Weather Barrier
HardieWrap®
WORK SAFE: FOLLOW JAMES HARDIE PRODUCT CUTTING INSTRUCTIONS
OUTDOORS
1. Position cutting station so that airflow
HardieTrim®
blows dust away from the user and
others near the cutting area. Shears
2. C
ut using one of the following
HardieSoffit®
methods:
Best
Panels
a. Best: Circular saw equipped with a
HardieBlade® saw blade and attached
vacuum dust collection system.
HardiePlank®
Lap Siding
Circular Saw HardieBlade® Saw Blade Vacuum
Shears (manual, pneumatic or electric) with vacuum adapter
may also be used (not recommended
for products thicker than 7/16 in.)
HardieShingle®
Siding
b. Better: Circular saw equipped with
Better
a dust collection feature (e.g. Roan®
Roan® Dust Collecting
saw) and a HardieBlade saw blade. Circular Saw HardieBlade® Saw Blade
Vertical Siding
HardiePanel®
c. Good: Circular saw equipped with a
HardieBlade saw blade
INDOORS
Good
DO NOT grind or cut with a power saw
Appendix/
Glossary
Circular Saw HardieBlade® Saw Blade
indoors. Cut using shears (manual,
pneumatic or electric) or the score and
snap method (not recommended for
2290 Report
ESR-1844 &
products thicker than 7/16 in.)
*May require proof of compliance (industry reports or exposure testing)
8Information
Product
General
Working
Safely
James Hardie ranks options for cutting our fiber cement products in a convenient "Good, Better, Best" chart. The chart
on the previous page is provided for informational purposes only to help you in selecting the appropriate cutting options
for your particular circumstances. If you are unsure which cutting tools are best for your job site, consult a qualified
Cutting and
Fastening
Tools for
industrial hygienist or safety professional, or contact your James Hardie representative for assistance.
The Occupational Safety and Health Administration (OSHA) regulates workplace exposure to silica dust. For
construction sites, OSHA has deemed that cutting fiber cement outdoors with a circular saw having a blade diameter
Requirements
Installation
General
less than 8 inches and connected to a commercially available dust collection system per manufacturer’s instructions
results in exposures below the OSHA Permissible Exposure Limit (PEL) for respirable crystalline silica, without the need
for additional respiratory protection.
Requirements
Fastener
General
Note: James Hardie makes no representation or warranty that use of a particular cutting option will assure your
compliance with OSHA rules or applicable laws and safety requirements.
Finishing and
Maintenance
CUTTING STATION SET UP
2.1
Weather Barrier Boards/Battens
HardieWrap®
Set up cutting tables or workstations in well
ventilated outdoor areas, downwind from other
workers. Do not cut indoors or in enclosed areas
with high speed saws unless special precautions
HardieTrim®
are taken to prevent overexposure to dust.
Clean Up and Disposal of Debris
When cleaning up dust and debris from cutting
HardieSoffit®
James Hardie® products, never use a broom or
Panels
brush if the debris material is dry. Use wet dust
suppressions methods, sweeping compoundd,
or use a vacuum to collect dust. Waste pieces of
HardiePlank®
Lap Siding
James Hardie siding and trim products can be dis-
posed of in landfills according to local ordinances.
No special handling is required.
HardieShingle®
Siding
SILICA WARNING
Vertical Siding
HardiePanel®
DANGER: May cause cancer if dust from product is inhaled. Causes damage to lungs and respiratory system through prolonged or repeated inhalation of dust from product.
Refer to the current product Safety Data Sheet before use. The hazard associated with fiber cement arises from crystalline silica present in the dust generated by activities
such as cutting, machining, drilling, routing, sawing, crushing, or otherwise abrading fiber cement, and when cleaning up, disposing of or moving the dust. When doing any
of these activities in a manner that generates dust you must (1) comply with the OSHA standard for silica dust and/or other applicable law, (2) follow James Hardie cutting
instructions to reduce or limit the release of dust; (3) warn others in the area to avoid breathing the dust; (4) when using mechanical saw or high speed cutting tools, work
Appendix/
Glossary
outdoors and use dust collection equipment; and (5) if no other dust controls are available, wear a dust mask or respirator that meets NIOSH requirements (e.g. N-95 dust
mask). During clean-up, use a well maintained vacuum and filter appropriate for capturing fine (respirable) dust or use wet clean-up methods - never dry sweep.
WARNING: This product can expose you to chemicals including respirable crystalline silica, which is known to the State of California to cause cancer. For more information
go to P65Warnings.ca.gov.
2290 Report
ESR-1844 &
9Information
Tools for Cutting and Fastening Fiber-Cement Products
Product
General
Working
Safely
James Hardie promotes certain tools and products for the safest and best way to cut their fiber-cement products,
consistent with its best practice recommendations (please refer to page 6-7). However, please consult tool
manufacturer instructions and guidelines for the safe operation of specific tools. The tools listed here are not made
Cutting and
Fastening
Tools for
for, or by, James Hardie Building Products, Inc. and James Hardie accepts no liability for their use or misuse.
SHEARS
Requirements
Installation
General
Because shears produce less dust than high-speed tools,
they are the preferred method of cutting lap and panel siding
products. Both electric and pneumatic shears are available,
Requirements
and they may be used for cutting indoors as well as outdoors.
Fastener
General
Shears are available that can make straight or radius cuts in fiber
cement products with relative ease. Shears cannot be used to
cut HardieTrim® boards.
Finishing and
Maintenance
TIP: For the smoothest cuts, when cutting James Hardie® siding products with a shear or circular saw, cut the board face down. When using a miter saw,
Boards/Battens Weather Barrier
cut the board face up. If installing James Hardie siding products with ColorPlus® Technology, leave the protective laminate film in place while cutting.
HardieWrap®
CIRCULAR SAWS
HardieTrim®
When cutting any James Hardie siding, soffit, or trim product with
a circular saw, use only tools that are designed specifically for
dust reduction. A dust-reducing circular saw has either a deflec-
HardieSoffit®
Panels
tor to direct any dust away from the user’s breathing area or a
collection box to capture the dust. James Hardie recommends
that a HEPA-equipped vacuum system be used in conjunction
HardiePlank®
Lap Siding
with any circular saw. (Circular saws should only be used in out-
door, well-ventilated areas.)
HardieShingle®
Siding
! WARNING
Vertical Siding
HardiePanel®
Always make sure the saw manufacturer’s safety equipment
is in place and in good working order. Never use high-speed
power tools when cutting James Hardie® products indoors.
Appendix/
Glossary
2290 Report
ESR-1844 &
10Information
Product
General
Working
Safely
HEPA VACUUMS
Always use a vacuum equipped with a HEPA filter to
Cutting and
Fastening
Tools for
help minimize the amount of respirable dust during
power saw cutting and clean-up. Many vacuums
are designed to connect directly to power tools and
Requirements
run only when the power tool is being operated. In
Installation
General
addition to a HEPA filter, using a disposable drywall
or collection bag is recommended to extend the life
of the HEPA filter and make disposal easier and safer.
Requirements
Fastener
General
POWER MITER SAWS
Finishing and
Maintenance
Like circular saws, a power miter saw should only be operated outdoors in
well-ventilated areas. Power miter saws should be equipped with a HardieBlade®
Weather Barrier Boards/Battens
HardieWrap®
saw blade and should be used in conjunction with a vacuum equipped with a
HEPA filter for maximum dust protection.
HardieSoffit® HardieTrim®
Panels
SAW BLADES
Traditional blades that are not designed for cutting James Hardie products may
HardiePlank®
Lap Siding
e.
packag
lade
generate excessive dust, cut slowly, or exhibit premature wear. The HardieBlade®
l&b a
anu m
POLYCRYSTALLINE
ne
chi
ma
s in
ng
rni
wa
all
ad re
saw blade is a unique circular saw blade designed to generate less respirable dust
DIAMOND TIPPED
g,
sin
eu or
Bef
than a traditional saw blade or continuous rim diamond blade. The HardieBlade
Doblar hacia afuera Twist Out
C I Ó N R O TAT I O N
D0704DH 5/8" Arbor
HardieShingle®
71/4" 4 Teeth
RPM 10,000
182mm Dientes
can also be used to cut the full line of James Hardie products and are available in
No golpees
Do Not Knock Out
R OTA
Siding
The ONLY Approved PCD Tipped
MAX
HardieBlade™
ION
TAT
7 ¼ in., 10 in., and 12 in. diameters. To extend the life of a HardieBlade saw blade,
RO
Cuts All Fiber Cement Boards Corta todas los tableros de fibrecemento
WEAR EYE PROTECTION
ADVERTENCIA: Protéjase
do not use it to cut any materials other than fiber cement.
siempre los ojos.
ATTENTION: Portez toujours
un appareil de protection
des yeux.
Do not use in Concrete
No usar en concreto
Vertical Siding
HardiePanel®
Appendix/
Glossary
2290 Report
ESR-1844 &
11Information
Tools for Cutting and Fastening Fiber-Cement Products (cont.)
Product
General
Working
Safely
JIG SAWS
Jig saws equipped with a fiber-cement cutting
Cutting and
Fastening
Tools for
blade may be used to cut service openings,
curves, radii, scrollwork, and other irregular
shapes in James Hardie® products. Because
Requirements
most jig saws are not equipped with dust
Installation
General
collection capabilities, these tools also should
only be used outdoors in well-ventilated areas
and for limited amounts of cutting.
Requirements
Fastener
General
DRILLING FIBER CEMENT
Finishing and
Maintenance
When required to drill a hole in fiber cement products, a masonry bit
should be used. For larger holes, a carbide tipped hole saw can be
Boards/Battens Weather Barrier
used. Due to the lack of dust collection, drills and hole saws should
HardieWrap®
only be used outdoors in well-ventilated areas and for limited amounts
of cutting. For best results, use a hole saw specifically designed for
fiber cement.
HardieTrim®
www.malcoproducts.com
HardieSoffit®
Panels
LAP GAUGES
Several different methods exist to ensure proper spacing and overlap of fiber cement products. The slowest method is
HardiePlank®
Lap Siding
to snap a chalk line with the proper spacing above each row of fiber cement as it is being installed. The siding gauge
leads all other alignment devices in ease of use, speed, and effectiveness. James Hardie recommends the use of
siding gauge when installing lap siding. When installing HZ5®, special care must be taken when using lap gauges so
HardieShingle®
the drip edge is not damaged. For best results, use a Siding Gauge that is specifically designed for HZ5®.
Siding
Vertical Siding
HardiePanel®
Appendix/
Glossary
www.pactool.us
2290 Report
ESR-1844 &
12Information
Product
General
Working
Safely
JOINT FLASHING
Flashing behind butt joints provides an extra level of protection against the 3.1 Flashing behind to add an
Cutting and
Fastening
Tools for
entry of water at the joint. James Hardie recommends 6 in. wide flashing that additional layer of protection
from water infiltration
overlaps the course below by 1 in. Some local building codes may require
different size flashing. Joint-flashing material must be durable, waterproof
Requirements
materials that do not react with cement products. Examples of suitable
Installation
General
material include finished coil stock and code compliant water-resistive
barriers. Other products may also be suitable.
Requirements
Fastener
General
Extend flashing
1 in. onto the
POWER NAILERS AND DIRECT-TO-STEEL FASTENING TOOLS course below
Finishing and
Maintenance
Pneumatic nailers and cordless nailers can be used to attach James Hardie products to wood, steel, or masonry
substrates. Pneumatic tools require the use of an air compressor with a hose. Finish nailers should be used for
Weather Barrier Boards/Battens
HardieTrim® boards only. Additionally, direct-to-steel tools such as those made by ET&F are designed specifically for
HardieWrap®
fastening to steel framing. Refer to the product-specific installation instructions in each section for fastener choices.
Power nailers recommended for attaching James Hardie products are siding nailers, roofing nailers and finish
nailers. Below is a chart showing the appropriate nailer for each of the James Hardie siding and trim products. Be sure
HardieTrim®
that the nailer chosen fires the fastener recommended for each product for the specific installment situation.
HardieSoffit®
PNEUMATIC NAILER USAGE WITH JAMES HARDIE® PRODUCTS
Panels
Siding Guns Roofing Guns Finish Guns
HardiePlank®
Lap Siding
HardieShingle®
Siding
Vertical Siding
HardiePanel®
HardiePlank® Lap Siding HardiePlank® Lap Siding HardieTrim® 5/4, 4/4 Boards
HardiePanel® Vertical Siding HardiePanel® Vertical Siding HardieTrim® Batten Boards
HardieShingle® Panels HardieShingle® Panels
HardieSoffit® Panels
Appendix/
Glossary
TIP: If framing nailers are used to install James Hardie products, be sure they
2290 Report
ESR-1844 &
are fitted with a flush mount attachment to control nail seating depth.
13Information
Tools for Cutting and Fastening Fiber-Cement Products (cont.)
Product
General
Working
Safely
NAIL & PIN GUNS
Pneumatic nail guns can be used to attach James Hardie products to wood, steel or masonry substrates. Finish nail
Cutting and
Fastening
Tools for
guns can be used for HardieTrim® board only. Refer to the product specific installation instructions for fastener choices.
Below are examples of commonly used nail guns.
Requirements
Installation
Hitachi (www.hitachipowertools.com)* Dewalt (www.dewalt.com)* ET&F Fastening Systems (www.etf-fastening.com)*
General
(NT65A2) 2½ in. 16 guage Finish Nailer (D51257K) 1¼ in - 2½ in. 16 Gauge Straight (500) Nailer to Steel Studs
(NV65AH) 2½ in. Siding Nailer Finish Nailer Kit (510) Nailer to Steel Studs
(NV45AB2(S)) 1¾ in Coil Roofing Nailer (610) Nailer to Steel Studs
(NV75AG) 3 in Coil Nailer (110) Finish Nailer to Steel Studs
Requirements
Fastener
General
Duo-Fast (www.duo-fast.com)* Porter Cable (www.deltaportercable.com)* Aerosmith (www.AerosmithFastening.com)
(P275C) Siding Coil Nailer (COIL250) 2½ in. Coil Nailer (ST4100/ST4200) Nailer to Steel Studs
(HN120) Nailer to Masonry
Requires special high pressure air compressor model number
Finishing and
Maintenance
AKHL1050E
Boards/Battens Weather Barrier
HardieTrim® HardieWrap®
NV65AH NT65A2 NV45AB2(S) NV75AG DC616KA†
HardieSoffit®
Panels
HardiePlank®
Lap Siding
P275C ET&F 510 610 ET&F 110 ET&F ST4100/ HN120
HardieShingle®
ST4200
Siding
USEFUL HAND TOOLS
Vertical Siding
HardiePanel®
TIP: If hand nailing, use a smooth
In addition to the power tools listed above, certain hand tools are necessary for the
faced hammer to avoid marking
installation of James Hardie® siding and trim products. These include: the product. Waffle-headed
hammers should not be used
• 25 ft. contractors tape measure
when hand nailing James Hardie
• Torpedo level
Appendix/
Glossary
siding and trim products.
• Pencil or pen
• Smooth-faced hammer
• Speed square
2290 Report
ESR-1844 &
• 4 ft. or longer level
144.1 Water-resistive barrier 4.2 Rafter tail 4.3
Roof sheathing
laps over the step flashing 4.4 Trim Siding
Self-adhering membrane and the roofing felt Drip edge
Extend shingles Seal cut
at least 1 in. out edges
Roofing felt from the fascia (of siding)
when gutters
Step flashing are present
Kickout flashing shall Flashing
be min 4 in x 4 in with
a 100° - 110 bend/ Roofing
kickout to divert water
away from the wall Fascia Soffit Ledger Sheathed Minimum 2 in.
clearance
Sub-fascia Blocking wall
Drip edge 4.5
and fascia Per IRC Code
Gutter and 905.2.8.3:
end cap flashing
should end shall be 4 in
4.12
a minimum
Wall HardiePlank
1 in. from
high by 4 in
sheathing lap siding siding wide
Water-resistive
Minimum 2
barrier 4.6 Sheathing
in. clearance HardiePlank®
Starter Lap Siding
Z-flashing from highest Strip
with vertical point of Z Flashing
element high decking Do not
enough for caulk 6mm
Starter strip (1/4”) gap
clearance Weather
General Installation Requirements
Resistive
Barrier
15
Deck
Ledger framing
Minimum Cut trim block into
22.5º two pieces to retro-fit
4.11 Do not caulk between the weather around existing vent.
Starter strip siding and the flashing. cut
Water-resistive
barrier
4.7 Wall sheathing
Flashing Water-
resistive
1/8 in. caulked barrier
gap
gap is left ¼ in
between siding 4.8 Trim HardiePlank
4.9 “L” Flashing
and the side lap siding
trim pieces. Water-resistive
Under-Cover
barrier Minimum 2 in.
HardieTrim®
board Flashing clearance from
clearance slab
Siding
4.10 Starter strip
Siding Flashing
and trim 4 in. over trim Exterior slab
min. with 1/4 in.
10 ft. Trim gap
max
1/4 in. Minimum, 1/4 in.
min.
clearance between
Flashing below the trim and
Minimum 6 in. trim rests on Do not caulk 1/4
clearance horizontal surface in. gap
Ground solid surface
Requirements Requirements Fastening Information
2290 Report Glossary Vertical Siding Siding Lap Siding Panels Weather Barrier Boards/Battens Maintenance Fastener Installation Cutting and Safely Product
ESR-1844 & Appendix/ HardiePanel® HardieShingle® HardiePlank® HardieSoffit® HardieWrap® HardieTrim® Finishing and General General Tools for Working GeneralInformation
General Installation Requirements
Product
General
Working
Safely
FRAMING AND SHEATHING
Refer to the appendix for more information on rigid foam insulation. 4.13 Water-resistive barrier
Cutting and
Braced stud wall
Fastening
Tools for
James Hardie® siding and trim products can be installed over braced
wood or steel studs spaced at a maximum of 24 in. on center or directly
to 7/16 in. thick OSB or equivalent sheathing. These products can also
Requirements
be installed over solid-foam insulation board up to 1 inch thick.
Installation
General
Irregularities and unevenness in framing, sheathing, foam and other
wall assembly components, including under driven nails, can telegraph
through to the finished siding and trim. These irregularities should be
Requirements
Fastener
General
corrected before the siding is installed.
When installing James Hardie siding and trim products over steel
studs James Hardie requires a minimum 20 gauge and recommends
Finishing and
Maintenance
a maximum of 16
gauge. Steel framing 4.14
Water-resistive barrier 4.15
Water-resistive barrier
that is outside of
7/16 in. thick OSB Maximum 1 in. foam
Boards/Battens Weather Barrier
this range may be
HardieWrap®
sheathing
too flimsy to provide
adequate holding
power or too heavy
for some fastening
HardieTrim®
systems.
HardieSoffit®
When using pins to attach siding products to steel, it is important to
Panels
4.16
hold the material tight to the steel framing when driving the pin as the
pin will not pull the material tight to the framing the same as a nail into Water Resistive
Barrier
wood will. Once the pin has been driven into the steel stud it is also Steel Framing:
HardiePlank®
Lap Siding
20 gauge min.
important to not set or hit the nail a second time with a hammer. When
driven into steel, the ballistic-shaped point uniformly pierces the steel
instead of drilling it out or tearing the steel. The displaced steel rebounds
around the pin to create a strong compressive force on the shank of
HardieShingle®
Siding
Sheathing
the pin When the pin is hit with a hammer it disrupts the compressive
and frictional forces holding the pin and significantly reduces the overall
holding capacity of the pin If the pin does is not set properly during the
Vertical Siding
HardiePanel®
first attempt, the pin should be removed and replaced with a second pin
When using a screw to attach James Hardie products to steel, a
screw with a self tapping point should be used. A self tapping screw
4.17
functions by having a cutting edge which drills away the material, making a tiny hole for the
Appendix/
Glossary
screw to go into. Some self tapping screws may be wing tipped which are intended to bore
out the fiber cement (creating a pilot hole), and will break off as the screw goes into the steel.
Either type of screw is acceptable for use.
2290 Report
ESR-1844 &
Refer to the correct code compliance reports when selecting a fastener for steel
applications and choose the corresponding tools from the tool section of this guide.
16Information
Product
General
Working
Safely
WATER-RESISTIVE BARRIER
Prior to siding, make sure the water-resistive barrier is properly installed according to the manufacturers’ instructions
Cutting and
Refer to page #30 for more information on HardieWrap® weather barrier including complete installation requirements.
Fastening
Tools for
IBC Code Reference: “1403.2 Weather protection. Exterior walls shall provide the building with a weather-resistant exterior wall envelope. The
exterior wall envelope shall include flashing, as described in Section 1405.3. The exterior wall envelope shall be designed and constructed in
Requirements
Installation
General
such a manner as to prevent the accumulation of water within the wall assembly by providing a water-resistive barrier behind the exterior veneer,
as described in Section 1404.2, and a means for draining water that enters the assembly to the exterior. Protection against condensation in the
exterior wall assembly shall be provided in accordance with the International Energy Conservation Code.
Requirements
Exceptions:
Fastener
General
1. A weather-resistant exterior wall envelope shall not be required over concrete or masonry walls designed in accordance with Chapters 19
and 21, respectively.
Finishing and
Maintenance
2. Compliance with the requirements for a means of drainage, and the requirements of Sections 1404.2 and 1405.3, shall not be required for
an exterior wall envelope that has been demonstrated through testing to resist wind-driven rain, including joints, penetrations and intersections
with dissimilar materials, in accordance with ASTM E 331 under the following conditions…”
Weather Barrier Boards/Battens
HardieWrap®
STAGING
Heavy building products and components such as roofing, drywall and floor coverings should be stored throughout
the structure prior to the installation of the siding. Distributing the weight in this manner will reduce the possibility of
HardieTrim®
floor plate compression on two or more story homes.
FLASHING
HardieSoffit®
When using James Hardie siding, trim, and weather barrier products, make sure that roof flashing, water table
Panels
flashing, window and door flashing, and flashing for other building envelope penetrations are properly installed and
lapped so that moisture drains down and to the exterior. Note: The successful installation of flashing requires thorough
planning before installation of roofing or siding. Scheduling and sequencing are important factors as well as having the
HardiePlank®
Lap Siding
correct flashings available on site at the correct time. James Hardie does not recommend the use of mill finished, raw
aluminum flashing or any other product that may bleed or adversely react with cement products. Painted or coated
aluminum flashings are recommended.
HardieShingle®
Manufacturers of ACQ and CA preservative-treated wood recommend spacer materials or other physical barriers to Siding
prevent direct contact of ACQ or CA preservative-treated wood and aluminum products. Fasteners used to attach
HardieTrim Tabs to preservative-treated wood shall be of hot dipped zinc-coated galvanized steel or stainless steel
and in accordance to 2009 IRC R317.3 or 2009 IBC 2304.9.5.
Vertical Siding
HardiePanel®
IBC Code Reference: “1405.3 Flashing. Flashing shall be installed in such a manner so as to prevent moisture from entering the wall or to
redirect it to the exterior. Flashing shall be installed at the perimeters of exterior door and window assemblies, penetrations and terminations of
Appendix/
Glossary
exterior wall assemblies, exterior wall intersections with roofs, chimneys, porches, decks, balconies and similar projections and at built in. gutters
and similar locations where moisture could enter the wall. Flashing with projecting flanges shall be installed on both sides and the ends of
copings, under sills and continuously above projecting trim.”
2290 Report
ESR-1844 &
17Information
General Installation Requirements (cont.)
Product
General
Working
Safely
ROOF-TO-WALL FLASHING
4.18 Self-adhering membrane Water-resistive barrier laps
Due to the volume of water that can run down a sloped roof, one of the over the step flashing and
Cutting and
Fastening
the roofing felt.
Tools for
most critical flashing details is where a roof intersects with a sidewall.
Install a self-healing adhesive-backed membrane along the roof/wall
Roofing felt
intersection before flashing. The membrane on the wall should extend
Step
behind the eaves framing and should be installed before the sub-fascia
Requirements
Installation
flashing
General
or trim goes on.
as stated on
The roof should then be flashed to the wall with step flashing page 13
positioned at every shingle course. Where the roof begins at its lowest
Requirements
Fastener
General
point, install a kickout flashing to deflect water away from the siding.
Kickout flashing can be made by cutting and bending a piece of step Drip edge
flashing at an angle. The water-resistive barrier on the wall should then and fascia
lap over the step flashing.
Finishing and
Maintenance
There are several companies that sell pre-made kickout flashings
that are designed to divert water away from the wall. Below is an
Boards/Battens Weather Barrier
example of a preformed polypropylene kickout. Be sure to follow all
HardieWrap®
manufacturer's installation instructions.
HardieTrim®
! WARNING
Copyright © 2009 DryFlekt. All rights reserved.
Caution: The kickout flashing shall be min 4 in x 4 in as required by IRC code
R905.2.8.3 and be angled between 100° - 110° to deflect water from dumping
HardieSoffit®
behind the siding and the end of the roof intersection
Panels
GUTTERS
HardiePlank®
4.19
Lap Siding
If gutters are installed, they should not terminate against siding or trim.
Maintain a 1 in. clearance between the siding and the gutter end-cap.
Kickout flashings should be installed on the roof above to divert roof
HardieShingle®
runoff into the gutters and away from the 1 in. gap. Gutter and
Siding
end cap
The amount of water that can be generated from a rain shower or should end a
storm can be substantial. Managing the collection and distribution of minimum 1 in.
from siding. 1
Vertical Siding
this water is important over the life of a home.
HardiePanel®
in.
Appendix/
Glossary
Code Reference: “1503.2.1 Locations. Flashing shall be installed at wall
and roof intersections, at gutters, wherever there is a change in roof slope
or direction and around roof openings…”
2290 Report
ESR-1844 &
TIP: James Hardie recommends the use of rain gutters whenever possible.
18Information
Product
General
Working
Safely
VALLEY FLASHING
4.20-A
For added protection at roof valleys, James Hardie requires one of Extend shingles
Cutting and
Fastening
Tools for
the following options: at least 1 in. out
from the fascia
1. If rain gutters are present: As the roof is being shingled, have when gutters
are present.
the roofer extend the shingles at least 1 in. out from the fascia to
Requirements
Installation
direct water directly into the gutters (figure 4.20-A).
General
2 If rain gutters not present: When rain gutters are not present, have
4.20-B
the roofer extend the valley flashing at least 2 in. out from the
Requirements
corner to direct water further away from the building (figure 4.20- Extend valley
Fastener
General
flashing at least
B). 2 in. out from
the corner of
3. If the roof is already flashed and shingled, add a short piece of the trim when
flashing to extend the valley in compliance with figure 4.20-B. gutters are not
Finishing and
Maintenance
present.
The above requirement also applies to roof valley’s at any other
locations where the fascia runs into a roof line such as dormer
valleys and roof-to-roof intersections.
Weather Barrier Boards/Battens
HardieWrap®
HardieSoffit® HardieTrim®
Panels
PENETRATIONS
4.21
Sheathing
HardiePlank®
For penetrations in the building envelope such as hose bibs and Starter Lap Siding
Strip
HardiePlank®
holes 1½ in diameter or larger, such as dryer vents, a block of
Lap Siding
Z Flashing
Do not
HardieTrim® 5/4, 4/4 boards shall be installed around the point of caulk 6mm
(1/4”) gap
penetration. Blocking should be a minimum 3 in radius greater than Weather
Resistive
the radius of the penetration. To install a block around an existing Barrier
HardieShingle®
vent pipe, it may be necessary to cut the block into two pieces. In
Cut trim block into
Siding
Minimum
this case, weather-cut the trim to fit it into place. Install flashing over 22.5º two pieces to retro-fit
weather around existing vent.
the top of the trim block. cut
Vertical Siding
HardiePanel®
Penetrations through a building envelope are made to
accommodate needs such as hose bibs, dryer and furnace vents,
electrical conduit, etc. It is important to restore the weather-resistant
barrier of the home after cutting a hole for the penetration.
Appendix/
Glossary
There are several pre-made blocking and flashing products
available that can simplify the installation of a penetration. One
TIP: As most penetrations will require blocking and flashing,
such example is Sturdimount®. Be sure to follow all manufactures
some planning is required. As the trim is ordered for the
2290 Report
ESR-1844 &
installation instructions. home, don’t forget to order some extra to serve as blocking.
19Information
General Installation Requirements (cont.)
Product
General
Working
Safely
HOSE BIBS
4.22 HardiePlank®
Hose bibs are a source of water which increases the likelihood of moisture Sheathing Lap Siding
Cutting and
Fastening
Tools for
related problems. The goal is to keep the water outside of the building and
the best way to do this is keep the water off the walls. A good preventative Starter
Strip
measure is to extend the hose bib further from the wall. A downward slope on Do not
the water pipe as it leaves the building will also encourage any slow leaks to fall caulk
Requirements
Installation
Z Flashing 1/4” gap
General
away from the home.
Large piping over 1½ in. diameter is required to have blocking and flashing
at the penetration. A block of HardieTrim® 5/4, 4/4 boards should be installed
Requirements
Minimum
Fastener
General
around the point of penetration. To install a block around an existing pipe, it 22.5º
weather
may be necessary to cut the block into two pieces. In this case, weather-cut HardieWrap™ cut
Weather
the trim to fit it into place. Install flashing over the top of the trim block. Resistive
Barrier
Finishing and
Maintenance
Boards/Battens Weather Barrier
HOT AIR VENTS (Dryer, Stove, Furnace, Heater, Etc.)
HardieWrap®
4.23 HardiePlank®
For hot air vents including dryer vents, stove vents, and Lap Siding
furnace and heater exhaust, it is important to move the air Sheathing
away from the building envelope. As the vent is installed, a Starter Do not
HardieTrim®
path for that moisture to leave the area should be identified. Strip caulk 6mm
Z Flashing (1/4”) gap
Consider what is being vented and where it is going before
installing the vent. For instance, a dryer vent directly under Weather
an eave is going to force hot, moist air to rise and collect at Resistive
HardieSoffit®
Barrier
Panels
the soffit. A good preventative measure for many vents is to
increase the distance they extend from the wall to help expel Install per appliance
moisture from the building. manufacturer’s
recommendations
HardiePlank®
Lap Siding
For dryer vents, avoid placement too low to the ground where debris could easily impede air flow, trapping heat
and moisture. Some types of high efficiency furnaces can be vented out through the walls. In these cases, avoid
HardieShingle®
locating the vent too close to the roof or eaves where heat and moisture will be trapped.
Siding
TIP: Consider location of the vent prior to installation and consider extending the vent further from the wall.
Vertical Siding
HardiePanel®
Any vent piping is required to have blocking and flashing at the penetration. A block of HardieTrim® 5/4, 4/4
boards should be installed around the point of penetration. The blocking should extend 3-4 in. along the wall from the
edge of the vent. To install a block around an existing vent, it may be necessary to cut several blocks, with weather-
Appendix/
Glossary
cuts on each piece. Flashing must be installed over the top of the trim block.
2290 Report
ESR-1844 &
20You can also read


