A QUICK TOUR OF ADOBE ILLUSTRATOR CC (2018 RELEASE) - Pearsoncmg.com
←
→
Page content transcription
If your browser does not render page correctly, please read the page content below
A QUICK TOUR OF
     ADOBE ILLUSTRATOR CC
     (2018 RELEASE)

     Lesson overview
     In this interactive demonstration of Adobe Illustrator CC (2018
     release), you’ll get an overview of the main features of the application.

     This lesson takes approximately 45 minutes to complete.

     Please log into your account on peachpit.com to download the lesson files
     for this chapter, or go to the “Getting Started” section at the beginning of
     this book and follow the instructions under “Accessing the Lesson Files
     and Web Edition.”

     Your Account page is also where you’ll find any updates to the chapters
     or to the lesson files. Look on the Lesson & Update Files tab to access the
     most current content.

10
In this demonstration of Adobe Illustrator CC, you will
be introduced to some key fundamentals for working
in the application.

                                                          11
Getting started
For the first lesson of this book, you’ll get a quick tour of the most widely used tools
and features in Adobe Illustrator CC, offering a sense of the many possibilities.
Along the way, you’ll create artwork for a bakery. First, you’ll open the final artwork
to see what you will create in this lesson.
� Note: If you 1 To ensure that the tools and panels function exactly as described in this lesson,
have not already delete or deactivate (by renaming) the Adobe Illustrator CC preferences file. See
downloaded the project
files for this lesson to
“Restoring default preferences” in the “Getting Started” section at the beginning
your computer from of the book.
your Account page,
make sure to do so now.
2 Start Adobe Illustrator CC.
See “Getting Started”
3 Choose File > Open, or click Open in the Start
at the beginning of
the book. workspace that is showing. Open the L00_end.ai
file in the Lessons > Lesson00 folder.
4 Choose View > Fit Artboard In Window to
see an example of the artwork you’ll create in
this lesson. Leave the file open for reference, if
you’d like.
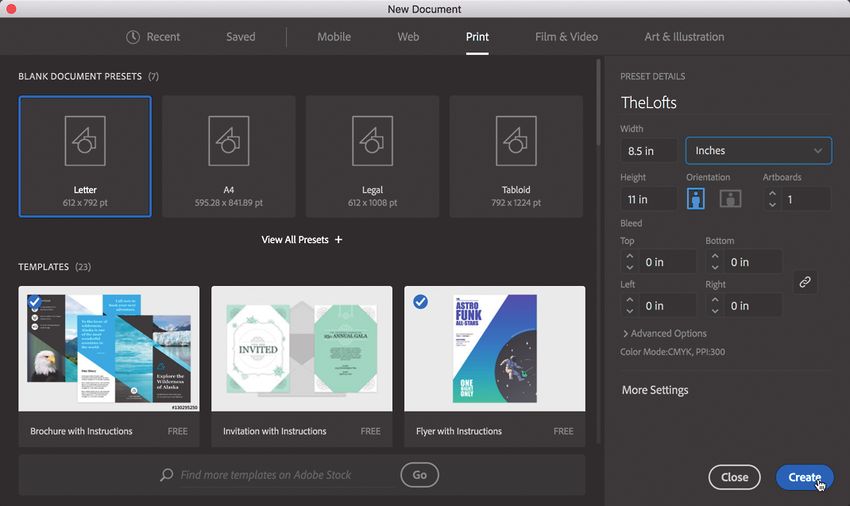
Creating a new document
� Note: Learn In Illustrator, you can start a new document using a series of preset options and
more about creating templates, depending on your needs. In this case, you will print the artwork you
and editing artboards
create as a postcard, so you will choose the Print preset to start.
in Lesson 5,
“Transforming Artwork.” 1 Choose File > New.
2 In the New Document dialog
box, select the Print category
along the top of the dialog box.
Click the Letter option.
In the Preset Details area on
the right, change the following:
• Name: TheLofts
• Units: Inches
• Width: 8.5 in (the default setting)
• Height: 11 in (the default setting)
3 Click Create, and a new, blank document opens.
12 A Quick Tour of Adobe Illustrator CC (2018 release)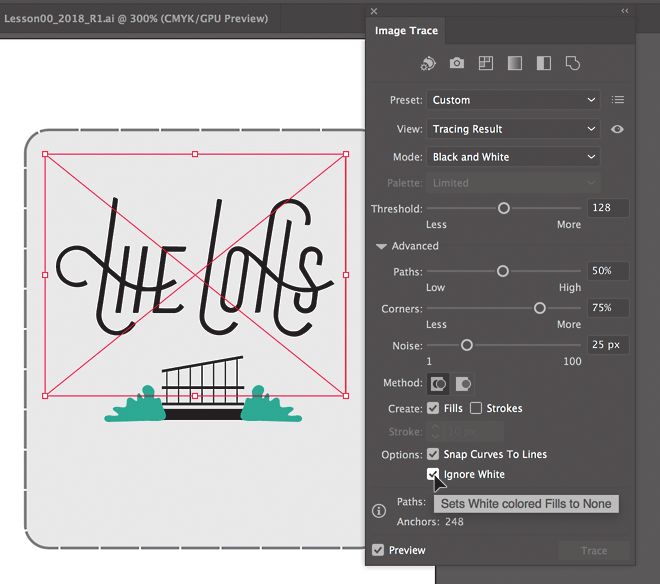
4 Choose File > Save As. In the Save As dialog box, leave the name as TheLofts.ai,
  and navigate to the Lessons > Lesson00 folder. Leave the Format option set
  to Adobe Illustrator (ai) (macOS) or the Save As Type option set to Adobe
  Illustrator (*.AI) (Windows), and click Save.
5 In the Illustrator Options dialog box that appears, leave the Illustrator options at
  their default settings and then click OK.
6 Choose Window > Workspace > Reset Essentials.                                             � Note: If you don’t
                                                                                            see Reset Essentials in
                                                                                            the Workspace menu,
Drawing a shape                                                                             choose Window >
                                                                                            Workspace > Essentials
Drawing shapes is the cornerstone of Illustrator, and you’ll create many of them in         before choosing
the coming lessons. To start your artwork, you’ll create a rectangle.                       Window > Workspace >
                                                                                            Reset Essentials.
1 Choose View > Fit Artboard In Window.
                                                                                            � Note: Learn more
                                                                                            about creating and
                                                                                            editing shapes in
                                                                                            Lesson 3, “Using Shapes
                                                                                            to Create Artwork for
                                                                                            a Postcard.”

   The white area you see is called the artboard, and it’s where your printable
   artwork will go. Artboards are like pages in a program like Adobe InDesign®.
2 Select the Rectangle tool ( ) in the Tools panel on the left. Move the pointer            � Note: Shapes can
                                                                                            be created by drawing
  into the upper-left part of the artboard (see the red X in the figure). Click and
                                                                                            or clicking the artboard
  drag down and to the right. When the gray measurement label next to the                   with a shape tool
  pointer shows a width of approximately 6.5 inches and a height of 7 inches,               and modifying shape
  release the mouse button. The shape will remain selected.                                 properties before they
                                                                                            are created.

                                                      ADOBE ILLUSTRATOR CC CLASSROOM IN A BOOK (2018 RELEASE)      13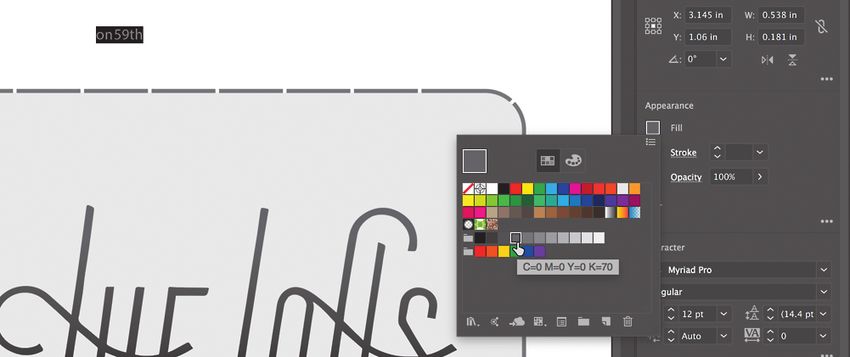
Editing shapes
                               Most shapes are Live, which means you can edit them without switching away
                               from the drawing tool, like the Rectangle tool. Next, you’ll round the corners of the
                               rectangle you just drew.
                               1 Drag the bottom, middle point on the rectangle down until you see a height of
                                 about 7.6 inches.

                               2 Move the pointer over the center of the shape (the blue circle). When the pointer
                                 changes ( ) drag the rectangle into the approximate center of the artboard.

� Tip: You can round           3 With the rectangle still selected, click and drag the
all of the corners or
each independently.              upper-right corner widget ( ) toward the center
You’ll learn more about          of the rectangle. When the gray measurement label
creating and editing             shows a value of approximately 0.4 in, release the
Live Shapes in Lesson 3,
                                 mouse button.
“Using Shapes to Create
Artwork for a Postcard.”           A lot of the different types of shapes you can create
                                   have widgets, like the corner widgets, for editing
                                   properties like the number of sides on a polygon, adding pie angles to ellipses,
                                   and more.
                               4 Choose File > Save to save the document.

14   A Quick Tour of Adobe Illustrator CC (2018 release)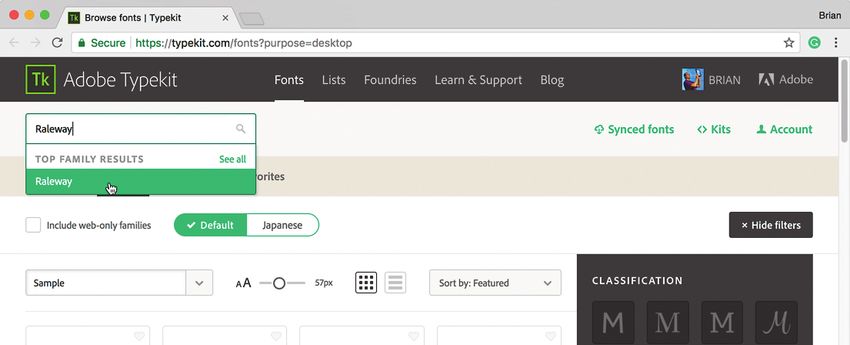
Applying and editing color
Applying color to artwork is a common Illustrator task. Shapes you create can have            � Note: Learn more
a stroke (border) and a fill. There are many ways in Illustrator to create your own           about fill and stroke in
                                                                                              Lesson 7, “Using Color
colors and edit colors that come with each document by default, called swatches. In           to Enhance Signage.”
this section, you’ll change the fill of the selected shape and edit the color you apply.
1 With the rectangle still selected, click the fill color box to the left of the word
  “Fill,” in the Properties panel to the right of the document. In the panel that
  opens, make sure that the Swatches option (          ) is selected at the top of the
  panel to show the default swatches. Move the pointer over an orange swatch,
  and when a tooltip appears (“C=0, M=50, Y=100, K=0”), click to apply the
  orange color to the fill of the shape.

   Every new document comes with a series of default colors called swatches.
   While you can use those colors, you can also create your own colors and save
   them as swatches to reuse them later.
2 With the swatches still showing for the fill, double-click the orange swatch you
  just applied to the shape, to edit the color.
3 In the Swatch Options dialog box, change the values to C=0, M=0, Y=0, K=8                   � Note: Going
                                                                                              forward, you’ll find you
  and select Preview to see the change to the shape. Click OK to edit the swatch              need to hide panels like
  color for the rectangle. Press Escape to hide the Swatches panel.                           the Swatches panel,
                                                                                              before you continue.
                                                                                              You can press Escape to
                                                                                              do this.

                                                        ADOBE ILLUSTRATOR CC CLASSROOM IN A BOOK (2018 RELEASE)     15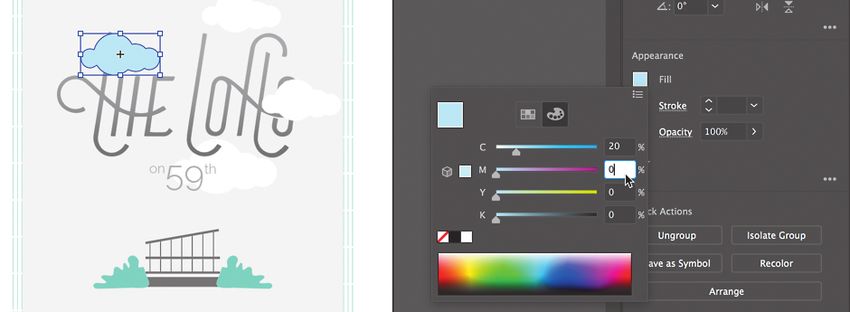
Editing strokes
� Note: Learn more             A stroke can be the visible outline (border) of artwork like shapes and paths. There
about working with
                               are a lot of appearance properties you can change for a stroke, including width,
strokes in Lesson 3,
“Using Shapes to Create        color, dashes, and more. In this section, you’ll adjust the stroke of the rectangle.
Artwork for a Postcard.”
                               1 With the rectangle still selected, click
                                 the color box ( ) to the left of the
                                 word “Stroke” in the Properties panel
                                 (circled in the figure). In the panel
                                 that appears, make sure the Swatches
                                 option (     ) is selected to show the
                                 default colors that come with the
                                 document. Click to apply a medium
                                 gray color.

                               2 Click the word “Stroke” in the
                                 Properties panel to open the Stroke
                                 panel. Change the following options:
                                   • Stroke Weight: 3 pt
                                   • Align Stroke:
                                       Align Stroke to Outside (     )
                                   • Dashed Line: Selected
                                   • Dash: 50 pt, Gap: 3 pt. After
                                       typing the Gap value, press Enter
                                       or Return.
                               3 Choose Object > Lock > Selection to temporarily lock the rectangle, so that it
                                 can’t be selected.

                               Working with layers
� Note: Learn more             Layers allow you to organize and more easily select artwork. Next, using the Layers
about working with
                               panel, you will organize your artwork.
layers and the Layers
panel in Lesson 9,             1 Choose Window > Layers to show the Layers panel to the right of the document.
“Organizing Your
Artwork with Layers.”          2 Double-click the text “Layer 1” (the layer
                                 name) in the Layers panel. Type Background,
                                 and press Return or Enter to change the layer
                                 name.
                                   Naming layers can be helpful when organizing
                                   content. Currently, the rectangle you created
                                   is on this layer.

16   A Quick Tour of Adobe Illustrator CC (2018 release)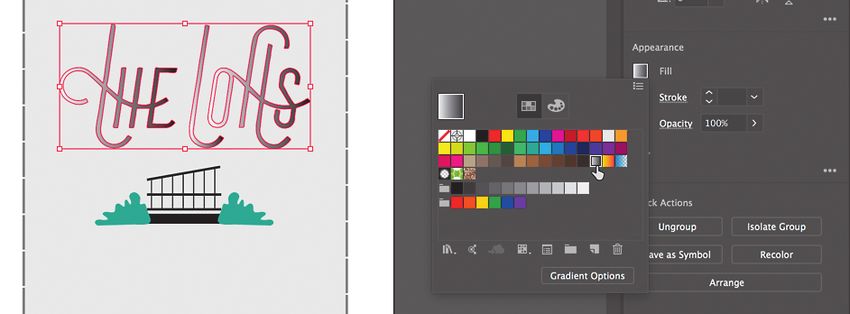
3 Click the Create New Layer button (        ) at the bottom of the Layers panel.
4 Double-click the new layer name, Layer 2, and type Content. Press Return or
  Enter to change the layer name.

5 Click on the Content layer, to make sure it’s selected in the Layers panel. Any
  new artwork will be put on the selected layer.

Transforming artwork
In Illustrator, there are a number of ways to move, rotate, skew, scale, distort, and        � Note: Learn more
shear (and more) artwork so you can get it just the way you want. This is called             about transforming
                                                                                             artwork in Lesson 5,
transforming artwork and is something you’ll do next to a building icon you create.          “Transforming Artwork.”
1 Select the Line Segment tool ( ) in the
  Tools panel on the left. In the middle of
  the artboard, to create a line, drag from
  left to right. As you drag, press and hold
  the Shift key to make the line straight.
  When you see a D (Distance) of 1.5
  inches in the gray label next to the pointer, release the mouse button and then
  the key.
2 Press the letter D to set the default fill color (white), stroke color (black), and
  stroke weight (1 pt) for the line.
3 Choose View > Zoom In to zoom in twice, to zoom in to the selected artwork.
4 Click the Properties panel tab on the right side of the workspace to see the               � Tip: You can also
                                                                                             choose Window >
  Properties panel. Change the stroke weight of the selected line by choosing
                                                                                             Properties to open the
  14 pt from the stroke weight menu.                                                         Properties panel.

                                                       ADOBE ILLUSTRATOR CC CLASSROOM IN A BOOK (2018 RELEASE)     17
5 Move the pointer just above the line and drag from left edge of the line to the
                                 right, while pressing the Shift key, to create a straight line. Release the mouse
                                 button and then the key.

                               6 Change the stroke weight of the new line to 3 pt in the Properties panel, by
                                 choosing it from the stroke weight menu. Now you’ll make copies of the line.
                               7 With the line selected, choose Object > Transform > Move. In the Move dialog
                                 box, change the Vertical value to –0.3 and click Copy.

                               8 Choose Object > Transform > Transform Again to repeat the last Move
                                 transformation on the selected line, and make another line.
                               9 With the last line selected, select the Rotate tool ( ) in the Tools panel on the
                                 left. Click the left end of the line to set the rotate around point there. Move the
                                 pointer to the right of the line and drag counter-clockwise to rotate the line a
                                 little. When you see an angle of around 10 degrees in the gray label next to the
                                 pointer, stop dragging.

                               10 Choose Select > Deselect.

18   A Quick Tour of Adobe Illustrator CC (2018 release)
Creating a blend
You can blend two distinct objects to create and distribute shapes evenly between          � Note: Learn more
two objects. For instance, to create a fence, you could blend two rectangles together      about working with
                                                                                           blends in Lesson 10,
and Illustrator will create all the copies between the two original rectangles. Next,
                                                                                           “Gradients, Blends,
you’ll create the rest of the building icon using a blend.                                 and Patterns.”
1 Select the Line Segment tool ( ) in the Tools panel, again. Move the pointer
  over the top line you rotated (see the “x” in the following figure). Drag straight
  down to create a new line. As you drag, press and hold the Shift key to make it
  straight. When the pointer reaches the first thin line, release the mouse button
  and then the key.

2 Change the stroke weight to 1 in the Properties panel to the right.
3 Position the pointer over the center widget of the line. When the pointer
  changes ( ), press and hold Option+Shift (macOS) or Alt+Shift (Windows),
  and drag to the right. Drag until you almost reach the right end of the lines.
  Release the mouse button and then release the keys.

4 Move the pointer over the top of the new line                                            � Tip: There are a lot
                                                                                           of keyboard commands
  and drag straight up to extend the line to the
                                                                                           that can help you work
  top line.                                                                                more efficiently in
                                                                                           Illustrator. In this case,
5 Double-click the Blend tool ( ) in the Tools
                                                                                           Option (Alt) copies
  panel to set a few settings for the tool. In the                                         the shape, and the
  Blend Options dialog box, choose Specified                                               Shift key constrains
  Steps from the Spacing menu, and change the                                              the movement to
                                                                                           45 degrees.
  value to the right to 5. Click OK.

                                                     ADOBE ILLUSTRATOR CC CLASSROOM IN A BOOK (2018 RELEASE)      19
6 Click on the vertical line on the left when you see the cursor look like this
and then click on the vertical line to the right when the cursor looks like this
to create a blend of the two objects, with 5 copies between them.
7 Select the Selection tool in the Tools panel
and drag across the artwork all of the artwork
for the building icon. Click the Group
button towards the bottom of the Properties
panel, to keep it all together and treat it as a
single object.
Drawing with the Pencil tool
� Note: Learn more The Pencil tool ( ) lets you draw freeform paths that contain curves and straight
about working with
lines. The paths you draw with the Pencil tool are editable later. Now you’ll draw a
the Pencil tool and
other drawing tools bush with the Pencil tool.
in Lesson 6, “Creating
an Illustration with the 1 Click and hold down on the Shaper
Drawing Tools.” tool ( ) in the Tools panel on the left. A
window may appear that discusses the Shaper
tool. Close it. Click and hold down on the
Shaper tool ( ) again, and in the tools menu
that appears, select the Pencil tool ( ).
For the next step, don’t worry about matching
what you see in the figures. Just have some fun.
2 To the left of the building icon, click and drag to start creating a bush. When
the pointer approaches where you started drawing, a circle will appear next to
the Pencil tool ( ), indicating that the path will be closed. Release the mouse
button to close the path. Leave the path selected.
20 A Quick Tour of Adobe Illustrator CC (2018 release)3 Click the fill color in the Properties panel to the right to reveal a panel. Make
sure that the Swatches option is selected, and click to apply a blue/green color
to the fill of the shape.
4 Change the stroke weight to 0 below the fill color in the Properties panel.
5 Select the Selection tool in the Tools panel and
drag the bush shape to the left of the building
icon. Press the Shift key and drag a corner of the
box around the bush, called a bounding box, to
scale it in proportion to the building icon (see
the figure).
6 With the bush selected, choose Edit > Copy, and then Edit > Paste. Drag the
copy to the right of the building icon.
7 Click the Flip Along Horizontal Axis option ( ) in the Properties panel.
8 Drag across the building icon and the two bush shapes to select them. Choose
Object > Group to keep them together.
ADOBE ILLUSTRATOR CC CLASSROOM IN A BOOK (2018 RELEASE) 21Creating shapes using the Shape Builder tool
� Note: Learn more The Shape Builder tool ( ) is an interactive tool for creating complex shapes by
about working with merging and erasing simpler shapes. Next, you’ll make a cloud by creating a few
the Shape Builder tool
in Lesson 4, “Editing circles and using the Shape Builder tool to combine them.
and Combining 1 Click and hold down on the Rectangle tool ( ) in the Tools panel on the left.
Shapes and Paths.”
Select the Ellipse tool ( ) in the menu that appears.
2 Press and hold the Shift key and drag
above the building icon and bushes.
When the gray measurement label next
to the pointer shows a height and width
of 1 inch, release the mouse button and
then the Shift key to create a perfect
circle.
3 With the circle selected, choose Edit > Copy, and then Edit > Paste to paste a
copy. Choose Edit > Paste two more times to create a few more copies.
4 Select the Selection tool ( ), and
drag each of the circles on top of one
another into a cloud shape.
5 With a circle selected, drag a corner of
the bounding box around the shape to
make it smaller. Do the same for a few
of the other circles, making them all
different sizes. Drag to arrange them
into a cloud shape.
6 Move the pointer above and to the left
of the circles. Drag across all of the circles to select them.
7 Click the fill color in the Properties panel to the right, make sure the Swatches
option is selected, and click white to apply it. Leave the circles selected.
22 A Quick Tour of Adobe Illustrator CC (2018 release)8 Select the Shape Builder tool ( ) in
the Tools panel on the left. Position
the pointer to the left and above all
of the selected circles (see the red X
in the figure). Press the Shift key and
drag to the right and down across all
the selected circles. Release the mouse
button and then the Shift key to combine the shapes.
9 Choose Object > Hide > Selection to temporarily hide the cloud.
10 Choose File > Save.
Placing an image in Illustrator
In Illustrator, you can place raster images, like JPEG and Adobe Photoshop® files, and � Note: Learn more
either link to them or embed them. Next, you’ll place an image of hand-drawn text. about placing images
in Lesson 14, “Using
1 Choose View > Fit Artboard In Window. Illustrator CC with Other
Adobe Applications.”
2 Choose File > Place. In the Place dialog box, navigate to the Lessons > Lesson00
folder, and select the HandLettering.psd file. Make sure that the Link option in � Note: If you don’t
the dialog box is selected, and click Place. see the Link option in
the dialog box, click the
Options button.
3 With the loaded graphics cursor, click in the upper-left corner of the rectangle
to place the image. Leave it selected.
ADOBE ILLUSTRATOR CC CLASSROOM IN A BOOK (2018 RELEASE) 23Using Image Trace
� Note: Learn more You can use Image Trace to convert raster images into vector artwork. Next, you’ll
about Image Trace in trace the Photoshop file you just placed.
Lesson 3, “Using Shapes
to Create Artwork for 1 With the hand lettering image still selected, click the Image Trace button in the
a Postcard.” Properties panel to the right and choose Black and White Logo from the menu.
� Tip: Another 2 Click the Image Trace panel button () in the Properties panel. In the Image
method for converting Trace panel that opens, click the toggle arrow to the left of Advanced (circled
the hand-drawn
in the following figure). Select Ignore White near the bottom of the panel to
lettering is by using the
Adobe Capture CC app. remove the white. Close the Image Trace panel by clicking the small X in the
To learn more about corner.
Adobe Capture, visit
http://www.adobe.com/
products/capture.html.
� Note: The hand 3 With the lettering still selected, click the Expand button at the bottom of the
lettering for this
Properties panel to make the object a series of editable vector shapes that are
project was created
by Danielle Fritz grouped together.
(www.behance.net/
danielle_fritz). 4 Move the pointer onto the lettering and drag it
so that it’s above the building icon and bushes,
if it isn’t already. Leave the hand lettering
shapes selected.
24 A Quick Tour of Adobe Illustrator CC (2018 release)Creating and editing gradients
Gradients are color blends of two or more colors that you can apply to the fill or � Note: Learn more
stroke of artwork. Next, you will apply a gradient to the lettering. about working with
gradients in Lesson 10,
1 With the lettering still selected, click the fill color in the Properties panel to the “Gradients, Blends,
right, make sure the gradients option is selected, and select the white-to-black and Patterns.”
swatch with the tooltip “White, Black.” Leave the swatches panel showing.
2 At the bottom of the Swatches panel, click the Gradient Options button to open
the Gradient panel. An arrow is pointing to it in the previous figure.
3 In the Gradient panel, click the Fill box to make sure you are editing the fill
(circled in the following figure). Double-click the little white color stop ( ) on
the left side of the gradient slider in the Gradient panel (an arrow is pointing to
it in the figure). In the panel that appears, click the Swatches button ( )
(if it’s not already selected), and select the dark gray swatch with the tooltip
“C=0, M=0, Y=0, K=70.”
4 Press the Escape key to hide the color swatches.
ADOBE ILLUSTRATOR CC CLASSROOM IN A BOOK (2018 RELEASE) 255 Select the Gradient tool ( ) in the Tools panel on the left. While pressing
the Shift key, starting at the red X in the figure, click and drag up across the
lettering, to reposition and resize the gradient. Release the mouse button and
then the key.
6 Choose Select > Deselect.
Working with type
� Note: Learn Next, you’ll add some text to the project and change formatting. You’ll choose a
more about working
Typekit font that requires an Internet connection. If you don’t have an Internet
with type in
Lesson 8, “Adding Type connection, you can simply choose another font you have.
to a Poster.”
1 Select the Type tool ( ) in the Tools
panel on the left, and click in a blank
area at the top of the artboard, above
the “THE LOFTS” lettering. A text
area will appear with the selected
placeholder text, “Lorem ipsum.”
Type on59th (with no space between
“on” and “59th.”)
2 With the cursor still in the text, choose Select > All to select it.
� Note: If you don’t 3 In the Properties panel to the right, click the fill color. In the panel that appears,
see the character
make sure the Swatches option is selected, and click to select the darker gray
options like Font Size
in the Control panel, swatch with the tooltip “C=0 M=0 Y=0 K=70.”
click the word
“Character” to see the
Character panel.
26 A Quick Tour of Adobe Illustrator CC (2018 release)4 In the Character section of the Properties panel,
select the font size and type 20. Press Return or
Enter to accept the size change.
Next, you will apply a Typekit font. You’ll need
an Internet connection. If you don’t have an
Internet connection or access to the Typekit
fonts, you can choose any other font from the
font menu.
5 Click the arrow to the right of the
Font Family field in the Properties
panel. Click the Add Fonts From
Typekit button to sync a font
from Typekit.
The Typekit.com website should
open in your default web browser
and you should be signed in to the site with your Creative Cloud ID.
6 Type Raleway in the Search Typekit field (or another font, if you can’t find that � Note: If you
one). Click Raleway in the search results menu that appears. are taken to the
Typekit.com home
page, you can simply
click the Browse
Fonts button. It may
also ask you to log
in with your Creative
Cloud (Adobe) ID.
7 Scroll down on the next page that appears, if necessary, to find the Raleway
Light font. Click the Sync button to the right of the font name to sync it to
your machine.
If you run into syncing issues, in the Creative Cloud desktop application, you
will be able to see any messages indicating that font syncing is turned off (turn it
on in that case) or any other issues.
ADOBE ILLUSTRATOR CC CLASSROOM IN A BOOK (2018 RELEASE) 27� Note: It may take 8 Close the browser window and return to Illustrator. With the text still selected,
a few minutes for the click to insert the cursor in the Font Family field in the Properties panel on the
font to sync with
your computer. right (circled in the following figure). Begin typing “Raleway.”
9 Position the pointer over Raleway Light in the menu that appears to show a live
preview on the selected text. Click Raleway Light to apply it.
10 With the Type tool still selected, click in the text, then drag across the “59” text
and change the font size to 50 in the Properties panel on the right.
11 Drag across the text “on,” to select it. In the Properties panel on the right, click
more options ( ) in the Character section to show more options. Change the
Baseline Shift to 18.
12 Drag across the “th” text to select it. In the
Properties panel on the right, click more
options ( ) in the Character section to show
more options. Change the Baseline Shift to 18.
13 Select the Selection tool ( ) in the Tools panel,
and drag the text below the hand lettering text,
but above the building icon and bushes. If you
need, you can drag all of the content so it looks
like the figure.
14 Choose File > Save.
28 A Quick Tour of Adobe Illustrator CC (2018 release)Aligning artwork
Illustrator makes it easy to align or distribute multiple objects relative to each other, � Note: Learn more
the artboard, or a key object. In this section, you’ll align several objects to the center about aligning artwork
in Lesson 2, “Techniques
of the artboard. for Selecting Artwork.”
1 Choose Object > Unlock All to unlock the rectangle in the background.
2 Select the Selection tool ( ) in the Tools panel, and choose Select > All.
3 Click the Align To Selection option ( ) in the
Properties panel to the right of the document, and
choose Align To Artboard.
The selected content will now align to the artboard.
4 Click the Horizontal Align Center button ( ) to
align the selected artwork to the horizontal center
of the artboard.
5 Choose Select > Deselect.
Working with brushes
Brushes let you stylize the appearance of paths. You can apply brush strokes to � Note: Learn more
existing paths, or you can use the Paintbrush tool ( ) to draw a path and apply a about working with
brushes in Lesson 11,
brush stroke simultaneously. “Using Brushes to
1 With the Selection tool ( ) selected, click in the gray rectangle in the Create a Poster.”
background to select it.
2 Choose Window > Brush Libraries > Borders > Borders_Lines to open the
Borders_Lines collection of brushes in a panel.
3 Click the brush named “Multilines 1.4” � Note: The brush is
in the panel to apply it to the stroke of a pattern brush, which
means that it repeats
the shape. artwork (in this case)
4 Click the X in the corner of the Borders_ along the path. The
brush artwork is scaled
Lines panel to close it. on the path based on
the stroke weight.
5 Choose Select > Deselect.
ADOBE ILLUSTRATOR CC CLASSROOM IN A BOOK (2018 RELEASE) 29Working with symbols
� Note: Learn more A symbol is a reusable art stored in the Symbols panel. Symbols are useful because
about working with they can help you save time and can save on file size as well. You will now create a
symbols in Lesson 13,
“Creating Artwork for a symbol from the cloud artwork.
T-Shirt.” 1 With the Selection tool ( ) selected, choose Object > Show All to see the cloud.
The cloud shape should be selected.
2 Choose Window > Symbols to open the Symbols panel. Click the New Symbol
button at the bottom of the Symbols panel to save the selected cloud as a symbol.
3 In the Symbol Options dialog box that appears, name the symbol Cloud, and
click OK. If a warning dialog box appears, click OK as well.
The artwork now appears as a saved symbol in the Symbols panel, and the cloud
on the artboard you used to create the symbol is now a symbol instance.
� Note: Your muffin 4 From the Symbols panel, drag the cloud symbol thumbnail onto the artboard
symbol instances may three times and arrange them however you like in the background. Click the x at
be in different locations
the top of the Symbols panel group to close it.
than those in the figure.
That’s okay.
5 Resize a few of clouds, making them different
sizes, by dragging a corner of the symbol
instance with the Shift key held down.
Release the mouse button and then the key.
� Tip: You could have 6 Double-click one of the cloud instances on
also clicked the Edit the artboard, to enter Isolation mode. In the
Symbol button in the
Properties panel to the dialog box that appears, click OK.
right of the document. 7 Click to select the cloud shape. Click the fill color in the Properties panel to the
right of the document and with the Color Mixer option () is selected so you can
see the CMYK sliders. Change the values to C=20, M=0, Y=0, K=0 to create a
light blue color. Press the Escape key to close the panel.
30 A Quick Tour of Adobe Illustrator CC (2018 release)8 Double-click in a blank area of the document window to exit the editing
(Isolation) mode, and notice that the other clouds have changed as well.
9 Click one of the cloud instances on the artboard, and choose Select >
Same > Symbol Instance to select all three. Choose Object > Group.
10 Click the Arrange button in the Properties panel and choose Send To Back.
Working with effects
Effects alter the appearance of an object without changing the base object. Next, � Note: Learn more
you’ll apply a subtle Drop Shadow effect to the lettering you traced earlier. about effects in
Lesson 12, “Exploring
1 With the Selection tool ( ), click the “THE LOFT” lettering. Creative Uses of Effects
and Graphic Styles.”
2 Click the Effect option ( ) in the Properties
panel on the right and choose Stylize > Drop � Note: Choose
Shadow. In the Drop Shadow dialog box, set the the Stylize option
in the Illustrator
following options (if necessary):
Effects section of the
• Mode: Multiply (the default setting) Effect menu.
• Opacity: 10%
• X Offset and Y Offset: 0.02 in
• Blur: 0
3 Select Preview to see it applied to the artwork and
then click OK.
4 Choose Select > Deselect.
5 Choose File > Save and then choose File > Close.
ADOBE ILLUSTRATOR CC CLASSROOM IN A BOOK (2018 RELEASE) 31You can also read