Instruction Manual 720p HD Projector - BHP720H - Blaupunkt
←
→
Page content transcription
If your browser does not render page correctly, please read the page content below
Instruction Manual 720p HD Projector - BHP720H

CONTENTS

General Safety								4

Product Overview								8

Remote Control								10

Placing Projector								12

First Time Setup								13

Projector Lens Focus							14

Settings

		Picture								15

		Sound								16

		Option								17

		Time								18

Specifications								19

Customer Helpline							Last Page
GENERAL SAFETY
Read this manual thoroughly before you start using the Projector.
Store this manual, the completed warranty card, your receipt and the product packaging.
The safety precautions instructions reduces the risk of fire, electric shock and injury when
correctly complied to.

Please follow all instructions and take notice of all warnings.

                                                          The lightning flash with symbol within the
                                                          triangle is intended to warn you of a
                                                          non-insulated dangerous voltage in the
                                                          product’s enclosure that could be of
                                                          sufficient magnitude to generate a risk of
                                                          electric shock to persons.

                                                          The exclamation point within the triangle
The cover (or back) of the unit should                    is intended to warn you to the presence
not be removed to prevent risk of electric
shock.                                                    of important operating and maintenance
This unit must be serviced by a qualified                 instructions in the documents included with
service personnel only.
                                                          the product.

                             IMPORTANT INFORMATION

The lightning flash symbol within the triangle is intended to warn you of
non-insulated dangerous voltage the product’s enclosure that could be of
sufficient magnitude to generate a risk of electric shock to persons.
• Only using furniture that can safely support the Products.
• Ensure the Product is not overhanging the edge of the supporting furniture.
• Do not place the product on a high furniture without securing both the furniture
  and the product to a stable support.
• Do not place the product on cloth or other conductive materials.
• Warn children of the dangers of climbing on furniture to reach the projector
  or its controls and to call for an adult to assist.

4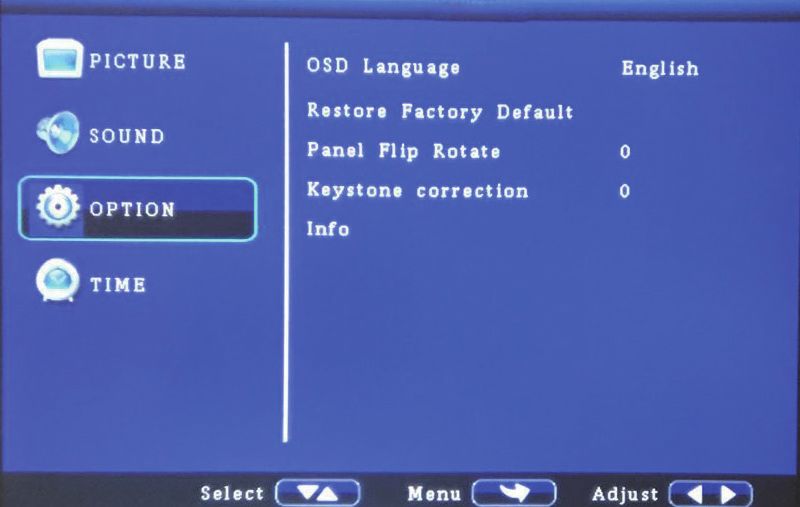
GENERAL SAFETY (CONT.)
                          IMPORTANT INFORMATION
• Do not expose this appliance to rain or moisture as it may result in fire or an
  electric shock hazard
• Do not tamper or change or modify the product in any way.
• Only use Accessories outlined and recommended by the manufacturer.
• Please do not expose the product to splashing or water contact
• Please do not place any object on top of the product including objects filled with liquids
 such as vases.
• Replace with same or equivalent type.

Installation
Please follow instruction when installing this product in accordance with the instruction
manual. This product must be positioned in a sufficiently stable location, it can be
potentially hazardous due to falling and can cause injury, particularly to children if it
positioned incorrectly.

• Before installing this Projector set, make sure your outlet voltage corresponds to the
  voltage stated on the product rating label
• Do not use a damaged power cord, plug or loose outlet. Doing so may cause an
  electric shock.
• Do not plug several devices into the same outlet. Doing so may cause the outlet to
  overheat and start a fire. Make sure the outlet is readily accessible during operation
  of the equipment.
• Do not bend, twist or kink the power cord excessively.
• Do not allow anything to rest on or roll over the power cord.
  Doing so may cause a fire or an electric shock.
• Do not run the power cord near heat-producing appliances such as radiators, stoves or
  irons. The excessive heat could melt the insulation and expose live wires, resulting in
  fire or electric shock.
• Unplug this Projector during lightning storms or when unused for long periods of time.
  Not doing so may result in fire or electric shock.
• Do not cover the ventilation openings of the product with items such as newspapers,
  tablecloths, curtains etc or insert objects into the slots available on the products.
  As this could result in the product temperature rising and could cause a fire.
• If you notice any unusual odors or smoke around the unit, immediately disconnect the
  unit from the outlet and contact the service center. Failure to do so may result in fire
  or electric shock.
• When not using the unit for long periods of time or when you are moving the unit
  please ensure to disconnect the power cord from the wall socket.
                                                                                               5
GENERAL SAFETY (CONT.)
• Please beware that Dust could accumulate over time on the unit and cause it to generate
    heat and or deteriorate insulation, which in turn may result in an electrical fire.
• The product is not intended for use by persons (including children) with reduced physical,
    sensory or mental capabilities, or young children of any age, They must be supervised
    product by a person responsible for their safety.
• Batteries from the remote control must be only removed by an adult, the adult must
    ensure to keep them out of reach of infants and children. Seek medical attention
    immediately if a child has swallowed a battery.
• Batteries (battery pack or batteries installed) shall not be exposed to excessive heat such
    as sunshine, fire or the like.
• To maintain the product do not use any chemical or cleaning agent or wet cloth, please
    only ensure to utilize a dry cloth to wipe it down from marks or dust and only after
    unplugging the product from the power socket.
• Please ensure to contact our call center for any repair or service required for the products.

                                     ! CAUTION !
DO NOT look directly into Project LENS. This can cause damage to a persons or
childrens eyes. Take all nessecary precautions to make sure that no one looks into
the LENS while turned on.

MAKE SURE this project is out of reach of children or baby so that they do not
stand and look into the project LENS.

DO NOT cover the vents, the vents are needed to let out hot air. Placing objects
near or covering the vents can cause the product to overheat and permenantly
damage the projector.

6
GENERAL SAFETY (CONT.)
Please make sure upon positioning this product, the place is:
• Not wet or damp and Well ventilated
• Away from direct sunlight or heaters.
• Away from splashes or food.
• Protected from excessive dust or grease.
• Do not install this equipment in a confined space such as a bookcase or similar unit.
• Do not install the Projector set near heat sources such as radiators, stoves or other audio
  visual equipment that produce heat.
• Do not place containers with liquids, if liquid falls inside the products it may result in
  short-circuit, fire or electric shock.
• Do not place small metallic objects on top of the unit. Metal object falls inside the
  product it may result in short-circuit, fire or electric shock.
• Do not use or store flammable or combustible materials near the unit. Doing so may
  result in fire or explosion. Do not place any naked flame sources, such as lit candles,
  cigarettes or incense sticks on top of the Projector set.
• Install the unit at a reasonable distance from the wall to ensure sufficient ventilation.

                                       “HDMI, the HDMI logo and High-Definition Multimedia
                                       Interface are trademarks or registered trademarks of
                                       HDMI Licensing LLC.”

                                                                                                7
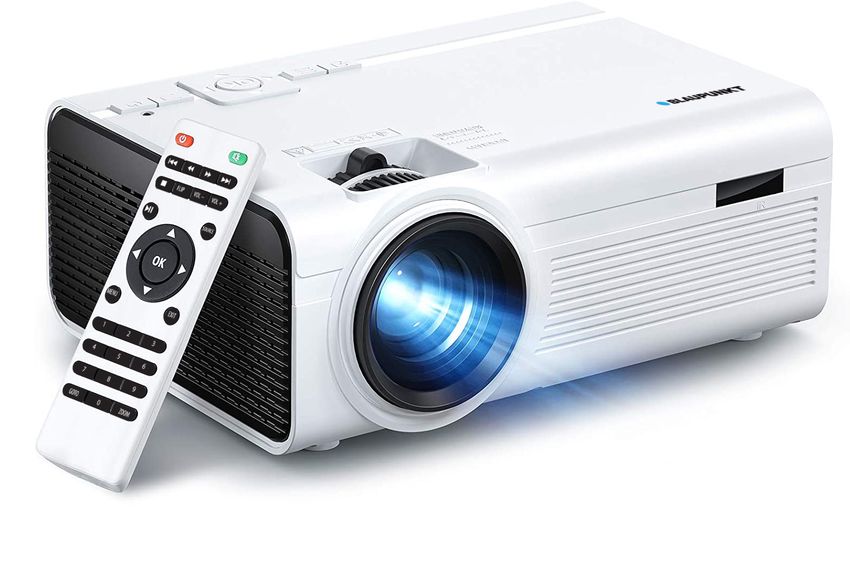
PRODUCT OVERVIEW

8

PRODUCT OVERVIEW (Cont.)

1.    Power Button
2.    Return / Back Button
3.    Navigation Arrows / OK button
4.    Menu
5.    Source (input) button
6.    Tilt Dial
7.    Focus Dial
8.    Lens
9.    Headphone Jack
10.   AV In
11.   Micro SD Card Slot
12.   HDMI 1
13.   HDMI 2
14.   USB Input
15.   DC In (power)

                                      9
REMOTE CONTROL
Your projector comes with a Remote Control to access and control your
projector from a distance. (Batteries not included).

Make sure to place the batteries into the back compartment of the remote
control in the correct way. The polarities on the battery (+/-) must match the
polarities on the remote control in order for the remote to work.

10
REMOTE CONTROL (cont.)
Using the Remote Control
• Do not mix old and new batteries in the remote
• Do not use different types of battery
• If you do not intend to use the unit for a long time, please remove batteries from the
 remote to avoid accident.
• Keep batteries away from children and pets.
• Never throw batteries into a fire.
• Do not drop, or impact the remote control as it void warranty immediately.
• The remote control operate at a range of 5 to 6M effectively
• Do not expose the remote control sensor to a bright light.

                                                                                           11
PLACING PROJECTOR
Your projector can be installed in four different configurations:
Front Facing Table Front Ceiling
(A Projector Mount is
required, Not Included)
Behind Projector Screen Ceiling Behind Projector Screen
(Special Rear Projection Screen is (A Projector Mount is required,
required, Not Included) Special Rear Projection Screen is
required, Not Included)
DISTANCE BETWEEN THE PROJECTOR AND THE SCREEN.
1 metre - 31” (inches) 3 metre - 100” (inches)
2 metre - 66” (inches) 4 metre - 120” (inches)
12FIRST TIME SETUP
Make sure to place the projector on a flat and stable surface that is level. So that
the projector projects the video/image onto the wall nice and straight.
1. Plug in the Power cable into the DC Port of the Projector. Then plug in
the other end into a wall power socket.
2. Once the power is plugged in, Press the button located at the top
to turn on the projector.
3. You can now need to connect a source of media to play from to project
onto the wall. This can be through:
a. HDMI 1
b. HDMI 2
b. USB
c. AV IN (Red, White, Yellow to 3.5mm Jack)
d. MICRO SD
4. When you plug in a media source, you must select the INPUT source
you want to view. By doing this, press the button on the unit or
SOURCE on the Remote for the SOURCE menu to appear, then navigate
with the arrow buttons, and press the Circle button to select the SOURCE.
5. Once you have selected the SOURCE, you can now adjust the VOLUME
and manually adjust the focus of the projector lens to suite your needs
depending on the distance from the wall your projector is.
PLEASE FOLLOW THE NEXT STEPS ON HOW TO MANUALLY ADJUST THE FOCUS.
13PROJECTOR LENS FOCUS Once you have your Projector all setup, input mode selected, power turned on. You can now adjust the focus and keystone correct (tilt forward or backwards) depending on the orientation of your projector. 1. Turn the FOCUS dial to adjust the LENS focus. LEFT DIRECTION - Is toward larger screen sizes best focus point. RIGHT DIRECTION - Is towards smaller screen sizes best focus point. 2. Turn the KEYSTONE dial to adjust the Tilt Direction. RIGHT DIRECTION - Tilts the screen backwards (top of screen) This is best for aiming the project up higher on the wall. Tilting the screen backward will straighten out the picture. LEFT DIRECTION - Will tilt the screen back to the standard position. 14
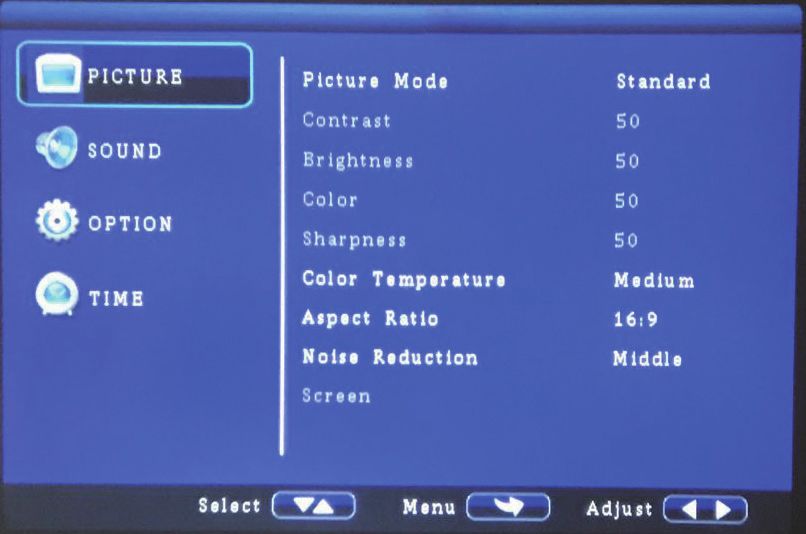
SETTING - PICTURE
To Access the setting PICTURE menu:
1.		   Press the MENU        button located on the top of the Projector or
		     the MENU button on the Remote Control.
2.     With the directional keys, Press the RIGHT    arrow button to enter
		     PICTURE settings.
3.     To navigate back to PICTURE/SOUND/OPTION, with nothing selected,
		     Press LEFT      button.

PICTURE MODES:        Standard, Soft, Vivid, User
				                  (contrast, brightness, sharpness, colour).
COLOUR TEMP:		        Adjust between Medium, Cool, Warm.
ASPECT RATIO:         3 modes: Auto, 4:3, 16:9
NOISE REDUCTION:      Off, Low, Middle, High, Default.

                                                                             15
SETTING - SOUND To Access the setting PICTURE menu: 1. Press the MENU button located on the top of the Projector or the MENU button on the Remote Control. 2. With the directional keys, Press the DOWN button, when on SOUND, Press the RIGHT arrow button to enter SOUND settings. 3. To navigate back to PICTURE/SOUND/OPTION, with nothing selected, Press LEFT button. SOUND MODES: Standard, Music, Movie, Sports, User When on User mode, you can adjust more settings such as Treble & Bass. BALANCE: Adjust the Audio Balance of the left or right speaker. SURROUND SOUND: Adjust between ON or OFF. 16
SETTING - OPTION
To Access the setting OPTION menu:
1. Press the MENU button located on the top of the Projector or
the MENU button on the Remote Control.
2. With the directional keys, Press the DOWN button, when on
OPTION, Press the RIGHT arrow button to enter OPTION settings.
3. To navigate back to PICTURE/SOUND/OPTION, with nothing selected,
Press LEFT button.
OSD LANGUAGE: Adjust between Languages: English (default)
RESTORE FACTORY: Press Yes to reset your projector settings and device.
PANEL FLIP ROATATE: Press to flip th screen between Rotate: 0, 1, 2, 3...
KEYSTONE CORRECT.: Adjust different angle between -22° to 22°.
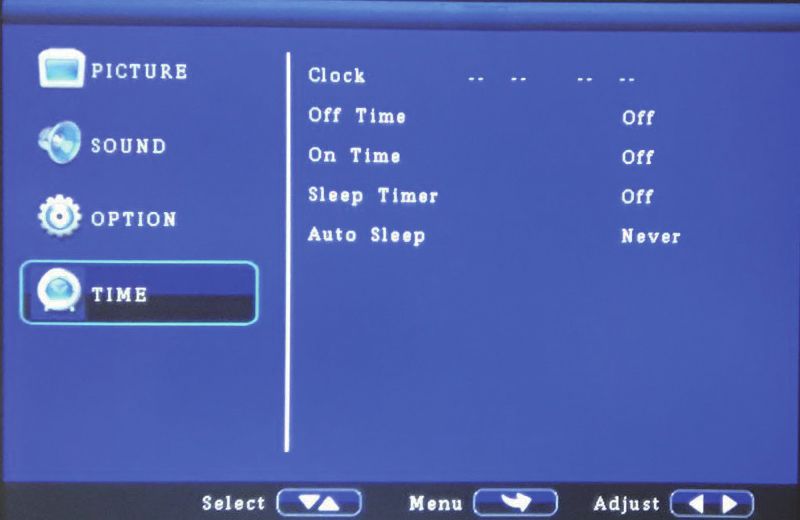
17SETTING - TIME To Access the setting TIME menu: 1. Press the MENU button located on the top of the Projector or the MENU button on the Remote Control. 2. With the directional keys, Press the DOWN button, when on TIME, Press the RIGHT arrow button to enter TIME settings. 3. To navigate back to PICTURE/SOUND/OPTION, with nothing selected, Press LEFT button. CLOCK: Set the Clock to Day / Month / Year / Hour / Minutes OFF TIMER: Set Turn OFF timer to Day / Hour / Minutes ON TIMER: Set Turn ON timer to Day / Hour / Minutes SLEEP TIMER: Set when you want the projector to turn off, with: OFF / 10mins / 20mins / 30mins / 60mins / 90mins / 120mins / 180mins / 240mins. AUTO SLEEP: Select to auto sleep functions: NEVER / 4 Hours / 6 Hours / 8 Hours 18
SPECIFICATIONS
DISPLAY                            Supports up to 1080p (1920x1080)

Resolution                         1280 x 720 Native Resolution

Projection Distance                1-4 Metres

Projection Size                    31” to 120” (inches)

Lumens                             2000 Peak Lumens (90 ANSI)

Contrast Ratio                     500 : 1

Aspect Ratio                       16:9, 4:3, AUTO

                                   Movie: AVI/FLV/RMVB/MKV/MP4/3GP/MOV/MPG/MPEG/TS/
                                   TP/VOB
Multimedia Playback
Format under                       Music: MP3/WMA/OGG/AAC/FLAC
USB Mode
                                   Photo: JPG/BMP/PNG

Power Source                       12VDC 4A

USB                                5V --- max. 500mA

Dimensions                         203 (w) × 150 (d) × 82 (h) mm

                                   Net: 0.9 kg
Weight
                                   Gross: 1.28 kg

                                   1 x Instruction Manual           1 x Remote Control

Accessories                        1 x DC Supply Cord               1 x Warranty Card

                                   1 x Lens Cover

NOTE: This document is for reference only, the operation interface is subject to software.

                                                                                             19
CUSTOMER SUPPORT: info@ayonz.com DISTRIBUTED BY: Ayonz Pty Ltd
You can also read