SAP S/4HANA 1909 FPS02 Fully-Activated Appliance: Plan to Produce Using Advanced Planning for Capacity Utilization - SAP S/4HANA 1909 FPS02 ...
←
→
Page content transcription
If your browser does not render page correctly, please read the page content below

SAP S/4HANA 1909 FPS02 Fully-Activated Appliance                   PUBLIC
June 2020 (V1.0)
English

SAP S/4HANA 1909 FPS02 Fully-Activated Appliance:
Plan to Produce Using Advanced Planning for Capacity Utilization
Demo Guide

Table of Contents

1         Where Can This Script Be Used?                                                  3

2         Demo Story: Plan to Produce Using Advanced Planning for Capacity Utilization     4
2.1       Preliminary Steps                                                                4
          2.1.1    Post Initial Stock                                                      4
          2.1.2    Check Stock Level                                                       6
2.2       Create Planned Independent Requirements                                          8
2.3       Run Material Requirement Planning                                                9
2.4       Monitor Capacity Utilization                                                    11
2.5       Workaround for Planned Orders Replication to APO                               25
2.6       Create Production Order for Semifinished Product                               27
2.7       Release Production Order for Semifinished Product                              29
2.8       Confirm Production Order for Semifinished Product                              32
2.9       Post Goods Receipt for Semifinished Production Order                           34
2.10      Manage Inspection Lot                                                          36
2.11      Create Production Order for the Finished Good                                  37
2.12      Release Finished Goods Order                                                   39
2.13      Confirm Production for Finished Product                                        43
2.14      Post Goods Receipt for Production Order                                        46

Document History

    Revision      Date               Change

    1.0                  Release for customer

                                                                                           2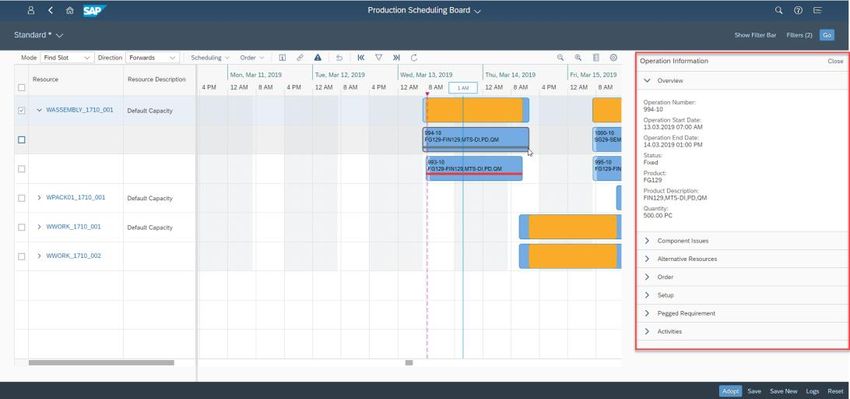
1 Where Can This Script Be Used?

This demo script has been written for usage with the SAP S/4HANA 1909 Feature Package Stack 02 (FPS02) Fully-
Activated Appliance (in short “appliance” in this script), hence you will need such an appliance to make use of this guide.
The appliance can be brought up in two ways, and the demo scenario in this script is largely the same for both:

1.   Via SAP Cloud Appliance Library (hosted on cloud providers)
     You need a cloud provider account at AWS, MS Azure, or GCP. With this, you can deploy the appliance within 1-2
     hours from https://cal.sap.com > Solutions > SAP S/4HANA 1909 FPS02 Fully-Activated Appliance.
2.   Via installing it on your own on-premise hardware.
     You need to provide your own hardware, and order & install the appliance as explained in SAP Note 2041140.

If you are new to the SAP S/4HANA Fully-Activated Appliance, introductory information can be found here:
https://blogs.sap.com/2018/12/12/sap-s4hana-fully-activated-appliance-create-your-sap-s4hana-1909-system-in-a-
fraction-of-the-usual-setup-time/

Important:
Before you start your demo, please read SAP S/4HANA Fully-Activated Appliance: Demo Scripts for information about
necessary preparations, especially any post-deployment steps to ensure the full functionality of your appliance. These
steps are covered in sections;
         B) General Remarks
         C) Post-deployment Steps
         D) Log-on to the system
Besides this, you will also find links to all demo scripts on this page.

                                                                                                                    3
2 Demo Story: Plan to Produce Using Advanced
  Planning for Capacity Utilization

This demo story describes the end-to-end scenario for planning and producing a finished product using both raw
materials as well as semifinished goods. The focus is set on the advanced capabilities of the “Monitor Capacity
Utilization” app which helps a planner to monitor, plan and correct any capacity overload issues.

2.1 Preliminary Steps

2.1.1 Post Initial Stock
In a real business case, the raw materials or the semifinished products can be purchased from external vendors; in that
case, that process is covered by the standard purchasing or subcontracting processes. In this demo story, for all raw
materials (RM20 and RM124), initial stock is posted using movement type 501.

  What to Do                What You Will See
  Open the Fiori
  Launchpad.
  User: S4H_PP_DEM
  Password: Welcome1
  Navigate to the Goods
  Receipt Processing
  section and choose the
  Post Goods Receipt
  Without Reference app.

  In the Goods Receipt
  Without Reference
  view, choose the Item
  Details (>) button on
  the item line.

                                                                                                                  4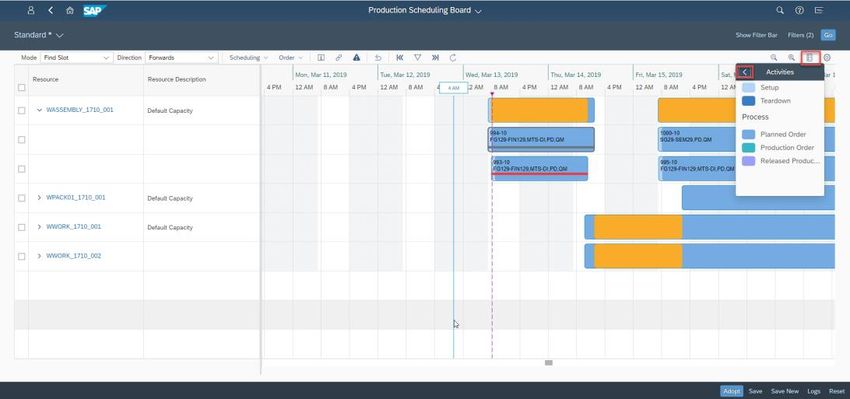
What to Do                What You Will See
The Goods Receipt
Item view displays

In the Materials
section, make the
following entries:
Material: RAW20,PD
Quantity/Unit:3000
Alternative Unit of
Measure: PC

In the Storage Location
/ Stock Type section,
make the following
entries and choose
Apply and New:
Plant: 1710
Storage Location: 171B
Stock Type:
Unrestricted-Use

Choose the Apply and
New button.

Repeat the steps
above for material
RM124.

In the Materials
section, make the
following entries:
Material: RM124
Quantity/Unit:3000
Alternative Unit of
Measure: PC

In the Storage Location
/ Stock Type section,
make the following
entries and choose
Apply:
Plant: 1710
Storage Location: 171B
Stock Type:
Unrestricted-Use

Choose Apply.

                                              5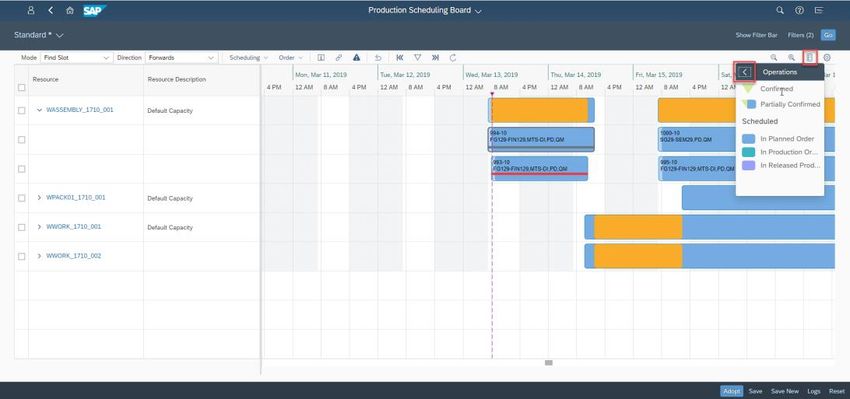
What to Do                What You Will See

  Choose Post.

  A successful message
  displays with the ID of
  material document
  posted.

2.1.2 Check Stock Level
Important: It is recommended to check the available stock and the open requirements for the finished product FG129.
You can check this using the Check Material Coverage app. If there are enough stock and open requirements (2000 PC),
just remove some stock and delete the existing planned orders so that new planned orders can be automatically created
while running MRP. After doing the necessary corrections, run the check again.

                                                                                                              6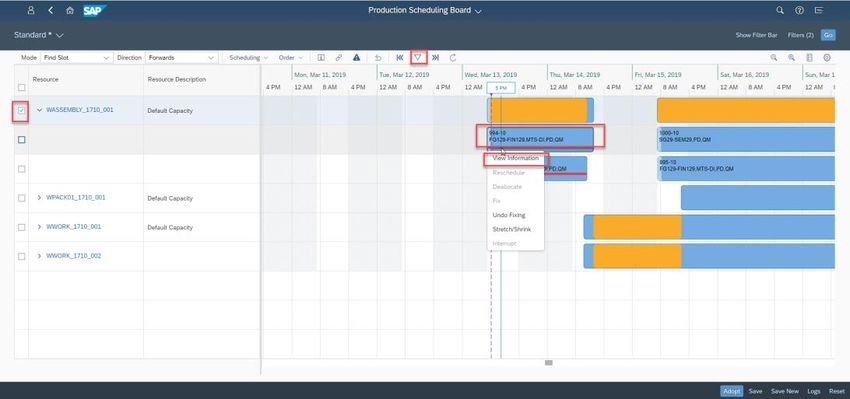
What to Do                 What You Will See
Open the Fiori
Launchpad.
User: S4H_PP_DEM
Password: Welcome1
Navigate to the
Demand Forecasting
and Material Data
Planning section and
choose the Check
Material Coverage app.

In the Find Material
dialog box, make the
following entries and
choose OK:
Material: FG129
Plant: 1710
Shortage Definition:
MRP Standard

Check the total value of
the existing stock and
of the existing open
requirements.

                                               7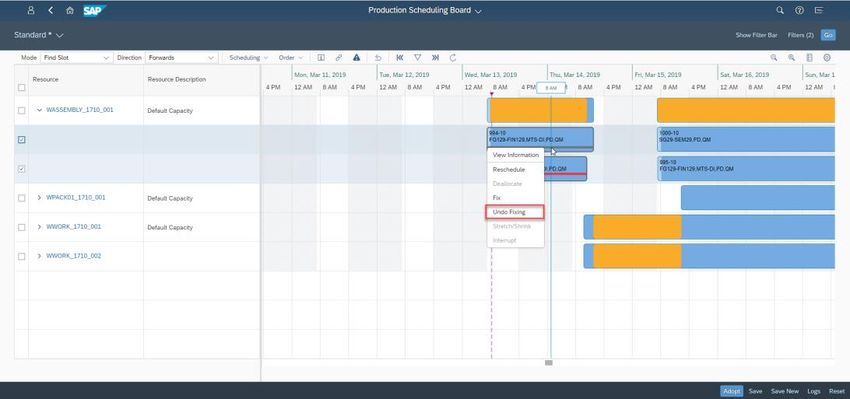
If there are enough        For the necessary corrections use any of the following apps:
 stock and open             •    Change PIRs
 requirements (3000
 PC), just remove some      •    Change Planned Orders /Convert Planned Orders to Production Orders
 stock and delete the       •    Post Goods Movement
 existing planned orders
 so that new planned
 orders can be
 automatically created
 while running MRP.

2.2 Create Planned Independent Requirements
Several planned independent requirements are created for a finished good. This will ensure that the high demand will
cause a capacity overload at the work center in the production plant.

 What to Do                 What You Will See
 Open the Fiori
 Launchpad.
 User: S4H_PP_DEM
 Password: Welcome1
 Navigate to the
 Demand Forecasting
 and Material Data
 Planning section and
 choose the Maintain
 PIRs app.

 In the filter area, make
 the following entries
 and choose Go:
 MRP Area: 1710
 MRP Controller: 001
 Material: FG129
 Period Indicator: W

 Search the Planned
 Independent
 Requirements item line
 and choose its Item
 Details (>) button.

                                                                                                                8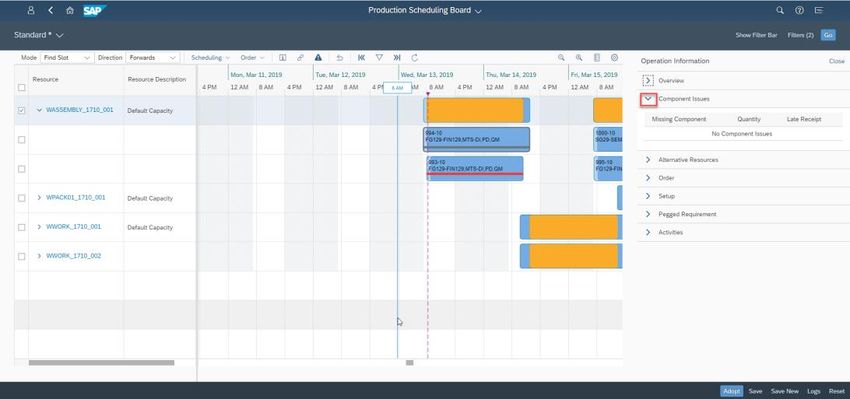
In the Planned
 Independent
 Requirements view,
 make the following
 entries:
 For the current week:
  •   Quantity: 500
 For the current week + 1:
  •   Quantity: 500
 For the current week + 2:
  •   Quantity: 1000
 For the current week +3:
  •   Quantity: 1000
 For the current week + 4:
  •   Quantity: 2000

 Choose Save

 A confirmation
 message displays.

2.3 Run Material Requirement Planning
The MRP run generates planned orders and dependent requirements for the finished good as well as for the semifinished
product and the raw materials. Afterwards, the newly created planned orders will generate the resource overload for the
relevant work centers.

 What to Do                  What You Will See
 Open the Fiori
 Launchpad.
 User: S4H_PP_DEM
 Password: Welcome1
 Navigate to the
 Advanced Planning
 section and choose the
 MRP – Single-Item,
 Multi-Level app.

                                                                                                               9
In the Single-Item,
Multi-Level screen,
make the following
entries and press
E n t e r twice:
Material: FG129
Processing Key: NETCH
Create Purchase Req.:
3 Planned Orders
SA Deliv. Sched. Lines:
3 Schedule Lines
Create MRP List: 1 MRP
List
Planning Mode: 2 Re-
explode BOM and
routing
Scheduling: 2 Lead
Time Scheduling and
Capacity Planning
Plant: 1710

                          A confirmation log is displayed. Planned Orders are created for both finished product FG129 as
                          well as for semifinished good SG29.

To doublecheck the
MRP run results, open
the Check Material
Coverage app and use
the following selection
criteria and choose OK:
Material: FG129
Plant: 1710
Shortage Definition:
MRP Standard
Take a note of the
Planned Order IDs.

                                                                                                              10
Repeat the check for
material SG29.
2.4 Monitor Capacity Utilization
Using the Monitor Capacity Utilization app, the production planner will evaluate the resource overload. From here the
planner can navigate to the production scheduling board where further details will be available and from where the
planner will effectively adjust the capacity planning as needed.
What to Do What You Will See
Open the Fiori
Launchpad.
User: S4H_PP_DEM
Password: Welcome1
Navigate to the My
Home section and
choose the Monitor
Capacity Utilization
app.
In the Monitor Capacity
Utilization view, choose
the User button and
choose the App Setting
option.
In the App Settings
pop-up, choose Area of
Responsibility.
11What to Do What You Will See
In the Area of
Responsibility screen,
choose the Add button.
In the Choose Your Plant
and Planner view,
choose the plant and
planners corresponding
to plant 1710.
Choose OK.
In the Area of
Responsibility view,
delete any entries
corresponding to plant
1010 (if applicable).
Choose OK.
In the App Settings
view, choose OK.
12What to Do What You Will See
In the Monitor Capacity
Utilization screen, if no
resource information is
available, execute the
workaround steps
described in chapter 2.5
Workaround for Planned
Orders Replication to
APO.
Once the workaround
is performed, refresh
the Monitor Capacity
Utilization screen by
choosing the Go
button.
The loading level of
each resource is shown
by day.
To get a better
understanding of the
loading diagram, choose
Legend.
A resource overload
exists for each day
marked in red.
Choose the
WASSEMBLY_1710_00
1 resource.
13What to Do What You Will See
In the overview view for
Utilization, the planner
can evaluate which are
the days when the
resource is over or
underutilized.
Choose the Utilization
dropdown button and
select Material.
In the overview view for
Material, the planner
can evaluate which are
the materials which
load the resource on a
given day.
Choose the Material
dropdown button and
select Order Type.
In the overview screen
for Order Type, the
planner evaluates
which order types load
the resource on a given
day.
Choose the Order Type
dropdown button and
select Activity.
14What to Do What You Will See
In the overview view for
Activity, the planner
can evaluate which
kind of activities load
the resource on a given
day: setup, teardown
and produce activities.
Choose the List of
Operations tab.
The List of Operations
tab shows the
operations scheduled
on the resource filtered
by date.
Any missing
components are shown
on the Operation Issue
column.
Choose Back.
In the Monitor Capacity
Utilization view, choose
all the resources which
have a work load
higher than zero.
Choose the Production
Scheduling Board
button.
In the Production
Scheduling Board view,
choose Go.
15What to Do What You Will See
On the left-hand side of
the view, expand the
node for resource
WASSEMBLY_1710_00
1.
Use any of the
Go to the Current Time,
Zoom Out or Zoom In
buttons to adjust the
timeline view.
To better understand
the diagram, choose
Legends and Operation
Status.
To go back to the
planning board, click
anywhere on the chart.
16What to Do What You Will See
For the
WASSEMBLY_1710_00
1 resource, select the
first order assigned to
the first operation.
Choose Scheduling and
Deallocate.
The deallocated
operation will be shown
with a red line cutting
through the
corresponding bar.
For the
WASSEMBLY_1710_00
1 resource, select the
second order assigned
to the first operation.
Choose Scheduling and
Fix.
The fixed operation will
be shown with a grey
line cutting through the
corresponding bar.
The deallocated
operation reduces the
capacity consumption
while the fixed
operation is blocked
for rescheduling.
In the same time, the
red coloured line
cutting across the
planned order will
remind the planner
that the dealocated
operation needs to be
rescheduled on the
resource.
17What to Do What You Will See
Choose Settings.
In the Settings dialog
box, check all the
checkboxes and
choose OK.
Choose Legends,
choose Back, choose
Operations.
The Legend pop-up
shows now the various
operations statuses.
Choose Legends and
choose Back.
Choose Activities.
The Legend pop-up
shows now the various
activity types.
18What to Do What You Will See
Choose the Go to
Current Time button.
Right-click on the fixed
operation and choose
View Information.
The Operation
Information pane is
opened on the right
side of the screen.
In the Operation
Information pane,
expand the Component
Issue details.
In the same way,
additional information
such as Additional
Resources, Order or
Activities can be
double-checked.
19What to Do What You Will See
Now select both
operations assigned to
the
WASSEMBLY_1710_00
1 resource, by pressing
control key.
The system displays
both operation details
in the right-hand side
pane.
In the Operations pane,
choose Close.
Right-click to choose
the fixed operation and
choose Undo Fixing.
As a result, the grey
line is gone, and the
operation can be
rescheduled if needed.
Drag the operation to
the right.
Notice that the
overlapping is reduced,
and the orange section
of the diagram became
partially blue.
This shows that the
planner has
successfully fixed the
overloading problem
20What to Do What You Will See
Choose Adopt twice.
To go back to the
Monitor Capacity
Utilization view, choose
Back.
In the Monitor Capacity
Utilization view, select
the SAP Capacity
Utilization – Dealloc.
Op. profile.
To refresh the screen,
choose Go.
Choose the
WASSEMBLY_1710_00
1 resource.
21What to Do What You Will See
In the Capacity
Utilization view, from
the Utilization drop-
down menu, choose
Order Type.
The planner realizes
that there are still
some de-allocated
operations which
should be allocated on
the resource. The
planner can take
necessary actions.
Choose Back.
In the Evaluation Profile
dropdown, choose the
SAP Standard Capacity
Utilization profile and
choose Go.
22What to Do What You Will See
Select the resources
that needs to be
rescheduled and
choose Production
Scheduling Board.
Choose Go and choose
the deallocated
operation.
Choose Scheduling and
Reschedule.
As a result, the
operation is
reallocated.
By drag and drop,
adjust the resource
utilization so that no
underload or overload
remains.
23What to Do What You Will See
Once the resource
planning is complete,
choose Adopt and
Back.
In the Monitor Capacity
Utilization view, there
are no remaining
utilization overloads.
242.5 Workaround for Planned Orders Replication to APO
For the situations where the “Monitor Capacity Utilization” app brings no data even if all the necessary steps were done,
perform the workaround steps described below.
What to Do What You Will See
Open the Fiori
Launchpad.
User: S4H_PP_DEM
Password: Welcome1
Navigate to the
Advance Planning
section and choose the
CIF – Comparison /
Reconciliation app.
In the CIF –
Comparison /
Reconciliation of
Transaction Data view,
choose the Execute
Comparison /
Reconciliation tab
Make the following
entries and choose
Execute:
Partner System:
S4HCLNT100
Material: FG129 and
SG29
Plant: 1710
Planned Orders: X
In the S4HCLNT100
(APO)
S4HCLNT100 (R/3)
screen, in the left-hand
side section of the
screen, expand the
Planned Orders folder
and choose the Missing
in APO line.
In the right-hand
section of the screen,
select the newly
25What to Do What You Will See
created Planned
Orders and choose
Send to APO.
A confirmation pop-up
is displayed.
Choose OK.
Close the app.
Navigate to the
Advance Planning
section and choose the
CIF - Cockpit app.
In the CIF Cockpit
screen, on the left-
hand section of the
screen, expand any of
the S4HCLNT100 -
S4HCLNT100 nodes
and double-click the
qRFC line.
In the right-hand
section of the screen,
search for the qRFC
Queue Names starting
with CFPLO* and
ending with the
*Planned Order
Ids created before.
Double-click any of
these lines.
In the qRFC Monitor
(Inbound Queue) view,
choose the Activate
Queue button.
26What to Do What You Will See
In the Activate Queue
pop-up, confirm the
Queue Name.
Choose Continue.
In the qRFC Monitor
(Inbound Queue)
screen, choose the
Refresh button until
the queue becomes
empty.
Choose Back button.
In the CIF Cockpit view,
check for any
remaining entries
corresponding to the
newly created Planned
Orders.
Repeat the above
steps if needed.
2.6 Create Production Order for Semifinished Product
Once the capacity load was solved, a first production order is created for the semifinished good SG29.
27What to Do What You Will See
Open the Fiori
Launchpad.
User: S4H_PP_DEM
Password: Welcome1
Navigate to the
Demand Forecasting
and Material Data
Planning section and
choose the Check
Material Coverage app.
In the Find Material
dialog box, make the
following entries and
choose OK:
Material: SG29
Plant: 1710
Shortage Definition:
MRP Standard
Choose the Edit button
next to the Planned
Ord ID
In the dropdown,
choose Convert.
28What to Do What You Will See
In the Change Planned
Order pop-up, select
Convert to
Production Order
Choose OK.
In the Manage Material
Coverage view, the
Planned Order was
replaced by a
Production Order.
Note down the
Production Order ID.
2.7 Release Production Order for Semifinished Product
To start the production of the semifinished good, the relevant production order must be released.
29What to Do What You Will See
Open the Fiori
Launchpad.
User: S4H_PP_DEM
Password: Welcome1
Navigate to the Shop
Floor Control and
Manufacturing
Execution section and
choose the Manage
Production Orders app.
In the Manage
Production Orders
view, choose the User
button and the App
Setting option.
In the App Settings
pop-up, choose Area of
Responsibility.
In the Area of
Responsibility view,
choose the Add button.
30What to Do What You Will See
In the Choose Your
Plant and Production
Supervisor view,
choose the plant and
supervisor
corresponding to plant
1710 and order type
(e.g. YB1)
Please deselect any
other entries if
applicable.
Choose OK.
In the Area of
Responsibility view,
choose OK.
In the Manage
Production Orders
view, make the
following entry the and
choose Go:
Material: SG29
In the Manage
Production Orders
view, select the
Production Order ID
created before and
choose Release.
31What to Do What You Will See
A confirmation
message is displayed
in the bottom side of
the screen.
The Production Order
Status is updated to
Released.
2.8 Confirm Production Order for Semifinished Product
Once each phase of the production has been completed, the relevant operations of the production order are fully
confirmed.
What to Do What You Will See
Open the Fiori
Launchpad.
User: S4H_PP_DEM
Password: Welcome1
Navigate to the Shop
Floor Control and
Manufacturing
Execution section and
choose the Manage
Production Orders app.
In the Manage
Production Orders
view, make the
following entry and
choose Go:
Material: SG29
32What to Do What You Will See
In the Manage
Production Orders
view, choose the
Details (>) button to
display the order
details.
In the Order Details
screen, navigate to
Order Schedule tab
and choose the Details
(>) button to display
the order details.
In the Operation Details
view, choose Confirm
Operation.
In the Enter Time
Ticket to Production
Order view, make the
following entries and
press E n t e r :
Order: Production
Order ID
Operation: 10
Confirm. type: Final
confirmation
Choose Actual Data.
33What to Do What You Will See
In the Enter Time
Ticket to Production
Order view, scroll down
to the Activities section
and make the following
entries:
Machine: Add 60 min
to the actual time.
Choose Goods
Movement.
In the Enter
Confirmation for
Production Order:
Goods Movement view,
choose Post.
A confirmation
message is displayed
in the bottom-down
part of the screen.
2.9 Post Goods Receipt for Semifinished Production Order
Once the production of the semifinished good it is completed, a goods movement is posted for the entire quantity
requested in the production order.
34What to Do What You Will See
Open the Fiori
Launchpad.
User: S4H_PP_DEM
Password: Welcome1
Navigate to the Goods
Receipt Processing
section and choose the
Post Goods Receipt for
Production Orders app.
In the Post Goods
Receipt for Production
Order view, make the
following entries and
press E n t e r :
Order:
Order ID:
In the Post Goods
Receipt for Production
Order view, scroll down
to the Items section
and choose the item.
Choose Post.
A confirmation
message is displayed
on the screen.
Choose OK.
352.10 Manage Inspection Lot
Because SG29 semifinished good is QM relevant, an inspection lot was created at the moment of the goods receipt and a
special stock was posted. Once the quality of the goods is inspected, the special stock has to be transferred to
unrestricted stock in order to be available for further processing.
In the following steps the entire quantity of the relevant inspection lot will be transferred from quality inspection to
unrestricted stock.
What to Do What You Will See
Open the Fiori
Launchpad.
User: S4H_PP_DEM
Password: Welcome1
Navigate to the Shop
Floor Control and
Manufacturing
Execution section and
choose the Manage
Usage Decision app.
In the Manage Usage
Decision view, make
the following entries:
Material: SG29
Usage Decision Made:
NO
Choose Go.
Choose the
corresponding
inspection lot.
In the Usage Decision
view, choose Edit.
36What to Do What You Will See
In the Usage Decision
tab, make the following
selection via the
corresponding radio
button:
Usage Decision Code:
A1 Accepted –
Unrestricted
Stock.
Choose Save.
The status of the
Usage Decision
updates in the upper
side of the screen.
In the Material
Documents tab, the
transfer to unrestricted
stock can be checked.
2.11 Create Production Order for the Finished Good
Once all semifinished goods and raw materials are available and the capacity overloads were solved, the production order
can be created for the finished product.
What to Do What You Will See
Open the Fiori
Launchpad.
User: S4H_PP_DEM
Password: Welcome1
Navigate to the
Material and
Production Planning
section and choose the
Check Material
Coverage app.
37What to Do What You Will See
In the Find Material
pop-up, make the
following entries:
Material: FG129
Plant: 1710
Shortage Definition:
MRP Standard
Choose OK.
Choose the Edit
button next to the
Planned Ord ID. and
in the dropdown menu,
choose Convert.
38What to Do What You Will See
In the Change Planned
Order pop-up, choose
Convert to Production
Order.
Choose OK.
In the Manage Material
Coverage view, the
Planned Order replaces
a Production Order.
Note down the
Production Order ID.
Repeat the steps if
needed for any
additional Planned
Order.
2.12 Release Finished Goods Order
To start the production of the finished good, the relevant production order is released.
39What to Do What You Will See
Open the Fiori
Launchpad.
User: S4H_PP_DEM
Password: Welcome1
Navigate to the Shop
Floor Control and
Manufacturing
Execution section and
choose the Manage
Production Orders app.
In the Manage
Production Orders
view, choose the User
button and the App
Setting option.
In the App Settings
pop-up, choose Area of
Responsibility.
In the Area of
Responsibility view,
choose the Add button.
40What to Do What You Will See
In the Choose Your
Plant and Production
Supervisor view, select
the plant and
supervisor
corresponding to plant
1710 and order type
(e.g. YB1)
Please deselect any
other entries if
applicable.
Choose OK.
In the Area of
Responsibility view,
choose OK.
In the Manage
Production Orders
view, make the
following entry in the
filter area and choose
Go:
Material: FG129
41What to Do What You Will See
In the Manage
Production Orders
view, choose the
Production Order ID
created before and
choose Release.
A confirmation
message is displayed
on the bottom of the
screen.
The Production Order
Status is updated to
Released.
422.13 Confirm Production for Finished Product
Once each phase of the production has been completed, the relevant operations of the production order are fully
confirmed.
What to Do What You Will See
Open the Fiori
Launchpad.
User: S4H_PP_DEM
Password: Welcome1
Navigate to the Shop
Floor Control and
Manufacturing
Execution section and
choose the Manage
Production Orders app.
In the Manage
Production Orders
view, make the
following entry in the
filter area and choose
Go:
Material FG129
In the Manage
Production Orders
view, choose the
Details (>) button to
display the order
details.
43What to Do What You Will See
In the Manage
Production Orders
screen, navigate to
Order Schedule tab
and choose the Details
(>) button to display
the order details.
In the Operation Details
screen, choose
Confirm Operation.
In the Enter Time
Ticket to Production
Order screen, make the
following entries and
press E n t e r :
Order:
Operation: 10
Confirm. type: Final
confirmation
Choose Actual Data.
44What to Do What You Will See
In the Enter Time
Ticket to Production
Order screen, choose
Goods Movement.
In the Enter
Confirmation for
Production Order:
Goods Movement view,
add the components of
the Production Order
(check the Manage
Production Orders
screen) and choose
Post.
45What to Do What You Will See
A confirmation
message is displayed
in the bottom-down
part of the screen.
Repeat the steps
above to confirm other
Production Order
Operations if
applicable.
2.14 Post Goods Receipt for Production Order
Once the production of the finished good it is completed, a goods movement is posted for the entire quantity requested in
the production order.
What to Do What You Will See
Open the Fiori
Launchpad.
User: S4H_PP_DEM
Password: Welcome1
Navigate to the Goods
Receipt Processing
section and choose the
Post Goods Receipt for
Production Order app.
In the Post Goods
Receipt for Production
Order view, make the
following entries:
Order:
46What to Do What You Will See
Press E n t e r .
In the Post Goods
Receipt for Production
Order view, scroll down
to the Items section
and select the item:
Item: X
Choose Post.
A confirmation
message is displayed
on the screen.
Choose OK.
47www.sap.com/contactsap © 2020 SAP SE or an SAP affiliate company. All rights reserved. No part of this publication may be reproduced or transmitted in any form or for any purpose without the express permission of SAP SE or an SAP affiliate company. The information contained herein may be changed without prior notice. Some software products marketed by SAP SE and its distributors contain proprietary software components of other software vendors. National product specifications may vary. These materials are provided by SAP SE or an SAP affiliate company for informational purposes only, without representation or warranty of any kind, and SAP or its affiliated companies shall not be liable for errors or omissions with respect to the materials. The only warranties for SAP or SAP affiliate company products and services are those that are set forth in the express warranty statements accompanying such products and services, if any. Nothing herein should be construed as constituting an additional warranty. SAP and other SAP products and services mentioned herein as well as their respective logos are trademarks or registered trademarks of SAP SE (or an SAP affiliate company) in Germany and other countries. All other product and service names mentioned are the trademarks of their respective companies. Please see www.sap.com/corporate-en/legal/copyright/index.epx for additional trademark information and notices.
You can also read