Preparing for remote data collection at NE-CAT
←
→
Page content transcription
If your browser does not render page correctly, please read the page content below
Preparing for remote data collection at NE-CAT
Important Note: The beamtime and remote login privileges are intended just for you and
your group. You are not allowed to share these with any other person or group. If we notice
any misuse of these privileges we reserve the right to cancel your current and future
beamtime. Currently, remote data collection is available on both 24ID-E and -C beamlines.

Requirements: NE-CAT remote data collection software is designed to connect to the
beamlines via a web browser. Currently fully supported browser is the latest (no more than
half year old) version of Firefox. You will need a computer with a high-speed internet
connection and an optional webcam, speakers and microphone (for webex session). All
graphical information is best reproduced on a computer monitor with screen resolution of
1680x1080 or higher. If you want to download diffraction images and inspect them locally, you
would need a program like adxv installed.

Dewar shipping: Dewars should be shipped to arrive at NE-CAT at least one working day in
advance of the beam time. Please note that dewars are not delivered to NE-CAT during the
weekend and holidays. Provide the support staff with the tracking number. Mark your name
on the dewar, if it is not obvious in the shipping label. Attach a return shipping FedEx label
with the dewar. See http://necat.chem.cornell.edu/userprogram/shippinginfo.htm. If you prefer
to receive your data via a hard drive (rather than via the internet), you should send it along
with the dewar.

7 days before: Users need to inform NE-CAT support staff of their intention to collect data
remotely.

3-4 days before: If you are a first time user, a group login will be created for you on the
remote server (https://remote.nec.aps.anl.gov:3001). Each group has a primary investigator
(P.I.), an administrator, and regular users. The P.I. and the group administrator will be able to
create/update/delete group users, taking responsibility for managing group members’ access
privileges. Once a user is created, he/she can obtain a password by clicking on the password
recovery link and entering their email address (which was entered by the administrator). Ship
your dewars.

1-2 days before: You should provide your beamline support with a document detailing the
pucks you have sent, and inform them which four pucks you would like to have loaded when
you start your data collection. You should also send a phone number where you and your
group members can be reached. Your beamline support will email you details for a WebEx
session to be used for communication during your data collection time, a script for syncing
your remotely collected data to your home computers (the password is usually valid for 3-4
days only), as well as any additional details you may need.

On the day: Remote data collection experiments will start at 11am. However, support staff
will let you know if an earlier start is possible. Your local support will load the first pucks you
requested, enable remote control and then notify you that you are good to go.
When users log in to https://remote.nec.aps.anl.gov:3001 during their access time, they will
have the option to control the session, observe the session, or to inspect the images from the
session as they are collected. Note that only one web browser instance can have control at a
time, while more than one web browser instances can observe and/or inspect images. You
can interact with your local support via a WebEx video session and the telephone (24ID-E
phone number is 630-252-7480).

We will load pucks at 11am. Puck change can be requested between 11am to 6pm. Note that
puck change takes approximately 20-40 minutes. So, plan your beamtime accordingly,
especially if there are multiple groups participating in a trip.

Afterward: Once your data collection is done, fill-out the end of the run form located at
http://necat.chem.cornell.edu/userprogram/endofrunsummary.htm. Your dewar and hard drive
will be shipped back to you using a FedEx label supplied by you. Your dewar will not be
shipped back unless you provide a return-shipping label. You will be able to browse your
images on the remote server for one week, and your local support will be able to help you
with any problems you may have with your data.
Remote Data Collection on 24ID-E

                               short manual, version of October 2014
Note 1. All beamline software and hardware are under intense development: new features are constantly added
or modified. Your support personnel will provide most up-to-date information. Please send your comments and
suggestions about the manual to igor@anl.gov.

Note 2. Currently several beamline functions are not yet implemented in the remote session: no discrete vector
scan and no occluded view. Stay tuned for these features.

    I.   Starting the new session:
Once you receive an explicit permission from your support personnel, please login to
https://remote.nec.aps.anl.gov:3001 with your registered email address and password . Initial password
and forgotten password may be recovered by clicking on “Lost your password” link and providing a
registered email; after login you can change the password.

After a successful login you should accept NE-CAT user policy:

and you should see in your browser a screen similar to one in Figure 1.

Figure 1. Selection of the remote session

Your current session will have “OBSERVE” ,“CONTROL” and “Images” buttons , assigned to your
group/institution (like a second line for NECAT on a figure above). The other sessions for your group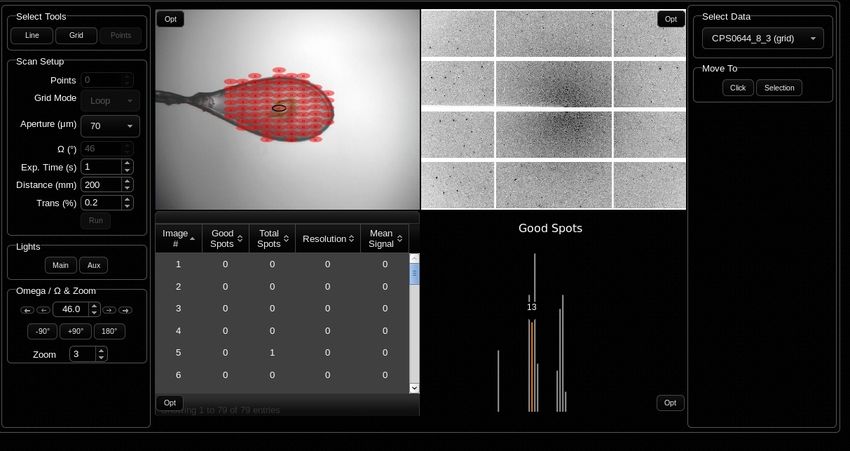
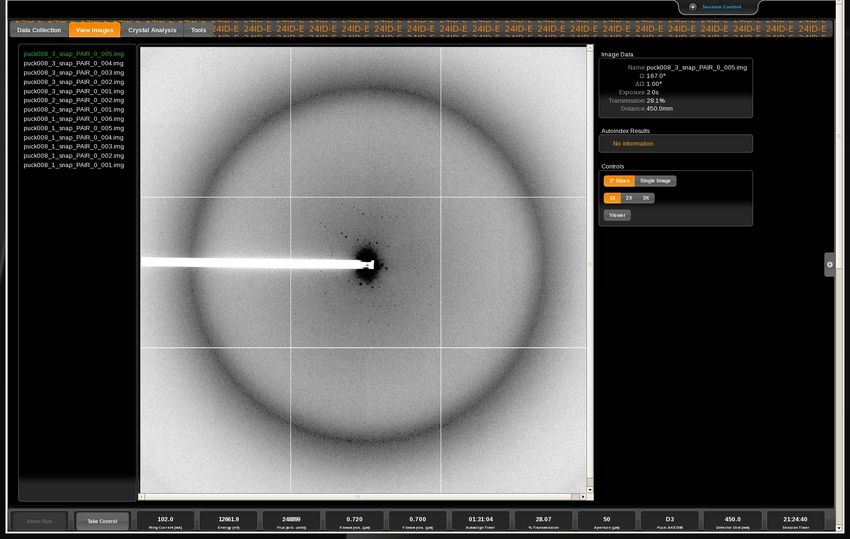
(if any) will be grayed out. If you don't see your group/institution, please call your support personnel.
Only one member (IP address) of your group can “control” the beamline (data collection), while more
than one can “observe” or browse “images”.

Press “GetSync” button to get the script for real-time data transfer (password is valid for 5 days only).

For real-time data processing results you should check RAPD processing in a separate browser
instance: login to https://rapd.chem.cornell.edu/rapd (login/password for RAPD are currently different
from remote session).

To collect data press “Control” button. This will bring you to a screen similar to one in Figure 2. This
will be your main working environment for the remote session.

Figure 2. Initial view of the main working environment for the remote session.

The default view is “Data Collection”; “View Images” tab may be used to visualize all diffraction
images; “Crystal Analysis” is used to setup different scans of the loop/crystal; “Tools” tab is used to
start CHAT session with your support person and restart “Console”, all others functions under “Tools”
tab are under development..

On the right side of the screen there are two small live video feeds of the sample/goniometer area: they
can be stowed away or brought back to view window by clicking on the arrow. Top video feed is pre-
assigned to three different views inside the experimental hutch: close-up view of the mounted crystal
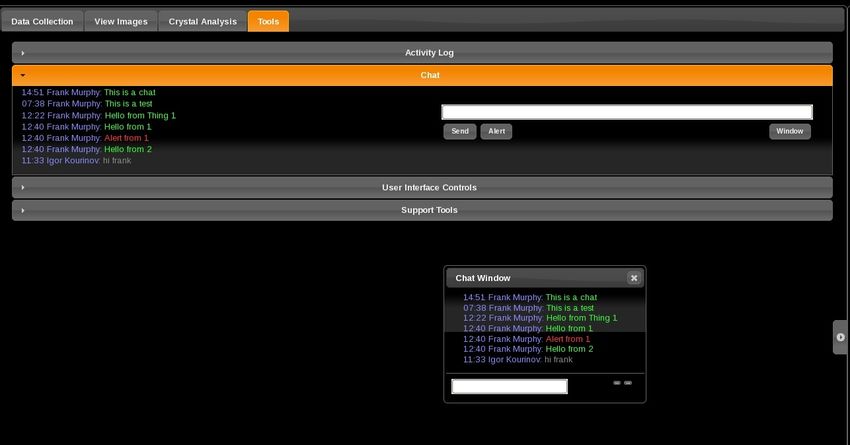
(“Sample”), view of the robot dewar (“Robot”) and the wide-angle view of the hutch (“Wide”). Have
patience while camera switches the view. It may takes up to 20 sec. for the camera to switch.

On the bottom of the screen there are several informational boxes; moving the cursor over each box
will show some additional information. If the box is yellow, it means the corresponding value needs
attention. Certain boxes can be double-clicked to change experimental parameters: double-clicking on
“X beam pos.” or “Y beam pos.” will trigger a trimming of the beam position in the corresponding
direction; double-clicking on “AutoalignTimer” will align the beam to the sample position; double-
clicking on “Aperture” will allow change of aperture size; double-clicking on the box with mounted
crystal ID (like A1 in Fig.2) will setup a crystal mounting dialog.

Click on “Main” button inside the “Light” box to illuminate the crystals; “Aux” will add a weak
external illumination, which may not be apparent.

The central portion of the screen will show the mounted crystal and will be used for crystal centering.
If you don't' see the sample after a mount, click on the “sample” on the top-left video feed and visually
check if a sample is indeed mounted. If the sample is visible on the goniometer, set the zoom to 1 and
rotate the crystal to bring it into the visual field of centering video feed and move it manually to the
right by pressing on the > arrows.

To start a chat session with your support personnel, go to “Tools” tab and click on “Chat” bar. Click on
“window” button and a new, floating “chat window will appear: see figure below.

Move the small “Chat Window” to the bottom of the main window and re-size it; go back to “Data
Collection” tab. Check Figure 3 for the best location of the chat window in the main window.
It is strongly advised that all members of the group have this small “chat” window open during remote
data collection session.
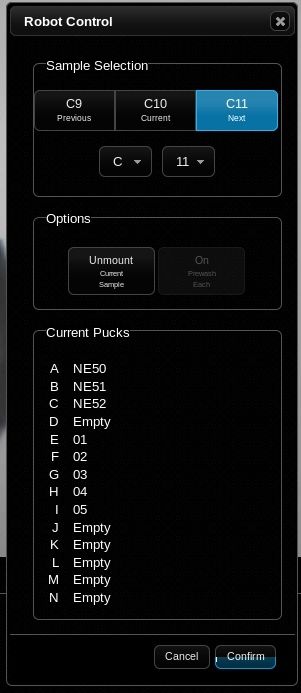
II. Mounting and centering crystals

1. Click “Other” in “Change Sample” box – new pop-up “Robot
Control” window will appear

2. Make selection (puck ID and crystal # - currently on the figure it
is B6) and press “confirm”.

3. Wait; in ~55 seconds the crystal will be mounted, illuminated and
visible in the central portion of the screen. The bell will sound too.

“Options” box includes “Unmount” button and the button to switch
“on” the pre-wash of the crystal. Currently, the pre-wash is not stable
and we are advising NOT to use it. If there is ice on crystal,
dismount and mount it again.

“Current pucks” may include information about the real names of
your pucks (input is done by your support personnel)

4. Center the crystal (step 5-10 below)

5. Change zoom to 1

6. Click in “3Click” button in “Centering” box – a number “1” will appear left from “3Click” button.

7. Perform “3-Click” centering by clicking on your crystal – click once on the sample; sample rotates
by 90 degree; click second time etc. (total THREE clicks should be done) . If you change your mind,
“Abort” button may be used get out of “3-click” alignment cycle. It is recommended to finish 3-clicks
centering without aborting the operation (“abort” function currently is not very stable).

8. Increase zoom (e.g to 5) and repeat “3-Click” alignment.

9. Check crystal alignment by manually rotating it using “Omega” box buttons.

10. Repeat “3-click” centering again , if necessary.

11. Proceed to data collections (section III below)
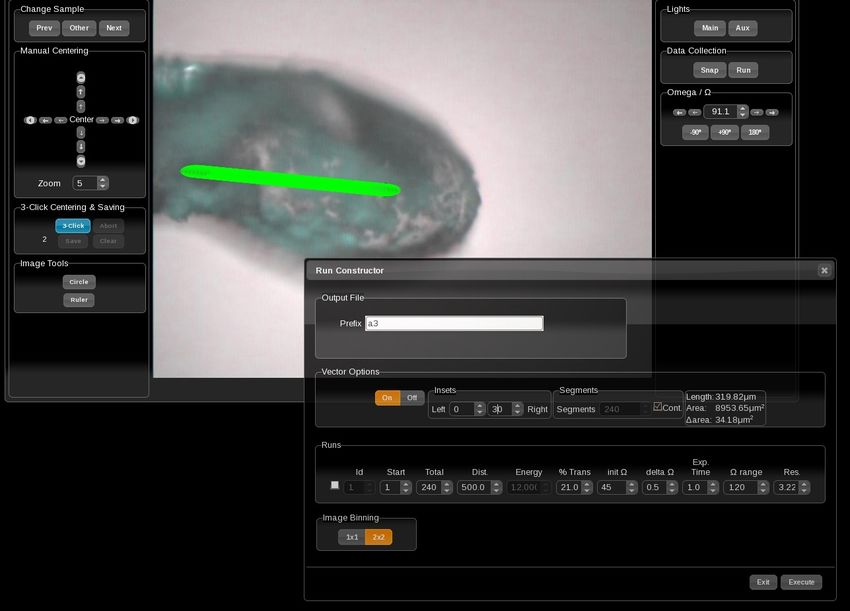
Figure 3. Main screen with illuminated mounted crystal ( D4 ) and beam contour (30x50 micron).

For continuous (helical) data collection mode you should create a vector along the crystal:

a. Align the beginning of the vector, as described in steps 5-10 above. Press “Save” button to save the
current centering position,

b. Repeat the centering procedure for a second point along the crystal (endpoint of the vector) and save
the second centering position.

Once the vector is created, it will be drawn over your crystal and will follow it during all omega
rotations and during snaps/runs configuration setup.

Note: To clear previously saved vector, if necessary, press “Clear” button.
III. Data Collection

       A. Snapshots

Click on “Snap” button in “Data Collection” box; a new
dialog will pop-up (see figure at right):

1. Type in the file prefix in the box “prefix”. You will see
the full final filename below.
2. Select 2x2 image binning mode (1x1 is only for
extremely sharp diffraction). Selected values are always
highlighted in orange
3. Select “Paired Snap Acquisition” ON and 90o Offset
(highly recommended for RAPD to properly index and
estimate the data collection strategy).
4. Type in parameters for the snapshot: initial angle,
oscillation range, exposure time, detector distance and
transmission (flux).
5. In the “resolution” box you will see corresponding
values for current detector distance ( you may also input
desired resolution and the detector distance will be re-
calculated).

Please note : detector distance should be in the range of 1000 to 125 mm and exposure time should be
a multiple of 1 seconds ONLY ( use 1 second exposure and change the flux %).

6. Click “Execute” when ready to collect snapshots.

Now you can see incoming images by clicking on “View Images” tab, the following window will
appear: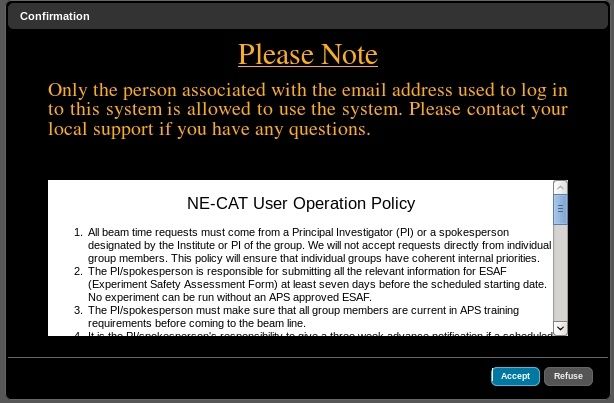
Figure 4. “View Images” tab

In this window it is possible to zoom in/out (1X, 2X and 3X buttons), draw resolution rings and view
either single image or one degree slice during “fine-slicing” data collection.

For high resolution pictures and more advanced viewing functions press”Viewer” button on the main
session screen - another pop-up window will appear.

B. Data Collection - Run Setup

Click on “Run” button in “Data Collection”
box; the next dialog window will depend on
whether the vector was defined for the crystal
(helical scan) or not defined (single spot data
collection).

B1. Conventional data collection
If the vector was NOT defined, you will see a
simple dialog (figure on the right).
Fill and check all fields before starting data
collection by pressing “Execute”.
Buttons in “Edit Runs” box allow you to
add/remove extra runs, if necessary.
B2. Continuous vector scan ( helical ) data collection

If the vector was defined, continuous vector data collection is on by default, and you will see a different
dialog and the vector will be drawn over the crystal:

Figure 6. Run construction for helical data collection (continuous vector scan).

Once you change any numbers in the “Run Constructor” dialog, the software will draw the beam path
on the crystal in green. Numbers under “Insets” (can be either positive and negative) determine the
position and the length of the scan vector. If “Vector Options” is off, no helical scan will be performed,
and all data will be collected from the current centering spot on the crystal.
Please note, that only integer numbers for exposure time should be inputted (1 sec is the best choice)
(exposure should be a multiple of 0.5).
Currently, helical scan run doesn't use run_ID. Make sure you use a new and unique file_prefix. A
problem of file overwriting may corrupt current remote session.

During data collection buttons that change the hardware configuration will be be disabled. However,
you can browse the images. Once data collection is done the bell will sound, and all buttons will be
enabled for control. The illumination of the crystal is not ON automatically after snapshots or runs. You
need to press “Main” button in “lights” box (sometimes this button should be pressed two times). You
can not see the crystal during data collection, however, auxiliary light can help to some extent,
(accessible by pressing “Aux” button).
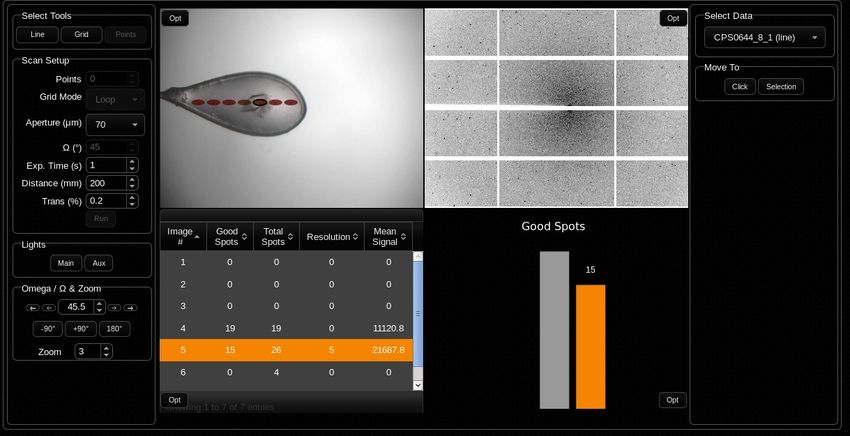
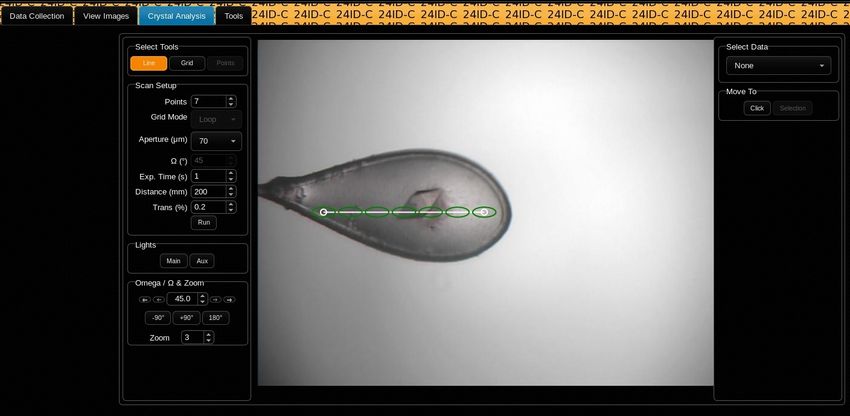
IV.     Crystal Analysis tools (under development)
a. line scan

Figure 6. View of Crystal Analysis Tab (Line tool is selected)

Before any actions in “Crystal Analysis” Tab the vector along the crystal or the loop should be created!

1. Select “Line” in “Select Tools” box
2. In “Scan Setup” box change number of points to collect along the vector, aperture size, exposure
time, detector distance and the transmission (Grid Mode is not yet functional)
3. Adjust loop/crystal view by changing Omega and Zoom values
4. Once you are satisfied with the scanning protocol – press “Run”
5. The “Scan Progress” dialog will appear, do not abort the scan; during the scan all buttons will be
grayed. Wait until you see the results – Figure 7 below.

Figure 7. Results of the “line scan”
6. Browse through all images by selecting appropriate image number (lower left quadrant) or by
choosing the highest number of spots (lower right quadrant)
7. Make selection and press “Selection” in “Move To” box ( “Click” box is not yet implemented)

b. grid scan, aka “alignment by diffraction”
1. Select “Grid” in “Select Tools” box and only “fill” scan in “Grid Mode” is functional now
2. In “Scan Setup” box change aperture size, exposure time, detector distance and the transmission
3. Adjust loop/crystal view by changing Omega and Zoom values
4. Once you are satisfied with the scanning protocol – press “Run”
5. The “Scan Progress” dialog will appear, do not abort the scan; during the scan all buttons will be
grayed. Wait until you see the results – Figure 8 below.

Figure 8. Results of loop scan

6. Browse through all images by selecting appropriate image number (lower left quadrant) or by
choosing the highest number of spots (lower right quadrant)
7. Make selection and press “Selection” in “Move To” box ( “Click” box is not yet implemented) – the
goniometer will be centered at the selected point.
8. Alignment at the orthogonal orientation should be done manually (for now).
V. Data Backup
Press “GetSync” button on the main session screen (Figure 1) to get the script for real-time data
transfer (password is valid for 5 days only). A new click on “GetSync” will generate a new password
inside the script. You may choose to provide an external hard drive for additional data backup, which
will be shipped back with the dewar.

       VI. Troubleshooting
The most important advice for a stable remote session is to be patient, and not to use any double-
clicking, unless specifically required (i.e. to change the aperture size or to do auto-alignment): Click
once and wait for something to happen or for the operation to finish.

The remote session is able to automatically reconnect to the beamline control software – it may take
couple minutes. If your session is not responsive, – close the current session, logout , wait one minute
and login again.

Still no connection/response? : go to "Tools" tab, select "user interface controls" and there is a button
called “Restart RAC”; you should click on it and wait one minute for all sockets to re-connect.

Still no connection/response? : go to "Tools" tab, select "user interface controls" and there is a button
called "Restart Console"; click on it, wait one minute for all sockets to re-connect, and re-login again.
 Please use with extreme caution!

 If none of these helped, call the beamline (630) 252-7480, or any other number supplied by your
support personnel.
You can also read