Skyward Discipline Guide - 2020-2021 STUDENT DATA SYSTEMS - Midland ISD
←
→
Page content transcription
If your browser does not render page correctly, please read the page content below

Skyward Discipline Guide
2020-2021
STUDENT DATA SYSTEMS

Skyward Discipline Guide
TABLE OF CONTENTS
ADD DISCIPLINE RECORDS ............................................................................................................................ 2
   To create a NEW discipline record ............................................................................................................ 2
   Add a Victim .............................................................................................................................................. 4
ADD DISCIPLINE RECORDS TO MULTIPLE STUDENTS .................................................................................... 7
   To add an Existing discipline record to multiple students ........................................................................ 7
DISCIPLINE RECORDS WITH PLACEMENT EXTENDING INTO THE NEXT YEAR ............................................... 9
   To add a discipline record that will extend into the next year ................................................................. 9
ADDING BULLYING/HARASSMENT DISCIPLINE RECORDS ........................................................................... 11
   Allegation with outcome as NOT Bullying/Harassment with one student ............................................. 11
   Allegation with outcome as NOT Bullying/Harassment with multiple students .................................... 12
   Allegation with outcome as Bullying/Harassment with one student ..................................................... 14
ADD CHILD RESTRAINTS .............................................................................................................................. 15
   Entering MISD Police Officer restraints of Special Education students .................................................. 16
   Entering MISD Police Officer restraints of General Education students ................................................ 17
   Entering School District Employee or Volunteer restraints of Special Education students ................... 19
DISCIPLINE MAINTENANCE FEATURES ........................................................................................................ 20
   To view discipline records ....................................................................................................................... 20
   Discipline records maintenance and features ........................................................................................ 21
DISCIPLINE REPORTS ................................................................................................................................... 24
   Skyward Reports ..................................................................................................................................... 24
       Discipline Detail................................................................................................................................... 24
       Discipline Graphs ................................................................................................................................ 27
       Number of Occurrences ...................................................................................................................... 30
   Skyward Report Manager ....................................................................................................................... 32
SIX WEEKS DISCIPLINE VERIFICATION REPORTS ......................................................................................... 34
   Discipline Error Report Instructions ........................................................................................................ 34
   Child Restraint Error Report Instructions................................................................................................ 40

                                                                      Page 1 of 46                                                                Last updated 10/05/2020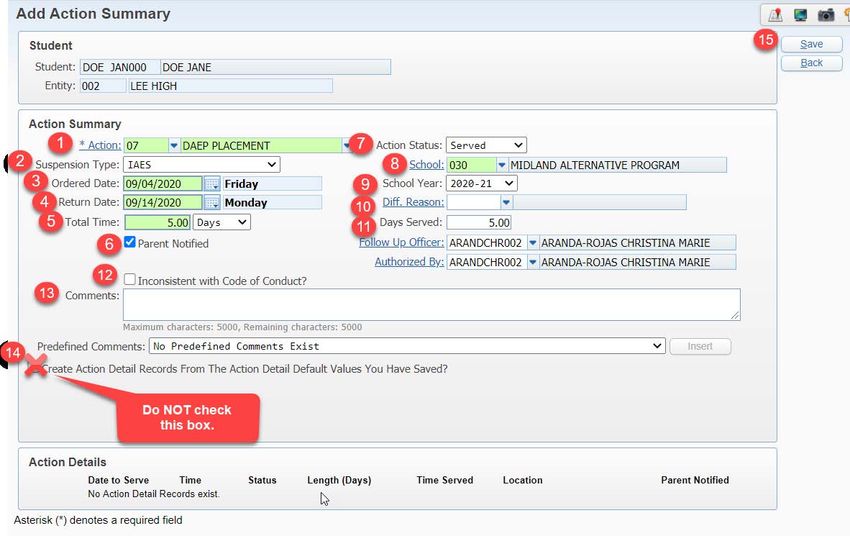
Skyward Discipline Guide
The Skyward Discipline module tracks offenses and the actions to those offenses. It is also
used for PEIMS and the Office for Civil Rights (OCR) reporting. Offenses can be entered
either by the campus discipline officer or as referrals through the teacher’s gradebook.

ADD DISCIPLINE RECORDS

A discipline record is created when a student violates a campus rule. A record is created for
each offense committed by the student.

Each discipline record logs the incident date and an offense code that indicates the nature
of the offense. Each offense has an incident number, which can be assigned to multiple
students. The discipline record can also contain an action code that indicates the steps
taken by campus administrators in response to the offense. Each offense can have multiple
action codes.

For instructions on entering disciplinary incidents where the disciplinary placement extends
into the next school year, please see page 9 of this document.

To create a NEW discipline record:

   1. From the Students menu click Student Profile – PR.

   2. Go to the Discipline>Offenses tab and locate the student by Student ID, Name or
      by clicking the Student link. Once the student is populated, click Add.

                                         Page 2 of 46                                 Last updated 10/05/2020
Skyward Discipline Guide
3. In the Add Offense section, input the following:
1. Offense/Referral: Since this is an offense, leave as Offense. Note: If the
teacher entered the referral in their gradebook, referral will automatically
populate. This must be changed to Offense for PEIMS and OCR reporting.
2. Offense: Select the offense code or select the Offense link to view a list of
codes.
If the primary offense has a PEIMS-equivalent code corresponding to
either conduct requiring mandatory expulsion or conduct requiring
mandatory placement in a DAEP (discretionary expulsion), the action
code must have an applicable PEIMS-equivalent code.
If the primary offense has a PEIMS-equivalent code corresponding to
conduct requiring mandatory expulsion, the action code must
correspond to a mandatory action, or action code 27 or 28
(mandatory action not taken) must be selected.
3. School: Select the school the incident took place.
4. Location: Select the location of the offense. This field is required for all
offense codes except 21-23, 33-34, 41-45, and 55-56. Offense
codes 09 and 10 must have 04 in the Location field.
Note: Some offense codes have only certain allowed behavior locations. For
instance, offense code 21-violation of the SCOC will always report as behavior
location 00 regardless of where the behavior occurred. Please refer to your
chart from Appendix E from your discipline training materials for the allowable
behavior locations.
5. Offense Date: Enter the date the offense occurred.
6. Offense Time: Enter the time the offense occurred.
7. Parent Notified: Check the box if the parent was notified. Note: This is for
data mining purposes only.
8. Incident: Since this is a new incident, leave as New Incident. This option will
assign the next available Incident #.
9. School Year: Select the School Year the incident took place.
10. Disc Officer: If you are a Discipline Officer and your staff record has the
Discipline Officer option selected (Staff>Staff Profile), your name will auto
fill this field when you create a new Offense record.
NEW REQD 11. Referred by: Select the staff member that gave the referral. Note: If the
teacher entered the referral in their gradebook, the teacher’s name will
automatically populate.
12. Comments: Enter comments regarding the offense. Please be mindful of
what you enter.
Page 3 of 46 Last updated 10/05/2020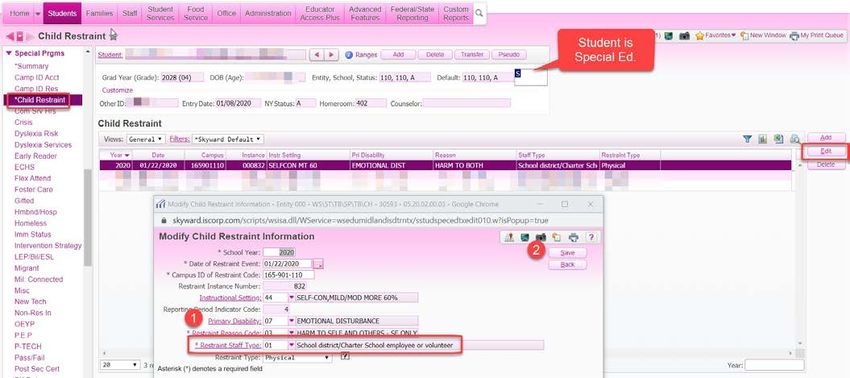
Skyward Discipline Guide
         13. Victims: Add victims to the offense (see below for instructions). Note: This
             field is required when adding a bullying/harassment incident (see page 11 for
             instructions).
         14. Click Attach to upload supporting documentation, if needed. Choose the file,
             click the upload button, then click Save.
         15. Once all fields have been entered, click Save and Add Action.

Add a Victim

         1. Click Add.
         2. Locate the student by Student ID, Name or by clicking the Student link.
         3. Relationship: If there is any relationship between the student with the
            Offense record and the Victim, select the relationship type.
         4. Primary Victim: Check this box if this is the Primary Victim of the Offense.
            You can add more than one victim to each Offense record.
         5. Comments: Enter comments that were made by the victim regarding the
            offense.
         6. Notes: Enter data as appropriate (i.e. notes from the investigation).
         7. Once all the fields have been entered, click Save.

                                       Page 4 of 46                                Last updated 10/05/2020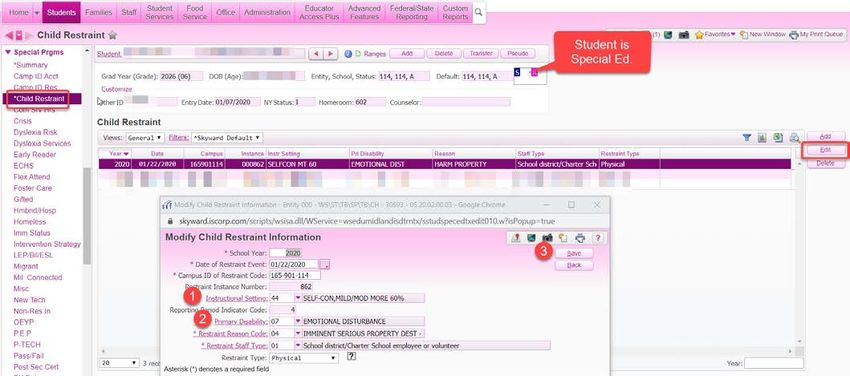
Skyward Discipline Guide
4. In the Add Action Summary section, input the following:
1. Action: Select the action code or select the Action link to view a list of codes.
If an action code has a PEIMS-equivalent code, the primary offense
must have a PEIMS-equivalent code and will be reported to PEIMS. If
the action code does not have a PEIMS-equivalent code, the primary
offense may or may not have a PEIMS-equivalent code.
2. Suspension Type: If the student’s action is suspension, select the suspension
type (i.e. ISS, OSS).
3. Ordered Date: Enter the date you ordered the placement, NOT the first day
of the student’s placement.
4. Return Date: If the student is serving an In or Out of School Suspension,
enter the date the student will return to class.
5. Total Time: Enter the official DAYS that you originally assigned to the
student. This is required when the action taken requires the student to be
removed from his/her regular setting (class).
6. Parent Notified: Check this box to verify you have contacted the parent and
have notified them of this action.
7. Action Status: There are three options you can choose from:
Open –This signifies that the Action has not yet been served.
Reissued – The Reissued option would be used if the student did not
serve the Action on the Ordered date and now the Action is being
changed to a higher consequence.
Served – When the student has completed the Action, you can mark
the Action as Served.
8. School: Select the school the student will be serving the action. For ISS, this
will be your campus number. For DAEP and expulsion with services, this will
be MAP 165901030 or Parker 165901122. For OSS and expulsion without
services, this field will be blank.
Page 5 of 46 Last updated 10/05/2020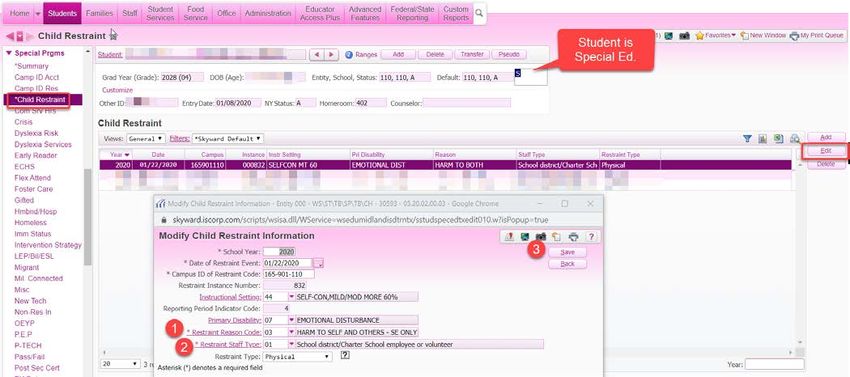
Skyward Discipline Guide
If the action code entered has a PEIMS equivalent code of 03, 04, 07,
08, 09, 10, 11, or 14, enter 030 (Midland Alternative Program) for
secondary students or 122 (Parker Elementary) for elementary
students expelled to MAP or have received DAEP placement.
If the action code entered has a PEIMS equivalent code of 01, 05, 25,
27, 28, or 50 leave this field blank.
9. School Year: Select the school year the action will be taking place.
10. Diff Reason: If a student does not serve the discipline term that has been
assigned (Total Time), then you must select the difference reason code and
input the actual number of instructional days (Days Served) that the student
was in attendance when calculating this number. Do not include days absent.
11. Days/Hours Served: When the Action Status is changed to Served, this field
will update with the Hours or Days Served based on what you entered in the
Total Time field. This is the number of days the student actually served.
NEW 12. Inconsistent with Code of Conduct?: Check this box if an out-of-school
suspension (OSS), disciplinary alternative education program (DAEP)
placement (not by court order), or expulsion action is inconsistent with a
local education agency’s student code of conduct.
13. Comments: Enter comments regarding the action record.
14. Never check Create Action Record Details From The Action Detail
Default Values You Have Saved.
15. Once all fields have been entered, click Save.
Page 6 of 46 Last updated 10/05/2020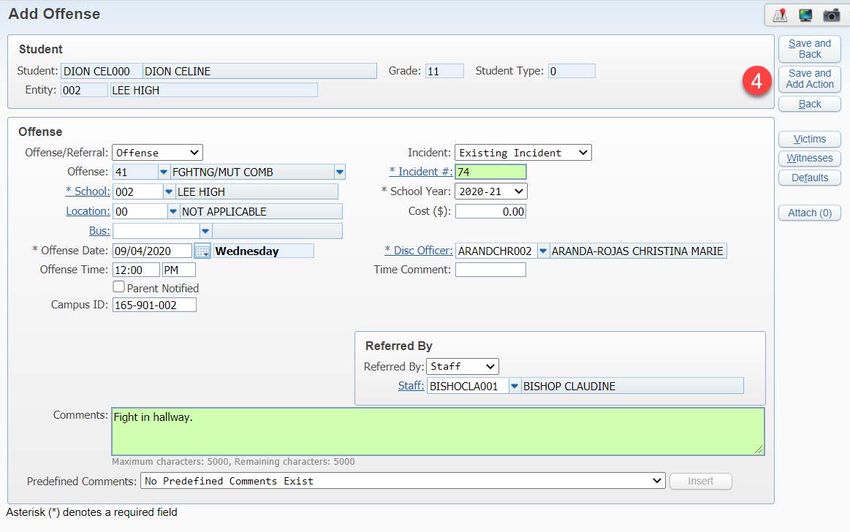
Skyward Discipline Guide
ADD DISCIPLINE RECORDS TO MULTIPLE STUDENTS

To add an Existing discipline record to multiple students:

   1. Go to the Discipline>Offenses tab and locate the student by Student ID, Name or
      by clicking the Student link. Once the student is populated, click Add.

   2. In the Add Offense section, input the following:
          1. Incident: Since this is an existing incident, select Existing Incident.
          2. Incident #: Input the incident # of the offense to link all of the students
             together.
          3. An Existing Incident Number popup will display. Click Yes to overwrite the
             information on the screen with the information from the selected incident.

                                      Page 7 of 46                               Last updated 10/05/2020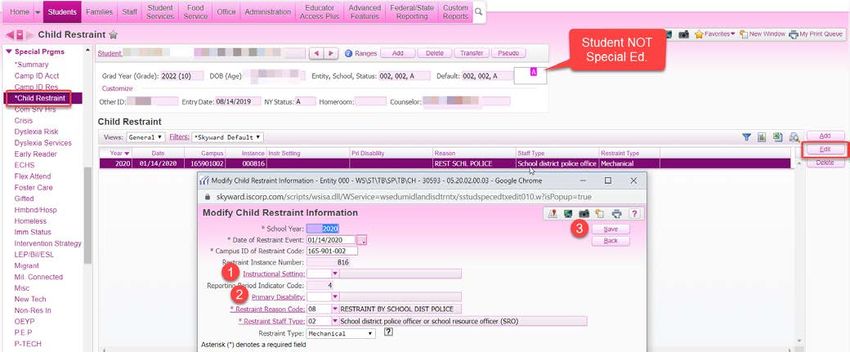
Skyward Discipline Guide
     4. Update the pre-populated fields as needed and then click Save and Add
        Action to complete the discipline record.

  Important: The offense code must be the same for all students involved in the incident;
  however, the action codes may be different (refer to pages 5-6 for instructions on
  adding action codes).

                                    Page 8 of 46                                 Last updated 10/05/2020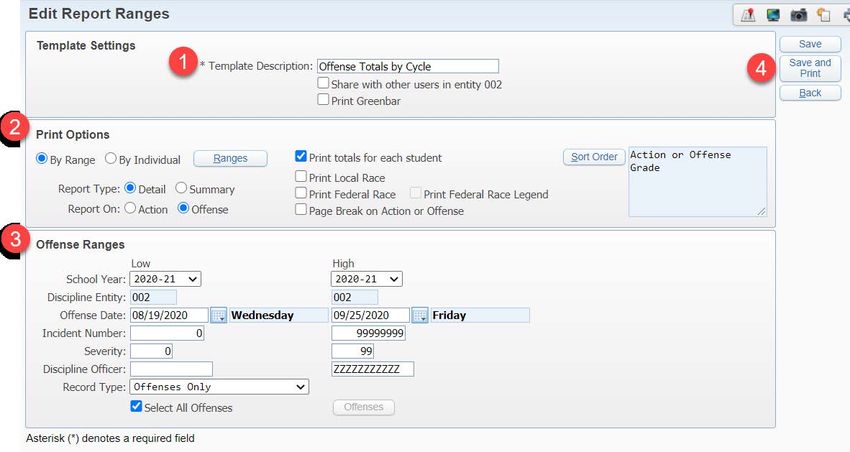
Skyward Discipline Guide
DISCIPLINE RECORDS WITH PLACEMENT EXTENDING INTO THE NEXT
YEAR

Current year disciplinary incidents with disciplinary actions of DAEP or expulsion where
students will start the next school year in DAEP or will be expelled with or without services
for the start of the next school year must be entered into Skyward under the current year.

To add a discipline record that will extend into the next year:

In this example, the student was expelled to DAEP for 30 days beginning 05/11/2020 for
possession of marijuana. .

   1. Go to the Discipline>Offenses tab and locate the student by Student ID, Name or by
      clicking the Student link. Once the student is populated, click Add.
   2. In the Add Offense section, enter the offense information and then click Save and
      Add Action.
   3. In the Add Action Summary section, the following fields must be entered to reflect
      that the student served 10 of the 30 days with a difference reason code (08) that the
      school year ended.
          1. Ordered Date: Date that you ordered the placement. May not be the first day
             of the student’s placement.
          2. Total Time: What you originally gave the student.
          3. Action Status: Mark as served.
          4. School: Where the student served the placement.
          5. Diff. Reason: A difference reason code must be entered since the student
             only served 10 of the 30 days of the DAEP assignment.
          6. Days Served: How many days the student actually served.
          7. Click Save once all fields have been completed.

                                         Page 9 of 46                                Last updated 10/05/2020
Skyward Discipline Guide
4. For the 2020-2021 discipline record, create a new discipline record with a new
incident number to record the continuation of DAEP from the previous year (2019-
2020). The same Offense Code must be used and the Offense Date must be the
student’s entry date (i.e. 8-19-20). If you do not know the Offense Code, call the SDS
department.
5. In the Add Action Summary section, input the following:
1. Action: Student DAEP continuation from previous year.
2. Ordered Date: Student’s entry date.
3. Total Time: Number of days remaining from previous year.
4. Action Status: Mark as served.
5. School: Where the student served the placement. If expelled WITHOUT
services, this should be blank.
6. Days Served: How many days the student actually served this year.
7. Click Save once all fields have been completed.
Page 10 of 46 Last updated 10/05/2020Skyward Discipline Guide
ADDING BULLYING/HARASSMENT DISCIPLINE RECORDS
All reports/allegations of bullying/harassment on the basis of: sex, race, color, or
national origin, disability, sexual orientation, or religion, regardless of the outcome,
must be keyed into Skyward to ensure the data is reported to the Office for Civil Rights
(OCR). An allegation is a claim or assertion that someone has done something wrong or
illegal, typically made without proof.
Allegation with outcome as NOT Bullying/Harassment with one student
The steps below explain how to enter a bullying/harassing allegation where the outcome
was found as not bullying/harassing. This referral is keyed (tied) to the person making
the allegation of being bullied/harassed (i.e. victim, accuser), not the person being
accused of doing the bullying/harassing.
1. Go to the Discipline>Offenses tab.
2. Locate the student making the allegation by Student ID, Name or by clicking the
Student link.
3. Once the student is populated, click Add.
4. Offense/Referral: Click the drop-down and select Referral.
5. Offense: Enter the bullying/harassing offense code that describes the basis for the
report.
001-HAR/BUL GENDR (Harass/Bully on Sex)
002-HAR/BUL RACE (Harass/Bully on Race, Color, or National Origin)
003-HAR/BUL DISAB (Harass/Bully on Disability)
004-HAR/BUL SEX ORN (Harass/Bully on Sexual Orientation)
005-HAR/BUL RELIG (Harass/Bully on Religion)
006-HAR/BUL OTHER (Harass/Bully on Other – not listed above)
6. Location: Enter 00.
7. Offense Date: Enter the date the student came in to report the incident.
8. Referred By: Enter the data as appropriate.
9. Comments: Enter detailed comments excluding any information that can identify
the accused student (i.e. name).
10. Once all data has been entered, click the Save and Back.
Page 11 of 46 Last updated 10/05/2020Skyward Discipline Guide
Allegation with outcome as NOT Bullying/Harassment with multiple students
If more than one student is making an allegation for the same incident, the referrals must
be tied together using the same incident number. The steps below explain how to connect
the incidents together where the outcome was found as not bullying/harassing.
1. Go to the Discipline>Offenses tab.
2. Locate the student that needs to be tied to the other student making the
allegation by Student ID, Name or by clicking the Student link.
3. Once the student is populated, click Add.
4. Incident: Since this is an existing incident, select Existing Incident.
5. Incident #: Input the incident # of the offense to link all the students together or
click the Incident # link to view all incidents.
6. An Existing Incident Number popup will display. Click Yes to overwrite the
information on the screen with the information from the selected incident.
Page 12 of 46 Last updated 10/05/2020Skyward Discipline Guide
7. Once all information has been entered, click the Save and Back.
8. If the message ‘Continue without entering PEIMS required data?’ appears, click the
Yes to continue and save the record.
Page 13 of 46 Last updated 10/05/2020Skyward Discipline Guide
Allegation with outcome as Bullying/Harassment with one student
The steps below explain how to enter a bullying/harassment allegation where the outcome
was found as bullying/harassing. This offense is keyed (tied) to the person being
accused and found guilty of bullying/harassing, not the person making the allegation
of being bullied/harassed (i.e. victim, accuser).
Note: If multiple students are involved in the same incident and are found to be
bullying/harassing, all students must be tied together by the incident number. Follow the
steps below to create the incident for the first student. Then refer to pages 7-8 for instructions
on entering multiple students.
1. Go to the Discipline>Offenses tab.
2. Locate the student being accused and found guilty of bullying/harassing by
Student ID, Name or by clicking the Student link.
3. Once the student is populated, click Add.
4. Offense/Referral: Click the drop-down and select Offense.
5. Offense: Enter the bullying/harassing offense code that describes the basis for the
report.
001-HAR/BUL GENDR (Harass/Bully on Sex)
002-HAR/BUL RACE (Harass/Bully on Race, Color, or National Origin)
003-HAR/BUL DISAB (Harass/Bully on Disability)
004-HAR/BUL SEX ORN (Harass/Bully on Sexual Orientation)
005-HAR/BUL RELIG (Harass/Bully on Religion)
006-HAR/BUL OTHER (Harass/Bully on Other – not listed above)
6. Location: Enter 00.
7. Offense Date: Enter the date the offense occurred.
8. Referred By: Enter the data as appropriate.
9. Comments: Enter detailed comments excluding any information that can identify
the student (i.e. name) making the report/allegation.
10. Click Victims to enter information regarding the victim(s) who reported the
bullying/harassment. Note: Add additional names if there are multiple victims. See
page 4 for instructions on how to enter a victim.
Page 14 of 46 Last updated 10/05/2020Skyward Discipline Guide
ADD CHILD RESTRAINTS
ALL district employee/volunteer and MISD police officer restraints of special education
students must be entered in Skyward. For general education students, only the MISD police
officer restraints are to be entered in Skyward.
You can quickly determine that a student is identified as a special education student by
looking in the student indicator box on the Student Profile screen:
Special Education student:
General Education student
Page 15 of 46 Last updated 10/05/2020Skyward Discipline Guide
Entering MISD Police Officer restraints of Special Education students
1. Go to the Special Ed>Child Res tab and locate the student by Student ID, Name or
by clicking the Student link. Once the student is populated, click Add.
Note: Some items on this screen will automatically populate. The fields that have been
boxed in RED must be entered for each restraint of special education students by MISD
police officers.
2. School Year: For the 2020-2021 school year, it will be 2021.
3. Date of Restraint Event: Enter the date the restraint occurred.
NEW 4. Start Time: Input the time the student was restrained.
5. Campus ID of Restraint Code: This field will automatically populate based on the
campus that is adding the restraint record. Note: If the restraint did not occur on the
student’s home campus, then this field needs to be updated to the campus code for the
campus where the restraint did occur.
6. Restraint Instance Number: This field will automatically generate once the record
is saved.
7. Instructional Setting: This field will automatically populate from the student’s
special education program record.
8. Reporting Period Indicator Code: This field will automatically populate based on
the date that was selected above for the restraint event.
9. Primary Disability: This field will automatically populate from the student’s special
education program record.
10. Restraint Reason Code: Enter code 08-Restraint by School District Police.
11. Restraint Staff Type Code: Enter code 02-School district police or SRO.
12. Restraint Type: Select either Mechanical or Physical from the dropdown.
13. Once all information has been entered, click Save.
Page 16 of 46 Last updated 10/05/2020Skyward Discipline Guide
Entering MISD Police Officer restraints of General Education students
Note: These are the only restraints that are to be entered for general education students.
1. Go to the Special Prgms>Child Restraint tab and locate the student by Student ID,
Name or by clicking the Student link. Once the student is populated, click Add.
Note: Some items on this screen will automatically populate. The fields that have been
boxed in RED must be entered for each restraint of general education students by
MISD police officers.
Page 17 of 46 Last updated 10/05/2020Skyward Discipline Guide
2. School Year: For the 2020-2021 school year, it will be 2021.
3. Date of Restraint Event: Enter the date the restraint occurred.
4. Start Time: Input the time the student was restrained.
5. Campus ID of Restraint Code: This field will automatically populate based on the
campus that is adding the restraint record. Note: If the restraint did not occur on the
student’s home campus, then this field needs to be updated to the campus code for the
campus where the restraint did occur.
6. Restraint Instance Number: This field will automatically generate once the record
is saved.
7. Instructional Setting: Leave blank since the student is not in special education.
8. Reporting Period Indicator Code: This field will automatically populate based on
the date that was selected above for the restraint event.
9. Primary Disability: Leave blank since the student is not in special education.
10. Restraint Reason Code: Enter code 08-Restraint by School District Police.
11. Restraint Staff Type Code: Enter code 02-School district police or SRO.
12. Restraint Type: Select either Mechanical or Physical from the dropdown.
13. Once all information has been entered, click Save.
Page 18 of 46 Last updated 10/05/2020Skyward Discipline Guide
Entering School District Employee or Volunteer restraints of Special Education
students
1. Go to the Special Ed>Child Res tab and locate the student by Student ID, Name or
by clicking the Student link. Once the student is populated, click Add.
Note: Some items on this screen will automatically populate. The fields that have been
boxed in RED must be entered for each restraint of special education students by
school district employees or volunteers.
2. School Year: For the 2020-2021 school year, it will be 2021.
3. Date of Restraint Event: Enter the date the restraint occurred.
4. Start Time: Input the time the student was restrained.
5. Campus ID of Restraint Code: This field will automatically populate based on the
campus that is adding the restraint record. Note: If the restraint did not occur on the
student’s home campus, then this field needs to be updated to the campus code for the
campus where the restraint did occur.
6. Restraint Instance Number: This field will automatically generate once the record
is saved.
7. Instructional Setting: This field will automatically populate from the student’s
special education program record.
8. Reporting Period Indicator Code: This field will automatically populate based on
the date that was selected above for the restraint event.
9. Primary Disability: This field will automatically populate from the student’s special
education program record.
10. Restraint Reason Code: Enter code 01-07 for the appropriate ‘imminent harm’. Do
NOT enter 08-Restraint by School District Police in this field.
11. Restraint Staff Type Code: Enter code 01-School district/charter employee or
volunteer. Do NOT enter 02-School district police or SRO in this field.
12. Restraint Type: Select either Mechanical or Physical from the dropdown.
13. Once all information has been entered, click Save.
Page 19 of 46 Last updated 10/05/2020Skyward Discipline Guide
DISCIPLINE MAINTENANCE FEATURES
To view discipline records:
The student’s discipline records are listed. The details can be viewed by highlighting a
record and then expanding it.
Page 20 of 46 Last updated 10/05/2020Skyward Discipline Guide
Discipline records maintenance and features:
Quick Print: To access Discipline Reports
1. Click Quick Print.
2. Select the report you wish to print.
3. Select the Template to run.
4. OPTIONAL: Select Make Favorite.
5. Click Run.
Add: Create a new Offense record.
Edit: Update an existing discipline record. Remember to click Save and Back once all
updates have been made.
Delete: Delete an existing discipline record. The message shown below will appear.
Click Yes to delete the offense. Note: Action codes, victims, and witnesses must be
deleted before the offense can be deleted.
Page 21 of 46 Last updated 10/05/2020Skyward Discipline Guide
Dis Notes: Discipline Notes can be viewed, added, edited, or deleted.
All Notes: All Notes can be viewed, added, edited, or deleted.
Totals: The total number of Offenses, Actions, and Points can be viewed.
Page 22 of 46 Last updated 10/05/2020Skyward Discipline Guide
Susp/Exp: The student’s Suspension and Expulsion records can be viewed.
Defaults: Defaults may be setup which will automatically populate specific data
when a new Offense record is created. All defaults can be overridden as needed.
Page 23 of 46 Last updated 10/05/2020Skyward Discipline Guide
DISCIPLINE REPORTS
Skyward Reports
The Skyward Discipline module contains reports to produce graphs of offenses or actions,
or to run a report of all offenses or actions that have occurred during a specific date range.
To access Skyward Discipline reports, go to Office>Discipline – DI>Reports - RE. Note:
Depending on your access level, you may not see all reports displayed.
Discipline Detail – DD – This report provides details of students’ discipline records.
1. Click Discipline Detail – DD.
2. Click Add.
3. To create a template, follow the steps below:
Page 24 of 46 Last updated 10/05/2020Skyward Discipline Guide
1. Enter a Template Description.
2. Select the Print Options:
Ranges – Specify the students whose records will be included
in the report (i.e. active students only, specific grade levels,
etc.).
Sort Order – You can sort by one or more fields. If multiple
fields are selected, you can page break each sort item.
3. Select the Offense Ranges:
School Year - Select the school year.
Offense Date – Specify a date range. You also have the option to
use the Today Less Number of Days which allows you to look at
offenses that took place a defined number of days prior to today.
Record Type – You can print for all offenses or selected offenses.
Offense Sort Order – You can sort by Offense Date or Offense
Code.
4. Select the Action Ranges:
Suspension Type - Use this field to limit the actions to ‘In School’
and ‘Out of School Suspension’ or ‘Expulsions’ and others.
Action Sort Order – You can sort by Action Date or Action Code.
5. Select the Action Detail Ranges to filter the ‘Action Details’ that will
display on the report.
6. Once all sections have been completed, click Save and Print.
Page 25 of 46 Last updated 10/05/2020Skyward Discipline Guide
Page 26 of 46 Last updated 10/05/2020Skyward Discipline Guide
7. Once the report has completed processing, click View Report.
Example
Discipline Graphs – GR – This report can be used to create and view graphs of
discipline offenses and actions.
1. Click Discipline Graphs – GR.
Page 27 of 46 Last updated 10/05/2020Skyward Discipline Guide
2. Click Add.
3. To create a template, follow the steps below:
1. Enter a Template Description.
2. Select the Graph Options:
Graph By - Use the “Graph By” option’s drop-down list to
select Action/Detail, Offense, or Offense Rate Graph.
Generate – Select to generate either a report or a graph of the
data.
Record Type – When creating an Offense or Offense Rate
graph, you can select to graph Offenses, Referrals, or Both.
Ranges – Specify the students whose records will be included
in the report or graph (i.e. active students only, specific grade
levels, etc.).
Graph Title – The Graph Title and Graph Sub-Title entered
here will appear at the top of the printed graph.
3. Date Ranges: Specify a Date Range, or choose to report on the
Previous 4 Weeks.
4. Select the Breakdown options:
Breakdown By – There are several other selections available on
the drop-down list to choose from such as: location, month, school,
grade, and others.
Graph Type – Bar, pie, and line type graphs are all available
options.
Legend – Choose whether or not you want to display the short
description in the Graph Legend. The code will appear
automatically.
5. Once all sections have been completed, click Save and Print.
Page 28 of 46 Last updated 10/05/2020Skyward Discipline Guide
6. Once the report has completed processing the graph will display.
Example
Page 29 of 46 Last updated 10/05/2020Skyward Discipline Guide
Number of Occurrences – NO – This report displays discipline totals for offenses or
actions during the selected dates.
1. Click Number of Occurrences - NO.
2. Click Add.
3. To create a template, follow the steps below:
1. Enter a Template Description.
2. Select the Print Options:
Ranges – Specify the students whose records will be included
in the report (i.e. active students only, specific grade levels,
etc.).
Report Type – Select ‘Detail’ to display specific student
information or select ‘Summary’ to display totals only.
Report On – Select ‘Action’ or ‘Offense’. This example will be for
Offenses.
Sort Order – You can sort by one or more fields. If multiple
fields are selected, you can page break each sort item.
3. Select the Offense Ranges:
School Year - Select the school year.
Offense Date – Specify a date range.
Record Type – You can print for all offenses or selected offenses.
Page 30 of 46 Last updated 10/05/2020Skyward Discipline Guide
4. Once all sections have been completed, click Save and Print.
5. Once the report has completed processing, click View Report.
Example of Report Type: Detail
Example of Report Type: Summary
Page 31 of 46 Last updated 10/05/2020Skyward Discipline Guide
Skyward Report Manager
The Student Data Systems (SDS) department creates and publishes custom reports to
Skyward Report Manager for departments and campuses throughout the district. These
reports are usually live, current data with specific criteria programmed for each report.
When running reports on Skyward Report Manager, please keep in mind:
Skyward Report Manager can only be accessed on the MISD network.
Each user must be given security access to a report in order to view it. If you are
unable to access a specific report, please contact Fannita Barakat at
fannita.barakat@midlandisd.net .
All the data on each report is current at the point in time that you access it. You can
re-run a report each time you need updated information.
Discipline Action Counts by Grade Level : This report displays counts of ALL actions (PEIMS
and Non-PEIMS reportable) by grade level.
Example
Page 32 of 46 Last updated 10/05/2020Skyward Discipline Guide
Discipline Offense Counts by Grade Level This report displays counts of ALL offenses
(PEIMS and Non-PEIMS reportable) by grade level.
Example
For instructions on ‘How to Navigate Report Manager’ click here.
Page 33 of 46 Last updated 10/05/2020Skyward Discipline Guide
SIX WEEKS DISCIPLINE VERIFICATION REPORTS
The SDS department will run multiple reports at the end of each cycle and place them in
your school’s PEIMS shared folder. You must review and correct each error as needed.
Discipline Error Report Instructions
Below is a sample of the report and a description of each column from left to right.
Ent – This is the campus number.
Alphakey – This is the student’s identification key that is used to locate the student
in Skyward.
Name (Last, First MI) – This is the student’s name.
Gd – This is the student’s current grade level.
Inc Id – This is the discipline incident number assigned to each disciplinary offense
record.
Camp ID Enrl – This is the campus in which the student is enrolled.
Stu Unique ID: This is the student’s social security number or state ID number.
Dis Act Rsn – This is the reason the student was subject to a disciplinary action.
Beh Loc – This indicates where the offense occurred (on/off campus, school related,
etc.)
Dis Act Id – This is the disciplinary action number that indicates the differentiation
between two or more separate disciplinary actions reported with identical values.
Dis Date – This is the date on which the disciplinary assignment was ordered.
Act Dis Len – This is the actual length in days of the disciplinary assignment the
student completed.
Camp ID Disc Resp – This is the campus on which the student was enrolled when
the disciplinary assignment was made.
Camp ID Disc Assign – This is the campus in which the student was placed for
disciplinary reasons.
Dis Act Cd – This is the disciplinary action taken for the student.
Page 34 of 46 Last updated 10/05/2020Skyward Discipline Guide
Rpt Prd – This is the grade/attendance reporting cycle.
Off Lng Dis Asn – This is the official length in days of the student’s disciplinary
assignment.
Dis Ln Dif Rsn – This is the reason for the difference, if any, between the official and
actual lengths of the student’s disciplinary assignment.
PEIMS Error – This identifies the error that must be reviewed and updated in
Skyward. Follow the instructions below to correct the error(s).
To update the errors found under the PEIMS Error column, please follow the appropriate
steps based on the error message.
1. *F* If LEN-DIFF-RSN-CODE is 00, OFFICIAL- and ACTUAL-LENGTH must not be
different. 42508 – Explanation: If the Total Time and Days Served under the Action
Summary do not match, then the Diff. Reason field must contain a difference reason code.
To correct the error, you have 2 choices:
A. If the student did not serve all days and the Total Time and Days Served is correct:
1. Leave the Total Time and Days Served as is.
2. Select Served from the drop down box next Action Status.
3. Enter a Difference Reason code to indicate why the student did not serve all
days and click Save.
OR
Page 35 of 46 Last updated 10/05/2020Skyward Discipline Guide
B. If the student served all days and the Total Time is correct:
1. Enter the number of days served by selecting Served from the drop down
box next to Action Status and click Save.
IMPORTANT: If the student has not yet served all of the assigned days, leave the Action
Status: Open and ignore the error.
Page 36 of 46 Last updated 10/05/2020Skyward Discipline Guide
2. *F* If LEN-DIFF-RSN-CODE isn’t 00, OFFICIAL- and ACTUAL-LENGTH must be
different. 42509 – Explanation: If the Total Time and Days Served under the Action
Summary match, then the Diff. Reason” field must be ‘00’ to indicate there is no difference.
To correct the error, you have 2 choices:
A. If the Total Time and Days Served is correct, leave as is and change the Difference
Reason code to ‘00’ to indicate there is no difference between total time and days
served.
OR
Page 37 of 46 Last updated 10/05/2020Skyward Discipline Guide
B. Leave the Difference Reason code as is and change the Days Served to reflect the
actual number of days the student served. Therefore, the total time and the days
served will not be the same.
Page 38 of 46 Last updated 10/05/2020Skyward Discipline Guide
Use the chart below to assist with other errors:
ERROR EXPLANATION/THINGS TO CONSIDER
*SW* Invalid DIS-ACTION-CODE or DIS-ACTION- Incomplete Action: Requires mandatory placement
REASON-CODE per edit 42533. which was not taken.
1. Is the offense code correct (Should a local
offense code be considered?)
2. If the offense code is correct, why was the
mandatory action not taken?
3. If the student is SPED, was this the decision of
the ARD committee? If mandatory action was
not taken under the allowances of CHAPTER
37, then add an action with code 27 (SPED
ONLY) or 28 (REGULAR STUDENTS) and
comments explaining why.
*SW* If DIS-ACT-CD is 25 or 26, and DIS-ACT- Partial day of ISS or OSS greater than 1. Is this correct
RSN is not 01, OFF-LEN-OF-DIS and ACT-LEN-OF- or should there be full days or a combination of full
DIS should be less than 002. 42579 and partial days?
*SW* Invalid DIS-ACTION-CODE or DIS-ACTION- Is the offense code correct? If so, why was mandatory
REASON-CODE per edit 42534. action not taken?
*F* If DISC-ACT-RSN is 11-14, 16-19, 30-32, or Behavior location 04 is not applicable for offense
57, then BEHAVIOR-LOC must be 01, 02, 03, or code.
05. 42585
*F* If DISC-ACT-RSN is 04-07, 27, 28, or 49, then Behavior location 04 (OFF CAMPUS) or 05 (ANOTHER
BEHAVIOR-LOC must be 01-03. 42583 SCHOOL DISTRICT) is not applicable to offense code.
*SW* For this ACT-RSN-CODE, ACTION-CODE Offense code does not allow for expulsion
should not be 01-04,09,11,12,15,50-53,56,58,59 (unauthorized expulsion).
or 61. 42526
*F* DATE-OF-DISCIPLINARY-ACTION must not Action date outside of the school year. Check the dates
be equal to or greater than 09/01 of next school of the discipline action and the placement dates.
year. 42550
*W* DATE-OF-DISCIPLINARY-ACTION should be Action date outside of the school year. Check the dates
>= 08/01 andSkyward Discipline Guide
Child Restraint Error Report Instructions
Below is a sample of the report and a description of each column from left to right.
Ent – This is the campus number.
Alphakey – This is the student’s identification key that is used to locate the student
in Skyward.
Name (Last, First MI) – This is the student’s name.
Gd – This is the student’s current grade level.
Res Evnt ID – This is the restraint event ID number assigned to each child restraint
record.
Event Date – This is the date on which the child restraint took place.
Stu Unique ID: This is the student’s social security number or state ID number.
Stat Org ID – This is the campus the child restraint took place.
Pri Res Rsn – This indicates the primary reason the student was retrained.
Rpt Prd – This is the grade/attendance reporting cycle.
Inst Set – This is the student’s Instructional Setting at the time he or she was
retrained.
Res Stf – This is the staff member who restrained the student.
SE – This indicates whether the student was receiving Special Education services at
the time he or she was restrained.
Prim Dis – This is the student’s Primary Disability at the time he or she was
retrained.
PEIMS Error – This identifies the error that must be reviewed and updated in
Skyward. Follow the instructions below to correct the error(s).
Page 40 of 46 Last updated 10/05/2020Skyward Discipline Guide
To update the errors found under the PEIMS Error column, please follow the appropriate
steps based on the error message.
1. *F* If RESTRAINT-STAFF-TYPE-CODE is 01, then PRIMARY-DISABILITY-CODE must
not be 00 or blank, and SPECIAL-ED-INDICATOR-CODE must be 1. 45435-0005
To correct the error, you have 2 choices:
A. If the student was receiving Special Education services at the time he or she was
restrained AND was restrained by a School District Employee or Volunteer (refer to
NOTE on page 46 to determine special ed status):
1. Input the student’s Primary Disability code at the time he or she was
retrained.
2. Click Save.
OR
Page 41 of 46 Last updated 10/05/2020Skyward Discipline Guide
B. If the student was restrained by a School District Employee or Volunteer AND the
student was not receiving Special Education services at the time he or she was
restrained (refer to NOTE on page 46 to determine special ed status):
1. Highlight the child restraint record.
2. Click Delete.
2. *F* REPORTING-PERIOD-INDICATOR-CODE must be 1-6. 45435-0007
To correct the error:
A. If the student was restrained in the 2020-2021 school year:
1. Change the School Year to 2021.
2. Click Save.
Page 42 of 46 Last updated 10/05/2020Skyward Discipline Guide
3. *F* If SPECIAL-ED-INDICATOR-CODE is 1, then INSTRUCTIONAL-SETTING-CODE
and PRIMARY-DISABILITY-CODE must not be blank. 45435-0011
To correct the error:
A. If the student was receiving Special Education services at the time he or she was
restrained (refer to NOTE on page 46 to determine special ed status):
1. Input the Instructional Setting code.
2. Input the Primary Disability code.
3. Click Save.
Page 43 of 46 Last updated 10/05/2020Skyward Discipline Guide
4. *F* If RESTRAINT-STAFF-TYPE-CODE is 02, then RESTRAINT-REASON-CODE must
be 08. 45435-0014
To correct the error, you have 2 choices:
A. If the student was restrained by a School District Police Officer or School Resource
Officer:
1. Change the Restraint Reason Code to 08.
2. Click Save.
OR
Page 44 of 46 Last updated 10/05/2020Skyward Discipline Guide
B. If the student was receiving Special Education services at the time he or she was
restrained AND was restrained by a School District Employee or Volunteer (refer to
NOTE on page 46 to determine special ed status):
1. Input a Restraint Reason Code of 01-07. Do NOT enter 08-Restraint by
School District Police in this field.
2. Change the Restraint Staff Type to 01.
3. Click Save.
Page 45 of 46 Last updated 10/05/2020Skyward Discipline Guide
5. *F* If SPECIAL-ED-INDICATOR-CODE is 0, then INSTRUCTIONAL-SETTING-CODE
and PRIMARY-DISABILITY-CODE must be blank/not reported. 45435-0015
To correct the error:
A. If the student was not receiving Special Education services at the time he or she was
restrained (refer to NOTE on page 46 to determine special ed status):
1. Delete the Instructional Setting code.
2. Delete the Primary Disability code.
3. Click Save.
Note: To verify whether a student was receiving Special Education services at the time he or
she was restrained, go to the Special Ed tab in Skyward or contact the Special Services
department.
Page 46 of 46 Last updated 10/05/2020You can also read


