VENUS USER'S GUIDE - WM00176 VENUS SPA

Page created by Leo Blair
 
CONTINUE READING
VENUS USER'S GUIDE - WM00176 VENUS SPA
VENUS
                        USER’S GUIDE

WM00176
VENUS SPA
User’s manual
_____________________
Version: 02.2014
VENUS USER'S GUIDE - WM00176 VENUS SPA
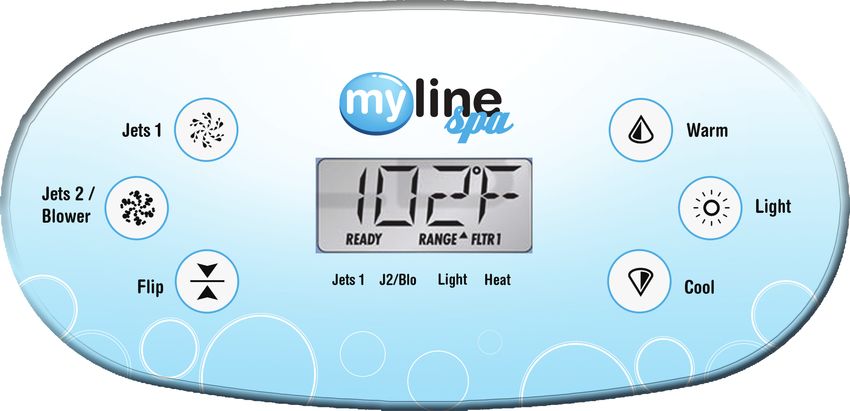
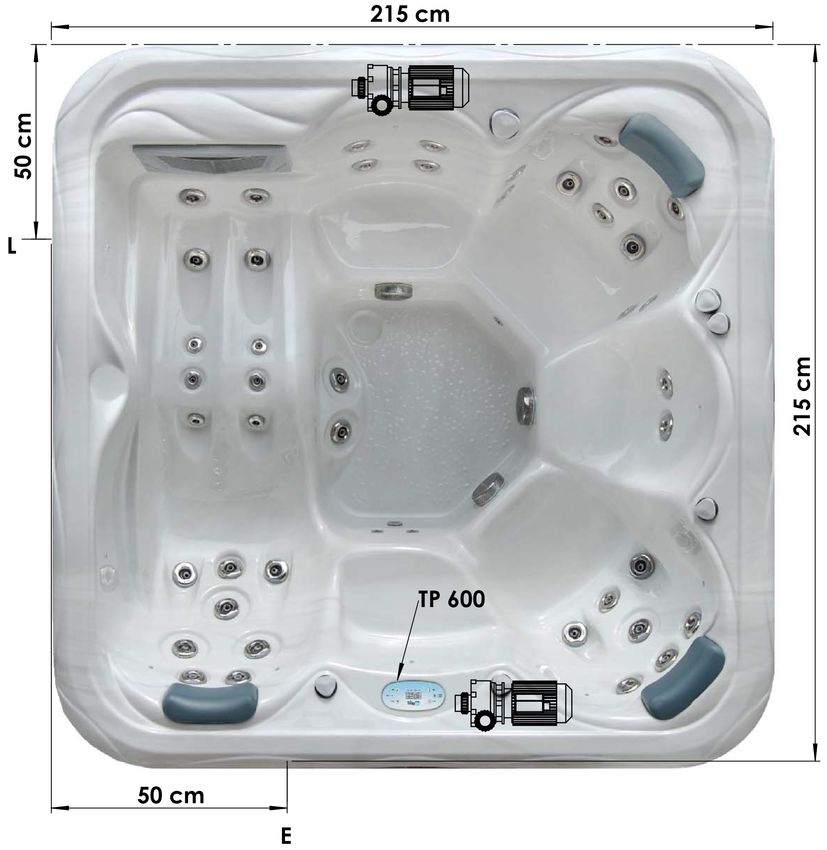
Standard Specification:
    2150 × 2150 × 900 mm
    Shell material            PU reinforced antimicrobial acrylic
                              (6,3 mm)
    Total number of bathers   6 Prs.
    Lounge beds               1 Prs.
    Seats                     5 Prs.
    Water volume              1450 l
    Net weight                ~330 kg
    Power requirement         1 ×32 A (230V/50Hz) optimum
                              1 ×16 A (230V/50Hz) minimum
    Total number of jets      49
    Hydro massage pump        1×2 HP 2 speed (230V/50Hz)
                              1×2 HP (230V/50Hz)
    Diverter                  1
    Ozonator                  1
    Filter                    2
    Chromotherapy lighting    18×1 LED
    Heating unit              1 (3kW/230V/50Hz)
    Air inlet regulator       4
    Controller                TP600
    3/4” Drain                1
    Cabinet                   Maintenance-free Synthetic
    Spa cover                 Thermal cover with child locks
    Headrests                 3
    Thermo cover              1
VENUS USER'S GUIDE - WM00176 VENUS SPA
Warranty letter

Serial number:...............................................

Model: .............................................................

                              Distributor                                                Retailer
     Date of buying:                                                   Date of buying:

     Signature:                                                        Signature:

                                  (stamp)                                                (stamp)

                                             2014 MyLine Spa Limited Warranty
                                             WARRANTY FOR EXPORT Warranty;
                                            Limitations of Liability and Damages.

Company offers a limited warranty comprised of replacement of faulty parts and offers no
reimbursement for labour of repairs outside any abnormal failure rates to be determined by
both parties.
5 years on spa shell: WELLIS warrants the structure of the spa shell against defects in work-
manship and material for a period of 5 years, subject to the limitations and conditions listed
in this Warranty.
3 years on spa shell surface: The acrylic spa shell is warranted against cracking, blistering or
delaminating due to defects in materials or workmanship for three years from the original
date of delivery.
VENUS USER'S GUIDE - WM00176 VENUS SPA
2 years on spa plumbing: Spa fittings and plumbing are warranted against leaks due to de-
fects in materials or workmanship for two years from the original date of delivery. There is no
labour coverage on internal jet parts replacement, cleaning or adjusting.
2 years on standard and optional spa equipment – Balboa Control Systems, Jet Pump(s),
Laing Circulation Pump, Heater, Wi-Fi module, IR receiver: The spa equipment systems are
warranted against failure due to defects in materials or workmanship for two years from the
date of delivery. Fuses, bulbs, and seals are not covered.
2 years on Pulsar hydrotherapy system: The factory installed Pulsar hydrotherapy systems are
warranted against failure due to defects in materials or workmanship for one year from the
original date of delivery.
2 years on spa cabinets/skirts: The factory installed spa cabinets/skirts are warranted against
failure due to defects in materials or workmanship for one year from the original date of
delivery.
2 years on ozone generator: The ozone generator is warranted against failure due to defects
in materials or workmanship for one year from the original date of delivery.
2 years on audio system components: The factory installed audio components (i.e. power
supply, speakers, wires, etc.) are warranted against failure due to defects in materials or work-
manship for one year from the original date of delivery. There is no in-field labour service on
these items.
2 years on LED lights: The factory installed LED lights are warranted against failure due to
defects in materials or workmanship for one year from the original date of delivery.
2 years on UV-C sanitizer lamp: The factory installed UV-C sanitizer lamps are warranted
against failure due to defects in materials or workmanship for one year from the original date
of delivery.
2 years on I.S.I.S. water disinfection system: The factory installed I.S.I.S. water disinfection sys-
tems are warranted against failure due to defects in materials or workmanship for one year
from the original date of delivery.
1 year on blower: The blower is warranted against failure due to defects in materials or work-
manship for one year from the original date of delivery.
1 year on thermo cover: The thermo cover is warranted against failure due to defects in mate-
rials or workmanship for one year from the original date of delivery.
1 year on WELLIS Spa Umbrella: The factory installed WELLIS Spa Umbrellas are warranted
against failure due to defects in materials or workmanship for one year from the original date
of delivery.
1 year on LCD TV system: The factory installed LCD TV systems are warranted against failure
due to defects in materials or workmanship for one year from the original date of delivery.
90 days on skimmer house: Skimmer houses are subject to water chemistry variation and
are warranted for ninety days from the original date of delivery. NO warranty on filters, spa
pillows and skimmer house tops.
VENUS USER'S GUIDE - WM00176 VENUS SPA
WARRANTY PERFORMANCE

1.   This warranty does not cover cleaning or adjusting spa or for customer error in following
     correct procedures.
2.   WELLIS Magyarország Kft. reserves the right to substitute a spa or component of equiv-
     alent value, either new or factory reconditioned and any such repair or replacement
     shall assume as its warranty only the remaining portion of the warranty on the original
     product.
3.   WELLIS Magyarország Kft. is not liable for any costs associated with in-ground, in-deck,
     or in-home installations or removal. Costs associated with installations other than
     standard residential portable spa use will be the sole responsibility of the spa owner.
     The spa owner is responsible for any freight and/or delivery and set up charges for a
     replacement spa.
4.   The radio reception is not covered under warranty due to the following: The radio signal
     reception may be impaired by the positioning of the spa next to or near structures, high
     power lines, main power lines or metallic towers. The signal reception may be impaired
     if the spa is located near hills or it is in a valley or simply outside the broadcasting range
     of the radio stations. The position of the spa and radio may be “out of phase with the
     bandwidth” or the radio frequency. External signal reception assistance may be required
     and is not part of this warranty.
5.   WELLIS Magyarország Kft. shall not be liable for any incidental or consequential damag-
     es for breach of any expressed or implied warranty, breach of contract, negligence, strict
     liability, or any other legal theory related to this product. All consequential expenses
     including loss of use, damages, or contingent liabilities arising out of any alleged defi-
     ciencies of the spa are specifically excluded from this warranty.
6.   Warranty coverage is only extended to the original buyer. Spas purchased from anyone
     other than a current WELLIS Spas Authorized Dealer are specifically excluded from any
     warranty coverage. To obtain warranty service, please notify your WELLIS Spas Author-
     ized Dealer in writing within 14 days of the problem (with problem details, original
     proof of purchase).
7.   The Authorized Dealer will repair or replace any component found defective under the
     terms of this warranty – and permitted by WELLIS Magyarország Kft. Travelling expenses
     may apply outside of every European cities.
8.   If the Authorized Dealer doesn`t supply the customer with proper service, please notify
     WELLIS Magyarország Kft. by mail within 10 days of the problem.
9.   Electrical connection: All electrical connections are required to be done by a qualified
     electrician solely. The spa has to be connected to separate current circuit equipped with
     suitable power switch and life safety relay. Omission of these electrical conditions/re-
     quirements entails immediate loss of the warranty.
10. Water connection: All water connections are required to be done by a qualified plumber
    solely. If the spa is placed indoor make allowances for the following special require-
    ments: The water accumulates around the spa so the socket cover has to be in posses-
    sion of a suitable drainage. This arrangement hinders the water in collecting.
11. WELLIS Magyarország Kft. offers a limited warranty as described in the Warranty Letter.
12. Warranty claim is enforceable with this warrant letter. Irregular establishing of this
    warrant letter doesn`t affect to the validity of warranty obligation. If customer doesn`t
    get this warrant letter from the Authorized Dealer, it doesn`t affect to the validity of
    warranty obligation.
VENUS USER'S GUIDE - WM00176 VENUS SPA
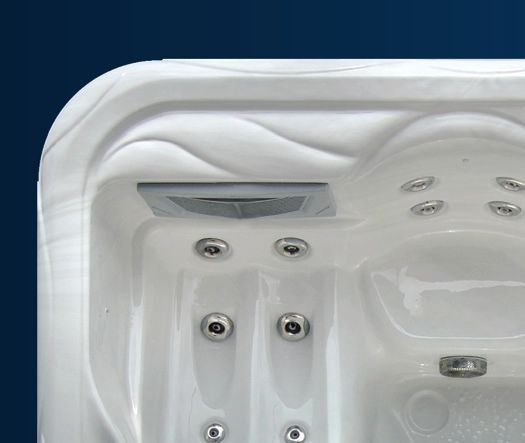
SPA WARRANTY COVERAGE WILL BE VOID
                         UNDER THE FOLLOWING CONDITIONS

1.   If damages caused by inefficient maintenance of water and/or chemical dosage.
     Terms of water hardness (limits): between 6-10 German degrees.
2.   If the spa surface or equipment has been damaged or discoloured as a result of im-
     proper water chemistry maintenance, including sanitizers such as trichlor type chlorine,
     calcium hypochlorite, sodium hypochlorite, and any other chemicals or a chemical
     dispenser that may rest on the spa surface. Some household cleaners can damage the
     spa shell or equipment and will void this warranty completely. Use only products that
     are recommended for spas.
3.   If damage to the spa has resulted from an Act of God, force majeure, moving of the
     spa, improper installation, unstable power conditions, customer negligence, customer
     abuse, weather and sunlight damage or damage caused in shipment.
4.   If damage to the spa has resulted from operation outside – temperature exceed 45°C.
5.   If the spa has been subjected to any alterations, after-market product installations, mis-
     uses, abuses, or if any repairs are attempted by anyone other than its authorised dealers.
6.   If damage to the spa has resulted from improper use of thermo cover.
7.   If damage to the spa has resulted from clogged, dirty and/or clogged filter. The spa war-
     ranty will be void if the owner does not follow all the instructions in the owner’s manual
     regarding the proper use and care of the spa. Warranty doesn`t apply to filters!
8.   If damage to the spa has resulted from improper electrical installation, voltage drop,
     peak voltage and/or operation is outside the pale of + / - 10% voltage range.
     Electrical conditions:
     For electrical installation it is required to build a 30mA circuit breaker (life safety relay),
     which is just connected to the spa (not allowed to connect any other devices). This 30
     mA circuit breaker is not permitted to be installed in the same place as the spa.
     Required to install IEC, RCCB system in spa`s common surroundings.
     Length of cable is 3 meters at the place of spa installed.
     It is obligatory to observe all information, details and requirements which are in the
     product`s installation diagram regarding electricity demand and drain installation.
     These information can be found in the user manual, or able to download from www.
     wellis.eu. If you didn`t get the document from your dealer, please contact support@
     wellis.eu.
     If damage to the spa has resulted from debris in jets (i.e. sand, dirty calcium, leaves etc.).
9.   Warranty doesn`t extend to the waste water manifold (drain hose), pillows, filters, bulbs
     and/or pump sealing.
                                         LIMITATIONS

The Warranty expressions specified excludes any other implied or oral undertakings. Purchas-
ers also have current rights under statute which will be respected by WELLIS Magyarország
Kft. After a period of 12 months, for the purpose of assessing WELLIS Magyarország Kft.
liability, all aspects covered by this Warranty will be treated on a pro-rata basis. WELLIS
VENUS USER'S GUIDE - WM00176 VENUS SPA
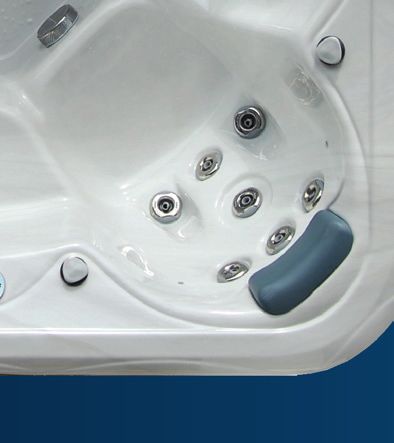
Magyarország Kft. or its agents will not be liable for any incidental or consequential loss or
injury. Nor will WELLIS Magyarország Kft. be liable for costs associated with but not limited to
building alterations or finishes and under no circumstances will be liable for greater expense
than the amount paid for the product.

THE SPA OWNER MUST DO EVERYTHING STATED IN THE SPA OWNERS MANUAL
     AND WARRANTY LETTER TO SAFEGUARD AND MAINTAIN THE SPA!

                                                       MANUFACTURER OF YOUR SPA:
                                                        WELLIS Magyarország Kft.

Registered:....................................31/C, Budaörsi út, H-1118 Budapest, Hungary
Central premise:..........................hrsz: 0417, Mánteleki út, H-2371 Dabas, Hungary

                                                  AUTHORIZED DEALER OF YOUR SPA
                                                    Company in charge of your spa

              Spa Industries Europe
Company name:.........................................................................................................................................................

Registered: ...................................................................................................................................................................

Central premise: .......................................................................................................................................................

Place of complaint: ................................................................................................................................................

E-mail address: ..........................................................................................................................................................

           http://www.spa-industries.eu/
Website: ......................................................................................................................................................................

Phone number: .........................................................................................................................................................

Fax: ..................................................................................................................................................................................

Person in charge of installation: ..........................................................................................................................

Date of installation: .................................................................................................................................................
VENUS USER'S GUIDE - WM00176 VENUS SPA
Service-work

The announcement date of damage:              _____________________________

                                                                              A
Date of received goods/parts for repair:      _____________________________
Date of the return of repaired goods/parts:   _____________________________
Date of site service:                         _____________________________
Improved error:                               _____________________________   stamp
Mode of repair:                               _____________________________
Failed component:                             _____________________________
New deadline for the warranty:                _____________________________

The announcement date of damage:              _____________________________

                                                                              B
Date of received goods/parts for repair:      _____________________________
Date of the return of repaired goods/parts:   _____________________________
Date of site service:                         _____________________________
Improved error:                               _____________________________   stamp
Mode of repair:                               _____________________________
Failed component:                             _____________________________
New deadline for the warranty:                _____________________________

The announcement date of damage:              _____________________________

                                                                              C
Date of received goods/parts for repair:      _____________________________
Date of the return of repaired goods/parts:   _____________________________
Date of site service:                         _____________________________
Improved error:                               _____________________________   stamp
Mode of repair:                               _____________________________
Failed component:                             _____________________________
New deadline for the warranty:                _____________________________

The announcement date of damage:              _____________________________

                                                                              D
Date of received goods/parts for repair:      _____________________________
Date of the return of repaired goods/parts:   _____________________________
Date of site service:                         _____________________________
Improved error:                               _____________________________   stamp
Mode of repair:                               _____________________________
Failed component:                             _____________________________
New deadline for the warranty:                _____________________________
VENUS USER'S GUIDE - WM00176 VENUS SPA
SAFETY INSTRUCTIONS
ATTENTION: PLEASE READCAREFULLY AND FOLLOW THE INSTRUCTIONS
AVOIDING THE RISK of injury of CHILDREN
1. In order to reduce the risk of injury to children, do not allow children to use this spaalone
   unless they are carefully supervised at all the times.
2. Lower water temperatures arerecommended for young children. Please test the water
   temperature with yourhands before allowing children to get into the spa, and make sure
   it iscomfortable for children’s usage.
3. Remember that wet surfaces can be slippery, please remind children to be careful when
   entering or exiting the spa.
4. Don’t permit children to climb onto the spa cover.

AVOIDING THE RISK of injury of bathers
1. In order to reducing the risk of injury to bathers, do not remove or lose anysuction fit-
   tings. Never operate spa if the suction fitting are broken or missing.
2. Remember that wet surfaces can be very slippery. Take care of a danger ofslipping and
   falling when entering or exiting the spa.
3. For the sake of health, people with infectious diseases should not be allowed touse the
   spa.
4. Keep any loose articles of clothing or hanging jewelry away from rotating jets orother
   moving components.
5. The use of drugs, alcohol or medicine before or during spa use may lead to unconscious-
   ness with the possibility of drowning. Persons using medicines shouldconsult a physician
   before using spa; some medicine may cause a user to becomedrowsy. While other medi-
   cine may affect heart beating, blood pressure changing and circulation problem.
6. Pregnant women should consult a doctor before using the spa.

AVOIDING TNE RISK OF ELECTROCUTION
1. Test the ground fault circuit interrupters before use. Must always to be connectedto a
    circuit protected by a ground fault interrupt.
2. Check the power cables cord, a damaged power cord may result in death, or seriousper-
    sonal injury due to electrocution. Do not use the spa with damaged power cable, change
    that immediately before using and need to disconnect the spa from power supply.
3. Do not permit any electrical appliances, such as a light, telephone, radio, or television
    within 1,5m of a spa. Keep a safe distance from spa, because this failure may result in-
    death, or serious injury due to electrocuting if the appliance should fallinto the spa.
4. Install your spa in such a way that drainage is away from the electricalcompartment and
    from all electrical components.
5. Disconnect the spa from the power supply before servicing the electricalcomponents.

NOTICE:
Your spa is anequippedwith two/three massage pumps that allow you tooperate eachpart of
the jet system separately or all valves simultaneously.
Do not connect power to an empty spa. Otherwise the components such ascontroller, heater,
circulation pump, and other systems could be damaged.
VENUS USER'S GUIDE - WM00176 VENUS SPA
INSTALLATION INSTRUCTIONS
SITE PREPARATION
1.   INDOOR/BASEMENT INSTALLATION
     If you take it place your spa indoors, be aware of some special requirements. Water
     willaccumulate around the spa, so the flooring materials must provide a good grip
     whenwet proper drainage is essential to prevent a build-up of water around the spa.
     When building a new room for the spa it is recommended that a floor drain isinstalled.
     The humidity will naturally increase with the spa installed water may getinto woodwork
     and produce rot, mildew or otherproblems. Check for airborne moisture’s effects on
     exposed wood, paper, etc in theroom .To minimize these effects, it is best to provide
     plenty of ventilation to the spa area.

2.   OUTROOR AND PATIO INSTALLATION
     It is important that you have solid foundation to support the new spa when youinstall
     it .Tobe certain your deck or foundation can support your spa. You mustknow the deck
     maximum load capacity. Consult a qualified building contractor orstructural engineer.
     To find the weight of your spa, its contents and occupants, please refer to the spa speci-
     fication chart. This weight per square foot must notexceed the structure’s rated capacity:
     otherwise serious structural damages couldresult,if you install the spa outdoors we
     recommend a reinforced concrete pad a tleast four inches thick. Don’t forget to install
     some floor drains around your spa sothat it can take the water away during and after the
     heavy rain.

INSTALLATION
1.   Please read and study the OWNER’S MANUAL carefully. Please finda professional people
     to install and setup for first time.
2.   Remove the package, and take down the new spa on the prepared foundation.
3.   Open the control box compartment under the display by loosenthe screw and then
     open the control box. Prepare the accordingly cooper cable(the length will be enough
     to connect to the power supply), with electricalplug one side and another side without
     plug and then take the empty side of cablefrom electrical cable. Lead the cable through
     the pump compartment to the channelof control box compartment.Connect the electri-
     cal cable to control box according by electrical drawing in user manual.
4.   Your spa has been thoroughly tested duringthe manufacturing process to ensure relia-
     bility. So there is a small amount of water even within some grease may have remained
     in the plumbing after testing, as a result,may have spotted the spa shell or the spa siding
     prior thedelivery so before filling spa.
OPERATING INSTRUCTIONS
1.        Close the drain stub and fill the spa with water
After closing the drain stub, and fill up the tub with soft water to theindicated line inside
of the body. If you see any leak(orflood) anywhere, stop the filling procedure until it will be
fixed.
2.        Power up your spa
First check the main house CIRCUIT INTERRUPTORY that controls the electricto the spa
are functioning properly. Then connect the spa plug to the power supply.
3.        Trail open and test
Your controller with a factory‘s first setup already. push the button of PUMP/JET andAIR
BLOWER to make jets run for some minutes to check the operations of the jetsystem and
purge any remaining air from the heating system. once the jet systemfully operational, prim-
ing of the spa is complete. Check and make sure the all aircontroller and all jets are open.

Possible symptom is an AIR LOCK on the first starting or when fills up with new
water.
It can cause the jets to appear not work well or at all. It happens when you are filling the spa
up fairly rapidly, and air can get trapped in the pipe system that goes to the suction fittings
and to the jets. The water level rises up past the openings in the spa, but air becomes locked
in the pipes, and then when you start the spa pump, it tries to air bubble(s) still in water, but
only air is in the pipes. Sometimes the pump cannot prime itself at that point, so it just runs,
but does not pump any water.
Solution:
1.           Open the door of pump compartment.
2.           Loosen the quick disconnectfitting (white rim on the pump) in front of the pump a
little.
3.           Let some air get in and it will break the air lock that has developed, and then see
some water start to come out.
4.           Re-tighten the fitting.
5.           Turn the pump on again. It will surge for a few seconds and then start to pump
properly.
If it still does not work, please contact a local spa professional to check it for you.
CLEANING
GENERAL INFORMATION:
Water recirculation-filtering
The basic conditions for keeping the water of the spa clean are the removal of mechanical
dirt and the blending of the chemicals in the water with continuous water recirculation.
In all our spa’s appliances comprising of a pump and a filter are used for this purpose.
- The filter removes the dirt floating in the water or at the surface of the water. Filters with
paper or textile filter medium are used in the spa. The dirt settled at the bottom of the spa is
filtered out with the aid of the suction and stirring created by the massage pumps.

Protecting the spa
Don’t leave the spa expose to the sun without water or the cover. Exposure to direct sunlight
can cause solar distress of the shell material. Use a spa cover when spa is not in use, whether
it is empty or full. Try to keep your spa away from rain and snow. If possible, build a gazebo
for your spa.

1.   Don’t attempt to open the electrical control box. There are no user serviceable parts
     inside.
2.   Drain, clean and refill your spa with fresh water on a regular schedule.
3.   Clean the filter cartridge at least once a month.
4.   Have spa users bathe before entering the spa water, showering without soap prior to
     enter the spa, and using only the rinse cycle when laundering your bathing suit, will
     help avoiding detergent and soap residue in spa water.

FILTER CARTRIDGE RMOVAL AND CLEANING
You spa filter cartridge can become clogged with mineral particles of calcification from hard
water. Which may result in reduced water flow. We recommend to clean the filter cartridges
every month.
1. Remove filter grid.
2. Unscrew filter cartridge.
3. Clean with high pressure nozzle to remove all debris that clinging the filter.
4. Soak filter in warm water and WELLIS Alga Shock to remove all body oils and grime.
     Never use chlorine to clean the filter!
The chemical equilibrium of the water
The water of the spa will be clean and clear if its chemical components are in equilibrium.

1.   pH-value:
     The first important indicator is the pH value of the water. pH is measured in a scale
     between 0-14 where 7 is the neutral value. Below this level the water is acidic, above it
     is alkaline. The pH value of the human eye is around 7.5, below 7.2 and above 7.8 the
     water will sting the eyes of the bather. Experiences have shown that most problems are
     caused by a too high pH value. An improper value reduces the effect of the disinfectant.
2.   Water hardness:
     Water hardness is determined by the quantity of calcium and magnesium salts dissolved
     in the water.
     Hard waters contain too much of these dissolved salts and thus, left alone, scale will
     form. Scales can cause significant damage both to the walls of the spa, to the piping,
     filter and to the heating and engineering units. In Hungary waters are medium hard.
     Water hardness cannot be reduced by the addition of chemicals, but the formation of
     scales can be prevented.
3.   Disinfection:
     Disinfectant is the chemical that eliminates or neutralises the microorganisms (bacte-
     ria, algae, fungi, viruses) present in the water. Microorganisms are small, microscopic
     organisms, which cannot be detected with the naked eye and are continuously getting
     into the water through rain, wind and the body of the bathers. If they are not eliminated
     they pass from one person to the other through the water (and may cause sickness,
     infection). Organic matter turns the water of the spa opaque and cloudy. Most often – as
     we are dealing with warm water spas – bromine or active oxygen is used.
4.   Frothing:
     Froth is the smaller-bigger agglomeration of the bubbles and colloid contaminants
     found on the surface of the water. It is mostly caused by the mixing of the dirt, cosmet-
     ics, body care lotions, etc. that soak out of the human skin and the chemicals. It endan-
     gers the conservation of the aesthetic appearance and cleanliness of the water.
5.   Water analysers:
     There are several different types of water analysers, which are mostly used to measure
     chemical and disinfectant effect. Chemical (pH); Disinfectant (Br, O3)
     Tester types:
     - Box containing tablets and graduated measuring glass.
     - Litmus paper indicators in a box.

Chemicals should always be loaded into the filter housing.
Then proper disinfection of the spa balance, if the chemical levels are not at least 48 hours
below the specified value.
Even with the most accurate disinfection after 2-3 months, the water quality is no longer
maintain and necessary replace the full water quantity.
Then proposed a large swimming pool, shock-like disinfection.
Replacing underwater light
1. Turn off the power of the spa.
2. Remove plastic panel behind where the underwater light
is situated.
3. There is a plug with two wires going into the back of the
light.
4. Remove this plug by turning anticlockwise.
5. Replace faulty light globe with a new one.
6. Replace parts and put the plastic panel back on.
TROUBLESHOOTING

     Problem                Probable causes                          Solutions
Cloudy Water           Dirty filters.               Clean filters.
                                                   Shock spa with sanitizer.
                       Improper sanitization.      Add sanitizer.
                       Suspended particles/organic Adjust PH andl or alkalinity to recom-
                       matter.                     mended range.
                                                   Run jet pump(s) and clean filters.
                       Overused water.             Drain and refill the spa.
Water Odor             Excessive organics in water.    Shock spa with sanitizer.
                       Improper sanitization.          Add sanitizer.
                       Low PH level.                   Adjust PH or refill the spa.
Chlorine Odor          Chloramines level too high.     Shock spa with sanitizer.Adjust PH to
                       Low PH level.                   recommended range.
Musty Odor             Bacteria or algae growth.       Shock spa with sanitizer id problem is
                                                       visible or persistent drain, clean and
                                                       refill the spa.
Organic build-up/      Build-up of oils and dirt.      Wipe off scum with clean rag-if
scum ring around                                       severe.
spa                                                    Drain the spa.
                                                       Use a spa surface cleaner to remove
                                                       the scum, and refill the spa.
Algae Growth           High PH level.                  Shock spa with sanitizer and adjust
                                                       PH level.
                       Low sanitizer level.            Shock spa with sanitizer and maintain
                                                       sanitizer level.
Eye irritation         Low PH level.                   Ajust PH level.
                       Low sanitizer level.            Shock spa with sanitizer and maintain
                                                       sanitizer level.
Skin irritation/rash   Unsanitary water.               Shock spa with sanitizer and maintain
                                                       s anitizer level.
                       Free chlorine level above       Allow free chlorine level to drop
                       5ppm.                           below 5ppm before spa use.
Stains                 Total alkalinity andl or PH     Adjust total alkalinity and/or PH level.
                       too low high iron or copper     Use a metal deposit inhibitor.
                       in source water
Scale                  High calcium content in         Adjust total alkalinity and PH level.
                       water-total alkalinity and PH   If scale requires removal, drain the
                       level too high.                 spa, scrub off the scale, refill the spa
                                                       and balance the water.
Problem              Probable causes                          Solutions
Entire spa is inop-   Power failure.                 Check power source.
erative.              GFCI tripped heater            Reset GFCI, call for service if not reset.
                      high-limit thermostat          Disconnect power for at least thirty
                      tripped.                       second to reset heater high limit.
                                                     If it will not reset check for clogged
                                                     filters. If tripping continues, call for
                                                     service.
Spa does not heat     Integrated pressure switch     Check for cartridge filters. Integrated
jets and light op-    open Circulation pump          pressure switch will reset when the
erate (Ready, and     thermal cut-off tripped.       flow of water through the heater has
power indicators                                     been retored Call for ervice if the
are blinking.                                        heater trips frequently.
                                                     Check for cartridge filters or are looks
                                                     in plumbing Disconnected power to
                                                     the spa, allow circulation pump to
                                                     cool Circulation pump thermal cut off
                                                     will reset when pump has cooled and
                                                     power is reapplied. Call for service if
                                                     circulation pump thermal cut-
                                                     off trips frequently.
Jets weak or surg-    Spa water level too low.       Add water.
ing.                  Filters clogged.               Clean filters.
                      Air regulator is closed.       Open air regulator.
                      Jet closed.                    Open the jet.
Light inoperative.    Light wiring or assembly is    Replace light assembly.
                      faulty.
Power indicator is    Heater high-limit thermostat Disconnect power for at least thirty
blinking. (Entire     tripped.                     seconds to reset heater high limit. If it
spa inoperative)                                   will not reet. Check for clogged filters
                                                   if tripping continues, call for service.
Ready indicator       Temperature sensor prob-       Disconnect power for at feast thirty
blinking.             lem.                           second problem if blinking continues,
                                                     call for service.
TP600 Control Panel
User Interface and Programming Reference – Standard Menus

System Model:       BP-Series Systems are BP5XX, BP6XX, BP1XXX, BP2XXX.
Software Version:   7.0 and later
Panel Model:        TP600 Series
Software Version:   2.3 or later
Navigation
 ressed Navigation
             Main
        and held
        Navigating when
                   the  Menus
                           themenu
                       entire  temperature      is flashing,
                                   structure is done  with 2 orthe temperature
                                                                3 buttons          will continue
                                                                          on the control panel.  to change
  f only one  temperature
         Navigating the entire button  is available
                               menu structure is doneand
                                                     with
                                                      Somethe
                                                            or limit
                                                          2 panels   of the
                                                               3 buttons
                                                                   have      Temperature
                                                                         on the
                                                                        separate control
                                                                                  WARMpanel.  Range
                                                                                         (Up) and  COOLis (Down)
                                                                                                          reached bu
               Navigation
  ld, the progression will reverse direction. Some panels   others have a single Temperature   button. In
                                                                        separate WARM (Up) and COOL(Down)  the navig
                                                                                                                  bu
                               Navigating the entire menu structure is done with 2 or 3 buttonsTemperature
                                                                                            others   have
                                                                                                on the           buttons
                                                                                                           a single
                                                                                                       control panel.    are indicated
                                                                                                                      Temperature      by aInsingle
                                                                                                                                  button.           butt
                                                                                                                                              the navig
                                                                                                                                   Panels
                                                                                                                                 Temperature
                                                                                                               Some panels have separate    that(Up)
                                                                                                                                          WARM     have
                                                                                                                                                      and two
                                                                                                                                                   buttons COOL  Temperature
                                                                                                                                                               are  indicated
                                                                                                                                                                 (Down)  buttons,bybuttons
                                                                                                                                                                                     a single(Warm
                                                                                                                                                                                  while       butt
                                                                                                                                     useTemperature
                                                                                                                                           both
                                                                                                                                            thatof   them    toInTemperature
                                                                                                                                                                 simplify    navigation   and  pro
 anges                                                                                                              others have a single
                                                                                                                                   Panels
                                                                                                                       Temperature buttons
                                                                                                                                      a single
                                                                                                                                     use   both
                                                                                                                                                   havebutton.
                                                                                                                                             are indicated
                                                                                                                                                          two
                                                                                                                                                  Temperature
                                                                                                                                                  of them    to
                                                                                                                                                                  the navigation
                                                                                                                                                           by a single button
                                                                                                                                                                     icon
                                                                                                                                                                 simplify
                                                                                                                                                                                 diagrams
                                                                                                                                                                                   buttons
                                                                                                                                                                               icon.
                                                                                                                                                                           isnavigation
                                                                                                                                                                              shown.      and
                                                                                                                                                                                             (Warm
                                                                                                                                                                                               pro
                                                                                                                         Panels that have two Temperature buttons (Warm and Cool) can
 o temperature range settings with independent set temperatures. The High Range designated                                use both of a  single   Temperature        icon
                                                                                                                                       The LIGHT Button is also used to
                                                                                                                                      them  to simplify navigation  and    is shown.
                                                                                                                                                                        programming    where
                                                                                                                           a single Temperature icon is shown.
 , and the Low Range designated in the display byThe
                                                  a LIGHT choose
                                                          The LIGHT
                                                     “down”         theButton
                                                                         variousismenus  andto
                                                                                  also used  navigate each s
                                                          Buttonarrow.
                                                                is also used to
                                                                                                                                               choose
                                                                                                                                     choose theTypical   theof
                                                                                                                                                        use
                                                                                                                                                various menus various
                                                                                                                                                                the
                                                                                                                                                              and      menus
                                                                                                                                                                    Temperature
                                                                                                                                                                  navigate       and button(s)
                                                                                                                                                                                      navigate each
                                                                                                                                                                           each section.       allows
r various reasons, with a common use being a “ready         toTypical
                                                                 use”
                                                    Typical useSet
                                                                of the
                                                                         setting
                                                                    Temperature
                                                                          use of the
                                                                       Temperature
                                                                                    vs.
                                                                                    whilea “vacation”
                                                                                             the
                                                                                      Temperature
                                                                                   button(s)      numbers
                                                                                              allows changing
                                                                                                               setting.
                                                                                                               are
                                                                                                               the flashing
                                                                                                          button(s)  allow
g the menu structure below. Each range maintains       its own
                                                             Pressing
                                                   Set Temperature   set
                                                                     whiletemperature
                                                                         the LIGHT
                                                                           the       button
                                                                               numbers are     as
                                                                                           flashingprogrammed
                                                                                                 while
                                                                                                     in  the
                                                                                                        the   numbers
                                                                                                            LCD.
                                                               Set Temperature while the numbers are flashing            by
                                                                                                                         are
                                                  Pressing the LIGHT button while the numbers are flashing will
 nge is chosen, the spa will heat to the set temperature  enterassociated
                                                                  the
                                                             Pressing
                                                enter the menus.
                                                                        menus.
                                                                         the     with
                                                                             LIGHT      that
                                                                                     button      range.
                                                                                                 while   the  numbers    are
                                                                                                                          The
                                                                                                                   The menus can enter
                                                                                                                                 menus   the
                                                                                                                                           can
                                                                                                                                   be exited  menus.
                                                                                                                                                be
                                                                                                                                             with    exited
                                                                                                                                                   certain     with
                                                                                                                                                           button    certain
                                                                                                                                                                  presses.    button
                                                                                                                                                                           Simply waitingpresses.
                                                                                                                                                                                          for     S
                                                                                                           severalseveral
                                                                                                                   seconds seconds      willpanel
                                                                                                                           will return the   return    the panel
                                                                                                                                                  operation         operation to normal.
                                                                                                                                                             to normal.
                                                                                                                           The menus can be exited with certain button presses. S
enus
 tween 80°F and 104°F.
 ween 50°F and 99°F.                      Power-up Screens
                                                                                                                    several seconds will return the panel operation to normal.
                                                                                                                                       Key                      Key
                                                                                                                                                                              Key
                                                                                                                                                                      Indicates Flashing or Changing Segment
                                                                                                                                               Indicates Flashing   or Changing
                                                                                                                                                                Indicates                 Segment
                                                                                                                                                                          Alternating or Progressive Message - every 1/2 second
                                          Each time the System powers up, a series of numbers is displayed.
                            Power-up
                                 After Screens
                                       the startup sequence of numbers, the system will enter Priming Mode (See Page 3).                                                      Key Message - every 1/2 second
                                                                                                                                                                     A temperature button, used for Indicates
                                                                                                                                               Indicates Alternating or Progressive                 “Action”   Flashing or Changing Segment
 may be determined           by
          Each time the System
          Power-up   Screens powers up, a series of numbers is displayed.                                                                      A temperature button, used for “Action”
                                                                                                                                                                                                    Indicates
                                                                                                                                                                     Light or dedicated “Choose” button,       Alternating
                                                                                                                                                                                                         depending            or Progressive
                                                                                                                                                                                                                   on control panel
                                                                                                                                                                                  Indicates Flashing or Changing Segment
                                                                                                                                                                                                                                    con guration Message

                    After the startup sequence of numbers, the system will enter Priming Mode (See Page 3).      Waiting time that keeps the lastAchange
                                                                                                                                                    temperature        button, used for “Action”
                                                                                                                                                          to a menu item.
                    Each time the System powers up, a series of numbers is displayed.            Light or dedicated  “Choose”        button,     Indicates
                                                                                                                                                    depending  Alternating
                                                                                                                                                                      toon     orsetting
                                                                                                                                                                                   Progressive
                                                                                                                                                                             control     panel Message
                                                                                                          ***** Waiting  time (depends  on menuLight
                                                                                                                                                   item) thatdedicated
                                                                                                                                                         or   reverts    original
                                                                                                                                                                            “Choose”     and
                                                                                                                                                                                         button, depend
e menu         structure    isstartup
                    After the  donesequence
                                        with 2ofor  3 buttons
                                                  numbers,          onwillthe
                                                           the system      entercontrol   panel.
                                                                                 Priming Mode (See Page 3).
                                                                                                 configuration
                                                                                                                 ignores any change to that menu item.
                                                                                                                                                 A temperature button, used for “Action”
n either range.                        Some panels have separate WARM (Up)Waiting
                                                   Main Screen
                                                                                                    and COOL        (Down)
                                                                                                            time that keeps thebuttons,
                                                                                                                                     last change   while
                                                                                                                                                  to  a menu item.
                                                                                                                                                                                                  Waiting
                                                                                                                                                                                                  Light or time that keeps
                                                                                                                                                                                                           dedicated       the last
                                                                                                                                                                                                                      “Choose”      change
                                                                                                                                                                                                                                button,    to a
                                                                                                                                                                                                                                        depend

                                                                                                                                 ***** Waiting
                                                                                                                                             Waiting time (depends on menu item) that re
                                                                                                                                                     timechange
                                                                                                                                                           that keepsthatthemenu
                                                                                                                                                                             last change
                                                                                                                                                                                   item. to a
                                                                                      ***** setting and ignores any change
                                                                                                                                             ignores
                                                                                                                                                 thatany
                                                                                                                                                       reverts totooriginal
  6                                           others    have   a single
                                                                 While the    Temperature
                                                                           Temperature   is
                                                                          ng, press Light.
                                                                                                    Waiting time In
                                                                                                      button.    (depends
                                                                                                                     the     on menu item)
                                                                                                                            navigation
                                                                                                                                 *****to that
                                                                                                                                                diagrams
                                                                                                                                             Waiting timeitem.
                                                                                                                                                  menu     (depends on menu item) that re
                                                  Temperature buttons are indicated by a single button icon. Indicates
                                                READY   RANGE FLTR1      SET       RANGE
                                                                                                                                             ignores any  change   to  that menu   item.
 ol information.       Main Screen                                                                                                                              a Menu Item that
                                                                                                                                                        Depends on a Manufacturer

                       Main Screen
                                                     Panels that have two Temperature buttons (Warm and Cool)       Light Cycle if enabled
                                                                                                                                                        may orcan
                                                                                                                                                        Con guration and
                                                                                                                                                               may not appear.

                                                       use both of While
 Flash Press a Temp Button repeatedly to change the temperature.         them    theto      simplify
                                                                                       Temperature   is navigation and programming where
                                                                                              Main Screen
                                                                                      ng, press Light.
                                                        a single Temperature                  icon isis shown.
                    READY   RANGE FLTR1   SETSET      RANGE
                                                        RANGE
                                                                         While the Temperature
                                  READY          RANGE FLTR1             SET           RANGE                                 ng, press Light.
              SET             RANGE                              SET           RANGE
                                                                                           The LIGHT
                                                                                                OR       Button is alsoRANGE
                                                                                                                READY
                                                                                                                        used     to
                                                                                                                             FLTR1
                                                                                                                                          Light Cycle if enabled
                                                                                                Several Seconds
                                          SETREADY                                         choose the various menus and navigate each section.
                                                                                                         SET
                                                                                                                                          Light Cycle if enabled
            Pressing and holding a Temp Button will also change the temperature.
                            SET                 RANGE                                    Typical use of the Temperature button(s) allows changing the
                            SET                 RANGE
                                                                                        Set Temperature while the numbers are flashing in the LCD.
                                                                                                P                            1

                                                                                    Pressing the LIGHT button while the numbers are flashing will
                                                                       If Time of Day is not set
 ws in the LCD.
                            SETREADY
                                                    Main Screen                  enter
                                                                            “SET TIME”  will the menus.
                                                                                                     SET
                                          SET                            appear in this menu.                                2

              To Set        SETREADY
                                                                The menus can be exited
                                                                                      SET
                                                                                          with certain button presses. Simply waiting for
                                                         several seconds will return the panel operation to normal.
       *****
       Waiting                             READY           RANGE FLTR1

          Several Seconds                                                                           P          Main Screen                1

          Reverts to Original Setting
                                                                                                    P                            Key      1

                                                If Time of Day is not set         READY   RANGE FLTR1
                                                                                                             Indicates Flashing or Changing Segment
                                                     “SET TIME” willWaiting Several Seconds in the Main Indicates
                                                                                                             Menu       Alternating or Progressive Message - every 1/2 second
 wers up, a series of numbers is displayed.     If appear
                                                   Time oftemperature.
                                                           Day
                                                          in    iswill
                                                             this  notallow
                                                                  menu.  setthe display to revert to the MainMain
 Flash Press a Temp   SETButton repeatedly to change  the                                                          2 Screen
                                                                                                               Screen.
  e of numbers, the system will enter Priming Mode     (See
                                                     “SET   Page
                                                          TIME”    3).changes are not saved unless Light Aistemperature
                                                                  will
                                                               Most                                             pressed.     button, used for “Action”
                                                   appear in this menu.          Refer to Key above.        Light2or dedicated “Choose” button, depending on control panel con guration
                      SET

                                                                                                                                     Waiting time that keeps the last change to a menu item.
                                                                                                    OR
              SET             RANGE FLTR1                        SET           RANGE FLTR1
                                                                                                    Several Seconds  *****READYWaiting time FLTR
                                                                                                                                     RANGE  (depends
                                                                                                                                               1     on menu item) that reverts to original setting and
                                                                                                                              ignores any change to that menu item.
            Pressing and holding a Temp Button will also change the temperature.                                        Main Screen

                                                                                                                        Main Screen

                                                    While the Temperature is                                        READY        RANGE FLTR1
    SET             RANGE                                    ng, press Light.
                                                                                                     Waiting Several
                                                                                                                 READY Seconds   in the Main Menu
                                                                                                                          RANGE FLTR1                                                      Indicates a Menu Item that
                                                                                                will allow the display to revert to the Main Screen.                                       Depends on a Manufacturer
                                                                                               Most changes are not saved unlessthe
                                                                                                     Waiting Several   Seconds   in
                                                                                                                               Light     Mainif Menu
                                                                                                                                      Cycle
                                                                                                                                      Light     enabled
                                                                                                                                                is pressed.                                Con guration and
                                                                                                will allow the display  to Key
                                                                                                                           revert  to the Main Screen.                                     may or may not appear.
                                                                                                                Refer to       above.
                                                                                               Most changes are not saved unless Light is pressed.
                                                                                                                Refer to Key above.
Fill it up!
Preparation and Filling
Fill the spa to its correct operating level. Be sure to open all valves and jets in the plumbing system before filling to allow
as much air as possible to escape from the plumbing and the control system during the filling process.
After turning the power on at the main power panel, the top-side panel display will go through specific sequences. These
sequences are normal and display a variety of information regarding the configuration of the hot tub control.

Priming Mode – M019*
This mode will last for 4-5 minutes or you can manually exit the priming mode after the pump(s) have primed.

Regardless of whether the priming mode ends automatically or you manually exit the priming mode, the system will auto-
matically return to normal heating and filtering at the end of the priming mode. During the priming mode, the heater is
disabled to allow the priming process to be completed without the possibility of energizing the heater under low-flow or
no-flow conditions. Nothing comes on automatically, but the pump(s) can be energized by pushing the “Jet” buttons.
If the spa has a Circ Pump, it can be activated by pressing the “Light” button during Priming Mode.

Priming the Pumps
As soon as the above display appears on the panel, push the “Jet” button once to start Pump 1 in low-speed and then
again to switch to high-speed. Also, push the Pump 2 or “Aux” button, if you have a 2nd pump, to turn it on. The pumps
will now be running in high-speed to facilitate priming. If the pumps have not primed after 2 minutes, and water is not
flowing from the jets in the spa, do not allow the pumps to continue to run. Turn o he pumps and repeat the process.
Note: Turning the power o nd back on again will initiate a new pump priming session. Sometimes momentarily turning
the pump o nd on will help it to prime. Do not do this more than 5 times. If the pump(s) will not prime, shut o he
power to the spa and call for service.
Important: A pump should not be allowed to run without priming for more than 2 minutes.Under NO circumstances should
a pump be allowed to run without priming beyond the end of the 4-5 minute priming mode. Doing so may cause damage to
the pump and cause the system to energize the heater and go into an overheat condition.

Exiting Priming Mode
You can manually exit Priming Mode by pressing a “Temp” button (Up or Down). Note that if you do not manually exit the
priming mode as described above, the priming mode will be automatically terminated after 4-5 minutes. Be sure that the
pump(s) have been primed by this time.
Once the system has exited Priming Mode, the top-side panel will momentarily display the set temperature but the display
will not show the temperature yet, as shown below. This is because the system requires approximately 1 minute of water

                  or
  READY   RANGE        READY   RANGE

flowing through the heater to determine the water temperature and display it.

*M019 is a Message Code. See “General Messages” Pages.
Spa Behavior
Pumps
Press the “Jets 1” button once to turn pump 1 on or off, and to shift between low- and high-speeds if equipped.
If left running, the pump will turn off after a time-out period. The pump 1 low-speed will time out after 30 minutes. The
high-speed will time out after 15 minutes.
On non-circ systems, the low-speed of pump 1 runs when the blower or any other pump is on. If the spa is in Ready Mode
(See page 6), Pump 1 low may also activate for at least 1 minute every 30 minutes to detect the spa temperature (polling)
and then to heat to the set temperature if needed. When the low-speed turns on automatically, it cannot be deactivated
from the panel, however the high speed may be started.
Circulation Pump Modes
If the system is equipped with a circ pump, it will be configured to work in one of three different ways:
1, The circ pump operates continuously (24 hours) with the exception of turning off for 30 minutes at a time when the
water temperature reaches 3°F (1.5°C) above the set temperature (most likely to happen in very hot climates).
2, The circ pump stays on continuously, regardless of water temperature.
3, A programmable circ pump will come on when the system is checking temperature (polling), during filter cycles, during
freeze conditions, or when another pump is on.
The specific Circulation Mode that is used has been determined by the Manufacturer and cannot be changed in the field.

Filtration and Ozone
On non-circ systems, Pump 1 low and the ozone generator will run during filtration. On circ systems, the ozone will run with
the circ pump.
The system is factory-programmed with one filter cycle that will run in the evening (assuming the time-of-day is properly
set) when energy rates are often lower. The filter time and duration are programmable. (See page 10)
A second filter cycle can be enabled as needed.
At the start of each filter cycle, the blower (if there is one) or Pump 2 (if there is one) will run briefly to purge its plumb-
ing to maintain good water quality.

Freeze Protection
If the temperature sensors within the heater detect a low enough temperature, then the pump(s) and the blower automati-
cally activate to provide freeze protection. The pump(s) and blower will run either continuously or periodically depending
on conditions.
In colder climates, an optional additional freeze sensor may be added to protect against freeze conditions that may not
be sensed by the standard sensors. Auxiliary freeze sensor protection acts similarly except with the temperature thresholds
determined by the switch. See your dealer for details.

Clean-up Cycle (optional)
When a pump or blower is turned on by a button press, a clean-up cycle begins 30 minutes after the pump or blower is
turned off or times out. The pump and the ozone generator will run for 30 minutes or more, depending on the system. On
some systems, you can change this setting. (See the Preferences section on page 12)
the LCD
e to change       stopsdirection
               in one   flashing, the
                                  (e.g.spa willAfter
                                         UP).   heatallowing
                                                     to the new  setdisplay
                                                               the   temperature  when
                                                                            to stop     required.
                                                                                    flashing,  pressing
 se the temperature     to flash and    the next  press  will change   the temperature    in the opposite to
        If the panel has a single temperature button, pressing the button will cause the temperature
               again will cause the temperature to change in one direction (e.g. UP). After allowing the display
                 Temperature and Temp Range
               the Temperature Button will cause the temperature to flash and the next press will change the
               direction (e.g. DOWN).
                 Adjusting the Set Temperature
                 When using a panel with Up and Down buttons (Temperature buttons), pressing Up or Down will cause the temperature to
 ed and Press-and-Hold
        held      whenathe
           flash. Pressing         temperature
                            temperature                 is flashing,
                                         button again will  adjust the set the  temperature
                                                                           temperature  in the directionwill  continue
                                                                                                         indicated           to change
                                                                                                                   on the button.  When
           the LCD stops flashing, the spa will heat to the new set temperature when required.
nly one temperature             button     is available       and the        limit   of the     TemperaturePressing  Range is       reached
        If Ifathe
               Temperature
                  panel has a singlebutton   is pressed
                                     temperature             andthe
                                                 button, pressing   held    when
                                                                       button         thethe
                                                                               will cause  temperature         is flashing,thethe
                                                                                              temperature to flash.                  temperature
                                                                                                                                 button
 he progression         will
           again will cause    reverse
                             the          direction.
                                 temperature to change in one direction (e.g. UP). After allowing the display to stop flashing, pressing
        until the button is released. If only one temperature button is available and the limit of the Tem
                 the Temperature Button will cause the temperature to flash and the next press will change the temperature in the opposite
               when    the
                direction    button
                          (e.g. DOWN). is being held, the progression will reverse direction.

ges              Press-and-Hold
       Dual     Temperature
        If a Temperature                    Ranges
                         button is pressed and held when the temperature is flashing, the temperature will continue to change
 mperature range settings with independent set temperatures. The High Range designated in
                 until the button is released. If only one temperature button is available and the limit of the Temperature Range is reached
       This
d the Low
        whensystem
          Range       incorporates
                    designated
             the button                 intwo
                        is being held, the  thetemperature
                                                  display
                                           progression              arange
                                                               by direction.
                                                       will reverse    “down”settings with independent set temperatures. T
                                                                                  arrow.
              the display by an “up” arrow, and the Low Range designated in the display by a “down” arrow.
rious reasons,     with a common
          Dual Temperature           Rangesuse being a “ready to use” setting vs. a “vacation” setting.
e menuThese      ranges
         structure          can be
                         below.
          This system incorporates
                                      usedrange
                                    Each
                                    two
                                              for various     reasons,
                                                      maintains
                                         temperature range
                                                                             with
                                                                             ownaset
                                                                       itsindependent
                                                           settings with
                                                                                       common       use being
                                                                                        settemperature
                                                                                                                   aprogrammed
                                                                                                                     “ready to use”by
                                                                                                               asRange
                                                                                            temperatures. The High      designated in
                                                                                                                                      settin
        The   Ranges      are  chosen      using  the   menu      structure       below.     Each arrow.
                                                                                                   range maintains its own set temp
 is chosen, the spa will heat to the set temperature associated with that range.
          the display by an “up” arrow, and the Low Range  designated  in  the display by a “down”
              the  user.
                These     This
                      ranges can way,
                                 be usedwhen     a range
                                         for various reasons,is chosen,
                                                              with        the
                                                                   a common use spa
                                                                                beingwill  heat
                                                                                     a “ready     to setting
                                                                                              to use” the setvs. atemperature
                                                                                                                   “vacation” setting.associated w
                 The Ranges are chosen using the menu structure below. Each range maintains its own set temperature as programmed by
              For
               theexample:
                  user. This way, when a range is chosen, the spa will heat to the set temperature associated with that range.
 en 80°FHigh
         and   104°F.might be set between 80°F and 104°F.
              Range
         For example:
                 High Range might be set between 80°F and 104°F.
                                                                                                                                    Key                                                                                 Key
en 50°F Low
        and  99°F. might
         Low Range
             Range might be setbe set between
                               between 50°F and 99°F.50°F and 99°F.
                                                                              Key
                                                                Indicates Flashing or Changing Segment
                                                                                                                                                                        Indicates Flashing or Changing Segment
                                                                                                                                                                                                                                 Indicates Flashing or Cha
                                                                                                                                            Indicates Alternating   orAlternating
                                                                                                                                                                        Progressive
                                                                                                                                                       Indicates Alternating or P         MessageMessage -- every
                                                                                                                                                                                                            every     1/2 second
  be determined by
              More    specific    Temp
                                     RangesRanges        may bebydetermined  by
                                                                                                                                                              Indicates           or Progressive                  1/2 second
                More specific Temp           may be determined                             A temperature button, used for “Action”
                the Manufacturer.                                        A temperature button,       used for    “Action”                              A temperature button, us
              the  Manufacturer.
                                                                                           Light or dedicated “Choose”  button, depending on control panel
                                                                         Light or dedicatedconfiguration
                                                                                             “Choose” button, depending on control                     Light or dedicated “Choo
                                                                                                                                                           panel
                Freeze Protection is active in either range.                               Waiting time that keeps the last change to a menu item.     configuration
                                                                                                                                           configuration
        Freeze
 her range.      Protection
          See Ready              is active
                    and Rest on Page 6     in either range.                                                                                                  *****     Waiting time (depends on menu item) that reverts to original
                                                                                                                                                                       setting and ignores any change to that menu item.            Waiting   time that keeps t
                 for additional heating control information.                                                                               Waiting time that keeps the last change to a menu item.
              See Ready and Rest on Page 6
                          Main Screen
                                                    *****
                                               Set Temp will Show & Flash       Press a Temp Button repeatedly to change the temperature.
                                                                                                                                          Waiting time (depends
                                                                                                                                                        Main Screen
                                                                                                                                                                    on menu item) that reverts to original       *****
                                                                                                                                                                                                     setting and ignores any c
                                                                                                                                                                                                                                Waiting time (depends on

                                                                                                                                          setting and ignores any change to that menu item.
              for additional heating control information.
 formation.            READY   RANGE FLTR1         SET          RANGE             SET        RANGE                SET       RANGE
                                                                                                                                           OR
                                                                                                                                           Several Seconds    READY   RANGE FLTR1
                          Main Screen                      Set Temp will Show & Flash                      Press a Temp Button repeatedly to change the temperature.                                                    Main Screen
                                               While                            Pressing and holding a Temp Button will also change the temperature.
 Press a Temp Button repeatedly to temperature
                                    change the temperature.                                                                         Main Screen
                                               is flashing...
                 High-Range vs.
                 Low-Range Temp Choice
                                                                                                                                                                                         OR
                  READY         RANGE FLTR1                     SET           RANGE                         SET             RANGE                      SET            RANGE                                        READY      RANGE FLTR1
                                               Toggle the Range arrows in the LCD.                Main Screen                                                                            Several Seconds
                                                                                          OR
   SET         RANGE                         SET
                                            While  RANGE                                                        READY     RANGE FLTR1
                                                                To Set                    Several Seconds
                                                                                                   Pressing and holding a Temp Button will also change the temperature.
                                            temperature
 Pressing and holding
                 SET
                      a Temp
                        RANGE
                              ButtonSETwill isalso
                                                RANGE
                                                     change*****
                                                flashing...  the temperature.
                                                            Waiting     READY                                 RANGE FLTR1

              High-Range vs.                                                  Several Seconds
                                                                              Reverts to Original Setting
              Low-Range        Temp Choice
                   To next item in Main Menu

                           Main Screen         Set TempToggle
                                                       will Show the   Range
                                                                 & Flash  Press arrows   in the
                                                                                a Temp Button     LCD. to change the temperature.
                                                                                              repeatedly                                                         Main Screen
                                                                                                                                          Main Screen

 e LCD.                                                                                                      To Set
                       READY
                               Main ScreenSET
                               RANGE FLTR1                      RANGE FLTR1       SET        RANGE FLTR1          SET       RANGE FLTR1
                                                                                                                                           OR
                                                                                                                                           Several Seconds    READY   RANGE FLTR1

    To Set      SET             RANGE                           SET           RANGE                  *****
                                                                               Pressing and holding a Temp Button will also change READY
                                                                                                     Waiting
                                                                                                                                   the temperature.
                                                                                                                                              RANGE FLTR1

                                                                                                     Several Seconds
 ****
 aiting                ToREADY
                         next itemRANGE
                                   in Main Menu
                                         FLTR
                                            1
                                                                                                     Reverts to Original Setting

 everal Seconds
 everts to Original Setting
                          Main Screen                      Set Temp will Show & Flash                      Press a Temp Button repeatedly to change the temperature.                                                    Main Screen

 Press a Temp Button repeatedly to change the temperature.                                                                          Main Screen                                          OR
                      READY      RANGE FLTR1                    SET           RANGE FLTR1                   SET             RANGE FLTR1                SET            RANGE FLTR1                                  READY      RANGE FLTR1
                                                                                                                                                                                         Several Seconds
                                                                                                           Pressing and holding a Temp Button will also change the temperature.
                                                                                          OR
   SET         RANGE FLTR1                   SET                  RANGE FLTR1                                               READY         RANGE FLTR1
                                                                                          Several Seconds
 Pressing and holding a Temp Button will also change the temperature.
Mode – Ready and Rest
 d-Hold
              In order for the spa to heat, a pump needs to circulate water through the heater. The pump that performs th
  ture button
          knownisaspressed      Mode – Ready and Rest
                           andpump.”
                    the “heater held when the temperature is flashing, the temperature will continue to change
  ton is released. If only one temperature button is available and the limit of the Temperature Range is reache
   tton isThe heater pump can be either a 2-Speed Pump 1 or a circulation pump.
           being  held, the progression will reverse direction.
                                In order for the spa to heat, a pump needs to circulate water through the heater. The pump that performs this function is
              If the heater
                       knownpump      is a 2-Speed
                              as the “heater pump.” Pump 1, READY Mode will circulate water every 1/2 hour, using Pump 1 Low
              maintainThea heater
                           constant     water  temperature, heat as needed, and refresh the temperature display. This is known a
                                  pump can be either a 2-Speed Pump 1 or a circulation pump.
mperature IfRanges
    REST Mode
            thewill only
               heater    allow
                      pump        heating
                           is a 2-Speed    during
                                        Pump       programmed
                                             1, READY                filter
                                                      Mode will circulate   cycles.
                                                                          water everySince  polling
                                                                                     1/2 hour,        does1 Low,
                                                                                               using Pump   not inoccur,  the tempe
                                                                                                                   order to
        may nottwo
                 show           maintain a constant water temperature, heat as needed, and refresh the temperature display. This is known as “polling.”
                        a current temperature         until with
                                                             the heater   pump has
  ncorporates         temperature        range settings            independent         setbeen    running for The
                                                                                           temperatures.         a minute
                                                                                                                      High or  two. designat
                                                                                                                            Range
                REST Mode will only allow heating during programmed filter cycles. Since polling does not occur, the temperature display
        Circulation
  y an “up”     may Mode
             arrow,  and   (See
                          the   LowPage    4, under
                                       Range         Pumps,
                                                designated      for  other
                                                                 in the    circulation
                                                                        display
                                                                              beenby       modes)
                                                                                        a “down”       arrow.
        If the
 s can be      spa
            used
                    not show
                  Circulation
                    for  various
                                Mode – Ready and Rest
                             a current
                      is configured
                                        temperature
                                            forPage
                                 Modereasons,
                                        (See
                                                    until
                                                  24HR
                                                          the heater
                                                     4,with
                                                        under aPumps,
                                                                     pump
                                                          circulation,
                                                                common
                                                                          has
                                                                        forthe heater
                                                                           other
                                                                              use
                                                                                     running
                                                                                          pump
                                                                                 circulation
                                                                                     being
                                                                                              for a minute
                                                                                                  generally
                                                                                             modes)
                                                                                             a “ready
                                                                                                           or two.
                                                                                                               runssetting
                                                                                                          to use”     continuously.      Since the setting.
                                                                                                                                 vs. a “vacation”      heater p
        running,
 are chosen using If the  spa
                     the spa     will
                         thethemenu    maintain
                              is configured
                                           structure   set
                                                for 24HR     temperature
                                                          circulation,
                                                           below.             and
                                                                       the heater
                                                                     Each    range   heat
                                                                                  pump     as needed
                                                                                         generally
                                                                                       maintains          in  Ready
                                                                                                   runs continuously.
                                                                                                     itsMode,
                                                                                                         own     set  Mode,
                                                                                                                      Since  thewithout
                                                                                                                      temperature          polling.
                                                                                                                                 heater pump  is always
                                                                                                                                         as programmed b
                  In  order for
                  running,       the
                                  spaspa
                                       willtomaintain
                                              heat, a pump    needs to circulate
                                                        set temperature          water
                                                                          and heat      through
                                                                                    as needed in the heater.
                                                                                                 Ready       The pump that
                                                                                                               without       performs this function is
                                                                                                                        polling.
 s way, In
         when
            Rest aMode,
                    range
                  known     the
                           as  is
                               thechosen,
                                   spa           the spa
                                         willpump.”
                                    “heater      only   heatwill   heat
                                                               to set      to the set temperature
                                                                        temperature       during programmed  associated
                                                                                                                      filterwith
                                                                                                                              times,that
                                                                                                                                      even
                  In Rest Mode, the spa will only heat to set temperature during programmed filter times, even though the water is being
                                                                                                                                          range.
                                                                                                                                             though the wa
              filtered constantly
                       The  heater
                       filtered       when
                                   pump
                                constantlycan inin
                                              be
                                           when  Circulation
                                                 either a 2-Speed
                                                    Circulation  Mode.
                                                                  Pump 1 or a circulation pump.
                                                                Mode.
                                If the heater pump is a 2-Speed Pump 1, READY Mode will circulate water every 1/2 hour, using Pump 1 Low, in order to
  might be set maintain
               between      80°F and
                        a constant water 104°F.
                                         temperature, heat as needed, and refresh the temperature display. This is known as “polling.”
                                                                                                                                                                                Key Key
                                                                                                              Key the temperature display
                                           Main Screen
               REST Mode will only allow heating during programmed filter cycles. Since pollingIndicates
                                                                                                 doesFlashing
                                                                                                         not occur,
 might be set Main
              between
                   Screen 50°F and 99°F.
               may not show a current temperature until the heater pump has been runningIndicates
                                                                                                              or Changing Segment
                                                                                                      Flashingor
                                                                                             for a minute      or two.
                                                                                                                   Changing Segment
                                                                                                                While the Temperature is                                                        Indicates Alternating or Progressive Message - every 1/2 second
                                                                                                                still flashing, press Light                                               Indicates Alternating orIndicates Flashing
                                                                                                                                                                                                                   Progressive       or Changing
                                                                                                                                                                                                                                Message          Segment
                                                                                                                                                                                                                                         - every 1/2 second
  c Temp Ranges       may be
                 Circulation     determined
                               Mode
                                       READY
                                                    by Pumps,
                                                   RANGE FLTR1
                                     (See Page 4, under     While the
                                                                           SET
                                                                      forTemperature
                                                                           other circulation
                                                                                       is
                                                                                            RANGE
                                                                                                  modes)
                                                                                                                 A temperature button, used for “Action”
                                                                                                                repeatedly until MODE
                                                                                                                 Light or dedicated “Choose”Indicates
                                                                                                                appears in the LCD.
                                                                                                             A temperature       button, used
                                                                                                                                                         Alternating or Progressive Message - e
                                                                                                                                              button, depending
                                                                                                                                                   for “Action”on control panel configuration
                                                            still flashing, press Light
  turer.         If the spa is
                        READY
                               configured  for
                                   RANGE FLTR1
                                               24HR circulation,  SET
                                                                     the
                                                            repeatedly     heater
                                                                          until MODE pump
                                                                                      RANGE
                                                                                              generally runs continuously.time thatSince
                                                                                                             Light or dedicated
                                                                                                                 Waiting                 theAthe
                                                                                                                                     “Choose”
                                                                                                                                   keeps            heater
                                                                                                                                               temperature
                                                                                                                                             last
                                                                                                                                    Main Screen    button,
                                                                                                                                                  change        pump
                                                                                                                                                                button,      ison
                                                                                                                                                                     item. used
                                                                                                                                                               depending
                                                                                                                                                         to a menu                always
                                                                                                                                                                                    for “Action”
                                                                                                                                                                                      control panel
                                                            appears in the LCD.
                 running, the spa will maintain set temperature           and heat as needed in Ready        Mode,
                                                                                                             To Set
                                                                                                                      without polling.      Lightitem)
                                                                                                                                                    or dedicated      “Choose”      button,
                                                                                                                                                                                         and depending
                                                                                                          *****  Waiting time (depends on menu
                                                                                                             configuration                              that reverts to original setting

  ction is activeInin   either   range.               *****
                     Rest Mode, the spa will only heat to set temperature
                                    SETREADY                              SET        during
                                                                                  Main  Screen programmed filter
                                                                                     REST                Waiting
                                                                                                                 ignores any change to that menu item.
                                                                                                             Waiting  time that
                                                                                                                   times,      even keeps
                                                                                                                                       thoughthe lastthe
                                                                                                                                           Waiting
                                                                                                                                     RESTRANGE   FLTR1
                                                                                                                                                        change
                                                                                                                                                       time   that to
                                                                                                                                                              water     ais
                                                                                                                                                                    keeps menu      item.
                                                                                                                                                                             the last
                                                                                                                                                                             being       change to a men
                                                                                                         Several Seconds
                                                                                                         RevertsTo
                                                                                                                 to Set
 nd Rest on Page    6 constantly when in Circulation Mode.
              filtered                                                                                              Original Setting
                                                                                                                                                                       *****                                  *****
                                                                                                                                                                                         Waiting time (depends on   menutime
                                                                                                                                                                                                                 Waiting
                                                                                                                                                                                         setting and ignores any ignores
                                                                                                                                                                                                                 changeany
                                                                                                                                                                                                                          item)  that reverts
                                                                                                                                                                                                                              (depends
                                                                                                                                                                                                                             change
                                                                                                                                                                                                                         to that
                                                                                                                                                                                                                                               to original
                                                                                                                                                                                                                                         on menu
                                                                                                                                                                                                                                     to that
                                                                                                                                                                                                                                  menu
                                                                                                                                                                                                                                                   item) that rever
                                                                                                                                                                                                                                             menu item.
                                                                                                                                                                                                                                         item.
 al heating control information.
                   SETREADY
                                      Main Menu *****
                                      To next item in
                                                 Waiting         SET
                                                                     Toggle between READY and REST
                                                                     Pressing Light when the display is toggled will go to Main Screen.
                                                                         REST                                                         RESTRANGE FLTR1
                                      If not toggled
                                                                     READY Mode will allow the spaSeveral    Seconds
                                                                                                    to Poll and determine a need for heat. The panel will maintain a “current” temperature display.
                                       Screen a Temp Button repeatedly toReverts
         Set Temp will Show & FlashMainPress                              changetothe
                                                                                   Original Setting
                                                                                      temperature.
                                                                                                                                                                                          Key
                                                                                                                                                                                Main Screen
                                                                                  REST Mode will not Poll and will only heat during filter cycles. The panel will not display a current temperatureIndicates
                                                                                                                                                                                                    at all times.
                                                                                                                                                                                                               Flashing or Changing Segment
                                          Main Screen
                       To next item in                         Toggle between READY and RESTWhile the Temperature is                                                                            Indicates Alternating or Progressive Message - every 1/2 second
                       Main Menu READY             RANGE
                                                               PressingSET
                                                           FLTR1
                                                                        Light when
                                                                               RANGE
                                                                                    the display isstill
                                                                                                    toggled
                                                                                                        flashing, will
                                                                                                                  pressgo  to Main Screen.
                                                                                                                        Light
                                                                                                                                                                                                A temperature button, used for “Action”
                                                                                                                repeatedly until MODE
                       If not toggled                                                                                                            OR                 Light or dedicated “Choose”  button, depending on control panel configuration
            SET           RANGE                       SETFLTR1
                                               RESTRANGE
                                                                  1 Hour
                                                               READY  Mode will allow
                                                                     RANGE      RESTRANGE  spa toappears
                                                                                       the SET           in the LCD.
                                                                                                  Poll and    determine a need for heat.
                                                                                                             RESTRANGE
                                                                                                         RANGE                            The panel
                                                                                                                                    RESTRANGE       will maintain
                                                                                                                                                 READY             aFLTR1
                                                                                                                                                                     “current” temperature
                                                                                                                                                             RESTRANGE
                                                                                                                                                           RANGE                                  display.
                                                                                                                                                                                           RESTRANGE
                                                                                                                                                 Several Seconds
                                                                                                                              Main Screen                                                       Waiting time that keeps the last change to a menu item.
                                                                                  The Main Screen will display RUN PUMP FOR TEMP if the filtration pump has not run for over 1 hour.
         While                                    Pressing and holding  a Temp     Button      will
                                                                                              To Set also change the temperature.
         temperature        Main Screen
                                                               RESTThe
                                                                    Mode
                                                                       Main will not
                                                                            Screen willPoll and
                                                                                        display    will only
                                                                                                normally      heat
                                                                                                         during Filterduring
                                                                                                                       Cycles orfilter
                                                                                                                                  whencycles.
                                                                                                                                       the spa isThe
                                                                                                                                                  in use.                          *****
                                                                                                                                                      panel will not display aWaiting
                                                                                                                                                                               currenttime (depends on menu
                                                                                                                                                                                         temperature    at allitem) that reverts to original setting and
                                                                                                                                                                                                                times.
                                                                                                                                                                                                ignores any change to that menu item.
         is flashing...             SETREADY                              SET
                                                                                                         *****
                                                                                  If the filtration pump has been off for an hour or more, when any function button, EXCEPT Light, is pressed on the panel,
                                                                                                          Waiting
                                                                                  theREST
                                                                                       pump used in conjuncton    with the heater willRESTRANGE
                                                                                                          Several Seconds
                                                                                                                                                FLTR1
                                                                                                                                       run so that temperature can be sensed and displayed.
                                                                                                         Reverts to Original Setting
  Choice
                                   To next
                           RESTRANGE   FLTR1item in
                                                           1 Hour       Toggle between  READY and REST
                                                                                     RESTRANGE                                 RESTRANGE                                   RESTRANGE                               RESTRANGE                              RESTRANGE
                                                                        Pressing Light when the display is toggled will go to Main Screen.
         Toggle the   Range arrowsMain    Menu
                                     in the    LCD.                                          Main Screen
                                Ready-in-RestThe
                                              Mode
                                   If not toggled
                                                                        READY Mode will allow the spa to Poll and determine a need for heat. The panel will maintain a “current” temperature display.
                                                 Main Screen will display RUN PUMP FOR TEMP if the filtration pump has not run for over 1 hour.
                                                     To Set              The Main Screen will display normally during Filter Cycles or when the spa is in use.
                                READY/REST
                                        Main Screenappears in the display if the spa is in Rest Mode and Jet 1 is pressed. It is assumed that the spa is being used
                                                                REST Mode will not Poll and will only heat during filter cycles. The panel will not display a current temperature at all times.

            SET           RANGE and will*****
                                          heat to set Ifthe
                                         Waiting
                                                            the filtration
                                                           temperature.
                                                                   READY
                                                                           pump      has
                                                                                   While
                                                                               RANGE
                                                                                           been off for an hour or more, when any function button, EXCEPT Light, is pressed on the panel,
                                                                                        FLTR1 Pump 1 High can be turned on and off, Pump 1 Low will run until set temperature
                                                               pump used in conjuncton with the heater will run so that temperature can be sensed and displayed.
                                is reached,    or 1Seconds
                                         Several     hour    has passed. After 1 hour, the System will revert to Rest Mode. This mode can also be reset by entering
                                                        1 Hour
                                               RESTRANGE FLTR1                               RESTRANGE                      RESTRANGE                     RESTRANGE                       RESTRANGE                     RESTRANGE
                                         Reverts to Original Setting
  in Menu                       the Mode     Menu and changing the Mode.
                                                                                  The Main Screen will display RUN PUMP FOR TEMP if the filtration pump has not run for over 1 hour.
                                                                                  The Main Screen will display normally during Filter Cycles or when the spa is in use.

              Ready-in-Rest      Mode
                                          Main Screen                                 Main Screen
                                                                                  If the filtration pump has been off for an hour or more, when any function button, EXCEPT Light, is pressed on the panel,
         Set Temp will Show & Flash
                        Press a Temp Button repeatedly to change the temperature. the pump used in conjuncton with the heater will run so that temperature can be sensed and Main        Screen
                                                                                                                                                                                displayed.

                                                                    J

              READY/REST appears in the display if the spa is inORRest Mode and Jet 1 is pressed. It is assumed that the spa i
                                               RESTRANGE                         READY/ RESTRANGE

                    RANGEReady-in-Rest             Mode
              and will
            SET
                          heat
                          FLTR1
                                   to set
                                       SET
                                             temperature.
                                                  RANGE FLTR1
                                                                    While
                                                                     SET
                                                                                Pump
                                                                                 RANGE FLTR1
                                                                                             1 High
                                                                                                 Several can
                                                                                                         Secondsbe turned
                                                                                                                    READY
                                                                                                                                 on and off, Pump 1 Low will run until set
                                                                                                                             RANGE FLTR1

              is reached,       or 1 Pressing
                         READY/REST   hour     has
                                              and
                                           appears    passed.
                                                  holding
                                                     in thea Temp   After
                                                                  Button
                                                              display   ifwill 1spa
                                                                          thealsohour,
                                                                                  change
                                                                                     is inthethe  System
                                                                                               temperature.
                                                                                             Rest Mode          will1 isrevert
                                                                                                           and Jet               toItRest
                                                                                                                          pressed.            Mode.
                                                                                                                                        is assumed thatThis  mode
                                                                                                                                                        the spa       canused
                                                                                                                                                                is being   also be res
              the Mode   andMenu        and
                                will heat      changing
                                           to set temperature.  theWhile
                                                                       Mode.  Pump 1 High can be turned on and off, Pump 1 Low will run until set temperature
                                is reached, or 1 hour has passed. After 1 hour, the System will revert to Rest Mode. This mode can also be reset by entering
                                the Mode Menu and changing the Mode.
                            Main Screen                                         Main Screen

                                          Main Screen                                Main Screen

                              RESTRANGE
                                                           J            READY/ RESTRANGE
                                               RESTRANGE
                                                                    J            READY/ RESTRANGE
You can also read