Your Guide to the CARS System - CERF
←
→
Page content transcription
If your browser does not render page correctly, please read the page content below
CERF
       COUNTY EMPLOYEES’
       RETIREMENT FUND

                    Your Guide to the
                           CARS System

                             CERF Contact Information:

                             Toll-Free: 877-632-2373
                                Tel: 573-632-9203
                                Fax: 573-761-4404
                              E-mail: IT@mocerf.org
                                  www.mocerf.org

                                      Page 1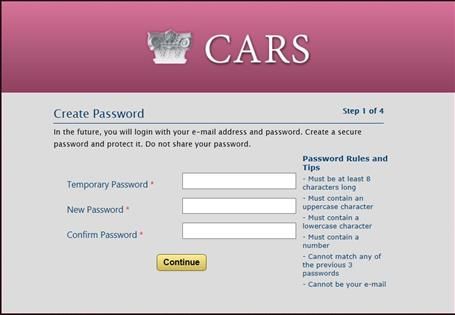
Table of Contents
Logging into CARS ........................................................................................................................ 3
Alert Messages .............................................................................................................................. 4
County Information ...................................................................................................................... 5
  County Profile ............................................................................................................................ 5
     County Contacts .................................................................................................................... 6
     Contact Role Descriptions: .................................................................................................. 7
     County Contribution Elections ............................................................................................ 8
     Bank Information .................................................................................................................. 9
     Validation Information ......................................................................................................... 9
  Participant Information ............................................................................................................ 9
Payroll Reporting ........................................................................................................................ 10
  Definitions ................................................................................................................................ 10
  Payroll Summary ..................................................................................................................... 10
  Naming a Payroll File ............................................................................................................. 11
  Upload Files ............................................................................................................................. 11
  File Status ................................................................................................................................ 11
  File Errors and Data Errors .................................................................................................... 12
     View and Correct Data Errors ........................................................................................... 12
     Errors Status ........................................................................................................................ 13
  Manually Creating the Payroll Header ................................................................................. 13
  Payroll Detail ........................................................................................................................... 14
  Make a Deposit ....................................................................................................................... 14
Forms ............................................................................................................................................ 16
  Employment Change .............................................................................................................. 16
  Employment Change Lookup ................................................................................................ 17
  Enrollment................................................................................................................................ 17
  Salary Verification ................................................................................................................... 18
  Deposit Exceptions ................................................................................................................. 18

                                                                    Page 2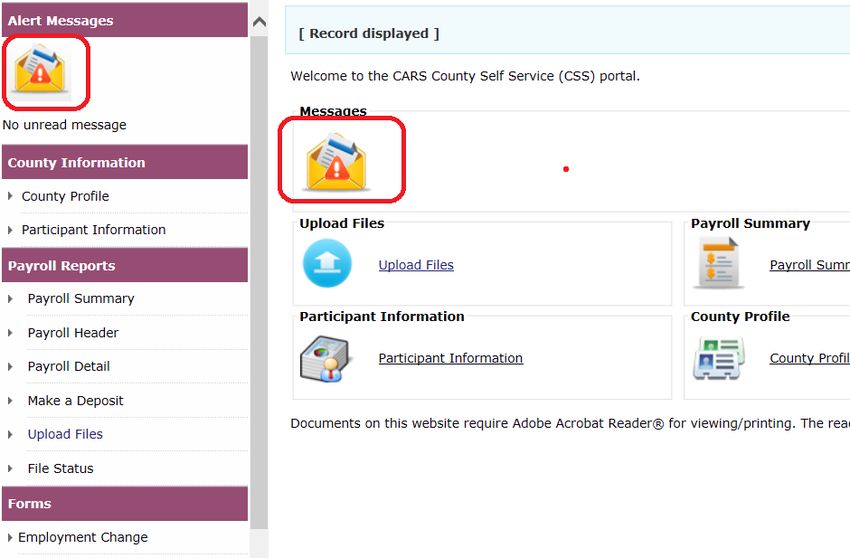
Logging into CARS
CERF must grant access to you the first time you log into CARS. You will receive an e-
mail from CERF with instructions for logging into the system. The e-mail will contain a
log-in name (which is your e-mail address), a system-generated password, and a link to
access CARS. When you click on the link, you will be directed to the registration page.
On the registration page, you will change your password. You should follow the criteria
displayed for creating a password. You will be asked to select a picture and four
questions to answer. Once these steps are completed, you will be registered with
Entrust. After the initial log-in, you can access CARS from www.mocerf.org.
You will get an additional screen asking if you want to register the computer. If this is
your computer at work, or your computer at home, you can answer yes. We
recommend that you answer no if this is a public computer.
The CARS system does not restrict multiple users on the same computer, but each user
will be required to have a separate user name and password.
If you forget your password, click “Forgot Password” on the log-in screen. You will be
required to answer two challenge questions. The challenge questions are ones that you
chose to answer when you logged in for the first time. You will then receive an e-mail
from CERF with your system-generated password.
If your account gets locked, you will need to call CERF to unlock the account. You will
receive an e-mail from CERF with your user name, system-generated password, and a
link to access CARS. You will only be required to change your password and answer
one question.
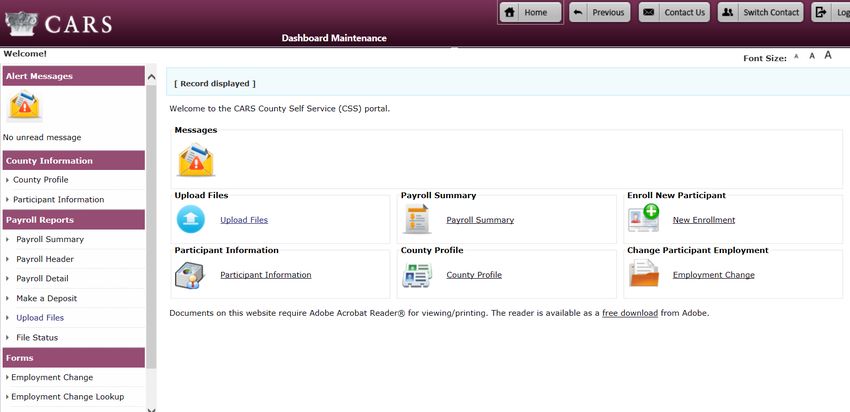
Page 3After logging in, the Dashboard Maintenance screen will appear.
This is the Home screen. From here you will be able to input data to be sent to CERF.
On the left side of the screen, you will see a list of actions. You can also perform these
actions by clicking on the appropriate section in the center of the screen.
Alert Messages
CERF may occasionally send you a message. If there are no messages, you will see the
statement “No unread message” under the icon. If you have a message, you will see a
statement that reads “1 unread message” under the icon. Click on the icon to open the
message.
Page 4You can return to the previous screen by pressing the Previous button at the top of the
screen.
Reminder: If you use the back arrow on your Internet browser, you will be
routed back to the CARS log-in screen and any unsaved information will be
lost.
You can change the font size by selecting the small, medium or large A at the top right
of the screen.
Note: If the system sits idle for 30 minutes, your session will time out. You will have
to sign in again to get back into CARS.
When you have finished submitting data to CERF, press the Logoff button at the top
right of the screen to log out of the system.
County Information
County Profile
Under County Information, select County Profile from the list at the left of the screen or
from the County Profile section in the middle of the screen. This takes you to the
County Maintenance screen.
Page 5Note: If there is a change in the County’s payroll reporting frequency, you must
contact CERF.
County Contacts
Under the County Contacts grid, you will see a list of the active county contacts. To
make a change to an existing contact, place a checkmark in the box next to the name
that is to be changed or click on the name hyperlink. Next, press the Open button.
This will take you to the County Contact Maintenance screen. Make changes to the
Contact Information as needed and press the Save button.
To make a change to a County Contact’s address, place a checkmark next to the
address under Contact Address or click on the address hyperlink and press the Open
button. The Address Maintenance screen appears. Make the necessary changes and
press the Save button.
Page 6To add a new contact, select the New button. This will open the County Contact
Maintenance screen. Enter the appropriate data under the Contact Information section.
The address will auto-populate with the current address. You can either keep the
address that is auto-populated or change it to a different address. Under Contact
Details, select the New button. A drop-down menu will appear. Select the appropriate
title.
Contact Role Descriptions:
o Account Contact – This person will upload payroll files.
o Benefit Contact – This person will submit forms.
o Administrative Contact – This person will submit changes to the
county’s demographic information as well as changes to elected officials
and contact information.
o Payment Contact – This person will submit deposits and Deposit
Exception forms.
The Account Contact will have access to the Payroll Summary Lookup, Payroll
Summary Maintenance, Payroll Header Lookup, Payroll Header Maintenance, Payroll
Detail Lookup, Payroll Detail Maintenance, Upload File, File Status Lookup, File Header
Maintenance, Salary Verification, Deposits and Deposit Exceptions screens.
The Benefit Contact will have access to the Submit Forms, Participant Information
Lookup, Participant Maintenance, Employment Change Wizard, Change Form Lookup
Maintenance, Enrollment Lookup, Enrollment Maintenance, Salary Verification Lookup
and Salary Verification Maintenance screens. This person will also be able to update
information for County Contacts.
The Administrative Contact will have access to the County Maintenance and County
Contacts Maintenance screens. The Participant information and County Contribution
Election grid will be read-only.
The Payment Contact will have access to the Deposit Lookup, Deposit Maintenance,
Deposit Exception Lookup, Deposit Exception Maintenance, and Bank Information
screens. The bank account number will be visible only to the user who creates the
account. County Contact information will be read-only. This person will not be able to
view county contact details beyond this page.
Page 7Note: The Contact Role fields are read-only. You will need to contact CERF to assign
a role(s) to a contact.
After changing existing information or adding new information, remember to check for
errors under the Validation Information grid. Errors that appear here will need to be
corrected before saving the information.
Press the Save button.
County Contribution Elections
A county has the option of paying all or any part of the additional 4% contributions for
its employees. The county’s election, by year, will be shown here.
If you place a check mark in the box next to the year and press the Open button or
click on the year hyperlink, you will be taken to a screen showing the employees for
which this election applies. You can view the information but cannot make any
Page 8changes. These changes occur once each year, to be effective January 1 of the next
year. CERF will notify you when the election can be changed.
Bank Information
On the County Maintenance screen, look for the section labeled Bank Information. You
can open the existing account or add information for a new account.
The user who adds a new bank account is the only user who will be able to see and
access the information for that account.
To open an existing account, place a checkmark in the box next to the appropriate
account and press the Open button or click on the Bank Account Number hyperlink.
The Bank Information screen will appear. Make the necessary changes and press the
Save button. You can press the Refresh button and the data will be reverted back to
the original and no changes will be made.
If you want to add a new bank account, press the Add a Bank Account button. The
Bank Information screen will appear. Insert the appropriate information and press the
Save button. In order to clear the screen before saving, press the Refresh button and
the fields will be blank.
Banking information cannot be deleted; however, it can be made inactive if it is no
longer being used.
Validation Information
Be sure to always check the Validation Information at the bottom of the screen to check
for any errors that may need to be corrected before submitting information to CERF.
Participant Information
You can search for employees who are active in your county.
Page 9You can select an employee from the list produced in the search by clicking on the
name hyperlink or checking the box next to the Social Security Number and pressing
the Open button. You will be taken to the Participant Maintenance screen. Here, you
can see the employee’s demographic information, employment information, service
details, and salary/hours information. Under the Employment Information grid, you can
change the employment status or terminate a non-vested employee by clicking on
either the Employment Change button or Terminate Employment button. When you
click on either of these buttons, you will be taken to a wizard that will walk you through
the process. The employee’s Social Security Number will be auto-populated in the
wizard. When you reach the Confirmation stage of the wizard, you will see a Download
Form button. By pressing this button, you will be able to download or print the form
before you finish the process. Press the Finish button.
Note: A terminated employee will remain in your search for 90 days after termination.
Payroll Reporting
As a reminder, counties that make contributions on behalf of their employees must also
continue to submit an electronic report or a paper copy of the breakdown of the
county-paid and employee-paid contributions for each employee for each payroll period.
This is required by CERF’s auditors.
Definitions
Payroll Summary – The Payroll Summary refers to the container that holds all of the
Payroll Headers for a month. You will not be able to create a Payroll Summary.
Payroll Header – The Payroll Header is the payroll report for a specific pay period.
Payroll Detail – The Payroll Detail is the individual payroll detail for each employee.
Payroll Summary
At the left of your screen, under Payroll Reports, select Payroll Summary. You can also
navigate to this screen by clicking on Payroll Summary in the middle of your screen.
The Payroll Summary Lookup screen appears. Enter the appropriate search criteria and
Page
10press the Search button. Select the appropriate Payroll Summary report from the
Search Results. The Payroll Summary Maintenance screen appears.
Naming a Payroll File
Following is an example of the proper format for naming a payroll file.
County# (xxx)_County Name_County_Beginning Payroll Date (yyyy_mm_dd)
Example: 026_Cole County_2015_08_01
Upload Files
At the left of the screen, under Payroll Reports, select Upload Files. You can also select
Upload Files from the middle of the Dashboard Maintenance screen. The Upload File
screen will appear. Under File Type, choose either Excel File or Text File from the drop-
down menu.
Select the appropriate reporting frequency. Only the payroll reporting options available
for your county will be shown in the drop-down menu.
Next, click the Browse button to find the appropriate file. Click the Upload File box.
File Status
After the file is uploaded, the file status will be either Valid or Review. If the file status
is Valid, it can be submitted to CERF. If the file status is Review, there is a question
about the information that must be addressed before it can be submitted to CERF.
Page
11File Errors and Data Errors
There are two types of errors, File Errors and Data Errors.
File errors are formatting errors and will display on the screen immediately. An
example of a file error is if the Social Security Number contains dashes or is less than
nine characters long. A Payroll Header cannot be uploaded until File Errors are
corrected.
Data Errors occur when incorrect information is reported on the Payroll Header, such as
an incorrect contribution amount reported for the corresponding salary. Data Errors
can be viewed in CARS approximately 10 minutes after the file has been uploaded.
View and Correct Data Errors
Select Payroll Header from the left navigation panel. Enter the Payroll Begin Date and
click the Search button. Locate the appropriate Payroll Header and click the Open
button. All Payroll Detail rows will have a status of either Review or Valid. Valid
indicates all of the information is correct. Review indicates there is a question about
the information that must be addressed. Once the data has been corrected, the status
will change to Valid.
Under Payroll Detail Validation, you will see the number of payroll records that are valid,
and the number of records that need to be reviewed. You will also see any errors that
exist on the report.
These errors should be reviewed and corrected before being submitted to CERF. If the
information is correct but warnings still exist, you can suppress the warnings by
checking the Suppress Warnings box at the top of the page. Once the information is
correct, or the warnings have been suppressed, press the Save button. The Payroll
Detail status will be shown as Valid.
Under the Payroll Header Validation grid, you will see any errors that exist on the
Payroll Header. These errors should be reviewed and corrected before being submitted
to CERF.
Page
12If the information is correct but warnings still exist, you can suppress the warnings by
checking the Suppress Warnings box at the top of the page. Once the information is
correct, press the Save button. The Payroll Header status should be shown as Valid.
Press the Submit button. The Submit button will not be available until the Payroll Detail
report and Payroll Header report both show the status as Valid. The status of the
Payroll Summary does not matter.
Errors Status
A hard error requires action by the user. Warning and Informational errors need to be
reviewed by the user. Warning and Informational errors can be suppressed in order to
move forward with the upload. You should also check the Payroll Header Validation box
for additional errors. After all errors have been addressed, the Payroll Header status
will change to Valid. Press the Submit button to submit the payroll report to CERF.
Manually Creating the Payroll Header
Under Payroll Header Records grid, press the New button.
The Payroll Header Maintenance screen appears. Add the required information and
press the Save button.
Page
13Payroll Detail
In order to add missing employees to a payroll header, you must first be in the Payroll
Header, press the New Payroll Detail button, and then add the individual payroll details
for each employee. If the county has a previously-posted Payroll Header, you can use
the Copy Forward function to copy all of the payroll details from the previous report into
the new payroll report, eliminating the need to re-enter information that already exists.
You will still need to make the necessary changes to the salary, hours, and
contributions for the payroll report you are creating, as well as adding the correct
payroll begin date, payroll end date, and receipt date.
To use the Copy Forward function, click on Payroll Summary and press the Search
button. Select the appropriate payroll summary by placing a check mark in the box
next to the date or by clicking on the date hyperlink. Under the Payroll Header Records
grid, press the New button and enter the required information. Press the Copy Forward
button to populate the payroll information from a prior payroll header and update the
information as needed.
Make a Deposit
In the left navigation panel, under Payroll Reports, select Make a Deposit. The Deposit
Lookup screen will appear. To make the deposit by ACH, select ACH Pull from the
Deposit Method drop-down menu. Click the New Deposit button.
Page
14Next, select the appropriate bank account number from the drop-down menu and enter
the deposit amount in the box provided. Click the Save button.
Click the Add Row button in the Deposit Details panel. Select the appropriate Deposit
Type from the drop-down menu and enter the dollar amount and the period.
If the deposit is for payroll, the period is the month in which the employees receive
their paychecks. If the deposit is for fees, the period is the month the fees were
collected in the various offices, NOT the month the fees were turned over to the
Treasurer. The total of all of the fields should equal the amount of the deposit. Click
the Save button. Fix any errors and click the Save button again. If there are no errors
and the deposit is Valid, the Submit button will appear at the top of the screen. Click
the Submit button.
To make a deposit by check, select Check from the Deposit Method drop-down menu.
Click the New Deposit button and enter the deposit amount in the box provided. Enter
the check number and click the Save button. Follow the same steps as if remitting by
ACH. After submitting the file to CERF, mail the check and transmittal form to KeyBank.
Available credits are shown under the Available Credit grid.
Page
15The Deposit History grid is a read-only table. Deposits for the last three periods are
shown here.
Forms
Employment Change
This is where you will submit changes in employment, employee information, leaves of
absence, seasonal notice and terminated non-vested forms.
At the left of the screen, under Forms, select Employment Change. You can also select
Employment Change in the middle of the Dashboard Maintenance screen. The
Employment Change Wizard will appear.
From the drop-down list, select the change you want to process. Next, input the Social
Security Number for whom you are making the change. Press the Next button. Make
the appropriate changes and press the Next button. The screen will show that you
have completed the change. If you want to download or print the form, press the
Download Form button. When you are finished, press the Finish button. Click OK and
you will be taken back to the Dashboard Maintenance screen.
Page
16Employment Change Lookup
You can search for forms that are open, expired, submitted to CERF, completed or
voided. Terminated members will appear 90 days after termination. After 90 days,
they will no longer appear.
At the left of the screen, under Forms, select Employment Change Lookup. The Change
Form Lookup Maintenance screen will appear. Type in the appropriate search criteria
and press the Search button. All forms relating to the search criteria will appear under
Search Results. You will see the open forms, expired forms and submitted forms on
the Forms tab. An open-ended leave form will appear as an open form. When the
employee returns from leave, you can open the existing form and complete it by adding
the leave end date and submitting it to CERF. A leave form that has extended beyond
12 months will appear under Expired Forms. Forms that have been submitted to CERF
will appear under Submitted Forms. Click on the Completed & Voided Forms tab to see
the completed and voided forms. Once you submit a form to CERF, and CERF has
uploaded the form, it will appear under Completed Forms.
Forms listed under Expired Forms, Submitted Forms, Completed Forms, or Voided
Forms cannot be changed. Forms listed under Open Forms can be changed, submitted,
or voided. Should you need to void a form, simply place a check mark in the box next
to the record and press the Void Form button. The form will be moved to Voided
Forms.
Enrollment
At the left of the screen, under Forms, select Enrollment. You can also enroll a new
participant by selecting New Enrollment in the middle of the Dashboard Maintenance
screen. The Enrollment Lookup screen will appear. Enter the employee’s Social
Security Number and press the New button.
Page
17The Enrollment Maintenance screen will appear. Enter the required information and
press the Save button at the bottom of the screen. Under the Required Attachments
grid, indicate how you will be sending the required attachment. If you select Electronic,
a field will be enabled for you to attach the document. Browse for the attachment and
click Attach. If there are no errors, the Submit button will appear. Press Submit.
Salary Verification
At the left of the screen, under Forms, select Salary Verification. The Salary Verification
Lookup screen will appear. Enter the Social Security Number for the employee you are
looking for and press the New button. The Salary Verification Maintenance screen will
appear. Complete the fields with the appropriate gross salary, hours, and contributions.
When you are finished, press the Save button. Press the Submit button to submit the
information to CERF. Press the Print Salary Verification button to print the document.
You and CERF will be able to send this form back and forth until all corrections are
made.
Deposit Exceptions
The Deposit Exception form is used when the total contributions (contributions plus
buyback payments) on the Payroll Header do not equal the amount of funds remitted
on the payroll. At the left of the screen, under Forms, select Deposit Exceptions. Enter
the appropriate criteria and press the Search button. The Deposit Exceptions Lookup
screen will appear. To search for an existing Deposit Exception form, enter the
appropriate search criteria and press the Search button. Records meeting the criteria
entered will appear under Search Results. Place a check mark in the box next to the
desired document and press the Open button.
Page
18To create a new Deposit Exception document, select the New button.
The Deposit Exception Maintenance screen will appear. Under the Deposit
Exception/Available Credits grid, you will see a list of credits with respective balances.
Enter the Receipt Date, Payroll Begin Date, Payroll End Date, Payroll Report or Expected
Deposit Total, Funds Remitted, and Difference.
Enter the amount of credits being used in the appropriate fields.
Page
19Click the Save button. If the total dollar amount entered matches the difference
calculated by CARS, the Submit button will appear. Click Submit. The Submitted box at
the top of the page will be checked and the submitted date will show today’s date.
Page
20You can also read