Standard Operating Procedure - SUSS MJB4 Mask Aligner - West Campus Cleanroom
←
→
Page content transcription
If your browser does not render page correctly, please read the page content below
Standard Operating Procedure
                        SUSS MJB4 Mask Aligner

Yale West Campus                        100 Cleanroom Core Facility
Cleanroom Core                                  300 Heffeman Drive
ywccleanroom.yale.edu                        West Haven, CT 06516

                                             Version 1.0, January 2018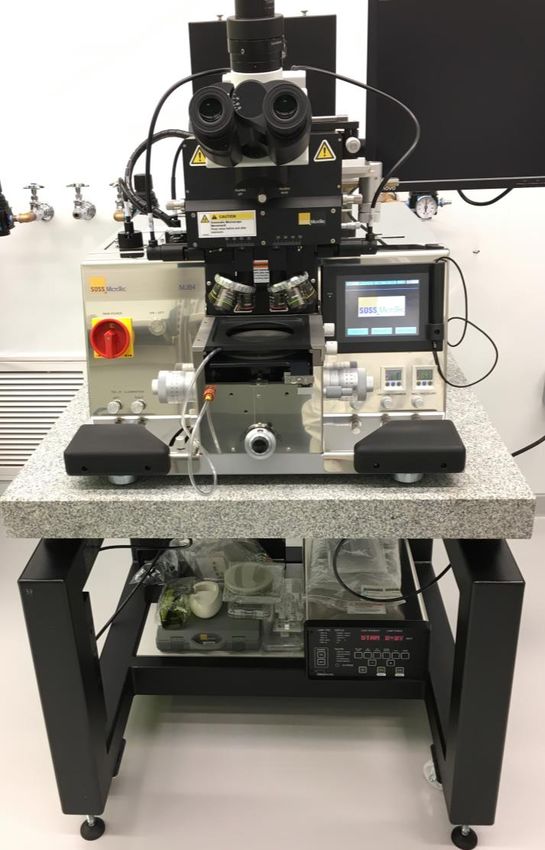
Table of Contents
1.    Logbook Sign-In ...................................................................................................................... 2
2.    System check ........................................................................................................................... 2
3.    Turn on the mask aligner ......................................................................................................... 3
4.    Perform Lamp Test .................................................................................................................. 6
5.    Load Mask ............................................................................................................................... 9
6.    Load Wafer ............................................................................................................................ 10
7.    Wedge Error Compensation (WEC) Setting Adjustment ...................................................... 12
8.    Mask Alignment and Exposure (Hard Contact mode) .......................................................... 14
9.    Unloading the Substrate and Mask ........................................................................................ 19
10.      Closing Mask Aligner ........................................................................................................ 20
11.      Logbook Sign-Off .............................................................................................................. 21

                                                                                                           Version 1.0, January 2018
                                                                            1
SUSS MJB4 Mask Aligner SOP
1. Logbook Sign-In
All users are requested sign in the logbook first.
2. System check
1) Check to make sure that the mask aligner in Power Off status
The machine is quiet
No light coming from UV lamp house
No LED lights on control units
2) Check on the wall behind machine to make sure that the N2, Compressed Air (CDA) and
Vacuum (VAC) valves are closed.
Note: report to manager immediately if any issues were found.
Version 1.0, January 2018
2
N2 VAC CDA
3. Turn on the mask aligner
1) Open N2, CDA and Vacuum on the wall. The bars should become parallel with ground:
Check to make sure the N2 pressure at 40 psi
Check to make sure the Air pressure at 80 psi
Warning: the mask aligner vibration damping air table is connected to the Air
outlet shared with the Zygo optical profiler on the left. Never disconnect the gas
line.
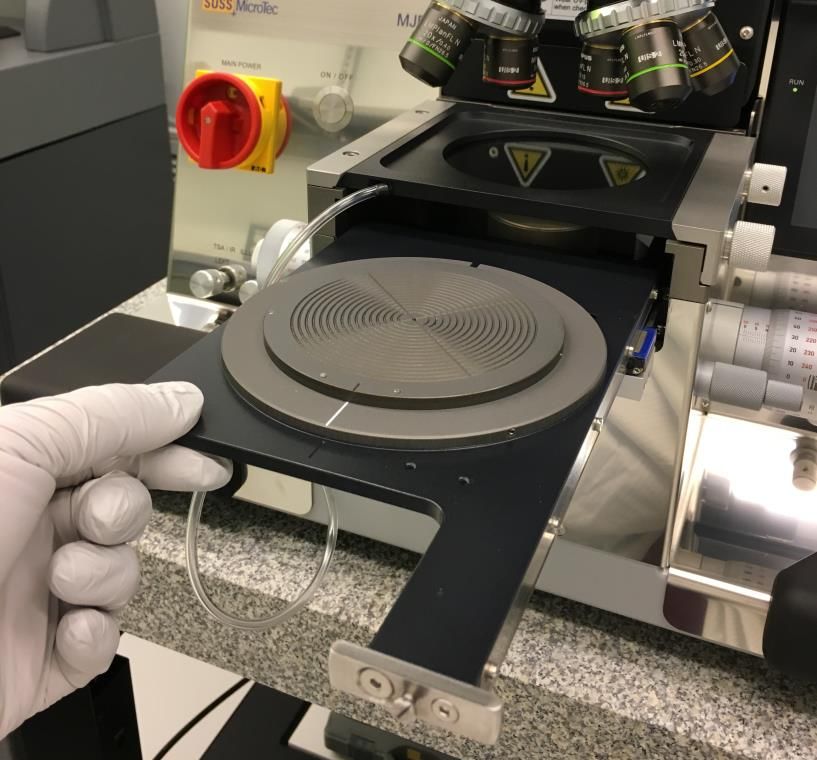
2) Turn ON MAIN POWER: rotate the red dial switch clockwise from flat OFF position
to vertical ON position on the left side of machine (see picture below).
Version 1.0, January 2018
3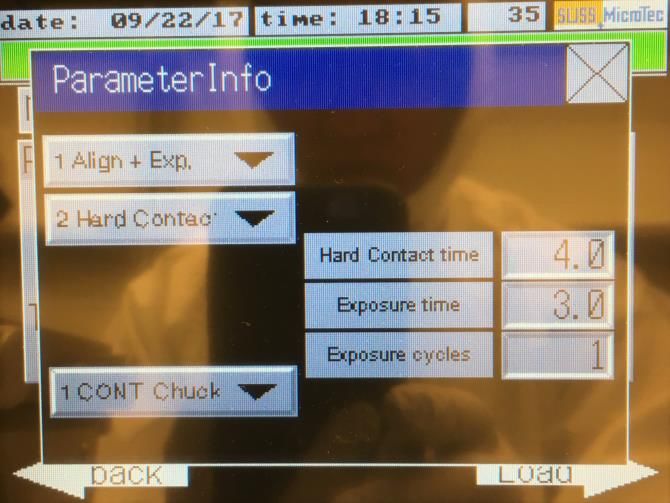
OFF                              ON

3) Wait until the small LCD display on the right side shows “start machine with ON/OFF
   button”.
4) Press the machine ON/OFF button on the right side of MAIN POWER dial switch.

5) Check the LED gauges below and above the touch LCD display.

                                                    LED
                                                    s

                                           Touch LCD

                                                       LED
                                                       s
                                                                 Version 1.0, January 2018
                                            4
Make sure the LAMP COOLING, VAC, N2 and CDA LEDs are all in green,
report to manager immediately if not.
Make sure the VACUUM CHAMBER and WEC PRESSURE LEDs are all
in green, report to manager immediately if not
6) Turn on the Lamp Power Supply unit on the bottom of the table: press ON button on
the control panel and wait to see READY on the digital display.
Make sure the LAMP TYPE highlights 350W Hg. If not, report to manager
immediately.
Warning: Never proceed if other power settings were chosen. The Hg lamp will
be burned with any wrong power settings. The cost of ~$10k will be charged to
user PI’s account.
7) Ignite Hg UV lamp:
Choose Constant Power (CP) mode by pressing button on the Lamp
Power Supply unit.
Wait until START appears in digital display.
Press START button as highlighted in above picture.
The LAMP LIFE/POWER LED will flash in FAILURE region, and the digital
display shows LAMP COLD
Wait for several minutes till digital display shows 0.0 (LIGHT INTENSITY)
and 275 Watt (LAMP POWER). The Hg UV light will be ignited.
Wait for additional 15 minutes until the UV light becomes stabilized before
proceeding to next step.
Warning: failure to follow the procedure will affect alignment resolution
and shorten Hg lamp lifetime.
Version 1.0, January 2018
5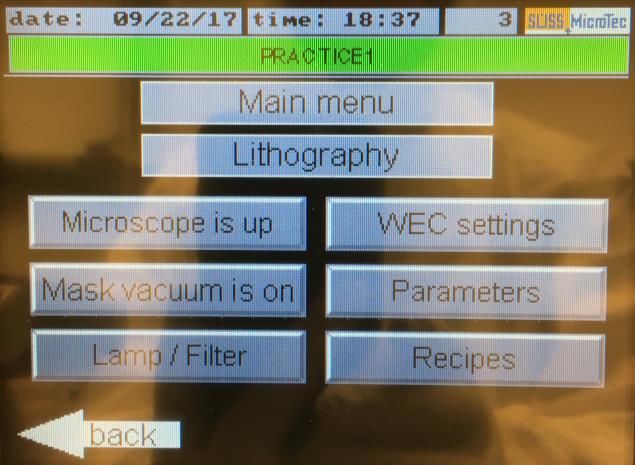
4. Perform Lamp Test
1) Press Main Menu on LCD touch screen below:

2) Touch Lamp/Filter button below:

3) Touch lamp test button below:

                                                Version 1.0, January 2018
                                         6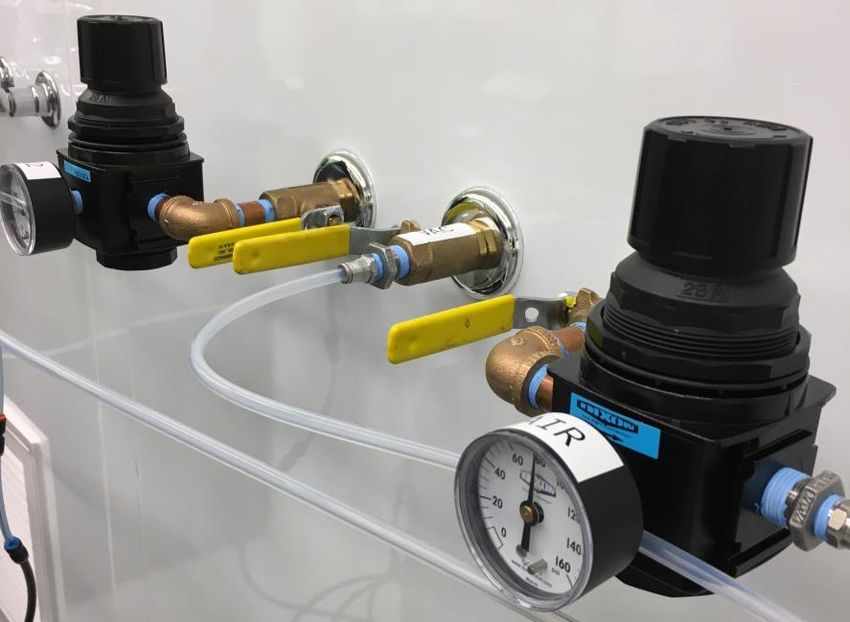
4) Follow the instruction on screen below to close contact lever.
Check to make sure the Separation Lever is at Contact (Cont) position;
Slowly push the lever forward until stopped at UP position. Once a click sound is
heard quickly stand away from the microscope to avoid being hit!
Warning:
Parts will be damaged if push the Contact Lever quickly.
UP position
Contact Lever
Separation lever
cont position
5) Put on the protective glass. Check to make sure that UV light comes out and covers
the mask and substrate holders. Do Not stare at the UV light without UV glass. Write
down the light intensity displayed in the power supply under the table; this will be used to
calculate the exposure time.
6) Once Lamp test is done, follow the instruction on touch screen below to open contact
lever:
Check to make sure the Separation Lever is at Contact (Cont) position;
Slowly pull the lever back to Down position. The microscope will slide to back
position.
Version 1.0, January 2018
7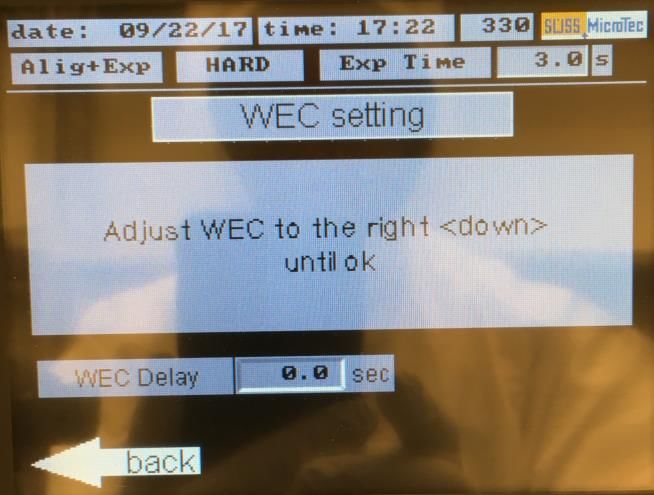
Warning: NEVER force to move if the Contact Lever is stuck. Maybe the Separation
   Lever needs to be switched to Contact (cont) positon.

                                                                   Down position

                           Separation lever

           cont position

7) Click back arrow on the screen to return to Main menu. The microscope will slide back.

                                                                  Version 1.0, January 2018
                                              8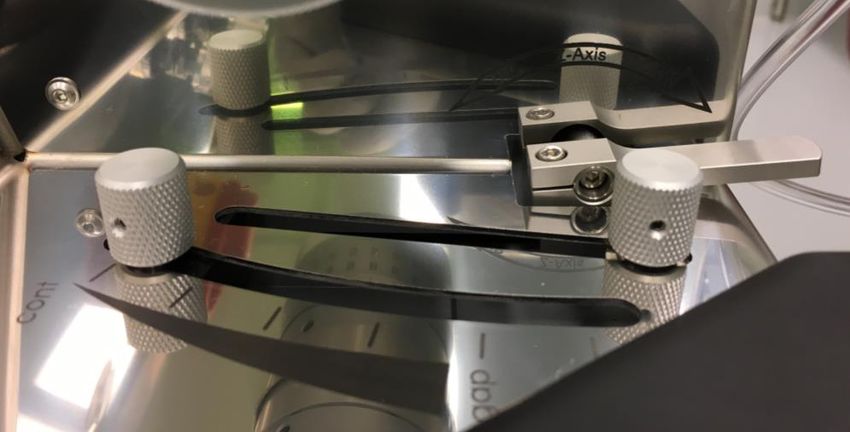
5. Load Mask
  1) Clean mask with IPA if necessary and dry with N2 in solvent hood.
  2) Loosen two knurled screws on the right side of mask holder frame and carefully pull
     the mask holder out from the alignment station.

                                         Mask holder

  3) Flip the mask holder with vacuum tubing on the right.
  4) Turn mask vacuum off: press and hold Mask Vacuum is on button on touch screen
     until Mask Vacuum is off appears.

  5) Carefully place the mask chrome side up (bronze color) with any ID markings on
     your left and the mask corner pressed against three stop screws on the holder corner.

                                                                 Version 1.0, January 2018
                                              9
Stop
screws
Vacuum tubing
on the right
6) Press Mask Vacuum is off button to go back to Mask Vacuum is on. The mask will
be sucked onto the holder. Flip the mask holder a little bit to make sure the vacuum is
indeed on and the mask cannot move.
7) Blow to clean the mask holder with N2 gun
8) Flip the mask holder back over and slowly slide it all the way back, and fix the mask
holder by hand tightening two knurled screws.
6. Load Wafer
Warning: this mask aligner can only hold the wafer size up to 4 inch. Never attempting
to load larger-size wafer which will damage the parts.
1) Slowly pull out the wafer holder until stopped.
2) Place the wafer with photo resist side facing up.
Version 1.0, January 2018
10wafer holder
3) Place the wafer orientation flat line (the longer one) against bottom stop screws with
the left edge resting against the third stop screw on the holder (see picture below)
4) Turn the holder slightly to align the bottom notch with the other two notches on the
bottom frame (see picture below)
Stop screws
Orientation line
notches
5) Press and hold the vacuum hand valve on the frame as highlighted below and
slowly push the holder all the way back and then release the vacuum hand valve.
Version 1.0, January 2018
11Warning: fail to follow above step will lead to wafer sliding off the position on the
holder.
wafer holder
Vacuum hand valve
7. Wedge Error Compensation (WEC) Setting Adjustment
Warning: WEC adjustment must be performed each time with a new mask or substrate
before substrate alignment and final UV exposure. Missing this critical step will lead to
part damage and charges (~$10,000) applied to user PI’s account.
1) Touch the WEC settings button below.
2) Follow screen instruction below to close the Contact Lever: make sure the
Separation Lever is at CONT position and push the Contact Lever forward slowly
all the way to UP positon.
Version 1.0, January 2018
123) Unlock the Thickness Setting Knob with the locking lever (on the top-right side of
the thickness setting knob).
4) Follow screen instruction below to “Adjust WEC to the left ”: slowly turn the
Thickness Setting Knob to the Up position (counterclockwise) as shown below.
Warning: Slowly turn the knob to avoid wafer crashing into mask.
Up Down
Locking
Lever
Thickness Setting Knob
Version 1.0, January 2018
135) Continue turning the Thickness Setting Knob counterclockwise several turns until
screen shows “Adjust WEC to the right until ok”.
6) Follow screen instruction above to “Adjust WEC to the right until ok”:
slowly turn the Thickness Setting Knob to the Down position (clockwise).
7) Make several turns until screen shows “WEC setting OK, Open contact lever”.
8) Lock the Thickness Setting Knob with the locking lever. Then follow screen
instruction to slowly pull the Contact Lever back to Down position and to go back
the Main menu screen.
8. Mask Alignment and Exposure (Hard Contact mode)
Note: Only Soft Contact and Hard Contact modes are available on our mask aligner. It is
highly recommended to choose Hard Contact mode for the best resolution (1~ 10 µm)
1) Create new recipe.
Touch Recipes on the Main menu screen to go to Recipe Editor screen below,
and touch blank screen to enable New button on the bottom.
Version 1.0, January 2018
14 Touch New button to pop up the keyboard, hit CLR button and put new recipe
name e.g. PRACTICE1 and touch ENTER to go back to Recipe Editor screen
Highlight the new recipe, e.g. PRACTICE1 and touch View button on the bottom
to check parameter settings in the Parameter Info window below:
Close the Parameter Info window to go back to Recipe Editor window
2) Change parameters in saved recipe.
Version 1.0, January 2018
15 Highlight the recipe in the Recipe Editor window below and hit Load on the
bottom right corner
The Main menu will be shown with the recipe name on the top highlighted in
green, e.g. PRACTICE1
Touch Parameters button to go to the Parameters menu screen with the recipe
name on the top highlighted in green, e.g. PRACTICE1
Version 1.0, January 2018
16 Edit parameters in the recipe:
Touch the dropdown list and choose the following settings from pop down list
1 Align + Exp
2 Hard Contact
Keep Hard Contact time at 4.0 sec
Exposure time and Exposure cycles can be adjusted by touching the
number and edit in the popup box.
The exposure time can be decided by following equation:
Exposure Time = Required Dose/Channel Intensity
3 CONT Chuck
Hit Load to go back to Main menu
3) Perform initial alignment.
Make sure the Separation lever is at CONT (Contact) position after WEC. If not,
slowly push it all the way forward.
Slowly push the Contact lever all the way forward to “UP” position. The microscope
will move down automatically.
Version 1.0, January 2018
174) The Exposure menu will appear on the touch screen.
5) Move Separation Lever down, away from CONT (contact) position. Otherwise, your
mask will be damaged by the movement of wafer. The photo resist will also be destroyed.
6) The Alignment menu will appear on the touch screen.
7) Microscope setup
Turn clockwise the TSA Illumination Left/Right knobs to find mask patterns on
the microscope monitor.
Adjust the coarse focus knob on the scope to focus on the mask.
a. Coarse focus b. Fine focus c. Split field mode
d. Intra-objective distance e. Rotation f. x/y stage movement
Version 1.0, January 2018
18 Select your desired magnification by rotating the objective turrets.
Use two fine focus adjustment on each side of the microscope to individually
correct the focus.
Two objective lateral translator knobs on each side of the microscope can be used
to move objectives relative to each other in x direction.
Note: Minimum separation between two objectives is 32 mm.
The micrometer on the upper right adjusts the yaw.
The microscope assembly can be positioned relative to the mask with the big
white knobs on the far upper right.
Note: the image in the eyepieces is rotated by 180 degrees.
Warning:
Microscope position cannot be changed when the microscope is up.
Forcing to do so will damage the parts
8) Align substrate with the mask by adjusting the stage X/Y and Theta knob.
9) After alignment, push the Separation Lever back to CONT (contact) position and the
Exposure menu will appear:
10) Press Alignment check button on the screen to allow program performing alignment
check on Hard Contact mode.
11) Hit Exposure on the screen to UV exposure on the substrate.
12) Select Yes on the screen.
Warning: stay away from the microscope which will move forward to start exposure. Put
on the protective glass and do not stare at the UV light.
13) After finish, follow screen instruction to pull the Contact Lever back to Down position.
The Main menu will appear on the screen.
9. Unloading the Substrate and Mask
1) Unload the wafer.
Press and hold the vacuum knob on the wafer holder, slowly slide the wafer
holder all the way out.
Remove the substrate using the tweezers; then push the holder all the way back
slowly.
2) Remove the mask.
Check to make sure Mask Vacuum is on. Note: Be careful and double check
vacuum is on, otherwise your mask may fall off when you flip the mask
holder.
Loosen two knurled screws on the right side of frame.
Slowly pull the mask holder out; flip it over and hold the mask.
Touch and hold Mask Vacuum is on button on the screen until Mask Vacuum is
off button appears.
Remove the mask and slide the mask holder back to alignment station.
Version 1.0, January 2018
1910.Closing Mask Aligner
1) Turn the TSA Illumination Left/Right knob counterclockwise until stopped.
2) Hit OFF button on the Lamp Power Supply to switch to STANDBY status
3) Press and Hold machine ON/OFF button until the touch screen show lamp cooling time
countdown from 600 seconds:
C
4) Wait 10 minutes until the lamp cooling by N2 is over and “start machine with
ON/OFF button” appears on the touch screen.
5) Turn OFF MAIN POWER: rotate the red dial switch from vertical ON position to flat
OFF position.
6) Close N2, CDA and Vacuum on the wall. The bars should remain vertical versus ground.
Version 1.0, January 2018
2011.Logbook Sign-Off
Users are requested to sign off the logbook and make comments for any concerns. Please
CONTACT cleanroom manager (Lei Wang at 203-745-8460) for emergencies.
Version 1.0, January 2018
21You can also read