TK7 1 - Tony Kuyper Photography
←
→
Page content transcription
If your browser does not render page correctly, please read the page content below
-1-

                TK7
            ©2019 Tony Kuyper

TK7 Panel                       ©2019 Tony Kuyper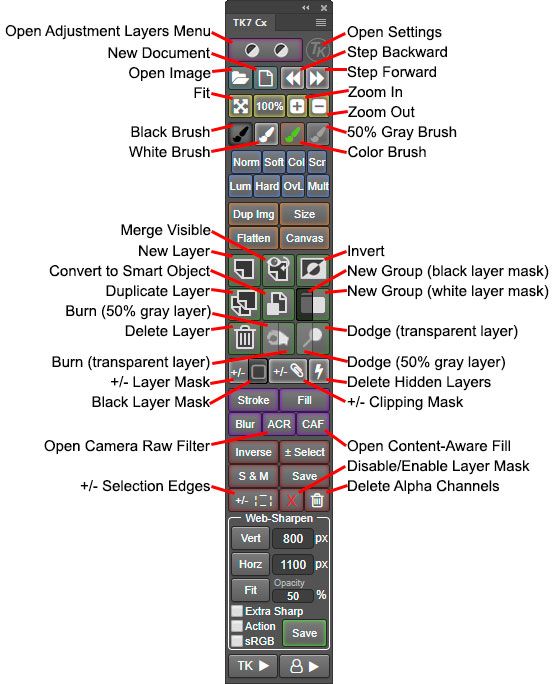
-2-
Table of Contents
Legal Notice / Acknowledgement 3
Overview 3
New Features 5
Very Important Information 10
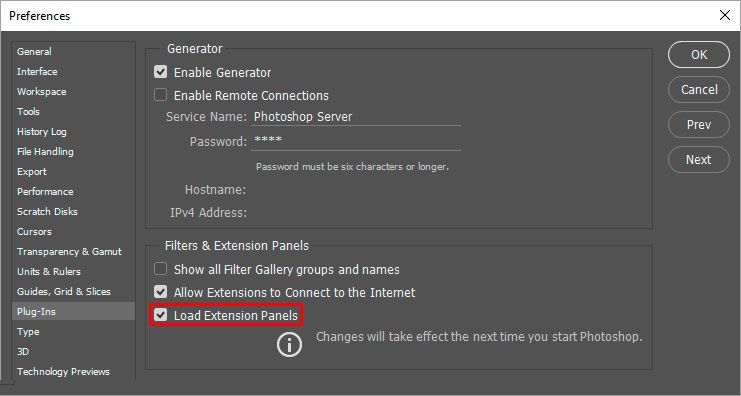
Installation 11
Features Commons to All Modules 12
Combo/Cx Modules 14
Web-Sharpen section 20
The TK► button−ACTIONS menu 23
The TK► button−COLOR menu 28
The TK► button−BLEND menu 32
The User► button 33
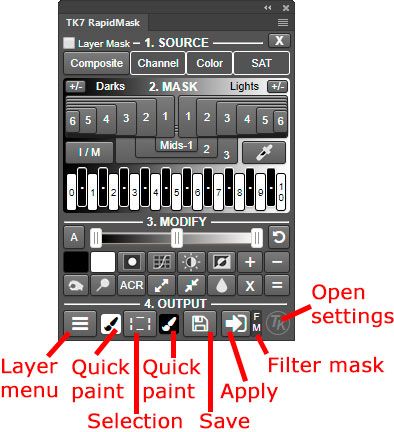
RapidMask Module 34
1. SOURCE 36
2. MASK 40
3. MODIFY 43
4. OUTPUT 49
Layer Mask Mode 53
User-Created Color Masks 55
Converting Color Images to Black and White 57
The "X" Button 58
Saturation/Vibrance 59
Saturation Painting 61
Batch Module 63
Workflow Considerations 64
Troubleshooting 66
NOTE: Button names are underlined in the sections that follow.
TK7 Panel ©2019 Tony Kuyper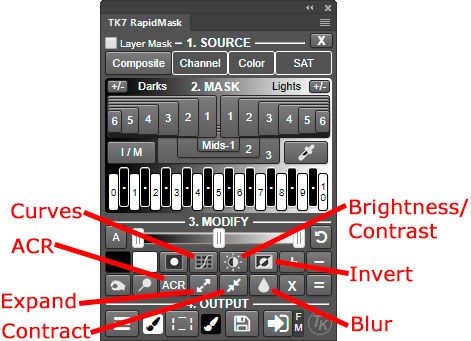
-3-

LEGAL NOTICE

The TK7 panel is copyrighted material (©Tony Kuyper). You may use the panel for
your personal work and enjoyment but transfer or sale is prohibited. If someone is
interested in using the panel, please have them visit my website www.Goodlight.us
to obtain it.

The terms TKActions, TK7, Rapid Mask, Luminosity Lock, and Quick Paint were
coined by Tony Kuyper and are trademarks of his products− TKActionsTM, TK7TM,
Rapid MaskTM, Luminosity LockTM, and Quick PaintTM.

Thank you for respecting the time and effort it takes to develop these techniques
and for showing the appropriate consideration for the intellectual property of
others. As always, please feel free to contact me if you have questions, comments,
or suggestions.

ACKNOWLEDGEMENT

The TK7 panel owes much to the many photographers who have contributed
suggestions and feedback. Thank you. Sean Bagshaw, André Distel, Luca Libralato,
Antonio Prado, Roy Yuan, Isabella Tabacchi, and Rafael Coutinho were the alpha-
testers and have provided valuable recommendations. The panel has also drawn on
the work of Alex Nail and Chris Tarantino. In addition, numerous websites and
videos have continued to influence and inspire my own workflow and panel-coding.
I have included their names in the pertinent sections when I remember them.

OVERVIEW

Since the publication of the original tutorial in 2006, luminosity masks have become
widespread and widely-accepted in the digital photographic community. From
initially intersecting selections, to 16-bit calculations, to the Infinity Mask and Zone-
Picker, and finally Luminosity Lock/Rapid Mask, TK panels have been the leading
innovator in integrating luminosity masks into the Photoshop workflow. The panel
continues to grow and evolve, and while luminosity masks are the primary masks
used by most photographers, the spectrums of masks created by the panel are no
longer limited to just luminosity. Component channels, color, saturation, and
vibrance can now be accessed in a similar manner. And unlike masks with hard or
mathematically feathered edges, pixel-based masks generated by the TK7 panel
are always self-feathering because they are generated from data encoded into
image's pixels. There is wide acceptance that pixel-based masks provide some of
the most natural selections for blending and adjusting images.

The TK7 panel once again improves the masking workflow. The Rapid Mask engine
continues to be the core process for creating 16-bit masks, but the computer code
and the way it interacts with Photoshop provides access to many new features.
One area of significant improvement is mask modification. The MODIFY section has
been substantially improved with a "single-slider" that quickly modifies a mask
using a Levels adjustment right on the module. This returns to the "infinity mask"

TK7 Panel                                                                ©2019 Tony Kuyper
-4-

concept pioneered in the TKActions V4 panel, but adds it directly to the panel
instead of having to open a Levels adjustment window. There are also new "color-
zones" that extend color masks to wider spectrums. This makes it possible to
select the "warm" or "cool" tones in the image with a single click. Finally, CMYK
masks were one of the last additions to the TK7 panel. They bring new colors to
the Channel masks spectrum, including the color black, and this black mask
essentially creates a new type of luminosity mask

In response to user requests, web-sharpening has been expanded. There are now
separate input fields for vertical and horizontal dimensions, and users can choose
which to use with any image. They can also use the "Fit" button to size their image
to fit in the dimensions defined by these vertical and horizontal inputs. These new
features are available in both the Combo/Cx modules and Batch module.

The TK7 layout will be very familiar to anyone using the TKActions V6 panel. There
are still two main modules: RapidMask and Combo/Cx. RapidMask is focused on
creating, modifying, and outputting masks. Combo/Cx runs Photoshop and
provides access to creative actions. The module names are the same, the colors
are the same, and button placement is mostly unchanged. However, buttons are
now 20% larger. This is possible because rollover help is no longer a constant
presence on each module. It's still available on demand by holding down the
ALT/option key, at which point it pops up either at the top or the bottom of each
module. But the user chooses when to display it instead of it always occupying
space on the module.

Workflow efficiency has taken on new importance in TK7. The compact, modular
design of the TKActions V6 panel is maintained. TK7 keeps its familiar, small
footprint and fits conveniently in any workspace. The Combo/Cx modules still
pretty much run Photoshop and Rapid Mask module makes all the masks. There's
no need to open multiple modules or to be constantly shifting to a different
interface or tab. Smart menus provide quick access to extra features and these
menus know when to close once they've served their purpose. TK7 adds extra
efficiency in the form of "Quick Paint" buttons that set up mask painting, a very
common process with luminosity masks. These one-click buttons complete five
tasks that would have required many more clicks with Photoshop.

New user options have been added to the RapidMask module. The first is "Keep
Channels panel clean." Checking this removes masks generated on the Channels
panel to insure smaller file size and to make manual cleaning unnecessary. There
is also now the option to auto-hide selection edges generated by loading a Rapid
Mask as a selection. The marching ants almost always get turned off to make
painting easier, so the panel will do it automatically now if this option is checked.

For those already using TKActions V6, TK7 will be a smooth transition to an even
easier workflow for luminosity and other masks. For those new to these advanced
masks, the panel's layout will help guide them through the process of building and
deploying masks in order to quickly start using them with their images. TK7 is

TK7 Panel                                                              ©2019 Tony Kuyper
-5-

designed to make luminosity masks easy for everyone, and to make sure there is
plenty of room to keep growing once you see what these masks can do.

NEW FEATURES

Updated Rapid Mask engine. The scripts that create masks in the MASK section
of the RapidMask module have been improved. Mask generation is about 20%
faster, though, this may be hard to actually notice since new masks already
appeared at near real-time speeds in the V6 panel. This feature is best appreciated
in masks that traditionally required multiple calculations, like Lights-5 and -6 or the
extreme ends of the Zone masks.

Single-slider modify. The RapidMask module's MODIFY section has been
completely redesigned. The most prominent new feature is a triple-handle slider
for making a Levels adjustment to any mask directly from the module. This brings
the infinity mask concept pioneered in the V4 panel directly to the module's
interface instead of having to open a separate window to perform the adjustment.
The handles on the slider are the same as Photoshop's Levels
adjustment−shadows, midtones (expressed as gamma), and highlights−and they
even move the same way, with the gamma handle automatically adjusting on the
slider when either the shadows or highlights are changed. Single-slider modify is
the easiest way yet to modify almost any mask. It's fast and efficient and is
available in Layer Mask Mode as well as the Rapid Mask Mode. In Layer Mask Mode
the adjustment affects the layer mask on the active layer. In Rapid Mask Mode, it
affects the current Rapid Mask being created on the Channels panel and viewed on-
screen. It's an obvious and intuitive addition to the module and will be easy for
anyone to use.

MODIFY options. In addition to single-slider modify, the MODIFY section of the
RapidMask module has several other changes that allow more precision control of
Rapid Mask modification. Burn and Dodge brushes have been added. These are
Photoshop tools that can now be easily accessed from the module. Dodging the
highlights is a great way to make light gray areas of the mask lighter or white
without affecting the midtones and shadows. Similarly, burning the shadows
makes dark gray areas of the mask black without affecting highlights and midtones.
So Burn and Dodge can be useful for making the mask more pure black and white
in those situations where a mask with more contrast would be helpful.
    The MODIFY section also now has its own black and white brushes for painting
black and white directly on the Rapid Mask. This makes it easy to create conceal
and reveal in the mask in large areas with a few brushstrokes. Burn/Dodge and the
Black/White paintbrushes allow highly customizable masks since users are able to
apply these effects exactly where they want.
    Another new feature in MODIFY is the Mask the Rapid Mask button. This allows
users to better create a mask of just those parts of the image that should be
affected by the mask, for example, the sky and clouds in a landscape image. The
selection can be made using a selection tool, like the Lasso or Marquee, or it can be
made by loading a saved selection from the Channels panel. Once there's an active

TK7 Panel                                                               ©2019 Tony Kuyper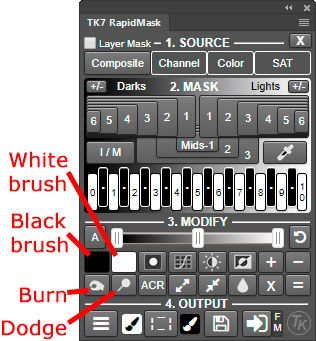
-6-

selection, click the Mask the Rapid Mask button. The non-selected areas turn black
in the mask effectively concealing that entire part of the mask from affecting the
image when the mask is deployed.
     There is a new Brightness/Contrast button in the MODIFY section that allows
this type of adjustment to directly affect the Rapid Mask, like Curves and Single
Slider Modify, which are also present in the MODIFY section. Finally, there is a new
ACR button in the MODIFY section that brings the full power of Photoshop's ACR
filter to be used to adjust the Rapid Mask.

CMYK channel masks. The SOURCE > Channel menu has four new mask options
corresponding to the CMYK channels. These masks can potentially be a good
starting point where cyan, magenta, or yellow is the dominant color in the image.
I've only started playing with these masks, but they look interesting. They provide
another way of creating masks specific to colors in the image. Because CMYK is a
subtractive color model, the actual masks from an image in CMYK Color mode need
to be inverted as Rapid Masks when brought into an image in RGB Color mode. The
panel takes care of this atomically. It creates the necessary duplicate image in
CMYK Color mode, extracts the channel mask (C, M, Y, or K), inverts it, and then
displays it on-screen as the Rapid Mask. It's generally obvious when looking at the
CMYK masks that they are brightest in the colors they target and darkest in the
"opposite" color on the color wheel. However, one consequence of inverting the
actual CMYK channel masks for proper viewing in RGB Color images is that dark
tones without any color end up showing lighter in the mask than would be
expected. For example, nearly black objects might show more as a gray color in
the Yellow channel mask instead of being black, as expected. However, true yellow
objects in the Yellow mask will still show as a much lighter gray tone or even white
    One of the most intriguing CMYK masks is the Black mask. Unlike a luminosity
mask that takes into account color when calculating tones in the mask (yellows are
lighter than blues), the CMYK Black mask disregards all color and only shows the
black (K) value of pixels in the image. A dark, saturated blue color might show up
as a lighter gray tone in a Darks-series luminosity mask, but it will be completely
black in a CMYK Black mask. My initial experiments show this could be a significant
advantage in making the correct mask for exposure blending. The Black mask isn't
contaminated with color and therefore shows less feathering across the image.
However, it does a great job of separating out the light and dark parts of the image
with nearly perfect feathering in the (sometimes tricky) transition zone.

Color-zones. There are also new masks on the SOURCE > Color menu on the
RapidMask module. These six new "color-zones" stretch the color selections across
wider ranges of color in the image. At first this might seem counterintuitive.
Usually the goal is to make masks more specific and less general. However, the
new color-zones are always adjacent colors on the color spectrum, and some of the
new groupings are particularly useful. The Yellow-Red color zone, for example, is
an easy way to select the warm tones in the image. And the Blue-Cyan color zone
selects the cool colors. But all the zones are worth a bit of experimentation. It's
often surprising which works. For example, Cyan-Green might be a good choice for
ocean water in some lighting situations, and Green-Yellow is good for foliage, which
often contains a considerable amount of yellow. It's important to note that these

TK7 Panel                                                            ©2019 Tony Kuyper
-7-

new color zones are NOT merely combinations of the previous Color Range masks.
They are separate calculations that are highly specific for the colors in that
particular range. The new color zones provide a great starting point for making
masks if color is the primary criterion for making a selection. Unlike luminosity
masks which only have two options, Lights and Darks, color zones have six. So the
initial mask already has a more exact choice than the binary options with luminosity
masks. And once the initial color zone mask is made, the full spectrum of Lights,
Darks, and Zone masks can be made using the data locked in for that mask. So in
terms of precision and options, the new color zones have a lot to offer. My own
experience in using them indicates they work best when selecting more saturated
colors in the image. They can easily be used to adjust color brightness and
contrast, and, when added as a layer mask on a Selective Color adjustment layer,
provide precision control over subtle color modification.
     The previous Color Range masks are still present in the TK7 panel.

Keep Channels panel clean. This is a new checkbox option in the settings for the
RapidMask module. The Rapid Mask process creates two new channels on the
Channels panel ("Lum Lock" and "Rapid Mask") as a "memory" for creating
luminosity and other masks. In previous versions of the panel, these memory
channels persisted until the user intentionally deleted them. In some situations
this can be helpful since the Rapid Mask could be reused for multiple output options
without having to recreate it. However, some users always wanted to start with a
fresh mask anyway. The "Keep Channels panel clean" option lets users choose
which they prefer. The default is to have this option unchecked so that the memory
channels are NOT automatically deleted. This mirrors the behavior of these
channels in the V6 panel. Checking this option will delete these channels anytime
an output (except for the Save option) is invoked or when turning off Layer Mask
Mode by un-checking the "Layer Mask" checkbox and returning to Rapid Mask
Mode. These are the times when it's most likely that the user would prefer to have
the Channels panel cleaned of masks generated by the panel. NOTE: The Save
output button does NOT clean the Channels panel because when saving the mask,
the user often still wants to immediately use the mask for some other output
purpose with one of the other buttons in the OUTPUT section.

Auto-hide selection edges. Because the RapidMask module provides an
integrated 16-bit workflow, selections from luminosity masks are less necessary
than in previous versions of the panel. The most common use for them is to paint
through them so that the active selection guides where paint lands on a layer mask
(mask painting) or on a pixel layer (luminosity painting). In both these cases it's
advantageous to have the selection edges (marching ants) turned off so they don't
interfere with user's evaluation of how the painting is affecting the image. As such,
there is now a setting in the settings window called "Auto-hide selection edges"
that, when checked, automatically hides the selection edges for selections created
using the Selection output option. It's recommended to leave this settings
checkbox checked unless you prefer to see the selection edges and to turn them off
manually if you if don't want them. Even without the selection edges appearing,
the active selection indicator still turns on to provide an indication that the Rapid

TK7 Panel                                                             ©2019 Tony Kuyper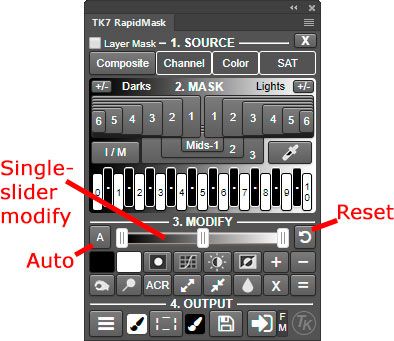
-8-

Mask has successfully been loaded as a selection and that the selection is active
and ready to be painted through.

Quick Paint buttons. As mentioned above, one of the most common uses of
luminosity masks is to make a selection from a mask and then paint through that
selection onto a layer mask to either reveal or conceal the contents of that layer.
The new Quick Paint buttons on the RapidMask module significantly improve the
efficiency of preparing for mask painting. There are two Quick Paint buttons: a
White Mask/Black Brush button and a Black Mask/White Brush button. If mask
painting is the goal, one of them can be clicked AFTER using the Selection button to
load the current Rapid Mask as a selection (that's why they're located next to the
Selection button). Both buttons do five tasks in a single click:

1) Creates a layer mask on the active layer that matches the background
color of the button. A white background on the button means the layer mask is
also white, indicating that it is a Reveal All mask, revealing all contents of the layer.
The black background button creates a black, Hide All layer mask to completely
hide all contents of the layer.
2) Activates the Paintbrush tool.
3) Sets the brush color to the opposite color of the mask (the color of the
brush icon on the button). This allows painting through the active selection to
counter what the mask is doing, which is the primary purpose of mask painting.
4) Makes the layer mask the active painting canvas. This insures the paint
goes on the mask on not on the image.
5) Makes sure the active layer's visibility is turned on. It's important to be
able to see the layer in order to evaluate the mask painting on the overall image.

Now all that's left to do is choose the brush size and opacity and start painting on
the on-screen image. Everything else has been taken care of by the Quick Paint
button.

Filter mask. The Apply output button now has a small secondary option designated
"FM" to make filter masks instead of layer masks. Filter masks are only available
on Smart Object layers where there are smart filters already present. A filter mask
filters the smart filters according to the mask. The rest of the Smart Object is
unchanged. So a filter mask on a smart object layer can actually take the place of
two or more pixel layers depending on the filters that are applied. It's a somewhat
advanced application and will be most useful to users already familiar with Smart
Object layers.

Multi-dimension web-sharpening. Several users requested independent
dimensions for vertical and horizontal images for web-sharpening. This is now
available in the Combo/Cx and Batch modules with separate input boxes for the two
dimensions. It allows users to enter both vertical and horizontal dimensions and
then resize and sharpen their image to correspond to the dimension of their
choosing. The "Fit" button is also still available. It now resizes and sharpens the
image to fit in a box defined by the Vertical and Horizontal input values. This

TK7 Panel                                                                ©2019 Tony Kuyper
-9-

should be a useful addition for users who sharpen landscape and portrait images to
different dimensions when preparing them for the web.

New/Updated Actions. There are several new actions in the TK► menu:

1) Freehand vignette. After creating an outline of the desired vignette using the
Lasso tool, this action turns it into an actual vignette for the image. The action
stops at the Gaussian Blur to allow setting the blur radius of the vignette that best
matches the image.
2) Spotlight. This action is sort of the opposite of the freehand vignette. The
user again first uses the Lasso tool to select part of the image. Then, clicking this
menu item creates a spotlight affect within the selection. The Gaussian Blur dialog
again opens to allow for adjusting the size of the blur radius.
3) RBG ↔ Lab. For those who like to use LAB Color mode for some adjustments,
this action creates the LAB workspace as a smart object and then can also save the
LAB adjustments back to the smart object in the original document.
4) Dehaze. This is an action Sean Bagshaw contributed to the panel that sort of
works like the dehaze feature in ACR/LR. It increases saturation and contrast in a
manner that cuts through atmospheric haze but without the color shift that
sometimes accompanies the ACR/LR slider. It's also adjustable after the action
runs.
5) Add Color. While this action has been available in the previous version, it now
uses a new method that allows previewing the effect the color will have on the
image and even the ability to change the color later on.

Updates on all modules. Several features have been upgraded that affect the
interface on all modules. These are meant to improve the user experience when
using the panel.

1) Buttons are 20% larger. Easier to see, easier to click.
2) Rollover help. This is now accessed by holding down the ALT key (Mac: option
key) and rolling the mouse over a button or feature on the panel. The help
message for that button will then appear at the top or bottom of the module.
NOTE: Do NOT click on the button when the ALT/option key is depressed. Simply
roll the mouse over the button to see the help message.
3) More icons. Icons have replaced written button names in many places to
create a cleaner look and to provide a more universal interface since TKActions
users speak many different languages. If you're not sure what an icon means, roll
the mouse over the button while depressing the ALT/option key. The help message
that appears will tell you what the button does.
4) Settings access. There are two ways to access the settings for a module.
    a) Click the "TK" icon on the module
    b) Click "Settings…" from the fly-out menu in the upper right corner of the
        module.
Settings are where the module's language, color, and active selection indicator can
be customized to the user's preference.

TK7 Panel                                                             ©2019 Tony Kuyper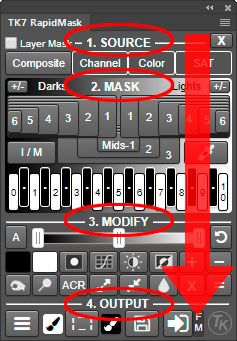
- 10 -

5) Easy update. Settings from the previous V6 panel are automatically imported
when the TK7 modules are installed. Language choice and personal action names
transfer from the previous version.

FIRST UPDATE: September 2019. After the TK7 was released, additional
improvements were added.

1. Image/Mask (I/M) toggle button. Instead of two different buttons to switch
between the image view and the mask view, the updated version now has just one
I/M button that does both. If the mask is being viewed, the I/M button switches to
a view of the image, and if the image is displayed on−screen, the I/M button
switches to a view of the mask. This makes it easy to quickly switch between the
mask and the image by pressing the same button repeatedly.

2. My Channels. The SOURCE > Channel menu in the RapidMask module has a
new item at the bottom called "My Channels." Clicking it opens a new window on
the module that lists the user's alpha channels by name that have been saved on
the Channels panels. An Active Selection button and a Current Layer Mask button
are also displayed in the new window if these items are present in the current state
of the image. When one of these buttons is clicked, that channel (or active
selection) becomes the new Rapid Mask in the Rapid Mask engine. Once this
occurs, then all the buttons in the MASK, MODIFY, and OUTPUT section of the
module can be used with it. My Channels is a great way to bring the user's
personal masks into the Rapid Mask process for calculations using the mask
calculator or for outputting using the buttons in the OUTPUT section.

3. Infinity Color Masks. The Choose item in the SOURCE > Color menu has
been repurposed to allow users to create highly accurate and infinitely adjustable
masks based on color. These masks are essentially a "Magic Wand" tool specifically
for color. They are very much like luminosity masks except they are based on color
instead of pixel brightness. Like luminosity masks, these new color masks feather
seamlessly into the surrounding colors. Luminosity masks opened a whole new way
to adjust images based on tonal brightness, and these infinity color masks will do
the same thing for color.

VERY IMPORTANT INFORMATION

1. The TK7 modules only work in Photoshop CC. The advanced features
cannot be programmed into panels that work in Photoshop CS6. For CS6 users, the
TKActions V5 panel is still available on the Panels & Videos page.

2. Properly set up the working color space. There is a PDF called "Setting Up
the Color Working Space" in the download folder. It explains how to properly set
the color and gray working spaces in Photoshop. Be sure to read it and implement
its recommendations to get the best results when using luminosity masks.

3. The actions in the panel are meant to be used in RGB and Lab color
modes. While some actions will work in Grayscale and CYMK, the buttons have

TK7 Panel                                                            ©2019 Tony Kuyper
- 11 -

only been tested in RGB and Lab. Not all buttons will work in Lab because
Photoshop doesn't allow that particular function. For example, it's not possible to
create a Black and White adjustment layer in Lab. As such, the menu item to
create a masked Black and White adjustment layer only works in RGB color mode.
Nothing will happen if you click it in Lab Color mode.

4. Rapid Mask speeds will vary. The Rapid Mask engine significantly speeds up
the process of generating pixel-based masks, but speeds will vary depending on
factors such as computer speed, image size, and available memory. SOURCE
masks take longer to generate than the spectrum masks in the MASK section.
Once a SOURCE has been selected, though, spectrum masks are generated up to
90% faster than previous methods. The Rapid Mask engine also makes deploying
the mask very fast since all the calculations have been completed for the mask
when the mask is generated.

6. Give the actions time to complete their steps. While the panel increases
speed and efficiency of many functions, it's important to keep in mind that
Photoshop is still executing numerous steps in the background each time a button
is clicked. Some of the multistep actions called by the panel are memory-intensive
and still take considerable time to execute. At other times, buttons will not work
because there is a condition, like an open dialog window, that precludes any
Photoshop function from running, including buttons and actions in the panel. While
the panel itself is nearly impossible to break, it is possible to push buttons too
rapidly or at the wrong time and end up creating error states in Photoshop. It
should be infrequent, but it's not impossible. If you do notice a predictable and
repetitive error, please contact me so I can fix it.

INSTALLATION

There are installer files in the download folder as well as instructions on how to use
these installers. Please be sure to read the installation PDF before installing.

NOTE: If you have the TKActions V6 panel and are using the User ► actions, you
can continue using the same action set on your regular Photoshop Actions panel.
Just double click the "TK-V6-Actions" name on the action set and change it to
"TK-User-Actions" instead. Do this before installing the TK7 panel. The TK7 panel
will then see that you have your actions already installed when it opens and will use
them when you click one of the actions in the User ► menu. Any custom names
you have entered for these actions on the Combo/Cx V6 modules will transfer
automatically to the TK7 modules

TK7 Panel                                                              ©2019 Tony Kuyper
- 12 -

FEATURES COMMON TO ALL MODLES

                       Settings−All modules have settings specific to that module.
                       To access them, click the "TK" icon on the module or click
                       "Settings…" from the fly-out menu in the upper right corner
                       of the module. The settings window is the place to set the
                       module's language, color, and active selection indicator.

                       Rollover Help−Most buttons and functions on the modules
                       have instant rollover help available (image at left). Simply
                       hold down the ALT key (Mac: option key) and roll the mouse
                       over a button. A pop-up help message will appear either at
                       the top or the bottom of the module that describes what it
                       does or how to use it. NOTE: Do not click on the button to
                       access the help message. Simply roll the mouse over the
                       button while holding down the ALT/option key.

                       Active Selection Indicator−Each
                       module has a built-in active selection
                       indicator. This indicator turns on
                       whenever there is an active selection.
                       Its purpose is to remind the user that
                       an active selection is present even if
                       the marching ants have been purposely
                       turned off or if the degree of selection
                       is not sufficient to generate marching
                       ants, such as the Midtones-1 selection.

                       The settings window for each module,
                       accessed by clicking the "TK" icon or
                       via the module's fly-out menu, includes
                       four options for displaying the active
                       selection indicator: Fixed, Pulse,
                       Animated, and Off (image at right).

                       "Fixed" is the default setting (image at
                       left). In this mode, the active selection
                       indicator displays as a series of red dashes across the top of
                       the module when there is an active selection. The "Fixed"
                       setting is a good choice to start. It generally does not
                       require additional CPU resouces when it displays on a
                       module.

The "Pulse" option is the same graphic as the "Fixed" option, but it blinks on and off
every second to provide a more visible reminder that there is an active selection.

TK7 Panel                                                              ©2019 Tony Kuyper
- 13 - The "Animated" option (right) displays as a scrolling series of small black and white dashes similar to the marching ants that surround selections in Photoshop. The continuous movement associated with this option makes it a more obvious reminder that there is an active selection. However, the Adobe architecture for extension panels requires more CPU resources to display the moving gif image of the "Animated" option. While one animated gif on one module won't make a noticeable difference in computer performance, multiple gif images on multiple open modules might. My basic strategy for selection indicators is to use "Pulse" on all modules. "Animated" is a bit more visual, but can take up extra resources. If you want to use "Animated" for the selection indictor, just use it on one module and set the other modules to "Fixed," "Pulse," or "Off." TK7 Panel ©2019 Tony Kuyper
- 14 -

COMBO/CX MODULES
                        The Combo and Cx modules perform identical
                        functions. They just have different layouts so
                        the user can choose a configuration that
                        works best for them.

                        The Combo module (left) is the same width
                        as the RapidMask module. This makes for
                        aligned stacking in a dedicated panel dock in
                        Photoshop

                         The Cx module (right) is tall and skinny and
                         is meant to be used in a different fashion.
                         This "toolbar" layout is similar to the
                         Photoshop Tools panel. It can be
                         conveniently tucked to the side of the
                         workspace so that it's functions are always
                         available but with a minumum horizonital
                         footprint to allow maximum space for working
                         on the image. While it's still best to put the
Cx module in a dedicated dock to insure proper interaction with the
image workspace, it will take up less than half the width of the
stacked Combo/RapidMask module. When using the Cx module,
stacking it in the same dock as the RapidMask module is usually not
recommended. They are different widths and will not align properly
resulting in wasted space. Instead, when using the Cx module, it's
usually best to dock the RapidMask module ABOVE Photoshop's
Layers panel. Since it's not needed all the time, RapidMask can be
minimized to just it's tab by double-clicking on the tab. Whenever
RapidMask is need, single-clicking its tab will instantly maximize it.
This makes Cx available all the time while still having RapidMask
quickly available when it's needed. This video by Sean Bagshaw
provides a detailed and excellent overview on how to create a custom
workspace with these different modules.

The Combo/Cx modules have buttons for menu commands, keyboard
shorcuts, and pop-up menus from various other standard Photoshop
panels. In addition to running many common Photoshop functions,
the modules have menus for creative actions. The purpose of the
Combo/Cx modules is to provide quick-click access to these different
functions.

TK7 Panel                                                               ©2019 Tony Kuyper
- 15 - The Combo/Cx modules use a variety of icon buttons for different commands. The image below provides details for what each icon and abbreviated button means. The color of the border shadow for each button helps group buttons with similar function together. It can be dimmed or brightened using the slider in the module's settngs. Many of the buttons are self-explanatory, but rolling the mouse over any button while holding down the ALT key (Mac: option key) displays its function in a pop-up help window. These help tips are especially useful when first starting to use TK7 Panel ©2019 Tony Kuyper
- 16 -

this module in order to learn the functions of the icon buttons. When there is an
active selection, an active selecton indicator displays at the top of the module.

There is information on each button below (the color refers to the
button's border shadow color). Images of the Cx module are shown here,
but there are corresponding buttons and menus on the Combo module.

                 The one magenta button at the top opens a pop-up
                 menu of adjustment layer buttons. Simply rolling over
                 this button with the mouse will open it. The icons on the
                 buttons match Photoshop's adjustment layer icons.
                 These adjustment layers will be created with a white,
                 Reveal All layer mask unless there is an active selection.
                 If there is an active selection (like a luminosity selection)
                 when one of these buttons is clicked, that selection is
                 incorporated into the layer mask for the adjustment layer
                 created. Only adjustment layers permitted by Photoshop
                 in the current color mode of the image can be created.
                 For example, an image in Lab color mode cannot have a
                 Selective Color adjustment layer created for it because
Photoshop does not allow this. Once an adjustment layer is created, the
Properties panel automatically opens so the user can make the desired
adjustment. New in the TK7 module is the ability to somewhat choose
where the new adjustment layer is inserted in the layer stack. The
default placement for the new adjustment layer is directly above the
current active layer. However, sometimes, like when working INSIDE a
group of layers, the goal is to make a new adjustment layer OUTSIDE the
group, and the default won't do that. Simply clicking one of the
adjustment layer buttons always places the new layer INSIDE the group if
the current active layer is inside group or if the group layer itself is
active. To change this default behavior, CTRL/command+click on the
adjustment layer button instead. Doing this automatically inserts the
new adjustment layer at the TOP of the layer stack OUTSIDE any groups
that may exist on the Layers panel.

Cyan buttons make documents available.
Open−Opens the dialog for opening an existing image.
New document−Opens a dialog for creating a new document.

White buttons
Near the top on Cx, in the middle on Combo:
Undo−Steps back sequentially through the Photoshop history
Redo−Steps forward through the Photoshop history.
In the center on both Cx and Combo:
+/- Layer Mask−Removes a layer mask if one is present on the active layer and
adds a layer mask if there is none. If there is an active selection when a layer mask
is created, the selection is incorporated into the layer mask. Half of this button has

TK7 Panel                                                                ©2019 Tony Kuyper
- 17 - a translucent black overlay. If this part of the button is clicked, a black mask (Hide All) is added to the current active layer. +/- Clip−Turns the previous layer into a clipping mask for the active layer. Clicking the button a second time releases the clip. Delete Hidden Layers (lightning bolt)−Removes all layers from the Layers panel whose visibility (the eyeball) has been turned off. Yellow buttons determine how the image is displayed by Photoshop. Fit−Fits the image in the existing image window space. 100%−Displays the image so one pixel in the image is displayed as one pixel on the monitor. Plus sign (+)−Zooms-in Minus sign(-)− Zooms out BRUSH ICON BUTTONS: Black brush/white brush buttons−These buttons select the Brush tool and set the foreground to that button's color−black or white. The background color is set to the opposite color. There is a lot of mask-painting that happens with either black or white paint when developing an image in Photoshop. These buttons provide a quick way to choose the desired paint color without clicking back and forth using the "D" and "X" keys. Color brush−This button selects the Brush tool and opens the Photoshop Color Picker so the user can select their desired color, usually by clicking somewhere on the image. The foreground and background colors are set to the selected color. The Color brush can be used to paint color on different layers. Gray brush−This button selects the Brush tool and sets the foreground and background colors to 50% gray. The gray brush is a precision eraser for pixel layers set to Soft Light, Hard Light, or Overlay blending modes. For layers with these blending modes, 50% gray is transparent. So painting this "color" on such a layer essentially creates transparency and reveals the contents of the layers below. The Gray brush can be used to undo or refine layer painting procedures, like burning and dodging. Blue buttons change the blending mode of the active layer. The button name determines the blending mode. If more than one layer is selected, only the blending mode of the topmost layer is changed. In order to save space, these buttons collapse to an abbreviated name on the module. Rolling the mouse pointer over one of these buttons instantly expands it to a more complete name. The expansion and contraction of these buttons can make them jump around a bit. It's best to roll over these buttons approaching from either above or below. Sliding the mouse along the row sometimes means they can jump in and out from under the mouse pointer. Approaching and rolling over from above or below expands the correct button so it can be appropriately clicked. Orange buttons affect the dimensions or resolution of the image. These are useful in preparing an image for printing. TK7 Panel ©2019 Tony Kuyper
- 18 -

Dup Img−Creates a duplicate of the current image.
Size−Opens the Image Size dialog so the image can be resized to the desired
output size and resolution.
Flatten−Flattens the layers of the active image, often to facilitate resizing
and sharpening.
Canvas−Opens the Canvas Size dialog window.

Green buttons are generally associated with operations performed on layers
in the Layers panel. These are all icons, so it may take a bit to learn all
their functions. Use rollover help function by holding down the ALT key
(Mac: options key) to quickly see what each button does
New Layer−Creates a new, empty pixel layer. The default insertion point
for the new layer is directly above the current active layer. To insert the
new layer at the top of the layer stack, hold down CTRL/command when
clicking this button.
Merge Visible−Merges the current active layers into a new pixel layer. It's
often a good idea to use the New Layer button first to make a blank pixel
layer at the top of the layer stack to insure that the Merge Visible button
creates the merged layer in a position where it will not be affected by any
adjustment layers above it.
Invert−Inverts the contents of the layer. On adjustment layers and group
layers, the contents of the layer mask are inverted. On pixel layers without
a layer mask, the pixels are inverted. On pixel layers with a layer mask,
the element contained within the layer's framing brackets is inverted.
Duplicate Layer−Duplicates the active layer. If the active layer is a smart
object, the duplication process runs the "New Smart Object via Copy" so
that the embedded object in the new duplicate smart object layer is
independent of the original smart object.
Smart Object−Creates a smart object of the current active layer.
Group−Puts the selected layer or layers into a group. More than one layer
can be selected to be included in the group. If there is an active selection,
it is turned into a mask for the group. If there is no active selection, then
the group is given a white (reveal-all) layer mask. The left half of this
button has a black overlay. Clicking this part of the button creates the
group layer with a black (Hide All) layer mask. The Group button is
particularly useful for the masking-the-mask technique described in Sean
Bagshaw's videos.
Delete Layer−Deletes the active layer. This is a particularly useful button
for experimentation. If an experiment doesn't work, click the Delete Layer
button and try something else. If multiple layers are selected they are all
deleted.
Burn−Creates a "Burn" pixel layer set to Soft Light blending mode for painting black
to darken image contents below the layer. Once the layer is created this action
also selects the Brush tool and changes the foreground color to black in preparation
for burning. A transparent layer is created by the right half of the button. A
transparent burn layer makes it easy to Ctrl+click (Mac: command+click) on the
layer thumbnail to create a selection of its contents, which can be useful for
additional adjustments and masks. The left half of this button has a gray overlay.

TK7 Panel                                                            ©2019 Tony Kuyper
- 19 -

Clicking the gray half of the button fills the layer created with 50% gray. This can
be useful when turning off the visibility of other layers to see what has been
painted on the Burn layer. While the user can choose between a transparent and
50% gray Burn layer, the actual results of painting on this layer will be the same.
Dodge−Creates a "Dodge" pixel layer set to Overlay blending mode for painting
white to lighten the contents below the layer. Once the layer is created this action
also selects the Brush tool and changes the foreground color to white in
anticipation of dodging. The button can create two different types of
layers: transparent and gray-filled. A transparent layer is created by the
right side of the button. Transparency makes it easy to Ctrl+click (Mac:
command+click) on the layer thumbnail to create a selection of its
contents, which can be useful for additional adjustments and masks. The
left half of this button has a gray overlay. Clicking the gray half of the
button fills the layer created with 50% gray. This can be useful for turning
off the visibility of other layers to see what has been painted on the Dodge
layer. While the user can choose between a transparent and 50% gray
Dodge layer, the actual results of painting on this layer will be the same.

Purple buttons are some miscellaneous functions. These actions need to be
allowed by Photoshop in order for the buttons to work. If nothing happens
when a button is clicked it means that Photoshop cannot perform the
action. Example: A Gaussian Blur is not possible on an adjusment layer
without a layer mask.
Stroke−Opens the Stroke dialog window. There are lots of rules in
Photoshop as to when it's possible to use the stroke function. If this
function doesn't work, it's possible that you've violated one of Photoshop's
rules which make the stroke function unavailable. If that happens, a
message is displayed that reviews some of the rules. One of the safest
things to do before using the stroke function is to make an active selection
of the edge that you want to stroke.
Fill−Opens the Fill dialog window.
Blur−Opens the Gaussian blur dialog window.
ACR−Opens the dialog for the Camera Raw filter. This filter only works on
a pixel layer or smart object layer. If the button is clicked when another
type of layer is active, a pixel layer is automatically created at the top of
the layer stack and the contents of the other layers are merged into the
new layer (merge visible) so that the filter can be opened. If the ACR
button is clicked on a smart object layer, the results become a smart filter
within that smart object.
CAF−Opens the Content-Aware Fill dialog window normally found in the
menu Edit > Content-Aware Fill... This function was introduced in
Photoshop CC 2019, so it only works in this and later versions of the
application. Content-Aware Fill requires an active selection of the area to
be filled. Use a selection tool, like Lasso or Marquee, to create that
selection before clicking the CAF button. Normally, Content-Aware Fill also
requires that the active layer be a normal pixel layer. However, the panel
checks the current layer type and creates a new pixel layer with a merged
composite image if need be. So an active selection is the only requirement to use

TK7 Panel                                                             ©2019 Tony Kuyper
- 20 -
the CAF button since the action can automatically generates the normal pixel layer
if the current active layer is a different type.
Red buttons are associated with selections, masks, and the Channels panel.
Inverse−Inverts the current selection.
+/- Select−This button toggles between Photoshop's Deselect and Reselect
commands.
S&M (Select & Mask)−In Photoshop CC 2015.5 and later, this button opens
the "Select and Mask" dialog. In Photoshop CC 2015 and earlier, this button
opens the Refine Edge dialog box if there is an active selection, or opens the
Refine Mask dialog if there is a layer mask on the active layer.
Save−Opens the Save Selection dialog window so the active selection can be
saved as a channel mask on the Channels panel.
+/- selection borders−A toggle button to turn the selection borders (marching
ants) off and on.
Red X−Toggles disable and enable of the layer mask on the active layer.
Allows seeing the effect the mask is having on filtering the adjustment created
by the layer.
Clear channels (trashcan icon)−Removes non-color channel masks (alpha
channels) from the Channels panel.
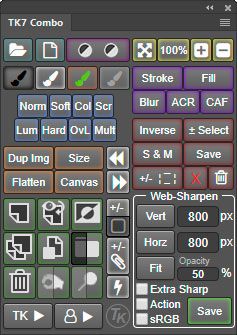
Web-Sharpen section
The Web-Sharpen section of the Combo/Cx
modules is a quick way to prepare any full-size
image for presentation in a web browser. It
uses an algorithm that has its origin in this
post by Alex Nail:
http://www.alexnail.com/blog/tutorials/resize-
and-sharpen-for-web/. The module includes
several modifications that appear to be
beneficial for most images and that allow the
user to further customize how their images are
sharpened for the web.
In the Web-Sharpen section, the user enters
values the algorithm uses for sharpening. The
sharpening action then duplicates the current
image and sharpens it according to these
parameters. The image to the left shows the
Layers panel for the sharpened image. The
module remembers what the user enters as parameter values and these
become the default the next time that web-sharpening is used.
The TK7 panel now allows separate input values for the vertical and horizontal
dimensions of the final sharpened image. Simply click in the input box next to the
Vert or Horz button to enter a value, in pixels, that corresponds to that dimension.
TK7 Panel ©2019 Tony Kuyper- 21 - The Opacity parameter is the opacity, in percent (1 to 100), of the "TK Web- Sharpening" group that actually sharpens the image. A higher value causes the final web-sharpened image to be sharper. This value can vary depending on the image. An Opacity setting of 50% is a good starting point. Images with lots of detail or large output size can often handle a higher Opacity setting. Images that are grainy or with soft, smooth features might benefit from a lower value. The user's workflow can also affect the Opacity setting. If significant sharpening has already been added during RAW file conversion, for example, then a lower Opacity setting might work better. The Extra Sharp parameter provides a checkbox that, when checked, disables the layer mask on the Sharpen #2 layer. This mask has the effect of confining sharpening to darker values in the image in order to prevent light halos from appearing in the sharpened image. For highly detailed images, though, these halos might not be a problem, and disabling the mask by checking Extra Sharp might look OK. However, disabling this mask can cause the web-sharpened image to look a bit crispy sometimes. The mask can be re-enabled with a Shift+click on the mask (or by using the red X button) in the sharpened version. The Action checkbox makes it possible to automatically play an action after the image has been sharpened and resized. Checking this box causes the "Post-Sharpen Action" in the "TK-User-Actions" action set on Photoshop's regular Actions panel to be played at the end of the sharpening process. The "TK-User-Actions" action set installs automatically when the Combo/Cx modules are first opened in Photoshop CC. The "Post-Sharpen Action" is blank when the action set installs. It is up to the user to record their own steps into the action. Whatever is recorded will be played after the image is resized and sharpened if the Action checkbox is checked. As an example, adding a watermark to the image is a common task that works when recorded as the "Post- Sharpening Action." Sean Bagshaw demonstrates how to create a watermark in this YouTube video: https://www.youtube.com/watch?v=- GLKpfnW8Q4. He also shows how to assign a user created action to one of the personal actions in the "TK-User-Actions" action set in this video: https://www.youtube.com/watch?v=_XIWCOefqXk. The sRGB parameter is also a checkbox. Checking it means the web- sharpened image is converted to the sRGB color profile as part of the action. The sRGB profile is often preferred for images posted on the internet. TK7 Panel ©2019 Tony Kuyper
- 22 -

Once the parameters are set, the user clicks the Vert, Horz or Fit
button to run the web-sharpen action. If Vert is clicked, the input
value next to the Vert button becomes the final vertical dimension
of the web-sharpened image. Clicking the Horz button makes it so
the dimension entered in the input box next to the Horz button
becomes the final horizontal dimension of the web-sharpened
image. The Fit button downsizes and sharpens the full-size image
so that it fits within a box created by the vertical and horizontal
dimensions in corresponding input boxes. NOTE: The orientation
(portrait or landscape) and aspect ratio of the image is NOT
changed during the downsizing and sharpening process. Even with
the Fit button, the ratio of the sides of the sharpened image are the
same as original image.

After the web-sharpen action completes, the user can adjust layer
opacity or add a layer mask to restrict the sharpening to specific
areas if desired. The Combo/Cx modules can also be used to add
adjustment layers if there is need to adjust things like brightness,
contrast, color, or saturation.

Once satisfied with the web-sharpened image, clicking the Save
button opens Photoshop's (now legacy) Save for Web dialog
window in order to save the image on the computer's hard drive.

NOTE: Web-sharpening is not intended for print output. Web-
sharpening and print-sharpening are two very different processes.
Web-sharpening, because it involves significant down-sizing of
most images and display on a single medium (computer monitor),
can be programmed as a series of steps that work for all images.
Print-sharpening, on the other hand, may involve enlarging or
down-sizing the image with output on a variety of different media
each requiring a different sharpening algorithm. While everyone
seems to have their own preferred print-sharpening method, my
personal recommendation is Nik Sharpener Pro. It provides a nice
variety of sharpening options, and, once the user finds what works
for them on their preferred paper, the same settings can be used
repeatedly with good results. Nik Sharpener Pro was free for a
period of time, but is now available from DxO:
https://nikcollection.dxo.com

TK7 Panel                                                               ©2019 Tony Kuyper
- 23 -

The TK► button

The TK► button opens a menu of actions useful in working with or
enhancing images. It usually will not need to be accessed as
frequently as the some of the other buttons on the Combo/Cx
modules, but in the right situation, the actions accessed here can
create some nice effects in the image or can speed up processing.
It is divided into three submenus−Actions, Color, and Blend. The
individual menu items are discussed below. This is a smart menu.
It closes automatically after running the action that was clicked.

The TK► button−ACTIONS menu

Vignette−This action creates an oval/circular vignette for the image. The
action stops to allow the user to choose the blur radius for the vignette to
facilitate the best blending of the vignette into the image. The module
makes a best guess as to what might work for the image as a starting
point, but you're free to increase or decrease the blur. The resulting
vignette will likely be a bit stronger than what is desired. Lowering the
Vignette layer opacity or painting black on the white part of the mask will
dial back the vignette to what works best for the image.

Freehand Vignette−This action is new to the TK7 panel. In order to use
it, the user first makes a freehand selection with the Lasso tool around
those parts of the image where they want the vignette. Then clicking this
menu item creates a vignette using the selection as a guide. The action
stops at Gaussian Blur so the blur radius of the vignette can be adjusted
to what works best for the image. The module makes a guess at an
appropriate amount of blur for the vignette based on the size of the
image, but this can be adjusted in the final step. After the action is
finished, use the layer's opacity setting to strengthen or dial back the
effect.

Spotlight−This action is also new to the TK7 panel and is a way to add a
lightening effect to parts of the image, often to help move the viewer's
eye to that location. It works by the user again using the Lasso tool to
create a selection that will be spotlighted. Then clicking the Spotlight
menu item runs an action to subtly lighten that part of the image. The action stops
at the Gaussian Blur so the spotlight can be adjusted to best blend into the image.
(The starting blur value is the module's best guess at what might work.) Once the
action finishes, use the Layer's opacity setting to adjust the brightness of the
spotlight.

TK7 Panel                                                             ©2019 Tony Kuyper
- 24 -

Dehaze−I was introduced to this action by Sean Bagshaw. It creates an effect
similar to the "Dehaze" slider in Lightroom/Adobe Camera Raw when it's
pulled to the right. Clarity and contrast are added to a wide range of
midtone values so that it effectively removes the sense of atmospheric
haze in nature photographs. It's also worth trying this action on non-
nature images since the effect is quite pleasing sometimes. After the
action finishes running, there is a new "Dehaze Group" group on the
Layers panel that contains the results. There are several ways the effect
can be modulated:

                           1) The "Fill" slider for the "Dehaze" layer in the
                           group can be used to increase or decrease the
                           effect.
                           2) There is an "Adjust Dehaze" layer that is a
                           clipped Brightness/Contrast layer with a preset
                           adjustment added as part of the action. The
                           Properties panel for this layer can be used to
                           adjust the brightness of the effect. (The
                           Contrast slider has little effect).
                           3) The layer mask on the "Dehaze Group" layer
                           can also be painted with a black brush to mask
                           the effect out of various parts of the image if
                           that's needed.
                           4) The layer mask created for the "Dehaze"
                           layer as part of the action is somewhat
                           important to getting the best results. You can
                           try replacing it if you'd like, however, it's hard
to return to the original mask if you do, and you might just want to delete
the entire group and start over if alternative masks aren't working.

The dehaze effect is modulated by the action to look good on any size
image. Usually you can just click the Dehaze menu item and then adjust
the results with the "Fill" slider on the "Dehaze" layer as needed.

Clarity−This option uses Photoshop's High Pass filter to increase edge
contrast in the image. However, it does so in a way that does not change
color saturation. The Clarity action stops to allow the user to select a
radius value. Choose a lower radius value (5 to 15 pixels) if the effect is
going to target light tones in the image or to enhance fine detail. Choose
a higher radius value (30 to 60 pixels) if the effect is going to be
constrained to darker tones or for a more artistic effect. As always, some
experimentation is useful in deciding how much clarity to add. It is often helpful to
constrain clarity to specific tonal ranges in the image−Lights, Midtones, or Darks.
The Layer Mask Mode of the RapidMask module makes it easy to experiment with
different masks as layer masks on the Clarity layer.

TK7 Panel                                                              ©2019 Tony Kuyper
You can also read