USER MANUAL JUSTCONNECT 16-CHANNEL POE NETWORK VIDEO RECORDER - DNR-2020-04P
←
→
Page content transcription
If your browser does not render page correctly, please read the page content below
Version 1.20 | 2017/06/26

                                  User Manual

JustConnect 16-Channel PoE Network Video Recorder

                                        DNR-2020-04P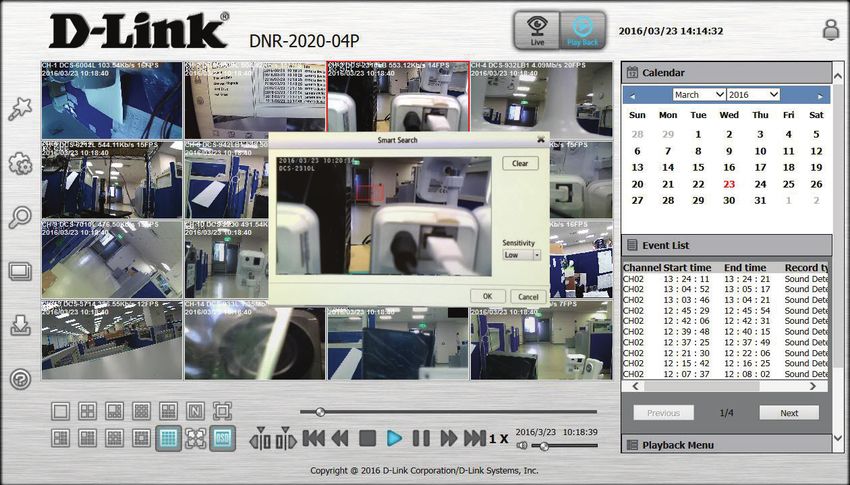
Preface
D-Link reserves the right to revise this publication and to make changes in the content hereof without obligation to notify any
person or organization of such revisions or changes. Information in this document may become obsolete as our services and
websites develop and change.

                                                           Manual Revision
                Revision                  Date                                                Description
                   1.00              April 27, 2016           • A1 Initial version

                   1.10           November 29, 2016           • Modified Remote Live View Control specification

                   1.20              June 26, 2017            • Changed system requirements

                                                                Trademarks
D-Link and the D-Link logo are trademarks or registered trademarks of D-Link Corporation or its subsidiaries in the United States or other
countries. All other company or product names mentioned herein are trademarks or registered trademarks of their respective companies.

Copyright © 2017 by D-Link Corporation, Inc.
All rights reserved. This publication may not be reproduced, in whole or in part, without prior expressed written permission from D-Link Corporation, Inc.

Apple®, Apple logo®, Safari®, iPhone®, iPad®, iPod touch® and Macintosh® are trademarks of Apple Inc., registered in the U.S. and other countries.
App StoreSM is a service mark of Apple Inc. Google Play™ and Android™ are trademarks of Google Inc.
Internet Explorer®, Windows® and the Windows logo are trademarks of the Microsoft group of companies.

ErP Power Usage

This device is an Energy Related Product (ErP) designed to be always on. It can be turned off via a power switch to save energy when it is not
needed.

Switched Off: 0.35 watts
D-Link DNR-2020-04P User Manual                                                                                                                              i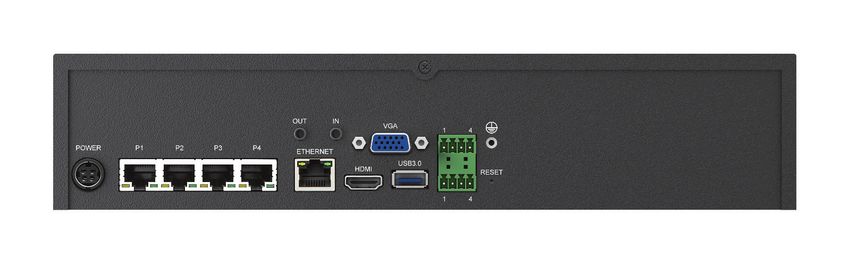
Table of Contents

                                                                      Table of Contents
Product Overview.......................................................................1                              Schedule.................................................................................34
   Package Contents.......................................................................... 1                            Recording Schedule.......................................................34
   System Requirements.................................................................. 2                            Event.........................................................................................36
   Introduction.................................................................................... 3                      E-Mail Settings.................................................................36
   Features............................................................................................. 4                 E-Map Settings.................................................................37
   Hardware Overview...................................................................... 7                               DI and DO..........................................................................38
       Front View................................................................................. 7                       Event Settings..................................................................39
       Rear Panel (Connections).................................................... 8                                      Log.......................................................................................41
                                                                                                                      Maintenance..........................................................................42
Installation...................................................................................9
                                                                                                                           Display and Language..................................................42
    Hard Drive Installation................................................................. 9
                                                                                                                           User Account....................................................................43
    Connect Your Network Camera(s).........................................12
                                                                                                                           System................................................................................44
    Configuring Your DNR-2020-04P...........................................13
                                                                                                                           Time and Date..................................................................45
Configuration........................................................................... 14                                Firmware Upgrade..........................................................46
   Live Video.......................................................................................15                     Hard Drive..........................................................................47
   Playback..........................................................................................19                    PoE Status..........................................................................48
   Smart Search.................................................................................21                 Camera Search..............................................................................49
   Menu Bar........................................................................................24              Album..............................................................................................50
   Setup Wizard.................................................................................25                 Backup.............................................................................................51
   Setup................................................................................................26         Help..................................................................................................53
       Network...................................................................................26
                                                                                                             Applications.............................................................................. 54
          Network Setup.................................................................26
                                                                                                                D-Link NVR Search Utility - Windows...................................54
          Dynamic DNS Settings..................................................28
                                                                                                                D-Link NVR Search Utility - Mac.............................................56
          IP Filter................................................................................29
                                                                                                                Playback Manager.......................................................................57
          SNMP...................................................................................30
                                                                                                                Remote Backup ...........................................................................59
       Camera....................................................................................31
                                                                                                                Verification Tool............................................................................61
          Audio and Video..............................................................31
D-Link DNR-2020-04P User Manual                                                                                                                                                                                               ii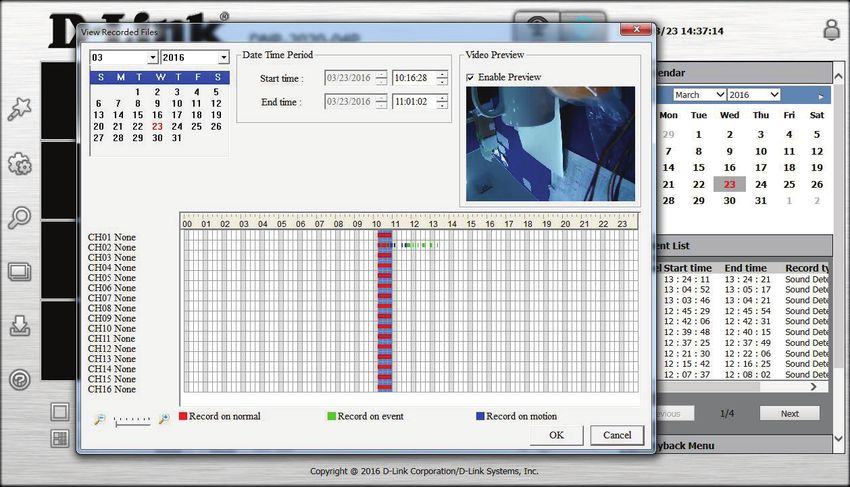
Table of Contents

Troubleshooting...................................................................... 62
Technical Specifications......................................................... 63
Regulatory Information.......................................................... 66

D-Link DNR-2020-04P User Manual                                                            iii
Section 1 - Product Overview

                                         Product Overview
                                            Package Contents
• D-Link DNR-2020-04P JustConnect 16-Channel PoE Network Video Recorder
• Hard disk screw x 8
• Rack-mount bracket x 2
• Rack-mount bracket screw x 8
• Power adapter x 1
• Power adapter cable
• Ethernet cable
• Quick Install Guide
• CD-ROM with applications and product documentation

Note: Using a power supply with a different voltage than the one included with your product will cause damage and void the warranty
for this product.

If any of the above items are missing, please contact your reseller.

D-Link DNR-2020-04P User Manual                                                                                                  1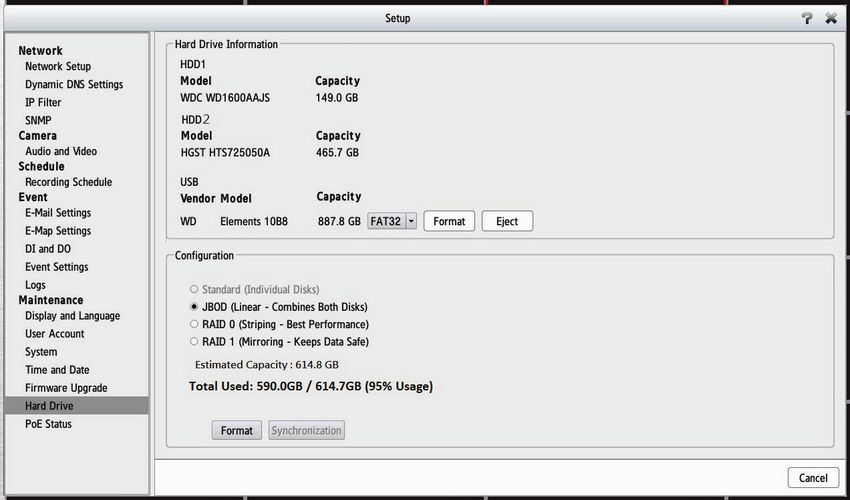
Section 1 - Product Overview

                                     System Requirements
             Hardware Requirements     • Two 3.5” SATA hard disk drives (not included)

                                       • Broadband Internet connection (for remote access)
              Network Requirements     • Network camera(s) (refer to the D-Link website for a list of supported cameras)
                                       • 10/100/1000 Mbps Ethernet switch or router

                                       Computer with the following:
                                       • Microsoft Windows 8, 7; Mac OS (10.7 or above)
             Web-based Configuration   • PC with Pentium 4 – 2.4 GHz or above; at least 512 MB RAM
               Utility / Remote PC     • Internet Explorer 8, Safari 7 (Mac OS) or above
                                       • Existing 10/100/1000 Mbps Ethernet-based network
             Minimum Requirements
                                       Note: Make sure you have the latest version of Java installed. Visit www.java.com to
                                       download the latest version.

D-Link DNR-2020-04P User Manual                                                                                               2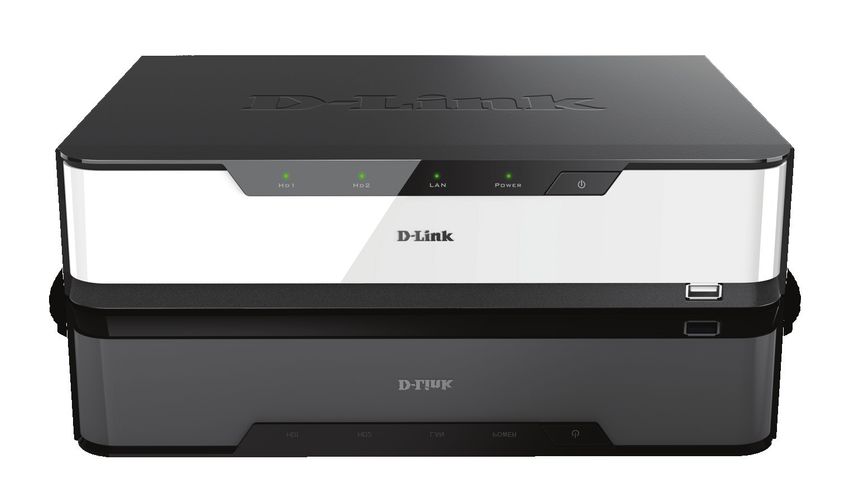
Section 1 - Product Overview

                                                Introduction
Congratulations on your purchase of the DNR-2020-04P JustConnect 16-Channel PoE Network Video Recorder.

The DNR-2020-04P is a standalone Network Video Recorder (NVR) designed to meet the surveillance requirements of small
and medium businesses. Thanks to its support for Power over Ethernet (PoE), it is easy to deploy without further investment
in electrical cabling. It features gigabit LAN speeds for high performance monitoring and recording of up to 16 channels
simultaneously in mission-critical applications. Added support for multi-channel network cameras using M-JPEG, MPEG4, or
H.264 codecs, and two 3.5-inch SATA hard disks with RAID to provide versatility, efficiency, and redundancy to meet enterprise
needs.

Featuring a powerful embedded system, the DNR-2020-04P can record, monitor, and play back video simultaneously from
network cameras located in local or remote sites without keeping your PC powered on. Simply connect a USB mouse and
an HDMI or VGA display to the device for instant access. Also, the DNR-2020-04P can be easily set up for remote access and
supports real-time monitoring and playback from anywhere via a web browser. Surveillance can be automated using versatile
recording modes that can be set independently for each channel, and support for audio in /out, DI/DO triggering, and external
USB 3.0 storage fills the needs of small businesses. Completing the package is the bundled video management software and
support for mobile app management, making the DNR-2020-04P a comprehensive monitoring and storage solution for all
your video recording needs.

D-Link DNR-2020-04P User Manual                                                                                             3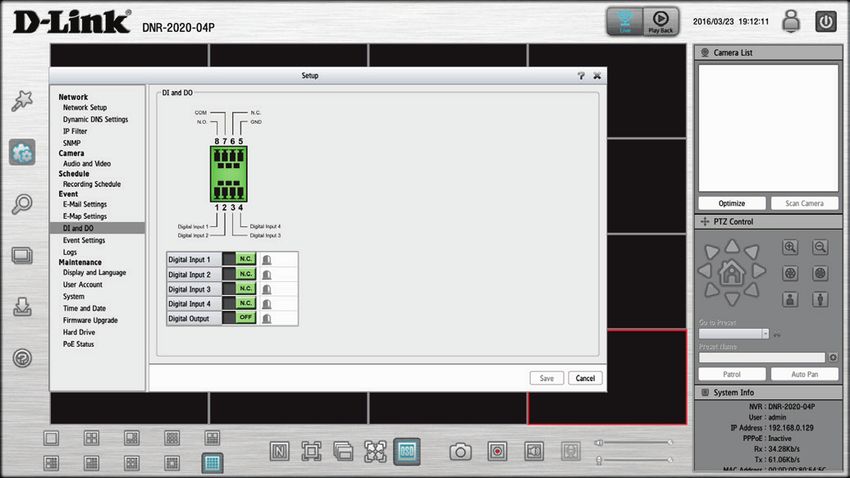
Section 1 - Product Overview

                                                    Features
Comprehensive IP Surveillance Solution

 • Total Solution: The DNR-2020-04P is a standalone network video recorder capable of 24/7 recording without a PC. The NVR
   can manage multiple network cameras, provide access to view live video, and play recorded data through the Internet from
   anywhere, anytime.
 • Convenient and Easy to Use: Power over Ethernet (PoE) saves on infrastructure costs and makes setting up network
   cameras easy. A user-friendly GUI simplifies network and camera setup, allowing you to easily access multiple cameras for
   configuration and viewing, recording and playback of video.
 • Centralized Interface for Configuration: The DNR-2020-04P provides a flexible and economic alternative to manage and
   configure multiple network cameras on a centralized device.
 • Megapixel Resolution Support: The DNR-2020-04P supports high-resolution recording for vivid videos with high clarity.

Complete Network Functionality

 • PPPoE Support: The NVR can connect to the Internet via an ADSL modem over Ethernet.
 • DDNS Support: Dynamic DNS is a solution for users without a fixed IP address. With the DDNS service, you can connect to
   the NVR over the Internet using an easy-to-remember domain name.
 • NTP Support: Maintaining an accurate record of time is essential if recorded data is to be used as evidence. To ensure that
   the time recording is always accurate, the NVR can update the system clock from a time server on the Internet using the
   Network Time Protocol (NTP).
 • DHCP Server: The NVR can act as a DHCP server for easy deployment of network cameras when placed in a network that
   has no existing DHCP server.
 • Quality of Service (QoS): The NVR can be customized to prioritize specific types of traffic via queues so that streams are
   smooth and reliable for mission-critical applications.
 • SNMP: The Simple Network Management Protocol (SNMP) is an application layer protocol that facilitates the exchange of
   management information between network devices. It helps network administrators remotely manage network devices
   and find and solve network problems with ease. The SNMP consists of the following three key components:
      • Manager: Network-management station (NMS), a server that executes applications that monitor and control

D-Link DNR-2020-04P User Manual                                                                                             4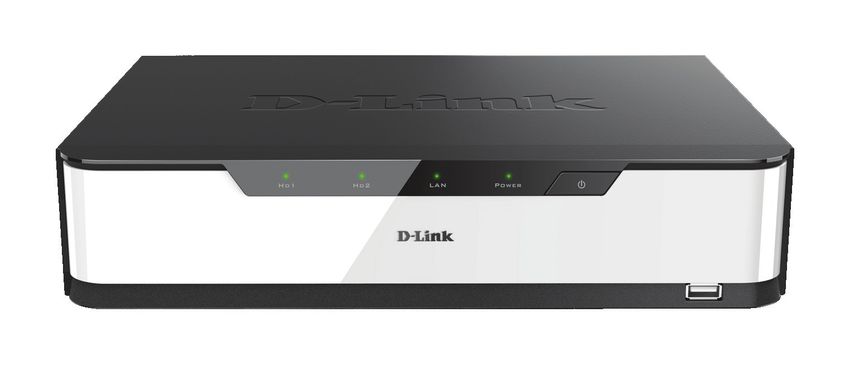
Section 1 - Product Overview

        managed devices.
      • Agent: A network-management software module on a managed device which transfers the status of managed
        devices to the NMS.
      • Managed device: A network node on a managed network. For example: routers, switches, bridges, hubs,
        computer hosts, printers, IP telephones, network cameras, web servers, and databases.

Full-featured Recording

 • Flexible Recording Schedule: Once cameras have been set up, a highly configurable scheduling system allows for continuous
   recording, set recording during specific time frames, or recording only on motion detection. Each camera can be set to
   record independently in their own modes. Event recording based on specific triggers is also supported.
 • Recording Automatic Overwrite: The NVR can be configured to overwrite the oldest data automatically when hard disk
   space runs out, allowing for continuous and uninterrupted recording.
 • Recording Stop Alert: The NVR also provides the option to stop recording when the hard disk is full. When the disk reaches
   capacity, a notification can be sent via e-mail and an audible alarm can be sounded.

Comprehensive Data and Security

 • Auto Boot after Power Recovery: The NVR will boot up automatically once power is restored after a power outage.
 • Access List Control: Users can specify safe and blocked IP addresses to filter external connections, increasing data security.
 • Multiple User Privilege Control: Administrators may also choose access privileges for users by specifying the cameras they
   may have access to for live view, playback, audio, and PTZ functions.
 • Backup Recording Data: Recorded data is stored in a secure database. This recorded data can be backed up to additional
   storage locations periodically or whenever needed.
 • RAID Mirroring: RAID 1 hard disk configuration mirrors recorded data onto two separate hard drives. In the event of HDD
   failure, data integrity is maintained on the secondary HDD.

D-Link DNR-2020-04P User Manual                                                                                                5
Section 1 - Product Overview

Flexible Event Management

 • Audio In/Out: Connect a microphone and a speaker to allow two-way communication (if supported by the camera).
 • DI/DO triggering: Connect to devices such as door sensors or point-of-sale systems to allow for easy event-based recording
   and action triggering. The NVR can monitor trigger events from all cameras, such as motion detection. These can be used
   to trigger e-mail notifications and recordings, all centrally handled by the NVR.

Instant Live View

 • Full Screen: Enlarge the display to view full-screen live and recorded video views.
 • Drag and Drop GUI: With multiple channels enabled, users can drag and drop channels to preferred locations.
 • Camera Name and Status on OSD: Camera name and recording status are displayed on the OSD (On Screen Display) to
   help identify the current camera.
 • PTZ: Users can control Pan/Tilt/Zoom (PTZ) functions for supported cameras from within the interface using the provided
   buttons, or by directly clicking on the video.
 • Audio Support: Audio picked up by a supported camera can be recorded and played back.
 • Preset Point: Camera position presets allow you to instantly restore a previously saved view.
 • Digital Zoom: Videos can be enlarged by digital zoom.

Intelligent Playback

 • AVI Outputs: Raw video can be exported to AVI format.
 • Playback Speed Control: Playback speed control allows for fast forward or fast rewind, and step playback can display video
   one frame at a time.
 • Smart Search: Users can search through footage by setting specific criteria such as motion detection.

D-Link DNR-2020-04P User Manual                                                                                            6
Section 1 - Product Overview

                                      Hardware Overview
                                                       Front View
                                     1             2             3            4             5

                                                                                                      6
                                  A solid green light indicates that the hard drive is installed properly. This light will blink during the
    1              HD1 LED
                                  read/write process. If the light is red, the hard drive is installed but has failed.
                                  A solid green light indicates that the hard drive is installed properly. This light will blink during the
    2              HD2 LED
                                  read/write process. If the light is red, the hard drive is installed but has failed.
                                  A solid green light indicates that the device is connected to your network. This light will blink
    3              LAN LED
                                  during data transfer. If the light is off, the device is not connected to your network.
                                  A solid green light indicates the device is powered on. This light will blink during bootup. If the
    4             Power LED
                                  power LED is off, the device is not powered on.
    5           Power Button      Push this button for one second to power on the device or for 5 seconds or more to power off.
                                  Connect a mouse to control the management UI when a monitor is connected via HDMI or VGA.
    6            USB 2.0 Port     This port is used for firmware updates, video exports to USB drives, and backups. Connection to a
                                  USB mouse/keyboard is supported.

D-Link DNR-2020-04P User Manual                                                                                                               7
Section 1 - Product Overview
Rear Panel (Connections)
3 6 8 9
1 2 4 5 7 10
1 Power Input Connect the supplied power cord to the input port.
Connect PoE devices to these ports for power to be supplied via Ethernet. Non-PoE devices will only
have Ethernet functionality.
2 PoE Ports 1-4 Green: A solid LED indicates that LAN is connected. The LED will blink during data transfer. An unlit
LED indicates there is no network connection.
Orange: A solid LED indicates that power via PoE is normal. An unlit LED indicates there is no power.
Connect a microphone to the Audio In port to use 2-way communication with your camera(s).
3 Audio In/Out Connect external speakers to the Audio Out port for audio playback.
Please note that your camera(s) must support this feature.
Connect the device to your router or switch using an Ethernet cable.
4 Gigabit Ethernet Port Yellow: Solid indicates Link status (connected to LAN). Blinking indicates data is being transferred.
Green: Solid Indicates an active Gigabit Ethernet connection. Off indicates Fast Ethernet connection.
5 HDMI Output Connect to your TV or monitor using an HDMI cable.
6 VGA Output Connect a monitor using a D-sub cable.
7 USB 3.0 Port Connect an external USB hard disk for more storage.
8 DI/DO Connect four DigitaI Input devices and one Digital Output device to these ports.
9 Grounding Port Connect a grounding wire to ground the NVR.
10 Reset Button Press and hold the reset button for 10 seconds to reset to factory default settings.
D-Link DNR-2020-04P User Manual 8Section 2 - Installation
Installation
Hard Drive Installation
1. First, make sure the power cable is not plugged into a power outlet.
Access the DNR-2020-04P’s hard drive bays by removing the screws
from the sides and back of the device.
2. Once the cover is removed, slide it rearward to remove it from the
device.
D-Link DNR-2020-04P User Manual 9Section 2 - Installation 3. Detach the HDD bay bracket, then insert one or two 3.5” SATA hard drives into the drive bays and use the provided screws to secure the drives in the bracket. 4. Connect the power and SATA cables from the device to each HDD. If a drive has been inserted correctly, the HDD LED will light up. 5. Re-attach the drive bay bracket to the device enclosure by sliding the tabs into the holes and using the screws provided to secure it. D-Link DNR-2020-04P User Manual 10
Section 2 - Installation

6. Re-attach the top cover by sliding it over the device. Re-insert the
   screw in rear of the cover to secure it.

D-Link DNR-2020-04P User Manual                                           11
Section 2 - Installation

                           Connect Your Network Camera(s)

You can connect PoE network cameras directly to your DNR-2020-04P.
For non-PoE network cameras, you will need to locate power outlets in the
on-site environment then run a CAT5 UTP cable to the P1-4 ports on the NVR.

1. Connect a CAT5 UTP cable to a port marked either P1, P2, P3, or P4.

2. Connect the other end of the cable to your PoE Camera.

D-Link DNR-2020-04P User Manual                                               12
Section 2 - Installation
Configuring Your DNR-2020-04P
You can setup your NVR without using a PC by connecting a VGA or HDMI
display to the respective ports on the back of the device. To control the
Graphical User Interface (GUI), connect a USB mouse to the USB port on the
front panel.
The default username of the NVR is admin and the default password is blank.
You can customize the password and configure NVR settings by clicking on
the setup wizard icon and following the on-screen instructions.
D-Link DNR-2020-04P User Manual 13Section 3 - Configuration
Configuration
You can access the configuration interface for the NVR on your PC by running
the NVR Search Utility or manually opening a web browser and entering
the IP address of your NVR. Enter admin as the username and enter the
password you created during installation.
You can also control and manage the NVR locally by connecting it to a TV
or external VGA/HDMI monitor and plugging in a USB mouse to control the
interface.
This section will enable you to configure and view the live video from your
network cameras.
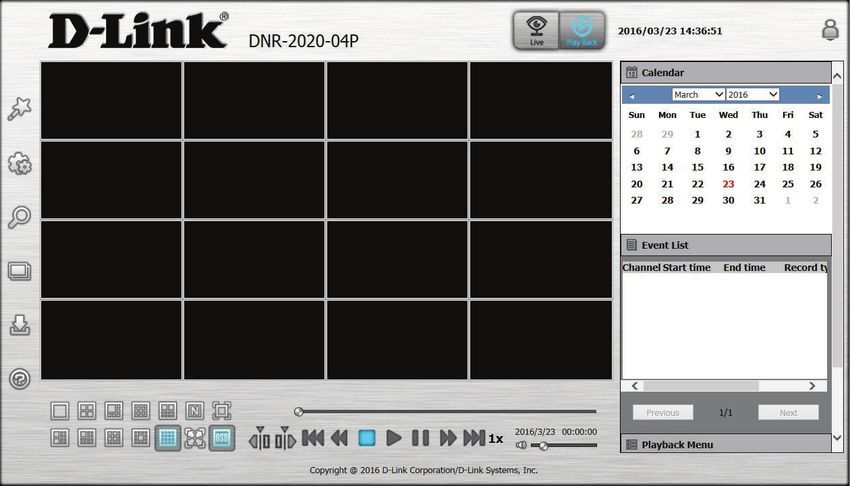
Shows the live video of network cameras and
Live Video
controls PTZ functions.
Displays recorded video and exports snapshots or
Playback
video.
Log Out Logs out of the NVR.
Shut Down Shuts down the NVR.
D-Link DNR-2020-04P User Manual 14Section 3 - Configuration
Live Video
This section describes the configuring and viewing of live video from
your network cameras, the functions of the live video screen, and the PTZ
functions. To monitor live video:
Step 1: Click the button at the top of the screen.
Step 2: Select a camera(s) from the camera list on the right and then drag
it to the location to where you want it to be displayed.
Optional: You can change the video display position by dragging it to another
position.
Notes:
1. The selected video will be marked with a red line.
2. Enable EPTZ: Right-click on the video and click on EPTZ. Click the + or – button to zoom in or zoom out. The flashing square
at the lower right of the video grid indicates the corresponding view of the camera.
3. If the camera supports PTZ, you can control the selected camera from the PTZ panel.
4. If the camera supports audio, you can check Enable Audio from the right-click menu and listen to the channel’s audio.
5. Snapshot: Right-click on the video and select the snapshot function to capture a specific video image immediately.
6. Right-clicking on the video will show the option as Full Screen. Press the ESC button on the keyboard to return to normal
display.
7. Swap: Right-click on the video and select Swap to display a different video channel.
D-Link DNR-2020-04P User Manual 15Section 3 - Configuration
Use this button to switch to a single camera
Display Single feed
feed in the live video display area.
Use this button to switch to view four cameras
Display 2 x 2 feeds
in the live video display area.
Use this button to switch to view one large
Display 1 + 5 feeds and five small streams in the live video display
area.
Use this button to switch to view nine cameras
Display 3 x 3 feeds
in the live video display area.
Display 2 + 8 feeds Enlarge two channels in the top row.
Display 2 + 8 feeds Enlarge two channels in the left column.
Enlarge one channel and show 12 additional
Display 1 +12 feeds
streams.
Display 4 + 9 feeds Enlarge 4 channels and display 9 feeds.
Display 1 center + Enlarge one channel in the center and display
12 feeds 12 feeds.
Display 16 feeds Show all 16 feeds simultaneously.
Switch between
Click to cycle between 2x2, 3x3, 4x4 views.
feeds
Select to display the video with full screen. Press
Full Screen the ESC button on the keyboard to return to
normal display.
Activate auto scan to rotate the channels/
Glance
cameras on the display screen.
Use this button to display the recording in its
Actual Size
original resolution.
OSD Display video stream information in the window.
D-Link DNR-2020-04P User Manual 16Section 3 - Configuration
Snapshot Click to take a still image and save it to a folder.
Manual Record Click to enable or disable manual recording.
Speaker On/Off Turn the speaker on or off.
Mic On/Off Turn the microphone on or off.
You can control the camera view by utilizing
the PTZ (pan, tilt, and zoom) camera control
PTZ Control panel to adjust the camera angle. This function
is only available with cameras that support the
PTZ function.
Information panel on the right side of the GUI:
Camera List: Displays the cameras connected to the NVR and their respective IP
addresses.
Optimize: Click Optimize to fine tune your camera settings for smoother live
viewing and video recording.
Scan Camera: Click Scan Camera and the NVR will use Admin as the user name and
a blank password to automatically add any network cameras from the
same local area network.
D-Link DNR-2020-04P User Manual 17Section 3 - Configuration
System Info: Displays the NVR’s network information such as the NVR’s IP address,
MAC address, and transfer rates.
Storage Displays a pie chart and table of used and free space as well as any
Information: attached storage devices.
Log: Displays the System, NVR, and Event logs.
E-Map: Check E-map to see camera(s) location and connection status.
D-Link DNR-2020-04P User Manual 18Section 3 - Configuration
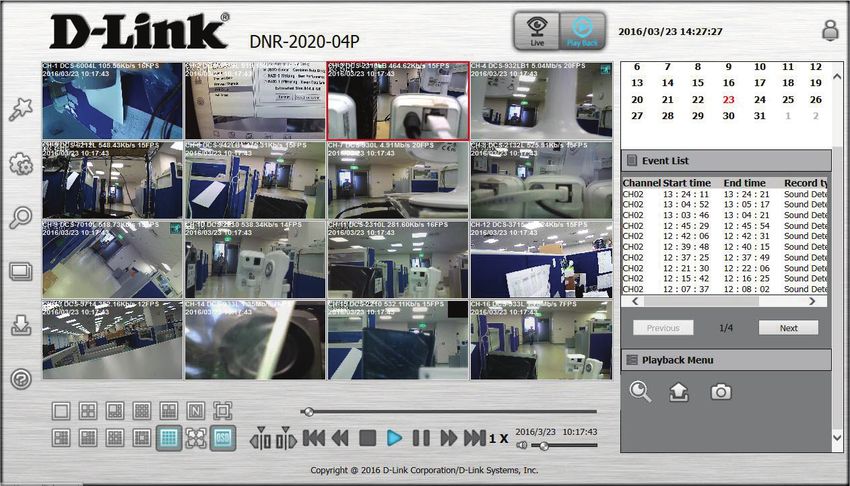
Playback
This section shows the NVR's recorded video feeds. You may select any of the available icons listed below to playback, adjust,
and export the recorded video streams.
Use this button to switch to a single camera
Display Single feed
feed in the live video display area.
Use this button to switch to view four cameras
Display 2 x 2 feeds
in the live video display area.
Use this button to switch to view one large
Display 1 + 5 feeds and five small streams in the live video display
area.
Use this button to switch to view nine cameras
Display 3 x 3 feeds
in the live video display area.
Display 2 + 8 feeds Enlarge two channels in the top row.
Switch between
Click to cycle bewteen 2x2, 3x3, 4x4 views.
feeds
Use this button to switch to a full screen view
Full Screen
of the live video feed.
Display 2 + 8 feeds Enlarge two channels in the left column.
Enlarge one channel and show 12 additional
Display 1 +12 feeds
streams.
Display 4 + 9 feeds Enlarge 4 channels and display 9 feeds.
Display 1 center + Enlarge one channel in the center and display
12 feeds 12 feeds.
Display 16 feeds Show all 16 feeds simultaneously.
Use this button to display the recording in its
Actual Size
original resolution.
D-Link DNR-2020-04P User Manual 19Section 3 - Configuration
On Screen Display Use this button to configure the various
Settings settings for the on screen display.
Click the Cue In or Cue Out button to set the
Cue in/Cue Out
period for saving a video.
Select a camera/video and click this button to
Play/Stop/Pause
play/stop/pause a particular channel.
Click to increase or decrease the playback
Speed
speed.
Reverse/Step Click to pause the playback and move to next
Forward frame or last frame.
Smart Search
Click to start the smart search.
Button
Export Use the button to export a video stream.
Click this button to take a still image of the
Snapshot
selected video stream.
D-Link DNR-2020-04P User Manual 20Section 3 - Configuration
Smart Search
Smart Search lets your find specific events for review. You may select any of the available icons under playback to control,
adjust, and export the recorded video streams.
Step 1:
Click on the Playback icon to enter playback mode.
Step 2:
Select the time and date of your specific event in the Calendar in the right
column to begin playback from.
D-Link DNR-2020-04P User Manual 21Section 3 - Configuration Step 3: Select the time period of the event that you wish to search for and press OK in the pop-up window. This will show the channels available for the time period. Step 4: In the available channels, select the channel that you wish to review. Step 5: Click on the Smart Search button to search the selected channel for the specified time period. D-Link DNR-2020-04P User Manual 22
Section 3 - Configuration

Step 6:
If necessary, in the Smart Search window, select the area you wish to detect
for abnormal events.

Step 7:
Select the sensitivity level from the drop-down menu.

Step 8:
Click OK when you are done specifying the selected area in the channel for
abnormal events during the specified time period.

Step 9:
Click a channel event under the Smart Search tab in the Event List window
to play back the recorded event.

D-Link DNR-2020-04P User Manual                                                23
Section 3 - Configuration

                                                           Menu Bar
The Menu bar resides on the left side of the screen. You can click the icons in this bar to access different sections, which are
described in the following pages.

                                  This will start the Setup Wizard, which will help you
                Setup Wizard      set up and configure the basic settings of the NVR.
                                  Refer to Setup Wizard on page 25.
                                  This will open the settings page of the NVR, where
                                  you can manually configure the different settings
                  Settings
                                  and features of the device. Refer to Setup on page
                                  26.
                                  This will let you automatically search for new
               Camera Search      cameras to add to the NVR. Refer to Camera Search
                                  on page 49.
                                  This will open the album, where you can see all the
                   Album          snapshots taken by the NVR. Refer to Album on
                                  page 50.
                                  This will let you back up the recordings stored on
                   Backup         the NVR to a USB drive, Samba server, or FTP server.
                                  Refer to Backup on page 51.

                                  This shows more information about using the NVR.
                    Help
                                  Refer to Help on page 53.

D-Link DNR-2020-04P User Manual                                                                                              24
Section 3 - Configuration
Setup Wizard
The Setup Wizard, helps you set up and configure the basic settings of the
NVR. Select the language you want to use, then click the Next button to
start the wizard.
D-Link DNR-2020-04P User Manual 25Section 3 - Configuration
Setup
Network
Network Setup
Network Setup lets you configure how you connect the NVR to the Internet or local network.
DHCP: Select this connection if you have a DHCP server running on your network
and would like a dynamic IP address to be automatically updated to your
NVR.
Static IP: You may obtain a static or fixed IP address and other network information
from your network administrator. A static IP address will simplify access to
your NVR in the future.
IP Address: Enter the fixed IP address of the NVR and the port that is used to access the
web interface.
Subnet Mask: Set this to match the subnet mask of the provided IP address. The default
value 255.255.255.
Gateway: Set this to the default gateway on your router or local subnet for proper network routing.
DNS1: Primary domain name server that translates names to IP addresses.
DNS2: Secondary domain name server to back up the primary domain name server.
Enable Enable this setting if your ISP is using PPPoE. You may already have a Username and Password provided by your ISP, or you may
PPPoE: need to contact your ISP. The connection status will be determined automatically by the system.
DHCP Server: Enable or disable the DHCP server. If your network doesn’t have a DHCP server, enable this feature for easier local network setup.
You can specify the IP address range and lease time that DHCP uses to provide IP addresses to clients.
Enable Bonjour: Enable the Bonjour service to allow users to discover the DNR-2020-04P with Apple devices.
D-Link DNR-2020-04P User Manual 26Section 3 - Configuration
Bonjour
Name: Enter the name of the device that will be used to identify the DNR-2020-04P when using Apple devices.
D-Link DNR-2020-04P User Manual 27Section 3 - Configuration
Dynamic DNS Settings
Enable this option only if you have registered a domain name with a dynamic
DNS service provider. The following parameters are displayed when the
option is enabled.
Server Select a dynamic DNS service provider from the pull-down list or input
Address: a custom DDNS server IP address.
Host Enter your host name. For example: myhost.mydomain.net.
Name:
Username: Enter the username for your dynamic DNS account.
Password: Enter the password for your dynamic DNS account. Confirm it in the
next text box.
Timeout: Type in the number of hours between updates to your DDNS provider.
Status: Displays the status of your DDNS connection.
D-Link DNR-2020-04P User Manual 28Section 3 - Configuration
IP Filter
By enabling IP filtering you can allow or block visitors from accessing the
NVR. To add IP addresses to the Allowed or Blocked lists, enter the IP address
range you want to allow or block into the text boxes, then click on Add to
Allowed List or Add to Blocked List.
Enable Enabling this will allow only the IP addresses in the allowed list to
Allowed List: access your NVR.
Note: Make sure you enter the IP address of the PC you use to access the NVR
before enabling this option, or you may not be able to access it afterwards.
Enable Enabling this will block all IP addresses in the blocked list from accessing
Blocked List: your NVR.
D-Link DNR-2020-04P User Manual 29Section 3 - Configuration
SNMP
If you have SNMP agents that you wish to send traps such as alarms and
syslog messages to your NVR, you can enable and configure your SNMP
settings on this page.
Enable Enable and enter a password for the Read/Write and Read-Only
SNMPv1, community strings here. Change the community string to keep
SNMPv2c: intruders from getting information about the network setup.
Enable This SNMP version adds encryption and authentication to the service for
SNMPv3: better security. You can specify separate Read/Write versus Read-only
name and passwords as well as the type of encryption to use.
D-Link DNR-2020-04P User Manual 30Section 3 - Configuration
Camera
Audio and Video
This section will allow you to configure and modify video, audio, and image
settings for each camera. Click on the camera name in the top section and
configure the parameters in the bottom section.
The Video tab has the following settings:
Camera The name of the camera is displayed here.
Name:
Main Profile: Choose from preset video profiles to apply as the main profile for
this camera.
Video Format: Select from the video formats supported by the camera. Options
include MJPEG, MPEG4, and H.264.
Frame Rate: Select the frame rate for the camera. The default rate is 15 fps.
Note: The system will adjust the frame rate automatically based on the
maximum frame rate that the camera can support.
Resolution: Select the resolution for the selected camera.
Bit Rate: Select the preferred bit rate for small or large file sizes.
Quality: Select the quality of the video for the camera.
Sub Profile: Choose from preset video profiles to apply as the sub profile for this
camera. Select alternate settings for the above fields for this profile.
D-Link DNR-2020-04P User Manual 31Section 3 - Configuration
The Audio tab has the following settings:
Audio Format: Select from supported audio formats (G.711, G.726, AAC).
Enable Turn on/off the microphone on the camera (if supported).
Microphone:
Audio-in Gain Select the audio-in gain level for the microphone.
Level:
Enable Enable audio out on the camera (if supported).
Speaker:
Audio Out Adjust the volume of the camera’s speaker.
Volume Level:
The Image tab has the following settings:
Brightness: Adjust the brightness.
Contrast: Adjust the contrast.
Saturation: Adjust the saturation.
Sharpness: Adjust the sharpness.
Note: For some IP cameras, the NVR supports motion detection.
D-Link DNR-2020-04P User Manual 32Section 3 - Configuration
The Motion tab has the following settings:
Enable Video Click on the check box to enable or disable motion detection settings.
Motion:
Clear: Clear all motion detection area selections on this channel.
Restore: Restore previous motion detection area selections on this channel.
Select All: Click on the check box to select all motion detection area selections
on this channel.
Sensitivity: Set the sensitivity of the motion detection from 0-100 in this text box.
D-Link DNR-2020-04P User Manual 33Section 3 - Configuration
Schedule
Recording Schedule
Once the cameras have been set up, a highly configurable scheduling system allows for either continuous recording or scheduled
recording. Each camera can be set to record independently at preset intervals and provide event recording based on specific
triggers. The NVR can be configured to overwrite the oldest data automatically when hard disk space runs out, allowing for
continuous and uninterrupted recording. It is possible to specify the number of days the recording should be kept for (within
the limits of the hard disk capacity).
Set Recording Mode
Enable Record according to a schedule set below.
Schedule
Recording:
Enable Select this option to automatically empty disk space when the disk
Automatic space is full. This will overwrite the earliest recorded video with the
Overwrite: latest video one day at a time.
Enable Audio Set the duration to store recorded video clips. After the duration, the
Recording: clips will be purged.
Keep [x] Keep at least [x] days of video footage on hard disk when the video
Day(s) Video: recycles.
Set Recording Schedule
Always Click this button to enable always-on recording for all IP cameras.
Record:
Add/Edit Select a camera from the camera list, and click Add/Edit Schedule to
Schedule: create a new schedule for the selected camera.
Delete Select a camera from the camera list, and click Delete Schedule to
Schedule: delete the schedule for the selected camera.
Copy Select a camera from the camera list, and click Copy Schedule to create
Schedule: a duplicate schedule.
D-Link DNR-2020-04P User Manual 34Section 3 - Configuration Set Recording Schedule Configuration 1. Select one of the cameras from the list and click on Add/Edit Schedule. 2. Choose a recording mode. The available options are: Continuous Recording, Record on event, and Record on motion. 3. Enter the desired Start time and End time, and choose a day of the week that the recording function will be active. 4. Press the OK button to save the new schedule. Note: • When configuring the motion detection event, be sure to set up the motion detection function on your camera first. • After changing the motion detection settings of your camera, be sure to disconnect the camera from the NVR and then re-connect it to update any new changes. • You can drag the time bar to change the recording period. Select the red bar for Continuous recording feature, the green bar for Record on event and the blue bar for Record on motion feature. D-Link DNR-2020-04P User Manual 35
Section 3 - Configuration

                                                                  Event
                                                             E-Mail Settings

If an event occurs, such as motion detection, or a hard disk failure, the NVR can
be configured to send an email notification to one or more email addresses.
Here you can configure the e-mail notification settings.
 Sender Email    Input the sender’s e-mail address.
     Address:

       Server    Enter the SMTP (Simple Mail Transport Protocol) server IP address.
     Address:

  User Name:     Enter the user name for your SMTP account.

    Password:    Enter the password for your SMTP account.

         Port:   Enter the port used by your SMTP server. Tick the checkbox here if the
                 e-mail server uses the SSL protocol.

         Test:   Click this button to send a test email and verify whether the settings
                 are correct.

Adding Contacts

Step 1: Insert the name of a new contact to receive notifications.
Step 2: Insert the e-mail address of this contact.
Step 3: Click Add.

D-Link DNR-2020-04P User Manual                                                           36
Section 3 - Configuration
E-Map Settings
The E-Map lets you view where cameras are placed via a blueprint of your
home or business. When an event occurs, the E-map event indicator will
show the location of the event.
You can upload your E-Map to the NVR. The maximum file size is 20 KBytes
in BMP and JPG file format. You can then drag and drop camera icons onto
the E-Map indicating camera placement.
Click Save Settings once you are done configuring your map.
Edit: Upload an image to be used as your map.
Delete: Delete a camera icon from the map.
D-Link DNR-2020-04P User Manual 37Section 3 - Configuration
DI and DO
The DI and DO page lets you manage four Digital Input (DI) and one Digital
Output (DO) devices connected to your NVR. It shows you the DI/DO
mapping and the current state of the device (Normally Closed (NC), Normally
Open(NO), or OFF).
For Digital Inputs 1-4:
When a DI is set to Normally Closed (N.C.), the normal state of the circuit is
closed to ground. In this scenario, events are triggered when the circuit is
opened, which then changes the status of the device to Open.
Example: The magnetic contacts on a window sensor that are broken during
a break-in will trigger an event.
When a DI is set to Normally Open (N.O.), the normal state of the circuit is
open. In this status, events are triggered when the circuit is closed to ground,
which then changes the status to Closed.
Example: A DI light switch that is turned on during off hours may close the
circuit and trigger an event.
For Digital Output:
• OFF indicates that the device is inactive and has not been triggered.
• ON indicates that the device is currently triggered.
Please go to the Event Settings on page 39 to select Digital Output as
the action and select the events that can act as triggers.
Click Save once you are done configuring your devices.
D-Link DNR-2020-04P User Manual 38Section 3 - Configuration
Event Settings
This page lets you configure what to do when an event is triggered by a
camera, such as when motion is detected. The NVR can then perform an
action, such as sending an e-mail notification.
For Camera Event Settings and System Event Settings:
Step 1: Select an event to listen for:
Connection An action is executed when connection is lost.
Lost:
Motion An action is executed when motion is detected.
Detected:
Passive An action is executed when the PIR sensor is activated.
Infrared:
Digital Input: An action is executed when the signal voltage is above or below a
specific threshold.
Sound
Detection: An action is executed when the camera microphone detects audio.
Hard Disk When the Overwrite function is not enabled, the NVR will stop
Space Full: recording when the HDD is full and will send an alert.
Hard Disk An alert will be sent if there is an error with the hard disk.
Error:
Fan Error: An alert will be sent if there is a fan error.
Network An action is executed when the NVR is disconnected from its
Disconnected: network.
D-Link DNR-2020-04P User Manual 39Section 3 - Configuration
Step 2: Select an event action:
Buzzer: The buzzer will sound as an alert.
E-Map: Select this option to update the camera status on the E-Map.
E-Mail: Select this option to have e-mail sent to a specified SMTP account
after receiving a camera event.
Digital If you have connected a device to the NVR’s digital output, selecting
Output: this option will trigger the output when a selected event occurs.
D-Link DNR-2020-04P User Manual 40Section 3 - Configuration
Log
This section displays the event log information including System, NVR, and
event logs. It allows you to check the details of each log and download them
to an external USB drive for backup. Click Clear to reset the logs.
System Log: Displays the system log information.
NVR Log: Displays the NVR log information, such as when recording stops or
the NVR system starts.
NVR Event Displays the event log information, such as motion detection or if a
Log: camera is disconnected.
D-Link DNR-2020-04P User Manual 41Section 3 - Configuration
Maintenance
Display and Language
This section will let you manage language, display, and On-Screen Display
(OSD) settings for your NVR.
Language: Select the language.
Device Name: Change the device name of the NVR.
Auto Scan The auto scan feature allows you to monitor and scan the activity on
Interval: all attached cameras for a specific time.
Enable Enables or disables the camera’s OSD.
Camera OSD:
Camera Displays the name of the camera on the OSD.
Name:
Date: Displays the date.
Bitrate: Displays the bitrate.
Camera Displays the camera number.
Number:
Time: Displays the time.
Frame Rate: Displays the frame rate.
Size: Displays the size in pixels.
Color: Change the color of camera’s OSD.
D-Link DNR-2020-04P User Manual 42Section 3 - Configuration
User Account
The User Account page enables you to create and delete user accounts for
accessing your NVR device and set user privileges for them.
Adding a New User
Follow the steps to manage existing user accounts and give new users access to the
NVR. Management options include adding and deleting users, and allowing access
rights to users. You can also change admin and user passwords.
Step 1: Click Add to input the new user account.
Step 2: Input the password. Type the password again to confirm.
Step 3: Select the channel of the cameras and PTZ/Microphone functions that this
user can access.
Step 4: Select the playback channels and Miscellaneous functions that this user can
access.
Step 5: Click Save Settings to apply.
The Administrator account can configure all functions of the NVR. This account cannot
be deleted. The default password for admin is blank. Setting a password after the first
login is strongly recommended. Hold the reset button on the rear panel of the device
to reset the NVR password to the factory default.
Note: Resetting the device will erase all previously saved settings.
D-Link DNR-2020-04P User Manual 43Section 3 - Configuration
System
On this page, you can save the NVR configuration to a file and restore it
when necessary, such as restarting the NVR in the event of a crash. Reset
the NVR to restore all configurations to factory default. Click Save to apply
your changes.
System Restart: If the NVR is malfunctioning or crashes unexpectedly, click Restart
on the NVR. Restarting the NVR will take about ninety seconds.
Restore to This will reset all settings back to the factory defaults.
Factory Default
Settings:
Save All the configurations can be saved as a file to the specified location.
Configuration Click Save to save the file.
Settings:
Load You can restore the configuration file after resetting to factory
Configuration default file. Click Browse to select the configuration file and restore
Settings: it by clicking Load.
Idle Time When the administrator enters all the Setup pages (except the
(Minutes): Live Video and Playback Page), the NVR will keep track of the idle
time when the user is not active. If this inactive period exceeds the
specified limit, the user will be logged out and will have to log in
again for security purposes. You can change the idle time limit here.
Buzzer: Enable or disable the buzzer. This is an audible alarm that sounds
when an event is triggered.
Enable Auto Enable or disable auto plugin. Enabling auto plugin allows the NVR
Plugin: to automatically detect any connected cameras on the LAN. The NVR
will automatically change the secondary video profile of IP cameras
once this option is enabled.
D-Link DNR-2020-04P User Manual 44Section 3 - Configuration
Time and Date
Configure time and date settings here. Click Save Settings to apply your
changes.
Manually Set Enter the complete time and date settings manually.
the Time and
Date:
Synchronize Select or enter an NTP Server here. An NTP Server is a server on the
with NTP Internet that maintains time. The NVR will contact the server you
Server: entered and update to the correct time.
Time Zone: Select your time zone from the pull-down list. There are three choices
for setting the time.
Enable Check the box to enable daylight savings time (DST). You can enable
Daylight automatic daylight savings time, or enter daylight saving time start
Saving: and end dates manually. You can enter the month, week, day, hour and
minute when daylight savings time starts and ends, and also enter the
timezone offset from GMT/UTC.
D-Link DNR-2020-04P User Manual 45Section 3 - Configuration
Firmware Upgrade
The device firmware and device pack can be upgraded from this page. To
update the firmware, you must save the updated firmware file to a USB drive,
then connect it to the NVR’s USB port. Click Browse to search the USB drive
for the firmware update file. Click Load to upgrade. The new version number
will be displayed. Firmware updates are available on the D-Link Support page
at http://www.dlink.com/support
Note: You may need to reformat your USB drive to NTFS format in order for the
DNR-2020-04P to recognize it.
D-Link DNR-2020-04P User Manual 46Section 3 - Configuration
Hard Drive
You can format the HDD and USB drives in this section, as well as eject the
USB drive. Formatting the HDD and USB drive will erase all data on the drive.
Note: Do not unplug the USB drive without clicking eject first, or the files on the
USB drive may become damaged.
HDD format Only supports one hard drive to create the volume.
Standard
(Individual Disks):
HDD format Combines both hard drives in a linear fashion to create
JBOD (Linear - one large volume geared towards maximum available space.
Combines Both This mode does not provide any redundancy.
Disks):
HDD format RAID Combines both hard drives in a striped fashion to create
0 (Striping - Best one large volume geared towards maximum performance.
Performance): All data will be lost if one disk fails.
HDD format RAID Mirrors the hard drives for redundancy. If one hard drive fails,
1 (Mirroring - the other still has all the data. Replace the failed hard drive and the
Keeps Data Safe): volume will rebuild, providing maximum data protection.
Estimated Size: Displays the total capacity available for use.
HDD Used: Displays the used space and total space of the volume.
Synchronization: In RAID 1 Mode, use this function to rebuild your data to a new disk
when one of the hard drives has been replaced.
D-Link DNR-2020-04P User Manual 47Section 3 - Configuration
PoE Status
You can check the status of the PoE ports (P1-P4) on the NVR from this page.
Link Status: Displays the status of the Ethernet connection
Link A network connection is established.
Unlink There is no network connection.
PoE Consumption: Displays the status of the PoE port
15W The camera’s maximum power consumption is 15 watts.
7W The camera’s maximum power consumption is 7 watts.
4W The camera’s maximum power consumption is 4 watts.
0W PoE is not actively providing power.
N/A PoE is not supported.
The total PoE power consumption is above 45 watts. Power
Overload
provision has stopped.
The camera’s power consumption is beyond the PoE class limit.
Overcurrent
Power provision has stopped.
Total PoE
Power The NVR can supply a total of 45 watts via PoE.
Consumption
D-Link DNR-2020-04P User Manual 48Section 3 - Configuration
Camera Search
The Camera Search function lets you automatically add cameras to the NVR.
You can then view camera information and preview the camera’s feed. To
add cameras follow the steps below.
Step 1: Click either D-link for D-link brand cameras or Onvif for cameras
with Onvif certification. Click Search to search for network cameras.
The system will list all the available cameras at that point in time.
Step 2: Highlight the camera by clicking on it. You can enter the camera
name, user name, and password of the camera at the bottom.
Step 3: Then click the Add button to add a camera to your camera list. If the
cameras are already added, they will be marked red.
Notes:
• Some cameras will limit the logins to the administrator only.
• To add cameras without the UPnP function, please go to the camera Setup
menu and enter the IP address manually.
• You may not be able to see all the cameras on your first search. It may take a
moment for the devices to respond to the UPnP request. Please click Search
again if the cameras are not immediately displayed.
Step 4: Click Save to add the selected camera to the NVR.
Step 5: Click OK in the pop-up window to confirm. Repeat steps 2 through
5 to add other cameras to your list.
D-Link DNR-2020-04P User Manual 49Section 3 - Configuration
Album
If you have taken screenshots from the live page, you can view them in the
Album. You can also export or delete screenshots from this page.
D-Link DNR-2020-04P User Manual 50Section 3 - Configuration
Backup
Unlike the Save Video function, the Backup function will save all the recorded
videos during the time period you select, instead of a single video clip. You
can set the NVR to make daily backups by using Auto Backup, or you can
make a single backup immediately by using Manual Backup.
Enable auto Check the Enable option to back up your recording data according to
backup: a daily schedule.
Daily backup The daily scheduled time to start the backup process.
time:
Start/End Select a time period of recordings to back up.
time:
Camera: Select the camera channels that you want to back up the recordings of.
Backup Type: You can select whether to back up to a USB drive, a Samba server, or
an FTP site. Click Stop to stop the backup process.
If you choose Manual Backup, you will see the following settings:
Date: Select a date to start the backup process.
Start/End Select a time period of recordings to back up.
time:
Camera: Select the cameras that you want to back up the recordings of.
Backup Type: You can select whether to back up to a USB drive, a Samba server, or
User Name: an FTP site.
Start/Stop: Click Start to start a manual backup using the settings specified, or
click Stop to stop a currently running backup.
D-Link DNR-2020-04P User Manual 51Section 3 - Configuration
If you choose Samba as the backup type, you will see the following settings:
Samba server: Enter the address of your Samba server.
Samba entry: Enter the folder path for the Samba server that you want to back up
your recordings to.
User Name: Enter the username for your Samba server account.
Password: Enter the password for your Samba server account.
If you choose FTP as the backup type, you will see the following settings:
FTP server: Enter the address of your FTP server.
FTP port: Enter the port used by your FTP server.
Folder: Enter the folder path for the FTP server that you want to back up your
recordings to.
User Name: Enter the username for your FTP server account.
Password: Enter the password for your FTP server account.
D-Link DNR-2020-04P User Manual 52Section 3 - Configuration
Help
The NVR Help page provides a list of support topics. Click on any of the topics
in the left-hand bar to access the manual for that specific feature.
D-Link DNR-2020-04P User Manual 53Section 4 - Applications
Applications
D-Link NVR Search Utility - Windows
In Windows, you can run the D-Link NVR Search Utility from the CD to search for the NVR on the local network. When powered
on, during the initial boot sequence, the device will wait to be assigned an IP address via DHCP by default. If it does not receive
a DHCP-assigned IP address, the Auto-IP process will assign a 169.254.xxx.xxx address to the device. If you want to change the
IP address before logging in, or are unable to connect to the NVR IP address, you can use the NVR Search Utility provided on
the product CD to locate the device on your network and make any changes that are needed.
Network The D-Link NVR Search Utility displays any NVR devices it
Video detects on the network.
Recorder:
Refresh: Click to refresh the device list.
Configuration: Click Configuration to access the Web-based configuration
of the NVR.
LAN: Configure the LAN Settings for the NVR.
Receive Select Enable to use DHCP for your LAN IP settings, or
DHCP: Disable to use static IP.
Apply: Click Apply to save and activate the changes to the
LAN Settings.
About: Click About to view the software version of the NVR Search Utility.
Exit: Click Exit to close the utility.
D-Link DNR-2020-04P User Manual 54Section 4 - Applications Select a device from the list and click Configuration. This will launch the computer’s default web browser and direct it to the IP address listed for the device. Note: The computer used to access the NVR web-based configuration manager must be on the same subnet as the NVR. If your network is using a DHCP server and the computer receives IP settings from the same DHCP server, the NVR will automatically be in the same subnet. If you have any problems accessing the Internet, make sure the browser is not configured to use a proxy server. D-Link DNR-2020-04P User Manual 55
Section 4 - Applications

                                  D-Link NVR Search Utility - Mac
Insert the CD, go to the CD directory, then enter the Mac Utility folder. Click the NVR Search Utility file to run the setup tool.
When first powered on, during the initial boot sequence the device will wait to be assigned an IP address via DHCP. If it does
not receive a DHCP-assigned IP address the Auto-IP process will assign a 169.254.xxx.xxx address to the device. If you want
to change the IP address before logging in or are unable to connect to the NVR IP address, you can use the NVR Search Utility
provided on the product CD to locate the device on your network and make any changes that are needed.

     Network      The D-Link NVR Search Utility displays any NVR devices it detects on
       Video      the network.
    Recorder:

      Refresh:    Click to refresh the device list.

Configuration:    Click Configuration to access the Web-based configuration of the NVR.

         LAN:     Configure the LAN Settings for the NVR.

      Receive     Select Enable to use DHCP for your LAN IP settings, or Disable to use
       DHCP:      static IP.

       Apply:     Click Apply to save and activate the changes to the LAN Settings.

       About:     Click About to view the software version of the NVR Search Utility.

          Exit:   Click Exit to close the utility.

D-Link DNR-2020-04P User Manual                                                                                                56
You can also read