FL STUDIO Getting Started Manual
←
→
Page content transcription
If your browser does not render page correctly, please read the page content below
FL STUDIO
              Getting Started Manual

IMPORTANT: Write your code above for safe-keeping. See how to use it, page 5.

                                     1
Information in this document is subject to change without notice and
does not represent a commitment on the part of Image Line Software.
The software described in this document is furnished under a license
agreement or nondisclosure agreement. The software may be used
or copied only in accordance of the terms of the agreement. It is illegal
to copy this software on any medium except as specifically allowed in
the agreement. No part of this document may be reproduced or
transmitted in any form or by any means, electronic or mechanical,
including photocopying and recording, for any purpose without the
express written permission of Image Line Software.

FL STUDIO is a registered trademark of Image Line Software. Other
company and product names are trademarks of their respective
owners. Image Line Software is a division of Image Line BVBA.

     Visit Image Line Software at http://www.image-line.com
    Visit FL Studio on the web at http://flstudio.image-line.com

     Getting Started Manual Copyright © Image Line Software.

             FL Studio Copyright © Image Line Software.

                      ALL RIGHTS RESERVED.

                                  2
TABLE OF CONTENTS
HOW TO INSTALL FL STUDIO ...................................................................................................... 5
WELCOME TO FL STUDIO ............................................................................................................ 7
FIRST RUN ...................................................................................................................................... 8
MAKE SOME NOISE ..................................................................................................................... 11
GETTING HELP! ........................................................................................................................... 11
HOW TO USE FL STUDIO ............................................................................................................ 12
THE CHANNEL RACK .................................................................................................................. 12
HOW TO USE SAMPLER CHANNELS ........................................................................................ 16
MIXER TRACK ROUTING ............................................................................................................. 21
STEPSEQUENCER & NOTES ...................................................................................................... 22
THE PIANO ROLL – NOTES. CHORDS & MELODIES ............................................................... 25
THE PLAYLIST – FROM PATTERNS TO SONGS ...................................................................... 30
AUDIO, PATTERNS & AUTOMATION CLIPS ............................................................................. 32
PERFORMANCE MODE ............................................................................................................... 33
INSTRUMENTS - FROM SAMPLERS TO SYNTHESIZERS ....................................................... 34
MIXING & EFFECTS ..................................................................................................................... 54
RECORDING & EDITING AUTOMATION .................................................................................... 66
AUDIO RECORDING ..................................................................................................................... 70
EDITING AUDIO WITH EDISON ................................................................................................... 71
EXPORTING AUDIO & SHARING YOUR WORK ........................................................................ 76
EXTERNAL & INTERNAL CONTROLLERS – KEYS, PADS & SLIDERS ................................. 78
CREDITS........................................................................................................................................ 85
INDEX ............................................................................................................................................ 87
3IMPORTANT: This guide is a general Getting Started manual for
all FL Studio editions. Some features are not available all
editions. For example: Fruity Edition does not include Audio
Clips. Please check our site http://flstudio.image-line.com for
upgrade options.
4THE FL STUDIO BOX DOES NOT CONTAIN INSTALLATION MEDIA
How to install FL Studio …
1. Download FL Studio – http://install.image-line.com
2. Register your code – While downloading, register the code from your box (e.g. XX0XX-
000XX-X000X-000X0), to your Image-Line account at http://boxregistration.image-line.com.
Make sure to use your real name so we can identify you, if you ever lose your password.
3. Test your account – Log out and test you can login again at http://my.image-line.com.
4. Install FL Studio – Run the installer. Normally, just accept the default settings.
5. Unlock FL Studio – Start FL Studio and select the top menu HELP > About. On the pop-up
panel, enter your account email and password. Click the eye-icon, to the right of the password
field, to avoid mistakes. If asked, allow FL Studio to pass your Firewall to connect to your
Image-Line account via internet.
6. Click ‘Unlock with account’ – You must agree to the Terms of Use to continue. When you
see ‘The registration succeeded’ click ‘Ok’ and FL Studio will close. To unlock FL Studio
without Internet access, use ‘Unlock with file’, see the next page.
7. Restart FL Studio – Your name and license code will show at the top of the HELP > About
panel. The e-mail and password fields are blanked for security.
NOTES: Next time you update FL Studio follow the procedure above. You may install FL Studio on
any computer/s that you exclusively control.
NEED HELP OR HAVE QUESTIONS?
Online self-help resources – Search http://support.image-line.com/knowledgebase OR use the
support landing page http://www.image-line.com/support/ OR ask for help in the support forums
http://forum.image-line.com. Use Technical Support or FL Studio (Looptalk).
Registration or Account issues – Use http://support.image-line.com/ticketing.
What’s included? - See http://www.image-line.com/documents/editions.html
5HOW TO UNLOCK FL STUDIO WITHOUT INTERNET ACCESS
Download the latest FL Studio installer and FLRegkey file from any computer with internet access
and install it on one without it as follows …
1. Register – Follow steps 1 to 3 above, to register the code from your Box.
2. Download a FLRegkey file – From your Image-Line account left-menu, click UNLOCK
PRODUCTS, then the main ‘unlock image’ to download your ‘FLRegkey.reg’ file. Save it and
the FL Studio installer, to a portable storage device. If you need to email the ‘FLRegkey.Reg’
file to yourself, zip it first.
3. Install FL Studio - Copy the FL Studio installer and FLRegkey.reg to your computer and run
the installer. The install wizard will guide you through the steps. Normally, just accept the
default settings.
4. Unlock FL Studio - Open FL Studio and use the top-left menu to select HELP > About. On
the pop-up panel, select ‘Unlock with file’.
5. Use your key – Browse to your FLRegkey.reg file, select and click open. You must agree to
the Terms of Use to continue. When you see ‘The registration succeeded’ click ‘Ok’ and FL
Studio will close.
6. Restart FL Studio – Your name and license code will show at the top of the HELP > About
panel. The e-mail and password fields are blanked for security.
NOTES: Next time you update FL Studio follow the procedure above. You may install FL Studio on
any computer/s that you exclusively control.
NEED HELP OR HAVE QUESTIONS?
Online self-help resources – Search http://support.image-line.com/knowledgebase OR use the
support landing page http://www.image-line.com/support/ OR ask for help in the support forums
http://forum.image-line.com. Use Technical Support or FL Studio (Looptalk).
Registration or Account issues – Use http://support.image-line.com/ticketing.
What’s included? - See http://www.image-line.com/documents/editions.html
6WELCOME TO FL STUDIO
This guide is a general introduction to using FL Studio. Press F1 while running FL Studio to open
the on-line manual for detailed help on specific features or functions. The manual will open showing
the last thing you clicked in FL Studio (it’s context sensitive).
Lifetime FREE updates of the edition you own: Customers who bought FL Studio 2 (way back in
1999) have received every version up to 20 absolutely free! That’s about $2200 of free updates. If
you have the Boxed version, register online to activate your Lifetime Free Updates. If you bought
FL Studio via Internet download, then you’re already registered for Lifetime Free Updates.
Our philosophy is that you should pay only for what you use, and we never charge for bug-fixes,
like many of our competitors do. Visit http://www.image-line.com to see what we have on offer.
Here are just a few of the cool features in FL Studio:
- Recording: Audio (microphones, guitars, synths), automation (knob / mouse movements)
and notes (polyphonic melodies) live, then edit the performance.
- Easy hardware controller linking: Right-click on the FL interface control, select link and
tweak the hardware controller knob, done.
- Piano Roll: The most advanced piano-roll in the industry. Per-note slides for native FL
Studio plugins. Complete suite of editing and creative composition tools.
- Channel Rack: Fast and intuitive pattern-based sequencing, perfect for percussion.
- Edison wave editor/recorder: Record, analyze, edit and transform audio. With beat slicing.
- Performance mode: Trigger Audio, Automation and Pattern Clips on the fly to mix, re-remix
and perform your projects live.
- Share: import/export .wav (wave), .mp3 (mpeg layer 3), .ogg (Ogg Vorbis), .mid (MIDI) files
and more.
- Fast: Of course there is the legendary FL Studio workflow, the fastest path from your brain
to your speakers!
Lemon Boy is in the house: Hey Dudes! Having problems? Before you panic
and start spamming the FL Studio Tech Support, look for me. I'll pop up here
and there with answers to common problems that might save you some trouble.
Of course, don’t neglect to press F1 inside FL Studio to open the in-line help or
visit the on-line forums http://forum.image-line.com/
7FIRST RUN
OK, so you just finished the installation and started FL Studio. This section explains what you will
see. Don’t forget to check the extensive on-line help that comes with FL Studio (press F1) and
check our ‘Getting Started’ video tutorials:
http://support.image-line.com/redirect/flstudio-start
1. The System Settings Screen. When you first run FL Studio, you should press F10 on your
PC keyboard to access it (or Options > Audio Settings). Use the select boxes to choose your
sound card and hardware controllers. For now, the most important one is the Audio section,
accessed as shown below.
1. Click Here
2. Then Here
2. Select FL Studio ASIO from the list in the pull-down menu. ASIO modes allow lower CPU
load and shorter buffer lengths (more on why that’s a good thing below) compared to the
Primary Sound Driver. You can always come back to this screen (by pressing F10) and
experiment with other options. If you don’t hear sound, open the FL Studio ASIO driver by
clicking ‘Show ASIO panel’ and select your audio playback device in the Output menu (where
it shows [Default output]).
83. Buffer Length? You don’t need to worry about most of the settings here yet, but you definitely
should know what the Buffer Length does. The buffer stores audio data from FL Studio before
it's sent to your audio interface. This allows your computer to even out spikes in CPU load, that
can cause audio glitches and crackles. Longer buffers mean lower CPU load and reduced
audio glitching. However, longer buffers can also mean the delay between playing a MIDI
keyboard or tweaking a control in FL Studio and hearing can make FL Studio feel sluggish or
‘laggy’. The ideal buffer with ASIO drivers is between 10 to 20 ms (441 to 882 samples). Some
other things to check…
Is your CPU running at full speed? Do you have some wimpy energy saving/CPU throttling
mode engaged? If you are serious about your music production, then you’ll be prepared to melt
those polar ice caps. While we like Polar Bears as much as the next guy, we are sorry, those
icebergs are just going to have to melt, just a little, for the sake of art. Don't feel so bad, Polar
Bears would eat your head if they had the chance, which they will if the ice-caps move any
closer to the equator. Consider this 'insurance' against Polar Bear plagues sweeping down
from the north eating your loved ones. On Windows - See the Windows 'Start > Settings >
Control panel > System & maintenance** > Power Options'. ** Whether or not this sub-
menu shows depends on your windows settings. Set your power management to 'High
performance mode'.
Smart Disable - Enable Smart disable on the Audio Settings and then run the Tools Menu
> Macros > Switch smart disable for all plugins. This will disable effects & instruments when
they are not making any sound and can significantly decrease CPU usage. NOTE: Smart
Disable is active only during live playback, it is temporarily disabled when rendering (exporting
audio).
The term 'Soundcard' can be confusing. It comes from the days when most
computers had a separate soundcard. These days most use a chip on the
motherboard, or it may be an external device connected by USB. A better
term is ‘Audio Interface’ - any device that makes the sound you hear from
your speakers. The Audio Driver is the software interface between the
operating system and the device. The driver tells FL Studio what
inputs/outputs and what sample-rates the Audio Interface can support.
94. The FL Studio desktop has a number of windows, most of these are movable (with overlap),
resizable, zoomable and switchable, so if a window isn't visible open it with the Shortcut toolbar or
the function key noted in brackets. The main windows involved in FL Studio music creation are
- Channel Rack (F6), Piano roll (F7). Mixer (F9) and Playlist (F5). The Browser (Alt+F8) is
used to access audio files, plugins & presets (see the Options > File settings to add folders
elsewhere on your computer to the Browser). NOTE: If you ever need to reset the position of all
windows to their default use (Ctrl+Shift+H) or see the View menu options.
Video Tutorials! A picture is worth 1000 words, so a video must be
worth, like, BILLIONS…once you are registered pop over to the FL
website and watch hours of cool video tutorials, this is really useful, so
I’ll SHOUT –
http://www.youtube.com/user/imageline
10MAKE SOME NOISE
Press the Play Button (make sure the switch to the left is in
SONG mode) to Play a project. It’s definitely worth checking the
demo songs. Open the browser (F8) left-click on the ‘Projects’
folder and right-click on the NewStuff.flp, then select ‘Open’ from the menu. You can also drag
the FLP file onto the desktop to open it. FLP files are FL Studio Project files and save entire songs.
Press Play and try to work out how the project was made. Pay attention to the Channel Rack,
Playlist and Mixer panels. Try moving sliders and clicking switches to see what they do.
GETTING HELP
This guide is intended to get you up and running - it is not meant to be a reference manual for
everything FL Studio can do (that’s what the Help system is for, press the F1 key on your PC
keyboard). Let’s look at the main FL Studio components:
1. The Hint Panel. Located on the Main Window just under the Menu Bar (top left in the picture
on the previous page). When you hover your mouse over any of the controls in FL Studio, this
panel will display a short description of what that control does and when you move a control,
it’s value. The Hint Bar also shows you the Shortcut Key that will activate the same function.
This is displayed on the right. Pressing this shortcut key has the same effect as pressing the
corresponding button.
Hint Panel
2. On-line Help. FL Studio also comes with an extensive on-line help reference. Just use the
Help Menu and select Contents. This help also features context-sensitivity – select a window
and press F1 on your keyboard. The reference automatically displays the help you are looking
for. You will notice a SEARCH box on the upper left, try it!
3. The Website. FL Studio has a massive web site at http://flstudio.image-line.com. The site has
a support section that includes a FAQ Knowledge Base, User Forums, Online Tutorials,
Video Tutorials, Song Exchange and more. Check the discussion forums to see if your
questions have already been answered, or log in and post your own.
11HOW TO USE FL STUDIO
The following section will guide you through some of the basic, and not so basic, features you’ll
use to make music with FL studio. You should also spend some time with the in-line help file (press
F1 inside FL Studio) and at least work through the Introduction to FL Studio section. You may
have noticed we keep mentioning that, because no-one reads the manual, but you are reading this,
so we have hope for you
HEY! Don't skip that step. This guide
will work a lot better if you start at one
end and work your way through to the
other.
THE CHANNEL RACK
The Channel Rack holds all the instruments that create sound and generators that
control automation (page 63). Every pattern has access to all instruments in the rack. In other
words, all patterns play from the same set of instruments. Patterns are not limited to a single
instrument as they are in most other sequencers. Music data can come in the form of Step
sequences and Piano roll scores (page 25).
There is one Channel button per instrument. The audio from each Channel is sent to one of
the Mixer Tracks (page 54) for effects processing and level mixing. When Instrument Channels
are added or removed from the project the height of the Channel Rack will change dynamically.
The Channel buttons also access Instrument Channel Settings (where a Mixer track is set, page
56) or the associated Piano roll. The Channel Rack is a pattern-based grid sequencer ideal for
creating drum loops and simple melodies.
The note and automation data visible across all Channels is known as a 'pattern'. Patterns include
Piano roll, Channel Rack and Automation data. Switch between patterns using the Pattern
selector (page 15). As the pattern number is changed, see how the pattern data in the Channel
Rack also changes. These are the patterns. Patterns are designed to be arranged in
the Playlist (page 30) as Pattern Clips to create your song.
12Open Channel Settings
Channel Settings
Select Channel
Open plugin
Channel Rack
1. What are Channels for? Each Channel is represented by a button (shown above) and
contains a single instrument plugin or sample. Click the button to open the instrument interface.
Channel buttons are usually followed by 16 Step Sequencer steps. If you're musically inclined,
these are 16th notes. If not, think of each group of four steps as one beat, so 16 steps are the
four beats of a basic 4x4 drum loop. You can click and drag on the lower-right corner of the
Channel Rack to show more steps if you need them.
A Channel
Channel Steps, on
name on and off
button
Drag here to
see more steps
132. What are Steps for? Click a step to activate it, this tells FL Studio to trigger the instrument at
that point in the bar or loop. For instance, steps 1, 5, 9, and 13 in the 1st Kick Channel are
selected, telling FL Studio to play the kick drum sound four times during the loop. If you think
of each group of four steps as a single beat, FL Studio will play the sound at the start of each
beat. Try changing the pattern of steps in the Kick Channel. If you need to turn a step off,
right-click it. Once you've got the steps to light-up like the picture below, press the play switch
to hear what you've created.
A pattern
Selector
Mute, Pan &
Volume
When programming patterns use pattern
mode. FL Studio will then play the selected
pattern.
143. How do you use patterns? While it’s cool to make a bunch of patterns, it’s not particularly
useful to play a single loop over and over. The idea is to place these patterns in the Playlist
(page 30). All the note & step data visible in the
Change pattern Channel Rack is known as a 'pattern'. You can
switch to a new pattern with the Pattern selector
panel on the Tool Bar or use the Picker Panel.
When you do this, the data visible in the current
Pattern will change to show the selected
pattern. To hear only that pattern (rather than
the whole Playlist) make sure the switch at the front of the Transport Panel is in ‘Pattern’ mode
(lit). Once you have made a bunch of Patterns, select the pattern using the pattern selector (or
the Playlist Clip selector), then left click on a blank area of the Playlist (use the pencil ) to
place it in the Playlist as Pattern Clip. NOTE: Be aware Snap controls how Clips can be
moved and placed, Line mode is usually best as it changes snap sensitivity with Zoom level.
4. Play with the Channel Controls. After you've set up the pattern, try playing with the Channel
Controls on the left. The two round knobs control the pan and volume of each Channel. Pan
moves the sound from left to right in the stereo field. The green box to the right of each button
switches the Channel on and off. To reset a knob to its default position, right-click it and select
‘reset’. If you move these controls while Record and Play are activated you can record their
movement, we call this ‘Automation’, more on page 63.
5. Make Your Own Beat. Don't like the beat above? Good, you have taste! It’s time to make your
own beat. In the following sections, we'll teach you how to load new samples, set up melodies,
and change the sound of each Channel (and even each step).
Learn what Use pencil or Arrangements are like
Play here
‘Snap’ does brush mode multiple Playlists
Select Patterns, Audio Clips
or Automation Clips
Click in the Picker Panel to select a Pattern OR drag-and-drop
to the Playlist
Left-click on the blank areas to
add the selected pattern
15HOW TO USE SAMPLER CHANNELS
In this section we'll show you how to modify the sound of the samples in each Sampler Channel.
FL Studio supports so much of this kind of tweaking that it's possible for two people to create totally
different sounds using exactly the same samples. Technically, each Channel contains an
Instrument, which could be a sample player or a synthesizer plugin. While there are dedicated
samplers like FPC (for percussion) & DirectWave (for instruments), the Channel Sampler is a
versatile and useful tool, so let’s look at that in more detail.
Wait! What's a "sample"? A sample is a recorded sound stored
in a file. Each Channel in FL Studio, by default, uses a single
sample, usually containing a single sound (like a snare drum), but
they can also contain entire beats (loops) or songs. Samples are
usually ".wav" format files but FL Studio supports ".mp3" and “.ogg”
sound format too.
1. Load a New Sample from the Browser. One way to load samples is to use the Browser.
This is usually on the left, although you can move it. To find a Kick sound, click on Packs >
Drums > Kicks. Left-clicking on a sample in the list will play it, right clicking will open it into the
selected Channel. You can also drag and drop samples onto the Channel Rack. Select a
Channel by clicking on the green Channel Selector light to the right of the Channel Button.
Lost the Browser? No problem. The big
buttons on the tool bar shown below will
Click here open and close various windows for you,
Here including the Browser & Step Sequencer.
(They will become clear in the fullness of
time…)
Here
Open Browser
Finally here
162. Open the Channel Settings Window (left-click on a Channel button). OK, let's modify the
kick drum sample. Load a Kick sound (shown below) and open the Channel Settings. You
can also change samples using the Open file icon to the right of the Sample Name (as shown
below) or use the Show in browser icon to show the location of the kick drum samples. As
you click on them, FL Studio will automatically play the sounds. Try opening some of the other
samples and listening to the effect a new kick drum has on the sound of the loop.
Click Show in Browser
Here
Channel
Selector
Open file
Can't hear the difference? If you press a button or turn a knob and
you can't hear any difference in the sound, try making the same change
on another Channel. For example, sometimes a change that doesn't
affect a kick drum much will make a huge difference to the sound of a
snare. If you still can't hear the difference, stop the loop from playing
and listen the sounds separately by clicking on the wave view window.
You might be able to hear the effect better without the other
instruments.
173. Play with the Sampler Channel. It’s worth noting that FL Studio can add audio effects on
Mixer tracks (set by the FX selector), but this section is to show you the power of Channel
sampler effects. Ok, at this point the best advice is to start the pattern looping, then play with
the controls in the sample panel of the Channel Settings Dialog and listen to the difference in
sound. Here's a short description of what some of them do. For more info see the on-line help.
Open sampler options
Vol, Pan: These knobs that also appear
on the Channel Rack.
Track: This control sets the Mixer track
used by the Channel. Click TRACK to
auto-assign to a Mixer track where you
can add effects.
Wave View Window: Shows the shape of the
sound sample. Click here to hear the sample with
all the effects. Also, a drag and drop window for
loading samples. Right-click too!
184. Play with the Instrument Settings. Let's take a quick look at the Instrument panel before
we move on. Click on the Instrument settings tab . Here you can adjust Envelopes and
LFO to your sample for the Volume, Pan, Cutoff, Resonance, and Pitch settings.
Select this switch to activate the envelope Open instrument settings
Control target selector
LFO
Envelope
You won’t hear LFO unless amount is set
Right-click along this bar to set the natural pitch (root note)
5. What's an Envelope? An envelope causes a parameter to vary over time. The most common
is the Volume Envelope that changes volume over time. That’s over-the-note-duration not
over-the-whole-song (use Automation for that). You can also set envelopes to affect Pitch,
Cutoff, and Resonance. In terms of a volume envelope (Volume), the Delay sets how much
time passes before the envelope starts, Attack (ATT) is the fade-in time, Hold sets how long
the sound holds at full volume, and Decay (DEC), Sustain (SUS), and Release (REL) control
how the sound fades away. Play with the knobs and watch the graph change above them.
6. What's LFO? LFO stands for Low Frequency Oscillator. It’s like an Envelope but repeats a
waveform pattern over and over while a note is held. Commonly LFO is used to make pitch
oscillate up and down over the duration of the sound (vibrato). The Amount (AMT) sets how
much the effect oscillates, Speed how quickly it oscillates, Delay sets how much time passes
before the LFO oscillation starts, and Attack (ATT) sets how quickly the oscillation ramps up
to its full amount. Play with the knobs and watch the graph change.
197. How do I Use Them? Use the Target Selector (see diagram above) to choose the target then
turn the knobs on either the Envelope or the LFO. REMEMBER to turn the Envelope on and
off for each effect (click the switch as shown). To turn off the LFO, reset the Amount (AMT)
to the middle so the knob pointing straight up.
8. Why Can't I Hear the Effect? If you're still on the Kick Drum it will be hard to hear any LFO
effect, although the Envelope might make a difference. These effects are more audible on
longer samples or on sustained instrument sounds such as 3OSC.
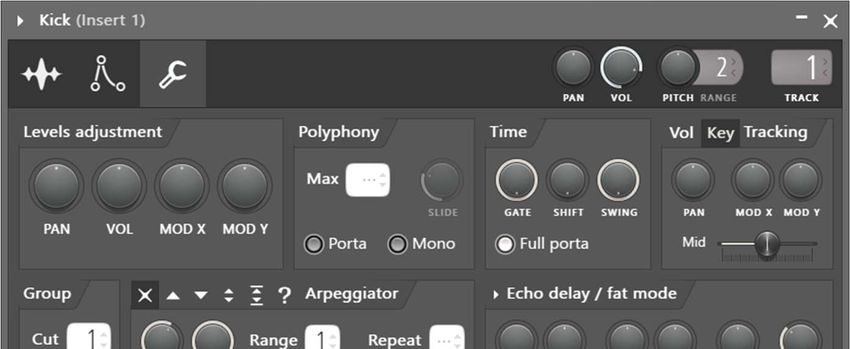
9. Play with the Misc settings . These functions work by automating note or MIDI data sent
to the plugin on the Channel. The echo for example sends out repeated notes with successively
lower velocity (volume). Cut groups are particularly useful as they can allow you to create
realistic percussion parts, like a closed hi-hat Channel stops an open hi-hat Channel. So one
sound on one Channel can stop another. The ‘By’ number is the one a Channel will listen for
to stop itself. The Cut channel is the signal the Channel itself sends. Notice, Cut itself, sets
both to the same number. When you load a synthesizer plugin the Arpeggiator is a lot of fun.
Click the up-arrow to the left of the Arpeggiator label and hold down any 3 notes and listen to
what it does.
Cut groups can be useful
20When you left-click on a Channel button, the Channel
settings will open along with the plugin interface. You will
find that some of the Channel settings controls may not
have any effect on the sound, this is normal. Generally, for
plugin instruments the Channel settings FX selector is used
to send the audio to a Mixer track. One tab on the Channel
settings that is cool with Plugin Instruments however is the
FUNC (Function) tab. Experiment with the Arpeggiator,
great for playing live with a MIDI keyboard.
Now we're cookin' with gas! …or is your PC on fire?
MIXER TRACK ROUTING
Every Channel in the Channel Rack can be sent to any Mixer track. There’s over 100 to choose
from, so you shouldn’t run out soon. The routing control is under the Channel Settings as shown
below. You can Auto assign a Channel to a Mixer Track by clicking the word TRACK below the
number indicator. Manually assign by click and drag on the indicator or even drag and drop
plugins on a Mixer track from the Browser or Plugin Picker (press F8). More on that later (page 54).
Signal flow from Channels to the Mixer
21STEPSEQUENCER & NOTES
By now you're familiar with some of the ways FL Studio lets you tweak the sound of Sampler
Channel. In this section, we'll show you how some of those effects can be applied to each step or
note separately. Later we'll also show you how to program melodies in the Piano Roll (page 24).
Step vs Piano roll
Right-click to
preview
open the
Piano roll
Drag these bars up and down edit
Select a target to edit
1. Piano roll steps. If you right-click the channel button for the sample, you will get the Piano
roll for that Channel. The Piano roll will show the steps as notes on note C5 aligned with the
grid. Below the note area you can see the vertical lines with circles on top. These show the
value of the target set by the note property selector. Try replicating the Hat pattern above
and notice how much more interesting it sounds when you change the velocity (volume) of the
steps as shown.
2. Target selector. You will see Pan, Velocity (another name for Volume), Release, Filter
cutoff frequency, Filter resonance (Q) and Fine pitch. Though some of these effects were
discussed in the "Tweaking the Channels" section, the difference here is that you can also
tweak the value of these effects for each step separately. Each bar on the Piano roll lower
section sets the value for the single note above it.
223. Panning the Kick Drum. Try setting the pan effect as shown below. The pan graph centers
in the middle. You can set pan values by clicking above and below the middle of the lower
window. After you have set up the view shown below, you should hear the kick drum flipping
back and forth from one speaker to the other.
4. Play with the Other Effects. Filter Cut and Filter Res can be used to add or subtract values
to the main cutoff and Resonance knobs in the Instrument settings panel of the Channel
settings dialog box. See the "Tweaking the Channels" section. Pitch makes the sample higher
or lower, like the pitch knob in the Channel settings dialog box.
5. Make melodies. Use the Piano Roll (page 24) for composing melodies. This will work best
with Synthesizer plugins, we show you how to load those on page 33. You probably also
noticed you can load both Step and Note data in the same pattern. It’s possible but it’s better
to keep beats (percussion) and notes (melodies) in separate patterns. If you make a mess and
add in too many Channels to the one Pattern, there’s a useful menu option: Split by channel:
23Super Important Tip. When you want to play repeated longer samples, you often need to set it up
so that each new note cuts off the previous one so they don’t overlap and make a mess. The easiest
way to do this is by right-clicking the Channel Name in the Channel Rack and selecting Cut Itself
from the popup menu.
Remember there are also a Group > Cut and Cut by options (page 20) under the Miscellaneous
channel settings? You can go even further and cut one or more Channels by another. The ‘By’
option decides what Cut group number will cut activity on the selected track.
Big News! You can undo the last tweak from
the Edit Menu or with CTRL Z. There is also an
‘undo history’ in the Browser directory called
‘Current project, History folder. Click up and
down the list to un/re-do changes. Make sure
F10 > General Settings > Undo knob tweaks
is selected.
24THE PIANO ROLL – NOTES, CHORDS & MELODIES
So you have probably already realized that there are some things that the Step Sequencer doesn't
do. You can’t use it to make melodies or to play chords. The Piano roll solves all of these problems!
Open the Piano Roll. Load up NewStuff.flp and select a pattern that shows some green bars as
shown below. Notice that the Channel Rack view is very different. These Channels contain Piano
Roll data instead of normal steps. You can open the Piano Roll for any, Channel either by right-
clicking the Channel name or by left-clicking the Mini Piano Roll.
Right Click here
Then click
or Left Click Here (Mini Piano Roll)
1. What You're Looking At (next page). See the Play Indicator Bar, the Edit Mode Buttons,
and the Edit Menu Button? These are important tools. Each horizontal green line shows
where a note starts and ends. The Piano Keyboard on the left shows the pitch of each note
(you can click that too). Remember we looked at ENVELOPES earlier? These are also
important as they interact with note ON (where an envelope starts) and OFF (where the note
release section starts). If you don’t have any envelopes set then the sound will probably start
but not stop when the note stops. Also keep in mind, synthesizers and other instruments will
have envelope sections of their own, and the Channel Settings envelopes won’t have any effect
for these.
Watch where you click! The mini view Piano roll in the
Channel window has a cool feature, that for long Piano roll
scores it will open the Piano roll at the location where you
clicked. Super-duper!
25Change
Local Edit Mode Channel Vertical
Menu Snap Buttons here Zoom
Mode
Drag here for Horizontal
position Drag here for Horizontal Zoom
Play Indicator
Drag here for Vertical position
Change lower Piano Roll note
data editor target here
Velocity (volume)
2. What’s with the lower Piano roll window? As we saw earlier, the lower window allows you
to adjust all sorts of per-note parameters such as note velocity, pan and also Channel
automation. If there is any Event automation (see page 66) in the pattern that the Piano roll is
part of, you can select that too and edit it in the lower window, just like in the Event editor. Even
more lazy? You can use the Channel selector to change Piano rolls within the pattern (“Change
Channel here’ above).
3. What Kinds of Channels Can Have Piano Rolls? You can have a Piano Roll for any type of
Instrument. Sustained notes will always work best when you are using Looped Samples &
Synthesizers. Loop points that let the sample play over and over again to create a sustained
sound that lasts as long as the note is held. If you don't have a looped sample, you can still
use the Piano Roll, but remember your notes may not last as long as you wanted them to.
26Man, this thing
Using Loop just keeps
Points getting' better!
Red lines are loop start/end points. You can set or edit them
in Edison (right-click the waveform and choose ‘Edit’)
4. Basic Piano Roll Editing
Piano roll Snap - You may find the note snaps to a place you didn't want it to go. If so,
change the Snap setting on the toolbar. Sometimes you just can't get the note length to
snap where you want no matter what you do. In this case, hold the ALT key to override
snap and drag the note.
Draw mode - Click on the note area, where you want it to start then release. Next grab
the middle of the note and drag it up/down. If the project is not playing, you should hear
the note you are entering as you drag it around. The length of the note will match the
length of the last note you placed or clicked. To change the length, grab the right-hand
side of the green bar and drag it. Right-click to delete notes. Modifier keys: (Shift) add
in stretch mode. (Ctrl) to make a selection. (Alt) to add in pencil mode with snap set to
'none'.
Delete - Click or Click-and-drag to delete notes. Right-click and hold on the background
to open the slice tool (F10 > General settings > Click and hold functions on). Modifier
keys: Hold (Ctrl) to make a selection, then press (Delete) Undoing Changes. Like the
Event Editor, there is a limited undo available from the Edit Menu or by pressing Ctrl-Z.
27Select (E) - Click notes or Click and drag to make group selections. Modifier
keys: (Shift) add to or remove notes from the selection.
Zoom to selection (Z) - Left-click and drag to zoom to selection. Left-click on
background to zoom out.
Play / Pause - Left-click to start/pauses playback. Right-click (while playing) to stop
and return to the last set start position. Right-click (while stopped) to return the play
head to the start of the Piano roll. NOTE: There is an option on the Right-click main
transport Stop button ‘Remember seek time’ for the start position to be remembered.
Note Colors. See the colored area beneath the spanner icon? Click it, this let you select the
color of the notes you enter. This may not seem useful now, but color-coding can really help
you out when you're trying to make sense of the notes you entered. Plus, the Edit Menu lets
you Select by color, so you can delete or copy and paste only those notes. Better still, note
colors allow you to control different MIDI Channels (see the main help in FL Studio, press F1).
5. Chords and Harmonies. One of the really nice features of the Piano Roll is that you can have
notes sound on top of each other to create chords and harmonies. Here, we're getting into
stuff that you need a musical ear for, but FL Studio does make life a little easier by giving you
a Chord stamp tool - Select the type of chord you want, and click it into the Piano roll.
Overlapping
notes/chord
6. Pitch-Bending Notes. This is really cool, but only works for FL Studio native plugins such as
MiniSynth (to pitch bend VST instruments you can automate the pitch knob for the Channel it’s
loaded into, see Event automation, page 63). If you click on the Slide Icon in the top left just
under the Edit Menu Button, you can insert pitch-bending notes (also called Slide Notes). To
28see how this feature works, place a long note on the PR, and then place a slide note above or
below it. Make sure the two notes overlap. The long note will play until it reaches the slide
portion. Then the pitch will rise towards the Slide Note and stay there until it reaches the end
of the original note. The longer the Slide Note, the longer the slide (see example next page).
Slide
switch
Note
Starts
Slides
Up
Slides
Down
Stops
7. Tweaking the Notes. Don’t forget you can individually change Volume, Cutoff, Resonance
and so on for each note in the bottom part of the Piano Roll Editor. Every time you enter a
note, you get a spike in the bottom graph that shows the level of the parameter selected by the
drop-down box on the left (labeled Event Select above). After you enter the notes, you can
change the values of any of the parameters by grabbing the top of the spikes and dragging
them. The horizontal line shows note length. You can set Velocity, Pan, Cutoff, Resonance,
and Pitch. As an added bonus, you can also use this graph as the Event Editor for Channel
Pan, Pitch, and Volume. NOTE: You can also change any note’s properties by double-clicking
it.
8. Importing MIDI Tunes. In the File Menu under MIDI, you'll find two methods of importing MIDI
sound files directly into the Piano Roll Editor. There are tons of MIDI files for various popular
melodies floating around out there. Now you can suck them directly into FL Studio and use
them in your songs. How cool is that?
29THE PLAYLIST - FROM PATTERNS TO SONGS
Now you've seen the basics of what can be done with a single pattern, we'll show you how to
program more than one pattern and link them together into a complete song.
1. The Pattern Selector & Picker Panel. FL Studio lets you create 999 different patterns of any
length. You can access the other patterns by changing the number in the Pattern Number box
or use the Picker Panel located on the left side of the Playlist (see next page). Use your mouse
to drag in the Pattern Selector. You’ll find it on the tool bar at the top of the main FL Studio
window. Right-click the pattern selector to show all patterns with data in them.
Pattern selector
Pattern/Song mode
2. Check out the Playlist (next page). This screen can be opened either using the button under
the hint bar, by hitting F5, or by right-clicking the song/pat button on the main screen (see
above). Try it, and you should get a new window that looks something like the one shown
below. The Playlist sequences (plays) Pattern, Audio and Automation Clips. Unlike most other
sequencers, the Playlist tracks are not bound to a single instrument, audio recording or even
Clip type. You can put any Clip type anywhere and even overlay Clips. Think of Clips as a
little like notes in the Piano roll. When the play-position reaches a Clip, FL Studio plays
whatever the Clip instructs it to do. This also means Playlist Clip tracks are not bound to
Mixer tracks, rather Channel Rack to Mixer routing of instruments decides the Mixer track/s
that are used. Try it - Make sure Song is selected and press Play. You should see the Play
Indicator on the Playlist start to move, and hear the patterns it is playing (use the NewStuff.flp).
When the indicator reaches the end of the Clips, it will jump back to the start of the song or
Song loop point and continue playing. If you switch to Pattern mode, FL Studio will just
repeatedly play the current pattern in the Channel Rack.
The Playlist can hold notes (Pattern Clips), automation or
‘remote control’ (Automation Clips) and audio (Audio Clips).
It’s all about CLIPS! What’s cool is that any track can hold any
Clip type. The Picker Panel holds all these Clip types.
30To add Clips, drag from the ‘Picker Panel’ to an empty area of the Playlist.
3. What's the Point? Now you can assemble a number of patterns together to make a song.
This lets you alter melodies, change beats, insert fills, and reuse some of the early parts of the
song later. The clip tracks show information about the data patterns & clips contain. The It’s
up to you how you want to work but many composers use separate patterns for drums, bass,
lead, etc. so they can work on them separately at first, and then piece the song together in the
Playlist. A good way to see the Playlist used ‘full-on’ is to see the NewStuff.flp or flp’s in the
‘Cool Stuff’ folder in the browser.
4. Data types: Each Clip track can hold unlimited number of Automation Clips, Pattern Clips and
Audio clips. To add a new instance of a clip select the clip to paste using the ‘Picker Panel’ (at
the left of the Playlist) and then click in an empty place inside the tracks or you can drag-and-
drop. Try moving the waves or cutting them with the slice tool. You can find more tutorial
projects explaining how to use them and also plenty of information in the on-line help (focus FL
Studio and press F1). See more info in the chapter Audio Tracks. You can apply automation
envelopes (e.g. to fade the volume in/out on an audio clip) on top of these audio clips.
I get it! The Playlist has a bunch of general purpose ‘Clip tracks’ the controls to the
left of the tracks are for naming and muting. Then the musical notes, sample and
automation data can be laid out in any of the Clip tracks (they are not fussy about
what they contain) easy…I think… what was that again?!
31AUDIO, PATTERNS & AUTOMATION CLIPS - EDITING
FL Studio Producer Edition lets you work with Audio, Pattern and Automation Clips. Fruity
Edition does not include Audio Clips.
To place an audio/automation & Pattern Clips, switch to draw or paint mode and left-click in an
Clip track. You can also drag a sample onto the Playlist and an Audio clip will be automatically
created. Brush mode allows you to draw multiple instances of the audio clip at once (hold the mouse
button and drag).
To erase a clip, click it with your right mouse button or use the left mouse button in erase mode.
To switch a clip instance to play another, open the clip menu (left-click the arrow in the top left
corner of the clip) and from the Select Channel menu, pick a replacement Clip.
To open the Channel Settings of the Channel associated with the clip instance, open the clip
menu and select Channel Settings.
To audition an Audio clip select Preview from the clip menu to listen to the audio clip sample (hit
the Stop button in the Transport panel to stop the preview).
Automation Clips (see page 69) can automate any editable parameter over the complete song
(instead of Event based automation). A common use of these Automation Clips is to make a fade-
in/out for an audio clip by automating its volume. However, the use of Automation Clips has a much
bigger scope than controlling the clips volume. Feel free to experiment with its use. Use the
appropriate switch to switch between Audio clips, Automation Clips and Pattern Clips handling.
32PERFORMANCE MODE
Performance Mode allows you to trigger Clips from the Playlist. You can use a mouse on the
Playlist, the typing keyboard or a controller to trigger Clips. The purpose is to create new live
performances or remixes of a projects Clip content (Audio, Pattern & Automation).
Performance mode works by treating the area before the Start Marker as a 'Performance Zone'
that allows Clips to be triggered out of sequence between tracks. One Clip can play per track, so if
you need more simultaneous Clips, use more Playlist tracks. Record mode determines whether
performances are recorded and laid out after the Start marker for later rendering.
There are LOTS of keyboard shortcuts and tool modifier keys that make working with
the Playlist really fast. For example, you can hold the Shift key while using the Pencil
or Brush tool and their action will swap with each other. You can also hold the Right-
Shift key and click to slice a Clip OR hover your mouse cursor and press the Insert
key to do the same. The Alt key releases snapping while you hold it. Press F1 and
check the manual for more!
33INSTRUMENTS - FROM SAMPLERS TO SYNTHESIZERS
Until now we've only been playing mainly with Sampler Channels. Useful but fairly basic as far as
sound generation goes. FL Studio also supports Channels that contain sounds made in real time by
software synthesizers like MiniSynth, GMS, 3xOSC, Harmor etc.. To use the proper terminology,
every Channel contains a plugin Instrument, sometimes more broadly called a ‘generator’ as some
generate automation data rather than sound. Instruments can either be a sample (in a Sampler
Channel, FPC etc), a synthesizer plugin, or some other type of instrument in combination with the
effects in the Channel Settings window. The combination of these Instruments with the sample
Channels gives FL Studio unlimited sonic potential.
1. Adding a Synthesizer Channel. There are many ways to do this. You can use the Add menu
or open the Browser > Plugin database > Generators and drag a plugin from there and drop
it on the Channel Rack or Mixer track. You can also download and install many FREE VST
instrument plugins from the web too.
Click the Plugin
Database and
drag-and-drop
Synths on a
Mixer track or
the Channel
Rack.
Click here to load a new
Instrument Channel
2. What to Expect. The new Channel button will appear in the Channel Rack and the Instrument's
graphical user interface (GUI) will appear when you click it.
3. How Do I Use them? It's important to know that most Instruments have their own help.
Pressing F1 in FL Studio will open the help to whatever was last clicked (FL Studio, a window
in FL Studio or a Plugin). If you are new to music production we would suggest starting with:
3xOSC, MiniSynth and GMS (in that order). These can be used to make just about any
professional sounding synth sound you can imagine BUT are simple enough that you won’t be
tearing your hair out. NOTE: Not all instruments are included, some are demos. BUT don’t
worry there are heaps of free ones (in fact most are). If a plugin says DEMO along the top of
the window, then it’s an additional purchase.
34Preset Sounds
4. Preset Sounds. Most synthesizer instruments have preset sounds available. In most cases,
you can get to them from the Preset selector controls by clicking on the little arrows on the
top right of the plugin window (right-click to see a big list) OR if that doesn’t work, use the
Plugin user interface. You may need to look around carefully for something to click, like the
preset selector on MiniSynth (above right). Just look for something that shows the name of the
sound in use (there’s usually arrows to show something can be changed).
5. How can I buy the demo instruments? Go to www.image-line.com > Shop. From there you
can choose plugins to buy.
6. What plugin instruments are available? See below:
My brilliant adlib performance! FL Studio
has a rolling recorder that captures all
keyboard performances. It’s always on, so
never lose that amazing adlib. Check out the
Tools > Dump score log to selected
pattern feature!
35 3xOsc (included) - This is a plain instrument that allows you to mix three Oscillators,
each of which generates a tone. The sounds on their own are not exciting, but they
are good raw material to be combined with INS panel effects and other plugin effects
(explained in a later chapter) and it’s a great place to start if you are new to synthesis.
Autogun (included) - is a universe of sounds waiting to be discovered. Based on the
Ogun synthesizer engine and Soundgoodizer effects processor, Autogun contains
4294967296 presets (Four Billion Two Hundred Ninety Four Million Nine Hundred
Sixty Seven Thousand Two Hundred Ninety Six), most previously unheard by man (or
woman, are there girls here? quick get their phone numbers!).
36 BassDrum (included) - is a flexible Bass/Kick drum synthesizer with sample-layer
support. Get ready to rumble...your neighbors!
BeepMap (included) - This is a weird one. Takes a bitmap image file and turns it into
a sound, with strange and wonderful results. This is the same kind of synth that Aphex
Twin used to embed an image of himself in a track that shows up when the track is
put through a spectrum analyzer.
BooBass (included) - A handy little bass instrument from the guy who brought you
SimSynth.
37 DirectWave (player version included) - A powerful sampler featuring a fully
programmable synthesis section, with all the usual sampler goodies. DirectWave can
also 'sample' (record sound) when loaded into a Mixer track on an effect slot.
FL Keys (included) - A realistic piano simulator with optimized CPU and memory
usage.
38 FL Studio Mobile (included*) – Is a complete music production environment that
works as an App on Android, iOS and Windows platforms plus as an FL Studio *native
plugin. In this way you can work on your mobile projects while on-the-go then continue
in FL Studio and take them to the next level.
FPC (included) - A software plugin similar to the hardware Akai MPC unit, coded &
optimized for the FL Studio platform. FPC is a self-contained multi-layer/velocity drum
machine that makes it easy to create, edit and swap drum kits on the fly. FPC supports
16 multi-layered patches for banks A and B.
Fruit Kick (included) - A kick drum instrument.
39 Fruity DrumSynth Live (included) - A Drum Synthesizer plugin that lets you define
drum hits and control them via a keyboard.
Fruity DX10 (included) - An 8-voice polyphonic (that means 8 notes at once) FM
Synthesizer. This one’s designed to give high quality sounds without eating up too
much CPU.
40 Fruity Envelope Controller (included) - Allows you to trigger envelopes that may
be linked to parameters in FL Studio. Includes an envelope editor, similar to that
used in Sytrus and FPC.
Fruity Granulizer (included) - This one helps you get cool, choppy and strange
sounds out of your samples.
41 Harmless (Signature) - Performs subtractive synthesis using an additive synthesis
engine. All sounds complex but it’s an easy synth to get great sounds out of.
GMS, Groove Machine Synth (Included) - Groove Machine Synth is multitimbral
hybrid synthesizer & FX channel from Groove Machine.
42 Harmor - Just like its predecessor Harmless, Harmor is powered by a powerful
additive synthesis engine. Its modules will look familiar to subtractive synthesizer
enthusiasts: oscillators, filters & phasers. These are featured in Harmor but, because
they are performed on additive synthesis data, rather than audio, offer more freedom.
Morphine - A powerful Additive Synthesizer with a logical, flexible architecture that
allows you to create any sound. You can do this directly by adjusting harmonics
manually or by taking any input sample and resynthesizing it into one of 4
independent voices.
43 Ogun - can produce exceptionally rich metallic and shimmering timbres, although it's
not limited to this genre. Ogun’s distinctive synthesis engine can generate more than
32,000 harmonics, modulated by high-level ‘harmonic mapping’ functions, that hand
tonal control directly to the user.
Toxic Biohazard - Features a hybrid synthesis engine, combining the best of FM
and Subtractive synthesis. With warm, analog-modeled filters and set of built-in
effects, Toxic Biohazard is convenience, simplicity, and superb sound quality.
44 Fruity Keyboard Controller (included) - An automation control which makes no
sound of its own, but can be used to control knob and sliders within FL Studio, by
mapping note pitch and velocity from the Piano roll or Channel Rack to any
automatable parameter or third-party plugin.
Fruity Slicer (included) - This one lets you slice up a beat and then play back
individual drum hits using the keyboard. You can make cool breaks really quickly
with this tool.
45 Poizone - A subtractive software synthesizer designed to bring you professional
quality results, without a learning curve that hinders your creativity. The concept
behind PoiZone was to design a synthesizer that had the smallest number of controls
while providing the maximum flexibility and features
Plucked! (included) - A synthesizer that produces specialized stringed instrument
sounds like guitars, harps, mandolins, etc.
46 Sawer - is a vintage modeling synthesizer that can cut through a mix with precisely
articulated and punchy sounds.
SimSynth Live (included) - A fully functional digital synthesizer. Use this baby to
create phat-sounding analog sounds for your dance and trance tracks.
47 Slicex (Producer) - Uses advanced beat detection algorithms to slice
song/percussion samples into pieces and make them independently playable from the
Piano roll or controller. If the wave file contains slice/region data, this will be
automatically used instead of the beat-detection algorithm. Slicex offers playback,
reordering of slices and time-stretching capabilities optimized for drum loops.
48 Sytrus (included) - Sytrus is one of the most versatile synthesizers in the FL Studio
armory, combining Frequency Modulation (FM), Ring Modulation (RM), plucked
string modeling and subtracting synthesis, and featuring a powerful envelope editor.
The synth includes a powerful editable unison mode and a comprehensive effects
section.
Transistor Bass - A subtractive synthesizer in the style of the legendary Roland
TB303™ Bassline synthesizer.
49You can also read