OCEAN REEF NEPTUNE SPACE SPECIALTY COURSE - IDM - Integrated Diving Mask Diving with a latest-genereation full face mask details, history, technique
←
→
Page content transcription
If your browser does not render page correctly, please read the page content below
IDM - Integrated Diving Mask

OCEAN REEF NEPTUNE SPACE
SPECIALTY COURSE
Diving with a latest-genereation full face mask
details, history, technique

Sergio Gamberini
Thanks to:
Carlo Bonatesta
Stefan Baier
Uthe and Miha Frlec
Letizia Beach Resort Noli-Italy
Maurizio Devincenti
Maik Schreiber
Cristoph Brix
Thierry Lucas
Gabriele Cucchia
Fabio Porcile
OCEAN REEF Diving Team

Pictures of OCEAN REEF Diving Team,
Alessio Dallai

IDM - Integrated Diving Mask

OCEAN REEF NEPTUNE SPACE
SPECIALTY COURSE
Diving with a latest-genereation full face mask
details, history, technique

Sergio Gamberini
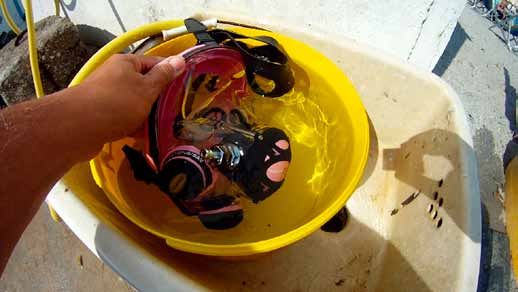
Table of Contents

1.       Introduction                                                                      6

2.       Divers and the Neptune system                                                     8

3.       A Brief History                                                                 10
         The four generations of full face masks and integrated masks

4.       Full face masks                                                                 12
         (the elements comprising a “full face” or “integrated” mask)
         4.1.    Visor
         4.1.1. Protective shield
         4.2.    The facial sealing system
         4.2.1. The face seal
         4.2.2. Harness and strap
         4.2.3. Quick release system for the mask
         4.3.    Side port (left) for communications unit
         4.4.    Side port (right) for surface air valve (SAV) and octopus
         4.5.    Breathing system
         4.5.1. Dedicated balanced regulator
         4.5.2. Airflow control
         4.5.3. Dive/Pre-Dive
         4.5.4. Orinasal pocket and air circulation
         4.5.5. Exhalation valve
         4.6.    Equalizing
         4.7.    LP Hose and 1st stage

5.       Accessories                                                                     18
         5.1.   Quick and swivel connectors
         5.2.   Corrective lenses
         5.3.   Integrated visor lights
         5.4.   SDVL (depth/pressure gauge)
         5.5.   Octopus adaptor
         5.6.   Measuring kit for choosing the correct size
         5.7.   Drinking Device
         5.8.   DDR – Dive Data Recorder

                                                                             Rel. 1.2 - 2012/01
     4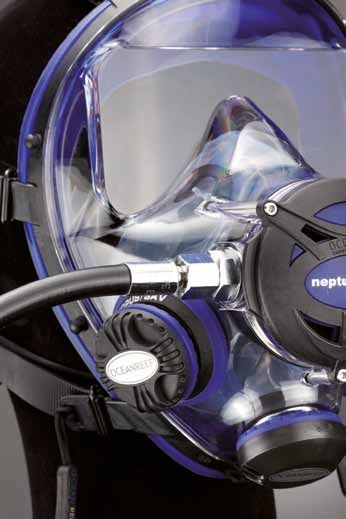
Ocean Reef Neptune Space Speciality Course
                                                Diving with a latest-genereation full face mask details, history, technique

6.       Communications Systems                                                                                      21

7.       When and why to use a full face mask

8.       Using the mask                                                                                              25
         8.1.        Preparation
         8.2.        Donning and doffing the mask
         8.3.        Donning the mask with a hood
         8.4.        Regulator sensitivity and first uses, consumption
         8.5.        Body position and effects on regulator sensitivity
         8.6.        Breathing
         8.7.        Equalizing pressure in the mask
         8.8.        Buoyancy lift
         8.9.        Defogging and fogging in the visor
         8.10.       Entering the water
         8.11.       How to descend
         8.12.       Correct head position with an integrated mask
         8.13.       How to exit the water

9.       Exercises you should know                                                                                   30
         9.1.        Surface Air Valve (SAV)
         9.2.        Different positions, including head-down
         9.3.        Flooding and clearing the mask
         9.4.        Removing and replacing the mask underwater
         9.5.        Switching from a full face mask to a conventional mask and regulator
         9.6.        Emergency procedure using Octopus with a quick-coupler

10.      Tips on mask maintenance                                                                                    37

11.      Conclusion                                                                                                  38

Rel. 1.2 - 2012/01
                                                                                                                     5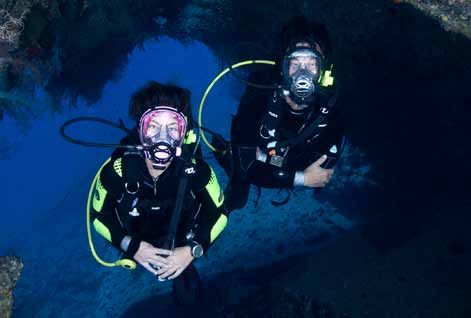
Rel. 1.2 - 2012/01
6
Ocean Reef Neptune Space Speciality Course
                                          Diving with a latest-genereation full face mask details, history, technique

1. Introduction

A mask is the crucial piece of equipment for beginning to dive. It
creates a bubble of air between the eyes/nose and the water. Sealing
this bubble against the face, a mask creates a “window” through which
we can observe what goes on under the surface of the ocean.

From the earliest goggles, masks have evolved
adopting increasingly lightweight, durable,
comfortable, and moldable materials, in more
pleasing and modern shapes. Used for fishing,
working, or simply to explore, masks have gen-
erally been kept separate from the breathing
system, whether this was a snorkel to use on
the surface or a dive regulator. In the pioneering
years it was fairly normal to use masks that cov-
ered the eyes, nose, and mouth, with strange
snorkels that had a floating ball in a joint on top
to prevent water from entering the mask during
the dive. They were cumbersome and relatively uncomfortable during the dive, since their volume
made them tend to rise toward the surface. However, they did allow divers to breathe through their
noses in a physiologically natural way.

The commonly-used conventional masks force divers to breathe unnaturally through the mouth,
but their size, light weight, design, and cost amply justify their use. They do not, however, permit
another important activity: the communication! When a diver must breathe through a mouthpiece
and does not have a sufficient volume of air in front of the mouth, this important function becomes
impossible.
Nose breathing and the possibility to communicate are special properties offered by the so-called
“full face masks”, which can be thought of as halfway between a diving helmet and the common
dive mask. They isolate the eyes, nose, and mouth, and were originally created to protect the
face from cold and pollutants. For many years they were the sole province of the military and
commercial divers.

In this book we’ll look into the latest generation of masks from OCEAN REEF, introducing the con-
cept of the “integrated mask” and expanding upon all the technical and usage aspects of a product
that will likely change the underwater diving technique radically in upcoming years.

Rel. 1.2 - 2012/01
                                                                                                               7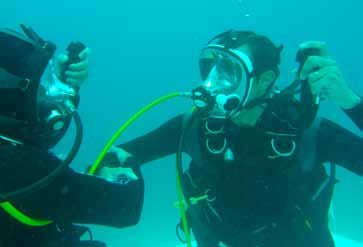
2. Divers and the NEPTUNE SYSTEM

By analyzing a diver we can define three major areas:

The lower area, the fins: we call this the THRUST area. Everything that moves us underwater can
be found in this section: fins, whether rubber or plastic, long or short, with or without channels,
and even diving vehicles!

In the middle is the section we call the PROTECTION and BUOYANCY section. This area includes
the various kinds of suits (wet, dry, neoprene, or tri-laminate) and the various classes and types of
buoyancy compensator vests. In this area, divers manage their warmth and position in the water.

The upper section is what we call the BREATHING and OBSERVATION area. This is basically the
diver’s head, where we have the MASK and REGULATOR. It is the area that controls the DIVE
COMPUTER and LIGHTING SYSTEMS, and is the area that can COMMUNICATE. So, the OCEAN REEF
FULL FACE MASK concept was born from exactly this inspiration: to create an integrated system, a
“container” offering all the functions of the DIVE MASK, a REGULATOR, a COMMUNICATIONS UNIT,
a COMPUTER, and helpful accessories like a lighting system.

As we’ll see further on, for technical reasons a “full face” mask must have its own volume which,
while clearly necessary, also creates unwanted additional buoyancy lift. To limit this buoyancy lift,
we can “fill” this space with appropriately designed elements that “integrate” system functions to
make diving safer and more comfortable.

This concept forms the basis for the idea behind the “NEPTUNE SYSTEM”, which is more than just
a full face mask; rather, it is an integrated system that can offer the diver:

•   Wide field of vision (mask)
•   Comfortable, natural breathing through the nose (regulator)
•   Communication with other divers and the surface (communication units)
•   Information on dive data (pressure gauges or dive computers)
•   Illumination of the surrounding environment without using the hands (light)

                                                                                      Rel. 1.2 - 2012/01
    8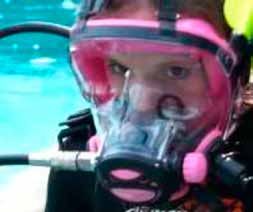
Ocean Reef Neptune Space Speciality Course
                     Diving with a latest-genereation full face mask details, history, technique

BREATHING &
OBSERVATION

PROTECTION &
BUOYANCY

THRUST

Rel. 1.2 - 2012/01
                                                                                          9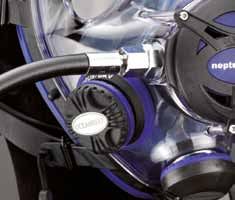
3. A Brief History
The four generations of full face masks
and integrated masks

The earliest full face masks were simply a downward extension of a conven-
tional mask to cover the mouth. There was no separation (orinasal) between
fresh and exhaled air, resulting in an increase in CO2. A conventional regula-
tor was used, connected to special rubber ports by removing the mouthpiece
and plugging the mouthpiece base into the appropriate housing. This meant
that practically any regulator could be connected. This first generation of
masks, with its simple construction, increased the protected area of the face,
but it reduced the functionality of the regulator and the safety of the product
because of the CO2 that accumulated inside the mask. Nasal breathing no possible.

                       The second generation of masks preserved the same principle of connect-
                       ing a conventional regulator to a special opening on the rubber body of the
                       mask, but introduced the concept of the orinasal pocket, or semi-mask.
                       The first connections began to appear that were made especially for mi-
                       crophones, which could be connected to communication units by wires or
                       ultrasonically.

                        The third generation of masks made a significant
                        jump in quality, because instead of connecting any
                        regulator with a mobile connection (not awfully pro-
fessional), a regulator was designed specifically for this use, and could NOT
be used for any purpose other than the full face mask. In the spirit of build-
ing a device that was not only protective but also high-performing (such as
for breathing), the focus began to grow into dedicated components and the
visor began to evolve, starting with the use of lighter and more mechanically
durable plastic polymers.

The fourth generation of masks took another quality leap forward in terms of
the regulator. The regulator was inserted inside the volume of the mask itself,
creating a more compact device. It became clear that while expanding the
field of vision, it was necessary to avoid bulky protrusions outside the mask,
and air bubbles need to be released symmetrically to improve user comfort.
In both the third and fourth generations, inhalation and exhalation were
both achieved using a regulator as in a conventional system. In the fourth
however, subjective philosophies led to the addition of an airflow control

                                                                                    Rel. 1.2 - 2012/01
  10
Ocean Reef Neptune Space Speciality Course
Diving with a latest-genereation full face mask details, history, technique
valve, in awareness that in addition to adapting to multiple intermediate pressures, this solution
also provided an answer to operating requirements.
The fifth generation is in truth the ZERO GENERATION: the leap from conventional full face mask
to the INTEGRATED mask. OCEAN REEF not only incorporates the regulator into the mask in order
to balance all that a diver needs; such as weight, buoyancy lift, visual field, breathing effort in
various positions and under differing conditions, profiles, and bubbles, but the company also strives
to incorporate everything that can be useful, increase safety, and make dives more enjoyable. This
led to the creation of a series of integrated solutions, such as the frame for using corrective lenses
inside the mask, the surface air valve that is built into the mask profile, lights installed in the upper
part of the visor and controlled by a switch/battery compartment that is efficiently connected to
the SAV, tank pressure and depth displays applied to the sides of the visor, and naturally, various
types of communications units. There are even solutions for drinking underwater as well as other
elements that “integrate” into the architecture of the mask.
Rel. 1.2 - 2012/01
114. Full face masks
(the elements comprising a “full face” or
“integrated” mask)
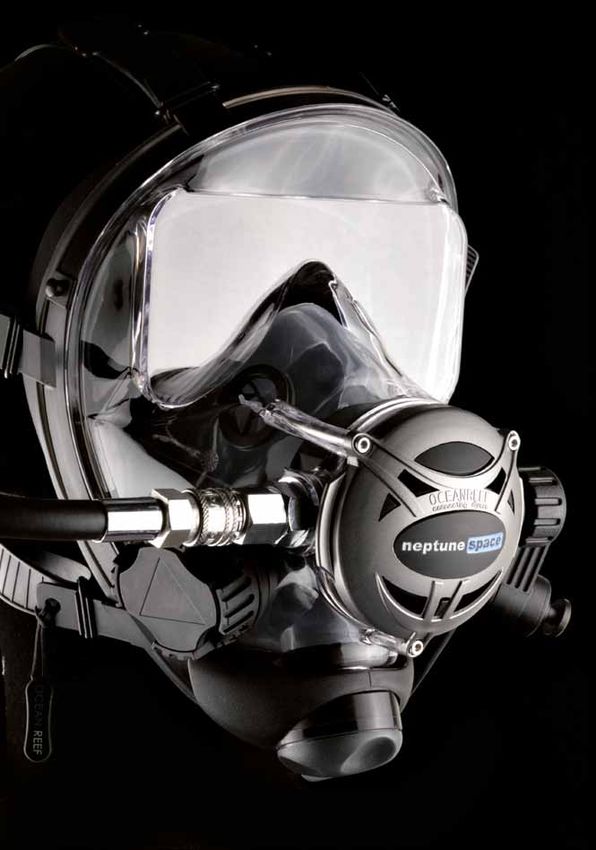
Now let’s take a closer look into how our OCEAN REEF mask is made.
4.1. Visor
This is the part that allows divers
to see and explore the underwater
world. It was generally made of tem-
pered glass. Some models currently
on the market still use it (Kirby Mor-
gan/ Scubapro). Glass is an excel-
lent transmitter of light and is highly
resistant to scratches. However, it
has lower mechanical durability and
cannot be affordably shaped, so it
can only be used flat. This means if
lateral vision is required or desired,
the only option is to create water-
proof joints that create breaks in the
view, both complicating and weigh-
ing down the mask. Shaping glass to
achieve curved surfaces would require a melting process at extremely high temperatures, and in
any event would not achieve parts that are optically acceptable for underwater use.
The visor on the OCEAN REEF mask is polycarbonate, treated on both sides with a protective
scratchproof lacquer that also protects against chemical aggression. The various technical charac-
teristics are listed below, but we can summarize by saying that the mask made of “techno-polymer”
(which is a plastic with advanced technical properties) makes it possible to shape the profile and
provides mechanical resistance to impacts far superior to glass. This allows us to achieve an excel-
lent field of vision (in which images are clear) that is well defined, and a “perceptive” area that
expands the general visual field.
It should be noted that without a mask, in the air, our stereoscopic vision is particularly broad,
but only 60 spherical degrees around what we’re looking at can be said to be in optical “focus”.
The rest is unfocused perception, but it still essential for human ergonomics. The visor we are de-
Rel. 1.2 - 2012/01
12Ocean Reef Neptune Space Speciality Course
Diving with a latest-genereation full face mask details, history, technique
scribing has both a very broad field of vision, and perception that
noticeably reduces all the blind or cloudy spots that are known
as tunnel vision in conventional masks. Masks that for physical
reasons create a tunnel in front of the eyes have no option other
than to draw the glass as near to the eyes as possible to expand
the visual field as far as possible.
4.1.1. Protective shield
The visor is provided with a protective shield that is removed before use. This shield is then put in
place for storage and when transporting the mask.
4.2. The facial sealing system
4.2.1 The face seal
The face seal is another critical feature of any mask, whether conventional, full
face, or the latest-generation of integrated models. In the OCEAN REEF model,
a patented spring-effect solution has been adopted. The shape of the seal that
rests against the face is especially wide and is “S” shaped, acting like a spring that
presses continuously and evenly along the face. The evenness of this compression
is also guided by several design solutions which convey pressure evenly along the
entire contour in contact with the face. This creates a “floating” effect as the seal
rests against the face.
Even the material was selected in order to maintain constant elasticity even under
differing environmental conditions (cold or warm).
Two sizes are available: small/medium and medium/large. A caliper is used to measure two dimen-
sions on the face, and a special table is used to select the size that is best suited for each diver’s
face. It is interesting to note that these two measurements are the
distance from below the chin to the upper part of the nose, and
the space between the cheekbones. A close-up of the kit and an
explanation of how to take these measurements is provided in the
“Accessories” section.
4.2.2 Harness and strap
The harness securely fastens the rubber section against the visor,
creating the so-called “seal of the mask”. The design ensures that
the face seal around the visor compresses consistently. The buckle
holders (6 pcs) are positioned approximately 60° from each other
and allow the strap to convey its pressure to the face in a very
comfortable and dry fashion. In fact, the strap does not exert pres-
sure directly on the rubber section as it does in traditional masks.
Rel. 1.2 - 2012/01
13Instead, acting on the harness, it uses the seal as a spring that rests on the contours of the face.
The strap in turn is not very flexible, precisely so that it can continuously transmit tension to the
harness and the rubber body without being subject to excessive stretching or contraction. It is easy
to adjust the strap (see below) thanks to the stainless steel buckles and roller.
4.2.3. Quick release system for the mask
The lower buckle holders feature quick release that make it faster and easier to
remove the mask from your face. There are two models. The classic pull fastened
to the buckle holder (G.divers model) or the bolted cross pull. Using different pro-
cedures, both allow for quick release of the lower straps and therefore removal of
the mask from the face.
In the case of the G.divers pulls, simply feel for them, grab, and pull forward. As
the buckle holder bends, it allows the strap to slide through and the mask to be
removed very quickly. Then simply lift the mask upward to remove it completely.
The quick release systems used in the other masks have the diver pull forward and
then upward with the index and ring fingers, allowing the strap to slide through
and the mask to come off.
4.3. Side port (left) for communications unit
On the left side of the mask there is a connector labeled “COMMUNICATION”. It is
covered by a removable cap that is screwed down and a flat gasket. The connec-
tor leads directly into the orinasal pocket. This is where the microphone including
service and call button is installed for both wired and wireless units. Once the cap is
removed and the flat gasket is safely in its housing, the microphone is inserted from
the outside. The screw that supports the small unit is tightened and the microphone
is bent into a position that does not interfere with the diver’s lips, checking that the
white membrane on the microphone is facing the visor.
Note: Do not over-tighten the PPT on the mask, and in particular check that the flat
gasket is still in place before inserting the unit.
4.4. Side port (right) for surface air valve (SAV), octopus and
accessories
On the right side of the G.divers mask there is a connector labeled SAV/OCTOPUS. It is covered by
a screw-on cap with a flat internal gasket. The connector has an internal one-way diaphragm valve.
This connector can be attached either to a surface air valve (SAV) or to a fitting that makes it pos-
sible to connect a conventional regulator.
SAV - surface air valve. When open, it allows the diver to breathe surrounding air while on the sur-
Rel. 1.2 - 2012/01
14Ocean Reef Neptune Space Speciality Course
Diving with a latest-genereation full face mask details, history, technique
face with the head out of the water to avoid wasting
the air in the tanks. The valve has a rotating cap
which unscrews open and screws closed. When the
valve is open the regulator does not engage. Re-
member to close this valve before diving.
In the Space, Raptor, Predator, and Iron Mask models
the SAV is incorporated with a special model in the
mask. The working principle is similar to what we
explained above. In both versions of the mask, the
right side port can be completely removed to allow
various accessories to be inserted, such as lighting
or drinking systems.
4.5. Breathing system
4.5.1. Regulator, balanced and dedicated
The regulator is an integral part of the mask, and is designed specifically for use in this application.
It is quite different from conventional models. The physics of a system like this are in fact rather
complex, since we are dealing with volumes of air between the air injection nozzle and the lungs
as well as varying physical positions assumed by the diver that affect the differences in relative
external pressure among the various components of the regulator. We must also consider general
aspects such as the option to drain residual water inside and avoid
limiting movement of the jaw that is essential for speaking. All of this
is very different from the extremely compact spaces of a conventional
regulator held between the teeth and used solely for breathing.
Air is managed in the inner mechanical area similarly to a conventional
regulator, and then enters from the bottom flowing upward along the
visor and thereby eliminating the problem of fogging. Then, through
the one-way valve (located on the orinasal pocket) it enters the inner
part of the mask and is breathed by the diver. Exhalations pass through
the lower exhaust valve, either fixed or directional. This gives the mask
also excellent properties in cold water because the diver doesn’t ex-
hale wet air from the lungs in the regulator. One of the freezing origin.
4.5.2. Airflow control
At the other side of the hose connection there is a knob. It works on the mechanism by adjusting
the flow of air to the mask. As we’ll see below, the diver’s position (looking upward, downward,
to the side, or upside down) alters the performance of the regulator and thereby changes breath-
ing effort. The diver must use the airflow control to find the right balance. For example, during
the beginning of the dive, it’s always advisable to keep the adjustment knob mostly closed. The
Rel. 1.2 - 2012/01
15mask is in fact very sensitive, and in the first few meters overly soft flow from the regulator will
manifest as a vibration in the main diaphragm. As you dive, progressively open the flow adjuster
to keep the flow consistent.
4.5.3. Dive/Pre-Dive
Alongside the flow adjuster there is a +/- two-position lever called the “Dive/Pre-Dive
system”(Space,Raptor,Predator and Iron Mask only) . Moving the lever to the “-” position partially
closes the air input opening (you can see this by looking at the regulator from above inside the
mechanism. It is a hole measuring approximately 5 mm on the chrome-plated metal body). Reduc-
tion of air flow impedes initiation of the Venturi effect, which leads to free flow. This can occur
out of the water or due to a sharp blow (generally this happens to a normal second stage when it
slaps against the water or another object. The Dive/Pre-Dive positioned on the chin is a “safety”
function to eliminate the possibility of spontaneous free flow out of the water. Immediately before
the dive, move the lever to “+” to get maximum performance from the regulator. The Dive/Pre-
Dive lever is deliberately stiff in order to prevent it from switching accidentally or unintentionally.
4.5.4. Orinasal pocket and air circulation
The orinasal pocket, or “semi-mask”, is fastened inside the mask and serves a vital func-
tion in the technology of the device: it keeps clean air for inhalation separate from
the carbon dioxide and humidity-laden exhaled air. It does so thanks to a good seal in
the nose and mouth area, two one-way valves located in the upper part of the orina-
sal pocket that act on nylon/glass valve housings, and because exhaled air is expelled
through the valve below the orinasal pocket itself. When the diver inhales, air
enters the mask from the regulator body and ventilates the visor from the bot-
tom up, providing constant anti-fogging action. The air then enters the orinasal
pocket through two symmetrical valves located on the pocket itself, and is in-
haled by the diver. When the diver exhales, the seal of the orinasal pocket and
the two valves do not allow the air to return to the main area of the mask where
it originated. Instead, it exits through the exhaust valve at the bottom of the mask.
Exhaled air is always very humid, and it tends to condense on colder sections, fogging
them. If the visor tends to fog, this may be caused by a poor seal in the orinasal pocket
or a malfunction in the valves. If this occurs, it’s a good idea to check that each component
is assembled correctly. If everything is assembled correctly yet humidity persists, it may be due to
heavy evaporation of residual water remaining on the visor (wet mask) paired with low tempera-
tures in the outside environment.
4.5.5. Exhalation valve
In the lower part of the mask we find the exhaust valve, which can be fixed (G.divers models) or
adjustable (Space/Predator/Raptor/Iron Mask models). The air exhaled into the orinasal pocket
exits through this valve. Both models feature small holes on the valve manifold and inside that di-
rect any water outside the mask. This is one of the reasons for positioning the air exhaust valve in-
dependently instead of keeping it on the regulator. The directional valve has 4 positions that allow
Rel. 1.2 - 2012/01
16Ocean Reef Neptune Space Speciality Course
Diving with a latest-genereation full face mask details, history, technique
the diver to exhale on both sides, keeping bubbles away from
the front visor, on a single side (for example when you do not
want the bubbles to interfere with a communications unit), or
to close the valve (though not completely), making it possible to
assume a head-down position without bothersome spontaneous
free flow triggered by the change in external pressure between
the exhaust valve and the regulator. It is generally necessary
to adjust the flow in advance and find the correct balance that
achieves efficient operations without wasting air.
4.6. Equalizing
Because the visor is rigid, divers cannot access their noses to simply squeeze with their fingers as
they would in a conventional mask. The mask has an adjustable internal equalizing system that
consists of silicone blocks fastened to adjustable supports, allowing divers to block their nostrils
using a special gesture on the visor (see details below). The base for the
blocks can be adjusted in three directions to adapt the system to different
configurations of the diver’s nose and face. The equalizing system must not
obstruct the nose in any way during the dive, and should only work when
necessary. This allows breathing and conversation to proceed normally
without adverse effect (speaking with a blocked nose is uncomfortable and
changes your tone of voice!)
The equalizing frame can be raised or lowered perpendicularly to the mask
using a screwdriver. The silicone blocks can be moved nearer to or farther from the nose (WITHOUT
INTERFERING WHEN NOT IN USE) using the appropriate size of insert (provided with the mask, in
three sizes: 3, 6, and 10 mm) on the seats where the silicone blocks are placed.
The inserts bring the blocks closer to the nose. This can be useful not only for
people with flatter noses, but also for those who wear the mask over a wetsuit
hood, thereby distancing the mask (and the equalizing system along with it) from
the face. The inserts bring the equalizing block to a manageable position. Finally,
the blocks can be rotated like cams on the pin to which they are fastened, allow-
ing them to be arranged closer together or father apart depending on the shape
of the nose.
4.7. LP Hose and 1st stage
The low pressure hose (LP) connects the mask to the 1st stage with standardized fittings and
lengths. The 1st stage used for CE Certification is the OCEAN REEF SL 35TX with INT or DIN 300 bar
fitting. The integrated mask functions best at an interstage pressure of 9.5 - 9.8 bar.
Rel. 1.2 - 2012/01
175. Accessories
5.1. Quick and swivel connectors
Quick connect hose. This device makes it fast and easy to connect and disconnect
the mask to and from the 1st stage (start/end of dive, transport, replacement,
etc.). The hose is connected to the 1st stage using a standard LP fitting and is
available in 800 and 1200 mm versions, as well as two types of quick
connections.
Swivel connection. This connection is used to direct the hose
connected to the mask to the diver’s preference and increases
its maneuverability. However, any type of intermediate connector
will reduce airflow capacity. This must be taken into consideration when used.
The swivel connection can be used with the quick connect hose.
5.2. Corrective lenses
Removable corrective lenses maybe installed in the mask can be. The
frame for the corrective lenses is designed like common glasses, without
the two side arms, although there are two guides (one per side) that
are inserted in a groove in the face seal, which along with the orinasal
pocket holds the frame steady inside the mask. Personalized lenses can
be inserted by an optician just as for any pair of glasses, allowing users to
choose the gradations and characteristics they want.
5.3. Integrated visor lights
The integration of a lighting system is one of the elements that best ex-
emplifies the concept of an integrated mask. The VISOR LIGHTS is a light
consisting of 6 powerful LEDs positioned in the mask visor and controlled
by a switch installed on the SAV or OCTOPUS port. Installation of visor
lights does not interfere with the diver’s use of the surface air valve. The
light creates a 12-degree oval beam focused right in front of the mask,
with a 75 lumen output and burn time of nearly 3 hours.
Rel. 1.2 - 2012/01
18Ocean Reef Neptune Space Speciality Course
Diving with a latest-genereation full face mask details, history, technique
5.4. SDVL (depth/pressure gauge)
SDVL stands for Shield Display & Visor Light. This accessory inte-
grates a depth and pressure gauge into the mask in addition to
the lighting system. These two crucial indicators are displayed
by LED bars placed to the sides of the visor, so they do not re-
duce the visual field. These LED bars consist of two sequences.
One shows the tank status (greed LEDs that go out progressively
as the air is used up) and the other displays a depth reference
(blue, yellow, and red LEDs that switch on as depth increases).
This provides a simple, immediate view of certain crucial pa-
rameters about the dive as well as access to a built-in lamp while still preserving the SAV. The SDVL
is controlled by a processor attached to the tanks.
5.5. Octopus adaptor
In masks where the SAV (surface air valve) is NOT provided standard, a fitting can
be attached for a conventional 2nd stage. This connector is screwed into the
SAV/OCTOPUS port on one end and to the second stage regulator on the other,
removing the mouthpiece. This can also be done on masks with built-in SAV.
However, a (simple) replacement of the connector on the mask is required.
This is an operation that should always be performed by specialized person-
nel.
This adaptor is available in two sizes to fit most regulator models.
5.6. Measuring kit for choosing the best size
To select the best mask size, a kit is provided that contains a
measuring tool (caliper) and a table indicating the distance
between the chin and the top of the nose and the distance
between the cheekbones.
The table shows which size works best for each face size,
minimizing possible leaks.
5.7. Drinking Device
The drinking device consists of a straw and a valve connected to the right side port (SAV/OCTOPUS)
on the mask, and can be connected to a pouch containing liquid. The connection between the
Rel. 1.2 - 2012/01
19pouch and the drinking system is a quick connector, and pouches can be changed during the dive. A
small folding valve opens the connection between the pouch and the drinking device. Simply apply
light pressure to the pouch after taking the straw in your mouth inside the mask to easily drink its
contents.
5.8. DDR – Dive Data Recorder
The DDR records activity in the mask from the moment it is in-
stalled until its internal battery runs out (on average 5 years!). It
can be installed on the mask upon request. It occupies very little
space and requires no manual activation or special care in terms
of maintenance. Any time the mask enters the water and descends
below 2 meters the DDR switches on and begins recording the dive
date and time, duration, temperature, and depth. When the dive is
over it returns to its dormant state and stores all the recorded data
in its memory. Its extreme usefulness lies not only in recording the
actual use of the product and the stresses it has undergone, but it
also helps calculate required maintenance using an algorithm pub-
lished on the OCEAN REEF website, and into which the user enters a portion of the data extracted
from his/her DDR. The DDR features an interface so that users can download all dive data and
profiles to their own computers.
Rel. 1.2 - 2012/01
20Ocean Reef Neptune Space Speciality Course
Diving with a latest-genereation full face mask details, history, technique
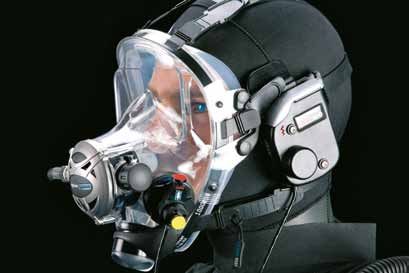
6. Communications Systems
The left side port on the mask called COMMUNICATION is dedicated to connecting the microphone
and the main controls for the communication unit. Once the screw-on cap is removed, a micro-
phone can be inserted and the activation controls for the transmitter functions can be screwed
in. This part is often called a PTT (press to talk), referring to the simplest system, consisting of
a button that allows for transmission when pressed. There can be up to two controls, in the form
of buttons to operate the volume, automatic transmission, channel changing, etc. From the PTT,
a cable leads to the transceiver unit, which can be connected to the mask using a special support
called the NACS, which attaches using two pins located on the harness, or it can be hooked to the
buoyancy compensator vest, separating it from the reception speaker mounted on the helmet or
hood. If mounted on the NACS, the communication unit includes the speaker for listening. The
communication unit is generally self-powered, combining compact size, light weight, autonomy,
and range of action. Our manual on underwater communications provides a full description of com-
munication systems and underwater communications technology.
Other communication systems can also be used including by wired, ultrasound, hybrid systems, and
systems offering video using a dive proof camera that can be mounted with the proper accessories
on the mask harness.
Rel. 1.2 - 2012/01
217. When and Why to Use a Full
Face Mask
Instead of asking yourself, “Why dive using a full
face or integrated mask”, perhaps you should
be asking: “Why not?” Sometimes conservativ-
ism can obscure advantages that would substan-
tially improve our activities. We are resistant to
change… Yet if we open our minds we realize,
“Something else exists beyond what we’ve be-
come used to using or doing.” For many experts
and beginners, it’s tradition to use a conven-
tional mask with the regulator held between the
teeth, breathing through the mouth, and it’s standard practice to teach the first rules of getting
around underwater using these tools. Basically, three simple arguments justify the use of a full
face or integrated mask.
• Breathing through the nose like Mother nature taught us.
• Protecting ourselves from the cold. We already do it with increasingly sophisticated suits – why
leave our most delicate areas exposed to the cold?
• Communicating by talking. It’s one of the most obvious natural actions of a human being. Com-
municating for practical reasons, if not only for safety.
Nonetheless, these reasons are sometimes not sufficient, and a broader examination is required.
A recent survey conducted over the internet
demonstrated that over 70% of beginners experi-
ence initial discomfort when diving and breath-
ing through their mouths with a conventional
regulator. A certain percentage is afraid of losing
the regulator, and as a consequence clench their
teeth around the mouthpiece so tightly that they
fatigue their facial muscles. Some even give up
diving for this reason, although most people con-
tinue, and adapt. Conventional masks are light-
weight, can be put on quickly, and after an initial
shock, regulators fully satisfy a diver’s demand
for air. On the surface, you can free yourself
Rel. 1.2 - 2012/01
22Ocean Reef Neptune Space Speciality Course
Diving with a latest-genereation full face mask details, history, technique
from your mask and regulator in seconds; these crucial points push the rest into the back of the
mind (cold, unnatural breathing…). What’s more, for people who are rooted in the classic concept
of diving (even a bit “militant” and “aristocratic”), speaking underwater would be “breaking the
idyll of underwater silence”)!The reality is that everything has
its place, and like always, an open and receptive point of view
(even a bit revolutionary) is what leads to true evolution.
So, we should ask ourselves, “why we dive”? If you dive for
work there are very specific requirements, and equipment must
be chosen and designed for that specific purpose, to protect
yourself from the cold, from pollution, and/or to work safely
and comfortably. Professionals, recreational and technical div-
ers select their equipment the exect way by the same rules.
According to the OCEAN REEF concept, an INTEGRATED mask should be used when:
• you want to breathe naturally through your nose rather than your mouth
• you want the freedom to have nothing clenched between your teeth and you want to commu-
nicate underwater
• you want to increase thermal protection for your face
• you want to increase your field of vision
• you want to integrate multiple functions such as lighting, dive information, breathing, and
communications in a single, compact element.
When making this choice, it’s crucial to get plenty of information on certain elements and evaluate
the features evenly and fairly. For example, an integrated mask is larger and heavier than a conven-
tional one: true! But it also integrates a regulator second stage and spaces dedicated to accessories
that could not otherwise be so conveniently integrated with a conventional mask.
It’s visually more complex, and seems more difficult to use: true! It seams but it isn’t! Aggregating
multiple elements by definition seems more sophisticated and complicated, but it’s all proportional
to the opportunities that using these elements deliver.
There are two classic questions that are always asked about a full face mask:
• What happens if it floods?
• What do I do if the regulator breaks?
An OCEAN REEF integrated mask cannot flood like a conventional mask. With a traditional mask
there is always a pressure difference between the outside and the inside, and for this reason it’s
relatively easy to flood the mask. But in the case of an INTEGRATED OCEAN REEF mask, the internal
pressure always balances to the external pressure, every time you breathe. To flood the mask you
would have to take it off your face!
If the second stage breaks or you run out of air, in conventional diving it’s relatively easy to switch
Rel. 1.2 - 2012/01
23to an alternate source, and
because the mask is sepa-
rate from the regulator, it
is not involved. With an in-
tegrated mask, options for
replacing the air source are
different, but they still exist
(SEE EXERCISES should know
– Section 9) and require the
same level of preparation
and education.
In truth, one system is NOT
an alternative to the other.
Both have applications that
depend on the subjective
needs of each activity, and as always, it’s advisable to understand both techniques so you can
handle any situation.
It’s definitely a mistake to rely on preconceived notions and not to expand your understanding.
Let’s not forget what happened with buoyancy compensator vests, or with dive computers, or more
recently with dry suits.
Rel. 1.2 - 2012/01
24Ocean Reef Neptune Space Speciality Course
Diving with a latest-genereation full face mask details, history, technique
8.Using the Mask
8.1 Preparation
For any dive to succeed, it is necessary to prepare all equipment properly.
1. Check that the mask has not been tampered with, and has no broken or missing parts.
2. How to customize the equalizing system: This op-
eration can take up to 5 or 10 min. (first time only),
because it must allow the diver to equalize comfort-
ably and safely. This can entail donning and doffing
the mask multiple times. Once the system has been
adjusted properly, you won’t need to “waste” these
precious minutes for subsequent dives. To begin, for
convenience sake move the harness to the front of
the mask so you can quickly bring it up to your face over and over. The adjustment must allow
you to keep your nose free under normal breathing conditions, and whenever you push the
forehead or front of the mask against your face, it must fully block your nostrils so that you can
equalize your ears. When the adjustment is complete, return the strap to its natural position
and run a final test by putting the mask on completely as if to begin a dive. If the results are
unsatisfactory you’ll have to start over.
3. Check operation of
a. Regulator adjustment knob – rotation in both directions
b. Dive/Pre-Dive – rotation
c. SAV surface air valve, open/closed, attachment to the mask
d. Exhaust valve (if adjustable, check all four positions)
e. Functionality of the various connected accessories
f. Connection to the first stage, check that the hose is screwed on properly
g. Regulator purge button, press to check the regulator is activated
h. Straps slide through the buckles
Rel. 1.2 - 2012/01
258.2 Donning and doffing the mask
Putting on the mask correctly is the second crucial step in the
success of the dive. A mask worn incorrectly makes the dive
unpleasant and causes leaks of air, discomfort in the jaw, ex-
cessive vibrations, and fatigue in the neck.
The correct procedure for putting on the mask is the following:
1. Check that the tank is open and the mask is connected.
2. Check that the straps are all at maximum length.
3. Put on the mask, and if installed, make sure that the surface air valve (SAV) is open to allow air
to pass.
4. Pull the central portion of the harness all the way down to the nape of your neck.
5. Adjust the six side straps beginning from with those in the middle, then the ones on the bottom,
and ending with the top two straps.
6. With the low-pressure hose connected, press the second stage purge button and check that air
flows freely.
7. Release the button and make sure that the flow of air stops.
8. Close the surface air valve (if installed) before descending.
8.3 Donning the mask with a hood
The hood must always be put on before the mask.
The mask can be worn with the face seal both over or under
the hood. Keep in mind that if you wear it “over”, the seal will
press against the material/fabric of the hood. If this material
has any nicks or gaps, they can become channels for air leaks
that will increase consumption. It’s preferable to use a hood
with a smooth neoprene exterior that is free of stitching run-
ning across the mask.
If the mask is worn under the hood, you must keep in mind that it’s possible for a small amount of
air to filter from the seal and end up inside the hood, inflating it. This phenomenon is well known
by suit manufacturers, who often include a small exhaust valve on top of the hood. If your hood
does not feature this valve, it’s advisable to install one before using it with the mask.
8.4 Regulator sensitivity and consumption
Sensitivity
Regulators are especially sensitive to changes in the diver’s position in the water and to pressure.
In shallow water (within 2-3 meters), if the adjustment is too open, you’ll notice a vibration every
time you inhale. Simply turn the flow adjustment knob gently to eliminate this vibration, which is
Rel. 1.2 - 2012/01
26Ocean Reef Neptune Space Speciality Course
Diving with a latest-genereation full face mask details, history, technique
caused by the high sensitivity of the regulator combined with the physics of the mask (internal air
volume and distance of the regulator body from your mouth).
Air consumption
People mistakenly think that the volume of the mask is correlated to air consumption. The big-
ger it is the more you consume. Wrong! Consumption is determined by other factors. If you think
about it, regardless of the volume of your mask, the air you inhale from the tank is equal to the
volume that your lungs are able to draw in. Whether you’re wearing a full face mask or using a
conventional regulator, your lungs are always the same! However, consumption can and does vary
according to certain factors.
Speaking results in higher consumption, of up to 15 to 20%. That’s reasonable, thinking about
how you breathe when you speak.
Switching from one breathing method to another requires you to adapt, and people who breathe
through their mouths tend to consume more at the beginning. However, after a bit of experience,
it’s even possible for you to reduce your consumption compared to conventional masks.
8.5 Body Position and Effects on Regulator Sensitivity
The sensitivity of the regulator changes depending on the diver’s relative position in the water. It
becomes stiffer when you look upward, and softens when you look downward, like any regulator.
In addition, exhalation effort is slightly higher when maintaining an upright position, while there
is a tendency for free flow to occur when you’re in a head-down position and the exhalation valve
is higher than the regulator.
8.6 Breathing
Breathing through the nose is absolutely natural for all of us, but it can feel a little strange when
you’ve been trained to use normal mouthpieces and regulators. The first time it can even seem a
little unsettling to keep your mouth closed and breathe through your nose, but you’ll get used to it
right away. The breathing technique is completely similar to conventional technique. Inhale, brief
apnea, and exhale. It’s incredibly pleasant to breathe so normally. Still, nothing’s stopping you
from breathing through your mouth as well if you like.
8.7 Equalizing Pressure in the Mask
With each breath, the mask balances its own internal pressure with the outside pressure, so the
mask squeeze effect (a common problem in traditional masks) cannot happen with an integrated
mask.
Rel. 1.2 - 2012/01
278.8 Buoyancy Lift and Weight of the Mask
This is a truly important concept to keep in mind when using full face or integrated masks.
1. These masks have a slightly higher volume than conventional masks.
2. They are also heavier because they integrate the regulator, which would otherwise be counted
separately.
3. It can be helpful to increase your weights by approximately 500 grams (1 lb) to compensate
for the buoyancy lift added by using an OCEAN REEF mask (other models require much more
weights!).
There are two requirements that must be satisfied to use it comfortably.
a. The weight must be contained to ensure that transport and use out of the water is not stressful
or bothersome.
b. The volume creates buoyancy lift underwater, which must be as low as possible to reduce
upward compression on the chin from below, which can create a sensation that your mask is
falling off and can tire the muscles in your neck.
Older models offered lead inserts to compensate for the strong buoyancy lift, but as soon as the
diver exited the water the mask became heavy and uncomfortable. Current technology focuses on
filling the volume of the mask with functional parts that have specific weights that are as neutral
as possible, in order to avoid weighing down the product while still decreasing the lift volume.
8.9 Defogging and Fogging in the Visor
While in conventional masks anti-fogging strategies were used for the inside of the glass, in an
“INTEGRATED” OCEAN REEF mask defogging is achieved thanks to the circulation of air described
previously.
We should however mention certain situations that we’ve learned to handle through experience.
Especially Cold Water
During dives in particularly cold water, the difference in temperature between the face and the
water surrounding the mask can be as high as 30 or more degrees. If the mask is wet inside or the
face is damp, this wide temperature gap will cause the humidity to condense on the inside of the
visor. There are two solutions to this problem.
Keep the inside of the mask and the face dry, in order to eliminate this formation of humidity.
Hold down the purge button on the regulator to “cool” the inside of the visor. This solution can
only be temporary however. It is always better to keep the inside of the mask as dry as possible.
In any event you can still spritz the inside of the visor with anti-fogging solutions.
Rel. 1.2 - 2012/01
28Ocean Reef Neptune Space Speciality Course
Diving with a latest-genereation full face mask details, history, technique
Leaks inside the mask
Under normal conditions, fogging indicates leaks, which are almost always caused by a poor seal of
the orinasal pocket against the face or the valve itself. It is also possible that the orinasal pocket
is not seated correctly or that the fastenings for the exhaust valve or the communications unit
have come loose. Regardless it is always a good idea to check the mask prior to beginning dive to
eliminate this problem. Don’t forget that in addition to humidity, CO2 also enters through these
leaks. That’s exactly what we want to avoid!
8.10 Entering the Water
Entering the water from shore is done just as you would while
wearing a traditional mask. Using the quick coupler, you can hold
the mask in your hand, make the connection shortly before, and
then put it on.
When you enter the water from a boat or pier with a traditional
mask, it’s always a good idea to steady the mask with one hand to
avoid losing it when you hit the water. With a full face mask this problem is very unlikely to occur,
but it’s still a good idea to put a hand on the regulator and hold the mask firmly.
8.11 How to descend
As you descend, it’s a good idea to assume the most comfortable position.
In general, breathing is most comfortable with your head up and your feet
down. Descending with your head downward can cause free flow and tire
your neck. You should equalize pressure using the procedure described
previously, pressing the upper section of the visor or pushing the mask
upward from the regulator. Both methods push back the equalizing device
to close your nostrils.
8.12. Correct head position with an integrated mask
There are no special differences compared to using conventional equipment.
8.13. How to exit the water
When you reach the surface, it’s worth taking a second to open the SAV (when it’s particularly cold and
you don’t wish to remove your mask), or to take the mask off entirely, leaving it attached to the hose.
Rel. 1.2 - 2012/01
299. Exercises You Should Know
All these exercises should be done first in the pool or confined area and then repeated in an open
water environment.
9.1. Surface Air Valve – Octopus Connection
• Make sure that the mask has an SAV installed
(surface air valve).
• Check that the valve works, opening and
closing easily. You should not have to overex-
ert it to open or close the valve.
• With the regulator connected to the tank and
the air valve open, put on the mask, checking
that air flows regularly.
• Open the SAV. The regulator should stop de-
livering air and you should be able to breathe
comfortably through the valve.
• Reach your entry point with your mask on and
the valve open. Some fogging in the visor is
possible and normal. It can be removed easily
by pressing the purge button on your regula-
tor to blow a little air over the visor.
• Before entering the water, close the SAV. Do
NOT twist too hard when closing the valve.
It is sufficiently closed when the regulator
begins working.
Rel. 1.2 - 2012/01
30Ocean Reef Neptune Space Speciality Course
Diving with a latest-genereation full face mask details, history, technique
9.2. Different Positions and Head-Down Position
There are six positions a diver assume
a. standing, on your feet or knees looking for-
ward (reference position).
b. swimming, horizontal and looking down-
ward (the mask will be softer than “a”).
c. sleeping, horizontal and looking upward
(the mask will be harder than “a”).
d. r side, horizontal and looking to the right
(like “a” but exhaling is easier).
Rel. 1.2 - 2012/01
31e. l side, horizontal and looking to the left
(like “a” but exhaling is easier).
f. down/under, with your head down and your
feet up (the mask will start to free flow
spontaneously from the exhaust valve. Close
the valve and use the flow adjuster until the
leak stops. Adjust your breathing).
In the first exercise, begin in the standing position, move to the swimming position, and return.
During this movement, use the flow knob to find the most comfortable adjustment.
Then, assume each of the six positions listed above, testing the adjustment and the regulator’s
“response”. In the “down/under” position, use the regulator adjustment, your own breathing,
and the exhaust valve to find a balance WITHOUT spontaneous free flow and with easy breathing.
9.3. Flooding and Clearing the Mask
a. Inhale.
b. Pull the mask away from the face by re-
leasing the lower straps. Partially flood the
mask. Then put the facial seal back in place,
ensuring that it is seated well, especially
along the upper edge, and gently press the
regulator button. The water inside the visor
will drop progressively.
Rel. 1.2 - 2012/01
32Ocean Reef Neptune Space Speciality Course
Diving with a latest-genereation full face mask details, history, technique
c. Repeat the operation, completely flooding
the mask and pressing the regulator button
until the full volume is empty again. In both
cases, the operation should be done slowly
to clearly understand how the mechanism
functions.
d. Repeat the steps “b” and “c”, trying to empty the mask only by exhaling, without pressing the
regulator button.
e. Readjust the lower straps.
Further Flooding Tests
1. Try to let water into the mask by slipping
your fingers under the facial seal on your
forehead. The air rises, the regulator opens,
and the flow of air prevents water from en-
tering (at most just a few drops will enter).
2. Try opening the SAV underwater to see what
happens, so you can recognize the problem
should you forget to close the valve before
the dive. You will feel a slow water leakage.
Rel. 1.2 - 2012/01
339.4. Removing and Replacing the Mask Underwater
a. Before removing the mask make sure you
have an emergency octopus available.
b. Kneel on the seabed.
c. Inhale
d. Remove the mask by gripping the quick re-
lease tabs and pulling forward. Then lift the
mask and slip it off your face to the right.
e. Breathe from the octopus and wait a few
seconds without a mask.
f. Hold the mask by the regulator with your
right hand. Then with your left hand, run
your thumb inside the facial seal until you
find the central connection point for the
harness.
g. Release the octopus and put on the mask,
pulling the straps behind the nape of your
neck and checking that the center of the
straps is slightly below it.
Rel. 1.2 - 2012/01
34Ocean Reef Neptune Space Speciality Course
Diving with a latest-genereation full face mask details, history, technique
h. Keeping the mask on your face, press the
regulator button to empty the mask of
water.
i. Adjust and tighten the middle straps so that
the mask fits comfortably on your face.
j. Finish clearing the mask (if necessary).
k. Check that the straps are flat against your
head without folds.
l. Tighten the straps on the bottom of the mask.
m. Tighten the straps on the top of the mask, making sure they’re not overly long (this can pull
the mask too far upward, reducing comfort and seal).
It’s a good idea to repeat the operation, this time clearing the mask by exhaling, without using
the regulator.
With the mask removed, also try to lengthen all the straps to fully adjust each strap. For even more
complete preparation, you can also practice:
• put on - clear - adjust
• put on - adjust - clear
• Also practice these exercises wearing a hood.
9.5. Switching From a Full Face Mask to a Conventional Mask and Regulator
Follow the operations above under point “e”.
a. Put on the conventional mask and clear it as you were taught by your training agency.
9.6. Alternative air assistance using Octopus with a quick connection
This procedure requires the diver to have an oc-
topus attached to a hose by a quick connection
identical to the one used on the mask.
By simulating an “out of air” scenario, divers
follow the standard conventional procedures,
and:
Rel. 1.2 - 2012/01
351. The assisting diver removes the octopus
from the quick-connect hose and signals this
operation to the other diver by showing him
or her the hose with the free quick coupler.
2. The diver who is running out of air inhales
and removes his or her hose from the mask.
3. The assisting diver attaches his or her hose
to the mask of the diver who needs air.
(Ascent procedures are the same as standard
procedures).
Rel. 1.2 - 2012/01
36Ocean Reef Neptune Space Speciality Course
Diving with a latest-genereation full face mask details, history, technique
10. Tips on Mask Maintenance
Like all diving equipment, full face masks require care and maintenance.
1. After the dive, rinse the mask with fresh water, and if possible soak it in fresh running water
for a few minutes. Leave it to dry, re-mount the protective shield and place the mask back in
the provided storage bag.
2. Periodically check the O-rings to be sure they are present and in good condition. Those on the
two side ports are especially important. Check the movement of the exhaust valve, the flow
adjustment system, the surface air valve (SAV), and the dive pre-dive. If the parts are too stiff
or stuck, contact a service center and do not dive with the mask.
3. If the mask is also used by other divers, wash it thoroughly and disinfect the parts that come
into contact with the nose and mouth. Check the manufacturer’s recommendations for this
operation.
4. Once a year, the mask should be overhauled at an authorized center to fully inspect and main-
tain all moving parts. If the mask features a DDR, use the internet service to check whether
maintenance is required.
Rel. 1.2 - 2012/01
37You can also read