Luminosity Masks What are they? How do you make one? What can you do with it?
←
→
Page content transcription
If your browser does not render page correctly, please read the page content below
Luminosity Masks
                               What are they?
                            How do you make one?
                            What can you do with it?

                                   By: Marty Kesselman
                                                                                  July, 2011

Its all about selections and masks:
As you become more familiar with Photoshop, Elements or CS, you will venture out into
the realm of layers, adjustment layers, filters, as-well-as selections and masks that can be
applied to all of the above. The mask is the underlying capability that provides
Photoshop with the capability to modify just a small portion of an image without
affecting other areas. Even Elements, that does not fully support masks, has them
attached to each adjustment layer. The selection process basically provides a “mask” to
Photoshop operations. The selection can be saved as a mask (alpha channel – Photoshop
jargon) for easy recall later. A problem with a selection or “mask” is the abruptness of
the edge. When making a selection using the selection tools, the edge is defined quite
abruptly. When working with selections and masks, the need to modify the edge slightly
to “feather” it and make the transition slightly fuzzier became clear to avoid the cut-out
pasted look. With each new version of Photoshop came some sort of improvement to
handle this need to “feather”. In recent versions the “refine edge” was given amazing
new features and the edge became “smart”.

Suppose you want to apply an adjustment to a small part of the image and use the brush
tool to direct the affect to this small area. You now have to deal with your ability to
control the brush and direct the adjustment carefully to the area of interest. What do you
do? You set your brush to be finely “feathered” (soft edged), properly sized, and apply
each stroke gently with very low “opacity”, one stroke at a time. All of this to assure a
smooth transitional affect that can not be captured by the viewer as “fixed-up”. Oops,
you accidentally affected a near-by area that you did not want to change. OK, delete that
stroke (ctl+z), and carefully make a selection that will protect the areas you do not want
to affect. This places a sharp edged mask on your ability to “paint with your brush”.
Suppose I told you it can all be done automatically, and this feature has been available for
many years and is available in Elements and CS?

The luminosity mask:
All the while, there existed a feature that seems to have gone ignored for many years, the
luminosity mask. The best source for information comes from Tony Kuyper (see his
tutorial at http://www.goodlight.us/writing/luminositymasks/luminositymasks-1.html ).
The luminosity mask is a black & white representation of the color image. If you were to
examine the channels pallet, you would see a red channel, a green channel and a blue
channel. The black and white image represented in each of the channels represents the
brightness of each color at each pixel location. The luminosity mask is a composite
brightness of all three colors representing the luminance of each pixel location and
presented as a black and white image. It looks like a black and white version of your
color image.

The basic luminosity mask is a selection that selects everything brighter than a 50% gray.
Well, not exactly. One major difference is that it also includes shades of gray brighter
than 50% and lower than 50%. The “marching ants” are presented at the 50% gray level.
The mask is the black & white image created when making the luminosity mask.

Making a luminosity mask: see Tony Kuyper;
http://www.goodlight.us/writing/luminositymasks/luminositymasks-2.html

There are a number of ways to do this.
    1- Type ctl+alt+~ (hold down the ctl and alt keys and press the ~ (tilde) key) for
        older versions of Photoshop or Elements. For CS4 or CS5 type ctl+alt+2 (hold
        down the ctl and alt keys and press the 2 key).
    2- Another way is to go to the channels pallet and ctl+click the icon in the RGB
        channel.
    3- Or drag the RGB channel down to the “load channel as selection” button ( circle
        icon).
As mentioned earlier the “marching ants” that appear in the image represent the 50% and
brighter parts of the image. However, do not be fooled. The actual mask includes the
darker parts as darker shades of gray.

Once you have made the selection you can save the selection in any of the usual ways.
   1- In the channels pallet click the “save selection as a channel” icon (the usual mask
      icon at the bottom of the pallet)
   2- Go to select>save selection
   3- A good name for this selection is “lights” since it presents the lighter parts of the
      image as shades of gray brighter than 50%.

This is a mask like any other mask. That is; white reveals and black conceals. Shades of
gray are someplace in-between. It has many uses.

Since it is a black and white rendition of your image it is easily used as a mask for a
layer.
    1- It can act as a starting point to create a complex mask, similar to using the red,
        green, or blue channel as a starter for a mask.
    2- Since it is whitest in the brighter areas of the image and darker in the darker areas
        of the image it can act as an automatic feathering feature. In this way you can
        direct adjustment layers to affect just the brighter parts of the image.
    3- This process can be reversed and by using the “inverse” of the selection you can
        affect the darker portions of the image.
    4- If we somehow managed to create a version of the mask that selected the more
        bright parts of the image, or the more dark portions we can affect just those parts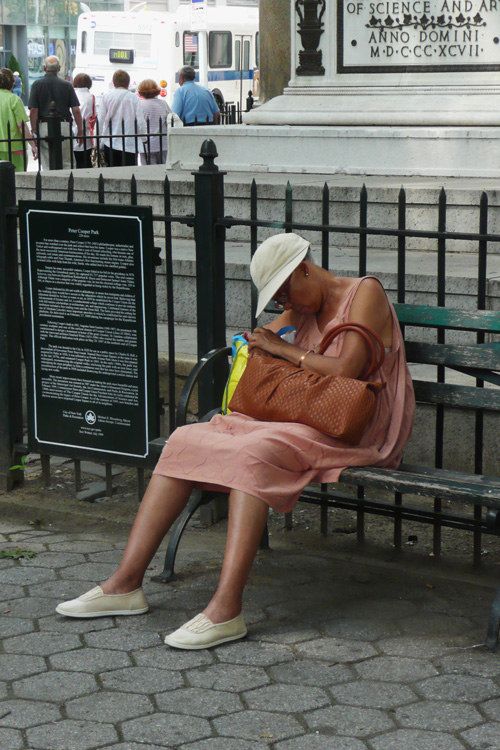
of the image and still have the automatic feathering feature of the basic luminosity
mask (I will describe how to do this).
Items 3 and 4 above are the basis for the enhanced luminosity masks we will describe
later. For now let’s consider how this might actually be used.
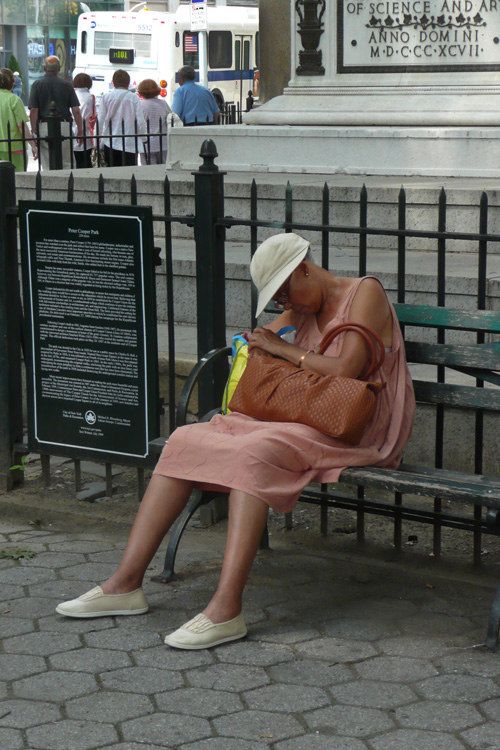
Original image Luminosity mask
The original image is slightly “flat” looking. It could use some contrast and color punch.
Lets do this with a quick adjustment and a luminosity mask.
1- Press ctl+alt+~ or 2 to create the luminosity mask. You will see the marching
ants.
2- With the selection active (marching ants visible) create a copy of the selected
pixels on its own layer.
a. Simply press ctl+j
b. Or go to layer>new>layer via copy
3- Now change the blending mode from “normal” to “Overlay”.
The image at the left has increased contrast and
                                          pumped up color. To increase the affect simply
                                          copy the top layer shown in the layers pallet
                                          above, by selecting it and pressing ctl+j.
                                          This will repeat the operation and increase the
                                          affect. If this is too much, reduce the opacity of
                                          the new layer to suit.

The image at the right is an example of the
repeated operation.

The affect can be modified by trying other
blending modes. The “soft light” blending
mode will soften the affect slightly.

Lets see what happens if we try to darken the
image using curves and increase contrast.

   1- create the luminosity mask as before
      press ctl+alt+~ or 2.
   2- Open a new curves adjustment layer
   3- Click B&W cookie icon at bottom of
      layers pallet to open the adjustment
      selections window and select “curves”.

Doing this will automatically load the
“luminosity mask” into the “curves” mask icon.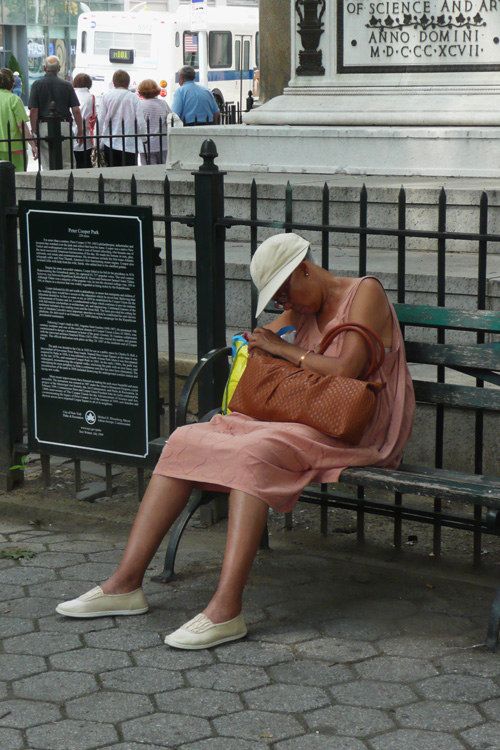
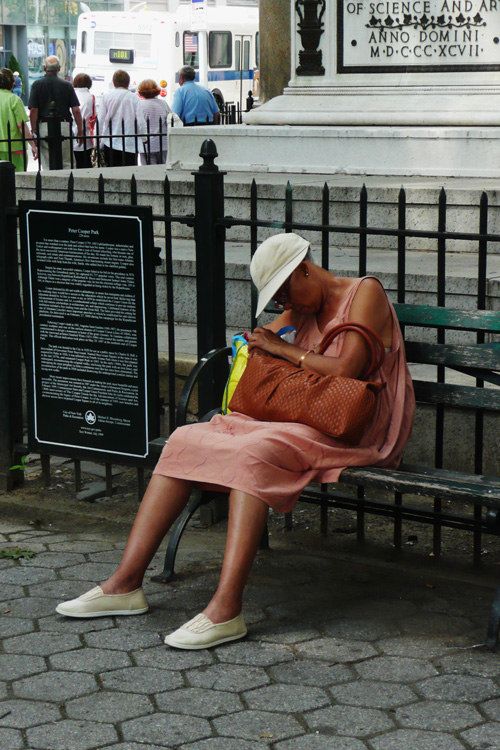
The curves adjustment has the right top corner point
dropped to slightly darken the white truck. The
curve was then placed into the typical “S” shape to
enhance the contrast.

It is interesting to note that the image is not as dark
as one would expect due to the luminosity mask
permitting the lighter areas to be affected more than
the darker as shown in the image to the left, where
the mask was disabled to demonstrate the affect of
the curves layer with no mask.

We might be interested in the mid-tones more than
the lights and the darks. To target these areas we
need to tailor the luminosity mask to the particular
brightness of interest. To do this requires some
detailed mask creating procedures which are best
executed by reading the detailed directions in Tony
Kuyper’s articles (see:
http://www.goodlight.us/writing/luminositymasks/lu
minositymasks-5.html ).
At the top of the pallets shown in the image to
                                          the left is my “actions” pallet. You can see that
                                          I have created some luminosity actions
                                          according to the directions of Tony Kuyper and
                                          I selected the narrow mid-tone luminosity mask
                                          for the curves adjustment shown at the left. The
                                          mask is seen as a very dark mask for the curves
                                          adjustment layer labeled mid-tones. The
                                          results, shown above, of the adjustment are
                                          almost completely “masked” and the radical
                                          curve in the adjustment only slightly affected
                                          the image. To increase the affect one can repeat
                                          the adjustment layer as indicated earlier. The
                                          curves layer brightened the lady’s dress and
                                          increased contrast in the mid-tones slightly.

Before we leave the applications of luminosity masking lets talk about dodging and
burning. It is during this brush intensive process that the automatic “feathering” is most
noticeable and effective. Lets try to “burn” the white truck somewhat using the
luminosity mask as an automatic feathering tool. The dodge and burn method I prefer is
the “overlay” method using a 50% gray layer that is painted with white to lighten (dodge)
and black to darken (burn).
    1- Create the overlay 50% gray layer by:
           a. Alt+click the new layer cookie icon (square in a rectangle) at the bottom
               of the layers pallet to open the new layer dialog box.
           b. Change the mode to “overlay”
           c. A check box will appear at the bottom for you to select fill with 50% gray.
               Click the check box
           d. Click OK
    2- A new layer above your active layer will appear. It is filled with 50% gray, and
       the layer is set to “overlay”.
    3- Create your luminosity mask selection
           a. In this case I used ctl+alt+~ or 2
           b. The marching ants appear.
    4- The selection has been made and is active. It will be easier to paint with black
       without the marching ants to distract you to burn the parts of the image you want
       to darken. To do this:
           a. Press ctl+h to hide the selection (marching ants vanish). To toggle the
               selection visible again simple press ctl+h again.
           b. With the selection hidden, but actually still active select a suitable brush
               tool.
                    i. I usually like to set the hardness to about 10 and the opacity to
                        about 10
                   ii. This will permit slow and careful painting. Each stroke will add to
                        previous strokes to slowly increase the amount of color you put
                        down.
           c. Press “d” to get the default black and white foreground and background
               colors
           d. Press “x” to toggle the colors to select black as foreground to burn. If you
               want to dodge you will need to choose the “inverse” selection
               (select>inverse) and make white the foreground color.
           e. Now adjust the brush size to paint with black over the area you want to
               darken. You do not have to be too accurate since the mask will help to
               feather and mask your painting so that the brighter areas are affected
               mostly.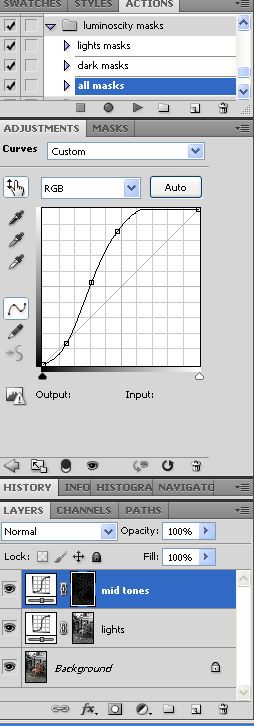
The “overlay” layer shown
                                                               at center shows that the
                                                               painting of black primarily
                                                               darkened the light area of the
                                                               truck; while the people in the
                                                               image were masked

automatically by the luminosity mask during the painting
process. This is the beauty of using the automatic
feathering feature of the luminosity mask to make the
painting process much easier to perform with almost no
concern of “painting outside of the lines”. The original
background layer image is shown at the left for
comparison.

I think it only fair for me to try to summarize the detailed
instructions in Tony Kuyper’s article to create a variety of
masks that would allow you to address different
luminosities in the image.

Important keyboard commands to remember:

Ctl+alt+~ or 2 “to select the basic lights luminosity mask”
Ctl+alt+shift+click a mask “ to intersect the mask with a selection already made”
Ctl+alt+click a mask “to subtract a mask from a selection already made”

“Basic darks” is inverse of “basic lights” (ctl+shift+i) after a selection
“Mid-tones” are entire image minus “lights” and “darks”. (subtract by; ctl+alt+click icon
of mask icon).

   1- We have already pointed out that the basic “lights” mask is created by simply
      ctl+click on the RGB icon in the channels pallet. This would be saved as “lights”.
      With the marching ants indicating the selection go to select>save selection.
          a. Alternatively use ctl+alt+~ or 2. Save the selection
   2- To create the next tonal range from “lights” to “light lights”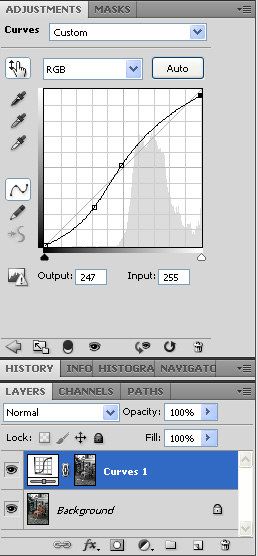
a. You want now to “intersect” the “lights” selection with itself.
                 i. You must make the “lights” channel a selection. Ctl+click the icon
                    of the lights channel in the channels pallet (you saved this earlier).
                ii. Once the ants are marching, shift+alt+ctrl+click on the same mask
                    icon to do the intersection operation. In this way, the "Light
                    Lights" mask comes from intersecting the "Lights" mask with
                    itself. Save it as “light Lights”.
               iii. The "Bright Lights" mask comes from intersecting the "Light
                    Lights" mask with itself, and so on. Save each with an appropriate
                    new name. Each gradually narrows the pixels selected to brighter
                    values.
3- To create the basic “darks” mask simply copy the “Basic Lights” mask and invert
   it in the channels pallet (you can press ctl+i to invert the mask). This would need
   to be saved with a new name “darks”.
        a. Alternatively after selecting the lights mask (ctl+click icon) and getting
            the “marching ants” choose the inverse selection (Ctl+shift+i). Save this
            selection as “darks”.
4- Progressively intersect the masks with themselves to get “Dark Darks”, “Shadow
   darks”, “Supper Darks”. Shift+alt+ctrl+click on the same mask icon to intersect a
   mask with itself, once you have selected it. Then save the selection.
5- To get the mid-tone masks, first select the entire “Basic Lights” mask image
   (ctl+a) and then subtract off one light and one dark mask. To subtract masks use
   (ctl+alt+click icon of mask).
        a. When you remove the light and dark tones of an image, you'      re left with
            mid-tones.

"Basic Mid-Tones" = "Lights" and "Darks" subtracted from the entire mask image

"Expanded Mid-tones" = "Light Lights" and "Dark Darks" subtracted from the entire
mask image

"Wide Mid-tones" = "Bright Lights" and "Shadow Darks" subtracted from the entire
mask image

"Super Mid-tones" = "Super Lights" and "Super Darks" subtracted from the entire
mask image
Result Windows Mac OS
Select individual channels Ctrl + 3 (red), 4 (green), 5 (blue) Command + 3 (red), 4 (green), 5 (blue)
Select composite channel Ctrl + 2 Command + 2
Load channel as selection Control-click channel thumbnail, or Alt + Ctrl + Command-click channel thumbnail, or Option +
3 (red), 4 (green), 5 (blue) Command + 3 (red), 4 (green), 5 (blue)
Add to current selection Control + Shift-click channel thumbnail. Command + Shift-click channel thumbnail
Subtract from current selection Control + Alt-click channel thumbnail Command + Option-click channel thumbnail
Intersect with current selection Control + Shift + Alt-click channel thumbnail Command + Shift + Option-click channel thumbnail
Set options for Save Selection As Channel Alt-click Save Selection As Channel button Option-click Save Selection As Channel button
button
Create a new spot channel Control-click Create New Channel button Command-click Create New Channel button
Select/deselect multiple color-channel Shift-click color channel Shift-click color channel
selection
Select/deselect alpha channel and show/hide Shift-click alpha channel Shift-click alpha channel
as a rubylith overlay
Display channel options Double-click alpha or spot channel thumbnail Double-click alpha or spot channel thumbnail
Toggle composite and grayscale mask in ~ (tilde) ~ (tilde)
Quick Mask mode
Additional Information:
The primary reference that I used is Tony Kuyper’s articles. His website also provides
many tutorials on the subject as well as some FAQs (frequently asked questions).
Therefore, I would like to give full credit to my source (Tony Kuyper) and provide you
with his website information and some of his website pages that I think would provide
you with very informative addition documentation on the subject.
Tony Kuyper’s home page http://www.goodlight.us/!
"
! "# $ !#%& '
http://www.goodlight.us/writing/paintinghdr/paintinghdr-1.html
Some general Tips:
In my opinion, the primary advantage of using a luminosity mask is to make it easier to
use brush strokes to implement and control blending, and for directing adjustment layers
to highlights, shadows, mid-tones.
1- Contrast- To affect contrast use dodging or burning in the same direction as the
mask. That is; dodge “lights”, burn “darks”.
a. Use overlay blending modes
2- Decrease Contrast- To affect a decrease in contrast use dodging and burning in an
opposite direction. That is; dodge “darks” and burn “ lights”.
3- Blending two renditions of the same image- Sometimes you may find that you
want to darken the sky and lighten the foreground to better balance an exposure.
There may be a complex mask to deal with, like leaves on trees.
a. Create your darkened and lightened areas on separate layers, and “blend”
them by painting on the mask layer “through a luminosity mask”.
i. The luminosity mask will provide automatic blending to help you
control a soft transition at the edges of trees.
4- Try to use the best mask for the job- Practice and discover how these masks work
in different situations.
a. Generate a full complement of luminosity masks so that you can “play”
and choose the best mask for the job.
b. Experiment, you can always throw your work away since it is on its own
layer.
c. Consider modifying your masks to address a slightly moved tonal area.
i. See Tony Kuyper:
http://www.goodlight.us/writing/magicmidtones/magicmidtones-
4.html and particularly the section on subtracting masks;
http://www.goodlight.us/writing/magicmidtones/magicmidtones-
3.htmlYou can also read