Creating a UNBC campus map in google earth
←
→
Page content transcription
If your browser does not render page correctly, please read the page content below
Creating a UNBC campus map in google earth
In this lab you are going to create a UNBC map in google earth by adding some your own data into the
google earth, such as campus buildings, place marks, making the building in 3D model, etc.

Searching for a place
First let's find out our school location in google earth. You can find a place by searching a place name.
Type in "University of Northern BC" in the search panel and click the search button. The Google earth will
take you to our school location. Here you will be adding more information to google earth to make it
specific for UNBC.

First we are going to add some pacemakers for UNBC campus such as building names

Creating a New Placemark
As we are going to add some details to UNBC campus, we will create a folder in Places to hold our
information.

    •   Right-click on My Places->Add->Folder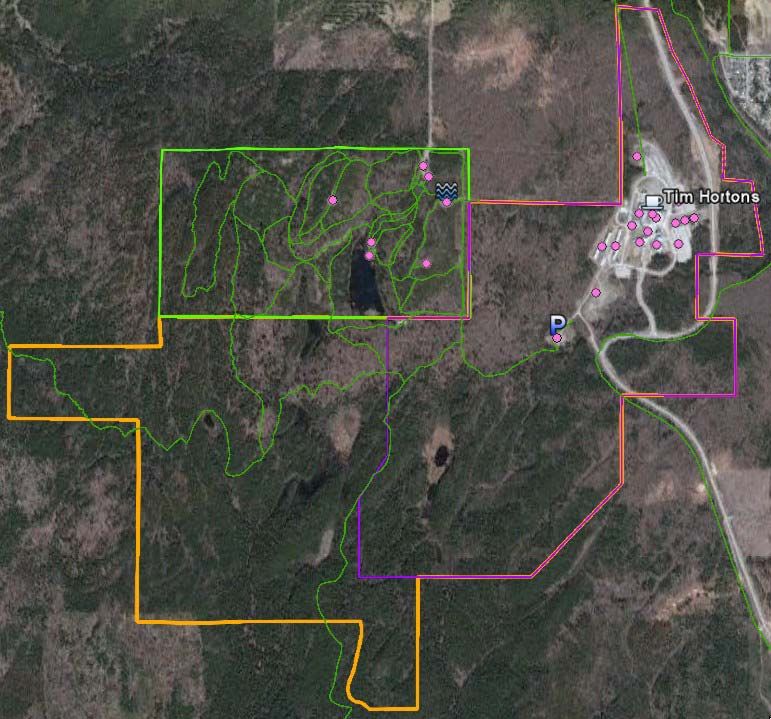
•    Type UNBC for the folder name. The UNBC folder will shows under My Places in the side
         window.
    •    Create a sub folder Buildings under UNBC by right-click on UNBC folder->Add->Folder and give
         Buildings for the name of the folder.

A placemark is a visual notation that marks a location. Each placemark appears as a pushpin with a label.
We will first create a placemark for our Library building

    •    Now create a placemark for Library building under the Buildings folder by right-click on Buildings
         folder->Add->Placemark.

         The New Placemark dialog box appears and a New Placemark icon is centered in the viewer
         inside a flashing yellow square. Position the placemark. To do this, position the cursor on the
         placemark until the cursor changes to a pointing finger and drag it to the desired location. The
         cursor changes to a finger pointing icon to indicate that you can move the placemark. You can
         also put a place mark by specify lat/long coordinates.

         The follows are the properties of a place mark

Name          the name of the placemark
              including HTML text. Here you give some description of this placemark so that a window will
Description
              popup to show the description when you move your mouse over on this placemark
Style,
              You can choose a color, scale (size) and opacity for the placemark icon
Color
View          Define the observer location
              Choose the height of the placemark as it appears over terrain with a numeric value or the
Altitude      slider. Choose Extend to ground to show the placemark attached to a line anchored to the
              ground.
              Click the icon for the placemark (top right corner of the dialog box) to choose an alternate
Icon
              icon.

         Set the following properties for the new placemark:

                                                                     Name:            Library
                                                                     Description:     UNBC Geoffrev R. Weller Library Buildi
                                                                     Style, Color:    Here just take default value. You can m
                                                                                      properties later if necessary.
                                                                     View:            Take the default values
                                                                     Altitude:        Take the default values
                                                                     Icon:            Use the default icon.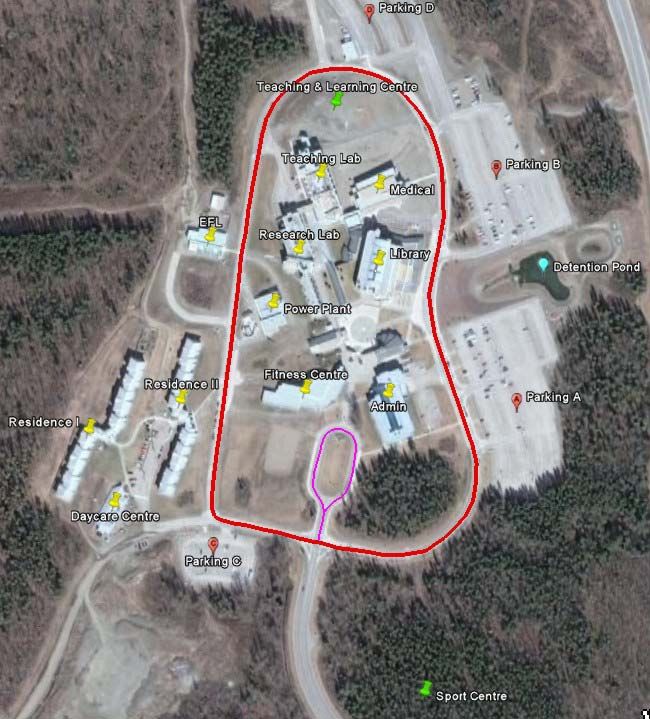
•   If the placemark's location is not correct, place your cursor over the placemark (the middle of the
        placemark) and drag it to the correct location.
    •   Click OK to apply the information you entered in the placemark dialog box.

Your placemark appears in the 3D viewer and as an entry in the selected folder. Once you save this
placemark, you can always change its position and properties by right-click on the placemark.

Now follow the same procedure to create a placemark for each building location under Buildings folder.
You can change the properties for the placemark if necessary.

You can save your map into a file which can be opened at anytime from google earth.

    •   Right-click on UNBC folder->Save Place As. Select KML for the file type.
    •   Navigate to your google_earth folder under your geog205 and give a name of unbc.kml for the
        file name. This file can be opened later on at anytime and anywhere with google earth.

Once you are done in creating placemark for each building, in the same way to create a placemark for
each parking lot. Here you can change the icon image by clicking on the icon located at upper right in the
property window. A icon selector pops up allowing your to choose different icon image. You can also
change the color and size of the placemark in the property window.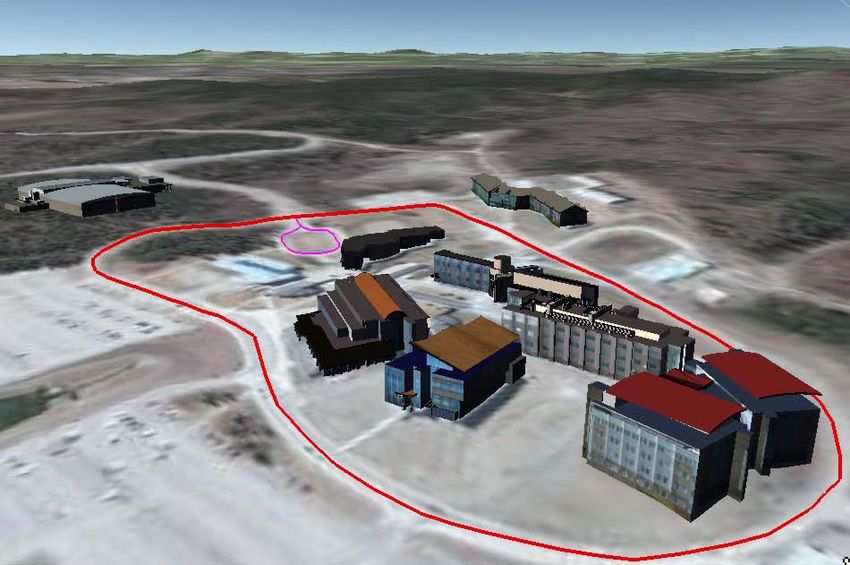
•   Now create a placemark for parking lot A. Create a subfolder Parkings under UNBC folder by
        right-click UNBC and Add->Folder.
    •   Right-click Parkings and choose Add->Placemark.
    •   In the property window, click the icon right to the Name box. Here you can choose whatever the
        icon you think can best identify your features. Click OK to close the icon selector and click OK
        again to close the property window.
    •   Now add the rest of parking lots (B, C,D)

You can always change and modify the properties of a placemark by right clicking on the placemark
either from the 3D viewer or from the side bar under My Places

Measuring distances
Google Earth offers a number of tools that you can use
to measure distances and estimate sizes. Depending
upon which version of Google Earth you are using, you
have access to the following measuring tools

    •   Measuring with a line or path (all Google Earth versions)
    •   Measuring with a circle radius or polygon (Google Earth PRO)

To use the measuring tool, click the Ruler button to open Ruler window (Tools menu) to measure length,
area, and circumference as follows. In our case, you can only measure line and path duo to the free
version of google earth we have.

    1. Position the imagery you want to measure within the 3D viewer and make sure you are viewing
       the earth from top-down and with terrain turned off for best accuracy. Measuring is calculated
       using the lat/lon coordinates from point to point and does not consider elevation.

    2. From the Tools menu, select Ruler. The Ruler dialog box appears. Consider moving the dialog
       box to a region of your screen that doesn't obstruct the 3D viewer. You can change the
       measuring units by clicking the down arrow at right.

    3. Choose the type of shape you want to measure with. All versions of Google Earth can measure
       with Line or Path. Google Earth PRO users can also measure using a polygon or circle.

    4. Click in the 3D viewer to set the beginning point for your shape and continue clicking until the line,
       path, or shape measures the desired region. (For circle, click in the center and drag out to define
       the circle.)

Measuring a Line is done by placing the starting location and the end location, which make up a single
line (one line segment). Path is made up by a number of lines which is done by by placing a number of
clicks in the viewer to make up the path. You can always click the Clear button on the Ruler window to
clear the line or path to start over.

A red dot indicates the beginning point of your shape, and a yellow line connects to it as you move the
mouse. Each additional click adds a new line to the shape, depending upon the tool you chose. The total
units for the shape are defined in the Ruler dialog box, and you can choose other units of measure for the
existing shape.

Q1. What is the straight distance from the north end of the bus loop to the parking lot A ?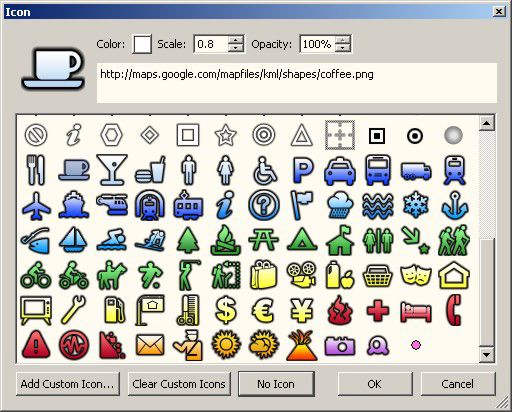
Q2. What is the parameter of parking lot B in nearest meters?

Adding Path and Polygon to the map
You can draw free-form paths and polygons in the 3D viewer and save them in your folder just as you
would a placemark. Paths and polygons share all the features of placemark data, including name,
description, style view, and location. Once you create a path, you can select and play tour of it.

Follow the steps below to draw a path or polygon in the 3D viewer for the University loop and the bus loop
(see the image above)

    •   the thicker line in red is for University campus ring loop and,
    •   the thinner line is for bus loop

Position the 3D viewer to best contain the region you want to mark. The more detailed your view, the
more closely your drawing can follow the land feature.

    •   Right-click UNBC folder and choose Add->Polygon. The New Path or New Polygon dialog box
        appears and the cursor changes to a square drawing tool. Enter the properties for your drawing
        just as you would for any other type of places data. Here we will be drawing the campus ring
        road.
    •   Type in Campus Ring Road for the name of the polygon.

    •   Click Style, Color tab and set Orange for the color (by clicking the square beside Color), 4 for
        Width and Outlined for Area Color.
    •   Now leave the property window open and move it aside to make room for drawing area. Move the
        cursor into the drawing area. You probably notice that the cursor is shown in a square shape.
    •   Go the the campus ring road to start your drawing and use the following methods to achieve your
        desired shape: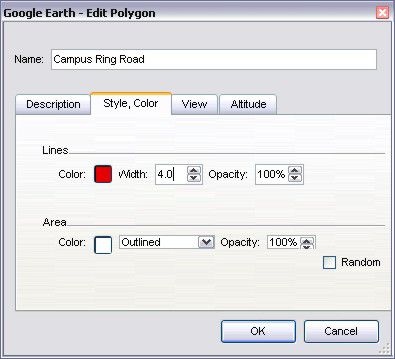
Free-Form shape - Click once, hold, and drag. The cursor changes to an up-arrow to indicate
        that you are using free-form mode. As you drag the cursor around the 3D viewer, the outline of
        the shape follows the path of your cursor. If you are drawing a path, a line appears as a result,
        and if you are drawing a polygon, a shape evolves from the path of your cursor, always
        connecting the beginning and ending points.

        Regular shape - Click and release. Move the mouse to a new point and click to add additional
        points. In this mode, the cursor remains a square drawing tool.

You can use a combination of these drawing modes to combine curved edges with straight edges. To
transition from a free-form mode to a regular mode, just release the mouse button, position the pointer to
a new place, and click. A straight edge is drawn between the last point and the most recent one. Reverse
the process to enter free-form drawing mode again.

    •   Once you are done, click the OK button on the property window. Now you should have the ring
        road showing in orange color. You can always change and modify the shape and property of the
        ring road by right-click and open the property window.
    •   In the same way, add a path line for the bus loop. Here add a path instead of polygon. Change
        the properties if necessary.

Now you should have the following contents in your UNBC folder:

    •   Buildings (Placemarks)                  •   Parkings (Placemarks)
            o Library                                  o Parking Lot A
            o Medical                                  o Parking Lot B
            o Administration                           o Parking Lot C
            o Teaching Lab                             o Parking Lot D
            o Teaching & Learning                      o Detention Pond (if
            o Research Lab                                 desired)
            o Fitness Center
            o Daycare Center                    •   Campus Ring Road (Polygon
            o Power Plant                           outline, in red)
            o Residence I                       •   UNBC Bus Loop (Path or
            o Residence II                          Polygon, in purple)
            o Northern Sport Center

Save your map to unbc.kml under your google_earth folder.

TOP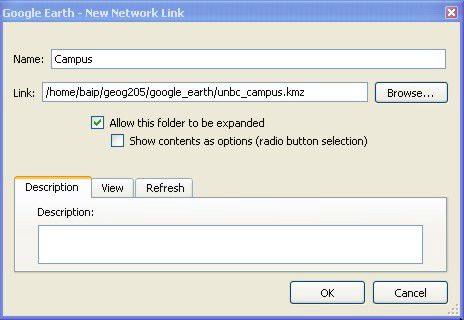
Stop here before going further. Let John know
when you hit this point.
Adding spatial data to Google Earth from ArcGIS
Exporting ArcGIS layer to Google Earth
Spatial data can be exported to google earth with symbolization and labeling.

    •   Start Osmotar server and open ArcMap with a new map file
    •   Add data unbc_reserve, unbc_endowment, trails_clip, and features from N:\labs\unbc_shp
    •   Change symbol size to 7 and color to orange for features layer.
    •   Symbolize unbc_reserve based on the Descrip field with the Hollow symbol. The outline should
        be dot-dash style
    •   Symbolize unbc_endowment with Hollow symbol (you may change the outline style and color)
    •   Symbolize trails_clip in dash green line.
    •   Rename unbc_reserve, unbc_endowment, trails_clip and features to Reserve Land,
        Endowment Land, Trails and Features respectively

Now we will group all the layers together to make a grouped layer UNBC Campus.

    •   Hold down the CTRL key and click Reserve Land, Endowment Land, Trails to highlight them all
    •   Right-click on any highlight item and choose Group. A New Group Layer is created and
        displayed.
    •   Right-click on the New Group Layer and choose properties. Change the group name to UNBC
        Campus and click OK. This will make the KML conversion easier.

The attribute information can be displayed in google earth by turning on the HTML Popup in the
properties.

    •   Right-click on Reserve Land and open attribute table. Examine the data fields, In most cases, we
        only want some useful information visible and hide the rest information. This can be done by
        hiding fields in the table.
    •   Right-click on Reserve Land and open the properties window. Click Field tab, you can see all
        attribute fields here. Click Clear All button located at bottom to uncheck all the fields. Now click
        the check mark beside the Descrip field to make only this filed visible in the table. Click Apply
        button to apply the changes.
    •   Click HTML Popup tab and check "Show content for this layer using HTML Popup Tool". This will
        make the attribute information visible in google earth when clicking spatial location. Click Verify
        button to test.

Now repeat the steps to make only Descrip filed visible an turn on the HTML Popup for Endowment
Land layer.

For Trails, make only NAME and SHPE_Leng fields visible and turn on the HTML Popup

You can make the popup show as an URL to display the name of the place.

    •   For Features, make only IDENTIY field visible.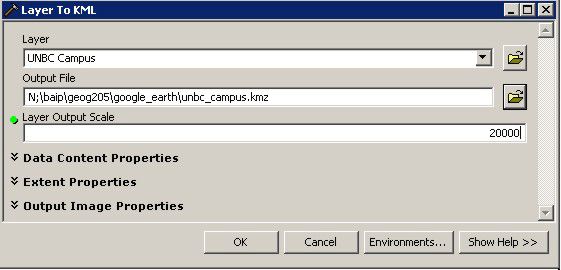
•   In the HTML Popup tab, check Show content for this layer using the HTML Popup tool.
   •   Click the radio button for As a URL and choose IDENTITY for the Field. Click OK.

Export UNBC campus layer to a KML file.

   •   Click ArcToolbox->Conversion Tools->To KML and double click Layer to KML tool

   •   Choose UNBC Campus layer from the dropdown arrow for Layer.
   •   Click the button right to Output File and navigate to your local my205\google_earth folder and
       save to the file unbc_campus.kml.
   •   Set the Layer Output Scale to 20000. Click OK
   •   Now export Features to a KML file. Give the file name unbc_features.kml under your
       google_earth folder with 20000 scale.

Adding KML to Google Earth
Now back to google earth on your local machine

   •   Right-click UNBC folder and choose Add-> Network Link.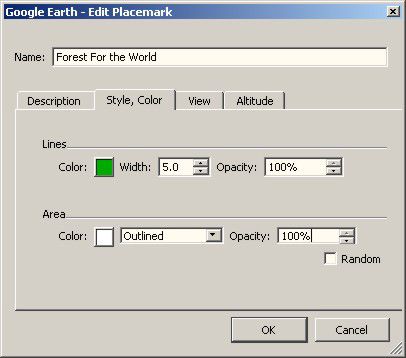
•   Give the UNBC campus for the Name and specify the location of unbccampus.kmz file. Click OK.
    •   Add unbc_features.kmz to google earth and give the network line name to UNBC Features.
    •   Two new layer is displayed under UNBC folder in google earth

You can click a feature on the map to see the attributes in the table.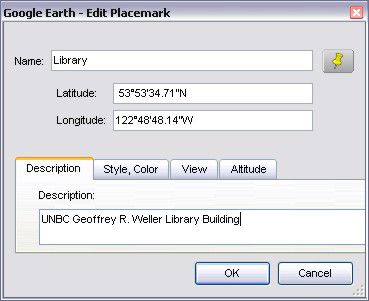
•   Click a location in Features layer, a window pops up showing the name of the feature. You can
        examin other layer's attributes.

You can customize the layer in color, size etc. in the properties window.

    •   Click the plus size beside Reserve Land to expend the layer. Right-click on Forest For the
        World and choose Properties. Here you can change the properties of the layer.
    •   Click Style, Color tab and change the Line With to 5 to make it thicker. Click OK.

    •   You can also customize the symbols for each feature. Expend the Features layer and find Tim
        Horton's.
• Right-click on Tim Horton's and open the properties window. In the properties window, click the
symbol right beside the name of the feature (Tim Horton's) to open the symbol selector.
• Choose the CUP symbol and click OK and OK again.
• Save your map to unbc.kml under your google_earth folder.
Adding 3D model (Optional)
With Google Earth, you can place custom images and Google SketchUp 3D models over the view of the
earth. Image overlays provide additional information about the underlying earth imagery. For example,
you can:
• Use a map of satellite weather data that updates to reflect the most recent weather imagery for
that region.
• Use imagery of a site plan and parcel boundaries to view the development stages over a
particular parcel.
• Use publicly available image maps (or create your own image maps) for such things as hiking
trails, camping spots, theme parks, fishing locations, national park boundaries, and more.
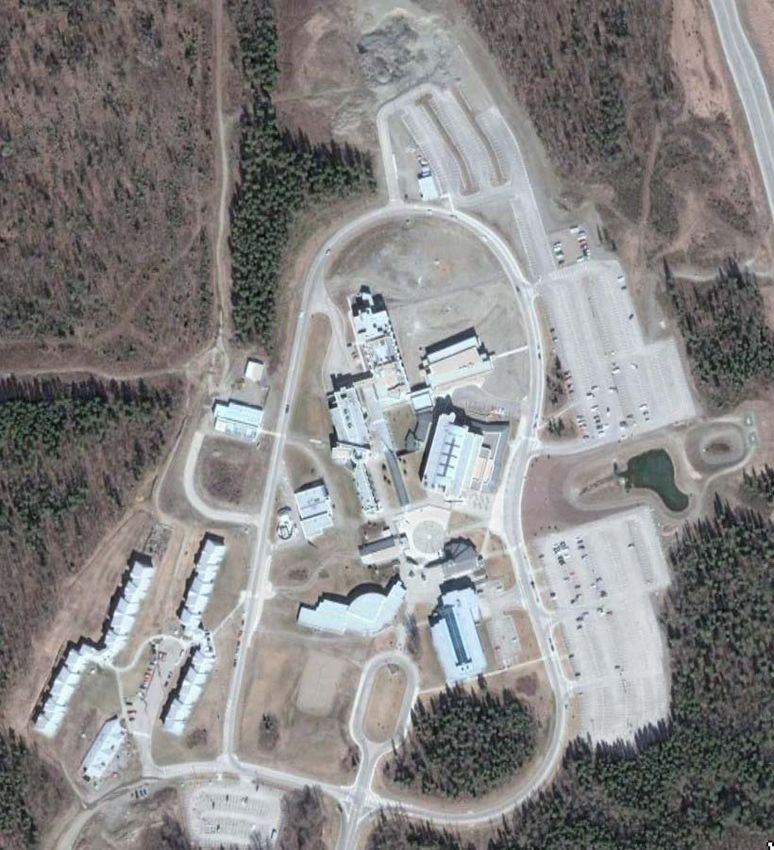
The UNBC campus was overlayed by airphoto which is 2D image. If you look at the image for CN Tower
above, you probably notice that some buildings are showing in 3D model. This is the result of using 3D
warehouse layers provided by google earth (under the Layers) or other contributor. Unfortunately, there
are no 3D buildings for UNBC available in 3D warehouse layer.
Can we make our campus building stand up (3D model)? The answer is YES.
Google SketchUp is a software allowing users to create 3D models that can be exported to google earth
with real coordinates and shared with others. For more information about Google SketchUp, visit the
product home page.
You can do a lot in SketchUp by drawing, painting, cut, paste etc. But due to time limit, we will use the 3D
images created in SketchUp from a graduate student in our map.
• Right-click on UNBC folder->Add Fodder and give folder name to Campus 3D Buildings.
• Leave the google earth open. Open a web browser and go to the google website www.google.ca
• In the search text box, type 3D warehouse. Here you can see a lot 3D model built by others
• Type in UNBC to search again. Here you can find most of UNBC buildings in 3D model created
by Eric Chow and others (Library, Medical, Teaching Lab, Research lab, Teaching&Learning,
Canfor Center, Sport Center, Student Residence)
• Click the link for Library, the building is showing in bigger picture. Click the dropdown arrow on
the Download Model button and click the download version for Google Earth 4 and save it to your
google_earth folder.
• Back to the google earth window, right-click on Campus 3D Buildings folder and click Add-
>Network Link. A window pops up allowing you to add the link file.
• Navigate to your google_earth folder and select file for Library you just downloaded from web and
click OK. The 3D model will be added to your google earth map.
• Now back to your web browser and download all the rest 3D buildings and save them in your
google_earth folder.
• Add them all into your map in google earth.
• Save your UNBC place to unbc.kml by right-click UNBC folder-> Save Place As.• You can tilt the view to see all aspect of the buildings (click the image below to see the big
picture).
The unbc.kml file can be opened at anytime from google earth. You can also send this file to friends then
they can view our campus by opening this file from google earth.
TOP
• Remember to close all programs on the terminal server Osmotar and logoff.
• Logout from the local machine
Assignment 2
Due: 6pm Nov 26th 2010
In this assignment, you are required to make a map in Google Earth. Please check Thematic Maps lab
and Google Earth lab for references.
DATA: N:\labs\geog205\asgn2
unbc_students: The dataset contains the city locations and the number of UNBC students from the
cities across Canada and oversea. The field CITY contains the city name, the
STUDENTS field have the total number of students from each city1. The map should show the number of students in graduated symbolization with an appropriate
number of classes and symbol size (such as over 7 classes, max symbol size is 30 etc.). See
Thematic Maps lab
2. The value of zero in STUDENTS field should be excluded from the symbolization
3. Prince George should be the only data value in the last class (as the number of students is way
larger than the other areas). The symbol size (radius) for Prince George should be roughly the
square root of 7.5 times (2.74) of the city of Quesnel as the number of students is ~7.5x
(manually customize the symbol for Prince George). Due the the limitation of the symbol size (25)
when your export layer from ArcGIS to Google Earth, make the symbol size for Prince George the
same size of the Quesnel and change the symbol size for Prince George manually in Google
Earth after.
4. The map should come up with popped information with only the name of the city and the number
of students
5. The map should have two placemarks: one is for Prince George and the other one is for your
hometown with the appropriate name.If you are from PG, this could either be your location within
PG, or another place significant to you e.g. parents / grandparents home.
6. The name of the file, layer and link should be appropriate and meaningful.
7. Save your google earth map to a KML file and send it to your TA.
HITS: 1 – 4 can be done in ArcGIS. 5 – 7 can be done in google earthYou can also read