LOGMEIN RESCUE WEB SSO VIA SAML 2.0 - USER GUIDE
←
→
Page content transcription
If your browser does not render page correctly, please read the page content below
LogMeIn Rescue
Web SSO via SAML
      2.0
    User Guide
Contents
Introduction to Rescue SAML 2.0...........................................................................................3
Document Overview.............................................................................................................................................................3
Abbreviations, Definitions, and Acronyms......................................................................................................................3
Abbreviations......................................................................................................................................................................3
Definitions............................................................................................................................................................................3
References...............................................................................................................................................................................4
LogMeIn Rescue SAML 2.0 Overview....................................................................................5
Physical Overview of How Rescue SSO Works.............................................................................................................5
IDP-initiated SSO with POST Bindings.............................................................................................................................5
SP-Initiated SSO with Redirect (GET) Bindings..............................................................................................................5
IDP Requirements.....................................................................................................................6
Connection..............................................................................................................................................................................6
SAML 2.0 Web SSO Profile.................................................................................................................................................6
Signature.............................................................................................................................................................................6
Response Encryption.......................................................................................................................................................6
Configuration.............................................................................................................................7
IDP Configuration...................................................................................................................................................................7
Assertion Consumer Service URL.................................................................................................................................7
Important Assertion Configuration for Security Context.........................................................................................7
ADFS 2.0 Configuration...........................................................................................................9
ADFS Relying Party Configuration....................................................................................................................................9
ADFS Relying Party Claim Rules.......................................................................................................................................11
Edit the Claim Rules.........................................................................................................................................................11
Configure the Claim Rule...............................................................................................................................................13
Configuring LogMeIn Rescue SAML 2.0 with Azure Active Directory.............................15
Prerequisites..........................................................................................................................................................................15
Configure your Azure Active Directory Account..........................................................................................................15
Configure LogMeIn Rescue...............................................................................................................................................16
Test the Configuration.........................................................................................................................................................17
Troubleshooting SAML 2.0 Configuration ..........................................................................18
Basic SAML Error Codes....................................................................................................................................................18
Rescue Specific SAML Error Codes................................................................................................................................19
Rescue Specific Login Error Codes.................................................................................................................................19
Common Mistakes...............................................................................................................................................................19
More Rescue Side Troubleshooting..............................................................................................................................20
Appendix: IDP Server Configuration.....................................................................................21
IIS Configuration...................................................................................................................................................................21
Apache Tomcat Configuration.........................................................................................................................................22
ii LogMeIn Rescue Web SSO via SAML 2.0 User GuideIntroduction to Rescue SAML 2.0
Document Overview
This document describes how to configure LogMeIn Rescue to use Security Assertion Markup Language
(SAML) 2.0 with your Identity Provider (IDP) (for example, ADFS 2.0).
SAML is an XML framework for transmitting authentication and authorization data over the Internet.
Through this framework, SAML enables different security services to exchange and process security
information. For making this exchange possible, SAML defines the structure of documents that transport
security information between services.
Abbreviations, Definitions, and Acronyms
Abbreviations
• SAML: Security Assertion Markup Language
• IDP: Identity Provider
• MAH: LogMeIn Rescue Master Account Holder
• ADFS: Active Directory Federation Services
• UTC: Coordinated Universal Time (UTC) is the primary time standard by which the world regulates
clocks and time.
Definitions
Master Account The Master Account Holder is the owner of the LogMeIn Rescue account and has
Holder complete control over all areas of the Administration Center. He and the Master
Administrators are the only users with access to the Global Settings tab.
Technicians Technicians provide remote support using the LogMeIn Rescue Technician Console.
Technicians can choose to run the Technician Console in a supported browser or
as a desktop application.
Administration Administrators use the LogMeIn Rescue Administration Center to configure LogMeIn
Center Rescue to reflect any support organization; from one support technician, to teams
of support technicians with different responsibilities and capabilities. The online
interface is used to create and assign permissions for other administrators and
Technician Groups. Administrators can also create support channels, which are
web-based links that automatically connect customers to technicians.
Company ID Unique identifier of the Rescue account.
Tip: To obtain your unique company ID, see the sample code under Single
Sign-On on the Global Settings tab of the Administration Center.
Copyright © 2021 LogMeIn, Inc. 3Rescue User SSO A per-technician ID defined in the Single Sign-On ID field on the Organization tab
ID of the Administration Center when adding or editing organization members.
Certificate Public Encryption that uses a private/public key pair, thus ensuring that data can be
key/Private key encrypted by one key pair, but only decrypted by the other key pair.
References
• Wiki SAML 2.0: http://en.wikipedia.org/wiki/SAML_2.0
• SAML Specifications: http://saml.xml.org/saml-specifications
• ADFS 2.0: http://technet.microsoft.com/en-us/library/adfs2(v=ws.10).aspx
4 LogMeIn Rescue Web SSO via SAML 2.0 User GuideLogMeIn Rescue SAML 2.0 Overview
Rescue currently supports the following SAML 2.0 methods of authentication:
• SP-initiated
• IDP-initiated
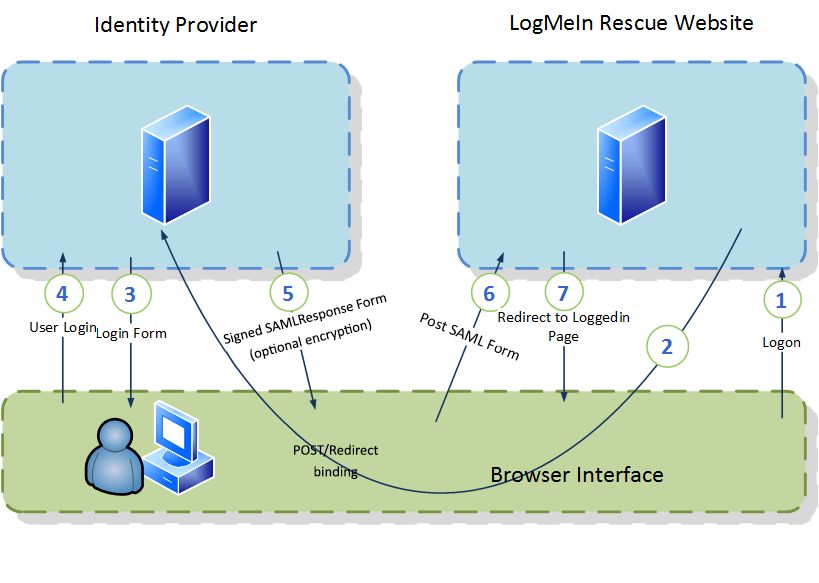
Physical Overview of How Rescue SSO Works
IDP-initiated SSO with POST Bindings
With HTTP POST binding, Rescue responds to a request with a document containing an XHTML form.
See Chapter 4.1.1 in the Oasis SAML 2.0 Technical Overview document.
SP-Initiated SSO with Redirect (GET) Bindings
With HTTP Redirect binding, you can send the SAML messages via HTTP GET requests by setting the
message as a query string in the URL. See Chapter 4.1.2 in the Oasis SAML 2.0 Technical Overview
document.
Copyright © 2021 LogMeIn, Inc. 5IDP Requirements
Connection
The Rescue website uses HTTPS communication for HTTP connection. Your IDP must support the HTTP
protocol over HTTPS connection (443).
SAML 2.0 Web SSO Profile
Your IDP must support SAML 2.0 Web SSO Profile.
Tip: See the Oasis SAML 2.0 Technical Overview.
Your IDP must support one of the following SAML bindings:
• HTTP POST Binding Authentication Response format
• HTTP Redirect Binding (GET) Authentication Response format
For more information, see SAML 2.0 Bindings.
Signature
Rescue validates the signature of the Assertion and Response. You need to sign the Assertion and
Response with the same private key.
Response Encryption
The LogMeIn Certificate public key is attached to each assertion request for enhanced security. It is
recommended to use the key to encrypt the SAML response that contains assertions in order to protect
private data at each end of the SSL pipe.
No further configuration is necessary since Rescue automatically detects if the response is encrypted
or not.
Important: When using the HTTP Redirect Binding, ensure that the IDP server is able to parse
longer URLs, as encrypted query strings may exceed the predefined limit. For IIS and Apache
Tomcat configurations, see Appendix: IDP Server Configuration on page 21.
6 LogMeIn Rescue Web SSO via SAML 2.0 User GuideConfiguration
IDP Configuration
Assertion Consumer Service URL
Set the ACS URL in your IDP Federation configuration:
https://secure.logmeinrescue.com/sso/saml2/receive
Important Assertion Configuration for Security Context
NameID Name ID is part of the Subject section in the SAML Response message. The IDP must
[Required] include the user identifier. There are two ways to provide the identifier:
Technician The NameID value contains the Rescue technician SSO ID. It is a property of
SSO ID the Rescue technician and you can edit it in the Admin Center.
Note: The NameID format is not restricted by Rescue.
Sample:
jdoe
Technician The NameID value contains the Rescue technician Email address. It is a property
Email of the Rescue technician and you can edit it in the Admin Center.
Note: The NameID format is not restricted by Rescue.
Sample:
jdoe@logmein.com
CompanyID The IDP must provide the Rescue CompanyID, which is a unique identifier per LogMeIn
Attribute Rescue account. The certificate is assigned per Rescue account, and we use the CompanyID
[Required] to find the public key.
Sample:
123456
Copyright © 2021 LogMeIn, Inc. 7Tip: To obtain your unique company ID, log in to the LogMeIn Rescue Administration
Center, and navigate to Global Settings > Single Sign-On.
Language If the attribute includes a language code (IETF language tag format), the IDP sends it to
[Optional] Rescue. If the code matches an existing Rescue language, the Rescue website is displayed
in that language. See the LogMeIn Rescue Administrators Guide for a list of supported
languages.
Sample:
en-US
8 LogMeIn Rescue Web SSO via SAML 2.0 User GuideADFS 2.0 Configuration
ADFS Relying Party Configuration
You can configure Relying Party either manually or by importing the ServiceNow Metadata into your
ADFS server. Manual configuration of the Relying partner appears to be easier to implement, therefore
the below procedure describes manual configuration.
1. Open the ADFS 2.0 Management console and select Action > Relying Party Trusts
The Add Relying Party Trust Wizzard is displayed.
2. Click Start.
The Select Data Source windows is displayed.
3. Select Enter data about the relying party manually, then click Next.
The Specify Display Name window is displayed.
4. Specify a display name ,such as “LogMeIn Rescue SSO”, and enter any notes you want. Click Next.
The Choose Profile window is displayed.
5. Select the ADFS 2.0 Profile, then click Next.
The Configure Certificate window is displayed.
6. Make sure no token encryption certificate is selected, then click Next.
The Configure URL window is displayed.
7. Make sure no settings are enabled, and click Next.
The Configure Identifiers window is displayed.
Copyright © 2021 LogMeIn, Inc. 98. Enter the URL of the LogMeIn Rescue Web site to which you connect as the Relying Party trust
identifier. In this case, use https://secure.logmeinrescue.com, and click Add.
9. Click Next.
10. In the Choose Issuance Authorization Rules window, select the Permit all users to access this
relying party option. Click Next.
The Ready to Add Trust window is displayed.
11. Click Next.
The Finish window is displayed.
12. Clear the Open the Edit Claim Rules dialog for this relying party when the wizard closes check
box. Click Close.
n the Relying Party Trusts window, the new Relying Party is displayed.
13. Right-click the Relying Party you have just created, and select Properties.
The LogMeIn Rescue SSO Properties window is displayed.
Remember: The name of this window depends on the display name you specified earlier.
14. In the LogMeIn Rescue SSO Properties window, select the Endpoints tab.
15. In the bottom left corner, click Add.
The Add an Endpoint window is displayed.
16. Set the following values:
Endpoint type: SAML Assertion Consumer
Binding: POST
17. In the URL field, type: https://secure.logmeinrescue.com/sso/saml2/receive.
10 LogMeIn Rescue Web SSO via SAML 2.0 User Guide18. Click OK.
The new SAML Assertion Consumer is displayed in the window.
19. In the top right corner, click the Advanced tab.
20. Set the Secure hash algorithm to SHA-256.
21. Click OK.
The LogMeIn Rescue SSO Properties window closes.
ADFS Relying Party Claim Rules
Edit the Claim Rules
This enables proper communication with Rescue.
1. In the Relying Paty Trusts window, right-click the Relying Party and select Edit Claim Rules…. .
The Edit Claim Rules for LogMeIn Rescue SSO window is displayed.
Copyright © 2021 LogMeIn, Inc. 11Note: The name of this window depends on the display name you specified earlier.
2. On the Issuance Transform Rules tab, select Add Rule…. .
The Select Rule Template window is displayed.
3. Select Send LDAP Attribute as Claims as the claim rule template. Click Next.
The Configure Rule window is displayed.
4. In the Claim rule name field, give the Claim a name, such as “Email”.
5. Set the following values:
• Attribute Store - Active Directory
• LDAP Attribute - E-Mail-Addresses
• Outgoing Claim Type - E-Mail Address
6. Select Finish.
The new rule is displayed on the list.
7. In the bottom left corner, select Add Rule... .
The Select Rule Template window is displayed.
8. Select Transform an Incoming Claim as the claim rule template to use. Click Next.
9. In the Claim rule name field, give the Claim a name, such as "Email to Name ID".
10. Set the following values:
• Incoming claim type - E-mail Address
Important: Must match the Outgoing Claim Type in rule #1.
• Outgoing claim type - Name ID (This is requested in Rescue requirements.)
• Outgoing name ID format - Email
Note: In section you can set the Name ID to user name or another custom value. If you do
this, you must set the Name ID format to Persistent.
12 LogMeIn Rescue Web SSO via SAML 2.0 User Guide11. Select Pass through all claim values, then click Finish.
The new rule is displayed on the list.
Configure the Claim Rule
1. In the Edit Claim Rules for LogMeIn Rescue SSO window, Select Add Rule… .
Note: The name of this window depends on the display name you specified earlier.
The Select Rule Template windows is displayed.
2. Select Send Claims Using a Custom Rule as the claim rule template to use, then click Next.
3. In the Claim rule name field, give the Claim a name, such as “CompanyID”.
4. Fill the Custom rule field: => issue(Type = "LMIRescue.CompanyID", Value = "[your
company ID]");
5. Click Finish.
The new rule is displayed on the list.
Copyright © 2021 LogMeIn, Inc. 136. Test the implementation at your ADFS URL: https://.com/adfs/ls/IdpInitiatedSignOn.aspx 14 LogMeIn Rescue Web SSO via SAML 2.0 User Guide
Configuring LogMeIn Rescue SAML 2.0 with Azure Active
Directory

Prerequisites
      • An Azure Active Directory Premium subscription (P2 recommended)
      • An active LogMeIn Rescue subscription

             Restriction: You will likely need the help of Rescue Support to perform certain steps of the
             configuration.

Configure your Azure Active Directory Account
      1. Log in to https://portal.azure.com using your premium subscription.
      2. Navigate to Azure Active Directory > Enterprise Applications > New application.
         The Add an application menu is displayed.
      3. Select Non-gallery application.
         The Add your own application menu is displayed.
      4. Give the new application a name and click Add.
         Your application is created.
      5. Navigate to Single sign-on > SAML-based sign-on.
      6. Under Basic SAML Configuration, set the following values:

           Identifier (Entity ID)   https://secure.logmeinrescue.com/
           Reply URL (Assertion  https://secure.logmeinrescue.com/Sso/Saml2/Receive
           Consumer Service URL)

      7. Under User Attributes & Claims, click the Add new claim button.
      8. Navigate to User Attributes & Claims > Add new claim to provide the following information.

           Name                             LMIRescue.CompanyID
           Source attribute                 Your Rescue company ID between quotation marks. (For example,
                                            "123456".)

      9. In the sub-menu, click Users and groups.
      10. Add the users and/or user groups you want to have access to LogMeIn Rescue.

Copyright © 2021 LogMeIn, Inc.                                                                              15
Configure LogMeIn Rescue
Important: Some of the below steps require access to the LogMeIn Rescue internal network.
Contact Rescue Support to help you perform the configuration.
1. Log in to LogMeIn Rescue with your Master Account Holder (MAH) account, and launch the Admin
Center.
2. In the Admin Center, create the desired technician accounts
Note: The email addresses for these technicians should match the email addresses provided
within the Azure Portal in Configure your Azure Active Directory Account on page 15.
3. Perform the LogMeIn Rescue SAML setup at https://secure.logmeinrescue.com/SSO/Saml2/Settings.
Important: You will likely need the help of Rescue Support to perform this step.
a) Make sure the SAML2Active option is checked.
b) Copy the Login URL value from the Azure Portal and paste into the SAML2IDPUrl field.
c) Copy the Azure AD Identifier value from the Azure Portal and paste into the SAML2IDPIssuer
field.
d) Set Binding to httppost (1) .
e) Set LoginType to email (1).
f) Click the Submit button.
4. Download the SAML Signing Certificate (Base64) from the Azure Portal.
5. Open the .cer file you downloaded, and copy the certificate value to the clipboard (without the BEGIN
CERTIFICATE and END CERTIFICATE lines).
6. Go to https://secure.logmeinrescue.com/SSO/Saml2/CertSettings, and paste the certificate value
into the textbox, then click the Submit button.
Important: You will likely need the help of Rescue Support to perform this step.
16 LogMeIn Rescue Web SSO via SAML 2.0 User GuideTest the Configuration
1. Log in to the Azure Portal.
2. At the bottom of the page, click the Test button.
3. Click Sign in as current user, and follow the usual Azure AD sign-in process.
4. Choose your Azure AD account.
You are automatically logged in to your associated Rescue account.
Copyright © 2021 LogMeIn, Inc. 17Troubleshooting SAML 2.0 Configuration
Rescue indicates the possible problems with error codes. There are also error codes for unexpected
problems. The codes or texts may appear as a result or subcode at the client. Below, you find a detailed
list of the codes with a few words about the most common problems.
Basic SAML Error Codes
RelayStateMissing (1) The relaystate is not found. The IDP did not provide it.
RelayStateExpired (2) The relaystate has expired. The login process took too
much time.
ResponseRelayStateIsWrong (3) The relaystate does not match the expected state. It may
be the response for a different request.
ResponseNotSuccess (4) The response indicates that the authentication failed.
ResponseDestinationIsWrong (5) The response destination does not match with our
address.
ResponseExpired (6) The response has expired. The login process took too
much time.
ResponseNotContainAssertion (7) Fatal error: the response must contain at least one
assertion.
ResponseIssuerIsEmpty (8) The response issuer was empty. The IDP must provide
the issuer and it must be the same value as in our
configuration.
AssertionExpired (9) Assertion has expired. The login process took too much
time.
AssertionSubjectNotValid (10) The assertion contains an invalid subject.
AssertionSubjectDataAddressIsWrong (11) The assertion subject’s address is wrong. It must match
with the target address (the SP address).
AssertionSubjectNotOnOrAfterNotValid The assertion subject has expired. The login process took
(12) too much time.
AssertionConditionNotOnOrAfterNotValid The assertion condition has expired. The login process
(13) took too much time.
AssertionConditionNotBeforeNotValid (14) The assertion condition has expired. The login process
took too much time.
IDPConfigurationIsWrong (15) There is an error with the IDP configuration. Ensure that
you configured the Rescue side of the SAML login
correctly. Also check the subcode, which may indicate
some concrete error.
ResponseSignatureNotValid (16) The signature of the response is not valid. Ensure that the
configured public key is really the public key of the IDP
certificate.
18 LogMeIn Rescue Web SSO via SAML 2.0 User GuideAssertionSignatureNotValid (17) The signature of the assertion is not valid. Ensure that the
configured public key is really the public key of the IDP
certificate.
NameIDNotFound (18) Fatal error: NameID cannot be found in the response. It is
key information about the user.
SAMLComponentError (254) Internal error with the SAML component. This is a Rescue
issue.
UnspecifiedError (255) The cause of the error is unknown.
Rescue Specific SAML Error Codes
RescueCompanyIDMissing (1) Company ID is missing. Provide your company ID in the SAML
assertion as defined in the documentation.
ResponseIssuerIsWrong (2) The issuer value of the SAML response is not the same as the
configured one. It must be exactly the same value.
AssertionIssuerIsWrong (3) The issuer value of the SAML assertion is not the same as the
configured one. It must be exactly the same value.
NameIDPolicyFormatMismatch (4) The NameID policy format is different than the configured one.
Ensure to provide the same format as in the configuration.
UnspecifiedError (255) The cause of the error is unknown.
Rescue Specific Login Error Codes
loginSAML_UnknownError (999) The cause of the error is unknown. It is probably a Rescue
issue.
loginSAML_InvalidLogin (1120) Login failed because of an invalid login attempt. It is probably
a Rescue issue.
Common Mistakes
This section lists mistakes that are easy to make because even a small error (such as, casing or a
one-character difference) can cause failure.
Wrong issuer The Rescue side value of the IDP issuer must be exactly the same as the one
posted by the IDP. Even a one-character difference can cause problems.
Remember: Mind casing!
Copyright © 2021 LogMeIn, Inc. 19Wrong company ID The company ID is important because the SAML configuration is stored on a
per-company basis. If the IDP sends a wrong company ID, then the correct
configuration will not be found, and the login process will fail.
Tip: Take special attention to companies with more than one account (for
example, a test and a production account).
Wrong NameID Rescue provides two ways of being sent the identity of the user: email or SSO
format ID. These options are mutually exclusive, so the IDP must decide which one to
use, and configure the Rescue side with that value. Then the IDP must send the
identity in that format.
Wrong certificate Rescue needs the public key of a certain company’s certificate to be uploaded
on the Rescue side. If the SAML assertion is signed with a different certificate
(for a different certificate there is a different public key) or not signed at all, then
we cannot be sure that the request came from a trusted partner, so Rescue
cannot let the user log in.
More Rescue Side Troubleshooting
If you are stuck with resolving a problem, check the following:
• Make sure the SAML login is enabled for the company.
• Make sure the user exists in the Rescue system.
Note: "User" here refers to the actual user, not the company.
• Make sure the actual configuration you are stuck with really belongs to the company ID you need.
Tip: Mind test vs production accounts!
• Make sure the certificates are the correct ones.
20 LogMeIn Rescue Web SSO via SAML 2.0 User GuideAppendix: IDP Server Configuration
Important: The IDP server must be able to handle payloads/query strings of at least 4096 bytes
when assertions are encrypted.
IIS Configuration
1. Open the IIS Manager.
2. Select your IDP site and double click Request Filtering.
3. On the Query Strings tab, right-click the grid.
The Edit Request Filtering Settings window is displayed.
4. Set the following values:
Field Minimum Recommended Value
Maximum URL length (Bytes) 4096
Maximum query string (Bytes) 4096
Copyright © 2021 LogMeIn, Inc. 21Apache Tomcat Configuration
The default maximum HTTP header size on Apache Tomcat servers is 4096 bytes (4 KB), which should
suffice. Check the maxHttpHeaderSize attribute in your server configuration.
For details, see the related Apache documentation.
22 LogMeIn Rescue Web SSO via SAML 2.0 User GuideIndex
A M
ADFS 3, 9, 11 MAH 3
Azure 15
N
B
NameID 7
Binding 6
P
C
Protocol 6
Claim rule 11
CompanyID 7
R
H Relying Party 9
Http 6
S
I Signature 6
SSO ID 7
IDP 3, 7
IIS 21
U
UTC 3You can also read