USER GUIDE MW300RE 300MBPS WI-FI RANGE EXTENDER - REV3.0.0 1910080035 - ALZA
←
→
Page content transcription
If your browser does not render page correctly, please read the page content below
User Guide
300Mbps Wi-Fi Range Extender
         MW300RE

                               REV3.0.0
                               1910080035
COPYRIGHT & TRADEMARK Specifications are subject to change without notice. is a registered trademark of MERCUSYS TECHNOLOGIES CO., LTD. Other brands and product names are trademarks or registered trademarks of their respective holders. No part of the specifications may be reproduced in any form or by any means or used to make any derivative such as translation, transformation, or adaptation without permission from MERCUSYS TECHNOLOGIES CO., LIMITED. Copyright © 2018 MERCUSYS TECHNOLOGIES CO., LIMITED. All rights reserved. http://www.mercusys.com
CE Mark Warning

This is a class B product. In a domestic environment, this product may cause radio interference, in
which case the user may be required to take adequate measures.

OPERATING FREQUENCY (the maximum transmitted power)

2412MHz—2472MHz(20dBm)

EU declaration of conformity

MERCUSYS hereby declares that the device is in compliance with the essential requirements and
other relevant provisions of directives 2014/53/EU, 2009/125/EC and 2011/65/EU.
The original EU declaration of conformity may be found at http://www.mercusys.com/en/ce.

RF Exposure Information

This device meets the EU requirements (2014/53/EU Article 3.1a) on the limitation of exposure of
the general public to electromagnetic fields by way of health protection.
The device complies with RF specifications when the device used at 20 cm from your body.

Продукт сертифіковано згідно с правилами системи УкрСЕПРО на відповідність вимогам
нормативних документів та вимогам, що передбачені чинними законодавчими актами
України.

Safety Information
•   Keep the device away from water, fire, humidity or hot environments.
•   Do not attempt to disassemble, repair, or modify the device.
•   Do not use the device where wireless devices are not allowed.
•   The socket-outlet shall be installed near the equipment and shall be easily
    accessible.
•   For passthrough devices, plug the power strips into the integrated electrical
    sockets of the devices, but devices of the same or another type not be
    stacked in normal use.

Please read and follow the above safety information when operating the device. We
cannot guarantee that no accidents or damage will occur due to improper use of the
device. Please use this product with care and operate at your own risk.

Explanation of the symbols on the product label

    Symbol       Explanation

                 Class II equipment

                 AC voltage

                 Indoor use only

                 Protection earth

                 RECYCLING

                 This product bears the selective sorting symbol for Waste electrical and electronic
                 equipment (WEEE). This means that this product must be handled pursuant to
                 European directive 2012/19/EU in order to be recycled or dismantled to minimize
                 its impact on the environment.

                 User has the choice to give his product to a competent recycling organization or to
                 the retailer when he buys a new electrical or electronic equipment.
CONTENTS
Conventions .............................................................................................................. 1
Chapter 1. Introduction ......................................................................................... 2
1.1 Product Overview .........................................................................................................2
1.2 Product Appearance .....................................................................................................2
1.2.1 LED Explanation ...............................................................................................2
1.2.2 Button Explanation ............................................................................................3
Chapter 2. Connect the Extender to the Internet ................................................ 4
2.1 Method One: Via a Web Browser .................................................................................4
2.1 Method Two: Via WPS ..................................................................................................7
Chapter 3. Basic Configuration............................................................................ 8
3.1 Status ............................................................................................................................8
3.2 Device Management .....................................................................................................9
Chapter 4. Advanced Configuration .................................................................. 10
4.1 Wireless ......................................................................................................................10
4.2 Profile ..........................................................................................................................10
4.3 Network .......................................................................................................................12
4.4 DHCP Server ..............................................................................................................12
4.5 System Tools...............................................................................................................14
4.5.1 Firmware Upgrade ..........................................................................................14
4.5.2 Factory Default Restore ..................................................................................15
4.5.3 Backup & Restore ...........................................................................................15
4.5.4 Reboot.............................................................................................................16
4.5.5 Login Password ..............................................................................................16
4.5.6 System Log .....................................................................................................17
FAQ (Frequently Asked Questions) ...................................................................... 18MW300RE 300Mbps Wi-Fi Range Extender
Conventions
The extender or MW300RE, or device mentioned in this User Guide stands for MW00RE Wireless
Wi-Fi extender without any explanations.
Parameters provided in the pictures are just references for setting up the product, which may
differ from the actual situation.
You can set the parameters according to your demand.
More Info
Specifications and the latest software can be found at the product page at the official website
http://www.mercusys.com.
The Quick Installation Guide can be found where you find this guide or inside the package of the
extender.
-1-MW300RE 300Mbps Wi-Fi Range Extender
Chapter 1. Introduction
1.1 Product Overview
The range extender connects to your router wirelessly, strengthening its signal and expanding
its coverage into areas that could not otherwise be reached.
Multicolor LED helps you find the right location for your range extender for the best Wi-Fi
extension.
1.2 Product Appearance
1.2.1 LED Explanation
LED Status Indication
Blinking red The extender is connecting to the router.
Solid red The extender is not connected to the router.
Signal The extender is connected to the router, and is in a good
Solid green
location.
The extender is connected to the router, but is too far away
Solid orange
from the router.
-2-MW300RE 300Mbps Wi-Fi Range Extender
1.2.2 Button Explanation
Button Description
Press and hold this button for more than 5 seconds until the
RESET/WPS Signal LED starts blinking quickly to reset the extender
Press for 1 second to use the WPS function.
-3-MW300RE 300Mbps Wi-Fi Range Extender
Chapter 2. Connect the Extender to the Internet
Power On
Plug the extender into a power outlet near your router, and the Signal LED turns solid red.
Note: For safety and best performance, we suggest that you position the extender vertically as shown
below.
2.1 Method One: Via a Web Browser
1. Connect your wireless device to the extender's network MERCUSYS_RE_XXXX.
Note:
1. The default SSID (network name) is printed on the product label at the back of the extender.
2. If you are using a computer, unplug the Ethernet cable from your computer (if any) first.
2. Follow the instructions of the Quick Setup Wizard to connect the extender to your router.
1) Launch a web browser and enter http://mwlogin.net in the address field.
-4-MW300RE 300Mbps Wi-Fi Range Extender
2) A login window will appear. Create a login password when prompted, then click Start. For
subsequent logins, use the password you have set.
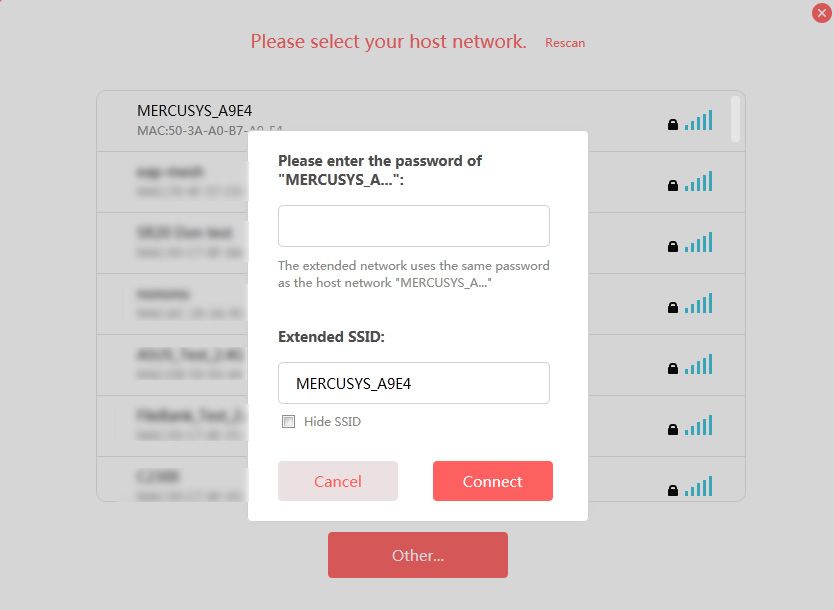
3) The extender will scan and display all available networks. Select your router's host
network from the list.
Note:
If the network you want to extend is on but not listed, please try the following steps.
· Move the extender closer to your router, and click Rescan in the top-right corner of the list.
· Click Other... to manually enter the SSID (network name) and password of the network you want to extend,
and click Connect.
-5-MW300RE 300Mbps Wi-Fi Range Extender
4) Enter the network password when prompted, then click Connect. You can also customize
the extended network name on this page.
5) Check the Signal LED on your extender. Green or orange LED indicates a successful
connection.
3. Relocate the extender.
1) Plug the extender into an electrical outlet between your host router and the Wi-Fi
“dead“ zone. The location you choose must be within the range of your existing host
network.
2) Wait until the Signal LED is lit and solid green. If it’s not, relocate it closer to the host router
to achieve better signal quality.
-6-MW300RE 300Mbps Wi-Fi Range Extender
4. Enjoy! Connect to the extended network and enjoy the internet. The extended network uses
the same wireless password as your host networks, but may have different network name if
you have customized the SSID during the configuration.
2.1 Method Two: Via WPS
1. Press the WPS button on your router.
2. Within two minutes, press the RESET/WPS button on your extender for 1 second. The Signal
LED should change from flashing to a solid state, indicating a successful WPS connection.
3. Relocate the extender.
3) Plug the extender into an electrical outlet between your host router and the Wi-Fi
“dead“ zone. The location you choose must be within the range of your existing host
network.
4) Wait until the Signal LED is lit and solid green. If it’s not, relocate it closer to the host router
to achieve better signal quality.
4. Enjoy! Connect to the extended network and enjoy the internet. The extended network uses
the same wireless password as your host networks, but may have different network name if
you have customized the SSID during the configuration.
-7-MW300RE 300Mbps Wi-Fi Range Extender
Chapter 3. Basic Configuration
After your successful login, you will see the basic configuration page. The main menus are on the
left of the page. On the right you can configure the corresponding function.
There are two functions on the Basic page: Status and Device Management. The detailed
explanations for each function are listed below.
3.1 Status
Go to Basic→Status, you can view the internet status of your extender.
Status - Displays the connection status and the name of the host network.
Wireless Scanner - Click to find all available networks if you want to extend another host
network.
-8-MW300RE 300Mbps Wi-Fi Range Extender
Extended SSID - Displays the name of the extended network. You can edit the name on
this page.
Distance between the extender and the host AP is Good – Displays whether the
extender is in a proper location. If the distance is too far, relocate the extender closer to
your router.
3.2 Device Management
Go to Basic→Device Management, you can view and manage the connected or blocked
devices.
1. Host Devices
Device Name/IP Address/MAC Address - Displays the name, IP address and MAC address
of the device. You can click to edit the device name.
Block - Click to remove the device from the list.
2. Blocked Devices
Device Name - Displays the name of the device. You can click to edit the device name.
Allow - Click to remove the device from the list.
-9-MW300RE 300Mbps Wi-Fi Range Extender
Chapter 4. Advanced Configuration
This chapter will show each web page's key functions and the configuration way.
4.1 Wireless
Go to Advanced→Wireless, you can view and configure the extended wireless network settings.
Network Name (SSID) - The extended wireless network name. You can change the name
on this page.
Hide SSID – Select this option if you want to hide the extended network from others.
4.2 Profile
Profile is used for managing the information of connected host networks. You can view recently
connected networks or manually add new ones.
Operation – Click Connect to connect to the host network in this profile or click Edit to edit
an existing profile.
Add - Manually add a host AP by entering the extended network name, host network name,
host MAC address, security type and password.
- 10 -MW300RE 300Mbps Wi-Fi Range Extender
Delete All - Click to delete all profiles.
Delete Selected - Click to delete selected profiles.
To add a new profile
1) Click Add.
2) Complete the settings as shown below, and click Save.
Extended SSID - Enter the extended network name.
Host SSID - Enter the host network name.
Host MAC Address - Enter the MAC address of the host router.
Host AP Security - Select the security type of the host network.
Host AP Password – Enter the password of the host network.
To connect to a host network
To connect to a host network that is listed in the profile screen, just find the profile and then click
Connect.
To manage an existing profile
To change the settings of an existing profile, find the profile and click Edit, then you can edit the
settings of this profile.
If you want to delete a profile that you no longer use, select the profile and click Delete Selected.
- 11 -MW300RE 300Mbps Wi-Fi Range Extender
4.3 Network
Go to Advanced→Network, you can configure network settings of the extender.
MAC Address - The unique physical address of the extender.
IP Settings - Select Auto or Manual. It is recommended to select Auto. If you want to set the
IP address and subnet mask manually, select Manual and enter them manually.
IP Address - The LAN IP address of the extender.
Subnet Mask - Subnet mask determines the size of the network. Normally it is
255.255.255.0.
4.4 DHCP Server
Go to Advanced→DHCP Server, you can configure the DHCP Server settings. DHCP server will
automatically assign IP address and subnet mask to devices on your network.
- 12 -MW300RE 300Mbps Wi-Fi Range Extender
DHCP Server - Select On, Off or Auto. When Auto is selected, the extender will detect other
DHCP server on the network to determine whether to enable DHCP server of this device or
not.
Start IP Address - Specify an IP address for the DHCP Server to start with when assigning
IP addresses. 192.168.1.100 is the default start address.
End IP Address - Specify an IP address for the DHCP Server to end with when assigning IP
addresses. 192.168.1.199 is the default end address.
Address Lease Time - The amount of time a network user will be allowed connection to the
extender with their current dynamic IP Address. Enter the amount of time in minutes and the
user will be leased this dynamic IP Address. After the time is up, the user will be
automatically assigned a new dynamic IP address. The range of the time is 1 ~ 2880
minutes. The default value is 120 minutes.
Gateway - (Optional.) The default is 0.0.0.0. Enter the LAN IP address of your host router.
Primary DNS - (Optional.) Enter the DNS IP address provided by your ISP or consult your
ISP.
- 13 -MW300RE 300Mbps Wi-Fi Range Extender
Secondary DNS - (Optional.) Enter the IP address of another DNS server if your ISP
provides two DNS servers.
Host - The name of the DHCP client.
MAC Address - The MAC address of the DHCP client
IP Address - The IP address that has been allocated to the DHCP client
Effective Time - The time of the DHCP client leased. After the dynamic IP address has
expired, a new dynamic IP address will be automatically assigned to the user.
Click Refresh to show the current attached devices.
4.5 System Tools
4.5.1 Firmware Upgrade
Go to System Tools→Firmware Upgrade, and then you can update the latest version of
firmware for the extender.
Hardware Version - Displays the current hardware version. The version of the upgrade file
must accord with the extender’s current hardware version.
Firmware Version - Displays the current firmware version.
- 14 -MW300RE 300Mbps Wi-Fi Range Extender
To upgrade the extender's firmware, follow the steps below:
Note: To avoid any damage, it is important to keep the extender powered on during the entire process.
1. Download the latest firmware upgrade file from our website (http://www.mercusys.com).
2. Click Browse to locate and select the downloaded firmware file.
3. Click Upgrade.
4. The extender will reboot automatically after the upgrade.
4.5.2 Factory Default Restore
Go to System Tools→Factory Default Restore, and then and you can restore the configurations
of the extender to factory defaults.
Click Factory Default Restore to reset all configuration settings to their default values. All your
custom settings will be lost when the extender is restored.
4.5.3 Backup & Restore
Go to System Tools→Backup & Restore, and then you can save the current configuration of the
extender as a backup file and restore the configuration via a backup.
Click Backup to save all settings as a backup file to your local computer.
- 15 -MW300RE 300Mbps Wi-Fi Range Extender
Click Browse to locate and select your backup file, then click Restore to restore the settings. The
restore process may take a few minutes to complete and the extender will automatically reboot
itself when finished.
4.5.4 Reboot
Go to System Tools→Reboot, and then you can click the Reboot button to reboot the extender
on the page.
Some settings of the extender will take effect only after rebooting, which include:
• Upgrade the firmware of the extender (system will reboot automatically).
• Restore the extender's settings to factory defaults (system will reboot automatically).
• Update the configuration with the file (system will reboot automatically).
4.5.5 Login Password
Go to System Tools→Login Password, and then you can change the login username and
password of the extender.
To change the extender's login password, follow the steps below.
1. Enter the Old Password of the extedner.
2. Enter the New Password.
3. Enter the new password again in the Confirm New Password field.
- 16 -MW300RE 300Mbps Wi-Fi Range Extender
4. Click Save.
For subsequent logins, use the new password you have set.
4.5.6 System Log
Go to System Tools→System Log, and then you can view the logs of the extender.
Refresh - Refresh the page to show the latest log list.
Save All - Click to save all the logs in a txt file.
Clear All - All the logs will be deleted from the extender permanently, not just from the page.
- 17 -MW300RE 300Mbps Wi-Fi Range Extender
FAQ (Frequently Asked Questions)
Q1. How to restore my extender’s configuration to its factory default settings?
Option One: With the extender powered on, press and hold the RESET/WPS button for more than
5 seconds until the Signal LED starts blinking quickly, then release the button.
Option Two: Log in to the extender’s web management page via a web browser, go to System
Tools > Factory Default Restore, and click Factory Default Restore.
Q2. What should I do if I forgot my login password?
Restore the extender’s configuration to its factory default settings referring to Q1, then create a
new password when prompted.
Q3. What should I do if I cannot log in to the extender's web management page?
Make sure your wireless device is connected to the extended network using the extended
SSID.
Verify that http://mwlogin.net is correctly entered in the web browser.
If you are using a computer, make sure it is set to obtain an IP address automatically.
Refer to Q1 to reset the extender and try again.
- 18 -You can also read