CCTV Menu Operations Manual - Yale
←
→
Page content transcription
If your browser does not render page correctly, please read the page content below
CCTV Menu Operations
             Manual

 SV-4C-2ABFX / SV-8C-4ABFX                                     SV-4C-2DB4MX

                                           Disclaimer!
This Manual will guide you through the standard settings and operations for normal Residential
     CCTV usage. The system is based on a professional system and may contain advanced
             features and settings that are typically not needed for residential use.
 This manual will be continuously updated and be available at www.yalelock.com/smart-living.

       The smarter way to protect your home.
02

                                                             (GB) Index

Section                                                                                Page

 1    Plan the camera location
      Connect cables as described in the manual that was included in the Kit.          03

 2    Download App - Personal registration in the App
      (It is better to have the App ready before starting the setup of the system. )   04
      Initial setup:   3         Wired Kit                                             05-06

                       4         WiFi Kit                                              07-11

 5    Menu overview                                                                    12

 6    Setting Date and Time - Synchronizing WiFi camera time                           13

 7    Setting up recording and motion detection                                        14-16

 8    Searching in recorded video                                                      17-18

 9    Backing up a video sequence                                                      19

10    Adding a WiFi camera                                                             20

11    Moving WiFi camera up in the channel list                                        21

12    Notification via email and App message                                           22

13    System information                                                               23
      Yale info and help desk                                                          24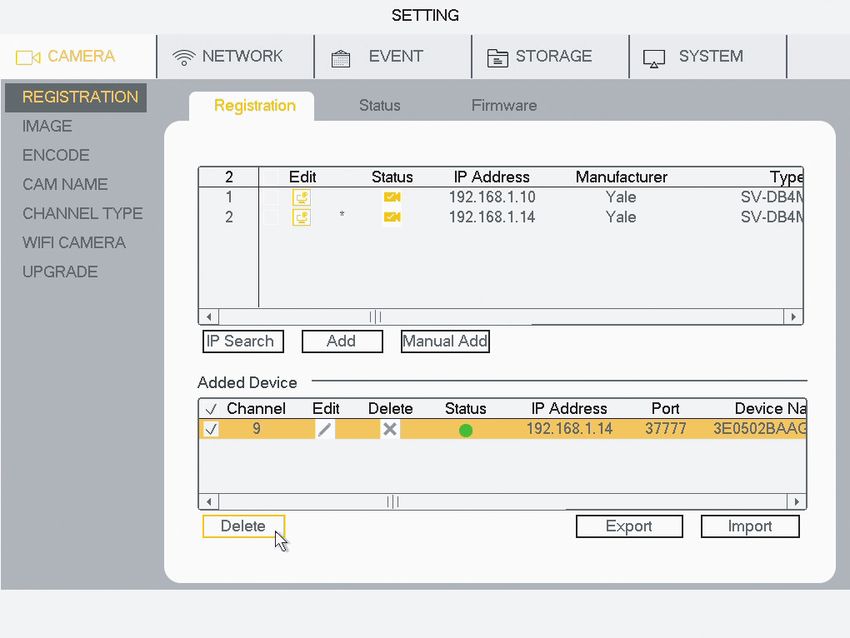
03

1                                                    Plan camera locations and connect cables

          It is the users responsibility to make sure to follow the local regulations
                              for setting up camera surveillance.

    Plan the camera location

    Connect cables according to the manual that came with your Kit.

                                                                                                         IP-cam                                  IP-cam

                   HDMI

                                            Router

                           Not included
                          Nicht enthalten
                            Non inclusa
                            Non inclus
                            No incluido

                                                                       HDMI

                                                                                                Router
                                                                               Not included
                                                                              Nicht enthalten
                                                                                Non inclusa
                                                                                Non inclus
                                                                                No incluido

                                                                                                                  HDMI / VGA

                                                                                                                                                   Router
                                                                                                                                Not included
                                                                                                                               Nicht enthalten
                                                                                                                                 Non inclusa
                                                                                                                                 Non inclus
                                                                                                                                 No incluido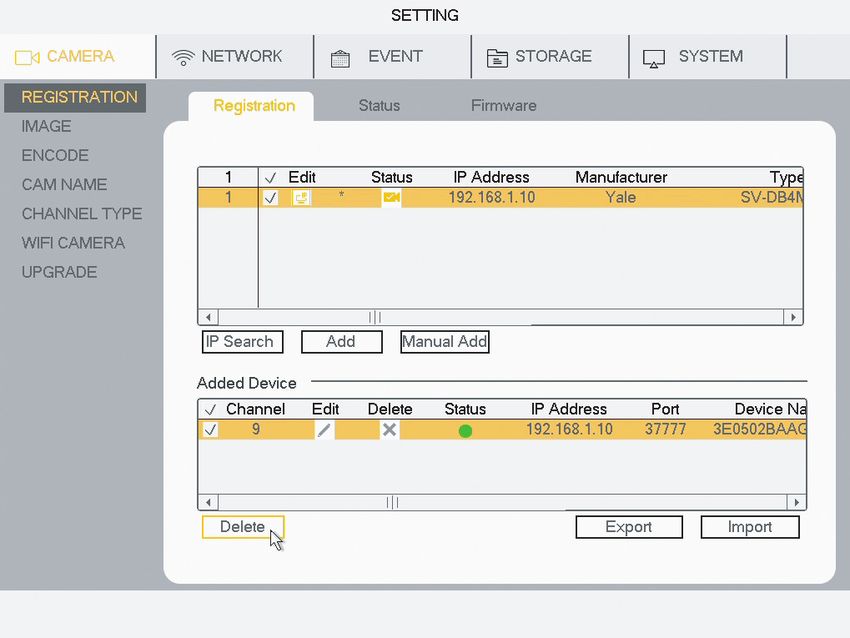
04

2                                     Download App - Personal registration in the App

    Download App for Android or IOS: “Yale Smart Living VIEW”

                            Yale Smart Living VIEW

    Personal registration in the App

                                                         App Log-in page:

                                                         Initial setup:

                                                         1) Click Register

                                                         This will be your opening page, after you have registered
                  Enter password
                                                         in steps 2) to 6).

                 Register, Forgotten password?

                                                                                                7) Enter username
                                                                                                8) Enter password
                                                                                                9) Click Log-in
                                                         Email Register page:

                                                         Initial setup:

                                                         2) Enter username
                                                         3) Enter password
                                                         4) Enter email
                                                         5) Click Register
                  Enter password                         6) Click Log-in   This will take you back to.
                  Email

                           Register
05

3                                            Initial setup - Wired Kit

    Initial setup for system with wired cameras.

                                                    1) Key in password

                                                    (Click in box and keyboard display will appear)

                                                    2) Confirm password

                                                    3) Click NEXT

                                                    4) Draw unlock pattern
                                                    (Min. 4 dots)

                                                    Draw again to confirm Draw unlock pattern

                                                                                  Remember this pattern!
                                                                                  This will be your key to
                                                                                  access the system.

                                                    5) Click NEXT

                                                    6) write email address and complete security Questions
                                                    (These are optional and can be switched OFF by “un-ticking”
                                                    boxes)

                                                    7) Security Questions:

                                                    8) Click SAVE

                                                    9) As default leave Auto-check for updates ticked.
                                                    (This will automatically keep your system up to date;
                                                    but only if connected to the internet via Router)

                                                    10) Click NEXT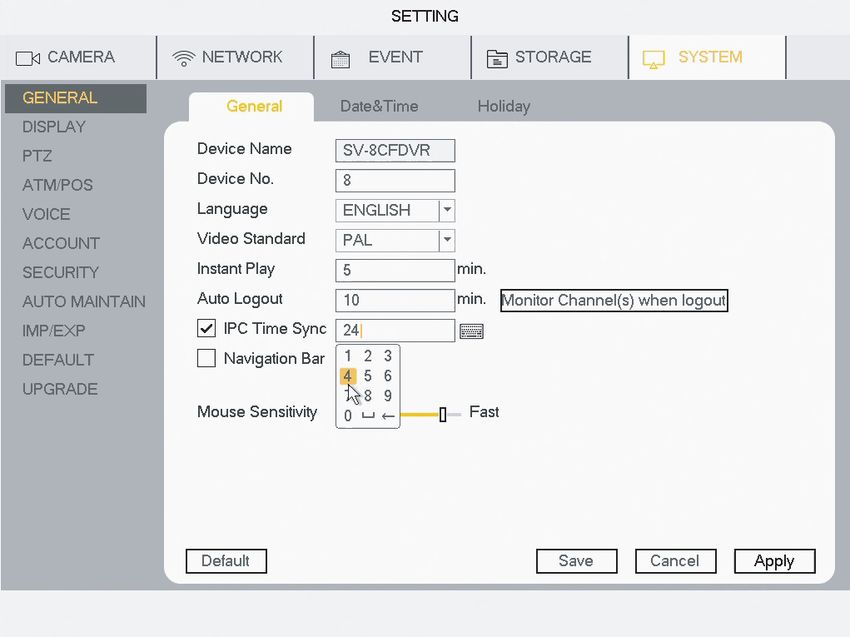
06

3                                            Initial setup - Wired Kit

    Initial setup for system with wired cameras.

                                                    11) Click Refresh to update Network connection.

                                                    12) Click NEXT

                                                    13) If you have only wired cameras in your Kit click NO.
                                                    (WiFi cameras can be added later if needed)

                                                           The App needs to be installed
                                                           and registered before scanning.

                                                    14) If you want access to your system via the Yale View App, scan
                                                    the QR code to connect to your DVR system.
                                                    (If not click NEXT)

                                                    15) Click NEXT

                                                                           The DVR system is now turned ON and
                                                                           cameras are recording. System is as default
                                                                           running in “Regular Mode”, which means
                                                                           that cameras are recording 24 hours a day
                                                                           and will overwrite the hard drive when full.
                                                    16) Click OK           Other “Modes” and backing up recorded
                                                                           video will be explained later in the manual.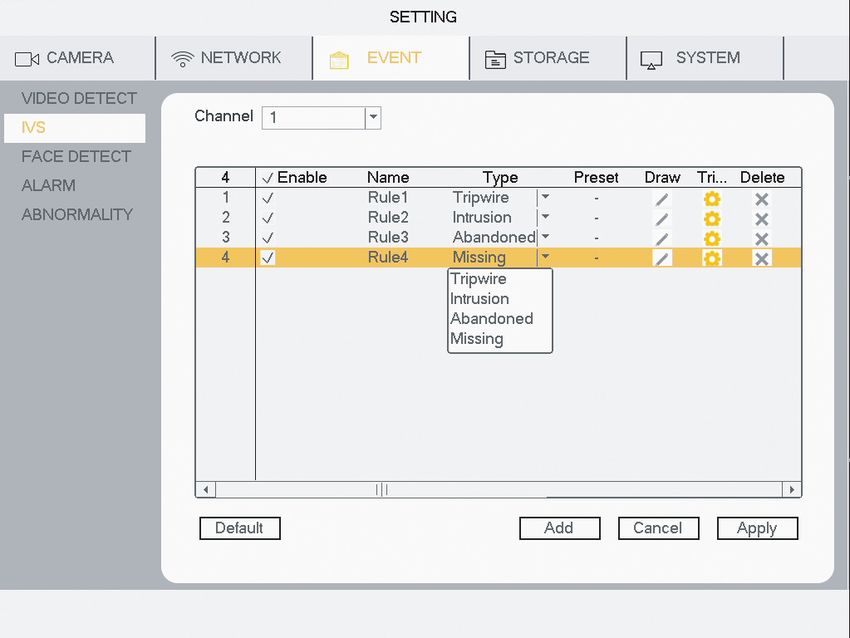
07

4                                             Initial setup - WiFi Kit

    Initial setup for system with WiFi cameras.

                                                    1) Key in password

                                                    (Click in box and keyboard display will appear)

                                                    2) Confirm password

                                                    3) Click NEXT

                                                    4) Draw unlock pattern
                                                    (Min. 4 dots)

                                                    Draw again to confirm Draw unlock pattern

                                                                                  Remember this pattern!
                                                                                  This will be your key to
                                                                                  access the system.

                                                    5) Click NEXT

                                                    6) Write email address and complete security Questions
                                                    (These are optional and can be switched OFF by “un-ticking”
                                                    boxes)

                                                    7) Security Questions:

                                                    8) Click SAVE

                                                    9) As default leave Auto-check for updates ticked.
                                                    (This will automatically keep your system up to date;
                                                    but only if connected to the internet via Router)

                                                    10) Click NEXT
08

4                                             Initial setup - WiFi Kit

    Initial setup for system with WiFi cameras.

                                                    11) Click Refresh to update Network connection.

                                                    12) Click Next

                                                    13) If you have WiFi cameras in your Kit (wiereless camera) click YES.

                                                    14) Connect Ethernet cables as described in the Yale Quick guide
                                                    included in the box with the DVR unit.

                                                    15) Click Next
09

4                                              Initial setup - WiFi Kit

     Initial setup for system with WiFi cameras.

                                                     16) Click Scan

    xxx.xxx.x.xx   SV-DB4MX-B                        17) All your connected cameras (WiFi) should now show up on the list.
    xxx.xxx.x.xx   SV-DB4MX-B
    xxx.xxx.x.xx   SV-DB4MX-B                        If all your cameras do not show up on the list, click Scan again.
                                                     If they still do not show up, check that they are all connected to power
                                                     and camera Ethernet cables are connected to the same router as the
                                                     DVR system.

                                                     17) Click Next

                                                     18) Leave box ticked and all cameras will have the same password as
                                                     you chose for the DVR system in the beginning.

                                                     19) Click Next
10

4                                              Initial setup - WiFi Kit

     Initial setup for system with WiFi cameras.

                                                     20) Click Next

    xxx.xxx.x.xx    SV-DB4MX-B
    xxx.xxx.x.xx    SV-DB4MX-B
    xxx.xxx.x.xx    SV-DB4MX-B

                                                     21) Click Next

                                                     22) Select the router you want to connect to.

                   “Your Router WiFi”

                                                     23) Write Connection Password for your Router.
                                                     (Same as when you connect any computer or smartphone to you
                                                     lokal router/network.)

                                                     24) Click Connect

                                                     25) Click OK
                                                     You can now unplug the ethernet/network cable from your
                                                     WiFi camera. It is now wirelessly connected to your router.
                                                     Camera power can be unplugged and then plugged in again when
                                                     mounted in the desired location, within range of the router.
11
4 Initial setup - WiFi Kit
Initial setup for system with WiFi cameras.
The App needs to be installed
and registered before scanning.
26) If you want access to your system via the Yale View App, scan
the QR code to connect to your DVR system.
(If not click NEXT)
27) Click NEXT
28) Setup is now complete.
The DVR system is now turned ON and
cameras are recording. System is as default
running in “Regular Mode”, which means
that cameras are recording 24 hours a day
and will overwrite the hard drive when full.
Other “Modes” and backing up recorded
video will be explained later in the manual.12
5 Menu overwiev
Menu overwiev
Right Click in the live view > brings up the top menu for the live view
screen options.
CAM 1 CAM 2 CAM 3
CAM windows can be dragged to
CAM 4 CAM 5 CAM 6
rearrange order.
The system is flexible for you to set to
CAM 7 CAM 8 CAM 9 your personal preferences and it can
always be reset to default setting.
Different view options for the live view screen.
(Example shown is an 8 channel system, 4 channel will have fewer
options.)
(PTZ and Image, not in use with this model)
Colour Setting and Display. Options for live view screen.
Camera Registration. Shortcut to Camera Registration in the
Main Menu
Here you can find video recordings
when you want to investigate or
document events.
Main Menu
OPERATIONS, INFO, SETTING OPERATE: SEARCH: Search for and playback recorded video by date
and Time.
FACE SEARCH: Search and playback recorded video by face
detection. (If feature is applied)
BACKUP: Plan backup of recorded video, to external media.
SHUTDOWN: Shutdown / Logout / Reboot
INFO: SYSTEM: HDD information, recording information.
EVENT: Lists of events, motion detection.
Network: List of Network activities.
LOG: List of operations / changes to the system.
Here you can personalise system
settings and adjust recording
event triggers.
SETTING: CAMERA: General camera setting.
Network: General network setting.
EVENT: Personal settings for recording triggers.
STORAGE: Time planning for recording and HDD tools.
SYSTEM: System settings.13
6 Setting Date and Time - Synchronizing WiFi camera time
Setting Date and Time
1
Date and Time
1) Go to SYSTEM > GENERAL > Date & Time
2 3 4 2) Set Year, Month, Date and Hour, Minutes.
3) Set your timeline acording to GMT
4) Click Save.
5) Click Apply.
6) Click Save.
6 5
Synchronizing WiFi camera time. Only needs to be set if WiFi cameras are being connected.
The WiFi cameras internal clock needs to be repeatedly
synchronized to keep the same time as the system.
1) Go to SYSTEM > GENERAL
2) In IPC Time Sync, set the interval at which the WiFi camera will be
synchronized. ( 24 hours, recommended )
3) Click Apply
4) Click Save14
7 Setting up recording and motion detection
Setting up recording schedule and recommended residential motion detection (MD)
(A) Click STORAGE
Setting up SCHEDULE (week planning) for recordings and event
triggers.
Click Event
Setting up movement-triggers for recordings.
Mode: (B) VIDEO DETECT = MD (Motion Detect)
(Detection of simple movement)
(C) IVS = INTEL (Detection of specific movement)
(D) FACE DETECT (Triggers when it detects a face-shape,
not a specific face !)
(A)
SCHEDULE - Record
1) Select Channel (Channel = Camera)
1 2) Select Mode : Regular (Continous video recording)
2 MD (Detection of simple movement)
3 Intel = IVS (Detection of specific movement)
4 3) Select Day(s) or All
4) Drag coloured bars to match period(s) of the day(s) you want
detected. (Drag again to delete bar)
5) When you have planned the week for the Channel - click Apply
and continue to next Channel.
6) When all Channels have been planned and applied - click Save
6 5
Click Default will take you back to factory setting.
(B) MD (Motion Detection) recommended residential motion detection (MD)
VIDEO DETECT - Motion Detect
1) Select Channel (Channel = Camera)
2) Tick Enable MD
1 3 3) Click Set to change motion sensor area. Default is the whole field
2
of view.
5 6 4
Drag to delete area, drag again to select new area(s)
4) Click Apply
Standard residential motion detection (MD) is 5) Click Test to check motion detection is working as planned.
supported by both Wired and WiFi cameras. (Buzzer can be activate to test motion detection)
6) When all Channels have been planned and applied - click Save
Click Default will take you back to factory setting.15
7 Setting up recording and motion detection
Setting up advanced IVS motion detection (wired cameras only).
(C) IVS = Intel
EVENT- IVS = Intel
(To add IVS functionality to your wired cameras go through the
1 following steps. )
1) Select Channel (Channel = Camera)
2) Click Add
3 Message
3) Click OK
2
4) Go to CAMERA menu - CHANNEL TYPE
Click Cancel IP CAM
(The WiFi cameras already installed (if any) will not be affected )
4 System will now reboot.
5
Open EVENT- IVS menu again
5) Select Channel (Channel = Camera)
6) Click Add
7) Choose Type: Tripwire/Intrusion/Abandoned/Missing
8) Draw “rule” for the type. (When drawing, right click to finish shape)
7 9) Click Apply
(Buzzer can be activate to test motion detection)
6
9
Tripwire Intrusion 8 Abandoned Missing
Trigger: when somthing is left in the area Trigger: when somthing is missing from the area
Trigger: when line is crossed Trigger: when area out line is crossed entry or exit - for longer than 30 seconds - for longer than 30 seconds16
7 Setting up recording and motion detection
Setting up face detection (wired camera only).
The face detect function only works with
Wired camera on CHANNEL 1
(D) FACE DETECT
EVENT- FACE DETECT (Triggers when it detects a face-shape,
not a specific face !)
1 3
2 1) Select Channel 1
2) Tick Enable
3) Click Set
(Here you can set the minimum size of the face that will trigger.)
4) Click Apply
5) When the Channel has been set and applied - click Save
(Buzzer can be activate to test motion detection)
5 4 Click Default will take you back to factory setting.
Face detection is useful at locations like front
door, at face hight or slightly above.17
8 Searching in recorded video
Searching in recorded video by Time/Date, Motion detection, Face detection
When you have setup your system, this menu
is where you can find video recordings to
investigate or document events.
OPERATE: (A) SEARCH: Search for and playback recorded video by
Date and Time.
(B) FACE SEARCH: Search and playback recorded video by
face detection. (If feature is applied)
BACKUP: Plan backup of recorded video, to external
media (Extenal HDD or USB memory).
SHUTDOWN: Shutdown / Logout / Reboot
(A) SEARCH
How to find a recording:
1
1) Select YEAR and Month.
2 2) Select Day.
3 Set up display:
Channel 1 Channel 2
3) Select 1/4/9 channel view.
4 4) Select which channels to watch.
List of recordings by type, Regular / MD / IVS(INTEL):
Select Channel at top. Double click to start listed recording.
Channel
6
3 Channel 4
24 hour timeline:
5 5) Click timeline to view recording.
7
6) Controls for play back:
Play
Stop Timeline:
Play (backwards) Click to start video
One frame steps (Only when paused)
Slow Playback (x1/2 / x1/4 / x1/8 x / x1/16) Channel 1 / 5
9 10 11 12 13 14
Fast Playback (x2 / x4 / x8 / x16) Channel 2 / 6
Channel 3 / 7
Channel 4 / 8
7) Zoom timeline:
General = Regular Motion = MD Intel = IVS
24hr 2hr 1hr 30min
No changes can be made in the Search window while video
is playing. Stop video to change parameters.
2560*1440
If you have a WiFi camera(s) connected together with
Over decode ability wired camera(s), single view must be used to see the WiFi
cameras.
WiFi cameras are high resolution and can not be viewed at
the same time as wired (low res.) cameras.
They must be viewed in single view, separately.18
8 Searching in recorded video
Searching in recorded video by Time/Date, Motion detection, Face detection
FACE SEARCH will show a picture taken of the face shape, captured by
the camera.
SEARCH by Year / Month / Date19
9 Backing up a video sequence
Backing up a video sequence to storage media.
OPERATE: BACKUP: Plan backup of recorded video, to external
media (Extenal HDD or USB memory).
Backup from SEARCH Menu
Backup - recorded video
Extenal storage media, HDD or a USB memory stick,
need to be plugged in to USB (back of unit).
Channel 1 Channel 2
Save a video sequence to external memory.
Channel 3 Channel 4
Use timeline to select period.
17:00:00 Backup sequence 20:50:00
Channel 1
1 2 3
Click start time + Click end time + Click to go to backup media
Backup from BACKUP Menu
Save a video sequence to external memory.
USB memory
1 1) Set Type to backup.
3 2) Set Start and END - Date / Time to backup.
2
3) Set Channel.
4) Click Backup.
420
10 Adding a WiFi camera
Adding a WiFi camera to you DVR
Go to Camera
Camera needs to be connected via ethernet cable to the router,
for the DVR to search for it.
See the manual that came with your kit for details of how to
connect cables.
REGISTRATION
1) Click IP Search
2) Select camera (tick)
2 3) Click Add
You will be asked if you want to use the same password for your
camera, as you are using for the DVR ( -RECOMENDED- )
1
3 Go to 8)
(In Added Device you camera will now be listed,
4 5 7 with Green status.)
If you did not select same password as system, continue from 4)
4) In Added Device select camera (tick)
5) Click Edit
6) Write password and click OK
7) Status will now change to green.
Camera is now active. (connected via ethernet cable)
6
(If your system have already got WiFi
cameras connected, steps 8 to 14 will
be already filled in)
Setting up WiFi camera connection to your router.
10 8) Go to WiFi CAMERA
9 9) Tick Enable
11
10) Select channel (the one your new WiFi is connected to)
11) Selet you router from the list.
8 12
12) Enter PASSWORD for you router
13) Click Apply
14) Click OK
The WIFi camera can now be disconnected from the ethernet cable
and power supply. The camera can be placed in the desired location
within range of the router.21
11 Moving WiFi camera in the channel list
Rearranging WiFi camera in channel list How to move WiFi cameras up the channels list for simpler
overview when searching and in the App.
Go to Camera
1) Go to CHANNEL TYPE
2) Tick (change) channel to IP
If you have wired cameras connected to the first 2 channels then
2 tick IP up to the first one after your wired channels.
1 (In this case No.3)
3) Click Apply
4) Click OK
4
System will then restart.
3
After restart go to REGISTRATION
Your cameras will have to be deselected and added again.
5) Tick to select camera
6) Click Delete to remove camera(s)
8
9 Reinstalling camera(s) in the new channels.
7 7) Click IP search
8) Tick to select camera
5
9) Click Add
Camera will now be listed in Added Device under the new
6 channel No.
The WIFi camera can now be disconnected from the ethernet cable
and power supply. The camera can be placed in the desired location
within range of the router, reattached to the power supply again.22
12 Setting up mail notification
Setting notifications to send message to you via mail and App.
Go to Network
1) Go to EMAIL
2) Tick Enable
2 3) Write your email in RECEIVER
1 4) Write Subject ( will make it easy to recognize the email )
3 5) Click Apply
4
6) Click Test ( the system will now send a test mail )
6 5
Activating email notification on motion detection.
(The same can be done for IVS and face detection)
7) Go to Event > VIDEO DETECT > Motion Detect
7
8) Click Send Email
9) Click Apply
8
10) Click Save
The system will now send you an email every time motion is
detected.
10 9
If you have the App connected, it will receive a message every
time motion is detected.23
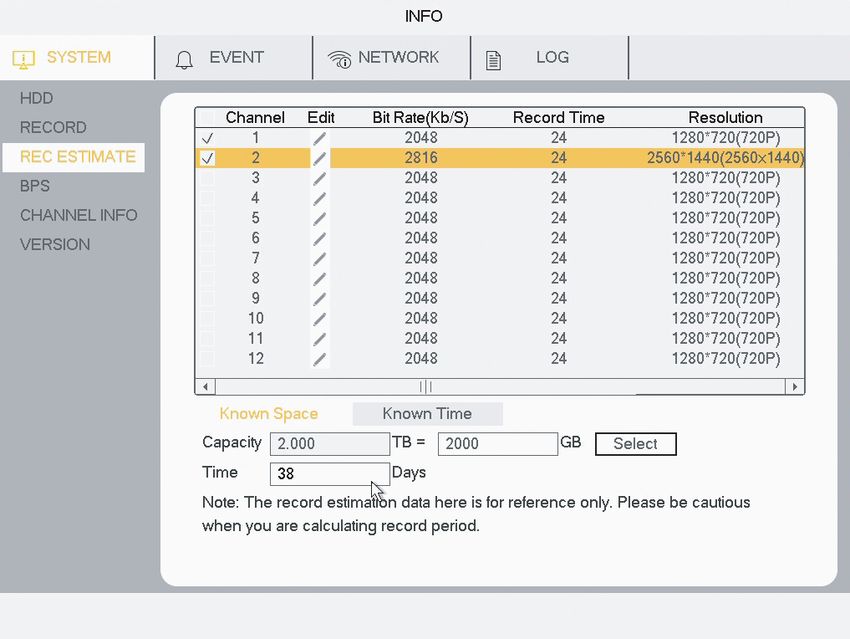
13 System information
Estimating recording time on the hard drive.
1 Harddrive recording time estimated
1) Go to INFO > SYSTEM > REC ESTIMATE
2
2) Check that all Cameras / channels are ticked.
3) Click select (in the pop up click OK)
4) Time will now show an estimate of time left to record.
If recording over-runs the hard drive capacity, it will as default
3
overwrite the oldest recording.
4
Formatting / erasing the hard drive.
Warning this will erase all recordings on your hard drive.
1) Go to STORAGE > HDD MANAGE
2) Tick selected hard drive.
3) Click Format
4) Click Apply
5) Click OK (in the pop up menu)
The system will now restart.24
Support
www.yalelock.com/smart-living
www.yalelock.com/smart-living
Englis
h
Eng
lish
THE YALE BRAND, with its unparalleled global reach and
Yale DVR MI v07
range of products, reassures more people in more countries
than any other consumer locking solution.
THE ASSA ABLOY GROUP is the world´s leading
manufacturer and supplier of locking solutions, dedicated to
satisfying end-user needs for security, safety and convenience.
An ASSA ABLOY Group brandYou can also read