XProtect Smart Client 2021 R1 - User m anual (sim plified) - Milestone XProtect Smart Client 2021 R1
←
→
Page content transcription
If your browser does not render page correctly, please read the page content below
M i lest on e Sy st em s
XProtect® Sm art Client 2021 R1

User m anual (sim plified)

User manual (simplified) | XProtect® Smart Client 2021 R1

Contents
Copyright, tradem arks, and disclaim er                      6

Surveillance system differences                              7

XProtect Sm art Client (explained)                           8

   Additional functionality                                  8

Workspaces in XProtect Sm art Client                        10

   Standar d tabs (over view)                               10

   Add-on tabs (over view)                                  10

   All tabs (in detail)                                     11

      Live tab (explained)                                  11

      Playback tab (explained)                              11

      Sear ch tab (explained)                               11

      Alar m Manager tab (explained)                        12

      System Monitor tab (explained)                        12

      Access Contr ol tab (explained)                       12

      LPR tab (explained)                                   13

      Tr ansact tab (explained)                             13

Buttons in XProtect Sm art Client (overview)                14

Views (configuration)                                       16

   Views and view gr oups (explained)                       16

   What can views contain?                                  17

   Cr eate view gr oups                                     19

   Cr eate views                                            19

   Add camer as and other items to views                    20

Managing views                                              22

   Sear ching for views and camer as (explained)            22

   Change individual camer as tempor ar ily                 24

   Swap camer as                                            25

   Send video between open views                            25

2 | Contents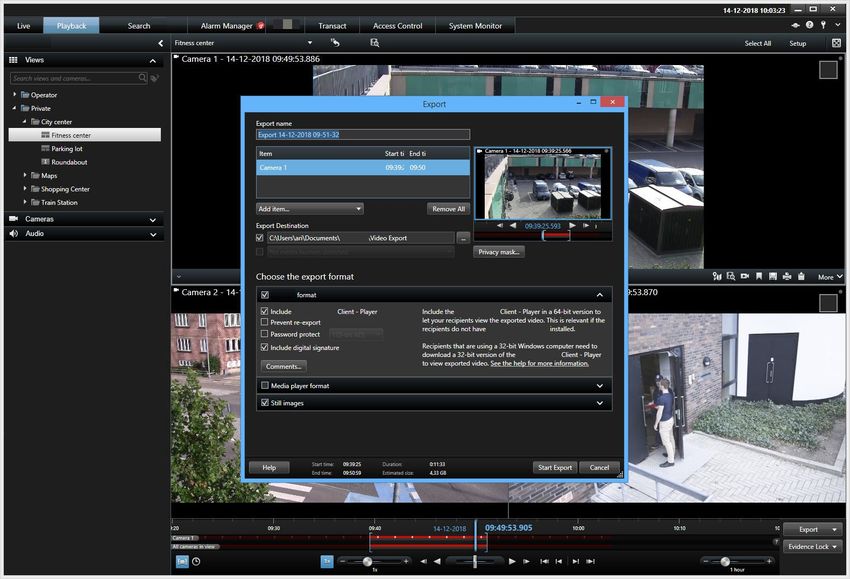
User manual (simplified) | XProtect® Smart Client 2021 R1

   Send views between displays                              25

   Multiple windows or displays (explained)                 26

N avigating your cam eras and views                         29

   Hotspots (explained)                                     29

      Use hotspots                                          29

   Camer a navigator (explained)                            29

      Use camer a navigator s                               30

   Car ousels (explained)                                   31

      Use car ousels                                        31

   Digital zoom (explained)                                 32

   Use digital zoom                                         32

   Vir tual joystick and PTZ over lay buttons (explained)   34

   Views and shor tcuts (explained)                         34

   Keyboar d shor tcuts (over view)                         35

Viewing live video                                          37

   Live video (explained)                                   37

   Live tab (over view)                                     38

   Camer a toolbar (over view)                              39

      Hide camer a toolbar                                  40

   Camer a indicator s (explained)                          40

   Recor d video manually                                   41

   Take single snapshots                                    41

I nvestigating incidents                                    43

   Viewing r ecor ded video (explained)                     43

      On the Playback tab                                   43

      On the Live tab                                       44

      On the Sear ch tab                                    44

   Playback tab (over view)                                 45

   Timeline (explained)                                     46

      Bookmar ks in the timeline (explained)                47

3 | Contents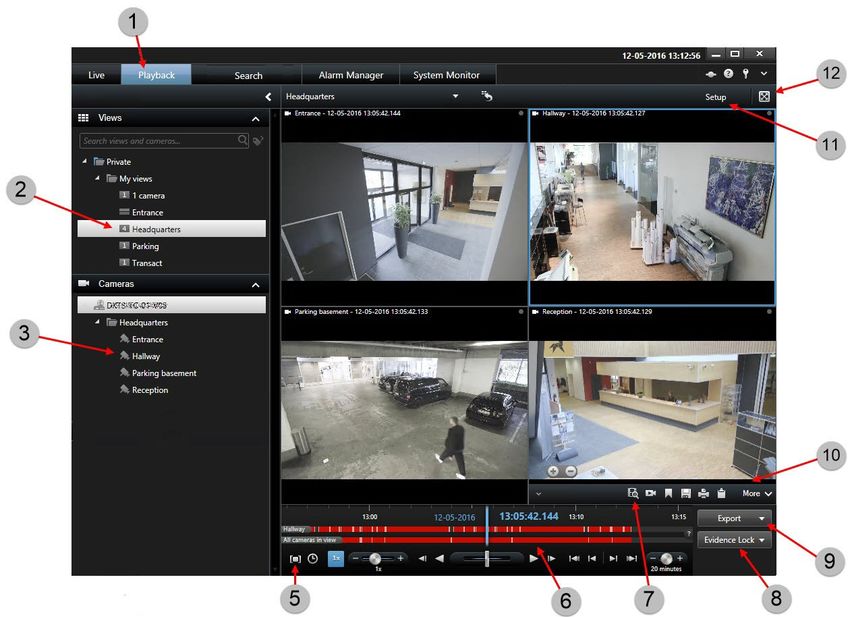
User manual (simplified) | XProtect® Smart Client 2021 R1

   Time navigation contr ols (over view)                    47

   View r ecor ded video independently of timeline          49

   Investigate your sear ch r esults                        50

Searching for video data                                    51

   Sear ch for video                                        51

   Sear ch for motion (smar t sear ch)                      55

      Motion sear ch thr eshold (explained)                 57

   Sear ch for bookmar ks                                   57

   Sear ch for alar ms                                      59

   Sear ch for events                                       59

   Sear ch for people                                       60

   Sear ch for vehicles                                     60

   Sear ch for video at location                            61

Search results, settings, and actions                       62

   Timeline on Sear ch tab (explained)                      62

   Actions available fr om sear ch r esults (over view)     63

      MIP-r elated actions                                  64

   Mer ged sear ch r esults (explained)                     64

   Match any or all sear ch cr iter ia (explained)          65

   Star t sear ch fr om camer as or views                   65

   Open sear ch r esults in separ ate windows               66

   Pr eview video fr om sear ch r esults                    66

   Show or hide bounding boxes dur ing sear ch              68

   Sor ting options                                         68

   Locate camer as while sear ching                         69

      Camer a icons (explained)                             72

   Bookmar k sear ch r esults                               73

   Edit bookmar ks fr om sear ch r esults                   75

   Take snapshots fr om sear ch r esults                    76

   Tr ansfer the sear ch time to the playback timeline      77

4 | Contents
User manual (simplified) | XProtect® Smart Client 2021 R1

Managing your searches                                      78

   Save sear ches                                           78

   Find and open saved sear ches                            79

   Edit or delete saved sear ches                           81

Creating video evidence                                     83

   Expor t video, audio, and still images                   83

   Mask ar eas in r ecor dings dur ing expor t              84

   Stor yboar ds (explained)                                84

   Expor t stor yboar ds                                    84

   Expor t locked video evidence                            85

   View expor ted video                                     86

   Pr inting or cr eating sur veillance r epor ts           88

      Pr int r epor t fr om single camer as                 88

      Cr eate r epor ts fr om sear ch r esults              89

   Copy images to clipboar d                                90

Glossary                                                    91

5 | Contents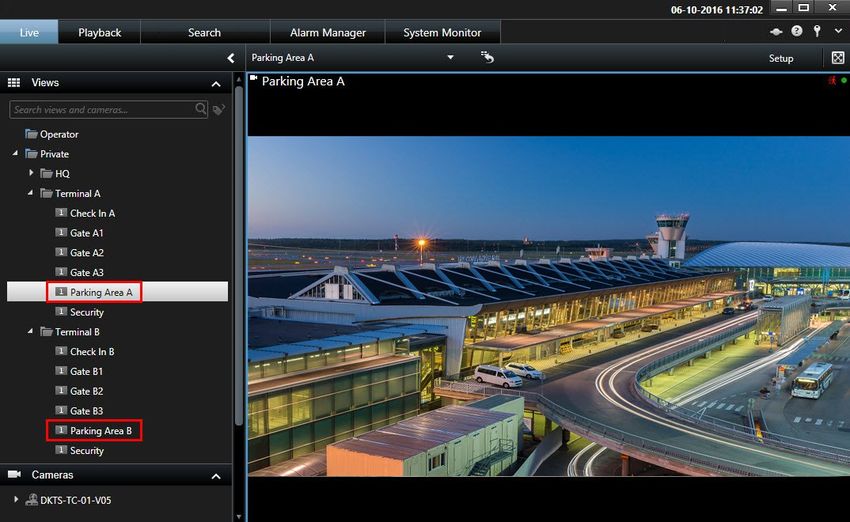
User manual (simplified) | XProtect® Smart Client 2021 R1

Copyright, trademarks, and disclaimer
Copyright © 2021 Milestone Systems A/S

Tradem arks

XProtect is a registered trademark of Milestone Systems A/S.

Microsoft and Windows are registered trademarks of Microsoft Corporation. App Store is a service mark of
Apple Inc. Android is a trademark of Google Inc.

All other trademarks mentioned in this document are trademarks of their respective owners.

Disclaim er

This text is intended for general information purposes only, and due care has been taken in its preparation.

Any risk arising from the use of this information rests with the recipient, and nothing herein should be construed
as constituting any kind of warranty.

Milestone Systems A/S reserves the right to make adjustments without prior notification.

All names of people and organizations used in the examples in this text are fictitious. Any resemblance to any
actual organization or person, living or dead, is purely coincidental and unintended.

This product may make use of third-party software for which specific terms and conditions may apply. When that
is the case, you can find more information in the file 3rd_party_software_terms_and_conditions.txt located in your
Milestone system installation folder.

6 | Copyright, trademarks, and disclaimer
User manual (simplified) | XProtect® Smart Client 2021 R1

Surveillance system differences
Most of the features are available in all versions of the XProtect VMS products, but there are exceptions
depending on what product you are using. For more information, see:

    l   Key feature overview: https://www.milestonesys.com/solutions/platform/product-index/

    l   Detailed product comparison chart: https://content.milestonesys.com/media

7 | Surveillance system differences
User manual (simplified) | XProtect® Smart Client 2021 R1

XProtect Smart Client (explained)
XProtect Smart Client is a desktop application designed to help you manage and view video from the cameras
that are connected to your XProtect VMS system. It gives you access to live and recorded video, instant control of
cameras and connected security devices, and allows you to perform advanced searches to find video data and
metadata - if any - that is stored on the server.

Available in multiple local languages, XProtect Smart Client has an adaptable user interface that can be
optimized for individual operators’ tasks and adjusted according to specific skills and authority levels.

Additional functionality
Depending on the XProtect add-ons installed on your XProtect VMS system, you can:

    l   combine video with integrated access control systems, including restricting or allowing access to
        buildings

    l   read license plate information from vehicles and view the live or recorded video that shows the vehicles

    l   view and investigate transactional data from POS systems in combination with video from cameras that
        monitor the POS systems

8 | XProtect Smart Client (explained)
User manual (simplified) | XProtect® Smart Client 2021 R1

By using the MIP SDK, users can integrate various types of security and business systems, and video analytics
applications, which you manage through XProtect Smart Client.

9 | XProtect Smart Client (explained)

User manual (simplified) | XProtect® Smart Client 2021 R1

Workspaces in XProtect Smart Client
XProtect Smart Client comes with a set of dedicated tabs allowing you to perform your daily surveillance tasks.
Some of these tabs are standard and others require XProtect add-ons.

Finally, some tabs may be custom-made through the MIP SDK and specific to your XProtect VMS system.
Functionality that depends on MIP SDK is not documented in the current manual.

Standard tabs (overview)
    l   The Live tab for viewing live video. See also Live tab (explained) on page 11

    l   The Playback tab for viewing recorded video. See also Playback tab (explained) on page 11

    l   The Search tab for making advanced searches for video and metadata. See also Search tab (explained)
        on page 11

    l   The Alarm Manager tab for investigating and managing alarms. See also (see Alarm Manager tab
        (explained) on page 12

    l   The System Monitor tab for viewing system information. See also (see System Monitor tab (explained)
        on page 12

            If some of the tabs are unavailable, it is because you do not have the rights required to
            access all these tabs.

Add-on tabs (overview)
    l   The Access Control tab for controlling your access control system and associated cameras. See also
        Access Control tab (explained) on page 12

    l   The LPR tab for identifying vehicles by their license plates, and investigating LPR related events. See also
        LPR tab (explained) on page 13

    l   The Transact tab for monitoring and investigating transactional data in combination with the associated
        video streams. See also Transact tab (explained) on page 13

These tabs are visible only if you have acquired licenses for:

    l   XProtect Transact

    l   XProtect LPR

    l   XProtect Access

10 | Workspaces in XProtect Smart Client
User manual (simplified) | XProtect® Smart Client 2021 R1
All tabs (in detail)
Live tab (explained)
On the Live tab, you can view live video feeds, and work with audio, carousels, hotspots, Matrix, smart map, pan-
tilt-zoom (PTZ) control, digital zoom, independent playback, and more.
Here, you can also enter setup mode, where you can set up views for your cameras and other types of content.
Playback tab (explained)
On the Playback tab, you can investigate recorded video by playing it back, start search from any camera or
view, and then document what you find by exporting evidence. To protect the evidence from being deleted from
the database, you can also add evidence locks to recorded video.
The timeline gives you advanced features for browsing recorded video and jumping to a specific date and time.
You can also:
l Listen to audio when connected to selected Milestone surveillance systems
l If your XProtect VMS supports smart map, you can get access to the cameras in your system in a
geographical interface, which is easy to navigate
l Use hotspots, digital zoom, or carousels, navigate fisheye lens images, print images, and more
Search tab (explained)
On the Search tab, you can search across the different types of data available in your VMS system. This includes:
l Video recordings in general
l Recordings with motion
l Recordings with motion in selected areas
l Bookmarks
l People
l Vehicles
l Video recordings with alarms
l Video recordings with events
For each search category, you can apply filters to refine your search.
From the search results, multiple actions are available. For more information, see Actions available from search
results (overview) on page 63.
11 | Workspaces in XProtect Smart ClientUser manual (simplified) | XProtect® Smart Client 2021 R1
Alarm M anager tab (explained)
On the Alarm Manager tab, you can view and respond to incidents or technical problems that have triggered an
alarm. The tab displays an alarm list, an alarm preview, and a smart map or map if one is available.
System M onitor tab (explained)
On the System Monitor tab, you can get a visual overview of the current state of your system servers, cameras,
other devices, and the computer running XProtect Smart Client.
By default, the tiles represent Recording servers, All servers, Failover servers, and All cam eras. Your system
administrator specifies the tiles and the threshold value for each state.
Here is a description of the colors used:
l Green: N orm al state. Everything is running normally
l Yellow: Warning state. At least one monitoring parameter is above the defined value for the N orm al
state
l Red: Critical state. At least one monitoring parameter is above the defined value for the N orm al and
Warning state
If a tile changes color and you want to identify the server or parameter that caused the change, click the tile. This
opens an overview in the bottom of the screen. Click the Details button for information about why the state
changed.
If a tile displays a warning sign, a data collector for one of your monitored servers or
cameras may not be running. If you place your mouse above the tile, the system shows
you when it last collected data for the relevant tile.
Access Control tab (explained)
On the Access Control tab, you can investigate access control events with search and filtering, and view the
associated video recordings and access control data. You can also monitor door states, investigate cardholders
and create reports.
You can drag the Access Control tab to its own separate floating window, while you keep the main window in the
background to watch multiple views simultaneously. You can also sort columns and drag the columns to different
positions.
You can search for, filter, sort, and review data related to:
l Events: Logs the events with a time stamp, event type, the associated door or access control unit, and
cardholder name if available. If your XProtect VMS system integrates with multiple access control
systems, the list displays from which access control system the event was triggered
12 | Workspaces in XProtect Smart ClientUser manual (simplified) | XProtect® Smart Client 2021 R1
l Doors: Lists the doors, access points and other access control units in each access control system, and
their current state
l Cardholders: Lists the cardholders in each access control system and their details
Depending on your access control system, you may be able to connect to the access
control system applications via the Access Control Adm inistration button in the top right
corner to, for example, specify access rights or manage cardholders.
LPR tab (explained)
On the LPR tab, you can investigate LPR events from all your LPR cameras, and view the associated video
recordings and license plate recognition data. Keep match lists updated and create reports.
The tab includes an LPR event list, and an LPR camera preview for previewing video associated with individual
LPR events. Below the preview, information about the license plate appears together with details from the
license plate match list it is associated with.
You can filter the event list according to the period, country module, LPR camera, or license plate match list. Use
the Search field to search for a particular license plate number. By default, this list shows LPR events from the
last hour.
You can specify and export a report of relevant events as PDF.
You can make updates to the existing match lists by using the License Plate Match List function.
Transact tab (explained)
On the Transact tab, you can investigate transactions through search and filtering, and view receipts and video
recordings in a combined view.
There is a search field and two filters:
l Search field: enter your search words here to perform a free text search. The search returns transaction
lines that contain your search words and does not distinguish between upper and lower case letters. In
the receipt, the transaction lines matching the search are highlighted
l Time interval: use this filter to specify the time interval, for example Last 7 days. You can also set a
custom interval by your own choice. By default, the filter is set to Today
l Source: use this filter to select the transaction sources you want to view transactions for. By default, the
filter is set to All
13 | Workspaces in XProtect Smart ClientUser manual (simplified) | XProtect® Smart Client 2021 R1
Buttons in XProtect Smart Client (overview)
XProtect Smart Client has multiple buttons that allow you to perform different actions. The buttons are located in
the following places:
l In the upper-right corner
14 | Buttons in XProtect Smart Client (overview)User manual (simplified) | XProtect® Smart Client 2021 R1
l In the lower-right corner
The buttons available vary depending on the tab you are standing on. For example, Setup is not available on all
tabs.
Button Description
Setup Enter setup mode.
Export Export video data. See also Export video, audio, and still images on page 83.
Evidence Lock Create an evidence lock to prevent evidence from being deleted.
Retrieve recordings from interconnected hardware devices or cameras that
Retrieve
support edge storage.
Toggle full screen m ode Toggle between full screen and a smaller window that you can adjust to the
size you want.
Status Access the Status window.
Access the help system, play online video tutorials, or view version number
Help
and plug-in information.
Log out Log out of XProtect Smart Client.
Configure XProtect Smart Client settings and behavior, joysticks, keyboard
Settings
shortcuts, language, and more.
Lift privacy m asks Users with sufficient rights can temporarily lift privacy masks.
Toggle them e Switch the XProtect Smart Client theme to dark or light.
Toggle sim plified or
Switch between simplified mode and advanced mode.
advanced m ode
15 | Buttons in XProtect Smart Client (overview)User manual (simplified) | XProtect® Smart Client 2021 R1
Views (configuration)
In setup mode, you can create views and specify which cameras or other types of content should be included in
each view. To organize your views, you must create at least one view group. This is often done by your system
administrator.
Your ability to edit views and groups depends on your user rights. If you can create the
view or group, you can also edit it.
Views and view groups (explained)
The way video is displayed in XProtect Smart Client is called a view. XProtect Smart Client can handle an
unrestricted number of views, allowing you to switch between video from various groups of cameras. Views can
hold between one and hundred cameras, but can also contain other types of content, for example images and
text.
Views must be contained inside view groups that help you organize your views.
Views are available on the Live and Playback tabs. Views can be private or shared:
l Private views can only be accessed by the user who created them. To make the view private, create it
inside the Private folder
l Shared views allow multiple operators to share the same views. Depending on your XProtect VMS
system:
l There may be a default folder for shared views named Shared or Default group
l Shared views can be shared by all operators, or access to selected shared views can be given to
certain operators. Typically, only a few people in an organization can create and edit shared
views, for example the system administrators
Not all users may have access to all cameras on the XProtect VMS system. Some of the
features you include in your shared view may not be supported in earlier versions of
XProtect Smart Client. Always make sure that the users you want to share with have the
necessary rights and are running the same XProtect Smart Client version as yourself.
Your user settings, including information about your views, are stored centrally on the XProtect VMS server, so
you can use your views on any computer that has XProtect Smart Client installed.
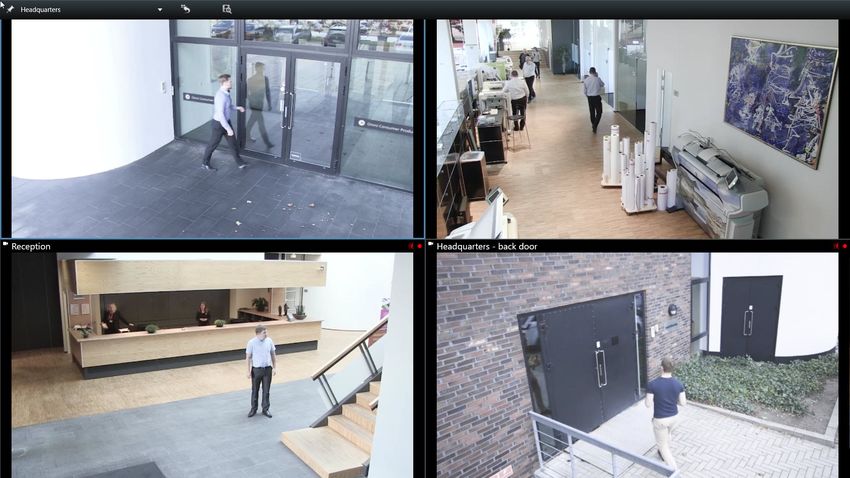
Example of a 2x2 view
16 | Views (configuration)User manual (simplified) | XProtect® Smart Client 2021 R1 What can views contain? In setup mode in the System Overview pane, you can see the items that you can add to your views: 17 | Views (configuration)
User manual (simplified) | XProtect® Smart Client 2021 R1

 Item                   Description

                        Allows you to show a list of alarms or an alarm preview. Both items are also available
 Alarms
                        on the Alarm Manager tab.

                        Access Monitor - with XProtect® Access installed, you can show access monitors in
 Access Monitor
                        your views, for example for a specific door.

                        Allows you to show video feed from a live camera or video played back. The cameras
 Cameras
                        appear under the site name, which is defined by your system administrator.

 Camera                 Allows you to navigate cameras according to how they are laid out on a map, for
 navigators             example a floorplan.

 Carousels              Allows you to shift between cameras at a pace that you define.

 Hotspots               Allows you to show whatever camera is in focus in a high resolution or frame rate.

 HTML pages             Allows you to show a webpage, for example an online news channel.

                        Allows you to show an image, for example if you want to distribute a picture of a
 Images
                        suspect.

 LPR                    With XProtect® LPR installed, you can add LPR cameras to views.

 Maps                   Allows you to show a floor plan or a geographical area.

 Matrix                 Allows you to show a Matrix position.

                        Allows you to navigate your cameras on a geographical map of the world based on
                        one of these online map services:

                             l   Bing Maps
 Smart maps
                             l   Google Maps

                             l   Milestone Map Service

                             l   OpenStreetMap

 Smart Wall             If XProtect Smart Wall has been configured by your system administrator, Smart Wall
 overviews              overviews allow you to control the contents of your video walls.

18 | Views (configuration)
User manual (simplified) | XProtect® Smart Client 2021 R1
Item Description
Allows you to show text, for example if you want to provide instructions for other
Text
operators.
Transact If XProtect Transact has been installed in your system, you can add point-of-sales
systems together with cameras.
Create view groups
Your XProtect Smart Client may be preconfigured to display view groups that you can add your views to.
However, you can create your own view groups to help you organize your views.
Example
Imagine that you have cameras installed on ten different levels in a multi-story building. You decide to create a
view group for each level and name them accordingly: Ground floor, First floor, Second floor, and so on.
Steps:
1. In setup mode, in the Views pane, select the Private or Shared top-level folder you want to add a group to.
2. Click Create N ew Group:
A new group is created named N ew Group.
3. Select and click the N ew Group to overwrite the name.
4. You can now create views within this group.
Create views
To view or play back video in XProtect Smart Client, first you must create a view, where you add the cameras you
need.
Requirements
Before creating the view, you need a group that you can add the view to. See also Create view groups on page 19.
Steps:
19 | Views (configuration)User manual (simplified) | XProtect® Smart Client 2021 R1
1. In the right corner, click Setup to enter setup mode.
2. In the Views pane, select the group you want to add the view to.
3. Click to create a new view.
4. Select a layout. The layouts are grouped according to their aspect ratio, and according to whether they
are optimized for regular content or content in portrait mode (where the height is greater than the width).
5. Enter a name for the view by overwriting the default N ew View name.
6. Click Setup again to exit setup mode. Your changes are saved.
Add cameras and other items to views
Basic steps:
20 | Views (configuration)User manual (simplified) | XProtect® Smart Client 2021 R1 1. Open the view that you want to modify. 2. Click Setup to enter setup mode. 3. In the System Overview pane, drag the required item into a position within the view. 4. Fill out any additional information about the item. 5. Click Setup again to exit setup mode. Your changes are saved. 21 | Views (configuration)
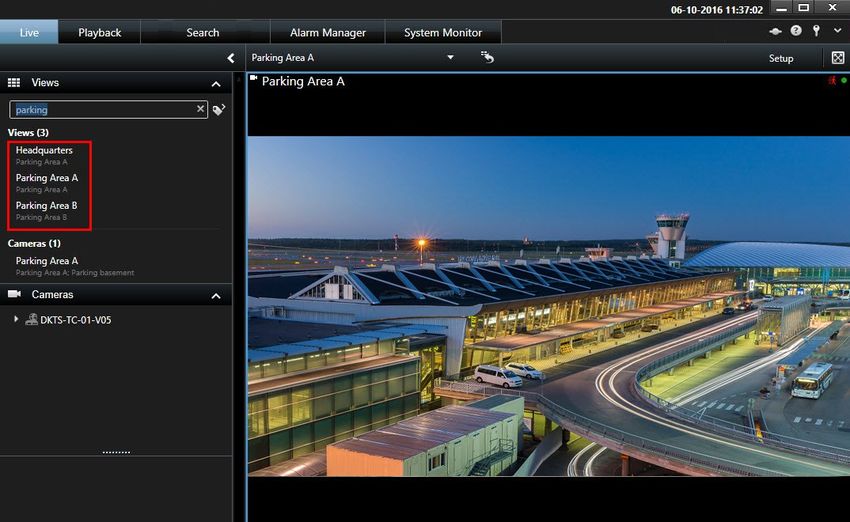
User manual (simplified) | XProtect® Smart Client 2021 R1

Managing views
Views are located on the Live and Playback tabs and can contain cameras and other types of content. If views
have been assigned shortcut numbers, you can select a view by using keyboard shortcuts. See also Keyboard
shortcuts (overview) on page 35.

Searching for views and cameras (explained)
If you have a large or complex hierarchy of view groups, the search function makes navigation easier and allows
you to search for views, cameras - including camera characteristics (see also Camera characteristics on page

23) - and keywords across the hierarchy. You can find an overview of common keywords if you click        next to
the search field.

Example

The following two images show a hierarchy of views and what it looks like when you search for parking:

22 | Managing views
User manual (simplified) | XProtect® Smart Client 2021 R1

            If a top-level folder has a red background     , it is protected. You can still access any
            views under the protected top-level folder, but you cannot create new views or edit
            existing views under it.

As you enter the search words, matching results for views and cameras are displayed. When you select one or
more of the matching cameras, the cameras appear in a temporary view that is optimized for the number of
cameras you select.

To view a single camera in a 1:1 view, click the search result in the Cam eras section.

To view the first 25 cameras in a view, click the search result in the Views section. You can also select cameras
manually if you press either CTRL or Shift while clicking the cameras. Press Enter to view the cameras.

Camera characteristics

23 | Managing views
User manual (simplified) | XProtect® Smart Client 2021 R1
l Name
l Description
l Capability:
l PTZ
l Audio
l Input
l Output
l Views containing a specific camera
l Recording server name or address (shows connected cameras)
Your system administrator can add free text tags in the camera description field on the
XProtect VMS server to make it possible to group cameras and search for these tags. An
example could be that all outdoor cameras use the tag "Outdoor" in the description field.
In that case, you can find all cameras of this type.
Change individual cameras temporarily
You can temporarily change the cameras in a view. However, it does not permanently change the view. If you
want to permanently change the content of a view, you must be in setup mode.
Requirements
You can only change the camera if the view item contains a camera or a position within a Smart Wall overview.
Steps:
1. Select the relevant item in the view.
2. Do one of the following:
l In the Cam eras pane, drag the relevant camera into the position in the view.
l On the camera toolbar, click More > Send to window > Main Window, and then select a position
in the view.
3. To restore your original view, click on the workspace toolbar.
In the Cam eras pane, the list of cameras is grouped by server. If a server is listed with a
red icon, it is unavailable, in which case you will not be able to select cameras from that
server.
24 | Managing viewsUser manual (simplified) | XProtect® Smart Client 2021 R1
Swap cameras
You can temporarily swap two cameras in a view. The camera in that position then exchanges places with the
one you swap it with. You can only swap cameras with other cameras. This can be useful, for example, if you
want to keep all your most important cameras in a certain position in your view.
Steps:
1. Click the relevant camera title bar and drag it to a new position.
2. To restore the original view, click on the workspace toolbar.
If you want to make permanent changes to your view, you must first be in setup mode.
Send video between open views
You can send video from a selected camera position to a single-camera position in another open view, including
any views you may have in floating windows or on secondary displays.
This feature is not available for hotspots, carousels, or Matrix positions.
Steps:
1. On the camera toolbar, click More > Send to Window.
2. Select the destination view, and then select the position in the view where you want the video for that
camera to display. If some of the camera positions are not selectable, they might be unavailable or used
for hotspots, carousels, or Matrix content.
Send views between displays
You can send a view to a specific display or a floating window. This is useful, for example, if you have several
monitors. Afterwards, you can synchronize the time of the destination display with the time used in the main
window.
1. In the Views pane, right-click the relevant view.
2. Click Send View To and then specify how you want your view to display.
If more secondary displays are available, they will be numbered.
25 | Managing viewsUser manual (simplified) | XProtect® Smart Client 2021 R1
3. To synchronize the time between the two displays, click Link window in the upper-right corner. The
timeline is hidden in the destination window, but is still visible in the main window.
Any hotspots, carousels, Matrix positions, still images, or HTML pages included in the view
will work as usual in a floating window.
Multiple windows or displays (explained)
You can send individual views to separate windows or displays, while keeping the main window of the XProtect
Smart Client in the background, so you can watch several views simultaneously. The selected camera or item is
always displayed with a blue border.
You can send any view to:
l A primary display that shows the view in a separate full-screen window on the main display of your
computer with the main window hiding behind it
By default, the tabs and controls are hidden. Press ESC to make the tabs and
certain controls reappear.
26 | Managing viewsUser manual (simplified) | XProtect® Smart Client 2021 R1
l A secondary display that shows the view in a full-screen window on another monitor (if available). The
main window stays visible on the primary monitor
By default, the tabs and controls are hidden. Press ESC to make the tabs and
certain controls reappear.
27 | Managing viewsUser manual (simplified) | XProtect® Smart Client 2021 R1
l A floating window that shows the view in a separate window. You can open any number of floating
windows and drag them to any monitor that is connected to your computer.
Click Link window to synchronize the time in the floating window with the time of
the main window.
Your multiple window setup is stored in XProtect Smart Client, so next time you log in, you
can reuse it. However, the setup applies only to the computer that you are currently using.
To use multiple windows on more than one computer, you must configure your multiple
window setup on each computer.
28 | Managing viewsUser manual (simplified) | XProtect® Smart Client 2021 R1
Navigating your cameras and views
Learn about some of the ways of navigating within or between the cameras in XProtect Smart Client.
Hotspots (explained)
A hotspot lets you view magnified and higher quality video from a selected camera in a dedicated position in a
view. Hotspots are useful because you can use a low image quality or frame rate for cameras in the regular
positions of the view and a high image quality or frame rate for the hotspot. This saves bandwidth on your
remote connections.
There are two types of hotspots:
l Global hotspots, which display the selected camera regardless of whether the camera is in the main
window or in a secondary display
l Local hotspots, which only display the selected camera of the local display
It is a good idea to have a hotspot in one of the larger positions of the view, for example, the large position in a
1+7 view: .
Use hotspots
l When you click a camera in a view, the hotspot position updates with video feed of that camera
l The title bar displays the hotspot icon:
When you view live or recorded video, you can double-click a hotspot (or any other camera position in a view) to
maximize it. When you do this, the video in the hotspot is displayed in full quality, regardless of your image
quality selection. If you want to make sure that the selected image quality also applies when maximized, in
Setup mode, in the Properties pane, select Keep when m axim ized.
Camera navigator (explained)
The camera navigator allows you to view several cameras in relation to each other as they are laid out on a map,
for example a floor plan . This can be useful if you want to follow someone or something from one camera to
another, for example, to follow suspects as they move around a building. By setting up your cameras according
to their location on a map, you can navigate from one camera to the next from a single view.
29 | Navigating your cameras and viewsUser manual (simplified) | XProtect® Smart Client 2021 R1
The underlying map itself does not appear, but the camera icons that are placed on the
map appear.
The cameras that are currently not in focus appear as thumbnail images on the right-hand side. They are sorted
according to proximity.
You can base your views on several maps that link to each other through hot zones, allowing you to follow
movement from a camera on one map to another camera on a sub-map, just as you would a person moving
from one floor to another or outside your building. The Sub-Maps pane gives you access to the cameras set up
on maps that are linked via hot zones on a map.
Use camera navigators
Use cameras navigators to navigate between related cameras as they are laid out according to a map.
Requirements
The camera navigator must be configured and then added to a view.
Steps:
1. On the Live or Playback tab, open the view that contains the camera navigator. Video from the default
camera of the map is displayed.
2. To view video from the other cameras on the map, click the camera icons that are currently not in focus.
You can also shift between the cameras in the thumbnail overview on the right-hand side.
30 | Navigating your cameras and viewsUser manual (simplified) | XProtect® Smart Client 2021 R1
3. To click back through you camera selection, click the Back button in the upper-right corner: .
4. To go to the default camera, click the Hom e button in the upper-right corner.
5. If you have navigated to a sub-map, you can click Up to go to the previous map, or Hom e to go to your
default view.
Carousels (explained)
A carousel is used for displaying video from several cameras, one after the other, in a single position in a view.
You can specify which cameras to include in the carousel as well as the interval between camera changes.
Carousels are displayed with the carousel icon on the toolbar: .
Fisheye lens cameras cannot be included in a carousel.
You can maximize a carousel by double-clicking the carousel position. When you do this, video from cameras
included in the carousel is by default displayed in full quality, regardless of your image quality selection. This
default cannot be overridden for carousels.
You can use digital zoom and PTZ controls from a carousel if the camera supports this. When you use the PTZ or
digital zoom controls that appear, the carousel pauses automatically.
Use carousels
If any of your views contain carousels, this icon will appear in the title bar next to the camera name: .
Requirements
l Carousels must be configured before you can use them.
l In the Settings window, Default for cam era title bar must be set to Show.
Steps:
1. On the Live tab, open a view that contains a carousel. When you hover over the view item, this toolbar
appears: .
2. The carousel starts automatically. To pause it, click the Pause button.
3. To shift to the next or previous camera in the carousel, click the Previous cam era or N ext cam era
button.
31 | Navigating your cameras and viewsUser manual (simplified) | XProtect® Smart Client 2021 R1
4. Additional actions available in the toolbar:
l Jump to the place on the smart map, where the camera is located
l Start search from the camera currently in focus, in a new window
l Create snapshot
l Copy to clipboard
You can maximize a carousel by double-clicking the carousel position. Video from
cameras included in the carousel is by default displayed in full quality, regardless of your
image quality selection.
Digital zoom (explained)
Digital zoom lets you magnify a portion of a given image so you are able to have a closer look at it. It works both
in live and playback mode.
Digital zoom is a useful feature for cameras that do not have their own optical zoom capabilities. Using digital
zoom will not affect any recording of the video. Recording will still take place in the regular format of the camera.
For non-PTZ cameras, digital zoom is enabled by default. If you enable or disable digital
zoom on one camera, all cameras in your view are affected. For PTZ cameras, this setting
only applies to one camera at a time.
When you export evidence, you can choose to export the regular images or the digitally zoomed images in AVI or
JPEG formats. When you export to database format, this is unavailable, because the recipient can use digital
zoom on the exported recordings. If you print an image on which you have used digital zoom, the digitally
zoomed area of the image will be printed.
Use digital zoom
Requirements
To enable digital zoom, on the camera toolbar, click More and select Digital zoom .
Steps:
32 | Navigating your cameras and viewsUser manual (simplified) | XProtect® Smart Client 2021 R1
1. Click and drag inside the image to zoom. The area you select is highlighted by a dotted line. When you
release the mouse button, the zoom will take effect.
2. To move to other areas of the image while maintaining your zoom level, in the overview frame, drag the
highlighted area to the required position.
3. To adjust the zoom level, click inside the image and use the scroll wheel on your mouse.
33 | Navigating your cameras and viewsUser manual (simplified) | XProtect® Smart Client 2021 R1
4. Click the Hom e icon inside the virtual joystick to return to the normal zoom level.
Virtual joystick and PTZ overlay buttons (explained)
If your views include fisheye cameras or lenses, or PTZ devices, you can navigate the images by using the virtual
joystick or the PTZ navigation buttons that may appear inside the image.
The virtual joystick:
If you do not want the camera toolbar to pop up when you hover over the view item, press
and hold the CTRL key while moving the mouse.
Views and shortcuts (explained)
You can use keyboard shortcuts to select views if the views have been assigned numbers. You assign numbers
to the views in setup mode on the Live and Playback tabs.
Using keyboard shortcuts to select a view only works if you are using a numeric keypad.
Example
If you have assigned the number 1 to a particular view, you select the view by pressing * + 1 + EN TER.
34 | Navigating your cameras and viewsUser manual (simplified) | XProtect® Smart Client 2021 R1
Keyboard shortcuts (overview)
When you work on the Live and Playback tabs, a number of keyboard shortcuts allow you to navigate within and
between views.
These shortcuts cannot be used for positions in views containing Matrix content or static
images.
Press these
To do this
keys
EN TER Toggle maximized and regular display of the selected item in the view.
Select a specific view item within a view. First, press ALT. A number is displayed for
each open window. If, for example, you want to select a view item in the second
window, press 2. Multiple numbers now appear, one for each view item that is
ALT visible in the second window. Press the number of the view item that you want to
select, for example 4. When a view item is in focus, it is marked with a blue frame.
If you are using a PTZ camera or a hotspot, this allows you to control cameras with
a joystick or to send the view item directly to the hotspot without using the mouse.
Change the camera in the selected view item to the camera with the matching
/ +
+EN TER Camera shortcut numbers may not necessarily be in use on your XProtect
VMS system. They are defined on the server.
/ +EN TER Change the camera in the selected view item to the default camera.
/ +/ +EN TER Change the cameras in all view items to the default cameras.
Change the selected view to the view with the matching shortcut number. Example:
* + If view shortcut numbers are used, you can see them on the Live and Playback tabs
+EN TER in the Views pane, where they appear in parentheses before the names of the
views.
35 | Navigating your cameras and viewsUser manual (simplified) | XProtect® Smart Client 2021 R1
Press these
To do this
keys
6 (numeric
Move the view position selection one step to the right.
keypad only)
4 (numeric
Move the view position selection one step to the left.
keypad only)
8 (numeric
Move the view position selection one step up.
keypad only)
2 (numeric
Move the view position selection one step down.
keypad only)
36 | Navigating your cameras and viewsUser manual (simplified) | XProtect® Smart Client 2021 R1
Viewing live video
You view live video mainly on the Live tab. To view live video, you must find a view that shows video from the
cameras that you are interested in. The views are available in the Views pane. For each camera that appears in
a view, different actions are available, for example taking snapshots or starting manual recording. See also
Camera toolbar (overview) on page 39. If something catches your attention, you can zoom in to take a closer
look using the virtual joystick.
Live video (explained)
The video stream from the camera is not necessarily being recorded. Typically, recording takes place according
to a schedule, for example, every morning from 10.00 to 11.30. Or whenever the XProtect VMS system detects
special events, for example, motion generated by a person entering a room, a door is opened, or similar.
If multiple streams have been set up on the server, you can temporarily view a different
stream by selecting this from the camera toolbar. On the camera toolbar, click More and
then select a stream from the available list.
To investigate an incident that was recorded, go to the Playback tab. To perform advanced searches, go to the
Search tab.
37 | Viewing live videoUser manual (simplified) | XProtect® Smart Client 2021 R1
Live tab (overview)
N um ber Description
1 The different workspaces. See also Workspaces in XProtect Smart Client on page 10.
2 Select a view.
Change cameras in views temporarily. See also Change individual cameras temporarily on
3
page 24.
View recorded video for individual cameras. See also View recorded video independently of
4
timeline on page 49.
5 The camera toolbar. See also Camera toolbar (overview) on page 39.
6 Enter or exit setup mode to add cameras and other types of content to your views.
7 Buttons. See also Buttons in XProtect Smart Client (overview) on page 14.
38 | Viewing live videoUser manual (simplified) | XProtect® Smart Client 2021 R1
Camera toolbar (overview)
The camera toolbar appears whenever the cursor hovers over a camera inside a view. The camera toolbar is
available both on the Live and on the Playback tab.
N um ber Description
Open a new search window where the camera is preselected. See also Start search from
1
cameras or views on page 65.
View recorded video independently of the timeline. See also View recorded video
2
independently of timeline on page 49.
3 Bookmark the video.
4 Take simple snapshots of what you are viewing. See also Take single snapshots on page 41.
Print a surveillance report from a single camera. See also Print report from single cameras
5
on page 88.
6 Copy single images to the clipboard. See also Copy images to clipboard on page 90.
7 Record video manually from a single camera. See also Record video manually on page 41.
8 Enable digital zoom. See also Use digital zoom on page 32.
Change the camera in the view item temporarily. See also Change individual cameras
9
temporarily on page 24.
39 | Viewing live videoUser manual (simplified) | XProtect® Smart Client 2021 R1
Hide camera toolbar
When you minimize the camera toolbar in a view item, the toolbar remains minimized only to you in the current
session. However, you can hide it permanently for a particular view item, for all users with access to the view
item.
Steps:
1. On the Live or Playback tab, click Setup to enter setup mode.
2. Find the view item where you want to hide the toolbar.
3. Click to hide the toolbar.
4. Click Setup again to exit setup mode. Your changes are saved.
The setting you make in setup mode is stored on the server, so that the change impacts
other XProtect Smart Client operators.
Camera indicators (explained)
The camera indicators show you the status of the video that is displayed in the camera view items. The camera
indicators are visible only if the camera title bar is enabled in the Settings window on the Application tab.
You can turn the camera title bar on and off on individual view items. On the Live or
Playback tab, click Setup and select the Show title bar check box in the Properties pane.
The list describes the different camera indicators that appear when:
l motion is detected. Click inside the image to reset the motion indicator
l the server connection to the camera is lost
l video from the camera is being recorded
40 | Viewing live videoUser manual (simplified) | XProtect® Smart Client 2021 R1
l a connection to the camera is established. This icon is only relevant for live video
l playing back recorded video
l no new images have been received from the server for more than two seconds
In the camera properties, you can add sound to notify you when there is motion.
Record video manually
Recording while watching live video is useful if you see something of interest.
Steps:
On the camera toolbar for the view item that you want to record, select one of the following options:
l Start recording for # Minutes
Once started, recording will continue for the number of minutes determined by your system
administrator. You cannot change this, and you cannot stop recording before the specified number of
minutes has passed.
l Start manual recording
Once started, recording will continue for the number of minutes determined by your system
administrator, or you can click the icon again to stop manual recording.
You can start recording the video stream from more than one camera
simultaneously, but you must select them one by one.
Take single snapshots
As you are viewing live or recorded video, or searching for video, you can take an instant snapshot that you can
share. The path to the folder, where the still image is saved, is specified in the Settings window under
Application settings.
Requirements
In the Settings window under Application, Snapshot must be set to Available.
Steps:
41 | Viewing live videoUser manual (simplified) | XProtect® Smart Client 2021 R1
1. If you are on the Live or Playback tab:
1. Hover over a view item that contains a camera, a hotspot, a carousel, or a camera navigator.
2. In the toolbar, click . The icon momentarily turns green.
2. If you are on the Search tab, double-click a search result and click in the camera toolbar. The icon
momentarily turns green.
3. To access the snapshots, go to the file location where the snapshots are saved.
If the image contains a privacy mask, this privacy mask is also applied to the snapshot
image.
42 | Viewing live videoUser manual (simplified) | XProtect® Smart Client 2021 R1 Investigating incidents You investigate incidents mainly on the Playback tab by using the timeline to browse recorded video. To view recorded video, you must find a view that shows video from the cameras that you are interested in. The views are available in the Views pane. For each camera that appears in a view, different actions are available, for example taking snapshots or launching search. See also Camera toolbar (overview) on page 39. If something catches your attention, you can zoom in to take a closer look using the virtual joystick. You can perform advanced searches on the Search tab and use the search results as a starting point for further investigation or actions, for example exporting and bookmarking. If the incident is associated with an alarm, go to the Alarm Manager tab, or select a view where the Alarm List has been added. Viewing recorded video (explained) There are different ways of viewing recorded video: On the Playback tab 43 | Investigating incidents
User manual (simplified) | XProtect® Smart Client 2021 R1

On the Playback tab, all cameras in a view display recordings from the same point in time, the master time. You can
play back or browse recordings by using the timeline. See also Time navigation controls (overview) on page 47.

However, you can also view and navigate recordings from individual cameras independently of the master time.
Independent playback must be enabled in the Functions settings.

If you are accessing your cameras through the tree structure in the Cam eras pane, you can open individual
cameras in a new window from the Playback tab.

On the Live tab
Though the Live tab normally shows live video, you can watch recorded video for individual cameras by clicking

the        button in the camera toolbar. This will open a new window where you can play back or browse the
recordings. Cam era playback must be enabled.

On the Search tab
The search results are basically video sequences that you can play back:

      l   Preview the search results. See also Preview video from search results on page 66

      l   Play back the search results in full screen mode or in a separate window. See also Open search results in
          separate windows on page 66

44 | Investigating incidents
User manual (simplified) | XProtect® Smart Client 2021 R1
Playback tab (overview)
N um ber Description
1 View recorded video on the Playback tab.
Select a view in the tree structure or use keyboard shortcuts. See also Keyboard shortcuts
2
(overview) on page 35.
Change individual cameras temporarily. See also Change individual cameras temporarily on
3
page 24.
Select a time span for exporting video. See also Time navigation controls (overview) on page
5
47.
45 | Investigating incidentsUser manual (simplified) | XProtect® Smart Client 2021 R1
N um ber Description
6 Browse using the timeline. See also Timeline (explained) on page 46.
Open a new search window with the camera preselected. See Start search from cameras or
7
views on page 65.
8 Create an evidence lock.
9 Export video data. See also Export video, audio, and still images on page 83.
Perform various actions on the camera toolbar. See also Camera toolbar (overview) on
10
page 39.
11 Enter or exit setup mode to add cameras and other types of content to your views.
12 Switch to full screen mode.
Timeline (explained)
The timeline displays an overview of periods with recordings from all cameras displayed in your current view.
Two timelines are displayed in the timeline area:
l The upper timeline shows the recording periods of the selected camera
l The lower timeline is for all the cameras in the view, including the selected camera. If you have linked
floating windows, these will also be included on the lower timeline
Drag the timeline to the right or left to move in time, or use the scroll wheel of your
mouse.
To adjust the range of the timeline, press CTRL and use the scroll wheel at the same time.
You will see these colors in the timeline:
l Light-red indicates recordings
l Red indicates motion
l Light green indicates outgoing audio
l Green indicates incoming audio
46 | Investigating incidentsUser manual (simplified) | XProtect® Smart Client 2021 R1
For a legend of the color codes, to the far right, click the small question mark.
Additional markers and colors
If there are additional sources of data available in your XProtect VMS system, incidents from these sources are
shown as markers in other colors. The incidents can appear as pop-ups in the timeline.
To view markers and colors from additional sources, Additional data and Additional
m arkers must either be enabled in the timeline settings or server-side by your system
administrator.
Bookmarks in the timeline (explained)
Bookmarks in the timeline are indicated with a blue bookmark icon: . To view the bookmarked video, place
your mouse over the icon.
Time navigation controls (overview)
47 | Investigating incidentsUser manual (simplified) | XProtect® Smart Client 2021 R1
N um ber Description
The playback date and time is the time to which all the cameras are tied. When you play
back recordings, all cameras in the view will show video from the same time. Some
1 and 3 cameras, however, may only record if motion is detected. Also, there may be no recorded
video from one or more cameras in the view matching the specified point in time. Then, the
last image in the database prior to the specified point in time will be dimmed.
2 The time of the timeline is indicated by a blue vertical line.
Select a period of time by dragging the start and end time indicators on the timeline -
4
typically when you are exporting video. Click again to see the timeline with no time selected.
5 Jump to a specific point in time by specifying the date and time.
The playback speed slider lets you change the current playback speed. Move the slider to
6
the left for slow motion, and to the right for fast motion. Click 1x for normal speed.
7 Move to the image just before the one currently viewed.
Play backward in time.
8
When you click either Play Backward or Play Forward, the button turns into a pause
button.
9 Adjust the speed. Drag it to the right to increase forward play speed.
Drag to the left to increase backward play speed.
10 Play forward in time.
11 Move to the image just after the one currently viewed.
12 Move to the first image in the database for the selected camera.
13 Move to the first image in the previous sequence.
48 | Investigating incidentsUser manual (simplified) | XProtect® Smart Client 2021 R1
N um ber Description
14 Move to the first image in the following sequence.
15 Move to the last image in the database for the selected camera.
16
Specify the time span of playback in the timeline.
View recorded video independently of timeline
When you play back video on the Playback tab, all recordings in the view are synchronized with the timeline. For
individual cameras, you can play back video independently of the timeline.
You can only use this feature for ordinary single-camera positions, not for hotspots,
carousels, or Matrix positions.
Requirements
In the Settings window > Functions tab, the Independent playback option must be set to Available.
Steps:
1. Move your cursor to the bottom of the camera that you want to view recorded video from. On the toolbar
that appears, click the Independent Playback button.
The independent playback timeline appears:
2. Drag the timeline to set the start time.
3. To view recorded video for the selected time on all the cameras in your view at once, on the toolbar, click
the Use the selected tim e on the playback tim eline button: . This displays the Playback tab with all
cameras synchronized to the time you have selected.
49 | Investigating incidentsUser manual (simplified) | XProtect® Smart Client 2021 R1
Investigate your search results
There are different ways of investigating incidents that you have found on the Search tab:
l Open the search result in a separate window where the Playback tab is preselected. See also Open
search results in separate windows on page 66
l Open the search result in a detailed view. Do one of the following:
l In the list of search results, double-click the search result to view it in full screen mode. Double-
click again to return to the list of search results
l If you are previewing your search result in the preview area, double-click inside the video image.
The search result opens in full screen mode. Double-click again to return to the preview area
50 | Investigating incidentsUser manual (simplified) | XProtect® Smart Client 2021 R1
Searching for video data
The search features are available mainly on the Search tab, but they are integrated with the Live and Playback
tabs.
Search for video
The Search tab lets you search for video recordings, and - based on the search results - lets you take action, for
example by exporting.
What can you search for?
l Video sequences
l Video sequences with motion
l Bookmarked video
l Video sequences with alarms
l Video sequences with events
l Video sequences with people
l Video sequences with vehicles
l Video recorded at a certain location
Requirements
l Searching for people, vehicles, and location is only available if these search categories were enabled by
your system administrator
l Searching for vehicles is also available if you have XProtect® LPR installed in your system. For more
information, ask your system administrator
The search categories Alarm s, Events, People, Vehicles, and Location are only available
if you are using one of these products:
l XProtect Corporate
l XProtect Expert
You can only combine search categories if you are using one of the products mentioned
above. For information about the features available in your XProtect VMS, see
Surveillance system differences on page 7.
Steps:
51 | Searching for video dataUser manual (simplified) | XProtect® Smart Client 2021 R1
1. Click the arrow to select a predefined time span, or define your own Custom interval.
2. In the Selected cam eras list, do one of the following to add cameras to your search:
l Use the search function to find cameras or views
l Manually select the cameras in the tree structure. To add all cameras within a view, select the
name of the view
As you add cameras, the search is run immediately.
52 | Searching for video dataUser manual (simplified) | XProtect® Smart Client 2021 R1 3. Click Search for to select the search categories. You can use search categories alone or combined. 4. For each search category that you add, you can refine the search by adding search filters. 53 | Searching for video data
User manual (simplified) | XProtect® Smart Client 2021 R1

   5. To preview the video of a search result, select the search result and, in the preview pane, click   .

                  To play back the video sequence in full-screen mode, double-click the search
                  result.

54 | Searching for video data
You can also read