VMware AirWatch Android Platform Guide - Deploying and managing Android devices with Workspace ONE UEM Workspace ONE UEM v9.6 - VMware Docs
←
→
Page content transcription
If your browser does not render page correctly, please read the page content below
VMware AirWatch Android Platform Guide
Deploying and managing Android devices with Workspace ONE UEM
Workspace ONE UEM v9.6

Have documentation feedback? Submit a Documentation Feedback support ticket using the Support Wizard on
support.air-watch.com.
Copyright © 2018 VMware, Inc. All rights reserved. This product is protected by copyright and intellectual property laws in the United States and other countries as well as by
international treaties. VMware products are covered by one or more patents listed at http://www.vmware.com/go/patents.
VMware is a registered trademark or trademark of VMware, Inc. in the United States and other jurisdictions. All other marks and names mentioned herein may be trademarks of their
respective companies.

                                                                                                                 VMware AirWatch Android Platform Guide | v.2018.08 | August 2018
                                                                                                                                    Copyright © 2018 VMware, Inc. All rights reserved.

                                                                                                                                                                                   1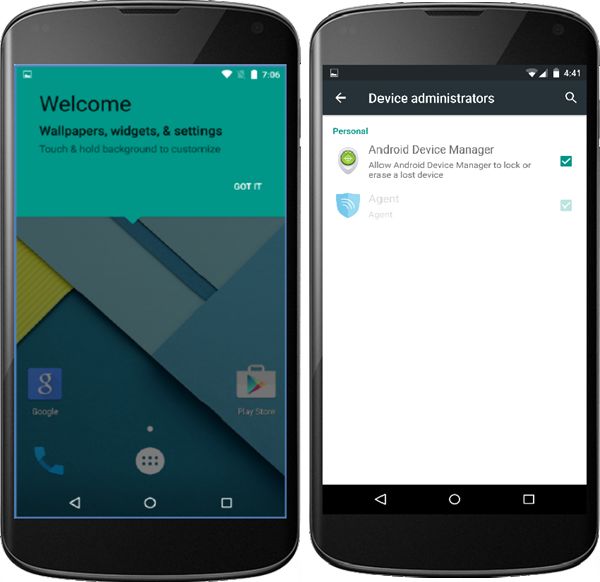
Table of Contents
 Chapter 1: Overview                                                                                                      5
             Introduction to Workspace ONE UEM Integration with Android                                                   6
             Android Name Change                                                                                          6
             Requirements for Deploying Android                                                                           6
             Key Terms for Android                                                                                        7
             Understanding Android Device Modes                                                                           8

 Chapter 2: Android EMM Registration                                                                                      9
             Register Android EMM with Managed Google Play Account                                                        9
             Register Android EMM with Managed Google Domain (G-Suite Customers)                                        10
             Unbind Domain from AirWatch                                                                                15

 Chapter 3: Android Enrollment                                                                                         16
             Work Managed Device Enrollment                                                                             16
             Work Profile Enrollment                                                                                    16
             Enrollment Settings                                                                                        16
             Device Protection                                                                                          17
             Autodiscovery Enrollment                                                                                   17
             Devices & Users / Android / Android EMM Registration                                                       17
             Device Protection for Android Devices                                                                      18
             Autodiscovery Enrollment                                                                                   18
             Work Managed Device Enrollment                                                                             19
             Enrolling Android Device into Work Profile Mode                                                            34

 Chapter 4: Android Profiles                                                                                           35
             Overview                                                                                                   35
             Android Versus Android (Legacy) Profiles                                                                   35
             Work Profile vs. Work Managed Device Mode                                                                  36
             Device Access                                                                                              36
             Device Security                                                                                            36
             Device Configuration                                                                                       36
             Passcode Profile                                                                                           37

                                                           VMware AirWatch Android Platform Guide | v.2018.08 | August 2018
                                                                           Copyright © 2018 VMware, Inc. All rights reserved.

                                                                                                                          2
Enforce Chrome Browser Settings                                                                              40
           Restrictions Profile                                                                                         41
           Enable Exchange Active Sync                                                                                  42
           Credentials                                                                                                  43
           Application Control                                                                                          44
           Configure Proxy Settings                                                                                     45
           Enable System Updates                                                                                        45
           Wi-Fi Profile                                                                                                46
           Configure VPN                                                                                                47
           Set Permissions                                                                                              50
           Configure Single App Mode                                                                                    50
           Set Date/Time                                                                                                51
           Create AirWatch Launcher Profile                                                                             52
           Configure APN Profile                                                                                        53
           Configure Enterprise Factory Reset Protection                                                                54
           Configure Zebra MX Profile                                                                                   55
           Using Custom Settings                                                                                        57

Chapter 5: Shared Devices                                                                                              59
           Configure Android for Shared Device Use                                                                      60
           Log In and Log Out of Shared Android Devices                                                                 61

Chapter 6: Application Management for Android                                                                          62
           Web Links for Android Devices                                                                                62
           Internal Apps with Android                                                                                   63
           Adding Public Applications for Android                                                                       63
           Assign Applications for Android                                                                              64
           Enable Play for Work                                                                                         66
           Integration Features                                                                                         66

Chapter 7: Android Device Management Overview                                                                          67
           Device Management Commands                                                                                   67
           Device Details Apps Tab                                                                                      67
           Specific Profiles Features for Android                                                                       68

                                                           VMware AirWatch Android Platform Guide | v.2018.08 | August 2018
                                                                           Copyright © 2018 VMware, Inc. All rights reserved.

                                                                                                                          3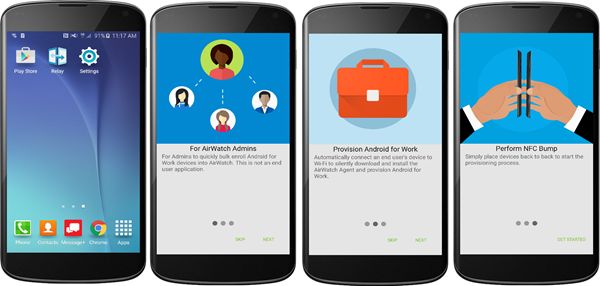
Specific Restrictions for Android                                                                70

                                    VMware AirWatch Android Platform Guide | v.2018.08 | August 2018
                                                    Copyright © 2018 VMware, Inc. All rights reserved.

                                                                                                   4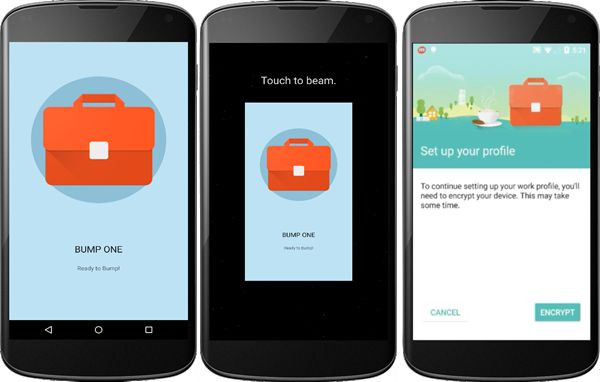
Chapter 1:
Overview
Introduction to Workspace ONE UEM Integration with
Android                                              6
Android Name Change                                  6
Requirements for Deploying Android                   6
Key Terms for Android                                7
Understanding Android Device Modes                   8

                                                         VMware AirWatch Android Platform Guide | v.2018.08 | August 2018
                                                                         Copyright © 2018 VMware, Inc. All rights reserved.

                                                                                                                        5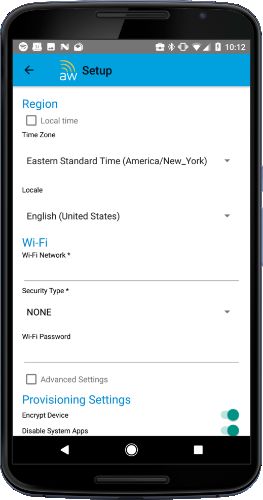
Chapter 1: Overview

Introduction to Workspace ONE UEM Integration with Android
VMware Workspace ONE UEM™ provides you with a robust set of mobility management solutions for enrolling, securing,
configuring, and managing your Android device deployment. Through the Workspace ONE UEM console, you have
several tools and features at your disposal for managing the entire life cycle of corporate and employee owned devices.
The guide explains how to integrate Workspace ONE UEM as your Enterprise Mobility Manager (EMM) with Android
devices for work profile and work managed device.

Android Name Change
Android for Work was introduced in 2015 to boost enterprise adoption for Android devices. Google has worked to
implement features in Android for Work available for most Android devices. Starting with Workspace ONE UEM console
release v9.4, Workspace ONE UEM has adopted the simplified naming convention. Android for Work has been renamed
to Android and is the default deployment method for new enrollments. This guide covers this deployment method. If
you are an existing VMware AirWatch customer, you can continue with your Android deployment using Android (Legacy)
for managing your device fleet. For documentation on Android (Legacy) management, see VMware AirWatch Android
(Legacy) Platform Guide.

Requirements for Deploying Android
Before deploying Android devices, you should consider the following pre-requisites, requirements for enrollment,
supporting materials, and helpful suggestions from the AirWatch team.

Supported Operating Systems
Android 5.X.X (Lollipop)
Android 6.X.X (Marshmallow)
Android 7.X.X (Nougat)
Android 8.X.X (Oreo)
Your Android device must be able to communicate with the Google Play Store. If your devices do not support Google
Play Integration, refer to Android (Legacy) deployment.

Enrollment Requirements
Each Android device in your organization's deployment must be enrolled before it can communicate with AirWatch and
access internal content and features. The following information is required prior to enrolling your devices.

If an email domain is associated with your environment – If Using Auto Discovery
 l   Email address – This is your email address associated with your organization. For example, JohnDoe@acme.com.

 l   Credentials – This username and password allow you to access your AirWatch environment. These credentials may
     be the same as your network directory services or may be uniquely defined in the Workspace ONE UEM console .

If an email domain is not associated with your environment – If Not Using Auto Discovery
If a domain is not associated with your environment, you are still prompted to enter your email address. Since auto
discovery is not enabled, you are then prompted for the following information:

                                                                         VMware AirWatch Android Platform Guide | v.2018.08 | August 2018
                                                                                         Copyright © 2018 VMware, Inc. All rights reserved.

                                                                                                                                        6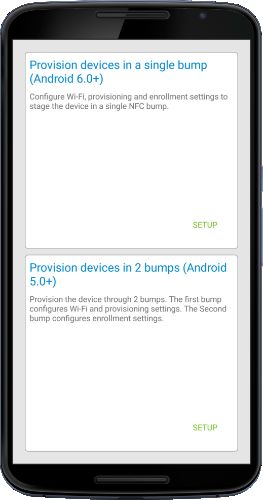
Chapter 1: Overview

 l   Enrollment URL – This URL is unique to your organization's enrollment environment and takes you directly to the
     enrollment screen. For example, mdm.acme.com/enroll.

 l   Group ID – The Group ID associates your device with your corporate role and is defined in the Workspace ONE UEM
     console .

 l   Credentials – This unique username and password pairing allows you to access your AirWatch environment. These
     credentials may be the same as your network directory services or may be uniquely defined in the Workspace ONE
     UEM console .
To download the Agent and subsequently enroll an Android device, you'll need the following information:
 l   Enrollment URL – The enrollment URL is AWAgent.com for all users, organizations and devices enrolling into
     AirWatch.

Key Terms for Android
These key terms associated with Android will help you in understanding how to configure and deploy settings to your
users.
 l   Work Profile– Work Profile mode, also known as Profile Owner, creates a dedicated container on your device for
     only business applications and content. Work Profile mode allows organizations to manage the business data and
     applications but not have access to the user's personal data and apps. The Android apps are denoted with a
     briefcase icon so they are distinguishable from the personal apps.

 l   Work Managed Device– Work Managed Device mode, also referred to as Device Owner, is scoped to the whole
     device. There is no personal side to the device and APIs pushed from the AirWatch Agent apply to the entire device.
     Work Managed Device mode applies to a device which starts in an unprovisioned state and, through a separate
     provisioning process, installs the AirWatch Agent and grants the Agent full control of the entire device.

 l   Managed Google Account – Refers to the Google account registered to the device used for Android and provides
     Android app management through Google Play. This account is managed by the domain that manages your Android
     configuration.

 l   Google Service Account – The Google Service Account is a special Google account that is used by applications to
     access Google APIs recommended for G Suite customers.

 l   EMM Token – Unique ID that Workspace ONE UEM uses to connect the Workspace ONE UEM console to the
     Managed Google Account.

 l   Managed Google Domain – Domain claimed for enabling Android associated with your enterprise.

 l   Google Domain Setup – Google process for claiming a managed Google domain.

 l   G Suite – A brand from Google from which you can push cloud computing, productivity and collaboration tools,
     software and products developed by Google.

 l   AirWatch Relay – The Workspace ONE UEM application admins use to bulk enroll Android Devices into Workspace
     ONE UEM.

 l   NFC Bump – This is done while using the AirWatch Relay app to pass information from the parent device to the child
     device.

                                                                          VMware AirWatch Android Platform Guide | v.2018.08 | August 2018
                                                                                          Copyright © 2018 VMware, Inc. All rights reserved.

                                                                                                                                         7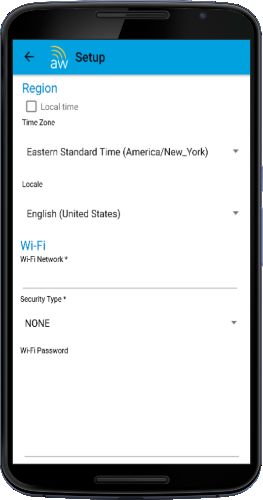
Chapter 1: Overview

Understanding Android Device Modes
Android’s built-in management features enable IT admins to fully manage devices used exclusively for work.
Android offers two modes depending on the ownership of the device being used within your organization. The Work
Profile(also called the Profile Owner) creates a dedicated space on the device for only work applications and data. This is
the ideal deployment for Bring Your Own Device (BYOD) programs. For devices that are being deployed to end users as
corporate owned, Work Managed Device mode allows Workspace ONE UEM and IT admin to control the entire device
and enforce an extended range of policy controls unavailable to work profiles, but restricts the device to only corporate
use.

Work Profile Mode Functionality
Apps in the Work Profile are differentiated by a red briefcase icon, called badged apps, and are shown in a unified
launcher with the user's personal apps. For example, your device shows both a personal icon for Google Chrome and a
separate icon for Work Chrome denoted by the badge. From an end-user perspective, it looks like two different
applications, but the app is only installed once with business data stored separately from personal data.
The AirWatch Agent is badged and exists only within the Work Profile data space. There is no control over personal apps
and the Agent does not have access to personal information.
There are a handful of system apps that are included with the Work Profile by default such as Work Chrome, Google Play,
Google settings, Contacts, and Camera – which can be hidden using a restrictions profile
Certain settings show the separation between personal and work configurations. Users see separate configurations for
the following settings:
 l   Credentials – View corporate certificates for user authentication to managed devices.

 l   Accounts – View the Managed Google Account tied to the Work Profile.

 l   Applications – Lists all applications installed on the device.

 l   Security – Shows device encryption status.

Work Managed Device Mode Functionality
When devices are enrolled in Work Managed Device mode, a true corporate ownership mode is created. Workspace ONE
UEM controls the entire device and there is no separation of work and personal data.
Important things to note for the Work Managed mode are:
 l   The homescreen does not show badged apps like Work Profile mode.

 l   Users have access to various pre-loaded apps upon activation of the device. Additional applications can only be
     approved and added through the Workspace ONE UEM console.

 l   The AirWatch Agent is set as the device administrator in the security settings and cannot be disabled.

 l   Unenrolling the device from with from Work Managed mode prompts device factory reset.

                                                                           VMware AirWatch Android Platform Guide | v.2018.08 | August 2018
                                                                                           Copyright © 2018 VMware, Inc. All rights reserved.

                                                                                                                                          8
Chapter 2:
Android EMM Registration
To start managing Android devices, you’ll need to register Workspace ONE UEM as your Enterprise Mobility
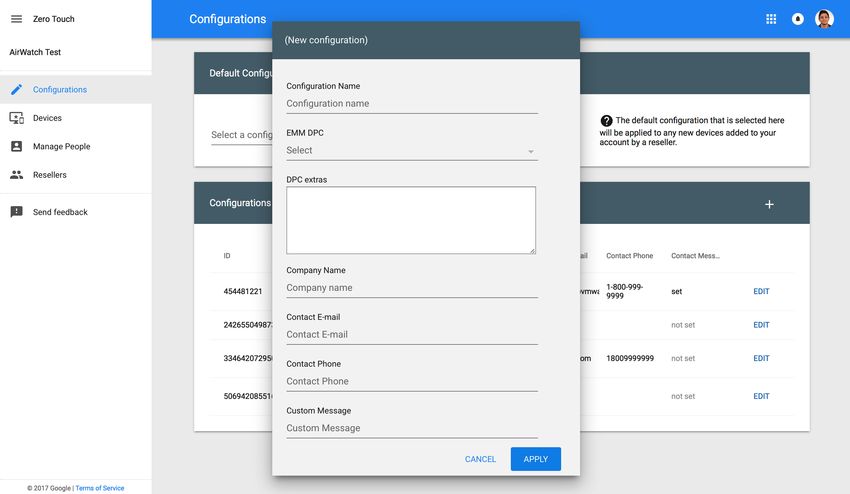
Management (EMM) provider with Google. The Getting Started page in the Workspace ONE UEM console provides a step
by step solution to help configure the enterprise management tools needed to secure and manage your device fleet.
There are two ways to configure Android: by using a Managed Google Play account (preferred) or using a managed
Google domain (recommended by Google for G Suite customers). A Managed Google Play account is used when your
business does not use G Suite and allows for multiple configurations of Android within your organization using a personal
Google account. Workspace ONE UEM manages this account and requires no Active Directory sync or Google verification.
Setting up Android using managed Google domain (G Suite) requires your enterprise to set up a Google domain and must
follow a verification process to prove that you own the domain. This domain can only be linked to one verified EMM
account. The setup includes creating a Google Service Account and configuring Workspace ONE UEM as your EMM
provider. Consider creating a Google account specifically for Android for your organization to use so as not to conflict
with any existing Google accounts.
The Google Service Account is a special Google account that is used by applications to access Google APIs and is required
when setting up Android using the managed Google domain method for your business. The Google Service Account
credentials are automatically populated when configuring Android Accounts when registering using managed Google play
account. If you encounter an error while setting Android Accounts, clear your settings in the Workspace ONE
UEM console and try again or create the account manually. For Google Accounts, consider creating your Google Service
Account before either setup method.
To change the Google account or make changes to your admin settings, you have to unbind the account from the
Workspace ONE UEM console.
Important: The setup of Android includes the integration of third-party tools that is not managed by VMware
AirWatch. The information in this guide for the Google Admin Console and Google Developer Console has been
documented with the available version as of January 2018. Integration with a third-party product is not guaranteed
and is dependent upon the proper functioning of the third-party solutions.
Register Android EMM with Managed Google Play Account
The Workspace ONE UEM console allows you to complete a simplified setup process to bind the UEM console to Google
as your EMM provider.
VMware AirWatch Android Platform Guide | v.2018.08 | August 2018
Copyright © 2018 VMware, Inc. All rights reserved.
9Chapter 2: Android EMM Registration
To start Android setup in the UEM console, complete the following:
1. Navigate to Getting Started > Workspace ONE > Android EMM Registration.
2. Select Configure and you are redirected to the Android EMM Registration page..
Note: If for some reason, the Android EMM Registration page is blocked, make sure you've enabled the Google
URLs in your network architecture to communicate with internal and external endpoints. For more information,
see the Recommended Architecture Guide.
3. Select Register with Google. If you are already signed in with your Google credentials, you are redirected back to the
Workspace ONE console.
4. Select Sign In,if you are not already, and enter your Google credentials and then select Get Started.
5. Enter your Organization Name. The Enterprise Mobility Manager (EMM) provider field populates automatically as
AirWatch.
6. Select Confirm > Complete Registration. You are redirected to the Workspace ONE Console, and your Google
Service Account credentials are automatically populated.
7. Select Save > Test Connection to ensure the service account is set up and connected successfully.
Note: If your settings in the UEM console have been cleared, when you navigate to register with Google, you will see a
message that prompts you to complete setup. You are redirected back to the Workspace ONE console, to finish
setup.
Register Android EMM with Managed Google Domain (G-Suite Customers)
Setting up your account with managed Google domain requires the organization to set up a Google domain if they do
not already use one.
You are to complete several manual tasks, such as verifying domain ownership with Google, obtaining an EMM token,
and creating an enterprise service account to use this type of setup.
To start Android setup in the Workspace ONE UEM console using managed Google domain method, complete the
following:
1. Navigate to Getting Started > Workspace ONE > Android EMM Registration.
2. Select Register to be redirected to the Android Setup Wizard to complete three steps:
l Generate Token: Obtain your enterprise token by registering your enterprise domain with Google.
l Upload Token: Enter the EMM Token into the Android setup wizard.
l Setup Users: Configure how users will be created for your entire enterprise.
3. Select Go To Google. You are redirected to the G Suite site.
4. Register your enterprise and verify your domain.
VMware AirWatch Android Platform Guide | v.2018.08 | August 2018
Copyright © 2018 VMware, Inc. All rights reserved.
10Chapter 2: Android EMM Registration
Setup Google Service Account
The Google Service Account is a special Google account that is used by applications to access Google APIs. You should
create this account after you generate your EMM token so you can upload all information at one time. The account is
only required if you are using the Google Accounts method for deploying Android.
1. Navigate to the Google Cloud Platform- Google Developers Console.
2. Sign in with your Google credentials.
Note: The Google Admin credentials do not have to be associated with your business domain. Consider creating
a Google account specifically for Android for your organization to use so as not to conflict with any existing
Google accounts.
3. Use the drop-down menu from the Select a project menu and select Create a project.
4. Enter a Project Name to create your API project in the New project window. Consider using Android EMM-
CompanyName as the naming convention.
5. Agree to the terms and conditions and select Create.
Your project generates and the Google Developer Console redirects you to the API Manager page.
6. Select Enable APIS and Services for Android from the APIs & Services Dashboard.
7. Search and enable the following APIs: Google EMM API and Admin SDK API.
After creating your project and enabling APIs, create your service account in the Google Developer's Console.
Create Service Account
Remain in the Google Developer's Console to create the service account.
1. Navigate to APIs & Services > Credentials > Create Credentials >Service Account Key > New Service Account.
2. Define the Service Account name for your service account. Consider following the Android naming convention and
be sure to note the name you choose as you will need it in further steps.
3. Use the drop-down menu to select the Role > Project as Owner.
4. Select the Key Type as P12.
5. Select Create. The identity certificate gets automatically created and downloaded to your local drive.
Caution: You must save your identity certificate and password for when you upload the certificate into the
Workspace ONE UEM console .
6. Select Manage service accounts from the Service Account Keys list which opens the Service Accounts page.
7. Select the menu button (three vertical dots) beside your service account and select Edit.
8. Select Enable G Suite Domain-wide Delegation.
9. Enter a Product name in order change settings for G Suite Domain. Consider using AndroidEMM-CompanyName as
VMware AirWatch Android Platform Guide | v.2018.08 | August 2018
Copyright © 2018 VMware, Inc. All rights reserved.
11Chapter 2: Android EMM Registration
the naming convention.
10. Select Save.
11. Select View Client ID under the Options field. The details of your service account displays. From here, you will leave
the Developer Console and input your credentials into the Google Admin Console.
Be sure to save your client ID before navigating away from the Developer's Console. You will also use these
credentials in the Workspace ONE UEM console when you upload your EMM token. For more information, see
Upload EMM Token on page 13
For steps to configure the Google Admin Console, see Setup Google Admin Console on page 12
Setup Google Admin Console
The Google Admin Console is where administrators manage Google services for users in an organization. AirWatch uses
the Google Admin Console for integration with Android and Chrome OS.
The Manage API client access page allows you to control custom internal application and third-party application access to
supported Google APIs (scopes).
To set up your Google Admin Console:
1. Login to the Google Admin Console and navigate to Security > Settings > Advanced Settings > Manage API Client
Access.
2. Fill in the following details:
Setting Description
Client Name Enter the Client ID obtained from AirWatch.
Paste the ID from your service account.
One or More API Scopes Copy and paste the following Google API scopes for Android:
Android:
https://www.googleapis.com/auth/admin.directory.user
3. Select Authorize.
Generate EMM Token
Your unique EMM token binds your domain for Android management to AirWatch. You are directed to the G Suite setup
site after selecting Go to Google from the previous task to begin.
1. Complete the following fields:
l About You – Enter your admin contact information.
l About Your Business – Fill out your company information.
l Your Google Admin Account – Create a Google admin account.
l Finishing Up – Enter the security verification data.
2. Select Accept & create your account after reading and agreeing to terms set by Google.
VMware AirWatch Android Platform Guide | v.2018.08 | August 2018
Copyright © 2018 VMware, Inc. All rights reserved.
12Chapter 2: Android EMM Registration
3. Follow the remaining prompts to Verify domain ownership and Connect with your provider. Once verified, this
becomes your managed Google domain.
To verify domain ownership, the following options are available: add a meta tag to your homepage, add a domain
host record, or upload HTML file to your domain site. Configure settings for the available options.
4. Select Verify to proceed. If this process is successful, the Connect with your provider section displays your EMM
token. This token is valid for 30 days.
Note: If you encounter problems during this step, please refer to Google Support using support number
and unique PIN listed.
5. Copy the generated EMM token and select Finish.
AirWatch recommends that you create your Google Service Account before you return to the Workspace ONE UEM
console to upload the EMM token, so that you can upload all credentials at one time.
Upload EMM Token
After you have finished all tasks in the Google Admin Console and the Google Developer Console, you are redirected to
the Workspace ONE UEM console to finish binding your G Suite domain with AirWatch for Android EMM.
1. Navigate to Getting Started > Workspace ONE > Android EMM Registration. If you have closed the window or are
not automatically redirected back to AirWatch.
2. Select Upload Token from the Android Setup wizard.
3. Complete the following fields:
Setting Description
Domain Domain claimed for enabling Android associated with your enterprise.
Important: If your domain has already been registered with another EMM provider, you
will not be allowed to upload a new EMM token.
Enterprise Token Unique identifier that links AirWatch to your G Suite configuration.
Google Admin Admin email created in the Google Admin Console. The email address displays from the View
Email Address Client ID from where you created your service account.
4. Enter the Directory Access Credentials, if needed. You only need to configure this if you plan to create users
automatically. For manual creation, you do not have to enter these credentials.
5. Proceed to upload your Google Developer Console Settings retrieved from your Google Service Account.
Setup Users
All users in your enterprise using Android will need Google accounts created to connect with their devices. This final step
in the Android EMM Registration wizard allows you to determine which setup method you prefer for creating users.
Admins have two options for creating users under Android:
VMware AirWatch Android Platform Guide | v.2018.08 | August 2018
Copyright © 2018 VMware, Inc. All rights reserved.
13Chapter 2: Android EMM Registration
l Create users manually by logging into the Google Admin Console or using the Google Active Directory Sync Tool
(GADS).
l Allow AirWatch to automatically create Google accounts during enrollment.
The format for the user name is username@.com.
To configure these settings:
1. Select Yes or No on the Create accounts during enrollment based on enrolled users' email prompt.
If yes, the next prompt will ask if you desire to use SAML to authenticate the accounts.
If no, the Workspace ONE UEM console directs you to the alternative method of creating Google accounts by the
Google Active Directory Sync Tool or the Google Admin Console.
2. Select Finish.
Creating Android Enrollment Users Automatically
AirWatch suggests that you create users for Android automatically during enrollment. The Android setup wizard allows
you to specify if you want to automatically create user accounts during enrollment, and if so, to use SAML to
authenticate the accounts. If you have not set up SAML previously, the wizard will display a link that directs you to
configure your settings.
If you wish to use create users automatically:
1. Select Yes to Create accounts during enrollment based on users' emails.
If you select yes, you will need configure the Directory Access Credential settings in the setup wizard. Upload a
Directory Access Certificate and enter a Service Account Email Address and Admin Email Address to configure these
settings.
2. Select Yes to Use SAML endpoint to authenticate accounts.
If you have not setup SAML, the wizard will prompt you to configure SAML authentication settings.
3. Select Finish to complete Android setup.
Creating Android Enrollment Users Manually
You can manually create user accounts for your entire enterprise outside of the Workspace ONE UEM console by either
using either the Google Cloud Directory Sync (GCDS) tool or the Google Admin Console. To access the Google Admin
Console , you can click the link provided in the setup wizard. You will need to contact Google for further instructions on
how to use the console.
The GCDS method requires you to use similar settings as the AirWatch Directory Services. Access the Directory Services
settings by navigating to Groups & Settings ► All Settings ► System ► Enterprise Integration ► Directory Services.
You can access the GCDS tool by clicking the link posted in the setup wizard or by downloading the tool directly to your
computer from the Google Support page.
The GADS tool allows you to manually create Google accounts for every employee in your enterprise in one bulk creation.
The accounts are created by synchronized with the information from your AirWatch Directory Services.
Note: The information discussed here is up to date as of latest version of GCDS v4.4.0 for March 2017.
VMware AirWatch Android Platform Guide | v.2018.08 | August 2018
Copyright © 2018 VMware, Inc. All rights reserved.
14Chapter 2: Android EMM Registration
To create users using this method, complete the following:
1. Select the link from the setup wizard or download the GADS tool directly from Google.
2. Open the tool from your desktop and select User Accounts and Groups to synchronize.
3. Select the Google Apps Configuration tab and enter the following:
a. Enter Primary Domain Name.
b. Select to Replace domain names in LDAP email address (of users and groups) with this domain name. This
will ensure that all user email addresses match the domain name.
4. Select the Authorize Now button.
5. Follow the steps to continue the authorization process when the Authorize Google Apps Directory Sync dialog
displays.
a. Sign-in to your Android admin account.
b. Enter the verification received in email.
c. Select Validate to confirm these settings.
6. Select the LDAP Configuration tab to enter the connection settings to sync the AirWatch Directory Services with
Google.
From here, you can enter the same settings saved in the AirWatch Directory Services to sync with this tool. To access
these settings, navigate to Groups & Settings ► All Settings ► System ► Enterprise Integration ► Directory Services.
7. Select Test Connection. If the sync is successful, this will auto create the linked Active Directory accounts and
corporate Google accounts in Google.
You will be directed back to the setup wizard to finish setup.
Unbind Domain from AirWatch
You can unbind the Android admin account in the Workspace ONE UEM console in the event you need to make a change
or change Google accounts.
1. Navigate to Devices > Device Settings > Devices & Users > Android > Android EMM Registration.
2. Select Clear Settings from the Android EMM Registration page.
VMware AirWatch Android Platform Guide | v.2018.08 | August 2018
Copyright © 2018 VMware, Inc. All rights reserved.
15Chapter 3:
Android Enrollment
Each Android device in your organization's deployment must be enrolled before it can communicate with the Workspace
ONE UEM console and access internal content and features.
The AirWatch Agent provides a single resource to enroll a device and provides device and connection details. Agent-
based enrollment allows you to:
l Authenticate users using basic or directory services, such as AD/LDAP/Domino, SAML, tokens, or proxies.
l Register devices in bulk or allow users to self-register.
l Define approved OS versions, models, and maximum number of devices per user.
Android has two enrollment options: Work Managed Device enrollment and Work Profile enrollment with additional
enrollment options for each mode.
Work Managed Device Enrollment
Work Managed Device mode, also called Device Owner, gives Workspace ONE UEM control of the entire device. This
mode is ideal for corporate owned device configurations that require a parent staging process. For more information, see
Work Managed Device Enrollment on page 19.
Work Profile Enrollment
Work Profile enrollment, also known as Profile Owner, is facilitated with the AirWatch Agent which secures a connection
between the Android device and the Workspace ONE UEM console. For more information, see Enrolling Android Device
into Work Profile Mode on page 34.
Enrollment Settings
The Android EMM Registration page lets you configure the various options for integrating with Android. This page uses a
wizard to help you set up the integration for devices. Enable these settings before beginning enrollment.
VMware AirWatch Android Platform Guide | v.2018.08 | August 2018
Copyright © 2018 VMware, Inc. All rights reserved.
16Chapter 3: Android Enrollment
Device Protection
Android OS 5.1 and above have a feature called Device Protection which requires Google credentials to be entered before
and after a device can be reset. When a device is ready to be enrolled as a Work Managed device for Android, the device
must be factory reset. This feature impacts Android enrollment. For more information, see Device Protection for Android
Devices on page 18.
Autodiscovery Enrollment
Workspace ONE UEM makes the enrollment process simple, using an autodiscovery system to enroll devices to
environments and
organization groups (OG) using user email addresses. For more information, see Autodiscovery Enrollment on page 18
Devices & Users / Android / Android EMM Registration
The Android settings page lets you configure the various options for integrating with Android prior to enrolling Android
devices. Android configuration uses a wizard to help you set up the integration for devices.
Configuration
The Configuration page shows Google Admin Console Settings and Google API settings after successful Android
EMM registration.
Enrollment Settings
Setting Description
Work Choose if devices should be associated with the enrollment user or device.
Managed When using paid apps, User Based is preferred for optimal license allocation and most BYOD use
Enrollment cases. For scenarios where a single user will not be associated with the device (such as Kiosks), Device
Type Based is preferred.
Enrollment Restrictions
Setting Description
Define the Select whether to Always use Android, or Always Use Android (Legacy), Define assignment
enrollment method group that use Android.
for this If you select Define Assignment Group that use Android, all unassigned devices default to use
Organization Android (Legacy).
Group
Assignment Groups Select a smart group from the drop-down menu.
When a smart group(s) is selected, devices or users that do not belong to that group(s) will go
through Android legacy enrollment (device administrator). Devices that belong to smart group
will enroll in Work Profile or Work Managed assuming they support these enrollment modes
VMware AirWatch Android Platform Guide | v.2018.08 | August 2018
Copyright © 2018 VMware, Inc. All rights reserved.
17Chapter 3: Android Enrollment
Device Protection for Android Devices
Android OS 5.1 and above have a feature called Device Protection which requires Google credentials to be entered before
and after a device can be reset. When a device is ready to be enrolled as a Work Managed device for Android, the device
must be factory reset.
Any existing Google account has to be removed from the device and the secure lock screen disabled to avoid triggering
Device Protection so that the AirWatch Agent can be installed during enrollment. Using the device from the factory reset
state also prevents the new user from being locked out of the device.
In the event the previous owner changed the Google account password, you must wait three days before factory
resetting any of your Android 5.1+ devices for enrollment unless you have explicitly disabled Android Device Protection
on them. If you factory reset one of your Android devices before those three days are up and then attempt to sign into
that device with your Google account, you will be met with an error message and not allowed to log into the device with
any account until 72 hours after the password reset occurred.
Autodiscovery Enrollment
Workspace ONE ™ UEM makes the enrollment process simple, using an autodiscovery system to enroll devices to
environments and organization groups (OG) using user email addresses. Autodiscovery can also be used to allow end
users to authenticate into the Self-Service Portal (SSP) using their email address.
Note: To enable an autodiscovery for on-premises environments, ensure that your environment can communicate
with the Workspace ONE UEM Autodiscovery servers.
Registration for Autodiscovery Enrollment
The server checks for an email domain uniqueness, only allowing a domain to be registered at one organization group in
one environment. Because of this server check, register your domain at your highest-level organization group.
Autodiscovery is configured automatically for new Software as a Service (SaaS) customers.
VMware AirWatch Android Platform Guide | v.2018.08 | August 2018
Copyright © 2018 VMware, Inc. All rights reserved.
18Chapter 3: Android Enrollment
Configure Autodiscovery Enrollment from a Child Organization Group
You can configure Autodiscovery Enrollment from a child organization group below the enrollment organization group.
To enable an autodiscovery enrollment in this way, you must require users to select a Group ID during enrollment.
1. Navigate to Devices > Device Settings > General > Enrollment and select the Grouping tab.
2. Select Prompt User to Select Group ID.
3. Select Save.
Configure Autodiscovery Enrollment from a Parent Organization Group
Autodiscovery Enrollment simplifies the enrollment process enrolling devices to intended environments and organization
groups (OG) using end-user email addresses.
Configure an autodiscovery enrollment from a parent OG by taking the following steps.
1. Navigate to Groups & Settings > All Settings > Admin > Cloud Services and enable the Auto Discovery setting.
Enter your login email address in Auto Discovery AirWatch ID and select Set Identity.
a. If necessary, navigate to https://my.workspaceone.com/set-discovery-password to set the password for Auto
Discovery service. Once you have registered and selected Set Identity, the HMAC Token auto-populates. Click
Test Connection to ensure that the connection is functional.
2. Enable the Auto Discovery Certificate Pinning option to upload your own certificate and pin it to the auto discovery
function.
You can review the validity dates and other information for existing certificates, and also can Replace and Clear these
existing certificates.
Select Add a certificate and the settings Name and Certificate display. Enter the name of the certificate you want to
upload, select the Upload button, and select the cert on your device.
3. Select Save to complete an autodiscovery setup.
Instruct end users who enroll themselves to select the email address option for authentication, instead of entering an
environment URL and Group ID. When users enroll devices with an email address, they enroll into the same group listed
in the Enrollment Organization Group of the associated user account.
Work Managed Device Enrollment
Android Work Managed Device mode gives Workspace ONE UEM control of the entire device. Using a factory reset device
helps ensure that devices are not set up for personal use.
There are several ways to enroll Work Managed devices:
l Using AirWatch Relay to perform an NFC bump
l Using an unique identifier or token code
l Scanning a QR code
l Using Zero Touch enrollment
VMware AirWatch Android Platform Guide | v.2018.08 | August 2018
Copyright © 2018 VMware, Inc. All rights reserved.
19Chapter 3: Android Enrollment
Your business requirements determine which enrollment methods you want to use. You cannot enroll devices until you
have completed Android EMM Registration. See Android EMM Registration to complete registration.
If the Android devices you are using are on a closed network, unable to communicate with Google Play, or are running
Android 5.0 or lower, then enroll Android using the Legacy enrollment method in the VMware AirWatch Android (Legacy)
Platform Guide.
Enrollment Settings
The Android EMM Registration page lets you configure the various options for integrating with Android. This page uses a
wizard to help you set up the integration for devices. Enable these settings before beginning enrollment.
AirWatch Relay
AirWatch Relay is an application that passes information from parent devices to all child devices being enrolled into
Workspace ONE UEM with Android. This process is done through and NFC bump and provisions child devices to:
l Connect to the parent device to Wi-Fi network and region settings including the device date, time, and location.
l Download the latest production version of AirWatch Agent for Android.
l Silently set the AirWatch Agent as device administrator.
l Automatically enroll into Workspace ONE UEM.
AirWatch Relay allows you to bulk enroll all child devices before deploying them to end users and eliminates end users
from having to enroll their own devices. All child devices must be in factory reset mode and have NFC enabled by default
to be enrolled as Work Managed Device for Android.
The NFC bump process depends on the Android OS. Devices running Android 6.0+ perform one bump to connect and
enroll child devices in one step. Devices running Android OS versions between v5.0 and v6.0 perform two NFC bumps.
The first bump is to connect the parent device to Wi-Fi network and region settings including the device date, time, and
location and download the AirWatch Agent. The second NFC bump is to enroll all child devices before deploying them to
end users.
For AirWatch Relay enrollment, see Enroll Work Managed Device with AirWatch Relay on page 21.
AirWatch Identifier
The AirWatch Identifier enrollment method is a simplified approach to enrolling Work Managed devices for Android 6.0+
devices. Enter a simple identifier, or hash value, on a factory reset device. After the identifier is entered, the enrollment is
automated pushing down the AirWatch Agent. The user only has to enter server details, user name, and password. For
AirWatch Identifier enrollment, see Enroll Work Managed Devices Using AirWatch Identifier on page 30.
With the identifier, you can also enroll on behalf of the end user by doing Single-User Device Staging. This method is
useful for administrators who set up multiple devices for an entire team or single members of a team. Such a method
saves the end users the time and effort of enrolling their own devices.
QR Code
Devices such as tablets do not support NFC, so these devices cannot use the AirWatch Relay enrollment method which
requires NFC bump for Android 7.0+ devices.
QR code provisioning is an easy way to enroll a fleet of devices that do not support NFC and the NFC bump. The QR code
contains a payload of key-value pairs with all the information that is needed for the device to be enrolled. QR Code
VMware AirWatch Android Platform Guide | v.2018.08 | August 2018
Copyright © 2018 VMware, Inc. All rights reserved.
20Chapter 3: Android Enrollment
enrollment does not require a managed Google domain or a Google account. Create the QR code before starting
enrollment. You can use any online QR Code generator, such as Web Toolkit Online, to create your unique QR code. The
QR code includes the Server URL and Group ID information. You can also include the user name and password or the user
has to enter their credentials.
Here is the format of the text to paste into the generator:
{
"android.app.extra.PROVISIONING_DEVICE_ADMIN_COMPONENT_NAME":
"com.airwatch.androidagent/com.airwatch.agent.DeviceAdministratorReceiver",
"android.app.extra.PROVISIONING_DEVICE_ADMIN_SIGNATURE_CHECKSUM":
"6kyqxDOjgS30jvQuzh4uvHPk-0bmAD-1QU7vtW7i_o8=\n",
"android.app.extra.PROVISIONING_DEVICE_ADMIN_PACKAGE_DOWNLOAD_LOCATION":
"https://awagent.com/mobileenrollment/airwatchagent.apk",
"android.app.extra.PROVISIONING_SKIP_ENCRYPTION": false,
"android.app.extra.PROVISIONING_WIFI_SSID": "Your_SSID",
"android.app.extra.PROVISIONING_WIFI_PASSWORD": "Password",
"android.app.extra.PROVISIONING_ADMIN_EXTRAS_BUNDLE": {
"serverurl": "Server URL",
"gid": "Group ID",
"un":"Username",
"pw":"Password"
}
}
For QR Code enrollment, see Enroll Work Managed Device Mode Using a QR Code on page 30.
Zero Touch Enrollment
Zero Touch enrollment allows for Android 8.0+ devices to be configured with Workspace ONE UEM as the enterprise
mobility management provider out the box.
When the device is connected to the Internet during the device setup, the AirWatch Agent is automatically downloaded
and enrollment details are automatically passed to enroll the device with no user interaction.
Prerequisites
Zero Touch enrollment is only supported by a limited number of mobile carriers and OEMs. Customers need to work with
their carrier to ensure that zero touch provisioning is supported. Learn more about supported carriers and devices on
the Google website.
For Zero Touch enrollment steps, see Enroll Work Managed Device Using Zero Touch on page 1.
Note: Zero Touch enrollment is only supported on Android 8.0 (Oreo) devices.
Enroll Work Managed Device with AirWatch Relay
Enrolling the Work Managed Device mode using AirWatch Relay varies depending on the Android OS version.
VMware AirWatch Android Platform Guide | v.2018.08 | August 2018
Copyright © 2018 VMware, Inc. All rights reserved.
21Chapter 3: Android Enrollment
If you are using Android 6.0+, the AirWatch Relay app provides a single NFC bump option which configures Wi-Fi,
provisioning, and enrollment settings. For provisioning Work Managed Devices with AirWatch Relay on Android 6.0+
devices, please see Provisioning Work Managed Device with AirWatch Relay for Android 6.0+ on page 22
Enrolling the Work Managed Device mode for devices running Android OS version between v5.0 and v6.0 is completed in
two NFC bump. Bump one configures region, Wi-Fi, and any applicable advanced settings applied to all the devices in
your fleet. Bump two configures the enrollment settings and automates the enrollment process. See Enrolling Work
Managed Device with AirWatch Relay for Android v5.0 and Android v6.0 on page 25.
Provisioning Work Managed Device with AirWatch Relay for Android 6.0+
For Android 6.0+, the AirWatch Relay app provides a single bump option which configures region, Wi-Fi, provisioning
settings, and enrollment settings in the single bump.
For provisioning Work Managed Devices with AirWatch Relay on Android 6.0+ devices:
1. Download the AirWatch Relay app from the Google Play Store to the parent device and launch the app once
complete.
2. Review the 'For AirWatch Admins' screen and select Next to proceed to the wizard.
This screen will allow you to view or skip to a setup wizard which provides a descriptions of the purpose of the app
and a tutorial of the NFC bump.
3. Tap Setup on Provision devices in a single bump (Android 6.0+).
4. From the parent device, define the following settings:
VMware AirWatch Android Platform Guide | v.2018.08 | August 2018
Copyright © 2018 VMware, Inc. All rights reserved.
22Chapter 3: Android Enrollment
Setting Description
Region
Local Time Enable this field for the device to automatically configure with local time.
Time Zone Select the time zone.
Locale Select the location your device will be enabled.
Wi-Fi
Wi-Fi Network Specify the Wi-Fi network the device will connect to.
Security Type Determine the encryption type for the connection.
Wi-Fi Password Enter the Wi-Fi Password.
Provisioning (Advanced)
Encrypt Device Enable this field to indicate that device encryption can be skipped as part of Work Managed
device provisioning.
Disable System Enable this field to skip the agent from disabling system apps during set up.
Apps
Enrollment Settings
Server Enter the server URL or hostname.
Group ID Enter an identifier for the organization group for the end users to use for device to log in.
Username Enter the credentials for the user the child device will be enrolled.
Password Enter the credentials for the user the child device will be enrolled.
5. Tap Ready from the parent device.
6. Perform the NFC bump by touching the parent and child device back to back. The child device should be in factory
reset mode which will ensure the device is not being used for personal use.
7. Tap Touch to Beam on the parent device with the devices still back to back.
8. Tap Encrypt on the child device with the devices still back to back.
The child device will automatically:
a. Connect to the Wi-Fi network defined in the AirWatch Relay app.
b. Download and silently install the AirWatch Agent.
c. Set the AirWatch Agent as device administrator.
d. Reset the device.
VMware AirWatch Android Platform Guide | v.2018.08 | August 2018
Copyright © 2018 VMware, Inc. All rights reserved.
23Chapter 3: Android Enrollment
After the child device has reset, the device is provisioned for Work Managed Mode. A welcome screen displays on your
child device. To verify this from the child device, navigate to Device Settings > Security > Device Administrators to view
AirWatch Agent listed as the device administrator. End users will not be able to deactivate this setting.
You will also notice on the device homescreen the pre-downloaded apps allowed. Any other applications will need to be
approved by the administrator from the Workspace ONE UEM console .
If you have several devices to enroll in your device fleet, then repeat NFC bump one on each child device to provision
them in Work Managed Device mode.
If enrollment was successful, the My Device page will display on the child device (shown above). All profiles and
applications will start to automatically push to the device. You will repeat the enrollment steps for each device needing to
be enrolled in your device fleet.
VMware AirWatch Android Platform Guide | v.2018.08 | August 2018
Copyright © 2018 VMware, Inc. All rights reserved.
24Chapter 3: Android Enrollment
The Workspace ONE UEM console reports the status of Android on the users devices. You can check the Details View
page to verify that Android was successfully created.
Navigate to Devices > Details View > Summary and view the Security section of the page to view the status. The should
be a green check to verify Android activation.
Enrolling Work Managed Device with AirWatch Relay for Android v5.0 and Android v6.0
For instructions
1. Download the AirWatch Relay app from the Google Play Store to the parent device and launch the app once
complete.
2. Review the 'For AirWatch Admins' screen and select Next to proceed to the wizard.
This screen will allow you to view or skip to a setup wizard which provides a descriptions of the purpose of the app
and a tutorial of the NFC bump.
3. Tap Setup on the desired option to Provision devices in 2 bumps (Android v 5.0- Android v6.0+).
If using Android 6.0+, select Provisioning devices in a single bump(Android 6.0+). For instructions for Android 6.0+
devices, please see Provisioning Work Managed Device with AirWatch Relay for Android 6.0+ on page 22.
VMware AirWatch Android Platform Guide | v.2018.08 | August 2018
Copyright © 2018 VMware, Inc. All rights reserved.
25Chapter 3: Android Enrollment
4. From the parent device, define the following settings:
Setting Description
Region
Local Time Enable this field for the device to automatically configure with local time.
Time Zone Select the time zone.
Locale Select the location your device will be enabled.
Wi-Fi
Wi-Fi Network Specify the Wi-Fi network the device will connect to.
Security Type Determine the encryption type for the connection.
Wi-Fi Password Enter the Wi-Fi Password.
Provisioning Settings
Skip Device Encryption Enable this field to indicate that device encryption can be skipped as part of
Requirement for Provisioning Work Managed device provisioning.
VMware AirWatch Android Platform Guide | v.2018.08 | August 2018
Copyright © 2018 VMware, Inc. All rights reserved.
26Chapter 3: Android Enrollment
Setting Description
Do Not Disable System Apps Enable this field to skip the agent from disabling system apps during set up.
During Provisioning
5. Tap Ready from the parent device to perform bump one.
6. Perform the first NFC bump by touching the parent and child device back to back. The child device should be in
factory reset mode which will ensure the device is not being used for personal use.
Important: Prior to performing a factory reset on child devices (if the device isn't new out of the box), disable the
lock screen and remove any existing Google account configured on the device. Device Protection is a feature for
Android 5.1 that requires uses to enter the Google account credentials prior to performing a factory reset. If you
disable lock screen and remove existing Google account, you will not be prompted for credentials and enrollment
will not be hindered.
7. Tap Touch to Beam on the parent device with the devices still back to back.
8. Tap Encrypt on the child device with the devices still back to back.
The child device will automatically:
l Connect to the Wi-Fi network defined in the AirWatch Relay app.
l Download and silently install the AirWatch Agent.
l Set the AirWatch Agent as device administrator.
l Reset the device.
After the child device has reset, the device is provisioned for Work Managed Mode and bump one is complete. A
welcome screen displays on your child device. To verify this from the child device, navigate to Device Settings > Security
> Device Administrators to view AirWatch Agent listed as the device administrator. End users will not be able to
deactivate this setting.
VMware AirWatch Android Platform Guide | v.2018.08 | August 2018
Copyright © 2018 VMware, Inc. All rights reserved.
27Chapter 3: Android Enrollment
You will also notice on the device homescreen the pre-downloaded apps allowed. Any other applications will need to be
approved by the administrator from the Workspace ONE UEM console .
If you have several devices to enroll in your device fleet, then repeat NFC bump one on each child device to provision
them in Work Managed Device mode. If not, proceed to enrollment.
9. Return to the AirWatch Relay app, from the parent device, and tap Enroll.
10. Define the enrollment settings. These setting will be used to automate enrollment of child devices.
VMware AirWatch Android Platform Guide | v.2018.08 | August 2018
Copyright © 2018 VMware, Inc. All rights reserved.
28Chapter 3: Android Enrollment
Setting Description
Server Enter the server URL or hostname.
Group ID Enter an identifier for the organization group for the end users to use for device to log in.
parent User Enter the credentials for the user the child device will be enrolled.
parent Password Enter the credentials for the user the child device will be enrolled.
11. Tap Ready.
12. Perform the second NFC bump by bringing the parent and child device back to back and tap Touch to Beam on the
child device to begin enrollment. The second NFC bump must be performed after the Setup Wizard has been
completed. Wait until the Setup Wizard completes and directs you to the device home page before performing the
second NFC bump to configure the AirWatch Agent.
13. Enter the credentials for the corporate Google account tied to the user. You will be prompted with the Google
account password screen.
14. Tap Next to proceed to the My Device page (shown in the image above).
If enrollment was successful, the My Device page will display on the child device (shown above). All profiles and
applications will start to automatically push to the device. You will repeat the enrollment steps for each device needing to
be enrolled in your device fleet.
Navigate to Devices > Details View > Summary and view the Security section of the page to view the status. The should
be a green check to verify Android activation.
VMware AirWatch Android Platform Guide | v.2018.08 | August 2018
Copyright © 2018 VMware, Inc. All rights reserved.
29Chapter 3: Android Enrollment
Enroll Work Managed Devices Using AirWatch Identifier
During Work Managed Device enrollment, the user enters a special DPC-specific identifier token when they are prompted
to add an account. A token is in the format “afw#EMM_Identifier” and automatically identifies Workspace ONE UEMas
your EMM provider.
Important: This enrollment flow is only for Android accounts using Android 6.0 (M+) devices.
To enroll using the AirWatch Identifier:
1. Tap Get Started on your factory reset device.
2. Select your Wi-Fi network and login with your credentials to connect the device.
3. Enter the identifier “afw#airwatch” when prompted to add a Google account. The setup wizard adds a temporary
Google Account to the device. This account is only used to download the DPC from Google Play and is removed upon
completion.
4. Tap Install to begin configuration of the AirWatch Agent to the device. The Agent will automatically open after install
is complete.
5. Choose the Authentication Method to continue enrollment:
l Select Email Address if you have configured Autodiscovery. In addition, you may be prompted to select your
Group ID from a list.
l Choose Server Details and enter Server, Group ID, and user credentials.
6. Follow the remaining prompts to complete enrollment.
All profiles and applications start to automatically push to the device. The Workspace ONE UEM console reports the
status of Android on the users devices. You can check the Details View page to verify that Android was successfully
created.
Navigate to Devices > Details View > Summary and view the Security section of the page to view the status. A green
check displays to verify Android activation.
Enroll Work Managed Device Mode Using a QR Code
The QR code enrollment method sets up and configures Work Managed Device mode by scanning a QR code from the
setup wizard. This enrollment flow is ideal for an admin staging multiple devices before deploying to users or for the end
user who will be enrolling their own device with the QR code provided by an IT admin. Use the Workspace ONE UEM
console to create the QR code before starting enrollment. Alternatively, you can use any online QR Code generator, such
as Web Toolkit Online, to create your QR code.
To use the UEM console to create the QR code, see the Enrollment Configuration Wizard in Staging & Provisioning. For
more information on the Enrollment Configuration Wizard, see, Generate a QR Code Using the Enrollment Configuration
Wizard on page 31.
After you have created the QR code, follow these steps to enroll your device:
VMware AirWatch Android Platform Guide | v.2018.08 | August 2018
Copyright © 2018 VMware, Inc. All rights reserved.
30You can also read