BOMGAR REMOTE SUPPORT REPRESENTATIVE GUIDE 15.2 - BEYONDTRUST
←
→
Page content transcription
If your browser does not render page correctly, please read the page content below
Bomgar Remote Support
                                                                                                                                     Representative Guide 15.2

© 2016 Bomgar Corporation. All rights reserved worldwide. BOMGAR and the BOMGAR logo are trademarks of Bomgar Corporation; other trademarks shown are the property of their respective owners.   TC:5/12/2016
BOMGAR REMOTE SUPPORT REPRESENTATIVE GUIDE 15.2
Table of Contents
Introduction to the Representative Console 4
Install the Representative Console 5
Login to the Representative Console 6
Representative Console User Interface 7
Change Settings and Preferences in the Representative Console 9
Changing Settings 9
Supporting Users 12
Support Session Start Options 12
Generate a Session Key to Start a Support Session 13
View Support Sessions in Queue 14
Accept a Session to Start Support 15
Generate an Apple iOS Profile Access Key 17
Supporting Systems 19
Use a Jumpoint for Unattended Access to Computers on a Remote Network 19
RDP to a Remote Windows System 21
Shell Jump to a Remote Network Device 23
Support Intel® vPro Windows Systems 24
Use Jump Clients to Access Unattended Computers 27
The Jump Interface 27
Jump to a Jump Client 27
Jump Client Properties 29
Toolset 32
Support Session Overview and Tools 32
Chat with the Customer During a Session 35
Screen Share with the Remote Customer for View and Control 37
Use Annotations to Draw on the Remote Screen 40
View Multiple Monitors on the Remote System 42
File Transfer to and from the Remote System 44
Access the Remote Command Shell 46
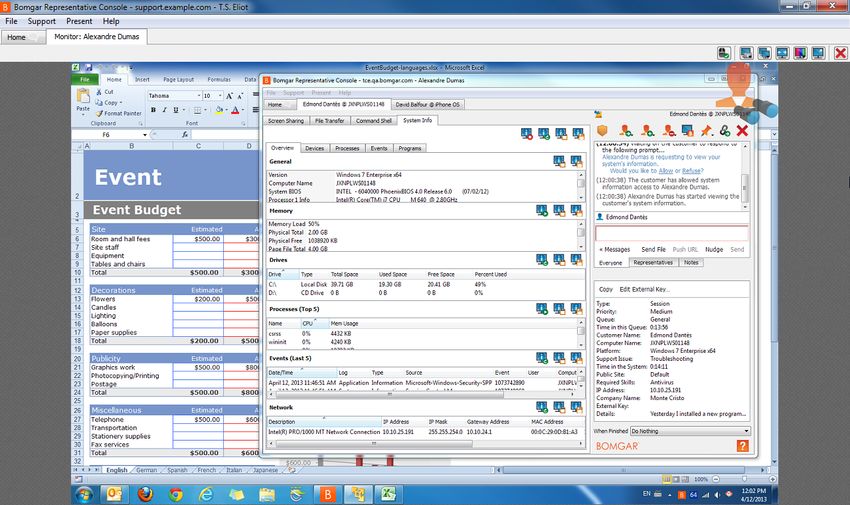
View Remote System Information 48
Access the Remote Registry Editor 50
CONTACT BOMGAR info@bomgar.com | 866.205.3650 (US) | +44 (0) 1628 480 210 (UK/EMEA) BOMGAR.COM 2
© 2016 Bomgar Corporation. All rights reserved worldwide. BOMGAR and the BOMGAR logo are trademarks of Bomgar Corporation; other trademarks shown are the property of their respective owners. TC: 5/12/2016
BOMGAR REMOTE SUPPORT REPRESENTATIVE GUIDE 15.2

                                            Show My Screen to the Customer                                                                                                     52
                                            Give a Presentation to Remote Attendees                                                                                            54
                                        Collaboration                                                                                                                          58
                                            Chat with Other Representatives                                                                                                    58
                                            Share your Screen with Another Representative                                                                                      59
                                            Accept an Access Request to Offer Elevation Help                                                                                   61

                                            Share a Session with Other Representatives                                                                                         62
                                            Use Extended Availability to Stay Accessible when Not Logged In                                                                    63
                                            Invite an External Representative to Join a Session                                                                                65
                                        Management                                                                                                                             66
                                            Manage Bomgar Buttons                                                                                                              66
                                            Monitor Team Members in the Dashboard                                                                                              69
                                            Representative Survey                                                                                                              70
                                        What Your Customer Sees: The Bomgar Customer Client                                                                                    71
                                            Public Site: Request Support                                                                                                       72
                                            Customer Client: Support Session Interface                                                                                         73
                                            Application Sharing: Limit What the Representative Can See                                                                         76
                                            Restricted Customer Interaction: Privacy Screen, Disable Remote Input                                                              77
                                            Automatic Log On Credentials: Reboot and Reconnect                                                                                 78
                                            Show My Screen: Reverse Screen Share                                                                                               79
                                            Bomgar Button: Quickly Request Support                                                                                             80
                                            Customer Exit Survey: Submit Feedback                                                                                              81

                                            Presentation Attendee Client: Join a Presentation                                                                                  82
                                        Ports and Firewalls                                                                                                                    84
                                        Troubleshoot Bomgar Representative Console Connections                                                                                 85
                                        Disclaimers, Licensing Restrictions and Tech Support                                                                                   86

CONTACT BOMGAR                                 info@bomgar.com           |      866.205.3650 (US)          |     +44 (0) 1628 480 210 (UK/EMEA)                             BOMGAR.COM                      3
© 2016 Bomgar Corporation. All rights reserved worldwide. BOMGAR and the BOMGAR logo are trademarks of Bomgar Corporation; other trademarks shown are the property of their respective owners.   TC: 5/12/2016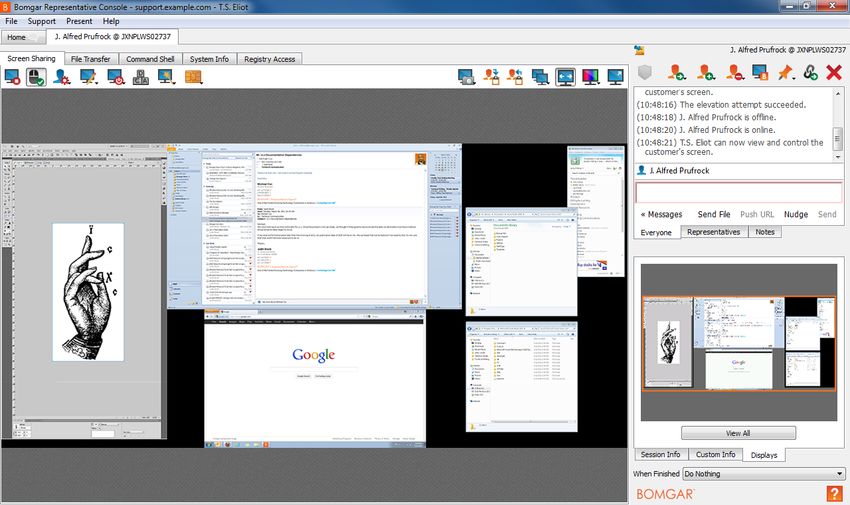
BOMGAR REMOTE SUPPORT REPRESENTATIVE GUIDE 15.2

        Introduction to the Representative Console
        This guide is designed to help you install the Bomgar representative console onto your computer and understand the features of
        the solution. Bomgar Remote Support enables you to support your customers remotely by connecting to them through the Bomgar
        Appliance.
        Use this guide only after an administrator has performed the initial setup and configuration of the Bomgar Appliance as detailed in
        the Bomgar Appliance Hardware Installation Guide. Once Bomgar is properly installed, you can begin supporting customers
        immediately. Should you need any assistance, please contact Bomgar Technical Support at help.bomgar.com.

CONTACT BOMGAR                                 info@bomgar.com           |      866.205.3650 (US)          |     +44 (0) 1628 480 210 (UK/EMEA)                             BOMGAR.COM                      4
© 2016 Bomgar Corporation. All rights reserved worldwide. BOMGAR and the BOMGAR logo are trademarks of Bomgar Corporation; other trademarks shown are the property of their respective owners.   TC: 5/12/2016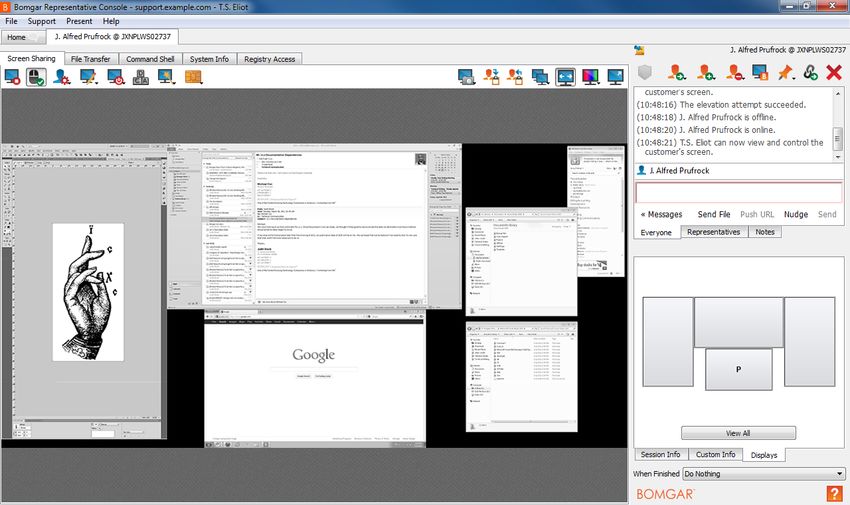
BOMGAR REMOTE SUPPORT REPRESENTATIVE GUIDE 15.2

        Install the Representative Console
        In any web browser, go to the URL of your Bomgar Appliance followed by /login and enter the username and password set by your
        administrator. You may be prompted to change your password the first time you log in.
        From the My Account page, download and install the Bomgar representative console. The option will default to the appropriate
        installer for your operating system.

          Note: On a Linux system, you must save the file to your computer and then open it from its downloaded location. Do not use the
          Open link that appears after downloading a file from some browsers.

        When the installation wizard appears, follow the instructions to install the software. After installing the representative console, you
        can choose Run Representative Console Now and/or Run at Startup. Then click Finish.

          Note: If you choose Run Representative Console Now during installation, a login prompt will appear on your screen.

CONTACT BOMGAR                                 info@bomgar.com           |      866.205.3650 (US)          |     +44 (0) 1628 480 210 (UK/EMEA)                             BOMGAR.COM                      5
© 2016 Bomgar Corporation. All rights reserved worldwide. BOMGAR and the BOMGAR logo are trademarks of Bomgar Corporation; other trademarks shown are the property of their respective owners.   TC: 5/12/2016
BOMGAR REMOTE SUPPORT REPRESENTATIVE GUIDE 15.2

        Login to the Representative Console
        After installing the Bomgar representative console, launch the
        representative console from its directory location as defined
        during installation.

          Note: By default, in Windows, you can access the
          console from Start Menu > All Programs > Bomgar >
          site.example.com, where site.example.com is the
          hostname of the site from which you downloaded the
          console.

        At the prompt, enter your username and password.
        Alternatively, if your administrator has configured a Kerberos
        server to enable single sign-on, you can log into the console
        without entering your credentials.
        Invited users can also enter a session key to join a shared
        session on a one-time basis.
        Check Remember my login information to have the console
        save your username and password. This option can be
        enabled or disabled from /login > Management > Security.
        If you have multiple languages enabled for your site, select the
        language you wish to use from the dropdown beside the globe
        icon. If you wish to change the selected language after logging
        in, you must log back out to choose another language.
        Once you log in, the console will open, and a Bomgar icon will
        appear in your computer’s system tray. If you close the console
        but remain logged in, you can reopen the window by double-
        clicking the system tray icon or by right-clicking the icon and
        selecting Show Window.

          Note: Your administrator may require you to be on an
          allowed network to log into the console. This network
          restriction may apply only the first time you log in or every
          time. This restriction does not apply to rep invites.

CONTACT BOMGAR                                 info@bomgar.com           |      866.205.3650 (US)          |     +44 (0) 1628 480 210 (UK/EMEA)                             BOMGAR.COM                      6
© 2016 Bomgar Corporation. All rights reserved worldwide. BOMGAR and the BOMGAR logo are trademarks of Bomgar Corporation; other trademarks shown are the property of their respective owners.   TC: 5/12/2016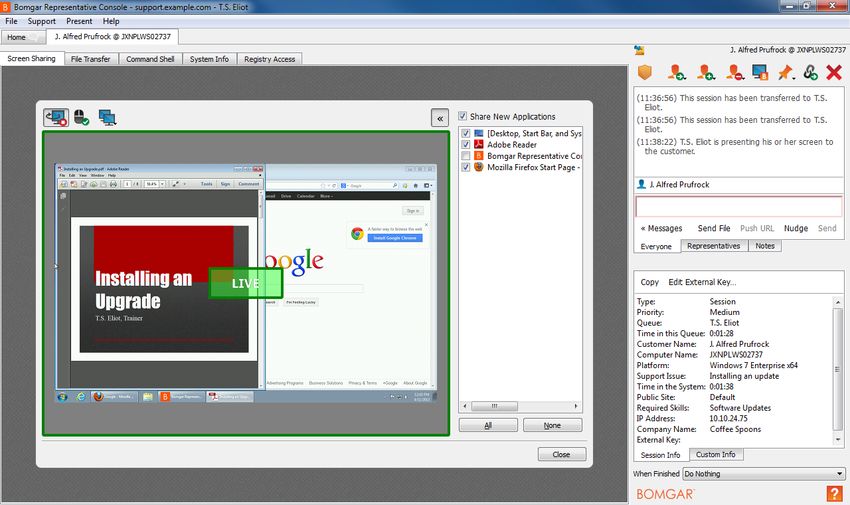
BOMGAR REMOTE SUPPORT REPRESENTATIVE GUIDE 15.2

        Representative Console User Interface

        Sessions - Manage multiple remote sessions at the same time.
        Quick Start Buttons - Easily access frequently needed tools. Quick start buttons can be turned on or off from File > Settings.

               l   Start - Open a dialog for a quick-reference guide to starting a session.
               l   Session Key - Begin sessions with randomly generated, one-time use session keys.
               l   Bomgar Buttons - View details and usage statistics of deployed Bomgar Buttons.
               l   Present - Share your screen with one or more remote attendees.
               l   Jump To - Jump to a computer on a remote network via Jumpoint or on your local network. Bomgar’s Jump Technology
                   enables privileged representatives to connect to an unattended remote computer to start a session without end-user
                   assistance.
               l   RDP To - Start a Remote Desktop Protocol session with a remote Windows system.
               l   Shell Jump - Quickly connect to SSH-enabled and Telnet-enabled network devices through a deployed Jumpoint.
               l   Intel® vPro - Using Intel®Active Management Technology, support fully provisioned Intel®vPro Windows systems below the
                   OS level.

        Queues - Queues list customers who are waiting for support or who are in a session. Details about the remote system being
        supported appear in this section.

CONTACT BOMGAR                                 info@bomgar.com           |      866.205.3650 (US)          |     +44 (0) 1628 480 210 (UK/EMEA)                             BOMGAR.COM                      7
© 2016 Bomgar Corporation. All rights reserved worldwide. BOMGAR and the BOMGAR logo are trademarks of Bomgar Corporation; other trademarks shown are the property of their respective owners.   TC: 5/12/2016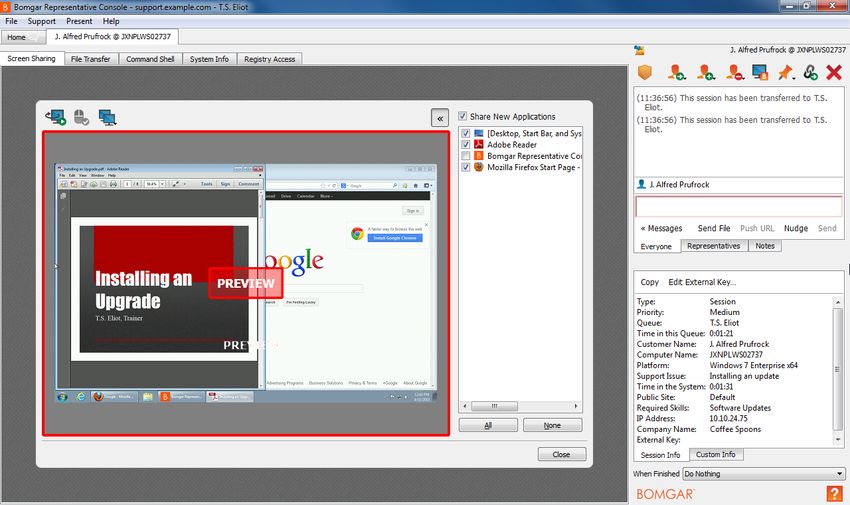
BOMGAR REMOTE SUPPORT REPRESENTATIVE GUIDE 15.2

        Dashboard - Privileged users can view and monitor ongoing sessions and teammates of a lower role, providing administrative
        oversight to help manage staff. Status indicators show whether representatives are available, are idle, are busy, or have auto-
        assign turned off. A bar at the bottom of the dashboard shows the percentage of representatives in each state.
        Access Requests - If a representative is a sponsor in one or more Access Sponsor groups, they will see an Access Requests tab
        in the representative console. When a representative makes a request, all sponsors in the selected access sponsor group will see a
        new request in the Access Requests tab of the representative console.
        Jump Client Interface - If you have installed a Jump Client on a system to enable unassisted access, those Jump Clients will
        appear here, grouped according to who can access them.

        Representative Chat - Chat with other logged in users. You also can share your screen with a team member without requiring a
        session.

CONTACT BOMGAR                                 info@bomgar.com           |      866.205.3650 (US)          |     +44 (0) 1628 480 210 (UK/EMEA)                             BOMGAR.COM                      8
© 2016 Bomgar Corporation. All rights reserved worldwide. BOMGAR and the BOMGAR logo are trademarks of Bomgar Corporation; other trademarks shown are the property of their respective owners.   TC: 5/12/2016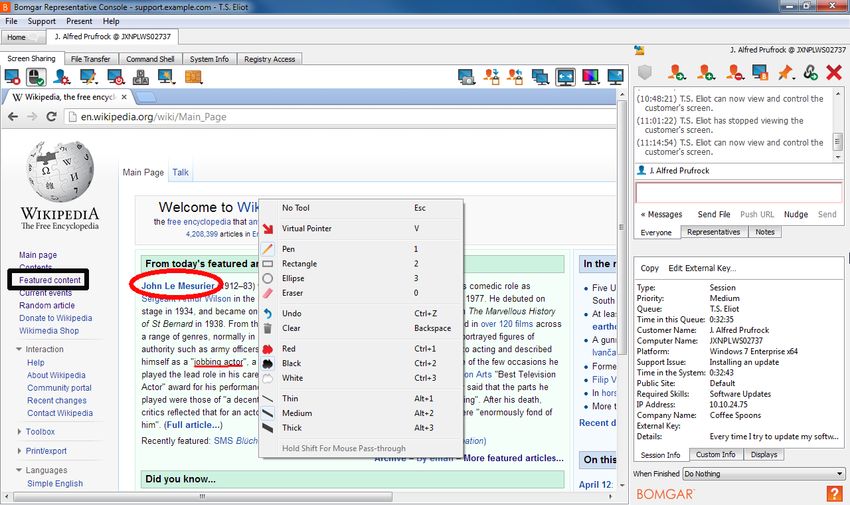
BOMGAR REMOTE SUPPORT REPRESENTATIVE GUIDE 15.2

        Change Settings and Preferences in the Representative Console
        Click on File > Settings in the upper left-hand corner of the console to configure your preferences.
        In general, you may configure the console settings according to your preferences. However, your Bomgar
        administrator may choose to manage your settings, enforcing those managed settings if desired.

        If your Bomgar administrator has changed and applied the
        default settings, then you will see a Settings Changed alert the
        next time you log into your console. Click View Settings to
        open your settings window to view the changes, or simply click
        OK to acknowledge the changes.

        Changing Settings

          Note: These instructions assume you are allowed to choose the settings used in your console. Settings enforced by your
          administrator appear marked with an asterisk and grayed out, and they are not locally configurable. See your administrator or
          the administrative guide rep console settings topic for more information.

        Each console settings window includes a Restore Defaults
        button in the lower left-hand corner of the window which will
        return all of your settings to the Bomgar default settings or to
        the default settings applied by your administrator if any have
        been set. An alert dialog will ask you to confirm that you wish
        to change to the defaults. Click Cancel if you wish to return to
        your locally saved preferences. Note that if any of the defaults
        are forced by your administrator, you will be unable to
        configure them.

        From the Global Settings section, you may choose to enable
        or disable spell check for chat and session notes. Currently,
        spell check is available for US English only.
        If automatic session assignment is disabled on login, then you
        will not be assigned sessions automatically until you choose to
        opt in.
        If, under Quick Start Buttons, you select Start Session, you
        will see a Start button at the top of your representative
        console. Clicking this button walks you through the ways your
        customer can start a support session. You also can select
        Session Key to display a session key generation button, and
        select Bomgar Buttons to display a button to launch the
        Bomgar Button management interface. Select Jump To, RDP,
        and Shell Jump to display buttons to launch those respective

CONTACT BOMGAR                                 info@bomgar.com           |      866.205.3650 (US)          |     +44 (0) 1628 480 210 (UK/EMEA)                             BOMGAR.COM                      9
© 2016 Bomgar Corporation. All rights reserved worldwide. BOMGAR and the BOMGAR logo are trademarks of Bomgar Corporation; other trademarks shown are the property of their respective owners.   TC: 5/12/2016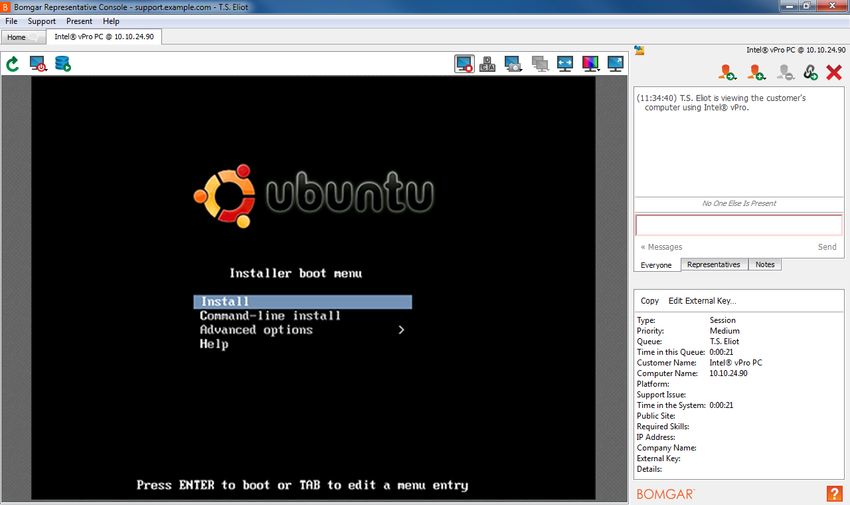
BOMGAR REMOTE SUPPORT REPRESENTATIVE GUIDE 15.2

        Jump connections. If you select Intel® vPro, you will see a button to launch access to a provisioned vPro Jumpoint. Start
        Presentation allows you to easily start a new presentation.
        Choose if you want the session menu icon to display, if the sidebar can be detached, and if the widgets on the session sidebar can
        be rearranged and resized.

        Choose your alert settings for chat messages. When you
        receive a chat message, you can choose to hear a sound and
        to see the application icon flash.

        If you would like to upload a custom sound for chat messages,
        click the […] button and select a WAV file on your computer.
        The file can be no larger than 1MB.
        Choose if the team chat should include status messages, such
        as users logging in and out, or only chats sent between team
        members.
        Choose if you want to receive pop-up notifications for
        messages received in a team chat and/or in a session chat.

        Choose if you want to hear an audible alert when a customer
        enters one of your queues and/or when a waiting session has
        been marked as overdue. If you would like to upload a custom
        sound for either of these alerts, click the […] button and select
        a WAV file on your computer. The file can be no larger than
        1MB.
        Also choose if you want to see the application icon flash when
        a customer enters one of your queues and/or when a waiting
        session has been marked as overdue. Additionally, when a
        customer enters your personal queue, such as by clicking on
        your name or entering a session key on the public site, the
        session can start immediately or prompt for your acceptance.

        You also can choose to receive pop-up notifications for certain
        events. These notifications will appear independent of your
        console and on top of other windows. Set where you wish to
        see pop-ups and how long they should display.
        Choose if you wish to hear an alert when a support session is
        automatically assigned to you. You can designate a custom
        sound for session assignments.
        Additionally, you can choose to be alerted when an automatically assigned session invitation is about to expire. You can choose a
        custom sound or select System Beep, which will play your default system sound.

CONTACT BOMGAR                                 info@bomgar.com           |      866.205.3650 (US)          |     +44 (0) 1628 480 210 (UK/EMEA)                             BOMGAR.COM                     10
© 2016 Bomgar Corporation. All rights reserved worldwide. BOMGAR and the BOMGAR logo are trademarks of Bomgar Corporation; other trademarks shown are the property of their respective owners.   TC: 5/12/2016
BOMGAR REMOTE SUPPORT REPRESENTATIVE GUIDE 15.2
Choose whether you want to start sessions with chat only or to
immediately request screen sharing.
You can choose to open sessions as tabs in the console or to
automatically detach sessions into new windows.
You may choose to automatically elevate to run the remote
client as a system service when executing a local network
Jump.
For situations where you might experience issues because a
customer’s secure desktop is enabled, you can be prompted to
elevate to run with administrative rights when the session
begins.
Set the default quality and size for a screen sharing session.
When screen sharing starts, you can automatically enter full
screen mode, which in turn can automatically collapse the chat
bar.
For easier access to screenshots you capture from the
console, set the default directory where you will save your
console-captured remote screenshots.
When you show your screen to a customer during a session,
you can choose to leave the representative console open or to
minimize it to your taskbar.
For easier file transferring, set the default directory from which
you wish to start browsing your local file system.
Set the number of lines to save in the command shell history.
CONTACT BOMGAR info@bomgar.com | 866.205.3650 (US) | +44 (0) 1628 480 210 (UK/EMEA) BOMGAR.COM 11
© 2016 Bomgar Corporation. All rights reserved worldwide. BOMGAR and the BOMGAR logo are trademarks of Bomgar Corporation; other trademarks shown are the property of their respective owners. TC: 5/12/2016BOMGAR REMOTE SUPPORT REPRESENTATIVE GUIDE 15.2
Supporting Users
Support Session Start Options
For a quick reference of the ways to start a session, click the
Start button at the top of your representative console. Note that
the available options will vary depending on your site
configuration and account permissions.
From the public site, your customer can choose your name
from a list or enter a session key. You can also email a link that
automatically prompts the customer to download the customer
client. Customers can also visit your public site and fill out an
issue submission form that lists either available
representatives or common support issues; the session will go
to either the selected representative or the queue of the
support team that owns the selected issue. You can also Jump
to an unattended system on your local or remote networks.
CONTACT BOMGAR info@bomgar.com | 866.205.3650 (US) | +44 (0) 1628 480 210 (UK/EMEA) BOMGAR.COM 12
© 2016 Bomgar Corporation. All rights reserved worldwide. BOMGAR and the BOMGAR logo are trademarks of Bomgar Corporation; other trademarks shown are the property of their respective owners. TC: 5/12/2016BOMGAR REMOTE SUPPORT REPRESENTATIVE GUIDE 15.2
Generate a Session Key to Start a Support Session
Dependent upon your account permissions, one method of
starting a support session is through the use of one-time,
randomly generated session keys. Session keys are not used
for authentication. They simply route the customer to the
appropriate team or rep and are valid for a limited time (see
Maximum Session Key Timeout in the Admin Interface Settings
Directory on bomgar.com/docs). The methods by which the
Bomgar appliance generates session keys are proprietary
information. When your customer calls with a support request,
generate a new session key from:
l the Support menu of the representative console
l the Start button at the top of the representative console
l the Session Key button at the top of the representative console
l pressing Ctrl + F4 or Command + F4
Set how long you want this session key to remain valid. The expiration time applies only to the length of time the key can be used to
start a session and does not affect the length of the session itself.
You also can select the public portal through which you want your customer to enter the session.
Depending on the options selected by your administrator, you may be able to send the invitation from your local email, from a
server side email, or by SMS.
Direct your customer either to go to the unique URL or to enter the session key on your public site. After running the customer client,
your customer will appear in your personal queue.
CONTACT BOMGAR info@bomgar.com | 866.205.3650 (US) | +44 (0) 1628 480 210 (UK/EMEA) BOMGAR.COM 13
© 2016 Bomgar Corporation. All rights reserved worldwide. BOMGAR and the BOMGAR logo are trademarks of Bomgar Corporation; other trademarks shown are the property of their respective owners. TC: 5/12/2016BOMGAR REMOTE SUPPORT REPRESENTATIVE GUIDE 15.2
View Support Sessions in Queue
Session queues provide information about and access to customers who are waiting for support. The Personal queue contains
customers with whom you are currently in session or who are waiting for a session with you specifically. A waiting session will
appear in your personal queue if it was transferred to you or if the customer initiated it by entering a session key you generated, by
selecting your name from the public site, or by clicking a Bomgar Button tied to you. Here, you also will see invitations for you to join
a shared session.
You also have queues for any teams of which you are a member. Additionally, the General queue is open to all allowed
representatives. If a customer initiates a session by selecting an issue type from an issue submission form, that customer will enter
a specific team queue based on which team owns that issue. A customer will also enter a team queue if they click a Bomgar Button
tied to a team. If a session is not destined for either a specific team or representative, it will enter the general queue. A session may
also enter a queue if it is transferred intentionally or due to waiting session rules, or if the representative's connection is lost in the
middle of a session. These queues will also contain invitations for any representative in the team to join a shared session.
Customers can also request assistance directly from a web page which contains a help link. This initiates a browser sharing
session, which allows a representative to chat and view the customer's web page. Administrators can generate custom links in
order to direct browser sessions to the correct representative or team queue. In the queue, browser sharing sessions are identified
by the “[Browser]” prefix next to the customer's name.
Sort your queues by several criteria, including the length of time the customer has been in queue, the customer’s name, issue
category, etc. All criteria may not be available depending on the manner in which the customer initiated the session.
Once the customer is in queue, either double-click the customer entry or select the entry and click the Accept button. Accepting a
session opens a new tab for that session at the top of the representative console. You can run multiple sessions simultaneously. A
new tab will be created for each session.
See "Accept a Session to Start Support" on page 15 for additional ways to accept support requests.
CONTACT BOMGAR info@bomgar.com | 866.205.3650 (US) | +44 (0) 1628 480 210 (UK/EMEA) BOMGAR.COM 14
© 2016 Bomgar Corporation. All rights reserved worldwide. BOMGAR and the BOMGAR logo are trademarks of Bomgar Corporation; other trademarks shown are the property of their respective owners. TC: 5/12/2016BOMGAR REMOTE SUPPORT REPRESENTATIVE GUIDE 15.2
Accept a Session to Start Support
Once the customer is in queue, there are several ways you can accept the session. If the session is in your personal queue or if you
have permission to manually accept sessions from a team queue, either double-click the customer entry or select the entry and click
the Accept button. If allowed to use the feature, start supporting the oldest queued session from among your team queues by
selecting to get the next session from:
l the Support menu of the representative console
l the Get Next button at the top of the representative console
You also can accept sessions that are assigned using
Equilibrium. When a session enters a queue that has
Equilibrium enabled, that session will be automatically
assigned to the best qualified and least busy representative,
based on matching skills, the number of sessions that
representative is supporting, and how long they have been
available.
When a session is assigned to you, you will be given a prompt to accept or reject the session, along with visual and audible alerts if
enabled. When the invitation is about to expire, visual and audible alerts will warn you. If you reject the invitation or the invitation
times out, the session will be reassigned to the next best qualified and least busy representative for that queue.
A rejected session will not be assigned to the same representative twice unless it is manually transferred into another queue for
which that representative is available. If a session cycles through all available representatives for the queue and is not accepted, it
will remain in queue until someone manually accepts or transfers it.
Alternatively, if your administrator has set up a waiting session rule for this queue, the session will either give an audible and visual
alert when it is overdue, or it will be transferred to an overflow queue. If that overflow queue has a waiting session rule set up that
transfers the session back to the first queue, the session could potentially bounce back and forth between the queues until it is
accepted.
A session will not be assigned to a representative if that representative is unavailable. If you lock your computer or switch to the
login screen, you will be marked as unavailable. Also, rules within the user permissions will mark you as unavailable if you are
participating in more than a set number of sessions or have been idle longer than a specified length of time. Finally, if you have
permission to opt out of session assignments, you may choose not to receive automatic session assignments. Set auto assignment
from:
l the Support menu of the representative console
l the Auto Assign button at the top of the representative console
l the right-click menu of the system tray icon
CONTACT BOMGAR info@bomgar.com | 866.205.3650 (US) | +44 (0) 1628 480 210 (UK/EMEA) BOMGAR.COM 15
© 2016 Bomgar Corporation. All rights reserved worldwide. BOMGAR and the BOMGAR logo are trademarks of Bomgar Corporation; other trademarks shown are the property of their respective owners. TC: 5/12/2016BOMGAR REMOTE SUPPORT REPRESENTATIVE GUIDE 15.2
Accepting a session opens a new tab for that session at the top of the representative console. You can run multiple sessions
simultaneously. A new tab will be created for each session.
CONTACT BOMGAR info@bomgar.com | 866.205.3650 (US) | +44 (0) 1628 480 210 (UK/EMEA) BOMGAR.COM 16
© 2016 Bomgar Corporation. All rights reserved worldwide. BOMGAR and the BOMGAR logo are trademarks of Bomgar Corporation; other trademarks shown are the property of their respective owners. TC: 5/12/2016BOMGAR REMOTE SUPPORT REPRESENTATIVE GUIDE 15.2
Generate an Apple iOS Profile Access Key
To distribute your Bomgar-enabled public and private profiles
to Apple iOS device customers, generate an Apple iOS profile
access key from the Support menu of the representative
console.
The setting iOS Configuration Profiles Page Enabled must be
selected in /login > Public Portals > Apple iOS for this option
to be available.
Click Generate Apple iOS Profile Access Key to launch the
Apple iOS Profile Selection interface.
The Apple iOS Profile Selection interface contains available
public or private profiles previously configured in the /login
interface.
While the public site can be made to show public iOS profiles
to anyone who knows the URL, generating an access key is
the only way to give a customer access to a private iOS profile.
Here you may select any public or private profiles to securely
distribute to your Apple iOS device customers via your iOS-
browsable support portal. Click the Generate Access Key
button.
CONTACT BOMGAR info@bomgar.com | 866.205.3650 (US) | +44 (0) 1628 480 210 (UK/EMEA) BOMGAR.COM 17
© 2016 Bomgar Corporation. All rights reserved worldwide. BOMGAR and the BOMGAR logo are trademarks of Bomgar Corporation; other trademarks shown are the property of their respective owners. TC: 5/12/2016BOMGAR REMOTE SUPPORT REPRESENTATIVE GUIDE 15.2
When you click the Generate Access Key button, a unique
Access Key Generated screen launches containing special
options for sending an email invitation to your Apple iOS
device customer. Depending on the options selected by your
administrator, you may be able to send the invitation from your
local email, from a server side email, or by SMS.
CONTACT BOMGAR info@bomgar.com | 866.205.3650 (US) | +44 (0) 1628 480 210 (UK/EMEA) BOMGAR.COM 18
© 2016 Bomgar Corporation. All rights reserved worldwide. BOMGAR and the BOMGAR logo are trademarks of Bomgar Corporation; other trademarks shown are the property of their respective owners. TC: 5/12/2016BOMGAR REMOTE SUPPORT REPRESENTATIVE GUIDE 15.2
Supporting Systems
Use a Jumpoint for Unattended Access to Computers on a Remote Network
Bomgar Jump Technology enables privileged users to connect to an unattended remote computer to start a session without end-
user assistance. Dependent upon your permissions, you may Jump to any computer on your LAN/VPN or on a network with a
Jumpoint agent. To Jump to a non-Windows computer or a system which is not on a network, see "Use Jump Clients to Access
Unattended Computers" on page 27.
Note: Jumpoint is only available for Windows systems. Jump Clients are needed for remote access to Mac or Linux computers.
To Jump to a Windows computer without a Jump Client, that computer must have Remote Registry Service enabled (disabled
by default in Vista) and must be on a domain. If you need to access remote computers via Jumpoint when no user is available,
make sure your account permissions are set either to disable prompting or to default to Allow. You cannot Jump to a mobile
device, though Jump Technology is available from mobile Bomgar consoles.
To Jump without a pre-installed client, open the Jump to…
dialog from:
l The Support menu of the representative console
l The Start button at the top of the representative
console
l The Jump To button at the top of the representative
console
From the Jumpoint dropdown, select the network that hosts
the computer you wish to access. Depending on your account
permissions, you can Jump to a system on your local network
or a network on which a Jumpoint is installed.
Enter the hostname or IP address of the system you wish to access.
Alternatively, if network browsing is enabled from the /login > Jump >
Jumpoint page, you can click the [...] button to browse the directory tree.
Once you have located the computer you wish to access, click Jump.
CONTACT BOMGAR info@bomgar.com | 866.205.3650 (US) | +44 (0) 1628 480 210 (UK/EMEA) BOMGAR.COM 19
© 2016 Bomgar Corporation. All rights reserved worldwide. BOMGAR and the BOMGAR logo are trademarks of Bomgar Corporation; other trademarks shown are the property of their respective owners. TC: 5/12/2016BOMGAR REMOTE SUPPORT REPRESENTATIVE GUIDE 15.2
You must provide administrative credentials to the remote computer in
order to complete the Jump. The administrative rights must be either a
local administrator on the remote system or a domain administrator.
The client files will be pushed to the remote system, and a
session will attempt to start. Depending on the session
permissions, the end-user may be prompted to accept or deny
the session. If no response is received within a defined interval
of time, the session will either start or cancel, again depending
on the session permissions.
Note: If you need to access systems through a Jumpoint
when no user is available, make sure the public portal
permissions and your account permissions are set either
to disable prompting or to default to Allow.
CONTACT BOMGAR info@bomgar.com | 866.205.3650 (US) | +44 (0) 1628 480 210 (UK/EMEA) BOMGAR.COM 20
© 2016 Bomgar Corporation. All rights reserved worldwide. BOMGAR and the BOMGAR logo are trademarks of Bomgar Corporation; other trademarks shown are the property of their respective owners. TC: 5/12/2016BOMGAR REMOTE SUPPORT REPRESENTATIVE GUIDE 15.2
RDP to a Remote Windows System
Use Bomgar to start a Remote Desktop Protocol (RDP) session with a remote Windows system. Because remote desktop protocol
sessions are proxied through a Jumpoint and converted to Bomgar sessions, users can share or transfer sessions, and sessions
can be automatically audited and recorded as your administrator has defined for your site. To use RDP through Bomgar, you must
have access to a Jumpoint and must have the user account permission Allowed Jump Methods: RDP via a Jumpoint.
To start an RDP session, open the Remote Desktop Protocol
dialog from:
l The Support menu of the representative console
l The RDP To button at the top of the representative
console
Select a Jumpoint and then enter the hostname or IP address
of the computer you wish to support.
Note: By default, the RDP server listens on port 3389,
which is therefore the default port Bomgar attempts. If the
remote RDP server is configured to use a different port,
add it after the hostname or IP address in the form of
: or : (e.g.,
10.10.24.127:40000).
Provide the username to sign in as.
Choose the resolution at which to view the remote system. This can be the same size as your primary monitor, the size of all of your
monitors combined, or one of several standard sizes.
Select the quality at which to view the remote screen. This cannot be changed during the remote desktop protocol (RDP) session.
View the remote screen in 2-bit gray scale for the lowest bandwidth consumption, 8-bit color for fast performance, 16-bit for a
medium quality of image and performance, or 32-bit for the highest image resolution.
To start a console session rather than a new session, check the Console Session box.
If the server's certificate cannot be verified, you will receive a certificate warning. Checking Ignore Untrusted Certificate allows you
to connect to the remote system without seeing this message.
To import an RDP file, click the Import button. This pre-populates some of the fields required for the remote desktop protocol
connection.
To begin the remote desktop (RDP) session, click Jump.
You will be prompted to enter the password for the username you specified earlier.
CONTACT BOMGAR info@bomgar.com | 866.205.3650 (US) | +44 (0) 1628 480 210 (UK/EMEA) BOMGAR.COM 21
© 2016 Bomgar Corporation. All rights reserved worldwide. BOMGAR and the BOMGAR logo are trademarks of Bomgar Corporation; other trademarks shown are the property of their respective owners. TC: 5/12/2016BOMGAR REMOTE SUPPORT REPRESENTATIVE GUIDE 15.2
Your remote desktop protocol (RDP) session will now begin.
Begin screen sharing to view the remote desktop. You can
send the Ctrl-Alt-Del command, capture a screenshot of the
remote desktop, and share clipboard contents.You also can
share or transfer the RDP session with other logged-in Bomgar
users, following the normal rules of your user account settings.
CONTACT BOMGAR info@bomgar.com | 866.205.3650 (US) | +44 (0) 1628 480 210 (UK/EMEA) BOMGAR.COM 22
© 2016 Bomgar Corporation. All rights reserved worldwide. BOMGAR and the BOMGAR logo are trademarks of Bomgar Corporation; other trademarks shown are the property of their respective owners. TC: 5/12/2016BOMGAR REMOTE SUPPORT REPRESENTATIVE GUIDE 15.2
Shell Jump to a Remote Network Device
With Shell Jump, quickly connect to an SSH-enabled or Telnet-enabled network device to use the command line feature on that
remote system. For example, run a standardized script across multiple systems to install a needed patch, or troubleshoot a network
issue.
To perform a Shell Jump through Bomgar, you must have access to a Jumpoint with Shell Jump enabled, and you must have the
user account permission Allowed Jump Methods: Shell Jump via a Jumpoint.
To start a Shell Jump session, open the Shell Jump dialog from:
l The Support menu of the representative console
l The Shell Jump button at the top of the representative console
Select a Jumpoint and then choose a provisioned system to which you
would like to Shell Jump. Then click Jump.
Alternatively, if this Jumpoint is set up with open access or limited access,
you can enter a hostname or IP address for a remote device, along with the
username to sign in as.
Choose the Protocol to use, either SSH or Telnet. Port automatically
switches to the default port for the selected protocol but can be modified to
fit your network settings. Select the Terminal Type, either xterm or VT100.
You can also select to Send null packets to keep idle sessions from
ending. Enter the number of seconds to wait between each packet send.
Then click Jump.
If attempting to Shell Jump to an SSH device without a cached
host key, you will receive an alert that the server's host key is
not cached and that there is no guarantee that the server is the
computer you think it is.
If you choose Save Key and Connect, then the key will be
cached on the Jumpoint's host system so that future attempts to
Shell Jump to this system will not result in this prompt.
Connect Only will start the session without caching the key,
and Abort will end the Shell Jump session.
When you Shell Jump to a remote device, a command shell session will immediately start with that device. If you are Shell Jumping
to a provisioned SSH device with an unencrypted key or with an encrypted key whose password has been cached, you will not be
prompted for a password. Otherwise, you will be required to enter a password. You can then send commands to the remote system.
CONTACT BOMGAR info@bomgar.com | 866.205.3650 (US) | +44 (0) 1628 480 210 (UK/EMEA) BOMGAR.COM 23
© 2016 Bomgar Corporation. All rights reserved worldwide. BOMGAR and the BOMGAR logo are trademarks of Bomgar Corporation; other trademarks shown are the property of their respective owners. TC: 5/12/2016BOMGAR REMOTE SUPPORT REPRESENTATIVE GUIDE 15.2
Support Intel® vPro Windows Systems
Using Intel® Active Management Technology, privileged users can support fully provisioned Intel® vPro Windows systems below
the OS level, regardless of the status or power state of these remote systems. To use Intel® vPro, you must have access to a
Jumpoint with Intel® vPro enabled and must have the user account permission Allowed Jump Methods: Intel® vPro via a
Jumpoint enabled.
Note: To support vPro systems, the Bomgar Appliance must be running software version 12.1 or greater. Prior to 14.2, it must
have Enterprise licensing. Remote systems using vPro with AMT version 5 or higher may be supported with Bomgar.
To start a session with an Intel® vPro system, open the Intel®
vPro dialog from:
l The Support menu of the representative console
l The Intel® vPro button at the top of the representative
console
Select a vPro-enabled Jumpoint from the dropdown, and then enter the
hostname or IP address of the remote vPro system you wish to access.
Click Jump.
Depending on your Jumpoint setup, you may be prompted to enter a
username and password.
The Jumpoint will detect the provisioned vPro hardware. If the credentials,
provided during either the Jumpoint configuration or the Jump attempt,
match the credentials of the vPro-provisioned system, the connection will
be initiated.
Depending on how the vPro computer is provisioned, you may
be prompted to enter a user consent code before performing
certain actions.
If a consent code is required, a pop-up will appear on the remote
screen. An end-user must provide you with this code before you
can gain hardware access.
CONTACT BOMGAR info@bomgar.com | 866.205.3650 (US) | +44 (0) 1628 480 210 (UK/EMEA) BOMGAR.COM 24
© 2016 Bomgar Corporation. All rights reserved worldwide. BOMGAR and the BOMGAR logo are trademarks of Bomgar Corporation; other trademarks shown are the property of their respective owners. TC: 5/12/2016BOMGAR REMOTE SUPPORT REPRESENTATIVE GUIDE 15.2
Once the connection is made, you will have control of the
remote vPro hardware. You can then use the vPro session
tools to work on the remote system.
vPro Session Tools
Reset the vPro connection.
Power off or power on the host machine. You may also reboot the host machine normally, to BIOS, to PXE, or to a
selected disk image.
Select an ISO or IMG file to mount on the remote system. File location is set during Jumpoint configuration.
Start or stop viewing the remote system's display using KVM.
Send Ctrl-Alt-Delete to the remote computer.
While screen sharing, capture a screenshot of the remote screen or screens at their full resolution. Save the image file
to your local system or to your clipboard. The capture action is recorded in the chat log with a link to a locally saved
image. The link remains active even after the customer has left the session, but it does not persist in the Bomgar
session report. This feature works on Mac, Windows and Linux, and it saves a full resolution image in PNG format. You
can adjust the Remote Screenshot Save Directory from File > Settings... > Support Tools in the Rep Console menu.
Select an alternate remote monitor to display. The primary monitor is designated by a P.
View the remote screen at actual or scaled size.
View the remote screen in 2-bit gray scale for the lowest bandwidth consumption, 8-bit color for fast performance, 16-bit
for a medium quality of image and performance, or 32-bit for the highest image resolution.
View the remote desktop in full screen mode or return to the interface view.
CONTACT BOMGAR info@bomgar.com | 866.205.3650 (US) | +44 (0) 1628 480 210 (UK/EMEA) BOMGAR.COM 25
© 2016 Bomgar Corporation. All rights reserved worldwide. BOMGAR and the BOMGAR logo are trademarks of Bomgar Corporation; other trademarks shown are the property of their respective owners. TC: 5/12/2016BOMGAR REMOTE SUPPORT REPRESENTATIVE GUIDE 15.2
From the Reboot menu, select Reboot and Enter BIOS to start the
BIOS boot process on the remote vPro system. You will then have
access to the BIOS for troubleshooting purposes.
Select Reboot Using PXE to boot the remote system using a network
interface independently of data storage devices or installed operating
systems.
Reboot to a Disk Image uses IDE-R to boot the remote system
to a specified ISO or IMG file.
Note that the remote system will display the screen exactly as
you see it, even when booting to another image.
CONTACT BOMGAR info@bomgar.com | 866.205.3650 (US) | +44 (0) 1628 480 210 (UK/EMEA) BOMGAR.COM 26
© 2016 Bomgar Corporation. All rights reserved worldwide. BOMGAR and the BOMGAR logo are trademarks of Bomgar Corporation; other trademarks shown are the property of their respective owners. TC: 5/12/2016BOMGAR REMOTE SUPPORT REPRESENTATIVE GUIDE 15.2
Use Jump Clients to Access Unattended Computers
To access an individual computer without end-user assistance, install a Jump Client on that system either from within a session or
from the Jump Clients page of the administrative interface. Your account permissions may disallow you from using Jump Clients, or
you may be allowed to Jump but not to deploy the clients yourself. You also may be allowed to pin clients to your personal Jump
Group or only to one of your team Jump Groups. You may be disallowed to set passwords, or you may be allowed to access all
Jump Clients without needing a password.
The Jump Interface
The Jump interface appears below the queues pane of the representative console. Click
Refresh to see the Jump Clients available to you. The list may contain both active and passive
Jump Clients.
Note: For the differences between the two types of Jump Clients, see "Active and Passive Jump Clients" on page 30.
Jump Clients are grouped according to who can access them – only the user who created them, a particular team, or all users. You
may see Jump Clients pinned to your personal Jump Group and to your team Jump Group, as well as to other teams whose Jump
Clients your team has been granted access to. Team Managers and Team Leads can also view Jump Clients that team members of
a lower role have pinned to their personal Jump Groups. From the Jump Client search feature, you can search for Jump Clients
based on specific criteria, such as Group, Last Accessed, Name, IP address, etc. For example, the Console User selection allows
you to search for the individual who is currently logged into a remote system.
Jump to a Jump Client
Browse through groups or dynamically search for computers. Once you have found the computer you wish to access, double-click
the entry, or select the entry and click the Jump button. This will attempt to start a session with the remote computer.
Note: If you need to access Jump Clients when no user is available, make sure the session permissions are set either to
disable prompting or to default to Allow for unattended sessions.
CONTACT BOMGAR info@bomgar.com | 866.205.3650 (US) | +44 (0) 1628 480 210 (UK/EMEA) BOMGAR.COM 27
© 2016 Bomgar Corporation. All rights reserved worldwide. BOMGAR and the BOMGAR logo are trademarks of Bomgar Corporation; other trademarks shown are the property of their respective owners. TC: 5/12/2016BOMGAR REMOTE SUPPORT REPRESENTATIVE GUIDE 15.2
You may programmatically connect to a Jump Client directly
from your systems management or ticketing tool. If your search
results in only one Jump Client, the session will start
immediately. If multiple Jump Clients are returned, select one
of the Jump Clients listed in the selection window and click
OK.
Note: For details about scripting, see Representative Console Scripting and Client Scripting API.
If a Jump Policy enforces a schedule for this Jump Client, an
attempt to access the Jump Client outside of its permitted
schedule prevents the Jump. A prompt informs you of the
policy restrictions and provides the date and time when this
Jump Client is next available for access.
CONTACT BOMGAR info@bomgar.com | 866.205.3650 (US) | +44 (0) 1628 480 210 (UK/EMEA) BOMGAR.COM 28
© 2016 Bomgar Corporation. All rights reserved worldwide. BOMGAR and the BOMGAR logo are trademarks of Bomgar Corporation; other trademarks shown are the property of their respective owners. TC: 5/12/2016BOMGAR REMOTE SUPPORT REPRESENTATIVE GUIDE 15.2
Jump Client Properties
Organize and manage existing Jump Clients by selecting one or more
Jump Clients and clicking Properties.
Change a Jump Client's mode from the Connection Type dropdown.
Active Jump Clients send statistics to the Bomgar Appliance on a defined
interval. Passive Jump Clients send statistics to the Bomgar Appliance
once a day or upon a manual check in. Based on the options your
administrator sets, these statistics may include the remote computer’s
logged-in console user, operating system, uptime, CPU, disk usage, and a
screen shot from the last update.
Once a Jump Client has a password set, its icon will show that it is locked,
and its screen shot will also be locked. In order to Jump to a locked Jump
Client, you must provide its password. Also, you must provide the
password to remove a locked Jump Client via the Jump Client interface;
you do not need the password to unpin from within a session, as you
would already have provided the password to Jump into the session.
If Starts Quietly is checked, the customer client will not take focus and will
remain minimized in the taskbar or dock when a session is started.
Move Jump Clients from one Jump Group to another using the Jump
Group dropdown. The ability to move Jump Clients to or from different
Jump Groups depends upon your account permissions.
Note: Multiple support teams and embassies may be able to access Jump
Clients pinned to one Jump Group, depending on rules set by your
Bomgar software administrator.
Further organize Jump Clients by entering the name of a new or existing Tag. While the selected Jump Clients will be grouped
together under the tag, they will still be listed under the Jump Group where each is pinned. To move a Jump Client back into its top-
level Jump Group, leave this field blank.
Select the Public Portal through which this Jump Client should connect. If a session policy is assigned to this public portal, that
policy may affect the permissions allowed in sessions started through this Jump Client. The ability to set the public portal depends
on your account permissions.
Jump Clients include a Comments field for a name or description, which makes sorting, searching, and identifying Jump Clients
faster and easier.
To set when users are allowed to access this Jump Client, choose a Jump Policy. These policies are configured by your
administrator in the /login interface.
Choose session policies to assign to this Jump Client. Session policies assigned to this Jump Client have the highest priority when
setting session permissions. The Customer Present Session Policy applies when the end user is determined to be present.
Otherwise, the Customer Not Present Session Policy applies. Customer presence is detected when the Jump Client session
starts. The session policy used for the session does not change throughout the session, regardless of any changes in the
customer's presence while the session is in progress. The ability to set a session policy depends on your account permissions.
CONTACT BOMGAR info@bomgar.com | 866.205.3650 (US) | +44 (0) 1628 480 210 (UK/EMEA) BOMGAR.COM 29
© 2016 Bomgar Corporation. All rights reserved worldwide. BOMGAR and the BOMGAR logo are trademarks of Bomgar Corporation; other trademarks shown are the property of their respective owners. TC: 5/12/2016BOMGAR REMOTE SUPPORT REPRESENTATIVE GUIDE 15.2
When pinning a Jump Client from within a session and customizing its
properties beforehand, you also have the option to set when the Jump
Client expires. This can be never, at a specific time and date, or after a
certain length of time. An expired Jump Client automatically uninstalls from
the remote system and is removed from the list in the Jump Client interface.
If you no longer need access to a remote system, select the Jump Client and click the Remove button, or right-click on the Jump
Client and select Remove from the menu. You may select multiple Jump Clients to remove them all at the same time.
Note: If the remote user manually uninstalls a Jump Client, it will remain in your queue, along with the statistics from its last
update, but you will not be able to access that computer. If a Jump Client goes offline and does not connect back to the Bomgar
Appliance for 180 days, it will automatically be uninstalled from the target computer and will be removed from the Jump
interface.
Active and Passive Jump Clients
Active Jump Client Passive Jump Client
Maintains a persistent connection to the Bomgar Appliance. Listens for a remote access request from the Bomgar Appliance.
Note: Some firewall configuration may be required.
Sends statistics to the Bomgar Appliance at regular intervals. Sends statistics to the Bomgar Appliance once a day or upon
manual check-in.
Enables remote access to any desktop operating system Enables remote access to any desktop operating system
supported by Bomgar. supported by Bomgar.
Number of installable clients is limited by your Bomgar 50,000 passive Jump Clients supported on all Bomgar
Appliance model. Appliance models.
If you need more passive Jump Clients, visit
B200 B300 B400
www.bomgar.com/help.
Up to 10,000 Up to 25,000
Up to 1,000 Active
Active Jump Active Jump
Jump Clients
Clients Clients
CONTACT BOMGAR info@bomgar.com | 866.205.3650 (US) | +44 (0) 1628 480 210 (UK/EMEA) BOMGAR.COM 30
© 2016 Bomgar Corporation. All rights reserved worldwide. BOMGAR and the BOMGAR logo are trademarks of Bomgar Corporation; other trademarks shown are the property of their respective owners. TC: 5/12/2016BOMGAR REMOTE SUPPORT REPRESENTATIVE GUIDE 15.2
Note: The maximum number of Jump Clients available to a Virtual Appliance is based on allocated resources. See the Virtual
Appliance Sizing Guidelines at www.bomgar.com/docs.
CONTACT BOMGAR info@bomgar.com | 866.205.3650 (US) | +44 (0) 1628 480 210 (UK/EMEA) BOMGAR.COM 31
© 2016 Bomgar Corporation. All rights reserved worldwide. BOMGAR and the BOMGAR logo are trademarks of Bomgar Corporation; other trademarks shown are the property of their respective owners. TC: 5/12/2016BOMGAR REMOTE SUPPORT REPRESENTATIVE GUIDE 15.2
Toolset
Support Session Overview and Tools
CONTACT BOMGAR info@bomgar.com | 866.205.3650 (US) | +44 (0) 1628 480 210 (UK/EMEA) BOMGAR.COM 32
© 2016 Bomgar Corporation. All rights reserved worldwide. BOMGAR and the BOMGAR logo are trademarks of Bomgar Corporation; other trademarks shown are the property of their respective owners. TC: 5/12/2016BOMGAR REMOTE SUPPORT REPRESENTATIVE GUIDE 15.2
Session Tools
Click the menu icon at the top left of the session window to open session controls for your session. You can
also right-click the session tab to see session controls.
Several of these controls have dedicated icons elsewhere in the interface and are described below
(Transfer, Invite, Remove Participant, Elevate, Deploy Bomgar Button, Deploy Jump Client, Custom
Links, Close).
From the menu, select Detach Session Tab to separate the session from the console, or click the session tab
and drag it away from the main window. The menu icon remains with your session even if you detach the
session tab, allowing you to position the session tab anywhere, such as on a separate monitor, and retain
session tool access. Reattach the session using the Attach Session Tab selection in the menu, or simply by
clicking the X to close the detached window.
Additionally, from the menu, select Locate Sidebar to find the sidebar for the session, which can be helpful if
you have several detached session sidebars (see below) scattered on your screen.
You can also rename the session or revert the name to the default.
Collapse the sidebar to maximize your session workspace. To pin the sidebar again, hover over the
collapsed sidebar arrow and click the Pin Sidebar icon.
Click this icon to detach the sidebar. Once detached, the sidebar can be positioned anywhere on your
desktop or placed on a separate monitor. The sidebar also can be resized according to your needs, or resize
the panes in the sidebar for more viewing space. Click on the Attach Sidebar icon to reattach the sidebar.
When the sidebar is detached, the Home icon is enabled (see below).
This Home icon is enabled whenever the sidebar is detached. In the case where you might have several
sessions going on at the same time and several detached sidebars on your screen, clicking on a sidebar's
Home icon brings up the associated session, saving time and avoiding confusion when trying to identify
which sidebar goes with which session.
It is possible to reposition the different widget sections displayed on the sidebar, like the chat window, the
session info pane, etc. When hovering over the title bar of a section, the cursor turns into a closed hand,
allowing you to drag and reposition that section on the sidebar.
Elevate a click-to-chat session to the full customer client, or elevate the customer client to have administrative
rights by clicking the shield button. Select Prompt Customer to request admin credentials from the remote
user. If you possess administrative credentials to the remote computer, select Specific User to supply an
administrative username and password, yourself.
Elevating the customer client enables switching user accounts, deploying Jump Clients in service mode, and
controlling protected windows and UAC dialog boxes. Elevation does not change the user context of the
active user and is not the same as logging out the active user and logging back in as an administrator.
Elevation to admin rights is currently available only for Windows and Mac computers. Administrators can set
the customer client to automatically request elevation at session initiation on Windows systems.
Should you decide someone else is better suited to handle a session, transfer control of that session to
another team or user. Remain as a participant or close your tab to leave the session with its new owner. Once
you have transferred the session to a new owner, your Transfer, Share, and Remove icons become gray,
and you will no longer be able to perform these actions, as you are no longer the session owner. The session
will persist until the new owner of the session closes the session.
Invite another user to participate in a shared session. You maintain ownership of the session but can receive
input from one or more teammates or an external user.
You can also request an access sponsor to perform certain actions on your behalf.
CONTACT BOMGAR info@bomgar.com | 866.205.3650 (US) | +44 (0) 1628 480 210 (UK/EMEA) BOMGAR.COM 33
© 2016 Bomgar Corporation. All rights reserved worldwide. BOMGAR and the BOMGAR logo are trademarks of Bomgar Corporation; other trademarks shown are the property of their respective owners. TC: 5/12/2016BOMGAR REMOTE SUPPORT REPRESENTATIVE GUIDE 15.2
The session owner can remove another user from a shared session. Additionally, you can disconnect the
customer but remain in the session tab to add notes or review the last captured system information.
If permitted, install a Bomgar Button on the remote desktop or BlackBerry or remove a previously installed
Bomgar Button. The customer can click the Bomgar Button to start a support session quickly and easily.
If permitted, install a Jump Client on the remote computer, enabling you or your teammates to access that
system later without end-user initiation. Uninstall the client if you no longer need unattended access to that
system. Currently, Jump Clients cannot be installed on mobile devices. To set details, including password,
comments, group, and so forth, select Customize.
Open a web browser on your computer to any sites defined by your administrator. This button can be
configured to include detailed information about the session, the end customer, and/or the Bomgar user who
is opening the custom link. If, for instance, the external key matches the unique identifier of a case in your
customer relationship management system, clicking this button could pull up the associated case in the
external system.
Close your session tab entirely. If you have ownership of the session, you can either uninstall the customer
client from the remote machine or leave the customer in queue for another representative to resume the
session. You can close the session from the sidebar, the session menu, or the session tab.
At the bottom right of the session window is information about the remote system along with any other information the customer may
have provided in the issue submission form. Also, if your administrator has enabled the XML API, you may designate an external
key for use in session reports. Any custom session attributes enabled by your administrator will appear in a Custom Info tab. Click
Copy to copy all information to your clipboard.
Another option that your administrator may choose to enable is the ability to log out the Windows user automatically or lock the
remote computer when the session closes. When you have been working on an unattended system, for example, locking the
computer is recommended to prevent unauthorized users from viewing private information. Set the action to take from the dropdown
at the bottom of the pane.
CONTACT BOMGAR info@bomgar.com | 866.205.3650 (US) | +44 (0) 1628 480 210 (UK/EMEA) BOMGAR.COM 34
© 2016 Bomgar Corporation. All rights reserved worldwide. BOMGAR and the BOMGAR logo are trademarks of Bomgar Corporation; other trademarks shown are the property of their respective owners. TC: 5/12/2016You can also read