SONICOS 7 DEVICE SETTINGS - ADMINISTRATION GUIDE - SONICWALL
←
→
Page content transcription
If your browser does not render page correctly, please read the page content below

SonicOS 7

Device Settings
Administration Guide
Contents

About Device Settings                                                                                       5

Managing SonicWall Licenses                                                                                 6
Licenses                                                                                                    6
Managing Security Services                                                                                  7
   Services Summary                                                                                         7
   Managing Security Services Online                                                                        8
   Manual Upgrade for Closed Environments                                                                   9
Registering Your SonicWall Appliance                                                                        10
Activating the Gateway Anti-Virus, Anti-Spyware, and IPS License                                            11
Activating FREE TRIALs                                                                                      11

System Administration                                                                                       12
Configuring the Firewall Name                                                                               12
Enabling Wireless LAN and IPv6                                                                              13
Changing the Administrator Name and Password                                                                13
Configuring Login Security                                                                                  14
   Configuring Password Compliance                                                                          15
   Configuring Login Constraints                                                                            16
Multiple Administrators Support                                                                             17
    Working of Multiple Administrators Support                                                              18
    Configuring Multiple Administrator Access                                                               21
Enabling Enhanced Audit Logging Support                                                                     21
Configuring the Wireless LAN Controller                                                                     22
Enabling SonicOS API and Configuring Authentication Methods                                                 22
Enabling GMS Management                                                                                     24
Configuring the Management Interface                                                                        26
   Managing through HTTP/HTTPS                                                                              26
   Selecting a Security Certificate                                                                         27
   Controlling the Management Interface Tables                                                              28
   Enforcing TLS Version                                                                                    28
   Switching Configuration Modes                                                                            29
   Deleting Browser Cookies                                                                                 29
   Configuring SSH Management                                                                               29
Client Certificate Verification                                                                             30
    About Common Access Card                                                                                30
    Configuring Client Certificate Verification                                                             31
    Using the Client Certificate Check                                                                      32
    Checking Certificate Expiration                                                                         33

                                                           SonicOS 7 Device Settings Administration Guide        2
                                                                                                Contents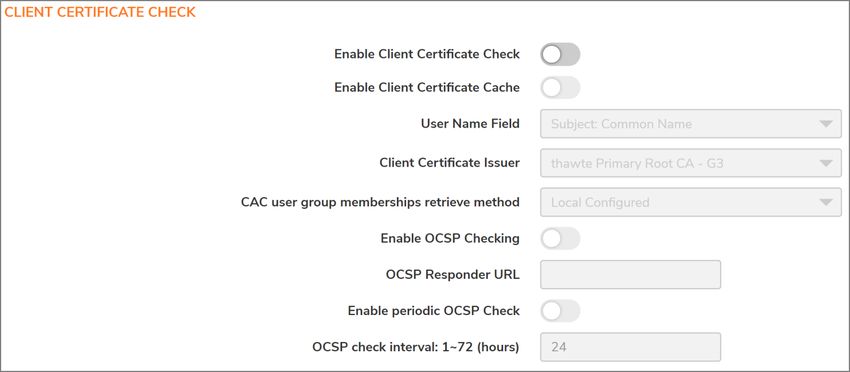
Troubleshooting User Lock Out                                                                         33
Selecting a Language                                                                                      33

Configuring Time Settings                                                                                 35
Setting System Time                                                                                       36
Configuring NTP Settings                                                                                  37
   Using a Custom NTP Server for Updating the Firewall Clock                                              37
   Adding an NTP Server                                                                                   38
   Editing an NTP Server Entry                                                                            39
   Deleting NTP Server Entry                                                                              39

Managing Certificates                                                                                     40
About Digital Certificates                                                                                40
About the Certificates Table                                                                              41
About Certificate Details                                                                                 42
Importing Certificates                                                                                    42
   Importing a Local Certificate                                                                          43
   Importing a Certificate Authority Certificate                                                          43
   Creating a PKCS-12 Formatted Certificate File (Linux Systems Only)                                     44
Deleting Certificates                                                                                     45
Generating a Certificate Signing Request                                                                  46
Configuring Simple Certificate Enrollment Protocol                                                        50

Administering SNMP                                                                                        52
About SNMP                                                                                                52
Setting Up SNMP Access                                                                                    53
    Enabling and Configuring SNMP Access                                                                  53
    Setting Up SNMPv3 Groups and Access                                                                   57
Configuring SNMP as a Service and Adding Rules                                                            60

Firmware Settings                                                                                         61
Firmware Management and Backup                                                                            61
    Firmware Management & Backup Tables                                                                   62
    Searching the Table                                                                                   64
Creating a Backup Firmware Image                                                                          65
    Creating a Local Backup Firmware Image                                                                65
    Creating a Cloud Backup Firmware Image                                                                66
    Scheduling Firmware Image Backups                                                                     66
Updating Firmware                                                                                         69
   Updating Firmware Manually                                                                             69
   Firmware Auto Update                                                                                   70
   Using SafeMode to Upgrade Firmware                                                                     70
Importing and Exporting Settings                                                                          71
   Importing Settings                                                                                     71
   Exporting Settings                                                                                     72
Configuring Firmware and Backup Settings                                                                  72

                                                         SonicOS 7 Device Settings Administration Guide        3
                                                                                              Contents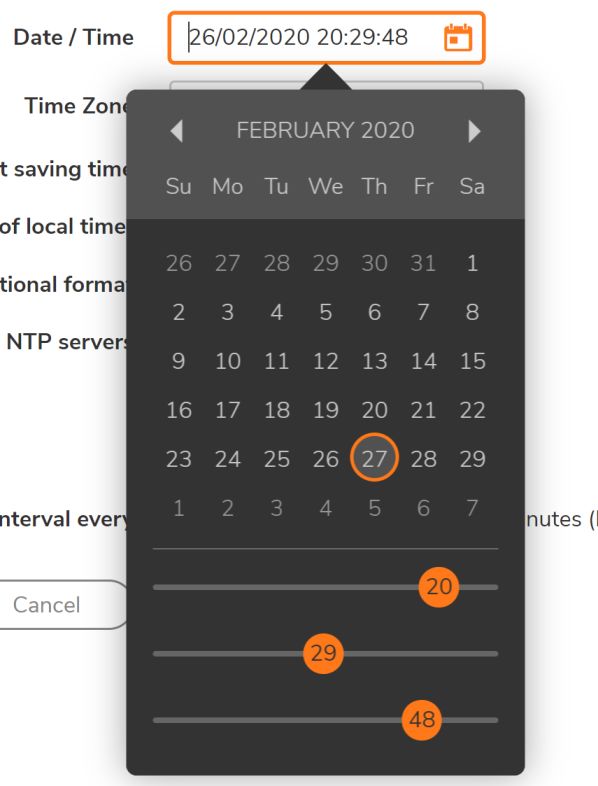
Send Settings or Reports by FTP                                                                        73
    Sending Diagnostic Reports to Technical Support                                                        75
    Boot Settings                                                                                          75
    One-Touch Configuration Overrides                                                                      75
    Enabling FIPS Mode                                                                                     76
    Enabling NDPP mode                                                                                     78

Storage                                                                                                    79
Installing or Replacing Storage Modules                                                                    80
Setting Storage Options                                                                                    80
    Configuring the Storage Module for Log File Storage                                                    80
    Purging a Storage Module                                                                               81
    Viewing Trace Logs                                                                                     81

Restarting the System                                                                                      82

SonicWall Support                                                                                          83
About This Document                                                                                        84

                                                          SonicOS 7 Device Settings Administration Guide        4
                                                                                               Contents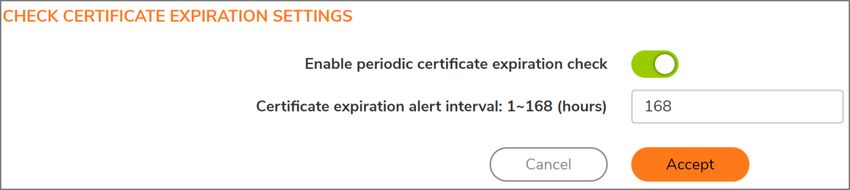
1

                                             About Device Settings
The web‐ based SonicOS Management Interface enables you to configure SonicWall network security
appliances (firewalls).

This document provides information on:

    l   Managing SonicWall Licenses
    l   System Administration
    l   Configuring Time Settings
    l   Managing Certificates
    l   Administering SNMP
    l   Firmware Settings
    l   Restarting the System

                                                            SonicOS 7 Device Settings Administration Guide       5
                                                                                    About Device Settings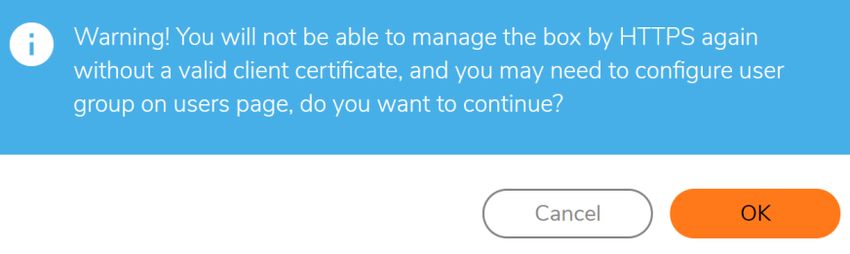
2

                             Managing SonicWall Licenses
    IMPORTANT: By design, the SonicWall License Manager cannot be configured to use a third-party
    proxy server. Networks that direct all HTTP and HTTPS traffic through a third-party proxy server may
    experience License Manager issues.

Topics:
    l   Licenses
    l   Managing Security Services
    l   Registering Your SonicWall Appliance
    l   Activating the Gateway Anti-Virus, Anti-Spyware, and IPS License
    l   Activating FREE TRIALs

Licenses
Device | Settings > Licenses page in the SonicOS management interface provides links to activate,
upgrade, or renew SonicWall Security Services licenses. From this page, you can manage all the licenses for
your SonicWall security appliance. The information listed in the Services table is updated from your
mysonicwall.com account. The Licenses page also includes links to FREE trials of SonicWall Security
Services.

                                                                SonicOS 7 Device Settings Administration Guide       6
                                                                                 Managing SonicWall Licenses
Managing Security Services
When you have established your Internet connection, it is recommended you register your SonicWall
security appliance, which provides the following benefits:

    l   Try a FREE 30-day trial of SonicWallGateway Anti-Virus, Anti-Spyware, and Intrusion Prevention,
        Content Filtering Service, and Client Anti-Virus
    l   Activate SonicWall Anti-Spam
    l   Activate SonicWall security services and upgrades
    l   Access SonicOS firmware updates
    l   Get SonicWall technical support

Topics:
    l   Services Summary
    l   Managing Security Services Online

Services Summary
The Device | Settings > Licenses page lists all the available and activated services on the SonicWall
security appliance. The friendly name of the security appliance is displayed above the SERVICES table.

Select appropriate option in the View drop-down box to list the services based on their activation status. The
available options are:

    l   Licensed and Unlicensed
    l   Licensed
    l   Unlicensed

The table displays the following information:

    l   SERVICES — lists all the available SonicWall Security Services and upgrades available for the
        SonicWall security appliance.
    l   STATUS— indicates if the security service is activated (Licensed), available for activation (Not
        Licensed), or no longer active (Expired).
    l   ACTION —displays options to upgrade, renew, try, or activate the service, depending on its license
        status.
    l   Count — displays the number of nodes/users currently connected to your appliance. If your security
        appliance is licensed for unlimited nodes, the count is displayed as Unlimited.

                                                                  SonicOS 7 Device Settings Administration Guide   7
                                                                                   Managing SonicWall Licenses
l Max. Count — displays the maximum number of nodes/users allowed for the license.
l EXPIRY DATE — displays the expiration date for any Licensed Security Service.
The information listed in the Services table is updated from your mysonicwall.com account the next time
the SonicWall security appliance automatically synchronizes with MySonicWall (once a day) or you can click
the SYNCHRONIZE button on this page to update the table.
For more information on SonicWall Security Services, see SonicOS 7.0 Security Services document
available at https://www.sonicwall.com/support/technical-documentation/.
Managing Security Services Online
You can activate, upgrade or renew services using one of the following methods:
l Performing service license updates in MySonicWall and synchronizing the changes in SonicOS
management interface.
1. Navigate to Device | Settings > Licenses page.
2. Click MySonicWall above the Services table.
3. Log into your MySonicWall account and upgrade the licenses. See MSW online help.
4. Synchronize changes. See Synchronizing Changes.
l Performing service license updates through SonicOS management interface. See Managing Services
from SonicOS Management Interface.
Topics:
l Managing Services from SonicOS Management Interface
l Synchronizing Changes
Managing Services from SonicOS Management Interface
You can activate, upgrade, or renew licenses for the Security Services on Device | Settings > Licenses
page.
To activate, upgrade, or renew services:
1. Navigate to Device | Settings > Licenses.
2. Select the appropriate option in the View drop-down box above the SERVICES table.
3. Locate the service you want to activate / renew / upgrade.
4. Click any option listed in the ACTIONS column based on what you need to do with the service.
The options listed for a service in the ACTIONS column depend on the status of the service.
l To activate a FREE trial, click Try.
l To activate a Security Service, click the Activate link.
l To renew a Security Service, click the Renew link.
l To upgrade a Security Service, click the Upgrade.
5. Follow the prompts to activate/renew/upgrade the service license. After completion, you are returned
to the Licenses page.
SonicOS 7 Device Settings Administration Guide 8
Managing SonicWall LicensesSynchronizing Changes
When you make changes to your Security Services in MySonicWall, you can synchronize them instead of
waiting for the system to do it automatically.
To synchronize your MySonicWall account with the Services table in SonicOS management
interface:
1. Navigate to Device | Settings > Licenses .
2. Click Synchronize option above the SERVICES table.
Manual Upgrade for Closed Environments
If your SonicWall security appliance is deployed in a high-security environment that does not allow direct
Internet connectivity from the SonicWall security appliance, you can enter the encrypted license key
information from https://mysonicwall.com manually on the Device | Settings > Licenses page in the
SonicOS management interface.
NOTE: Manual upgrade of the encrypted license keyset is only for closed environments. If your firewall
is connected to the Internet, it is recommended you use the automatic registration and Security Services
upgrade features of your appliance.
You need to perform steps 1 through 4 from a computer connected to the internet and then continue the
procedure in the SonicOS Management Interface of the security appliance that does not have internet
connectivity.
1. Make sure you have an account at https://mysonicwall.com and your SonicWall security appliance is
registered to the account before proceeding.
2. After logging into MySonicWall, click on the serial number of your registered SonicWall security
appliance listed in Product Management > My Products.
SonicOS 7 Device Settings Administration Guide 9
Managing SonicWall Licenses3. Click MANUAL UPGRADE and select Add keyset to your product. The scrambled text displayed
is the License Keyset for the selected SonicWall security appliance and activated Security Services.
4. Click Copy Code to copy the Keyset text for pasting into the Settings | Licenses page.
5. Make sure your SonicWall appliance is running the latest version of SonicOS.
6. Navigate to Device | Settings > Licenses.
7. Click Manual License at the upper-right corner of the page.
8. Paste (or type) the Keyset (from the step 3) into the Enter Keyset field in the Manual License
Upgrade dialog.
9. Click APPLY to update your SonicWall security appliance. The status field at the bottom of the page
displays The configuration has been updated.
10. You can generate the report from Device | Diagnostics > Tech Support Report to verify the
upgrade details.
NOTE: After the manual upgrade, the Settings | Licenses page does not contain any registration and
upgrade information.
Registering Your SonicWall Appliance
When you log in to your primary appliance for the first time, a Software Transaction Agreement (STA) form
displays for your acceptance before you can proceed. If you are using a CLI, you must type (or select) Yes
before proceeding. When you have accepted the STA, it is not shown for upgrades of either firmware or
software.
NOTE: MySonicWall registration information is not sold or shared with any other company.
See the Quick Start Guide for your security appliance for additional information on applying licenses
manually, synchronizing licenses manually, and upgrading firmware.
SonicOS 7 Device Settings Administration Guide 10
Managing SonicWall LicensesActivating the Gateway Anti-Virus, Anti-
Spyware, and IPS License
Your security appliance must be registered on MySonicWall to use these security services. See Registering
Your SonicWall Appliance or the Quick Start Guide for your security appliance.
Because SonicWall Anti-Spyware is part of SonicWall Gateway Anti-Virus, Anti-Spyware, and Intrusion
Prevention, the Activation Key you receive is for all three services on your SonicWall security appliance.
If you do not have a SonicWall Gateway Anti-Virus , Anti-Spyware , and Intrusion Prevention license
activated on your SonicWall security appliance, you must purchase it from a SonicWall reseller or through
your MySonicWall account (limited to customers in the USA and Canada).
Activating FREE TRIALs
You can try FREE TRIAL versions of SonicWallGateway Anti-Virus, Anti-Spyware, and Intrusion Prevention.
For information about activating a free trial of any or all of the Security Services, see the Quick Start Guide
for your security appliance or Managing Security Services Online.
SonicOS 7 Device Settings Administration Guide 11
Managing SonicWall Licenses3
System Administration
Configuring the Firewall Name
To configure the firewall name:
1. Navigate to Device | Settings > Administration.
2. Click Firewall Administrator.
3. Enter the hexadecimal serial number of the firewall in the Firewall Name field. This number
uniquely identifies the SonicWall security appliance and defaults to the serial number of the firewall.
The serial number is also the MAC address of the unit. To change the Firewall Name, enter a unique
alphanumeric name in the Firewall Name field. It must be at least 8 characters in length and can be
up to 63 characters long.
4. Enter a friendly name in the Firewall’s Domain Name field. The name can be private, for internal
users, or an externally registered domain name. This domain name is used in conjunction with User
Web Login Settings.
5. To facilitate recognition of the primary/secondary firewalls in the Event Logs, enable Auto-Append
HA/Clustering suffix to Firewall Name. When this option is enabled, an appropriate suffix is
appended automatically to the firewall name in the Monitor | Logs > System Logs page.
This option is not selected by default. For more information about Event Logs, see the SonicOS 7.0
Logs (Monitor) document.
SonicOS 7 Device Settings Administration Guide 12
System AdministrationEnabling Wireless LAN and IPv6
To enable the visibility of a wireless LAN and/or IPv6:
1. Navigate to Device | Settings > Administration > Firewall Administrator.
2. Click Enable Wireless LAN and/or Enable IPv6. These options are selected by default. A
confirmation message is displayed.
IMPORTANT: Enabling or disabling the Wireless LAN feature requires a restart of the firewall.
When WLAN is disabled:
l All access point and wireless-related management interface pages do not display.
l WLAN is not displayed as a zone type.
l Any existing WLAN zones or objects become uneditable.
When IPv6 is disabled, all IPv6 packets are dropped by the firewall and the Monitor | Tools and
Monitor > Packet Monitor page displays the log messages.
3. Click OK.
Changing the Administrator Name and
Password
Each SonicWall security appliance has a default administrator name of admin and a password of password.
To change the administrator name and/or password:
1. Navigate to Device | Settings > Administration.
2. Click Firewall Administrator.
3. Type the new name in the Administrator Login Name field.
The Administrator Name can be changed from the default setting of admin to any word using
alphanumeric characters up to 32 characters in length.
4. Perform the following steps to change password, otherwise skip to step 4:
a. Click Change Password.
b. Type the old password in the Old Password field.
SonicOS 7 Device Settings Administration Guide 13
System Administrationc. Type the new password in the New Password field. The new password can be up to 32
alphanumeric and special characters.
d. It is recommended you change the default password, password, to your own custom
password. Enter a strong password that cannot be easily guessed by others. A strong
password should have at least one uppercase letter, one lowercase letter, one number, and
one special character. For example, MyP@ssw0rd.
e. Type the new password again in the Confirm Password field.
f. Click Accept.
5. To enforce Two-factor Authentication, select TOTP from the One-time Passwords Method drop-
down.
You can now bind your mobile authentication application with your user account during the next login.
6. Click Accept.
Configuring Login Security
The internal SonicOS Web-server supports TLS 1.1 and above with strong ciphers (128 bits or greater) when
negotiating HTTPS management sessions. SSL implementations are not supported. This heightened level
of HTTPS security protects against potential SSLv2 rollback vulnerabilities and ensures compliance with the
Payment Card Industry (PCI) and other security and risk-management standards.
TIP: SonicOS uses advanced browser technologies, such as HTML5, which are supported in most
recent browsers. SonicWall recommends using the latest Chrome, Firefox, Internet Explorer, or Safari
(does not operate on Windows platforms) browsers for administration of SonicOS. Mobile device
browsers are not recommended for SonicWall system administration.
Configuring SonicOS password constraint enforcement ensures that administrators and users are using
secure passwords. This password constraint enforcement can satisfy the confidentiality requirements as
defined by current information security management systems or compliance requirements, such as
Common Criteria and the Payment Card Industry (PCI) standard.
Topics:
l Configuring Password Compliance
l Configuring Login Constraints
SonicOS 7 Device Settings Administration Guide 14
System AdministrationConfiguring Password Compliance
To configure password compliance:
1. Navigate to Device | Settings > Administration.
2. Click Login / Multiple Administrators.
Configure the following settings in the LOGIN SECURITY section.
3. To require users to change their passwords after a designated number of days has elapsed:
a. Select Password must be changed every (days). The field becomes active. This option is
not selected by default.
b. Enter the elapsed time in the field. The default number of days is 90, the minimum is 1 day,
and the maximum is 9999.
When a user attempts to login with an expired password, a popup window prompts the user to enter a
new password. The User Login Status window now includes a Change Password button so users can
change their passwords at any time.
4. To specify the minimum length of time, in hours, allowed between password changes:
a. Select Change password after (hours) . The field becomes active.
b. Enter the number of hours. The minimum – and default – time is 1 hour; the maximum is
9999 hours.
5. To require users to use unique passwords for the specified number of password changes:
a. Select Bar repeated passwords for this many changes. The field becomes active.
b. Enter the number of changes. The default number is 4, the minimum number is 1, and the
maximum number is 32.
6. To require users to change at least 8 alphanumeric/symbolic characters of their old password when
creating a new one, select Apply password constrains. For how to specify what characters are
allowed, see Step 7.
7. Specify the shortest allowed password, enter the minimum number of characters in the Enforce a
minimum password length of field. The default number is 8, the minimum is 1, and the
maximum is 99.
8. Choose how complex a user’s password must be to be accepted from the Enforce password
complexity drop-down menu:
l None (default)
l Alphanumeric characters— Requires both alphabetic and numeric characters
l Alphanumeric and symbolic characters— Requires alphabetic, numeric, and symbolic
characters – for symbolic characters, only !, @, #, $, %, ^, &, *, (, and ) are allowed; all others
are denied
9. When a password complexity option other than None is selected, the options under Complexity
Requirement become active. Enter the minimum number of alphanumeric and symbolic characters
required in a user’s password. The default number for each is 0, but the total number of characters
for all options cannot exceed 99.
l Upper Case Characters
l Lower Case Characters
SonicOS 7 Device Settings Administration Guide 15
System Administrationl Number Characters
l Symbolic Characters
NOTE: The Symbolic Characters field becomes active only if Alphanumeric and symbolic
characters is selected.
10. Select to which classes of users the password constraints are applied under Apply the above
password constraints for. By default, all options are selected:
l Admin – Refers to the default administrator with the username admin.
l Other full admin
l Limited admin
l Guest admin
l Other local users
Configuring Login Constraints
To configure login constraints:
1. Navigate to Device | Settings > Administration.
2. Click Login/Multiple Administrators.
In the LOGIN SECURITY section, configure the following:
1. To specify the length of inactivity time that elapses before you are automatically logged out of the
Management Interface, enter the time, in minutes, in the Log out the Admin after inactivity
of (mins) field. By default, the SonicWall Security Appliance logs out the administrator after 5
minutes of inactivity. The inactivity timeout can range from 1 to 9999 minutes.
TIP: If the Administrator Inactivity Timeout is extended beyond five minutes, you should end
every management session by clicking Logout in the upper right corner of the view to prevent
unauthorized access to the firewall’s Management Interface.
2. To configure the SonicWall Security Appliance to lockout an administrator or a user if the login
credentials are incorrect, enable Admin/user lockout. Both administrators and users are locked out
of accessing the firewall after the specified number of incorrect login attempts. This option is
disabled by default. When this option is enabled, the following fields become active.
SonicOS 7 Device Settings Administration Guide 16
System AdministrationCAUTION: If the administrator and a user are logging into the firewall using the same
source IP address, the administrator is also locked out of the firewall. The lockout is
based on the source IP address of the user or administrator.
a. Select Enable local admin/user account lockout (uncheck for login IP address lockout).
This option locks out user accounts and IP addresses when they have surpassed a specified
number of incorrect login attempts. This option is only available when admin/user lockout is
enabled.
b. Select Log event only without lockout for SonicOS to log failed user login attempts that
have reached the established threshold, but does not lock out the user or IP address. This
option is only available when Admin/user lockout is enabled.
After a user or IP address is locked out, a “User login denied - User is locked out” message
displays on the login screen and the login is rejected.
NOTE: You can review and edit all locked out user accounts on the Active Users page
when local admin/user account lockout is enabled.
c. Enter the number of failed attempts within a specified time frame before the user is locked out
in the Failed login attempts per minute before lockout field. The default number
is 5, the minimum is 1, and the maximum is 99. Enter the maximum time in which failed
attempts can be made. The default is 5 minutes, the minimum is 1 minute, and the maximum
is 240 minutes (4 hours).
d. Enter the length of time that must elapse before the user is allowed to attempt to log into the
firewall again in the Lockout Period (mins) field. The default is 5 minutes, the minimum is
0 (permanent lockout), and the maximum is 60 minutes.
3. Enter the number of incorrect login attempts from the command line interface (CLI) that triggers a
lockout in the Max login attempts through CLI field. The default is 5, the minimum is 3, and the
maximum is 15.
4. Click Accept.
Multiple Administrators Support
SonicOS supports multiple concurrent administrators with full administrator privileges, read-only privileges,
and limited privileges. The original version of SonicOS supported only a single administrator to log on to a
firewall with full administrative privileges. Additional users can be granted “limited administrator” access, but
only one administrator can have full access to modify all areas of the SonicOS GUI at one time.
SonicOS provides support for multiple concurrent administrators. This feature allows for multiple users to
log-in with full administrator privileges. In addition to using the default admin user name, additional
administrator user names can be created. Because of the potential for conflicts caused by multiple
administrators making configuration changes at the same time, only one administrator is allowed to make
configuration changes. The additional administrators are given full access to the GUI, but they cannot make
configuration changes.
Multiple Administrators Support provides the following benefits:
l Improved productivity: Allowing multiple administrators to access a firewall simultaneously
eliminates auto logout, a situation that occurs when two administrators require access to the
appliance at the same time and one is automatically forced out of the system.
SonicOS 7 Device Settings Administration Guide 17
System Administrationl Reduced configuration risk: The new read-only mode allows users to view the current
configuration and status of a firewall without the risk of making unintentional changes to the
configuration.
Working of Multiple Administrators Support
Topics:
l Configuration Modes
l User Groups
l Priority for Preempting Administrators
l GMS and Multiple Administrator Support
Configuration Modes
To allow multiple concurrent administrators, while also preventing potential conflicts caused by multiple
administrators making configuration changes at the same time, these configuration modes have been
defined:
Configuration mode Administrator has full privileges to edit the configuration. If no administrator
is already logged into the appliance, this is the default behavior for
administrators with full and limited administrator privileges (but not read-only
administrators).
NOTE: Administrators with full configuration privilege can also log in
using the Command Line Interface (CLI; see the SonicOS 7.0 CLI
Reference Guide).
Read-only mode Administrator cannot make any changes to the configuration, but can view
the entire management UI and perform monitoring actions.
Only administrators who are members of the SonicWall Read-Only Admins
user group are given read-only access, and it is the only configuration mode
they can access.
Non-configuration Administrator can view the same information as members of the read-only
mode group and they can also initiate management actions that do not have the
potential to cause configuration conflicts.
Only administrators who are members of the SonicWall Administrators user
group can access non-configuration mode. This mode can be entered when
another administrator is already in configuration mode and the new
administrator chooses not to preempt the existing administrator. By default,
when an administrator is preempted out of configuration mode, he or she is
converted to non-configuration mode. On the Device | Settings >
Administration page, this behavior can be modified so that the original
administrator is logged out.
Access rights available to configuration modes table provides a summary of the access rights available
to the configuration modes. Access rights for limited administrators are included also, but note that this table
does not include all functions available to limited administrators.
SonicOS 7 Device Settings Administration Guide 18
System AdministrationACCESS RIGHTS AVAILABLE TO CONFIGURATION MODES
Function Full admin in Full admin in Read-only Limited
config mode non-config administrator administrator
mode
Import certificates X
Generate certificate signing requests X
Export certificates X
Export appliance settings X X X
Download TSR X X X
Use other diagnostics X X X
Configure network X X
Flush ARP cache X X X
Setup DHCP Server X
Renegotiate VPN tunnels X X
Log users off X X guest users
only
Unlock locked-out users X X
Clear log X X X
Filter logs X X X X
Export log X X X X
Email log X X X
Configure log categories X X X
Configure log settings X X
Generate log reports X X X
Browse the full UI X X X
Generate log reports X X X
SonicOS 7 Device Settings Administration Guide 19
System AdministrationUser Groups
The Multiple Administrators Support feature supports two new default user groups:
l SonicWall Administrators: Members of this group have full administrator access to edit the
configuration.
l SonicWall Read-Only Admins: Members of this group have read-only access to view the full
management interface, but they cannot edit the configuration and they cannot switch to full
configuration mode.
It is not recommended to include users in more than one of these user groups. If you do so, however, the
following behavior applies:
If members of this user Are
group
SonicWall Administrators Also included in the Limited Administrators or SonicWall Read-Only
Admins user groups, the members have full administrator rights.
Limited Administrators Included in the SonicWall Read-Only Admins user group, the
members have limited administrator rights.
Read-Only Admins Later included in another administrative group, If this read-only admin
group is used with other administrative groups option in the SonicWall
Read-Only Admins group configuration determines whether the
members are still restricted to read-only access or have the full
administration capabilities set by their other group.
Priority for Preempting Administrators
These rules govern the priority levels that the various classes of administrators have for preempting
administrators that are already logged into the appliance:
1. The admin user and SonicWall Global Management System (GMS) both have the highest priority
and can preempt any users.
2. A user who is a member of the SonicWall Administrators user group can preempt any users except
for the admin and SonicWall GMS.
3. A user who is a member of the Limited Administrators user group can only preempt other
members of the Limited Administrators group.
GMS and Multiple Administrator Support
When using SonicWall GMS to manage a firewall, GMS frequently logs in to the appliance (for such
activities as ensuring that GMS management IPSec tunnels have been created correctly). These frequent
GMS log-ins can make local administration of the appliance difficult because the local administrator can be
preempted by GMS.
SonicOS 7 Device Settings Administration Guide 20
System AdministrationConfiguring Multiple Administrator Access
To configure multiple administrator access:
1. Navigate to Device | Settings > Administration.
Click Login / Multiple Administrators.
2. To configure what happens when one administrator preempts another administrator, from the On
preemption by another admin option, select whether the preempted administrator can be converted
to non-config mode or logged out:
l Drop to non-config mode: More than one administrator to access the appliance in non-
config mode without disrupting other administrators. This option is not selected by default.
l Log out: The new administrator to preempt other sessions.
NOTE: Selecting Log Out disables Non-Config mode and prevents entering Non-Config mode
manually.
3. To allow a lower-priority administrator to preempt the current administrator after a specified time,
enter the time, in minutes, in the Allow preemption by a lower priority administrator
after inactivity of (mins) field. The default is 10 minutes, the minimum is 1 minute, and the
maximum is 9999 minutes.
4. The SonicOS Management Interface allows administrators to send text messages through the
Management Interface to other administrators logged into the appliance. The message appears in
the browser’s status bar. To enable this option:
a. Select Inter-administrator messaging. The Messaging polling interval (seconds) field
becomes active.
b. Specify how often an administrator’s browser checks for inter-administrator messages in the
Messaging polling interval (secs) field. Specify a reasonably short interval to ensure
timely delivery of messages, especially if there are likely to be multiple administrators who
need to access the appliance. The default is 10 seconds, the minimum is 1 second, and the
maximum is 99 seconds.
5. To enable access by System Administrators, Cryptographic (Crypto) Administrators, and Audit
Administrators, select Multiple Admin Roles. When this option is disabled, these administrators
cannot access the system, and all related user groups and information about them are hidden. This
option is not selected by default.
Enabling Enhanced Audit Logging Support
An enhanced log entry contains the parameter changed and user name in the Monitor| Logs > System
Events page.
SonicOS 7 Device Settings Administration Guide 21
System AdministrationTo enable logging of all configuration changes in the Monitor| Logs > System Logs page:
1. Navigate to Device | Settings > Administration.
2. Click Audit / SonicOS API.
3. In the ENHANCED AUDIT LOGGING SUPPORT section, enable Enhanced Audit Logging
4. Click ACCEPT.
Configuring the Wireless LAN Controller
To enable wireless controller mode:
IMPORTANT: You must reboot the firewall after changing Wireless Controller modes.
1. Navigate to Device | Settings > Administration.
2. Click Audit/SonicOS API.
3. In the Wireless LAN Controller section, select any one of the options from the Wireless
Controller Mode drop-down menu:
l Wireless-Controller-Only (default)
This option enables wireless controller mode
l Non-Wireless
This option enables non-wireless controller mode
l Full-Feature-Gateway
This option enables normal firewall mode
4. After you select the appropriate wireless controller mode, click OK in the warning message displayed.
5. Click Accept.
Enabling SonicOS API and Configuring
Authentication Methods
You can use SonicOS API as an alternative to the SonicOS Command Line Interface (CLI) for configuring
selected functions. To do so, you must first enable SonicOS API. For more information about SonicOS API,
SonicOS 7 Device Settings Administration Guide 22
System Administrationsee the SonicOS 7.0 API document available at https://www.sonicwall.com/support/technical-
documentation/.
To enable SonicOS API and configure client authentication:
1. Navigate to Device | Settings > Administration.
2. Click Audit / SonicOS API.
3. In the SONICOS API section, enable SonicOS API.
4. Select any of the authentication methods for initial client authentication:
l RFC-7616 HTTP Digest Access authentication
l Select the appropriate digest algorithms: SHA256 (default), MD5
l Integrity protection: Disabled (default), Allowed, or Enforced.
l Session variant (password hashes in place of passwords):Disabled, Allowed
(default), or Enforced
l CHAP authentication.
l RFC-2617 HTTP Basic Access authentication
l Public Key Authentication
l RSA modulus (key/cipher size in bits): 2014 is the default.
l RSA padding type: PKCS#1 v1.5 or PKCS#1 v2.0 OAEP
l OAEP hash method: SHA-1, SHA-256, or Other
l OAEP mask (MGF1) method: SHA1, SHA-256, or Other
l Session security using RFC-7616 Digest Access Authentication
l Can hold user passwords received from the client.
l Maximum nonce use: 10 by default
l Two-Factor and Bearer Token Authentication
5. Click Accept.
SonicOS 7 Device Settings Administration Guide 23
System AdministrationEnabling GMS Management
NOTE: For more information on SonicWall Global Management System, see the SonicWall GMS and
SonicWall Management Services administration documentation, available at
https://www.sonicwall.com/support/technical-documentation.
To configure the Security Appliance for GMS management:
1. Navigate to Device | Settings > Administration.
2. Click Audit / SonicOS API.
3. Scroll to the ADVANCED MANAGEMENT section.
4. Enable Management using GMS. The Configure button becomes available.
5. Click Configure. The GMS Settings screen in displayed.
6. Enter the host name or IP address of the GMS Console in the GMS Host Name or IP Address
field.
7. Enter the port in the GMS Syslog Server Port field. The default value is 514.
8. To send only heartbeat status instead of log messages, select Send Heartbeat Status Messages
Only.
9. If the GMS Console is placed behind a device using NAT on the network, select GMS behind NAT
Device. When you select GMS behind NAT Device, the NAT Device IP Address field becomes
active.
10. Enter the IP address of the NAT device in the NAT Device IP Address field.
11. Select one of the following GMS modes from the Management Mode drop-down menu:
l IPSEC Management Tunnel—Allows the firewall to be managed over an IPsec VPN tunnel
to the GMS management console. If you selected this option, go to step 11.
l Existing Tunnel—Uses an existing VPN tunnel over the connection between the GMS server
and the firewall. If you selected this option, go to step 13.
SonicOS 7 Device Settings Administration Guide 24
System Administrationl HTTPS—Allows HTTPS management from two IP addresses: the GMS Primary Agent and
the Standby Agent IP address. The SonicWall firewall also sends encrypted syslog packets
and SNMP traps using 3DES and the firewall administrator’s password. Options for
configuring the GMS reporting server display. If you selected this option, go to step 12.
12. The default IPsec VPN settings are displayed with values populated by SonicOS. Verify the settings.
a. From Encryption Algorithms, select the appropriate algorithm.
b. Optionally, enter a new encryption key in the Encryption Key field:
For The key must be
DES 16 hexadecimal characters
3DES 48 hexadecimal characters
c. Optionally, enter a new authentication key in the Authentication Key field:
For The key must be
MD5 32 hexadecimal characters
SHA1 40 hexadecimal characters
d. Go to Step 13.
13. SonicOS needs to know the GMS reporting server.
a. Select Send Syslog Messages to a Distributed GMS Reporting Server. The GMS
Reporting Server IP Address and GMS Reporting Server Port options become
available.
b. In the GMS Reporting Server IP Address field, enter the IP address of the GMS server.
c. In the GMS Reporting Server Port field, enter the port of the GMS server. The default port
is 514.
14. Click OK.
15. Click Accept.
SonicOS 7 Device Settings Administration Guide 25
System AdministrationConfiguring the Management Interface
In this section, you configure:
l How the Management Interface tables display.
l Certificate usage.
l Whether you are operating in Configuration or Non-Config mode.
l Other management options.
Topics:
l Managing through HTTP/HTTPS
l Selecting a Security Certificate
l Controlling the Management Interface Tables
l Enforcing TLS Version
l Switching Configuration Modes
l Deleting Browser Cookies
l Configuring SSH Management
Managing through HTTP/HTTPS
You can manage the SonicWall security appliance using HTTP or HTTPS and a Web browser. HTTP web-
based management is disabled by default. Use HTTPS to log into the SonicOS Management Interface with
factory default settings.
SonicOS 7 Device Settings Administration Guide 26
System AdministrationTo manage through HTTP or HTTPS:
1. Navigate to Device | Settings > Administration.
2. Click Management.
3. To enable HTTP management globally, select Allow management via HTTP in the WEB
MANAGEMENT SETTINGS section, This option is not selected by default.
4. The default port for HTTP is port 80, but you can configure access through another port. Enter the
number of the desired port in the HTTP Port field.
IMPORTANT: If you configure another port for HTTP management, you must include the port
number when you use the IP address to log into the SonicWall Security Appliance. For example,
if you configure the port to be 76, then you must type LAN IP Address:76 into the Web browser,
for example, http://192.18.16.1:76.
5. The default port for HTTPS management is 443. To add another layer of security for logging into the
SonicWall Security Appliance by changing the default port, enter the preferred port number into the
HTTPS Port field.
IMPORTANT: If you configure another port for HTTPS management Port, you must include the
port number when you use the IP address to log into the SonicWall Security Appliance. For
example, if you use 700 for the port, then you must log into the SonicWall using the port number
as well as the IP address; for example, https://192.18.16.1:700.
Selecting a Security Certificate
Security certificates provide data encryption and a secure web site.
To specify the type of security certificate:
1. Navigate to Device | Settings > Administration.
2. Click Management.
3. From Certificate Selection drop-down box, select the type of certificate for your website:
l Use Self-signed Certificate, which allows you to continue using a certificate without
downloading a new one each time you log into the SonicWall Security Appliance. This option
is selected by default. Go to Step 3.
l Import Certificate to select an imported certificate from the Device | Settings >
Certificates page to use for authentication to the management interface. A confirmation
message displays.
a. Click OK. The Device | Settings > Certificates page is displayed.
b. See Managing Certificates section.
4. In the Certificate Common Name field, enter the IP address or common name for the firewall. If
SonicOS 7 Device Settings Administration Guide 27
System Administrationyou choose Use Selfsigned Certificate, SonicOS populates the field with the firewall’s IP address.
5. Click Accept.
To regenerate a Self-Signed Certificate:
1. Navigate to Device | System > Administration > Management.
2. In the WEB MANAGEMENT SETTINGS section, click Regenerate Certificate.
3. Click OK in the confirmation message that is displayed.
Controlling the Management Interface Tables
The SonicWall Management Interface allows you to control the display of large tables of information across
all tables in the Management Interface by changing the:
l Number of table entries displayed on a page.
l Frequency of background automatic refresh of tables.
Some tables have individual settings for items per page that are initialized at login to the value configured
here. After these pages are viewed, their individual settings are maintained. Subsequent changes made
here affect these pages only following a new login.
To change the display and refresh of tables:
1. Navigate to Device | Settings > Administration.
2. Click Management.
3. In the WEB MANAGEMENT SETTINGS section:
a. Enter the desired number of items per page in the Default Table Size (items per
page) field. The minimum is 1, the maximum is 5000, and the default is 50.
b. Enter the desired refresh interval, in seconds, in the Auto-updated Table Refresh
Interval (secs) field. The minimum is 1 second, the maximum is 300 seconds, and the
default is 10 seconds.
4. Click Accept.
Enforcing TLS Version
SonicOS supports versions 1.0, 1.1, and 1.2 of the Transport Layer Security (TLS) protocol. You can ensure
that the more secure version 1.1 and above are used.
To enforce use of TLS versions 1.1 and above:
1. Navigate to Device | Settings > Administration.
2. Click Management.
3. In the WEB MANAGEMENTS SETTINGS section, enable Enforce TLS 1.1 and Above.
SonicOS 7 Device Settings Administration Guide 28
System Administration4. Click Accept.
Switching Configuration Modes
Each appliance includes a Mode option that toggles the configuration mode of the Management Interface. If
you are in Configuration Mode, you can switch to Non-Config Mode at any time, or if you are in Non-Config
Mode. you can switch to Configuration Mode.
TIP: This method is in addition to switching modes from the Mode setting on each view. For more
information about modes, see the SonicOS 7 About SonicOS documentation.
To switch modes:
1. Navigate to Device | Settings > Administration.
2. Click Management.
3. In the WEB MANAGEMENT SETTINGS section, If you are in:
l Configuration Mode, click End Config Mode, and click OK.
The Mode indicator in the top right of the page displays Non-Config.
l Non-Config Mode, click Configuration Mode.
The Mode indicator in the top right of the page displays Configuration.
Deleting Browser Cookies
IMPORTANT: Deleting cookies causes you to lose any unsaved changes made in the Management
Interface.
To delete all browser cookies saved by the Security Appliance:
1. Navigate to Device | Settings > Administration.
2. Click Management.
3. Click Delete Cookies.
4. Click OK.
Configuring SSH Management
If you use SSH to manage the firewall, you can change the SSH port for additional security.
To change the SSH port:
1. Navigate to Device | Settings > Administration.
2. Click Management.
3. Scroll to SSH MANAGEMENT SETTINGS.
SonicOS 7 Device Settings Administration Guide 29
System Administration4. Enter the port in the SSH Port field. The default SSH port is 22.
5. Click Accept.
Client Certificate Verification
You can configure certificate verification with or without a Common Access Card (CAC).
NOTE: None of the options is selected by default.
Topics:
l About Common Access Card
l Configuring Client Certificate Verification
l Using the Client Certificate Check
l Troubleshooting User Lock Out
About Common Access Card
A Common Access Card (CAC) is a United States Department of Defense (DoD) smart card used by military
personnel and other government and non-government personnel who require highly secure access over the
Internet. A CAC uses PKI authentication and encryption.
NOTE: Using a CAC requires an external card reader connected on a USB port.
The Client Certificate Check was developed for use with a CAC; however, it is useful in any scenario that
requires a client certificate on an HTTPS/SSL connection. CAC support is available for client certification
only on HTTPS connections.
NOTE: CACs might not work with browsers other than Microsoft Internet Explorer.
SonicOS 7 Device Settings Administration Guide 30
System AdministrationConfiguring Client Certificate Verification
To configure Client Certificate Check:
1. Navigate to Device | Settings > Administration.
2. Click Certificate Check.
3. To enable client certificate checking and CAC support on the SonicWall Security Appliance, select
Enable Client Certificate Check. If you enable this option, the other options become available. A
warning confirmation message displays:
4. Click OK.
5. To activate the client certification cache, select Enable Client Certificate Cache.
NOTE: The cache expires 24 hours after being enabled.
6. To specify from which certificate field the user name is obtained, choose an option from User Name
Field:
l Subject: Common Name (default)
l Sub Alt: Email
l Sub Alt: Microsoft Universal Principal Name
7. To select a Certification Authority (CA) certificate issuer, choose one from the Client Certificate
Issuer drop-down menu. The default is thawte Primary Root CA - G3.
NOTE: If the appropriate CA is not listed, you need to import that CA into the SonicWall Security
Appliance. See Managing Certificates section.
8. To select how to obtain the CAC user group membership and, thus, determine the correct user
privilege, choose from the CAC user group memberships retrieve method drop-down menu:
l Local Configured (default) – If selected, you should create local user groups with proper
memberships.
l From LDAP – If selected, you need to configure the LDAP server. (see Configuring the
SonicWall for LDAP section in SonicOS 7.0 Users document available at
https://www.sonicwall.com/support/technical-documentation/.
9. To enable the Online Certificate Status Protocol (OCSP) check to verify the client certificate is still
SonicOS 7 Device Settings Administration Guide 31
System Administrationvalid and has not been revoked, select Enable OCSP Checking. When this option is enabled, the
OCSP Responder URL field displays and the Enable periodic OCSP Check option displays.
Enter the URL of the OSCP server that verifies the status of the client certificate in the OCSP
Responder URL field.
The OCSP Responder URL is usually embedded inside the client certificate and does not need to be
entered. If the client certificate does not have an OCSP link, you can enter the URL link. The link
should point to the Common Gateway Interface (CGI) on the server side, which processes the OCSP
checking. For example: http://10.103.63.251/ocsp.
10. To enable a periodic OCSP check for the client certificate for verifying that the certificate is still valid
and has not been revoked:
a. Select Enable periodic OCSP Check. The OCSP check interval field becomes available.
b. Enter the interval between OCSP checks, in hours, in the OCSP check interval 1~72 (in hours)
field. The minimum interval is 1 hour, the maximum is 72 hours, and the default is 24 hours.
11. Click Accept.
Using the Client Certificate Check
If you use the client certificate check without a CAC, you must manually import the client certificate into the
browser.
If you use the Client Certificate Check with a CAC, the client certificate is automatically installed on the
browser by middleware. When you begin a management session through HTTPS, a certificate selection
window asks you to confirm the certificate.
After you select the client certificate from the drop-down menu, the HTTPS/SSL connection is resumed, and
the SonicWall Security Appliance checks the Client Certificate Issuer to verify that the client certificate is
signed by the CA. If a match is found, the administrator login page displays. If no match is found, the
browser displays a standard browser connection fail message, such as:
.....cannot display web page!
If OCSP is enabled, before the administrator login page is displayed, the browser performs an OCSP check
and displays the following message while it is checking.
Client Certificate OCSP Checking.....
If a match is found, the administrator login page is displayed, and you can use your administrator credentials
to continue managing the SonicWall Security Appliance.
If no match is found, the browser displays:
OCSP Checking fail! Please contact system administrator!
SonicOS 7 Device Settings Administration Guide 32
System AdministrationChecking Certificate Expiration
To activate periodic checks of certificate’s expiration:
1. Navigate to Device | Settings > Administration > Certificate Check.
2. In the CHECK CERTIFICATE EXPIRATION SETTINGS section, select Enable periodic
certificate expiration check. This option is selected by default. When enabled, the Certificate
expiration alert interval field becomes available.
3. To set the interval between certificate checks, in hours, enter the interval in the Certificate
expiration alert interval: 1 - 168 (in hours) field. The minimum time is 1 hour, the
maximum is 168 hours, and the default is 168.
4. Click Accept.
Troubleshooting User Lock Out
When using the client certificate feature, these situations can lock the user out of the SonicWall Security
Appliance:
l Enable Client Certificate Check is checked, but no client certificate is installed on the browser.
l Enable Client Certificate Check is checked and a client certificate is installed on the browser, but
either no Client Certificate Issuer is selected or the wrong Client Certificate Issuer is selected.
l Enable OSCP Checking is enabled, but either the OSCP server is not available or a network
problem is preventing the SonicWall Security Appliance from accessing the OSCP server.
To restore access to a user who is locked out, the following CLI commands are provided:
l web-management client-cert disable
l web-management ocsp disable
Selecting a Language
If your firmware contains other languages besides English, one can be selected from Language Selection.
NOTE: Changing the language of the SonicOS Management Interface requires that the SonicWall
Security Appliance be rebooted.
SonicOS 7 Device Settings Administration Guide 33
System AdministrationTo select a language for the Management Interface:
1. Navigate to Device | Settings > Administration.
2. Click Language.
3. In the LANGUAGE section, select the appropriate language from the Language Selection drop-
down box.
4. Click Accept.
SonicOS 7 Device Settings Administration Guide 34
System Administration4
Configuring Time Settings
The Device | Settings > Time page provides a way to define the time and date settings used to time stamp
log events, to automatically update SonicWall Security Services, and for other internal purposes.
By default, the SonicWall security appliance uses an internal list of public NTP servers to update the time
automatically. Network Time Protocol (NTP) is a protocol used to synchronize computer clock times in a
network of computers. NTP uses Coordinated Universal Time (UTC) to synchronize computer clock times to
a millisecond, and sometimes to a fraction of a millisecond.
SonicOS 7 Device Settings Administration Guide 35
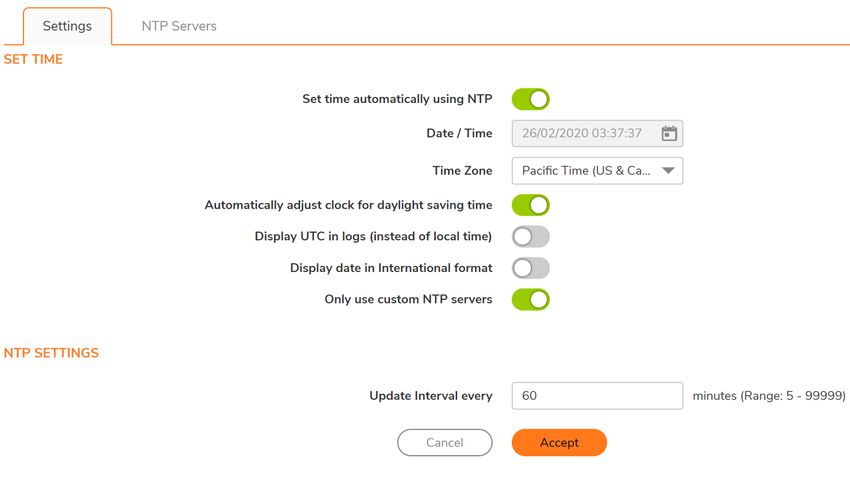
Configuring Time SettingsSetting System Time
You set the system time in the Settings screen of the Device | Settings > Time page.
To set the system time:
1. Navigate to Device | Settings > Time.
2. On the Settings screen, select the time zone you are in from the Time Zone drop-down list.
3. To set the time automatically, select Set time automatically using NTP to use NTP (Network Time
Protocol) servers from an internal list. This option is selected by default.
4. To set the time manually:
a. Clear Set time automatically using NTP. The Date/Time option becomes available.
b. Click the calendar icon in the Date/Time field to display the calendar.
c. Select the date, hour, minute, and seconds in the calendar.
d. Click away from the calendar to accept the settings.
SonicOS 7 Device Settings Administration Guide 36
Configuring Time Settings5. To enable automatic adjustments for daylight savings time, select Automatically adjust clock for
daylight saving time. For those areas that observe daylight savings time, this option is selected by
default.
6. To use universal time (UTC) rather than local time for log events, select Display UTC in logs
(instead of local time). This option is not selected by default.
7. To display the date in International format, with the day preceding the month, select Display date in
International format.
8. To use the manually entered list of NTP servers to set the firewall clock rather than the internal list of
NTP servers, select Only use custom NTP servers.
IMPORTANT: Select this option only if you have configured one or more NTP servers. For more
information about NTP servers, see Configuring NTP Settings.
9. Click Accept.
Configuring NTP Settings
Network Time Protocol (NTP) is a protocol used to synchronize computer clock times in a network of
computers. NTP uses Coordinated Universal Time (UTC) to synchronize computer clock times to a
millisecond, and sometimes, to a fraction of a millisecond.
TIP: The SonicWall security appliance uses an internal list of NTP servers, so manually entering a NTP
server is optional.
Using a Custom NTP Server for Updating the
Firewall Clock
To use a local server to set the firewall clock:
1. Navigate to Device | Settings > Time.
2. Add one or more NTP servers as described in Adding an NTP Server.
3. Select Only use custom NTP servers (see Setting System Time). This option is not selected by
default.
4. To configure the frequency for the NTP server to update the firewall, enter the interval in Update
Interval every (minutes). The default value is 60 minutes. The range is 5 to 99,999 minutes.
5. Click Accept.
SonicOS 7 Device Settings Administration Guide 37
Configuring Time SettingsAdding an NTP Server
To add an NTP server to the firewall configuration:
1. Click NTP Servers tab on Device | Settings > Time page.
2. Click the +Add button.
The Add NTP Server dialog is displayed.
3. Type the IP address of the remote NTP server in the NTP Server field.
4. Select the authentication type from the NTP Auth Type drop-down list:
a. No Auth – Authentication is not required and the following three options are dimmed. Go to
Step 8.
b. MD5 – Authentication is required and the following three options are active.
5. Enter the Trust Key number in the Trust Key No field. The minimum is 1 and the maximum is
65535.
6. Enter the Key number in the Key Number field. The minimum is 1 and the maximum is 65535.
7. Enter the password in the Password field.
8. Click Add. A Success message is displayed.
9. Click Close to return to the NTP Servers screen. The NTP Server table shows the added server.
SonicOS 7 Device Settings Administration Guide 38
Configuring Time SettingsYou can also read