RTA-OS PPCe200/GHS V5.0.32 - Port Guide Status: Released - ETAS
←
→
Page content transcription
If your browser does not render page correctly, please read the page content below

RTA-OS PPCe200/GHS V5.0.32
Port Guide
Status: Released
Copyright

Copyright

The data in this document may not be altered or amended without special notification
from ETAS GmbH. ETAS GmbH undertakes no further obligation in relation to this doc-
ument. The software described in it can only be used if the customer is in possession
of a general license agreement or single license. Using and copying is only allowed in
concurrence with the specifications stipulated in the contract. Under no circumstances
may any part of this document be copied, reproduced, transmitted, stored in a retrieval
system or translated into another language without the express written permission of
ETAS GmbH.

©Copyright 2008-2021 ETAS GmbH, Stuttgart.

The names and designations used in this document are trademarks or brands belonging
to the respective owners.

Document: 10640-PG-5.0.32 EN-02-2021

RTA-OS PPCe200/GHS Port Guide V5.0.32                                                2
Safety Notice

Safety Notice

This ETAS product fulfills standard quality management requirements. If requirements
of specific safety standards (e.g. IEC 61508, ISO 26262) need to be fulfilled, these
requirements must be explicitly defined and ordered by the customer. Before use of
the product, customer must verify the compliance with specific safety standards.

RTA-OS PPCe200/GHS Port Guide V5.0.32                                             3
Contents

 Contents

1   Introduction                                                                                                                                  7
    1.1     About You . . . . . . . . . . . . . . . . . . . . . . . . . . . . . . . . . . . . . . . . . .                                         7
    1.2     Document Conventions . . . . . . . . . . . . . . . . . . . . . . . . . . . . . . . .                                                  8
    1.3     References . . . . . . . . . . . . . . . . . . . . . . . . . . . . . . . . . . . . . . . . .                                          8

2   Installing the RTA-OS Port Plug-in                                                                                                            9
    2.1       Preparing to Install . . . . . . . . . . . . . . . . . . . . . .          .   .   .   .   .   .   .   .   .   .   .   .   .   .     9
              2.1.1      Hardware Requirements . . . . . . . . . .                      .   .   .   .   .   .   .   .   .   .   .   .   .   .     9
              2.1.2      Software Requirements . . . . . . . . . . .                    .   .   .   .   .   .   .   .   .   .   .   .   .   .     9
    2.2       Installation . . . . . . . . . . . . . . . . . . . . . . . . . . .        .   .   .   .   .   .   .   .   .   .   .   .   .   .    10
              2.2.1      Installation Directory . . . . . . . . . . . . .               .   .   .   .   .   .   .   .   .   .   .   .   .   .    10
    2.3       Licensing . . . . . . . . . . . . . . . . . . . . . . . . . . . . .       .   .   .   .   .   .   .   .   .   .   .   .   .   .    11
              2.3.1      Installing the ETAS License Manager . .                        .   .   .   .   .   .   .   .   .   .   .   .   .   .    11
              2.3.2      Licenses . . . . . . . . . . . . . . . . . . . . . .           .   .   .   .   .   .   .   .   .   .   .   .   .   .    12
              2.3.3      Installing a Concurrent License Server                         .   .   .   .   .   .   .   .   .   .   .   .   .   .    13
              2.3.4      Using the ETAS License Manager . . . .                         .   .   .   .   .   .   .   .   .   .   .   .   .   .    14
              2.3.5      Troubleshooting Licenses . . . . . . . . . .                   .   .   .   .   .   .   .   .   .   .   .   .   .   .    16

3   Verifying your Installation                                                                        19
    3.1      Checking the Port . . . . . . . . . . . . . . . . . . . . . . . . . . . . . . . . . . . . 19
    3.2      Running the Sample Applications . . . . . . . . . . . . . . . . . . . . . . . . . 19

4   Port Characteristics                                                                                                                         21
    4.1     Parameters of Implementation . . . . . . . . . .                .   .   .   .   .   .   .   .   .   .   .   .   .   .   .   .   .    21
    4.2     Configuration Parameters . . . . . . . . . . . . . .            .   .   .   .   .   .   .   .   .   .   .   .   .   .   .   .   .    21
            4.2.1     Stack used for C-startup . . . . . . .                .   .   .   .   .   .   .   .   .   .   .   .   .   .   .   .   .    21
            4.2.2     Stack used when idle . . . . . . . . . .              .   .   .   .   .   .   .   .   .   .   .   .   .   .   .   .   .    22
            4.2.3     Stack overheads for ISR activation                    .   .   .   .   .   .   .   .   .   .   .   .   .   .   .   .   .    22
            4.2.4     Stack overheads for ECC tasks . . .                   .   .   .   .   .   .   .   .   .   .   .   .   .   .   .   .   .    22
            4.2.5     Stack overheads for ISR . . . . . . . .               .   .   .   .   .   .   .   .   .   .   .   .   .   .   .   .   .    22
            4.2.6     ORTI/Lauterbach . . . . . . . . . . . . .             .   .   .   .   .   .   .   .   .   .   .   .   .   .   .   .   .    23
            4.2.7     ORTI/winIDEA . . . . . . . . . . . . . . .            .   .   .   .   .   .   .   .   .   .   .   .   .   .   .   .   .    23
            4.2.8     ORTI Stack Fill . . . . . . . . . . . . . . .         .   .   .   .   .   .   .   .   .   .   .   .   .   .   .   .   .    23
            4.2.9     Support winIDEA Analyzer . . . . . .                  .   .   .   .   .   .   .   .   .   .   .   .   .   .   .   .   .    23
            4.2.10    Link Type . . . . . . . . . . . . . . . . . .         .   .   .   .   .   .   .   .   .   .   .   .   .   .   .   .   .    23
            4.2.11    SDA RAM Threshold . . . . . . . . . . .               .   .   .   .   .   .   .   .   .   .   .   .   .   .   .   .   .    24
            4.2.12    SDA ROM Threshold . . . . . . . . . . .               .   .   .   .   .   .   .   .   .   .   .   .   .   .   .   .   .    24
            4.2.13    MultiCore Lock . . . . . . . . . . . . . .            .   .   .   .   .   .   .   .   .   .   .   .   .   .   .   .   .    24
            4.2.14    OS Locks disable Cat1 . . . . . . . . .               .   .   .   .   .   .   .   .   .   .   .   .   .   .   .   .   .    25
            4.2.15    MultiCore interrupts . . . . . . . . . . .            .   .   .   .   .   .   .   .   .   .   .   .   .   .   .   .   .    25
            4.2.16    Preserve SPE . . . . . . . . . . . . . . . .          .   .   .   .   .   .   .   .   .   .   .   .   .   .   .   .   .    25
            4.2.17    Enable stack repositioning . . . . . .                .   .   .   .   .   .   .   .   .   .   .   .   .   .   .   .   .    26
            4.2.18    Enable untrusted stack check . . . .                  .   .   .   .   .   .   .   .   .   .   .   .   .   .   .   .   .    26
            4.2.19    Use software vectoring . . . . . . . .                .   .   .   .   .   .   .   .   .   .   .   .   .   .   .   .   .    26
            4.2.20    Block default interrupt . . . . . . . . .             .   .   .   .   .   .   .   .   .   .   .   .   .   .   .   .   .    26
            4.2.21    Generate Cat1 EOIR . . . . . . . . . . .              .   .   .   .   .   .   .   .   .   .   .   .   .   .   .   .   .    27
            4.2.22    Cached CoreID register . . . . . . . .                .   .   .   .   .   .   .   .   .   .   .   .   .   .   .   .   .    27

RTA-OS PPCe200/GHS Port Guide V5.0.32                                                                                                             4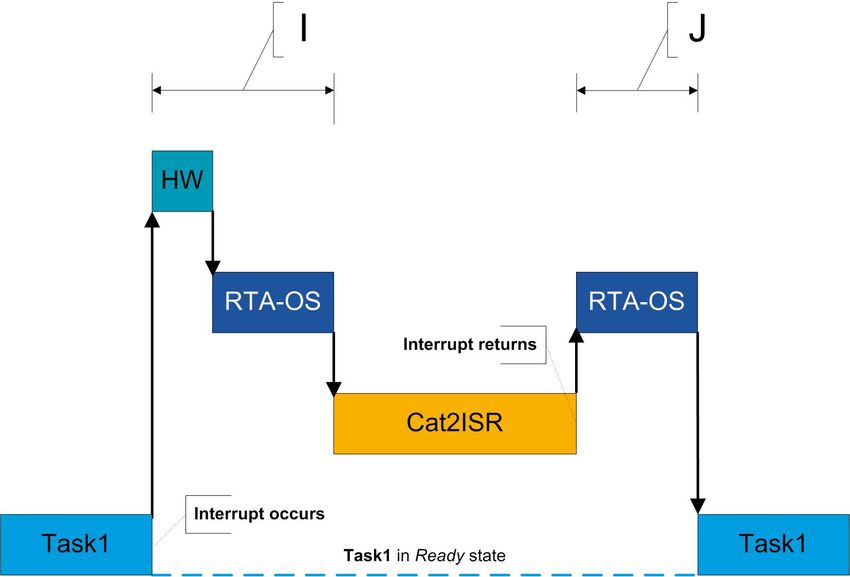
Contents

                4.2.23   Always call GetAbortStack              .   .   .   .   .   .   .   .   .   .   .   .   .   .   .   .   .   .   .   .   .   .   .    27
                4.2.24   Use Floating Point . . . . . .         .   .   .   .   .   .   .   .   .   .   .   .   .   .   .   .   .   .   .   .   .   .   .    28
                4.2.25   Use Short Enum . . . . . . .           .   .   .   .   .   .   .   .   .   .   .   .   .   .   .   .   .   .   .   .   .   .   .    28
                4.2.26   Optimizer Setting . . . . . .          .   .   .   .   .   .   .   .   .   .   .   .   .   .   .   .   .   .   .   .   .   .   .    28
                4.2.27   Customer Option Set 1 . . .            .   .   .   .   .   .   .   .   .   .   .   .   .   .   .   .   .   .   .   .   .   .   .    29
                4.2.28   Customer Option Set 2 . . .            .   .   .   .   .   .   .   .   .   .   .   .   .   .   .   .   .   .   .   .   .   .   .    29
                4.2.29   Customer Option Set 3 . . .            .   .   .   .   .   .   .   .   .   .   .   .   .   .   .   .   .   .   .   .   .   .   .    29
                4.2.30   Customer Option Set 4 . . .            .   .   .   .   .   .   .   .   .   .   .   .   .   .   .   .   .   .   .   .   .   .   .    30
    4.3         Generated Files . . . . . . . . . . . . . . .   .   .   .   .   .   .   .   .   .   .   .   .   .   .   .   .   .   .   .   .   .   .   .    30

5   Port-Specific API                                                                                                                                        32
    5.1     API Calls . . . . . . . . . . . . . . . . . . . . . . . . . .               .   .   .   .   .   .   .   .   .   .   .   .   .   .   .   .   .    32
            5.1.1     Os_CacheCoreID . . . . . . . . . . . . .                          .   .   .   .   .   .   .   .   .   .   .   .   .   .   .   .   .    32
            5.1.2     Os_InitializeVectorTable . . . . . . . .                          .   .   .   .   .   .   .   .   .   .   .   .   .   .   .   .   .    33
    5.2     Callbacks . . . . . . . . . . . . . . . . . . . . . . . . .                 .   .   .   .   .   .   .   .   .   .   .   .   .   .   .   .   .    33
            5.2.1     Os_Cbk_GetAbortStack . . . . . . . .                              .   .   .   .   .   .   .   .   .   .   .   .   .   .   .   .   .    33
            5.2.2     Os_Cbk_GetSetProtection . . . . . . .                             .   .   .   .   .   .   .   .   .   .   .   .   .   .   .   .   .    34
            5.2.3     Os_Cbk_SetMemoryAccess . . . . . .                                .   .   .   .   .   .   .   .   .   .   .   .   .   .   .   .   .    35
            5.2.4     Os_Cbk_StartCore . . . . . . . . . . . .                          .   .   .   .   .   .   .   .   .   .   .   .   .   .   .   .   .    40
    5.3     Macros . . . . . . . . . . . . . . . . . . . . . . . . . . .                .   .   .   .   .   .   .   .   .   .   .   .   .   .   .   .   .    41
            5.3.1     CAT1_ISR . . . . . . . . . . . . . . . . . .                      .   .   .   .   .   .   .   .   .   .   .   .   .   .   .   .   .    41
            5.3.2     Os_DisableAllConfiguredInterrupts                                 .   .   .   .   .   .   .   .   .   .   .   .   .   .   .   .   .    41
            5.3.3     Os_Disable_x . . . . . . . . . . . . . . .                        .   .   .   .   .   .   .   .   .   .   .   .   .   .   .   .   .    41
            5.3.4     Os_EnableAllConfiguredInterrupts .                                .   .   .   .   .   .   .   .   .   .   .   .   .   .   .   .   .    41
            5.3.5     Os_Enable_x . . . . . . . . . . . . . . . .                       .   .   .   .   .   .   .   .   .   .   .   .   .   .   .   .   .    42
            5.3.6     Os_IntChannel_x . . . . . . . . . . . . .                         .   .   .   .   .   .   .   .   .   .   .   .   .   .   .   .   .    42
    5.4     Type Definitions . . . . . . . . . . . . . . . . . . . . .                  .   .   .   .   .   .   .   .   .   .   .   .   .   .   .   .   .    42
            5.4.1     Os_StackSizeType . . . . . . . . . . . .                          .   .   .   .   .   .   .   .   .   .   .   .   .   .   .   .   .    42
            5.4.2     Os_StackValueType . . . . . . . . . . .                           .   .   .   .   .   .   .   .   .   .   .   .   .   .   .   .   .    42

6   Toolchain                                                                                                                                                43
    6.1      Compiler Versions . . . . . . . . . . . . . . . . . . . .                      .   .   .   .   .   .   .   .   .   .   .   .   .   .   .   .    43
             6.1.1    Green Hills Software v2014.1.9-3fp .                                  .   .   .   .   .   .   .   .   .   .   .   .   .   .   .   .    43
             6.1.2    Green Hills Software v2014.1.9 . . . .                                .   .   .   .   .   .   .   .   .   .   .   .   .   .   .   .    43
             6.1.3    Green Hills Software v2015.1.6 . . . .                                .   .   .   .   .   .   .   .   .   .   .   .   .   .   .   .    43
             6.1.4    Green Hills Software v2016.5.2 . . . .                                .   .   .   .   .   .   .   .   .   .   .   .   .   .   .   .    44
             6.1.5    Green Hills Software v2017.1.4 . . . .                                .   .   .   .   .   .   .   .   .   .   .   .   .   .   .   .    44
             6.1.6    Green Hills Software v2020.1.4 . . . .                                .   .   .   .   .   .   .   .   .   .   .   .   .   .   .   .    44
    6.2      Options used to generate this guide . . . . . . .                              .   .   .   .   .   .   .   .   .   .   .   .   .   .   .   .    44
             6.2.1    Compiler . . . . . . . . . . . . . . . . . . . .                      .   .   .   .   .   .   .   .   .   .   .   .   .   .   .   .    44
             6.2.2    Assembler . . . . . . . . . . . . . . . . . .                         .   .   .   .   .   .   .   .   .   .   .   .   .   .   .   .    45
             6.2.3    Librarian . . . . . . . . . . . . . . . . . . . .                     .   .   .   .   .   .   .   .   .   .   .   .   .   .   .   .    46
             6.2.4    Linker . . . . . . . . . . . . . . . . . . . . . .                    .   .   .   .   .   .   .   .   .   .   .   .   .   .   .   .    46
             6.2.5    Debugger . . . . . . . . . . . . . . . . . . .                        .   .   .   .   .   .   .   .   .   .   .   .   .   .   .   .    47

RTA-OS PPCe200/GHS Port Guide V5.0.32                                                                                                                         5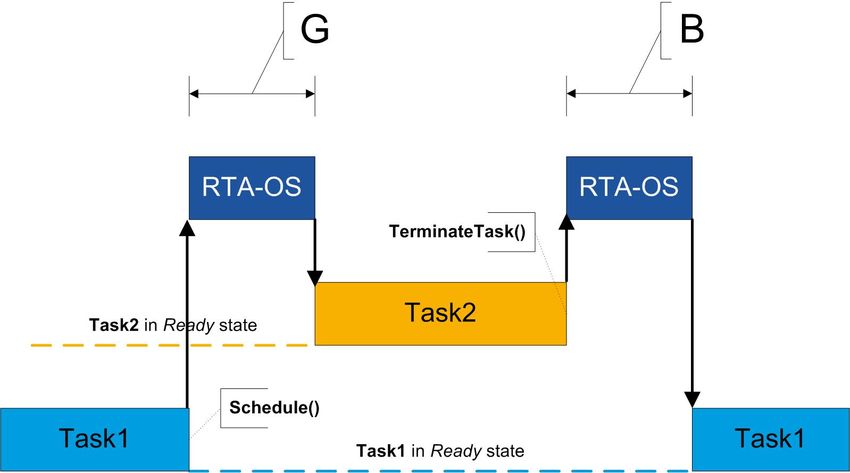
Contents
7 Hardware 49
7.1 Supported Devices . . . . . . . . . . . . . . . . . . . . . . . . . . . . . . . . . . . . 49
7.2 Register Usage . . . . . . . . . . . . . . . . . . . . . . . . . . . . . . . . . . . . . . 52
7.2.1 Initialization . . . . . . . . . . . . . . . . . . . . . . . . . . . . . . . . . 52
7.2.2 Modification . . . . . . . . . . . . . . . . . . . . . . . . . . . . . . . . . 53
7.3 Required OS resources . . . . . . . . . . . . . . . . . . . . . . . . . . . . . . . . . 53
7.3.1 Core ID Caching . . . . . . . . . . . . . . . . . . . . . . . . . . . . . . 54
7.4 Interrupts . . . . . . . . . . . . . . . . . . . . . . . . . . . . . . . . . . . . . . . . . . 54
7.4.1 Interrupt Priority Levels . . . . . . . . . . . . . . . . . . . . . . . . . 54
7.4.2 Allocation of ISRs to Interrupt Vectors . . . . . . . . . . . . . . . 55
7.4.3 Vector Table . . . . . . . . . . . . . . . . . . . . . . . . . . . . . . . . . 56
7.4.4 Using Raw Exception Handlers . . . . . . . . . . . . . . . . . . . . 57
7.4.5 Writing Category 1 Interrupt Handlers . . . . . . . . . . . . . . . 57
7.4.6 Writing Category 2 Interrupt Handlers . . . . . . . . . . . . . . . 57
7.4.7 Default Interrupt . . . . . . . . . . . . . . . . . . . . . . . . . . . . . . 57
7.5 Memory Model . . . . . . . . . . . . . . . . . . . . . . . . . . . . . . . . . . . . . . . 58
7.6 Processor Modes . . . . . . . . . . . . . . . . . . . . . . . . . . . . . . . . . . . . . 58
7.7 Stack Handling . . . . . . . . . . . . . . . . . . . . . . . . . . . . . . . . . . . . . . 58
8 Performance 59
8.1 Measurement Environment . . . . . . . . . . . . . . . . . . . . . . . . . . . . . . 59
8.2 RAM and ROM Usage for OS Objects . . . . . . . . . . . . . . . . . . . . . . . 59
8.2.1 Single Core . . . . . . . . . . . . . . . . . . . . . . . . . . . . . . . . . . 60
8.2.2 Multi Core . . . . . . . . . . . . . . . . . . . . . . . . . . . . . . . . . . . 60
8.3 Stack Usage . . . . . . . . . . . . . . . . . . . . . . . . . . . . . . . . . . . . . . . . 60
8.4 Library Module Sizes . . . . . . . . . . . . . . . . . . . . . . . . . . . . . . . . . . 61
8.4.1 Single Core . . . . . . . . . . . . . . . . . . . . . . . . . . . . . . . . . . 61
8.4.2 Multi Core . . . . . . . . . . . . . . . . . . . . . . . . . . . . . . . . . . . 63
8.5 Execution Time . . . . . . . . . . . . . . . . . . . . . . . . . . . . . . . . . . . . . . 66
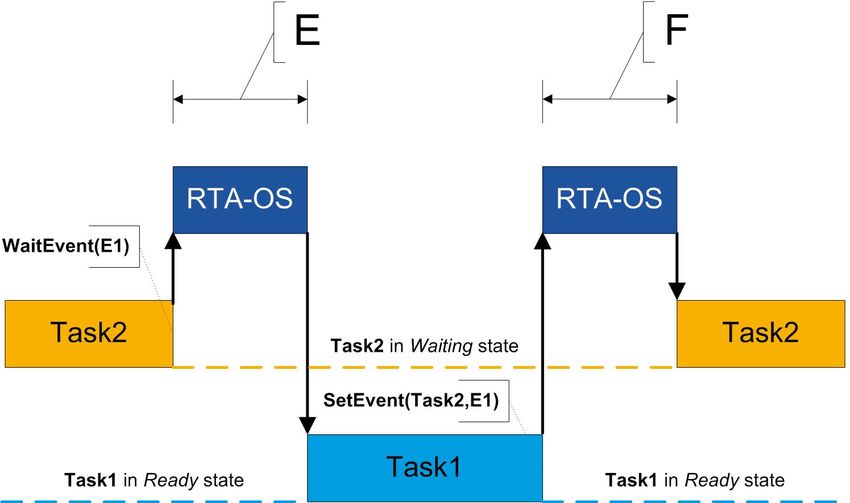
8.5.1 Context Switching Time . . . . . . . . . . . . . . . . . . . . . . . . . 67
9 Finding Out More 69
10 Contacting ETAS 70
10.1 Technical Support . . . . . . . . . . . . . . . . . . . . . . . . . . . . . . . . . . . . 70
10.2 General Enquiries . . . . . . . . . . . . . . . . . . . . . . . . . . . . . . . . . . . . 70
10.2.1 ETAS Global Headquarters . . . . . . . . . . . . . . . . . . . . . . . 70
10.2.2 ETAS Local Sales & Support Offices . . . . . . . . . . . . . . . . . 70
RTA-OS PPCe200/GHS Port Guide V5.0.32 6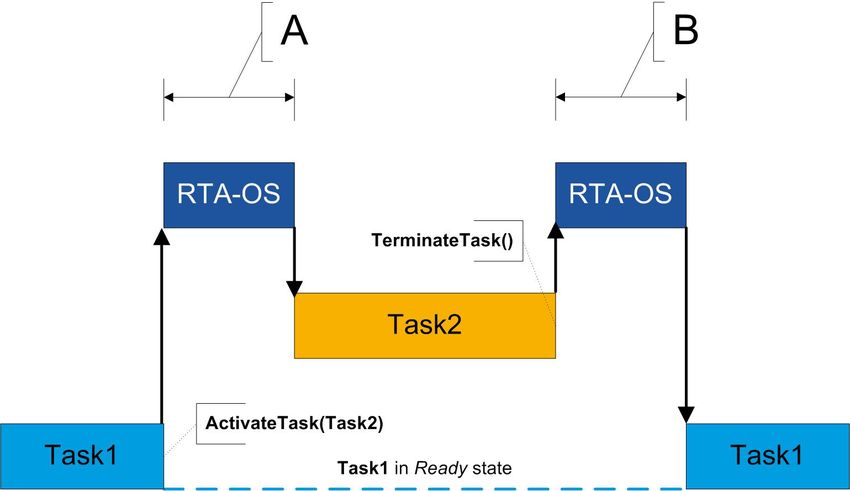
Introduction

1     Introduction

      RTA-OS is a small and fast real-time operating system that conforms to both the AU-
      TOSAR OS (R3.0.1 -> R3.0.7, R3.1.1 -> R3.1.5, R3.2.1 -> R3.2.2, R4.0.1 -> R4.5.0
      (R19-11)) and OSEK/VDX 2.2.3 standards (OSEK is now standardized in ISO 17356). The
      operating system is configured and built on a PC, but runs on your target hardware.

      This document describes the RTA-OS PPCe200/GHS port plug-in that customizes the
      RTA-OS development tools for the Freescale/ST MPC5xxx/SPC5xx with the GreenHills
      compiler. It supplements the more general information you can find in the User Guide
      and the Reference Guide.

      The document has two parts. Chapters 2 to 3 help you understand the PPCe200/GHS
      port and cover:

      • how to install the PPCe200/GHS port plug-in;
      • how to configure PPCe200/GHS-specific attributes;
      • how to build an example application to check that the PPCe200/GHS port plug-in
          works.

      Chapters 4 to 8 provide reference information including:

      • the number of OS objects supported;
      • required and recommended toolchain parameters;
      • how RTA-OS interacts with the MPC5xxx/SPC5xx, including required register set-
          tings, memory models and interrupt handling;

      • memory consumption for each OS object;
      • memory consumption of each API call;
      • execution times for each API call.

      For the best experience with RTA-OS it is essential that you read and understand this
      document.

1.1   About You
      You are a trained embedded systems developer who wants to build real-time appli-
      cations using a preemptive operating system. You should have knowledge of the C
      programming language, including the compilation, assembling and linking of C code
      for embedded applications with your chosen toolchain. Elementary knowledge about
      your target microcontroller, such as the start address, memory layout, location of pe-
      ripherals and so on, is essential.

      You should also be familiar with common use of the Microsoft Windows operating sys-
      tem, including installing software, selecting menu items, clicking buttons, navigating
      files and folders.

      RTA-OS PPCe200/GHS Port Guide V5.0.32                                               7
Introduction

1.2   Document Conventions
      The following conventions are used in this guide:

       Choose File > Open.            Menu options appear in bold, blue characters.

       Click OK.                      Button labels appear in bold characters

       Press .                 Key commands are enclosed in angle brackets.

       The “Open file” dialog box     GUI element names, for example window titles, fields,
       appears                        etc. are enclosed in double quotes.

       Activate(Task1)                Program code, header file names, C type names,
                                      C functions and API call names all appear in a
                                      monospaced typeface.

       See Section 1.2.               Internal document hyperlinks are shown in blue letters.

                                      Functionality in RTA-OS that might not be portable to
                                      other implementations of AUTOSAR OS is marked with
                                      the RTA-OS icon.

                                      Important instructions that you must follow carefully to
                                      ensure RTA-OS works as expected are marked with a
                                      caution sign.

1.3   References
      OSEK is a European automotive industry standards effort to produce open systems
      interfaces for vehicle electronics. OSEK is now standardized in ISO 17356. For details
      of the OSEK standards, please refer to:

                           https://www.iso.org/standard/40079.html

      AUTOSAR (AUTomotive Open System ARchitecture) is an open and standardized auto-
      motive software architecture, jointly developed by automobile manufacturers, suppli-
      ers and tool developers. For details of the AUTOSAR standards, please refer to:

                                      http://www.autosar.org

      RTA-OS PPCe200/GHS Port Guide V5.0.32                                                     8
Installing the RTA-OS Port Plug-in

2       Installing the RTA-OS Port Plug-in

2.1     Preparing to Install
        RTA-OS port plug-ins are supplied as a downloadable electronic installation image which
        you obtain from the ETAS Web Portal. You will have been provided with access to the
        download when you bought the port. You may optionally have requested an installation
        CD which will have been shipped to you. In either case, the electronic image and the
        installation CD contain identical content.
        Integration Guidance 2.1:You must have installed the RTA-OS tools before installing
        the PPCe200/GHS port plug-in. If you have not yet done this then please follow the
        instructions in the Getting Started Guide.

2.1.1   Hardware Requirements

        You should make sure that you are using at least the following hardware before in-
        stalling and using RTA-OS on a host PC:

        •   1GHz Pentium Windows-capable PC.
        •   2G RAM.
        •   20G hard disk space.
        •   CD-ROM or DVD drive (Optional)
        •   Ethernet card.

2.1.2   Software Requirements

        RTA-OS requires that your host PC has one of the following versions of Microsoft Win-
        dows installed:

        • Windows 8
        • Windows 10

        Integration Guidance 2.2:The tools provided with RTA-OS require Microsoft’s .NET
        Framework v2.0 (included as part of .NET Framework v3.5) and v4.5.2 to be installed.
        You should ensure that these have been installed before installing RTA-OS. The .NET
        framework is not supplied with RTA-OS but is freely available from https://www.
        microsoft.com/net/download. To install .NET 3.5 on Windows 10 see https://docs.
        microsoft.com/en-us/dotnet/framework/install/dotnet-35-windows-10.

        The migration of the code from v2.0 to v4.x will occur over a period of time for perfor-
        mance and maintenance reasons.

        RTA-OS PPCe200/GHS Port Guide V5.0.32                                                 9
Installing the RTA-OS Port Plug-in

2.2     Installation
        Target port plug-ins are installed in the same way as the tools:

          1. Either

               • Double click the executable image; or
               • Insert the RTA-OS PPCe200/GHS CD into your CD-ROM or DVD drive.
                  If the installation program does not run automatically then you will need to
                  start the installation manually. Navigate to the root directory of your CD/DVD
                  drive and double click autostart.exe to start the setup.

          2. Follow the on-screen instructions to install the PPCe200/GHS port plug-in.

        By default, ports are installed into C:\ETAS\RTA-OS\Targets. During the installation
        process, you will be given the option to change the folder to which RTA-OS ports are
        installed. You will normally want to ensure that you install the port plug-in in the same
        location that you have installed the RTA-OS tools. You can install different versions of
        the tools/targets into different directories and they will not interfere with each other.

        Integration Guidance 2.3:Port plug-ins can be installed into any location, but using
        a non-default directory requires the use of the --target_include argument to both
        rtaosgen and rtaoscfg. For example:
                rtaosgen --target_include:

2.2.1   Installation Directory

        The installation will create a sub-directory under Targets with the                  name
        PPCe200GHS_5.0.32. This contains everything to do with the port plug-in.

        Each version of the port installs in its own directory - the trailing _5.0.32 is the port’s
        version identifier. You can have multiple different versions of the same port installed at
        the same time and select a specific version in a project’s configuration.

        The port directory contains:

        PPCe200GHS.dll - the port plug-in that is used by rtaosgen and rtaoscfg.

        RTA-OS PPCe200GHS Port Guide.pdf - the documentation for the port (the docu-
            ment you are reading now).

        RTA-OS PPCe200GHS Release Note.pdf - the release note for the port. This doc-
            ument provides information about the port plug-in release, including a list of
            changes from previous releases and a list of known limitations.

        There may be other port-specific documentation supplied which you can also find in
        the root directory of the port installation. All user documentation is distributed in PDF
        format which can be read using Adobe Acrobat Reader. Adobe Acrobat Reader is not
        supplied with RTA-OS but is freely available from http://www.adobe.com.

        RTA-OS PPCe200/GHS Port Guide V5.0.32                                                   10
Installing the RTA-OS Port Plug-in
Figure 2.1: The ETAS License manager
2.3 Licensing
RTA-OS is protected by FLEXnet licensing technology. You will need a valid license key
in order to use RTA-OS.
Licenses for the product are managed using the ETAS License Manager which keeps
track of which licenses are installed and where to find them. The information about
which features are required for RTA-OS and any port plug-ins is stored as license signa-
ture files that are stored in the folder \bin\Licenses.
The ETAS License Manager can also tell you key information about your licenses includ-
ing:
• Which ETAS products are installed
• Which license features are required to use each product
• Which licenses are installed
• When licenses expire
• Whether you are using a local or a server-based license
Figure 2.1 shows the ETAS License Manager in operation.
2.3.1 Installing the ETAS License Manager
Integration Guidance 2.4:The ETAS License Manager must be installed for RTA-OS to
work. It is highly recommended that you install the ETAS License Manager during your
installation of RTA-OS.
The installer for the ETAS License Manager contains two components:
RTA-OS PPCe200/GHS Port Guide V5.0.32 11Installing the RTA-OS Port Plug-in
1. the ETAS License Manager itself;
2. a set of re-distributable FLEXnet utilities. The utilities include the software and
instructions required to setup and run a FLEXnet license server manager if con-
current licenses are required (see Sections 2.3.2 and 2.3.3 for further details)
During the installation of RTA-OS you will be asked if you want to install the ETAS
License Manager. If not, you can install it manually at a later time by running
\LicenseManager\LicensingStandaloneInstallation.exe.
Once the installation is complete, the ETAS License Manager can be found in
C:\Program Files\Common Files\ETAS\Licensing.
After it is installed, a link to the ETAS License Manager can be found in the Windows
Start menu under ProgramsÔ ETAS Ô License Management Ô ETAS License
Manager.
2.3.2 Licenses
When you install RTA-OS for the first time the ETAS License Manager will allow the
software to be used in grace mode for 14 days. Once the grace mode period has
expired, a license key must be installed. If a license key is not available, please contact
your local ETAS sales representative. Contact details can be found in Chapter 10.
You should identify which type of license you need and then provide ETAS with the
appropriate information as follows:
Machine-named licenses allows RTA-OS to be used by any user logged onto the PC
on which RTA-OS and the machine-named license is installed.
A machine-named license can be issued by ETAS when you provide the host ID
(Ethernet MAC address) of the host PC
User-named licenses allow the named user (or users) to use RTA-OS on any PC in the
network domain.
A user-named license can be issued by ETAS when you provide the Windows user-
name for your network domain.
Concurrent licenses allow any user on any PC up to a specified number of users to
use RTA-OS. Concurrent licenses are sometimes called floating licenses because
the license can float between users.
A concurrent license can be issued by ETAS when you provide the following infor-
mation:
1. The name of the server
2. The Host ID (MAC address) of the server.
3. The TCP/IP port over which your FLEXnet license server will serve licenses. A
default installation of the FLEXnet license server uses port 27000.
RTA-OS PPCe200/GHS Port Guide V5.0.32 12Installing the RTA-OS Port Plug-in
Figure 2.2: Obtaining License Information
You can use the ETAS License Manager to get the details that you must provide to ETAS
when requesting a machine-named or user-named license and (optionally) store this
information in a text file.
Open the ETAS License Manager and choose Tools Ô Obtain License Info from the
menu. For machine-named licenses you can then select the network adaptor which
provides the Host ID (MAC address) that you want to use as shown in Figure 2.2. For
a user-based license, the ETAS License Manager automatically identifies the Windows
username for the current user.
Selecting “Get License Info” tells you the Host ID and User information and lets you
save this as a text file to a location of your choice.
2.3.3 Installing a Concurrent License Server
Concurrent licenses are allocated to client PCs by a FLEXnet license server manager
working together with a vendor daemon. The vendor daemon for ETAS is called
ETAS.exe. A copy of the vendor daemon is placed on disk when you install the ETAS
License Manager and can be found in:
C:\Program Files\Common Files\ETAS\Licensing\Utility
To work with an ETAS concurrent license, a license server must be configured which is
accessible from the PCs wishing to use a license. The server must be configured with
the following software:
• FLEXnet license server manager;
• ETAS vendor daemon (ETAS.exe);
It is also necessary to install your concurrent license on the license server.
RTA-OS PPCe200/GHS Port Guide V5.0.32 13Installing the RTA-OS Port Plug-in
Figure 2.3: Unlicensed RTA-OS Installation
In most organizations there will be a single FLEXnet license server manager that is
administered by your IT department. You will need to ask your IT department to install
the ETAS vendor daemon and the associated concurrent license.
If you do not already have a FLEXnet license server then you will need to arrange for
one to be installed. A copy of the FLEXnet license server, the ETAS vendor daemon and
the instructions for installing and using the server (LicensingEndUserGuide.pdf) are
placed on disk when you install the ETAS License manager and can be found in:
C:\Program Files\Common Files\ETAS\Licensing\Utility
2.3.4 Using the ETAS License Manager
If you try to run the RTA-OS GUI rtaoscfg without a valid license, you will be given the
opportunity to start the ETAS License Manager and select a license. (The command-line
tool rtaosgen will just report the license is not valid.)
When the ETAS License Manager is launched, it will display the RTA-OS license state as
NOT AVAILABLE. This is shown in Figure 2.3.
Note that if the ETAS License Manager window is slow to start, rtaoscfg may ask a
second time whether you want to launch it. You should ignore the request until the
ETAS License Manager has opened and you have completed the configuration of the
licenses. You should then say yes again, but you can then close the ETAS License
Manager and continue working.
RTA-OS PPCe200/GHS Port Guide V5.0.32 14Installing the RTA-OS Port Plug-in
License Key Installation
License keys are supplied in an ASCII text file, which will be sent to you on completion
of a valid license agreement.
If you have a machine-based or user-based license key then you can simply install the
license by opening the ETAS License Manager and selecting File Ô Add License File
menu.
If you have a concurrent license key then you will need to create a license stub file that
tells the client PC to look for a license on the FLEXnet server as follows:
1. create a copy of the concurrent license file
2. open the copy of the concurrent license file and delete every line except the one
starting with SERVER
3. add a new line containing USE_SERVER
4. add a blank line
5. save the file
The file you create should look something like this:
SERVER 
USE_SERVER
Once you have create the license stub file you can install the license by opening the
ETAS License Manager and selecting File Ô Add License File menu and choosing the
license stub file.
License Key Status
When a valid license has been installed, the ETAS License Manager will display the
license version, status, expiration date and source as shown in Figure 2.4.
Borrowing a concurrent license
If you use a concurrent license and need to use RTA-OS on a PC that will be disconnected
from the network (for example, you take a demonstration to a customer site), then the
concurrent license will not be valid once you are disconnected.
To address this problem, the ETAS License Manager allows you to temporarily borrow a
license from the license server.
To borrow a license:
1. Right click on the license feature you need to borrow.
2. Select “Borrow License”
3. From the calendar, choose the date that the borrowed license should expire.
4. Click “OK”
RTA-OS PPCe200/GHS Port Guide V5.0.32 15Installing the RTA-OS Port Plug-in
Figure 2.4: Licensed features for RTA-OS
The license will automatically expire when the borrow date elapses. A borrowed license
can also be returned before this date. To return a license:
1. Reconnect to the network;
2. Right-click on the license feature you have borrowed;
3. Select “Return License”.
2.3.5 Troubleshooting Licenses
RTA-OS tools will report an error if you try to use a feature for which a correct license
key cannot be found. If you think that you should have a license for a feature but the
RTA-OS tools appear not to work, then the following troubleshooting steps should be
followed before contacting ETAS:
Can the ETAS License Manager see the license?
The ETAS License Manager must be able to see a valid license key for each product
or product feature you are trying to use.
You can check what the ETAS License Manager can see by starting it from the
Help Ô License Manager. . . menu option in rtaoscfg or directly from the
Windows Start Menu - Start Ô ETAS Ô License Management Ô ETAS License
Manager.
The ETAS License Manager lists all license features and their status. Valid licenses
have status INSTALLED. Invalid licenses have status NOT AVAILABLE.
RTA-OS PPCe200/GHS Port Guide V5.0.32 16Installing the RTA-OS Port Plug-in
Figure 2.5: Licensed features that are due to expire
Is the license valid?
You may have been provided with a time-limited license (for example, for evalu-
ation purposes) and the license may have expired. You can check that the Expi-
ration Date for your licensed features to check that it has not elapsed using the
ETAS License Manager.
If a license is due to expire within the next 30 days, the ETAS License Manager will
use a warning triangle to indicate that you need to get a new license. Figure 2.5
shows that the license features LD_RTA-OS3.0_VRTA and LD_RTA-OS3.0_SRC are
due to expire.
If your license has elapsed then please contact your local ETAS sales representa-
tive to discuss your options.
Does the Ethernet MAC address match the one specified?
If you have a machine based license then it is locked to a specific MAC address.
You can find out the MAC address of your PC by using the ETAS License Manager
(Tools Ô Obtain License Info) or using the Microsoft program ipconfig /all at
a Windows Command Prompt.
You can check that the MAC address in your license file by opening your license file
in a text editor and checking that the HOSTID matches the MAC address identified
by the ETAS License Manager or the Physical Address reported by ipconfig /all.
If the HOSTID in the license file (or files) does not match your MAC address then
you do not have a valid license for your PC. You should contact your local ETAS
sales representative to discuss your options.
Is your Ethernet Controller enabled?
RTA-OS PPCe200/GHS Port Guide V5.0.32 17Installing the RTA-OS Port Plug-in
If you use a laptop and RTA-OS stops working when you disconnect from the net-
work then you should check your hardware settings to ensure that your Ether-
net controller is not turned off to save power when a network connection is not
present. You can do this using Windows Control Panel. Select System Ô Hard-
ware Ô Device Manager then select your Network Adapter. Right click to open
Properties and check that the Ethernet controller is not configured for power
saving in Advanced and/or Power Management settings.
Is the FlexNet License Server visible?
If your license is served by a FlexNet license server, then the ETAS License Man-
ager will report the license as NOT AVAILABLE if the license server cannot be ac-
cessed.
You should contact your IT department to check that the server is working cor-
rectly.
Still not fixed?
If you have not resolved your issues, after confirming these points above, please
contact ETAS technical support. The contact address is provided in Section 10.1.
You must provide the contents and location of your license file and your Ethernet
MAC address.
RTA-OS PPCe200/GHS Port Guide V5.0.32 18Verifying your Installation
3 Verifying your Installation
Now that you have installed both the RTA-OS tools and a port plug-in and have obtained
and installed a valid license key you can check that things are working.
3.1 Checking the Port
The first thing to check is that the RTA-OS tools can see the new port. You can do this
in two ways:
1. use the rtaosgen tool
You can run the command rtaosgen −−target:? to get a list of available targets,
the versions of each target and the variants supported, for example:
RTA-OS Code Generator
Version p.q.r.s, Copyright © ETAS nnnn
Available targets:
TriCoreHighTec_n.n.n [TC1797...]
VRTA_n.n.n [MinGW,VS2005,VS2008,VS2010]
2. use the rtaoscfg tool
The second way to check that the port plug-in can be seen is by starting rtaoscfg
and selecting Help Ô Information... drop down menu. This will show informa-
tion about your complete RTA-OS installation and license checks that have been
performed.
Integration Guidance 3.1:If the target port plug-ins have been installed to a non-
default location, then the --target_include argument must be used to specify the
target location.
If the tools can see the port then you can move on to the next stage – checking that you
can build an RTA-OS library and use this in a real program that will run on your target
hardware.
3.2 Running the Sample Applications
Each RTA-OS port is supplied with a set of sample applications that allow you to check
that things are running correctly. To generate the sample applications:
1. Create a new working directory in which to build the sample applications.
2. Open a Windows command prompt in the new directory.
3. Execute the command:
rtaosgen --target: --samples:[Applications]
e.g.
rtaosgen --target:[MPC5777Mv2]PPCe200HighTec_5.0.8
--samples:[Applications]
RTA-OS PPCe200/GHS Port Guide V5.0.32 19Verifying your Installation You can then use the build.bat and run.bat files that get created for each sample appli- cation to build and run the sample. For example: cd Samples\Applications\HelloWorld build.bat run.bat Remember that your target toolchain must be accessible on the Windows PATH for the build to be able to run successfully. Integration Guidance 3.2:It is strongly recommended that you build and run at least the Hello World example in order to verify that RTA-OS can use your compiler toolchain to generate an OS kernel and that a simple application can run with that kernel. For further advice on building and running the sample applications, please consult your Getting Started Guide. RTA-OS PPCe200/GHS Port Guide V5.0.32 20
Port Characteristics

4       Port Characteristics

        This chapter tells you about the characteristics of RTA-OS for the PPCe200/GHS port.

4.1     Parameters of Implementation
        To be a valid OSEK (ISO 17356) or AUTOSAR OS, an implementation must support a
        minimum number of OS objects. The following table specifies the minimum numbers
        of each object required by the standards and the maximum number of each object
        supported by RTA-OS for the PPCe200/GHS port.

         Parameter                                                 Required         RTA-OS
         Tasks                                                           16           1024
         Tasks not in SUSPENDED state                                    16           1024
         Priorities                                                      16           1024
         Tasks per priority                                               -           1024
         Queued activations per priority                                  -     4294967296
         Events per task                                                  8              32
         Software Counters                                                8     4294967296
         Hardware Counters                                                -     4294967296
         Alarms                                                           1     4294967296
         Standard Resources                                               8     4294967296
         Linked Resources                                                 -     4294967296
         Nested calls to GetResource()                                    -     4294967296
         Internal Resources                                               2         no limit
         Application Modes                                                1     4294967296
         Schedule Tables                                                  2     4294967296
         Expiry Points per Schedule Table                                 -     4294967296
         OS Applications                                                  -     4294967295
         Trusted functions                                                -     4294967295
         Spinlocks (multicore)                                            -     4294967295
         Register sets                                                    -     4294967296

4.2     Configuration Parameters
        Port-specific parameters are configured in the General Ô Target workspace of
        rtaoscfg, under the “Target-Specific” tab.

        The following sections describe the port-specific configuration parameters for the
        PPCe200/GHS port, the name of the parameter as it will appear in the XML configu-
        ration and the range of permitted values (where appropriate).

4.2.1   Stack used for C-startup

        XML name       SpPreStartOS

        RTA-OS PPCe200/GHS Port Guide V5.0.32                                              21
Port Characteristics
Description
The amount of stack already in use at the point that StartOS() is called. This value is
simply added to the total stack size that the OS needs to support all tasks and interrupts
at run-time. Typically you use this to obtain the amount of stack that the linker must
allocate. The value does not normally change if the OS configuration changes.
4.2.2 Stack used when idle
XML name SpStartOS
Description
The amount of stack used when the OS is in the idle state (typically inside
Os_Cbk_Idle()). This is just the difference between the stack used at the point that
Os_StartOS() is called and the stack used when no task or interrupt is running. This
can be zero if Os_Cbk_Idle() is not used. It must include the stack used by any function
called while in the idle state. The value does not normally change if the OS configura-
tion changes.
4.2.3 Stack overheads for ISR activation
XML name SpIDisp
Description
The extra amount of stack needed to activate a task from within an ISR. If a task is
activated within a Category 2 ISR, and that task has a higher priority than any currently
running task, then for some targets the OS may need to use marginally more stack
than if it activates a task that is of lower priority. This value accounts for that. On
most targets this value is zero. This value is used in worst-case stack size calculations.
The value may change if significant changes are made to the OS configuration. e.g.
STANDARD/EXTENDED, SC1/2/3/4.
4.2.4 Stack overheads for ECC tasks
XML name SpECC
Description
The extra amount of stack needed to start an ECC task. ECC tasks need to save slightly
more state on the stack when they are started than BCC tasks. This value contains the
difference. The value may change if significant changes are made to the OS config-
uration. e.g. STANDARD/EXTENDED, SC1/2/3/4. Also note that if you are using stack
repositioning (to align the stack of untrusted code to suit the MPU) then you will need
to reduce the value by the amount of the adjustment.
4.2.5 Stack overheads for ISR
XML name SpPreemption
RTA-OS PPCe200/GHS Port Guide V5.0.32 22Port Characteristics
Description
The amount of stack used to service a Category 2 ISR. When a Category 2 ISR interrupts
a task, it usually places some data on the stack. If the ISR measures the stack to deter-
mine if the preempted task has exceeded its stack budget, then it will overestimate the
stack usage unless this value is subtracted from the measured size. The value is also
used when calculating the worst-case stack usage of the system. Be careful to set this
value accurately. If its value is too high then when the subtraction occurs, 32-bit un-
derflow can occur and cause the OS to think that a budget overrun has been detected.
The value may change if significant changes are made to the OS configuration. e.g.
STANDARD/EXTENDED, SC1/2/3/4.
4.2.6 ORTI/Lauterbach
XML name Orti22Lauterbach
Description
Enables ORTI generation for Lauterbach debugger.
4.2.7 ORTI/winIDEA
XML name Orti21winIDEA
Description
Enables ORTI generation for winIDEA debugger.
4.2.8 ORTI Stack Fill
XML name OrtiStackFill
Description
Expands ORTI information to cover stack address, size and fill pattern details to support
debugger stack usage monitoring.
4.2.9 Support winIDEA Analyzer
XML name winIDEAAnalyzer
Description
Adds support for the winIDEA profiler to track ORTI items. Context switches take a few
cycles longer as additional code is inserted to support this feature.
4.2.10 Link Type
XML name OSLinkMemModel
Description
Select the type of map used in linker samples.
RTA-OS PPCe200/GHS Port Guide V5.0.32 23Port Characteristics
Settings
Value Description
IntRAM Code/data in internal RAM (default)
IntFLASH Code in internal flash, data in internal RAM
4.2.11 SDA RAM Threshold
XML name sda_value
Description
Sets the value used for small data objects when compiling. Defaults to zero.
4.2.12 SDA ROM Threshold
XML name sda_value_const
Description
Sets the value used for small const objects when compiling. Defaults to zero.
4.2.13 MultiCore Lock
XML name MC_Locker
Description
Select hardware used for Spinlock implementation. The Software option is only applica-
ble to select SPC57x/SPC58x/MPC57xx variants. The default option is Software where
supported.
Settings
Value Description
Software Software decorated instruction (default)
SEMA4_Gate00 SEMA4 Gate00
SEMA4_Gate01 SEMA4 Gate01
SEMA4_Gate02 SEMA4 Gate02
SEMA4_Gate03 SEMA4 Gate03
SEMA4_Gate04 SEMA4 Gate04
SEMA4_Gate05 SEMA4 Gate05
SEMA4_Gate06 SEMA4 Gate06
SEMA4_Gate07 SEMA4 Gate07
SEMA4_Gate08 SEMA4 Gate08
SEMA4_Gate09 SEMA4 Gate09
SEMA4_Gate10 SEMA4 Gate10
SEMA4_Gate11 SEMA4 Gate11
SEMA4_Gate12 SEMA4 Gate12
SEMA4_Gate13 SEMA4 Gate13
SEMA4_Gate14 SEMA4 Gate14
SEMA4_Gate15 SEMA4 Gate15
RTA-OS PPCe200/GHS Port Guide V5.0.32 24Port Characteristics
4.2.14 OS Locks disable Cat1
XML name OSLockDisableAll
Description
Specify whether all interrupts are disabled while internal OS spinlocks are held. This
does not affect spinlocks accessed using the GetSpinlock or TryToGetSpinlock APIs
Settings
Value Description
true Disable all interrupts
false Do not disable interrupts (default)
4.2.15 MultiCore interrupts
XML name MC_Interrupt
Description
Select the first software interrupt to use for multi-core implementation. The OS will use
the appropriate number of consecutive interrupts.
Settings
Value Description
0 INTC0 (default)
1 INTC1
2 INTC2
3 INTC3
4 INTC4
5 INTC5
6 INTC6
4.2.16 Preserve SPE
XML name preserve_spe
Description
Select whether SPE related registers are preserved across TASK and Category 2 ISR
preemptions. NOTE: When set to TRUE the -SPE option is specified to enable the use
of ev* instructions to carry out the SPE preservation. When set to FALSE the -noSPE
option is specified no ev* instructions are used and no SPE preservation occurs. The
number of SPE related registers varies between variants.
Settings
Value Description
true Preserve SPE related registers
false Do not preserve SPE related registers (default)
RTA-OS PPCe200/GHS Port Guide V5.0.32 25Port Characteristics
4.2.17 Enable stack repositioning
XML name AlignUntrustedStacks
Description
Use to support realignment of the stack for untrusted code when there are
MPU protection region granularity issues. Refer to the documentation for
Os_Cbk_SetMemoryAccess
Settings
Value Description
true Support repositioning
false Normal behavior (default)
4.2.18 Enable untrusted stack check
XML name DistrustStacks
Description
Extra code can be placed in interrupt handlers to detect when untrusted code has an
illegal stack pointer value. Also exception handlers run on a private stack (Refer to the
documentation for Os_Cbk_GetAbortStack). This has a small performance overhead, so
is made optional.
Settings
Value Description
true Perform the checks (default)
false Do not check
4.2.19 Use software vectoring
XML name SoftwareVectoring
Description
Select software-based dispatching of interrupts. RTA-OS will provide the software dis-
patching code unless you specify your own dispatcher by configuring an interrupt on
IVOR 4.
Settings
Value Description
true Software vectoring
false Hardware vectoring (default)
4.2.20 Block default interrupt
XML name block_default_interrupt
RTA-OS PPCe200/GHS Port Guide V5.0.32 26Port Characteristics
Description
Where a default interrupt is specified, it will normally execute if a spurious interrupt
fires. You can block this behavior using this option. The option affects the priority
assigned to unused interrupt sources.
Settings
Value Description
true Block the default interrupt
false Allow the default interrupt handler to run if a spurious interrupt fires (de-
fault)
4.2.21 Generate Cat1 EOIR
XML name GenerateEOIR
Description
When hardware vector mode is used, each Category 1 ISR must signal the end of inter-
rupt by writing to the EOIR register in the interrupt controller. If this target option is set
to TRUE, RTA-OS will generate the correct EOIR code for you as part of the CAT1_ISR
macro. In software vectoring mode RTA-OS must write the EOIR in its interrupt dis-
patcher, so Category 1 ISRs must not write to EOIR. In software vectoring mode you
should leave this option undefined or FALSE.
Settings
Value Description
true EOIR code is added to CAT1_ISR
false Code EOIR code is not added (default)
4.2.22 Cached CoreID register
XML name CachedCoreID
Description
Specify the register to cache the AUTOSAR core ID into. This is necessary for multi-core
configurations. It defaults to either SPRG4 or PMGC0 (variant dependent).
Settings
Value Description
SPRG4 SPRG4
SPRG5 SPRG5
SPRG6 SPRG6
SPRG7 SPRG7
PMGC0 PMGC0
4.2.23 Always call GetAbortStack
XML name Always_call_GetAbortStack
RTA-OS PPCe200/GHS Port Guide V5.0.32 27Port Characteristics
Description
When an exception or mem exception ISR is triggered always use the
Os_Cbk_GetAbortStack() callback to set up a safe area of memory to use as
a stack executing the ProtectionHook (please refer to the documentation for
Os_Cbk_GetAbortStack).
Settings
Value Description
true Always call Os_Cbk_GetAbortStack()
false Only call Os_Cbk_GetAbortStack() when the ’Enable untrusted stack check’
target option is selected (default)
4.2.24 Use Floating Point
XML name use_fp
Description
Set to enable hardware or software floating point support (variant-specific).
Settings
Value Description
true Enables floating point
false Disables floating point (default)
4.2.25 Use Short Enum
XML name use_short_enum
Description
Set to enable the use of 8 bit enums.
Settings
Value Description
true Enables short enum
false Disables short enum (default)
4.2.26 Optimizer Setting
XML name optimizer_setting
Description
Controls the optimizer strategy compiler option (see the compiler documentation for
more details).
RTA-OS PPCe200/GHS Port Guide V5.0.32 28Port Characteristics
Settings
Value Description
Osize Improve code size over performance
Ospeed Improve code performance over size (default)
4.2.27 Customer Option Set 1
XML name option_set1
Description
Selects a different set of compiler default options. Requested by a customer
for a specific project and not supported elsewhere. The options are: -vle -
floatsingle -fhard -noSPE -Ospeed -Omax —inline_tiny_functions -Olink -no_auto_sda
-no_inline_trivial -sda=64 —no_commons -g -dwarf2 —std —no_rtti -lnk=-no_append
-ignore_debug_references -e _start1 -nostartfiles —preprocess_linker_directive_full -u
_start1 -callgraph=exec/callgraph.txt -gsize -Mu -Mx -Ml -Mn -keepmap.
Settings
Value Description
true Enables option set 1
false Use standard options (default)
4.2.28 Customer Option Set 2
XML name option_set2
Description
Selects a different set of compiler default options. Requested by a customer
for a specific project and not supported elsewhere. The options are: —
prototype_errors —quit_after_warnings -noSPE -sda=0 -vle —no_commons -Ospeed -
fnone –no_short_enum -bsp_generic -checksum -delete -no_ignore_debug_references
-Wundef —relative_xof_path -preprocess_assembly_files -c -G -dual_debug -dwarf.
Settings
Value Description
true Enables option set 2
false Use standard options (default)
4.2.29 Customer Option Set 3
XML name option_set3
RTA-OS PPCe200/GHS Port Guide V5.0.32 29Port Characteristics
Description
Selects a different set of compiler default options. Requested by a
customer for a specific project and not supported elsewhere. The
options are: –prototype_errors -farcallpatch -sda=0 –no_short_enum
-vle -fnone -noSPE -g -Ospeed -Omax -dwarf2 -X5261 -delete -
ignore_debug_references -split_data_sections_by_alignment -individual_data_sections
-individual_pragma_data_sections -individual_function_sections -
individual_pragma_function_sections -Wundef -Wimplicit-int –diag_warning=2003
-globalcheck=normal -map -lnk=-mapfile_type=2 -Man -Ml -Mx -Mu -keepmap –
no_commons -c99 –gnu_asm -convert_ppc_asm_to_vle -preprocess_assembly_files
-passsource -discard_zero_initializers
Settings
Value Description
true Enables option set 3
false Use standard options (default)
4.2.30 Customer Option Set 4
XML name option_set4
Description
Selects a different set of compiler default options. Requested by a cus-
tomer for a specific project and not supported elsewhere. The options
are: –prototype_errors –quit_after_warnings –no_short_enum -fnone -noSPE -
sda=0 -vle –no_commons -Ospeed -checksum -delete -c -G -dual_debug -
ignore_debug_references -preprocess_assembly_files -c99 -malloc_version=legacy -
kanji=utf8 -Wundef -bsp=generic –relative_xof_path
Settings
Value Description
true Enables option set 4
false Use standard options (default)
4.3 Generated Files
The following table lists the files that are generated by rtaosgen for all ports:
RTA-OS PPCe200/GHS Port Guide V5.0.32 30Port Characteristics
Filename Contents
Os.h The main include file for the OS.
Os_Cfg.h Declarations of the objects you have configured. This is in-
cluded by Os.h.
Os_MemMap.h AUTOSAR memory mapping configuration used by RTA-
OS to merge with the system-wide MemMap.h file in AU-
TOSAR versions 4.0 and earlier. From AUTOSAR version 4.1,
Os_MemMap.h is used by the OS instead of MemMap.h.
RTAOS. The RTA-OS library for your application. The extension
depends on your target.
RTAOS..sig A signature file for the library for your application. This is
used by rtaosgen to work out which parts of the kernel li-
brary need to be rebuilt if the configuration has changed. The
extension depends on your target.
.log A log file that contains a copy of the text that the tool and
compiler sent to the screen during the build process.
RTA-OS PPCe200/GHS Port Guide V5.0.32 31Port-Specific API
5 Port-Specific API
The following sections list the port-specific aspects of the RTA-OS programmers refer-
ence for the PPCe200/GHS port that are provided either as:
• additions to the material that is documented in the Reference Guide; or
• overrides for the material that is documented in the Reference Guide. When a
definition is provided by both the Reference Guide and this document, the definition
provided in this document takes precedence.
5.1 API Calls
5.1.1 Os_CacheCoreID
Used to cache the AUTOSAR core ID into register SPRG4-7 or PMGC0.
Syntax
FUNC(void, OS_APPL_CODE) Os_CacheCoreID(void)
Description
In multi-core configurations it is necessary to cache the AUTOSAR core ID into a register
that can be read efficiently by trusted and untrusted code. The target option ’Cached
CoreID register’ is used to specify which register to use from one of SPRG4, SPRG5,
SPRG6, SPRG7 or PMGC0. The default is either SPRG4 or PMGC0 (variant dependent).
The Os_CacheCoreID() must be called to do this caching for you. It must be called on
each core before any other OS call is made (including GetCoreID()). If you use the
OS_MAIN() macro, then this will silently call Os_CacheCoreID() for you. Similarly it will
be called during the execution of Os_InitializeVectorTable().
Example
OS_MAIN() {
/* The OS_MAIN macro implicitly calls Os_CacheCoreID() */
...
}
or
void main(void) {
Os_CacheCoreID();
...
}
or
void main(void) {
Os_InitializeVectorTable(); /* Os_InitializeVectorTable calls
Os_CacheCoreID() */
...
RTA-OS PPCe200/GHS Port Guide V5.0.32 32Port-Specific API
}
Calling Environment
Tasks/ISRs AUTOSAR OS Hooks RTA-OS Hooks
Task 7 PreTaskHook 7 StackOverrunHook 7
Category 1 ISR 7 PostTaskHook 7 TimeOverrunHook 7
Category 2 ISR 7 StartupTaskHook 7
ShutdownHook 7
ErrorHook 7
ProtectionHook 7
See Also
StartCore
StartNonAutosarCore
StartOS
5.1.2 Os_InitializeVectorTable
Initialize the interrupt hardware and vector table(s).
Syntax
void Os_InitializeVectorTable(void)
Description
Os_InitializeVectorTable() initializes the CPU and INTC interrupts according to the re-
quirements of the project configuration. In particular, it sets IVPR, IVOR registers and
INTC priorities. It sets hardware or software vectoring mode based on whether IVOR_4
has been assigned to an ISR.
Os_InitializeVectorTable() should be called before StartOS(). It should be called even if
’Suppress Vector Table Generation’ is set to TRUE.
Example
Os_InitializeVectorTable();
See Also
StartOS
5.2 Callbacks
5.2.1 Os_Cbk_GetAbortStack
Callback routine to provide the start address of the stack to use for some exception
conditions.
RTA-OS PPCe200/GHS Port Guide V5.0.32 33Port-Specific API
Syntax
FUNC(void *, {memclass}) Os_Cbk_GetAbortStack(void)
Return Values
The call returns values of type void *.
Description
Untrusted code can misbehave and cause a protection exception. When this happens,
AUTOSAR requires that ProtectionHook is called and the task, ISR or OS Application
must be terminated. It is possible that at the time of the fault the untrusted code’s
stack pointer is invalid. For this reason, if ’Enable untrusted stack check’ is configured,
RTA-OS will call Os_Cbk_GetAbortStack to get the address of a safe area of memory
that it should use for the stack while it performs this processing. Maskable interrupts
will be disabled during this process so the stack only needs to be large enough to get
to and execute ProtectionHook. A default implementation of Os_Cbk_GetAbortStack is
supplied in the RTA-OS library that returns the address of an area of static memory, but
you can implement your own version to override its behavior.
Note: memclass is OS_APPL_CODE for AUTOSAR 3.x,
OS_OS_CBK_GETABORTSTACK_CODE for AUTOSAR 4.1 and OS_CALLOUT_CODE other-
wise.
Example
FUNC(void *, {memclass}) Os_Cbk_GetAbortStack(void) {
/* Could be implemented to return a core-specific location.
* The last location of the array is treated as the previous
* stack frame where the LR would be stored */
static uint32 abortstack[400U];
return &abortstack[398U];
}
Required when
The callback must be present if ’Enable untrusted stack check’ is configured and there
are untrusted OS Applications. The callback is also present if the ’Always call GetAbort-
Stack’ target option is enabled.
5.2.2 Os_Cbk_GetSetProtection
Callback routine used to control the activation of the memory protection system.
Syntax
FUNC(boolean, {memclass})Os_Cbk_GetSetProtection(
boolean enable
)
Return Values
The call returns values of type boolean.
RTA-OS PPCe200/GHS Port Guide V5.0.32 34Port-Specific API
Description
This callback is used in configurations that have OS Applications where TrustedApplica-
tionWithProtection is true. It must return the state of the memory protection hardware
at the point it was called (TRUE if enabled, FALSE otherwise). It must then enable or
disable memory protection based on the incoming ’enable’ value. It is used to switch
between Trusted and TrustedApplicationWithProtection modes.
The callback is required for this target platform. (Some platforms such as the TriCore
can provide separate memory protection sets for untrusted, trusted and trusted-with-
protection modes and in that case the callback is not used.)
Note: memclass is OS_APPL_CODE for AUTOSAR 3.x,
OS_OS_CBK_GETSETPROTECTION_CODE for AUTOSAR 4.1 and OS_CALLOUT_CODE
otherwise.
Example
FUNC(boolean {memclass}) Os_Cbk_GetSetProtection(boolean enable) {
boolean initial = MPU.enabled;
MPU.enabled = enable.
return initial;
}
Required when
The callback must be provided when memory protection is selected and there are OS
Applications where TrustedApplicationWithProtection is true.
See Also
Os_Cbk_CheckMemoryAccess
CallTrustedFunction
CallAndProtectFunction
Os_Cbk_SetMemoryAccess
5.2.3 Os_Cbk_SetMemoryAccess
Callback routine used to prepare the memory protection system for a switch from
trusted to access-restricted code (untrusted or trusted-with-protection).
Syntax
FUNC(void, {memclass})Os_Cbk_SetMemoryAccess(
Os_UntrustedContextRefType ApplicationContext
)
RTA-OS PPCe200/GHS Port Guide V5.0.32 35Port-Specific API
Parameters
Name Type Mode Description
ApplicationContext Os_UntrustedContextRefType in A reference to
a type that de-
scribes the un-
trusted context.
Description
This callback is provided so that you have full control over the memory protection hard-
ware on your device, and so that you can decide the degree of protection that you want
to apply on a particular project. For example, you may choose to limit write-access for
access-restricted code but allow any read and execute access. Alternatively you may
wish to limit read/write and execute access for access-restricted code.
In an AUTOSAR OS, code that runs in the context of a Trusted OS Application is assumed
to have full access to any area of RAM, ROM or IO space that is available. Such code
runs in a privileged mode. On the other hand, code that runs in the context of an
access-restricted OS Application may have restrictions placed on it that prevent it from
being able access certain areas. Such code typically runs in ’user’ (untrusted) mode,
but there is also an AUTOSAR option to configure trusted OS Applications to run with
memory protection enabled. Trusted-with-protection code behaves in most ways like
trusted code. The only difference is that it runs with restricted access to memory.
Whenever RTA-OS is about to switch from trusted to access-restricted code, it
makes a call to Os_Cbk_SetMemoryAccess. It passes in a reference to an
Os_UntrustedContextType data structure that you can use to determine what permis-
sions to set for access-restricted code. The Os_UntrustedContextType structure con-
tains information about the OS Application, Task/ISR and stack region that applies to
the code that is about to be executed. Depending on the context of the switch, some of
these may contain NULL values. Os_Cbk_SetMemoryAccess is only called from trusted
code.
Os_Cbk_SetMemoryAccess gets called in the following cases:
1) Before calling a TASK that belongs to an access-restricted OS-Application.
2) Before calling a Category 2 ISR that belongs to an access-restricted OS-Application.
3) Before calling an access-restricted OS-Application Startup, Shutdown or Error hook.
4) Before calling a ’TrustedFunction’ that belongs to an access-restricted OS-
Application. (This extends the AUTOSAR concept, and allows a core trusted task to
call out to access-restricted code supplied by third parties.)
When using memory protection features, you must initialize the memory protection
hardware before calling StartOS(). You can choose what hardware to use, how many
regions to protect and what restrictions to apply.
RTA-OS PPCe200/GHS Port Guide V5.0.32 36Port-Specific API
If you want to run all access-restricted code with the same memory protection set-
tings, then you can set the ’Single Memory Protection Zone’ OS option. In this case
Os_Cbk_SetMemoryAccess will not be called. You must set up the MPU before running
any access-restricted code.
If you want to run all access-restricted code with the same basic memory protection
settings but apply protection to the stack, then you can set the ’Stack Only Memory
Protection’ OS option. In this case Os_Cbk_SetMemoryAccess will only be passed the
stack-related fields (Address and Size) plus Application. You must ensure that the mem-
ory protection settings limit the stack to the specified range.
* Note * Where the hardware does not allow protection regions to be set at
any address/size combination, you may choose to adjust the stack to a position
that can be protected efficiently. For example, the protection region may have
to be aligned on a 64-byte address boundary. In these cases, RTA-OS provides
the ’AlignUntrustedStacks’ configuration option. When this is set, a further field
’ApplicationContext->AlignedAddress’ becomes available. Its initial value will be the
same as ApplicationContext->Address. However you can change its value to signal
to the OS that the access-restricted code should start at a different location. For the
earlier example, if ApplicationContext->AlignedAddress initially has value 0x1020, you
might change it to 0x1000 before returning so that the OS will start running the code
at an address that is a multiple of 64. (This example assumes that the stack grows
towards lower addresses.) You will have set the stack protection region to start from
0x1000.
* Note *
’FunctionID’ and ’FunctionParams’ are only present when there are access-restricted
functions. The value of ’FunctionID’ will be INVALID_FUNCTION except when the call-
back is for an access-restricted function. In this case, ’FunctionID’ contains the function
identifier and ’FunctionParams’ is a copy of the pointer to the parameters of the func-
tion.
* Note *
’CoreID’ is only present where there are multiple AUTOSAR cores, and it holds the num-
ber of the current core.
Note: memclass is OS_APPL_CODE for AUTOSAR 3.x,
OS_OS_CBK_SETMEMORYACCESS_CODE for AUTOSAR 4.1 and OS_CALLOUT_CODE
otherwise.
Example
FUNC(void, {memclass}) Os_Cbk_SetMemoryAccess(Os_UntrustedContextRefType
ApplicationContext) {
/*
* When called for an access-restricted TASK:
* ApplicationContext->Application contains the ID of the OS
Application that the TASK belongs to.
RTA-OS PPCe200/GHS Port Guide V5.0.32 37You can also read