COLORCUT FB8000 MK2 SERIES COLORCUT PRO3 USER GUIDE - ENGLISH - INTEC PRINTING SOLUTIONS
←
→
Page content transcription
If your browser does not render page correctly, please read the page content below
ColorCut FB8000 MK2 Series
ColorCut Pro3 User Guide - English
Revision: 1.0a

                                               FB8000Pro
                             Auto Sheet Feeder and digital cutter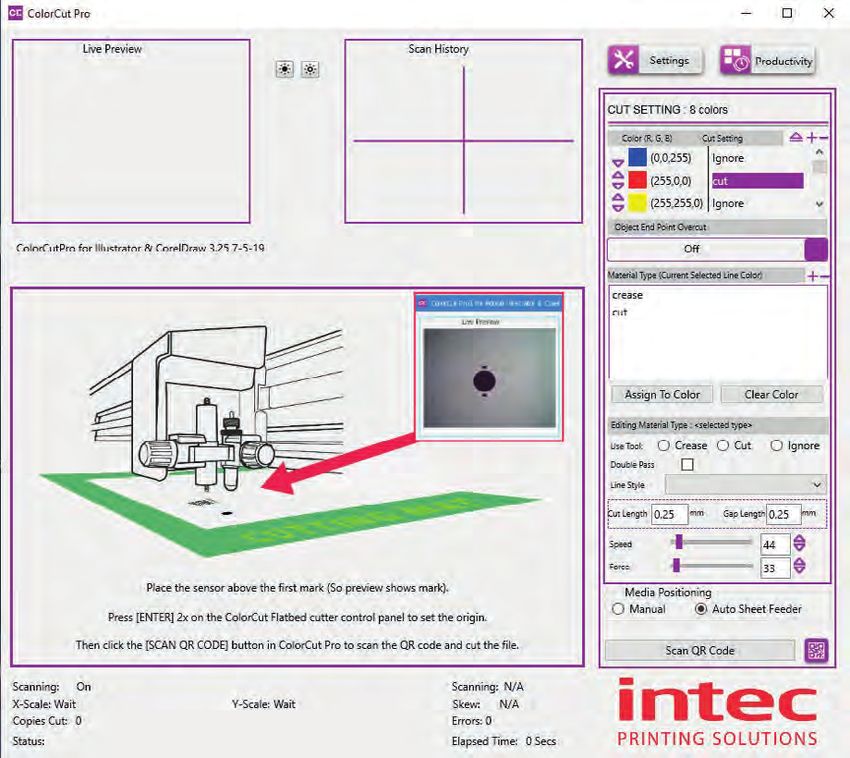
Contents
1. INTRODUCTION ............................................................................................ 5
             Compatible Vector Programs:.................................................................................5
             Workstation Hardware requirements: ....................................................................6
2. AN INTRODUCTION TO COLORCUT PRO3 ................................................ 7
    Mac users and ColorCut Pro ............................................................................................8
3. SETTING UP LIVE VIDEO FROM FB8000 FOR COLORCUT PRO .............. 9
    Using Wi-Fi to connect to FB8000 - Live Video Feed ......................................................9
         Configuring Windows Wi-Fi HotSpot (Method 1) .................................................10
         Configuring Windows Wi-Fi Direct Access Point (Method 2) ...............................15
         Configuring Windows Wi-Fi Direct Access Point (Cont.) ......................................16
4. GRAPHICS FILE DESIGN - CREATING YOUR ARTWORK ....................... 17
             Layers for printing .................................................................................................18
             Layers for cutting ..................................................................................................18
5. DRAWING CUT LINES, PERFORATION LINES OR CREASE LINES ........ 19
    Line Colors recognised by ColorCut Pro........................................................................19
6. EXPLANATION OF THE REGISTRATIONS PAGEMARKS ......................... 21
7. AUTOMATICALLY ADD REGISTRATION PAGEMAKERS ........................ 23
    Configuring Automatic PageMarks ...............................................................................24
    Additional Configuration for MAC users ........................................................................25
    Using ColorCut Pro Add PageMARKs ...........................................................................26
          Selecting the Layer to Add PageMarks ...............................................................26
    QR Codes and the Job Library ......................................................................................28
8. The Job Library & QR codes ...................................................................... 29
    Automatically Adding PageMARKs and QR codes ........................................................30
9.HOW TO CUT YOUR FILES USING COLORCUT PRO ............................... 33
    Launching ColorCut Pro (Direct Mode) .........................................................................34
         Selecting the Cutline Layer. ..................................................................................34
         Select the layer for the cutting ..............................................................................34
    Launching ColorCut Pro (Direct Mode) .........................................................................35
         Overview of the ColorCut Pro Software Panel Layout (Direct Mode) ...................36
    Launching ColorCut Pro (Job Server Mode) .................................................................37
         Overview of the ColorCut Pro Screen Layout (Job Server Mode) ........................38
10. SET UP COLORCUT PRO TO USE WITH YOUR FB8000 MK2 ............... 39
    Assigning the Cutter Environment in ColorCut Pro ........................................................39
11. SETTINGS: CONFIGURING THE COLORCUT PRO PLUG-IN ................ 41
    Knife Offset .....................................................................................................................42
    Scan Targets ...................................................................................................................44
    Output Device ................................................................................................................45
          Device Type ..........................................................................................................45
    Sensor Offset & the Auto Find feature............................................................................46
          Auto Find - Automatically Setting the Sensor Offset to the Blade .......................46
          Auto Find - Automatically Setting the Sensor Offset to the Blade .......................47
    Units of Measurement ....................................................................................................50
    Vision3 CCD Camera Live Video feed connection .........................................................50
          Setting IP address for Vision3 CCD Camera Live Video Echo .............................51
          Setting the HOTSPOT SSID..................................................................................51
    Choosing where to set Speed and Force ......................................................................52
    Activation/ Deactivating your ColorCut Pro License ......................................................53
          Deactivating ColorCut Pro ....................................................................................53
    Regional Language Options ...........................................................................................54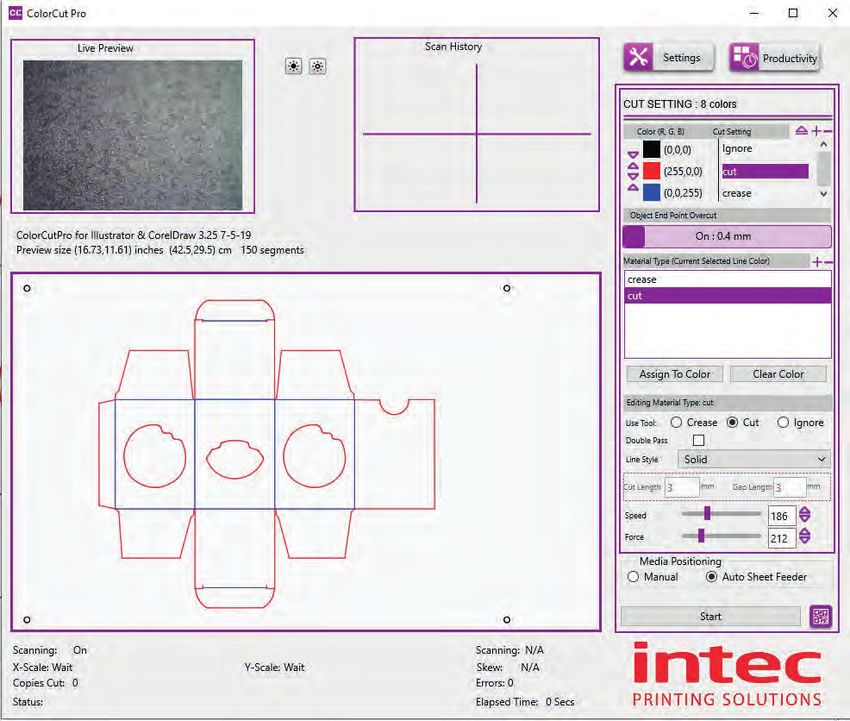
12. COLORCUT PRO - MAIN INTERFACE FUNCTIONS ............................... 55
About (Version information) for ColorCut Pro .................................................................55
The Job Preview Window ...............................................................................................55
The Live Preview Window ..............................................................................................56
The Scan History Window ....................................................................................57
The Settings Button ..............................................................................................58
The Productivity Button ........................................................................................58
The Cut Settings Window...............................................................................................59
The Material Type/Actions Window ................................................................................60
The Editing Material Type Window .................................................................................60
Selecting the Cutting/Creasing Tool .....................................................................61
Selecting the Double Pass Feature.......................................................................61
Selecting the Line Style of the Cut or Creasing Tool ............................................61
Selecting the Speed of the Cut or Creasing Tool .................................................61
Selecting the Force of the Cut/Crease .................................................................61
Assigning a Material Type/Action to a Color (or clearing one) .......................................62
13. PRODUCTIVITY & THE AUTO-SHEET FEEDER CONFIGURATION. ...... 63
Sort Method ...................................................................................................................64
Scan for QR code on every sheet ..................................................................................65
After scanning QR ask before cutting ............................................................................66
Eject function..................................................................................................................67
Media loading/placement ...............................................................................................67
Manual Media Positioning. ...................................................................................68
Automatic positioning using the Auto Sheet Feeder ............................................68
Auto Sheet Feeder Setup. ..............................................................................................69
Adjust Feed Advance ...........................................................................................69
Distance Between Vertical Marks .........................................................................69
Feeder Offset ........................................................................................................71
Air Pulse Hold Down .............................................................................................71
Automated Production Options......................................................................................72
14. ColorCut Pro (Direct Mode) ..................................................................... 73
Cutting jobs directly from your Graphics Application ....................................................73
15. ColorCut Pro (Job Server Mode) .............................................................. 75
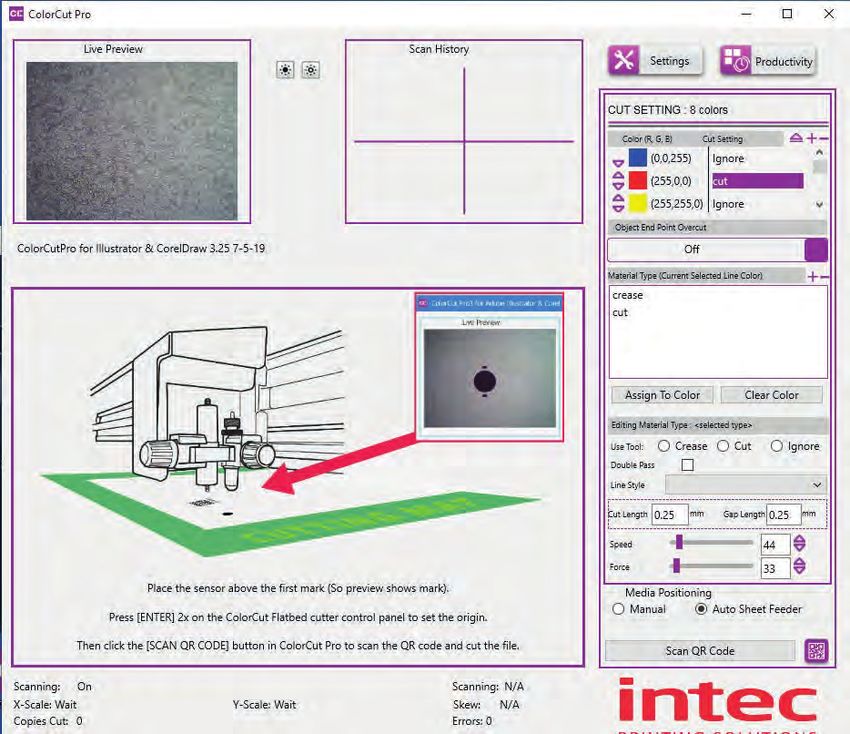
Retrieving jobs with QR codes printed on them ............................................................75
Enter a Job number to retrieve the Cut Job file directly. ......................................79
16. Daily operation: ........................................................................................ 81
16.1 Cutting a job (Direct from Illustrator/Corel Draw) ..................................................81
16.2 Cutting a job (Using ColorCut Pro- Job Library Server) ........................................87
17. Adjusting the FB8000 Auto Sheet Feeder ............................................... 93
Auto Sheet Feeder Controls ...........................................................................................93
Optimising Media Pick up vacuum ................................................................................93
Optimising sheet separation (Air-Blade pressure) ........................................................94
18. Manually positioning sheets ..................................................................... 95
Larger sheets can be cut when manually positioning sheets.........................................95
Where to position sheets in manual mode. ..........................................................95
Using Live Preview to position the sensor......................................................................96
19. Cutting without using PageMarks ........................................................... 97
Design requirements when cutting without PageMARKs .............................................98
How to cut without PageMARKs (Auto Sheet Feeder) .........................................99
How to cut without PageMARKs (Manual Positioning).........................................99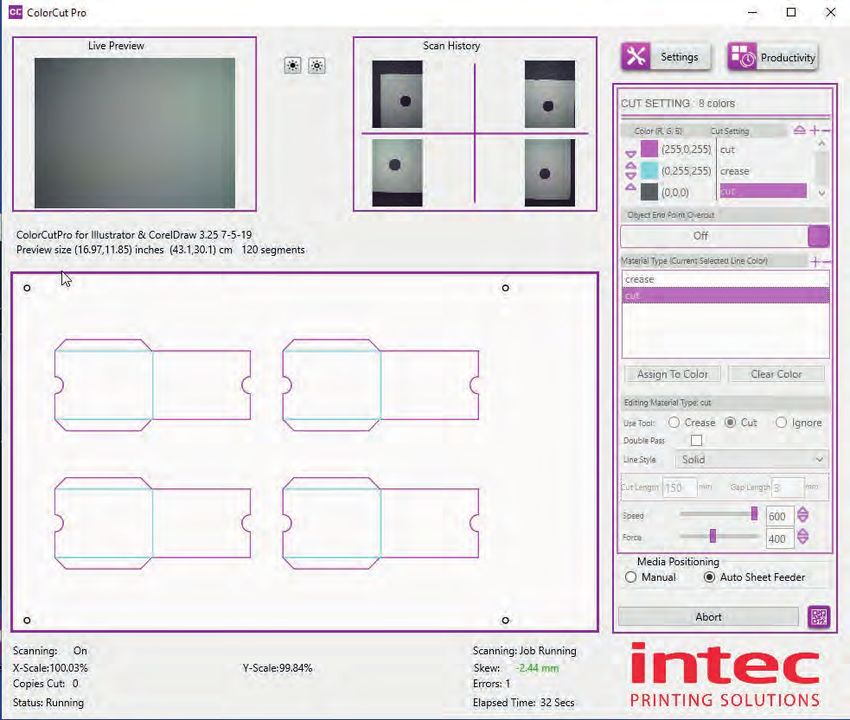
1. INTRODUCTION

To cut your projects with the Intec ColorCut Flatbed cutter, you need to be able to design
your artwork and then apply lines that you designate for cutting, creasing, scoring or
perforating. Projects and artwork can be created using either Adobe Illustrator on Mac
or PC, or CorelDraw on PC.
ColorCut Pro is a plug-in that provides you the ability to send projects that you have
designed in Adobe Illustrator® or CorelDRAW® directly to your Intec ColorCut Flatbed
cutter with no need to convert them to a different format.
Install ColorCut Pro™ and you will be provided with a new option within your Adobe
Illustrator® or CorelDRAW® software program to send the vector image to your ColorCut
Flatbed cutter. ColorCut Pro will also provide an option that enables you to simply add
Page Registration Marks for print & cut jobs, which work with the ColorCut Flatbed’s
Vision3 Registration Mark sensor. In addition ColorCut Pro can assign Job numbers
or QR codes and build a cut job library which can be linked to a stand alone version
of ColorCut known as the Job Server version of ColorCut Pro running on the same or
a different computer. The Job Server version of ColorCut Pro can be used by other
individuals within your company enabling jobs to be cut at any time without requiring
Adobe Illustrator or Corel Draw, and without having to re-open the original file.

ColorCut Pro3 does not currently work with any other vector imaging programs aside
from those listed in the Compatibility section below.
The full version of ColorCut Pro3 requires a PC, the job library server and remote cutting
feature are installed on a PC. However, Mac users can add the ColorCut Pro3 Page
Registration Mark and Job Library Client which enables Mac users to design their jobs,
and add cut marks or assign Job numbers and QR codes then their jobs are sent to the
remote ColorCut pro job library on a PC for Cutting.
PC users, the ColorCut Pro3 plug-in can be accessed directly from either Adobe
Illustrator® or CorelDRAW®.

Compatibility
The plug-in requires Adobe Illustrator® or CorelDRAW® to be installed on the computer
in question. The ColorCut Pro™ plug-in does not include the Adobe Illustrator® or
CorelDRAW® software.

Compatible Vector Programs:
PC - Adobe Illustrator®* CS1–CS6, CC, CC2014, CC2015, CC2017, CC2018 , CC2019, CC2020
CorelDRAW®** X4 - X8, 2017 - 2019
MAC - Adobe Illustrator®* CC2015, CC2017, CC2018 , CC2019, CC2020

* Does not support illegal copies of Illustrator
** Full version only. Does not support “Home and Student”, “Essentials” edition or illegal copies of
CorelDRAW

....continued overleaf

Intec Printing Solutions - ColorCut Pro User Guide for Intec ColorCut FB8000 .......................................................................Page No: 5
Workstation Hardware requirements:
Multicore Intel processor with 64-bit support
Windows 10 x64 bit
2 GB of RAM (4 GB recommended)
Minimum display resolution : 1024x900
Recommended Display Resolution: 1280x960 or higher.
(Screens with resolutions such as: 1152x900, 1024x900, 1280x960, 1440x900, 1440x960,
1440x1024, 1440x1080, 1600x900, 1600x1080, 1600x1280, 1920x1080 or higher)
2x available USB Ports (Note KB & Mouse often use a port each so factor this in)

FB1150, FB8000, and LC600 users:
PC directly connected to ColorCut must have Wi-Fi capability for Direct connection to iVision3
Camera Sensor. (for PC users with no wi-fi currently a USB Wi-Fi dongle included)

Compatible OS Versions:
PC Windows v7,8 or 10 – 64bit with
Mac OS version 10.15 (Mountain Lion), Mac OS 10.13 (High Sierra), MacOS version 10.12 (Sierra),
or Mac OS X version 10.11 (El Capitan)

Compatible Cutting Units:
Intec ColorCut® Flatbed (LC600, FB1150, FB5000, FB8000)
2. AN INTRODUCTION TO COLORCUT PRO3

ColorCut Pro (The main application),is PC Only. This is the application that
communicates with your Intec cutter and will ultimately cut your designs. This can be
launched in two ways:

   ColorCut Pro (Direct): ColorCut Pro can be accessed and launched from inside
   Illustrator or CorelDraw - just under your PRINT command. When starting
   ColorCut Pro directly from Illustrator or Corel Draw, it works just like the PRINT
   command. It takes the vector lines on the currently selected layer in the design
   that is open and exports them directly into the ColorCut Pro cutting window. You
   simply choose the action for each colored line e.g. Cut, Crease, Ignore, Perforate,
   Score and click start. Cutting will commence immediately. This is a very simple
   way to cut directly from your file.

   Where access to the original files is not practical, or where a different user
   wishes to cut the job, then we recommend designers use the ColorCut Pro job
   library (detailed below) and ColorCut Pro in standalone mode, either on the same
   computer or a different computer.

   ColorCut Pro (Job Server), Launched from the START MENU on your computer.
   Like ColorCut Pro (Direct) above, this is also the main application - identical to the
   application that launches from inside Illustrator or CorelDraw. However, there is
   no need for Illustrator or CorelDraw. As the Job Server version of ColorCut Pro is
   stand alone, thus will cut files or jobs created and saved to the ColorCut Pro job
   library using the ColorCut Pro ADD PageMarks & QRcode feature (detailed below).
   At launch ColorCut Pro (Job Server) will open with no cutting file or job selected
   and retrieve cut files from the ColorCut Job library by job number OR scanning the
   QR code on the printed sheets and then cut the file.

Both in Direct or Job Server mode, users can choose speed, force and other cutting
related controls and can set productivity options such as number of copies to cut.

From inside Illustrator or CorelDraw you can also find 2 additional utilities (Also
available on MAC):

ColorCut Pro ADD PageMARKs; this is a utility that automatically adds cutting
registration marks to your artwork. (Known as PageMARKs). Illustrator or Corel Draw
files with PageMARKs can be cut directly from Illustrator or Corel Draw by using the
ColorCut Pro application.

ColorCut Pro ADD PageMARKs & QRCode; this is a utility that enables users to
assign a Job number AND a QR code to their artwork so that is may be cut at a later
date. The QR code is automatically generated and the job number and placed on your
artwork. Once a QR code has been assigned to your artwork, the cutting file is sent
(in the background) to the ColorCut job library for use later with the main ColorCut
Pro (Job Server) application. With Job numbers and QR code files can be printed (or
sent to RIP’s (like a Fiery) and printed at a later date). The sheets can be cut using the
ColorCut Pro 3 (Job Server) version which can be done on a separate PC and does not
require the original file to be opened. The design to be cut is retrieved automatically
as the cutter reads the QR code. This is ideal for larger companies looking to separate
design and finishing(Cutting) of jobs.

  Intec Printing Solutions - ColorCut Pro 3 User Guide for Intec ColorCut FB8000 ........................................................................ Page No: 7
Mac users and ColorCut Pro
Mac users can design and generate jobs on Mac workstations using ColorCut Pro’s
Job library feature.

                   Note the main ColorCut Pro cutting application is PC only, so Mac users can
                   design their artwork on the Mac and use a PC to connect to the cutter for
                   the cutting of the jobs.

Mac users can design and cut files using 2 different approaches:

1. You can use the Mac ColorCut Pro feature ‘ColorCut Pro ADD PageMARKs’; this
utility will add the registration marks necessary to cut your file. You should then save
your design as an illustrator file that can be opened on the PC which is connected
to the cutter. (If you save the files in Illustrator format, you must have Illustrator also
installed on the PC to open Illustrator files). You can then use ColorCut Pro in direct
mode and then cut directly from the PC version of Illustrator.

or (the recommended solution is ):

2. Connect a PC to your Intec cutter and install ColorCut Pro on the PC (on the same
network as the MAC), configure the ColorCut Pro Job Library feature to act as a cut job
library server for your Mac.

Use your Mac to create your artwork and then use the Mac ColorCut Pro feature
‘ColorCut Pro ADD PageMARKs & QRCode’. (On MAC, this feature is found in the
Illustrator main menu, just under the PRINT command). This feature enables Mac
users to design on their Mac and then when the ‘Add PageMARKs & QR code’ feature
is selected from the Illustrator menu, ColorCut Pro will assign a Job number AND a
QR code to the artwork, the cut file is automatically sent (in the background), to the
ColorCut Pro Job library server on your PC so that is may be cut at a later date. This
enables Mac designers to design efficiently on their MAC and allows Print Production
operators to cut the Mac designed jobs from the remote PC connected to the Intec
cutter using the Job Server and Job Library feature.

Intec Printing Solutions - ColorCut Pro 3 User Guide for Intec ColorCut FB8000 ....................................................................Page No: 8
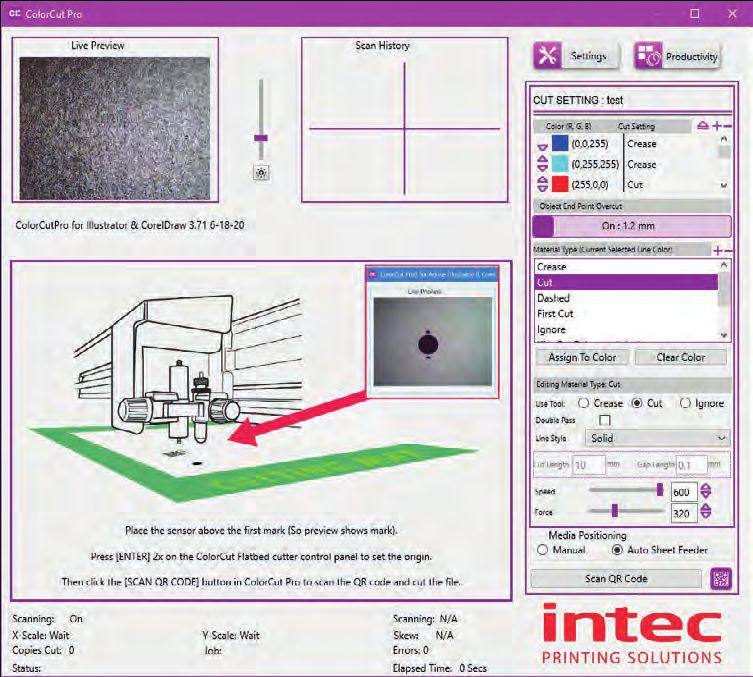
3. SETTING UP LIVE VIDEO FROM FB8000 FOR COLORCUT PRO

ColorCut Pro 3 uses the Vision3 registration system on your FB8000 to identify your
cutting registration marks (PageMarks), and to read the QR code for retrieving job
numbers.

                     Please Note: ColorCut Pro does NOT require a live video feed to do this,
                     your cutter will work perfectly fine with no video connection as all this is
                     all handled in the cutter. However, the Vision3 registrations system uses a
                     camera and incorporates a camera image echo function. This function will
                     broadcast over Wi-Fi the video feed that the Vision3 sensor can see. You
                     can connect to the live video relay using the ColorCut Pro application and
                     display the video feed which is useful when placing sheets manually or to
                     see while cutting and help identify issues. We recommend you do enable
                     this feature. Please follow the guide below on how to connect to the live
                     video feed before launching ColorCut Pro.

Using Wi-Fi to connect to FB8000 - Live Video Feed
This FB8000’s Vision3 registration system has a camera image echo function and the
live feed feed from the echo is transmitted through WLAN. To connect to the Video
feed you will need to broadcast a Wi-Fi Direct connection from the computer that is
running ColorCut Pro.

The FB8000 cutter will connect to a 2.4GHz Wi-Fi Direct connection or Wifi-HotSpot
defined as follows:
                            SSID:                H3
                        Password:                12345678

If your computer is not a laptop then you may not have Wi-Fi capabilities on your PC,
therefore your Intec FB8000 is supplied with a USB Wi-Fi Dongle B. to enable you to
do this.
                                     If you are connected on a PC with a Wi-Fi
                                     connection (such as a laptop you can ignore this
                                     step).

                                                                   1. Insert the Wi-Fi Dongle supplied with the
                                                                   FB8000.

                                                     B             2. When the dongle is recognised, please install
                                                                   the drivers (supplied in the Wi-Fi dongle box).

Intec Printing Solutions - ColorCut Pro 3 User Guide for Intec ColorCut FB8000 ....................................................................Page No: 9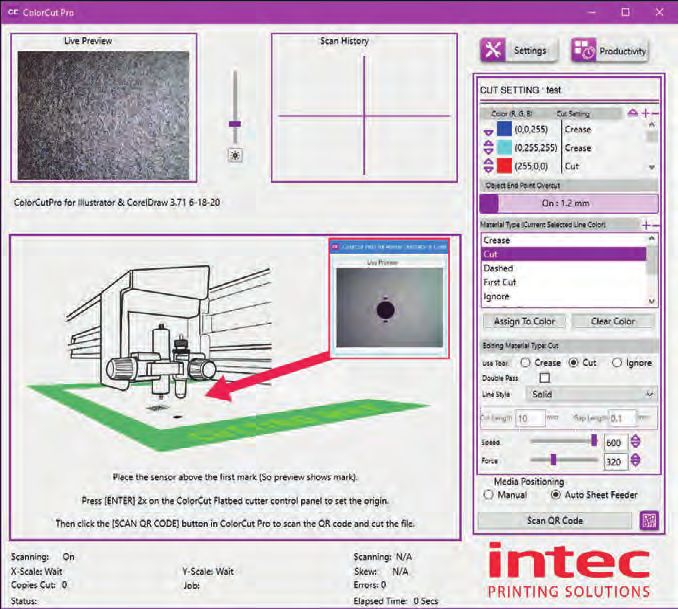
Using Wi-Fi to connect to FB8000 - Live Video Feed (Cont.).

Once you have Wi-Fi enabled on your computer there are 2 methods to connect to
your Intec FB8000 flatbed cutter.

1    . Use the built in Windows HOTSPOT function. This is easy to use and uses
       Windows 10’s own HOTSPOT feature.

                   Note: Even though you are will be connecting directly to the FB8000
                   cutter (and you are not using the internet for this connection), the Windows
                   HotSpot feature requires an internet connection before you can enable the
                   HotSpot. So please bear in mind, without an internet connection made via
                   a router the Windows HOTSPOT feature can not be enabled. If you do
                   not have an internet connection then we recommend creating a DIRECT
                   connection (Below) which is how newer devices like some TV remote
                   controls (Roku 3 )work, to do this use a utility like Wi-Fi Direct Access point
                   (below).

2    . Use the Wi-Fi Direct Access Point. This is a paid for utility from the
       Windows Store for Windows 10 users.

                   Wi-Fi Direct makes a direct connection the the FB8000’s Wi-fi video feed
                   from the Camera, eliminating any routers or network management issues. It
                   does this using the Wi-Fi Direct standard, which enables devices to easily
                   connect with each other without requiring a wireless access point. Wi-Fi
                   Direct allows two devices to establish a direct Wi-Fi connection without
                   requiring a wireless router.

Configuring Windows Wi-Fi
HotSpot (Method 1)

1    . Check the task bar on your computer and
       ensure you have an internet connection. If
       NO Wi-Fi connection shows, or the “Not
       connected to the Internet” icon shows C                                                                       C
       then click on the icon and connect to your
       Wi-Fi router and enter any ID or passwords
       required.

2    . Check the task bar on your computer and
       ensure you have a the Wi-Fi connection
       showing D. (This is essential to start the
       Wi-Fi HotSpot)                                                                                               D

Intec Printing Solutions - ColorCut Pro 3 User Guide for Intec ColorCut FB8000 ..................................................................Page No: 10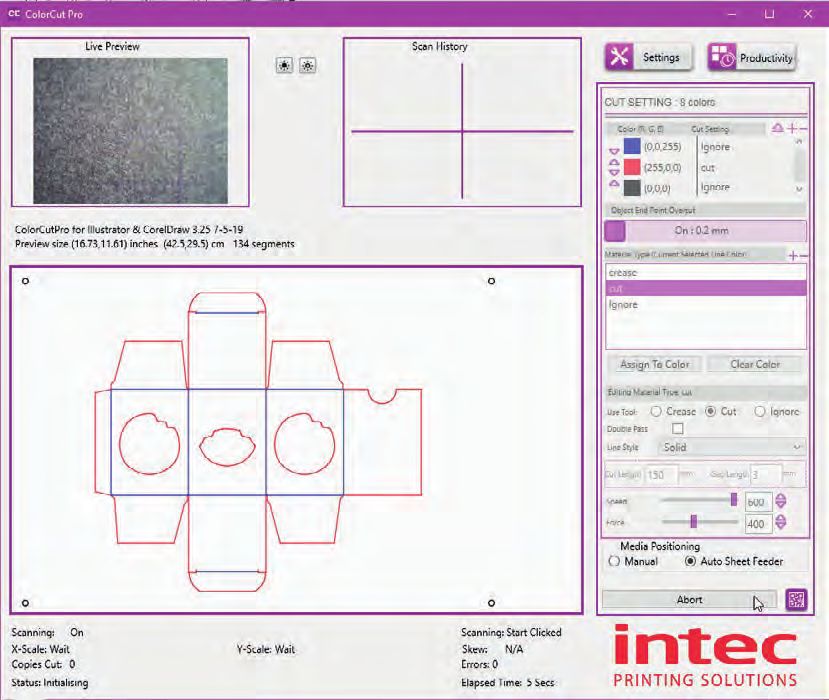
Configuring Windows Wi-Fi HotSpot (Cont.).

  . Left click on the Wi-Fi icon D in the task bar to
3   display the ‘Wi-Fi, Network & Internet setting’
    menu, then Right mouse click over the Mobile
    Hotspot E button in the lower right.

     The sub menu item ‘Go to Settings’ will be
     displayed. Click this.

                                                                                                                                              E

                                                                                                                           D

4   . The ‘Windows Mobile hotspot’ configuration menu will be displayed. This menu
      is only required when initially setting up the HotSpot. Each time you activate the
      HotSpot after this, the settings for the SSID, and Password will be remembered.

                                                                                                                     The Intec FB8000 is
                                                                                                                     set to make a direct
                                                                                                                     connection to a
                                                                                                                     2.4GHz WLAN with
                                                                                                                     an SSID of “H3”, and
                                                                                                                     broadcasts the Live
                                                                                                                     video feed to that
                                                                                                                     connection.

                                                                                                                     You need to set up
                                                                                                                     your HotSpot to
                                                                                                                     match this SSID
                                                                                                                     name. Click Edit F
                                                                                                                     to configure your
                                                                                                                     Hotspot to 2.4GHz,
                                                         F                                                           and set your SSID
                                                                                                                     and the password for
                                                                                                                     connection.

                  If you can’t activate the HotSpot and you
                  see the message show to the right, then
                  you skipped step 2. You must ensure
                  you have an internet connection to use
                  Windows HotSpot, even though the
                  cutter does not need one.

 Intec Printing Solutions - ColorCut Pro 3 User Guide for Intec ColorCut FB8000 ...................................................................... Page No: 11
Configuring Windows Wi-Fi HotSpot (Cont.).
. Under, Network Name, enter the SSID name ‘H3’ as shown G. Within the field,
5 Network password, enter the password ‘12345678’ H (The FB8000 automatically
will connect to the SSID H3, with a password of ‘12345678’. So these entries
must be set to match.
G
H
6 . The Intec FB8000’s Image Echo feature broadcasts using 2.4GHz, so it is
essential that you set the ‘Network Band’ I to 2.4GHz, if you set it to 5GHz
the cutter will not connect to your HotSpot and you will not be able to see the
Camera.
I
7 . Click save to save finish and save your setting. These will be remembered and in
future you only need to enable or disable the connection. When you click SAVE
you will be returned to the ‘Windows Mobile hotspot’ configuration dialogue box.
Intec Printing Solutions - ColorCut Pro 3 User Guide for Intec ColorCut FB8000 ..................................................................Page No: 12Configuring Windows Wi-Fi HotSpot (Cont.).
8 . In the ‘Windows Mobile hotspot’ configuration dialogue box, turn ON the ‘Share
my hotspot connection with other devices’ J.
At the bottom of this dialogue box you can see the devices that connect to your
computer K. It will take between 30 secs to 2 mins for the Intec FB8000 to see
the connection and connect to your Hotspot.
J
K
9 . After a short period (30 secs to 2mins)
you should see the Intec FB8000 device
connect. The IP address will be shown in
the connected devices list so you know it
has connected. L.
The setup is complete. In future you only
need to enable and disable your HotSpot,
to connect to the cutter. (See step 10 to
understand how to do this).
L
Intec Printing Solutions - ColorCut Pro 3 User Guide for Intec ColorCut FB8000 ...................................................................... Page No: 13Daily Operation - Enabling Windows Wi-Fi HotSpot.
10 . During daily operation you can now enable the connection to your Intec FB8000
cutter by simply clicking on the Wi-Fi icon in the Windows task bar M (Bottom
right of your screen).
Next click on the Mobile
HotSpot button N that appears
in the lower right corner of the
‘Network and Internet settings’
Dialogue box/menu that
appears.
N
M
The Mobile HotSpot button will
change color when it is activated,
and indicate the SSID name
(H3) and how many devices are O
connected. O
After enabling the mobile Hotspot,
ensure you power ON the Intec
FB8000 cutter, and allow 30 secs
- 2mins for it to connect to your
P HotSpot. Your Mobile HotSpot
will show when the device is
connected. P
You can now skip to the section on Graphic Design and Using ColorCut Pro. However,
if you do not have an Internet connection then follow the steps on how to set up a
direct connection to the Cutter without requiring an internet connection or router. (Wi-Fi
Direct Access Point following.)
Intec Printing Solutions - ColorCut Pro 3 User Guide for Intec ColorCut FB8000 ..................................................................Page No: 14Configuring Windows Wi-Fi Direct Access Point (Method 2)
1. ‘Wi-Fi Direct Access Point’ is an app available from the MicroSoft Store. It is
available for Win 10 users and enables you to set up a Direct Wi-Fi connection to
the Intec FB8000 Flatbed without the need for an internet connection or a separate
router. It is ideal for users without connection to a router OR users in secure
environments where connection to the Internet is not permitted for IT reasons, and
as such the normal Windows Wi-Fi HotSpot will not work.
‘Wi-Fi Direct Access B
Point’ (and other apps
may be available), is
a paid for application
available from the
MicroSoft Store.
To download it, open the Microsoft Store program from your Windows Start Menu,
and click on the SEARCH box B, enter the search term ‘Direct Access’ and the
app will appear in the search.
2 . Click on the application and
click [ GET ] to download it.
(Note: This is a paid app and
not part of the Intec FB8000,
please check it is compatible
with your Wi-Fi network (The
USB Dongles supplied have
been tested so if you are using
these it should be fine).
3 . After installing the Wi-Fi Direct Access
Point, locate the app from your Windows
START Menu and click to launch it.
Intec Printing Solutions - ColorCut Pro 3 User Guide for Intec ColorCut FB8000 ...................................................................... Page No: 15Configuring Windows Wi-Fi Direct Access Point (Cont.)
4 . The first time you launch Wi-Fi Direct Access Point, you will need to set the
Access Point Name (SSID) and the Security Key/Password to match the SSID
and Password that your
ColorCut FB8000 will try
to connect to.
C D
Click on the Access Point
Name SSID C and set it
to ‘H3’ .
Click on the Access Point
Security Key and set the
password to ‘12345678’
D
5 . Having entered the
Access Point Name and
the Password ensure
that is starts each time
with the same settings
by clicking the check
box next to “Start
Access Point with latest
settings on app startup”
E . Click on the button
‘START ACCESS POINT’
to configure the PC
E
to accept Direct Wi-Fi
connections.
6 . After clicking ‘START
ACCESS POINT’, the
FB8000 will take approx
30 secs to 2mins to see
the Wi-Fi access point
and connect. When the
FB8000 connects, you
will see the device and IP
address appear in the left F
column, F
You can now follow the the section on Graphic Design and Using ColorCut Pro. For
how to set up your artwork and how to configure the ColorCut Pro app for initial use
and daily operation.
Intec Printing Solutions - ColorCut Pro 3 User Guide for Intec ColorCut FB8000 ..................................................................Page No: 164. GRAPHICS FILE DESIGN - CREATING YOUR ARTWORK
The ColorCut Pro Plug-in works directly from Adobe Illustrator or CorelDRAW. It requires
the lines for cutting, perforating and creasing to be organised on a single layer. Therefore
when designing with graphics you should organize the graphic design in different layers:
- One or more layers for the main graphics (the printed artwork).
- One layer for the contour (the lines to be cut).
- PageMARKs, the marks that are used for Page Registration are automatically
placed for you on a different (additional) layer.
Designing using layers makes life easier because when printing, you don’t want to print
the cutting lines or folding lines on your artwork. Equally, when sending cutting lines
to the cutter, you don’t want to confuse the cutter with lines that may be in your printed
design. The layers feature enables you turn layers on or off as required. But in both
cases you need to have the registration marks available.
The most common mistake Graphics/Printing layer
people make is to print
all the layers including
the contour layer (the cut
lines) that make the prints
unusable in most cases.
Similar commands are available in
Adobe Illustrator and CorelDRAW to
enable and disable the layers.
In the pictures shown on this page
there is an external frame to indicate
the border of the sheet making it
easier for you to see the page.
Cut contour layer
Note: This is for illustration purposes
only.
Also please note: When you open
some PDF format files directly in
Adobe Illustrator or CorelDRAW, very
often you may also find an external
frame on the graphics. You will need
to delete the external frame if it exists
for the file to operate correctly with the
ColorCut Pro software.
Intec Printing Solutions - ColorCut Pro 3 User Guide for Intec ColorCut FB8000 ..................................................................Page No: 17Layers for printing In this example, the main graphics layer is visible and active. The ColorCut auto- generated 3rd layer with Alignment PageMARKs is visible. (Detailed later) The cut contour layer is disabled. This drawing is ready for printing. Layers for cutting In this example, the main graphics layer is disabled. The ColorCut auto-generated 3rd layer with Alignment PageMARKs is still visible. (Detailed later). The cut contour layer is active. This drawing is ready for cutting. If you used guidelines then it is not necessary to hide or remove them before saving. Intec Printing Solutions - ColorCut Pro 3 User Guide for Intec ColorCut FB8000 ..................................................................Page No: 18
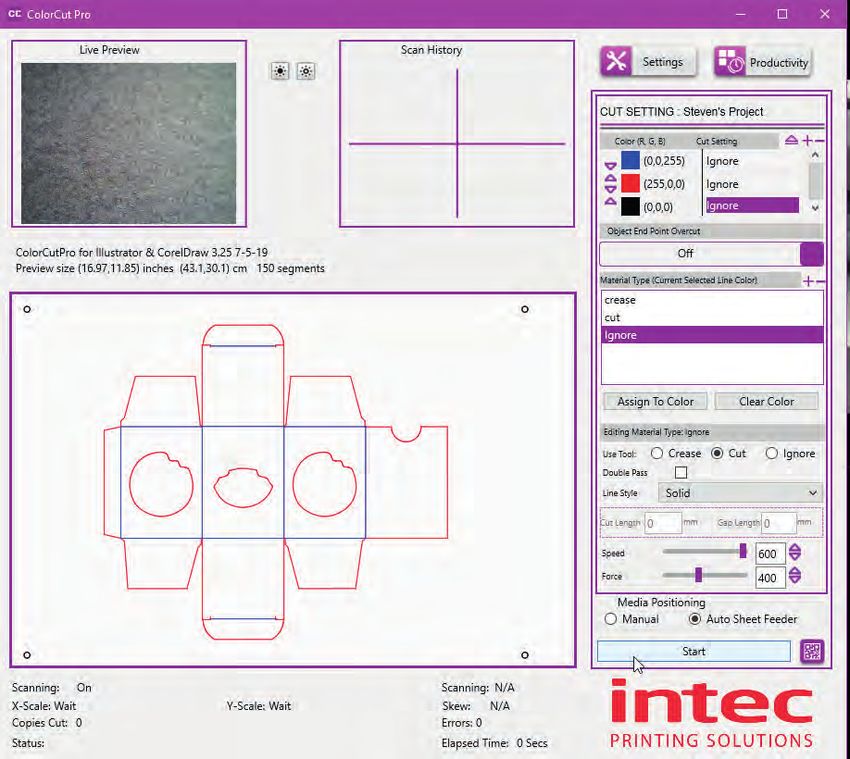
5. DRAWING CUT LINES, PERFORATION LINES OR CREASE LINES

The Intec ColorCut has 2 tools.
      A Blade Tool, which can be used to:                                              A double ended Creasing Tool
                                                                                       which can be used for:

            Contour-Cut shapes                                                               Wide Crease lines
            Score lines                                                                      Narrow Crease lines
            Perforate lines

When creating your projects you may wish to perform 2 or more actions with your cutter.
For example cutting a box and creasing the folds.
The easiest way to do this in your artwork is to use a different coloured line in your
design for the Crease line to the Cutting line. ColorCut Pro can recognise up to 8 pre-
defined colored lines (detailed below) making it easier for you to design and assign
actions for each line.
If you created a job with 4 colored lines (For example; RED, YELLOW, BLUE, GREEN) in
the ColorCut software you could set the actions as follows :
                RED to Cut using the Blade with full pressure
                YELLOW to Score, using the Blade with half pressure
                BLUE to Crease using the Creasing Tool, with full pressure.
and             GREEN to Perforate, using a dashed line and the Blade with full pressure.
NOTE: The actions you select a Line Color to perform can be reassigned at any time,
and the order in which they are performed can be adjusted easily. (See following pages).

Line Colors recognised by ColorCut Pro
These are the standard 8 colors that are can be recognised by ColorCut Pro.
ColorCut Pro will recognise the named colors in either RGB or C,M,Y,K.
                           Black                             Red                           Green                           Yellow

RGB No:                  (0,0,0)                        (255,0,0)                       (0,255,0)                      (255,255,0)
CMYK No:             [75,68,67,90]                     [2,98,95,0]                    [76,0,100,0]                      [4,2,98,0]

                            Blue                        Magenta                             Cyan                            Violet

RGB No:                 (0,0,255)                      (255,0,255)                     (0,255,255)                     (115,0,204)
CMYK No:               [91,80,1,0]                      [0,100,0,0]                     [100,0,0,0]                     [70,87,0,0]

The ColorCut Pro software will use Color matching for up to 256 variations of these
colors and it will generate the closest color to one of the above colors.

If you have designed your cut lines using a Pantone or other color spaces you must use
the Illustrator or CorelDRAW color commands to convert to (or remap) the color to one
of the above RGB or CMYK line colors.

Intec Printing Solutions - ColorCut Pro 3 User Guide for Intec ColorCut FB8000 ..................................................................Page No: 19
6. EXPLANATION OF THE REGISTRATIONS PAGEMARKS
Before you design your page you need to consider that each job requires 4 Registration
PageMARKs. The PageMARKs should be on all 4 corners of a rectangle that is at least
1mm larger than the cut lines. (i.e. The PageMARKs are parallel and perpendicular to
each other around yyour artwork. Either example below can be used.
Marks near page edges to maximise cutting area. Marks around artwork.
(Recommended for Automatic mode)
The first Registration PageMARK provides the origin of the job and is positioned at the
bottom left edge of the sheet The second provides scale (Y) and skew parameters and
is positioned top left in the drawing shown. The third mark provides skew and rotation
information and is positioned at the top right in the drawing shown and the final fourth
mark provides scale (X) and skew is bottom right.
Each Registration PageMARK is a 5mm diameter circle and should be 100% K black
with no outline.
Although you can manually draw the Registration PageMARKs on to your design,
PageMARKs do not need to be manually drawn on; ColorCut Pro will automatically add
them for you.
5mm
5mm
Intec Printing Solutions - ColorCut Pro 3 User Guide for Intec ColorCut FB8000 ..................................................................Page No: 21Explaination of the PageMARKs (Cont)
To maximise your cutting area you may choose to place the cut marks close to the
edge of your media. Be aware that there is a 8mm scanning zone around the cut
mark, (shown in red) so care should be taken not to
place artwork near the mark as this may be read by
the sensor and cause an error or reduce the accuracy
of PageMARK scanning.
In addition be aware that digital printers may have a
non-printable margin around the edge of the sheet.
So take care to observe your printer’s non-printable
margin when printing near the edges of a page so as The Vision3 Sensor needs 8mm
not to ‘clip’ the PageMARK. around the mark to read correctly
Technically, the absolute minimum margin (due to the scanning window) is 6mm
from the page edge or 8mm to artwork elements. However for best practise, it is
recommended NOT to place the marks closer than 10mm to the page edge (Note: the
registration mark is a 5mm diameter circle, the preferences for ‘automatically’ applying
marks, sets the distance to the centre of the cricel not the edge, so set a 12.5mm
margin in PageMarks preferences to achieve this). The recommended margins are
shown below .
Recommended distance
Recommended distance for top right PageMARK
from the top to the to the top of the page is
PageMARK. 10mm
0
10 mm 10 mm
10 mm 10 mm
10 mm 10 mm
Cut lines can extended
Recommended distance outside the perimeter of Recommended distance
from left side to the marks but care should of the PageMARK from
PageMARK is 10mm be taken that they do not the rear side 10mm
extend off the media area.
Intec Printing Solutions - ColorCut Pro 3 User Guide for Intec ColorCut FB8000 ..................................................................Page No: 227. AUTOMATICALLY ADD REGISTRATION PAGEMAKERS
You do not need to manually draw your PageMARKS on to your designs, ColorCut
Pro will automatically add the marks for you. After installing ColorCut Pro, upon
launching Illustrator (or CorelDraw), you will find a new set of options under the PRINT
command, in the FILE menu B.
B
C
D
Start by setting up how your PageMARKs will appear
on your jobs. Click on the Menu item ‘ColorCut Pro
PageMARK preferences’ C. (You only need to do
this on initial use.)
The ColorCut Pro PageMARKs Preference dialogue
box will appear D. You can use this control to set
where the cutting registration marks (PageMARKs) will appear on the sheet.
Choose if the marks are:
• Placed based on your page size and then define the margin (i.e. how far from
the page edge the centre of the PageMARK should appear).
or.
• Placed based on your design size and then define the margin (i.e. how far from
the design edges, that the centre of the PageMARK should appear).
With the FB8000 Pro including AutoSheet Feeder and in normal FB8000 operation,
it is recommended that you place the Marks based on your page size (as opposed
to based on your design size). This is because your page size will normally stay the
same, so positioning is easier and more consistent. Placing marks based on Design
size is not recommended when using the autofeeder and can be less efficient when
manually placing sheets.
Intec Printing Solutions - ColorCut Pro 3 User Guide for Intec ColorCut FB8000 ..................................................................Page No: 23Configuring Automatic PageMarks
. Select ‘Printing Position’ and select ‘Use Page Size’ B .
1 Note: Page size is updated from your
Artboard size in Illustrator, so you do
not need to adjust the page size setting
here it will automatically adjust when the
PageMARKs are added. B
. Locate the ‘PageMARK Orientation’ C section
2 and select the orientation for your design.
C
Ensure the PageMARKS are orientated so the 1st
mark and the QR code are placed on the lead
edge/feed edge of your media when in the feeder.
D
ColorCut Pro scans identifies the origin mark and
then moves the appropiate distance from your
design to locate the second/next mark (across the
lead/feed edge of the media - this is the edge of E
the media being advanced by the feeder (normally
the narrow edge)) So it is important add your
marks using the CORRECT orientation.
Failure to choose the correct orientation can mean your Cutter will try to
scan a mark that is located at a different position and fail (i.e. a distance
equivalent to the length of your sheet rather than the width).
If your design is Landscape then choose to add the PageMarks in a
Landscape Orientation. (Adding marks 1 &2 (and QR code if appropriate)
to the left edge - which is the lead edge when loaded in the feeder).
If your design is Portrait, then choose to add the PageMarks in a Portrait
Orientation. (Adding marks 1 & 2 (and QR code if appropriate) to the top
edge - which you rotate around when loading into the feeder and THEN
will become the lead edge in the feeder).
. Locate the ‘PageMARK Margins’ section D and enter the margin you would
3 like.
It is also IMPORTANT to note that the measurements are to the CENTRE of the
5mm round registration Mark. Therefore a 12.5mm margin to the centre of the
mark will give the recommended 10mm margin to the page edge.
4 . Sensor Type - The FB8000 Pro uses an advanced Vision 3 CCD camera sensor
which reads ROUND registration marks and will recognise QR codes. However
the ColorCut Pro applications supports a number of different Intec cutters,
some with standard IR sensors that use traditional square marks and barcodes.
Therefore to ensure that ColorCut Pro adds Round marks, please ensure that the
‘Sensor Type’ is set to “Vision3 CCD Camera (QR Code) “E in this dialogue box.
Intec Printing Solutions - ColorCut Pro 3 User Guide for Intec ColorCut FB8000 ..................................................................Page No: 24Additional Configuration for MAC users
Adding PageMARKs is exactly the same for MAC users, however Mac users will
typically use ColorCut Pro’s Job Library feature to assign a job number (and QR code
where applicable) to their jobs - enabling them to be cut efficiently in a production
enviroment.
MAC users wishing to use the Job Library
and QR Code feature must ensure that they
configure the connection to the Job Library
correctly, otherwise QR codes can not be
generated and added to jobs.
You will need to set the PC which is hosting
ColorCut Pro and connected to the FB8000
cutter, to broadcast/share the ColorCut Pro
Job Library folder.
F
There is a video guide on the Intec website
to guide you through this process, under
support, in the How to section; https://
intecprinters.com/how-to-video-support/
Once you have enabled the PC to share the
Job Library folder (ColorCut Pro Data), then
you will need to mount this share on your
MAC, and enter the path to it in the ‘Path
to Output’ section in the ColorCut Pro Add
PageMARKs preference screen. F
To confirm the path to be entered, please follow the video guide highlighted above,
or read the section ‘ MAC users - Connecting to the ColorCut Pro Job Library’ in the
separate ‘FB8000 - Setup & Installation guide’.
Intec Printing Solutions - ColorCut Pro 3 User Guide for Intec ColorCut FB8000 ...................................................................... Page No: 25Using ColorCut Pro Add PageMARKs
It is important to note, that when you activate the Add PageMARKs feature from the
File menu, the ColorCut Pro software will examine the currently selected ‘Layer’ in your
graphics application and isolate all vector lines and curves on the page.
You
Y may see an Error Message if there are artwork elements or images on the
layer selected when you launch ColorCut Pro. Therefore by drawing the cutting
profile and the artwork graphic on separate layers you can avoid this.
In this example, the graphic layer is active, this drawing is ready for printing.
Launching ColorCut
Pro Add PageMARKs
with the artwork layer
selected will generate
an error:
kRasterArt not supported
as ColorCut Pro does
not know how to
interpret the Graphics
as cutting lines.
Selecting the Layer to Add PageMarks
Ensure ONLY the vector lines you wish to cut and send to your Intec ColorCut
are on the layer selected before adding the PageMarks using ‘ColorCut Pro
Add Marks’. (You do NOT need to delete your artwork it simply must be on
a separate layer ). In the example below the Cutline is selected (The artwork
layer is not selected) and the layer is ready for you to add PageMARKs.
Note: We have hidden
the Artwork layer in this
example, however you
do not need to hide the
artwork layer.
The ONLY requirement.
is that you must select
the vector/cut line
layer and there should
be no artwork/printed
elements on the layer
you wish to cut or add
marks to.
Intec Printing Solutions - ColorCut Pro 3 User Guide for Intec ColorCut FB8000 ..................................................................Page No: 26Automatically Adding PageMarks
From the File menu in Illustrator or CorelDraw, select the menu item ‘ColorCut Pro
Add PageMARKs’. B
B
PageMarks will be automatically added to your job C, and you will see a NEW LAYER
‘ColorCutPro Auto Placement Only’ added in your layers palette. D
C C
D
C C
Intec Printing Solutions - ColorCut Pro 3 User Guide for Intec ColorCut FB8000 ...................................................................... Page No: 27Automatically Adding PageMarks (Cont.)
When printing your Artwork you will want to hide the cut lines as you do not want these
to print. Generating the PageMARKs on a separate layer means that you don’t hide
your PageMARKs when hiding your cut lines and enables you to leave the PageMARKs
layer visible alongside your artwork layer (while still enabling you to hide your cut lines).
Below the file is prepared for Printing (or saving as a PDF for Digital printing systems).
The cut line layer is hidden and NOT visible however the NEW LAYER which
includes the alignment PageMARKs ( ‘ColorCutPro Auto Placement Only’ ) is visible
alongside the layer including your artwork D, enabling your job to print with
your artwork AND the PageMARKs visible on your document.
D
QR Codes and the Job Library
The standard way of adding PageMARKs (detailed above) provides accurate cutting of
your files directly from Illustrator or CorelDraw. However in many cases the Graphic
Designer who generates the designs may not be the operator who is responsible for
also cutting the jobs.
Files including PageMARKs MUST be cut from Illustrator or CorelDraw, so this means
that the operator responsible for cutting the jobs must also use Illustrator or CorelDraw.
Even when the same operator is cutting the files, it may be some time later when the
printed job needs to be cut and this would require the operator to find and open the
original file again.
The ColorCut Pro Job Library feature makes cut file retrieval simpler, faster and more
efficient while also making cutting much easier.
Intec Printing Solutions - ColorCut Pro 3 User Guide for Intec ColorCut FB8000 ..................................................................Page No: 288. THE JOB LIBRARY & QR CODES
The recommended way to work is to assign a Job Number & QR code when adding
PageMarks. When you assign a Job number and QR code to your job, the cutting file
(lines for cutting) are sent automatically to a job file and stored in the Intec ColorCut Pro
Job library. This means that the file can be cut at any time using the ColorCut Pro (Job
Server) with NO NEED to open the original file in Illustrator or CorelDraw, simply by
scanning the QR code or manually entering the job number.
This enables faster, more efficient retrieval of cut files and simplifies the cutting
process. It also enables a different operator with no knowledge of drawing applications
such as Illustrator or Corel Draw to cut and finish the jobs.
The ‘Add PageMarks and QR Code’ feature will automatically apply the registration
PageMARKs to your jobs AND add the Job number, plus assign 2 QR codes to the
designB&C.
C
B
The reason there are 2 different QR codes is that the leading QR code (next to the
job number) identifies the sheet is the correct way round. The second(trailing) QR
code identifies the rear of the sheet. IF you accidentally mix the orientation of your
sheets when placing them in the FB8000 feeder or manually place it rotated on the
bed, the FB8000 will read what ‘should be’ the trailing QR code (QR code 2) first.
It will recognise that the sheet was placed or fed, rotated by 180 degrees and will
automatically rotate your cutting line for you so you still cut correctly.
The QR code MUST be placed next to the first mark scanned. As sheets are
typically feed on the FB8000 feeder, narrow edge first, this means QR codes
are placed on the LEFT edge for Landscape oriented jobs - or on the TOP of
the sheet for Portrait oriented jobs. The orientation of the Marks being added is
selected using the PageMark Placement Preferences from the FILE menu.
The Job Library function supports up to 999,999 different jobs. The valid range of
numbers is
1,000,000 - 1,999,999.
The software will automatically generate the job number for you (checking that the
number does not already exist first). However, if you wish to use your own job numbers
then you can manually enter this instead (providing it falls within the valid number range
of 1,000,000 - 1,999,999).
Intec Printing Solutions - ColorCut Pro 3 User Guide for Intec ColorCut FB8000 ..................................................................Page No: 29Automatically Adding PageMARKs and QR codes
When you select the ‘Add PageMARKs and QR code’ feature from the File menu,
the ColorCut Pro software will examine the currently selected ‘Layer’ in your graphics
application and isolate all vector lines and curves on the page. Therefore, the same
requirements apply when adding PageMARKs and QR codes as they do when adding
standard PageMARKs.
You will see an Error Message if there are artwork elements or images on
the layer selected when you launch ColorCut Pro. Therefore by drawing the
cutting profile and the artwork graphic on separate layers you can avoid this.
Therefore please remember to select the Cut line layer. With the Cut line layer (Not the
artwork layer) selected, select the menu item ‘Add PageMARKs and QR code’ from
the File menu.
D
The ‘Select QR Code Number’ dialogue box
will be displayed. A randomly generated QR
code & Job Number will be automatically filled
out in the Job number field.
Either accept the job number by clicking on E
the [ OK ] button, or enter your preferred job
number into the dialogue box. E
Intec Printing Solutions - ColorCut Pro 3 User Guide for Intec ColorCut FB8000 ..................................................................Page No: 30Automatically Adding PageMARKs and QR codes (Cont.)
PageMarks will be automatically added to your job F, along with the job number
G you selected, and 2 QR codes H& I. In addition you will see a NEW LAYER
‘ColorCutPro Auto Placement Only’ added in your layers palette. J
If your job already included a ‘ColorCutPro Auto Placement Only’
layer which had been either previously added using ‘Add PageMARKs’
OR had been added when using ‘Add PageMARKs & QR code’ but you
have change the QR code or changed the cutting lines, the existing
‘ColorCutPro Auto Placement Only’ layer will be replaced by the new
one. This is useful as if you have already printed the files with your QR
code and want to update the cutting profile, Re-generating the QRcode will
replace the existing saved cutting profile, updating it with your new one.
F F
J
I
G
H
F F
K
After generating your PageMARKs and
sending your job file to the ColorCut Pro
cutting library, K you will be asked IF you
want to open the file directly into ColorCut
Pro.
If you have already printed the file and wish to cut one, click YES. Alternatively if you
just want to see if all the lines transferred ok, also click YES to see the cutting job
preview. Otherwise, click NO to be returned to your artwork.
Remember to now hide your cut lines and make visible your artwork layer WITH the
PageMARKs and QR code to print or save as a PDF for printing later.
Intec Printing Solutions - ColorCut Pro 3 User Guide for Intec ColorCut FB8000 ...................................................................... Page No: 319.HOW TO CUT YOUR FILES USING COLORCUT PRO
Two different ways to use ColorCut Pro.
ColorCut Pro can be used in two different ways, please select the most suitable method
for your working environment.
1. ColorCut Pro (Direct) is the method of working where ColorCut Pro’s cutting
interface is launched DIRECTLY from your graphics application. The file currently open
in your graphics application will be transferred for cutting directly into the ColorCut
Pro application so you can cut the file you are working on (or open a previously saved
file). This way of working is ideal, for testing a design or for smaller companies where
the cutting will be handled by the same person that makes the artwork.
NOTE: When working in ColorCut Pro (Direct) mode, as ColorCut Pro is
launched directly from the graphic application it does require either Adobe
Illustrator or Corel Draw installed on the computer that will do the cutting. In
addition the operator will need to locate the file to cut and to be able to use
the graphics application in order to launch ColorCut Pro. For this reason, we
typically recommend using ColorCut Pro in stand-alone mode, also known as
ColorCut Pro Job Server mode.
2. ColorCut Pro (Job Server Mode) is the method of working where, in the design
stage when creating your files you add PageMARKS AND a QR code/ Job Number.
When you do this, the cutting lines are saved automatically in the Job library folder.
When using ColorCut Pro (Job Server Mode), ColorCut Pro is launched on its own
(stand alone) on your computer from the Windows Start Menu. It does not need
the original graphics file, or a graphics application installed on the computer. In
addition the simplified interface is designed to be used by any operator (typically a
Print Finisher with no specific computer or Graphic Applications skills) by providing a
START/SCAN QR button to start operation. The appropriate cutting file is retrieved
automatically by using the QR code, or can be retrieved manually by the operator
entering the job number.
Using ColorCut Pro in (Job Server) mode, streamlines the cutting process and
retrieves cut files for you making cutting much easier. It is the recommended way
of working, for busy designers so they can find the files quickly and especially in
companies where the cutter operator is a different person to the graphic designer, or
where a different computer will be used for the cutting such as in MAC environments.
NOTE2: When working in ColorCut Pro (Job Server) mode, as ColorCut Pro
will retrieve the cutting files from the job library for you, it is important that your
files where created with a Job Number and QR code using the ‘ColorCut Pro
‘ADD PageMARKS and QR code’ feature in the design process from your
Graphics Application.
The following section of this manual details how to launch ColorCut Pro to cut your files
using either method.
Intec Printing Solutions - ColorCut Pro User Guide for Intec ColorCut FB8000 .....................................................................Page No: 33You can also read