Sitecore Social Connected 8.1 - Sitecore Documentation
←
→
Page content transcription
If your browser does not render page correctly, please read the page content below
Sitecore Social Connected 8.1   Rev: September 13, 2018

Sitecore Social Connected 8.1
All the official Sitecore documentation.
Page 1 of 70

Logging in to a Sitecore website using social network credentials
The Social Connected module lets website visitors log in to the website with their social network credentials. This feature is called Social Connector. Sitecore does
not access the visitor’s credentials; it uses the API to communicate with the social network. If a visitor does not grant access to their profile information, the system
redirects them back to the website. The visitor still has to log in to the website.

When a website visitor logs in using their social network credentials, the Social Connected module receives all the information from the visitor’s profile that they
have allowed the social network to share.

The module saves the social profile information to a Sitecore user profile in the extranet domain and to a contact profile. A user profile stores service information,
such as access tokens, application ID, and so on. A contact profile stores the rest of the information, such as interests, sex, age, and so on.

Website visitors can use Social Connector to log in to the website with their social network credentials, thereby avoiding the registration process. Social Connector
also enables the website to collect more information about a website visitor from their social network profile.

The process of logging in to a Sitecore website

            Send feedback about the documentation to docsite@sitecore.net.

Configure advanced logging
The Social Connected module logs service information in the log files. You can enable more detailed logging. You can also customize logging to log information
about custom objects and classes.

Enable detailed logging

To enable the registering of the tracing information by Social Connected in the log files, in the website\app_config\include\social\sitecore.social.config
file, set the Social.Logging.TraceToLog setting to true.

Customize logging

To log information about your custom objects and static classes using the Social Connected API, you must implement formatters.

An object type or a static class must have an appropriate formatter that knows how to log this particular type.

Formatters are classes that implement the Sitecore.Social.Infrastructure.Logging.IEntityFormatter interface. Formatters are decorated with the
Sitecore.Social.Infrastructure.Logging.FormatterForAttribute attribute that specifies the type to log.

If there is no formatter defined for the object type and the type is marked with the System.SerializableAttribute attribute, the system uses the default formatter
that uses the SoapFormatter class to serialize objects into the SOAP format.

When you have implemented the formatters, you must specify the assemblies in which the formatters are stored:
Page 2 of 70

   1. Open the website\app_config\include\social\sitecore.social.config file.
   2. In the entityFormatterAssemblies node, in the assembly name parameter, specify the .dll files in which the module searches formatters:

The LogObject, LogStatic and LogEnumerable methods of the Social Connected log manager (the Sitecore.Social.Infrastructure.Logging.LogManager
class) now use your formatters for the appropriate types.

For a detailed description of the Social Connected logging API with examples, see the Sitecore.Social.Infrastructure.Logging namespace in the Social
Connected API document.

              Send feedback about the documentation to docsite@sitecore.net.

Configure posting interval
A message must meet all of the following requirements to be automatically posted to a social network:

    •   In the message configuration window, the Post automatically check box is selected.
    •   The message is either in the final state of a workflow or not in a workflow.
    •   The message has never been posted before.
    •   The corresponding content item is published after the message was created.

The Social Connected module uses the Sitecore.Social.Client.Tasks.PostFlaggedMessages scheduling agent to post content messages automatically after you
publish the Sitecore items that have content messages assigned to them.

This scheduling agent is ready to use, and it is configured to post messages that are ready to be posted to social networks every hour. Therefore, if you publish a
Sitecore item, the corresponding message is posted next time the scheduling agent runs. As a result, there is a delay between when an item is published and when the
corresponding message is posted.

To change the posting interval:

   1. Open the [website_root]\app_config\include\social\sitecore.social.config file.
   2. In the scheduling section, set the interval value:

                 /sitecore/system/social/accounts

              Send feedback about the documentation to docsite@sitecore.net.

The message search
The Social Connected module stores messages in the Sitecore/Social/Messages folder. This folder is an item bucket that has a configured index that the Social
Connected module uses to search for the messages. This index is based on the Lucene or Solr provider, and the Sitecore.ContentSearch API.

The following table shows the files in which you can change the index configuration for Lucene. The configuration files for Solr are identical but contain Solr in the
name of the files instead of Lucene.

                                           Configuration file                                                                        Section

\Website\app_config\Include\social\Sitecore.Social.Lucene.IndexConfiguration.config social/indexConfigurations

\Website\app_config\Include\social\Sitecore.Social.Lucene.Index.Master.config                            sitecore/contentSearch/configuration/indexes/index

\Website\App_Config\Include\social\Sitecore.Social.Lucene.Index.Web.config                               sitecore/contentSearch/configuration/indexes/index
Page 3 of 70

\Website\App_Config\Include\social\Sitecore.social.config                                              sitecore/settings

Note

The cache helps you to get the latest indexed data in a container. Other API methods, for example, GetMessagesByWorkflowState or GetMessagesByAccount,
depend on the corresponding job execution.

Solr configuration
Social Connected uses index names as names for Solr cores: social_messages_master and social_messages_web for the master and web databases respectively. If
you give Social Connected cores different names, you must specify these names in the Sitecore.Social.Solr.Index.Master.config and
Sitecore.Social.Solr.Index.Web.config files, in the  element.

Configuration for scaled environment
If you install the Social Connected module package on the Content Delivery server, you must edit the
\Website\App_Config\Include\social\Sitecore.Social.Lucene.Index.Web.config or
\Website\App_Config\Include\social\Sitecore.Social.Solr.Index.Web.config file specifying the name of the Content Delivery server database in the
database section. If you use a single common server for the Content Management and Content Delivery servers with the Master and Web databases, you can use the
default settings.

If you create a custom index for the Content Management or Content Delivery server, you must specify the index ID in the corresponding settings:

    • Social.Messages.SearchIndex.Master – the name of the Content Management server index
    • Social.Messages.SearchIndex.Web – the name of the Content Delivery server index

            Send feedback about the documentation to docsite@sitecore.net.

The Social Connected pipelines
The Social Connected module uses six pipelines. The pipelines are defined in the Sitecore.Social.config file. You can extend and customize the pipelines by
adding custom processors or replacing the default ones.

The social.createMessage pipeline
The social.createMessage pipeline is used when the module creates a message for a social network. It includes the following processors:

          Processor name                                 Description

GetRoot                              Gets a path in the content tree for the message item

                                     Creates two items under the messages root item:
CreateItem
                                         • Message
                                         • Posting configuration

SaveData                             Saves message data from its fields

The social.readMessage pipeline
The social.readMessage pipeline reads all the messages for the current item from the content tree and returns the messages collection. It includes one processor:

          Processor name                                 Description

ReadMessages                        Reads all the messages for the specified message IDs

The social.postMessage pipeline
The social.postMessage pipeline posts the message to the social network. It includes the following processors:
Page 4 of 70

          Processor name                                    Description

ResolveMessagePostingProvider        Selects a posting provider to post the message

PostMessage                          Posts the message to the social network

The social.buildMessage pipeline
The social.buildMessage pipeline builds the message before it is posted to the social network. It returns the message object that is ready to be posted. It includes
the following processors:

                 Processor name                                                         Description

ResolveRenderer                                     Returns the message builder for the posting configuration (goal or content)

BuildMessage                                        Builds the message

ReplaceTokens                                       Replaces tokens with their values

The social.matchUser pipeline
Thesocial.matchUserpipeline uses the data provided by a user to search for an existing user. If it cannot find the existing user, and the
CreateNewUserIfNoExistingFound property of the pipeline is set to true, it creates a new user.

                        Processor name                                                                        Description

PrepareUserData                                                   Creates a username and email for the user based on the user basic data.

FindByEmail                                                       Uses the email information provided by the user to search for an existing user

FindByDomain                                                      Searches for an existing user by domain

FindByNetworkCredentials                                          Uses the network credentials (ID) to search for an existing user

                                                                  This processor is specific to the Facebook network. It searches for an existing user by application-
                                                                  scoped IDs, if you use the Business Manager.
FindByFacebookIdsForBusiness
                                                                  Note

                                                                  This Social Connected functionality is available starting from Sitecore XP 8 Update-2.

CreateUser                                                        Creates a new user

The social.initializeApi pipeline
The social.initializeApi pipeline initializes social API. It includes one processor:

        Processor name                              Description

IoCInitialization                Initializes the inversion of control (IoC) container

             Send feedback about the documentation to docsite@sitecore.net.

Use the Social Connected configuration framework
The configuration framework in Social Connected lets you map the Sitecore configuration to C# classes. Using the configuration framework, you can encapsulate the
source of the configuration settings, removing dependency from Sitecore. This lets you easily substitute configuration in unit tests.

To use the Social Connected configuration framework to map the Sitecore configuration to C# classes:

   1. Create a settings class that represents a specific configuration using Sitecore.Social.Configuration.Model.ConfigurationData as a base class.

      Note

      The class is located in the Sitecore.Social.Configuration.dll assembly.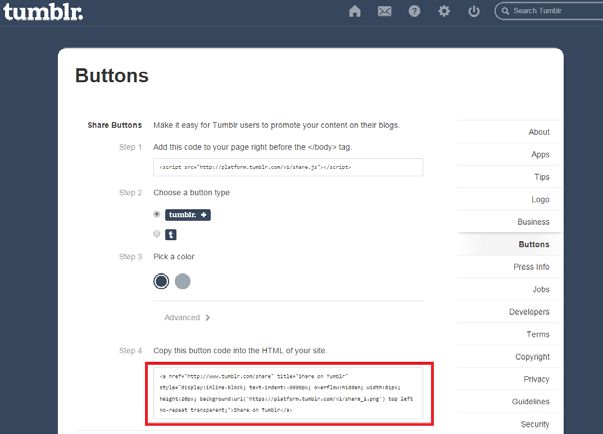
Page 5 of 70

   Use the following code as a sample:
   namespace Sitecore.Social.Tumblr.Configuration

   {

       using System;

       using Sitecore.Social.Configuration.Managers;

       using Sitecore.Social.Configuration.Model;

       ///

       /// Represents Tumblr specific settings.

       ///

       [Serializable]

       public class SettingsConfiguration : ConfigurationData

       {

           ///

           /// A read-only instance of the  class whose value represents a not defined configuration s

           ///

           public static readonly SettingsConfiguration Empty = new SettingsConfiguration();

           ///

           /// Gets or sets the default share goal.

           ///

           ///

           /// The default share goal.

           ///

           public string DefaultShareGoal { get; set; }

           ///

           /// Gets a value indicating whether the configuration is empty.

           ///

           ///

           ///       true if configuration is empty; otherwise, false.

           ///

           public override bool IsEmpty

           {

               get

               {

                   return this == Empty;

               }

           }

       }

   }

2. Implement the Configuration Manager: create a class that gets the configuration settings from Sitecore. Use the following sample code:
   namespace Sitecore.Social.Tumblr.Configuration

   {

       using Sitecore.Configuration;

       using Sitecore.Social.Configuration.Managers;

       using Sitecore.Social.Configuration.Model;

       ///

       /// Represents settings configuration manager for Tumblr.

       ///

       public class SettingsConfigurationManager : ConfigurationManager

       {

           ///

           /// Gets the configuration data.

           ///

           ///

           public override ConfigurationData GetConfigurationData()

           {

               return new SettingsConfiguration

                          {
Page 6 of 70

                                  DefaultShareGoal = Settings.GetSetting("Social.Tumblr.DefaultShareGoal", "Tumblr Share")

                               };

                }

            }

        }

   3. Map the Configuration Manager to the settings class by adding the Sitecore.Social.Configuration.Managers.ConfigurationManager attribute to the
      SettingsConfiguration class described in step 1, and set the ManagerType parameter to the type of the Configuration Manager that you implemented in step
      2. For example:
        ///

            /// Represents Tumblr specific settings.

            ///

            [Serializable]

            [ConfigurationManager(ManagerType = typeof(SettingsConfigurationManager))]

            public class SettingsConfiguration : ConfigurationData

            {

   4. Use the ConfigurationFactory class to get the appropriate settings class instance. The following code contains an example of how to retrieve the value of the
      DefaultShareGoal setting using the Social Connected configuration framework:

        var tumblrSettingsConfiguration = ExecutingContext.Current.IoC.Get().Get();

        var script = string.Format(

                       CultureInfo.CurrentCulture,

                       @"document.getElementById('{0}').addEventListener('click', function(){{{1}}})",

                       this.tumblrShareButton.ClientID,

                       SharingHelper.GetShareCallbackScript(this.GoalName, tumblrSettingsConfiguration.DefaultShareGoal));

You must add references to the following assemblies to make the code above work:

    • Sitecore.Social.Configuration.dll
    • Sitecore.Social.Infrastructure.dll
    • Ninject.dll

Note

Social Connected uses Ninject to resolve dependencies.

                    Send feedback about the documentation to docsite@sitecore.net.

Walkthrough: Configure Social Connected for Klout Scores
The Social Connected module can access information about a contact’s Klout Score if the contact logs in to your website with Twitter or Google+ credentials, or the
contact attaches one or both of these social networks to their profile. The Social Connected module transfers the Klout Score to the Sitecore analytics database –
Mongo DB.

You can use the Klout Score to personalize your website.

Important

When you register your app on Klout’s website, you enter into an agreement with Klout, who is an independent third party. Sitecore is not responsible for Klout’s
services or any losses arising from usage of these services.

This walkthrough describes how to:

    •   Configure the Social Connected module for Klout Scores
    •   Create a Klout application
    •   Create a Sitecore item for the Klout application
    •   Configure the Twitter or Google+ log-in control

Configure the Social Connected module for Klout Scores
Before you can access a contact's Klout Score, you need to ensure that Klout is enabled:

    • In the Website\app_config\include\social folder, rename Sitecore.Social.Klout.config.disabled to Sitecore.Social.Klout.config.

Create a Klout application
The Social Connected module receives visitors' Klout Scores from Klout via the application. To create a Klout application:

   1. Go to https://secure.mashery.com/login/developer.klout.com/ and click Register to build your awesome app.
   2. On the Applications tab, click Create a New Application.
Page 7 of 70

   3. Fill in the required fields.

Create a Sitecore item for the Klout application
After you have created a Klout application, you must create a Sitecore item for it. This Sitecore item contains connection keys that Sitecore uses to get the
information from Klout.

To create a Sitecore item for the Klout application:

   1. In Sitecore, in the Content Editor, open the sitecore/system/social/Klout/applications/default folder.
   2. Create an item based on the /sitecore/templates/System/Social/Klout/Klout Application template.

        Important

        The sitecore/system/social/Klout/applications/default folder must contain only one Klout item. If you want to use several applications for Klout, you must
        create a new item for each one in the sitecore/system/social/Klout/applications folder.

   3. In the new item, fill in the following fields:

                                     Field                                                                          Value

                                                                  The ID value of the Klout application. To get the ID, go to http://developer.klout.com/apps/myapps
        Application ID                                            and then click Edit application. You can see the ID in the last part of the URL:
                                                                  http://developer.klout.com/apps/edit/ID.

                                                                  The Key value of the Klout application. You can get the key on this page:
        Application Key
                                                                  http://developer.klout.com/apps/mykeys.

                                                                  The Shared Secret value of the Klout application. You can get this value on this page:
        Shared Secret
                                                                  http://developer.klout.com/apps/mykeys

Configure the Twitter or Google+ log-in control
Klout does not have its own Sitecore log-in control. Twitter and Google+ log-in controls use the Klout application to get the Klout Score. By default, the Twitter and
Google+ log-in controls are configured to use the Klout application from the /sitecore/system/Social/Klout/Applications/Default folder.

If you want to set up a control to use an application that is not included in the Default folder:

   1.   In Sitecore, in the Content Editor, click the item that contains either the Login with Twitter or the Login with Google login control.
   2.   On the ribbon, on the Presentation tab, click Details.
   3.   In the Layout details dialog box, click either the Login with Twitter or the Login with Google control.
   4.   In the Klout Application field, select the application that you want the control to use.
Page 8 of 70
Send feedback about the documentation to docsite@sitecore.net.
Walkthrough: Configuring Share buttons using Sitecore MVC
You can configure and place Share buttons from different social networks on your website. When a website visitor clicks a Share button, an appropriate message with
the link to the website is displayed in the social network. You can use either Sitecore sublayouts or Sitecore MVC renderings to create Share buttons, depending on
the functionality you use on your website. In this walkthrough, Tumblr is used as an example.
Follow this walkthrough if you use Sitecore MVC.
This walkthrough describes how to:
• Create a Share button campaign
• Create a Share button goal
• Create a Share button MVC controller
• Create a Share button MVC view
• Create the Share button MVC controller rendering
• Track MVC Share button events
Create a Share button campaign
You can assign any campaign to a Share button. This feature uses Sitecore xDB. You can use standard Sitecore campaigns or create new ones for Social Connected.
To create a campaign for a Share button:
1. In the Content Editor, navigate to /sitecore/system/Marketing Control Panel/Campaigns/Social and click the relevant social network campaign
group, for example, Tumblr.
2. Under the Tumblr category item, create a new item based on the Campaign template (/sitecore/templates/System/Analytics/Campaign). Name the new
item, for example, Tumblr Share Buttons.
Note
Sitecore xDB requires a campaign to be deployed before you can use it. To deploy the new campaign, on the Home tab, click Edit and then click Deploy.
Create a Share button goal
Some social networks allow users to subscribe to Share button events. For example, Twitter’s Tweet button has a ‘tweet’ event, which occurs when a user publishes a
tweet using the Tweet button.
You can use standard Sitecore goals or create new ones for Social Connected. To create a goal for a Share button:
1. In the Content Editor, navigate to /sitecore/system/Marketing Control Panel /Goals.
2. In the Goals folder, create a new goal. Name it, for example, Tumblr Share.
Note
Sitecore xDB requires a goal to be deployed before you can use it. To deploy the new goal, on the Home tab, click Edit and then click Deploy.
Create a Share button MVC controller
Social Connected uses the Sitecore controller rendering feature.
To create a Share button MVC controller:
1. Create a controller in the Sitecore.Social.Tumblr.Client.Mvc project.
2. Use the Sitecore.Social.Client.Mvc.Areas.Social.Controllers.SharingController as a base class:
namespace Sitecore.Social.Tumblr.Client.Mvc.Areas.Social.Controllers
{
using System.Web.Mvc;
using Sitecore.Globalization;
using Sitecore.Social.Client.Common.Helpers;
using Sitecore.Social.Client.Mvc.Areas.Social.Controllers;
using Sitecore.Social.Client.Mvc.Areas.Social.Models;
///
/// Tumblr sharing button controller.
///
public class TumblrSharingController : SharingController
{
///
/// Gets Tweet button view.
///
/// Tweet button view.
public PartialViewResult TumblrButton()
{Page 9 of 70
return this.PartialView(
"~/Areas/Social/Views/Sharing/TumblrButton.cshtml",
new ShareButtonViewModel
{
SharePageUrlWithAnalyticsParameters = SharingHelper.GetSharePageUrlWithAnalyticsParameters(this.CampaignId),
Text = Translate.Text(Common.Texts.ShareOnTumblr)
});
}
}
}
Create a Share button MVC view
To create a view for the MVC Share button:
1. Use the relevant code to create a view for the MVC share button. For example, for Tumblr you can find the original markup of the Tumblr Share button at
https://www.tumblr.com/buttons.
2. Store this view with the other views, for example, at: /Areas/Social/Views/Sharing/TumblrButton.cshtml
Sample code
@model Sitecore.Social.Client.Mvc.Areas.Social.Models.ShareButtonViewModelPage 10 of 70
///
/// Gets or sets the Tumblr share button identifier.
///
///
/// The Tumblr share button identifier.
///
public string TumblrShareButtonId { get; set; }
}
}
3. Update the MVC sharing controller code. Compose a script that subscribes the code generated by the SharingHelper.GetShareCallbackScript method to
the click event of the Tumblr Share button. For example, use the following sample code:
namespace Sitecore.Social.Tumblr.Client.Mvc.Areas.Social.Controllers
{
using System;
using System.Globalization;
using System.Web.Mvc;
using Sitecore.Common;
using Sitecore.Globalization;
using Sitecore.Social.Client.Common.Helpers;
using Sitecore.Social.Client.Mvc.Areas.Social.Controllers;
using Sitecore.Social.Tumblr.Client.Mvc.Areas.Social.Model;
///
/// Tumblr sharing button controller.
///
public class TumblrSharingController : SharingController
{
///
/// Gets Tweet button view.
///
/// Tweet button view.
public PartialViewResult TumblrButton()
{
var tumblrShareButtonId = string.Format("tumblrShare_{0}", Guid.NewGuid().ToID().ToShortID());
var script = string.Format(
CultureInfo.CurrentCulture,
@"document.getElementById('{0}').addEventListener('click', function(){{{1}}})",
tumblrShareButtonId,
SharingHelper.GetShareCallbackScript(this.GoalName, Configuration.Settings.GetSetting("Social.Tumblr.DefaultShareGoal")));
return this.PartialView(
"~/Areas/Social/Views/Sharing/TumblrButton.cshtml",
new TumblrShareButtonViewModel
{
SharePageUrlWithAnalyticsParameters = SharingHelper.GetSharePageUrlWithAnalyticsParameters(this.CampaignId),
Text = Translate.Text(Common.Texts.ShareOnTumblr),
SubscribeToShareButtonEventScript = script,
SharePageUrl = SharingHelper.GetSharePageUrl(),
TumblrShareButtonId = tumblrShareButtonId
});
}
}
}
Note
For simplicity, this example uses Sitecore API to get a value of the Social.Tumblr.DefaultShareGoal setting. However, we recommend using Social Connected
configuration framework.
1. Update the MVC sharing view code to enable the event tracking functionality. Update the @model to
Sitecore.Social.Tumblr.Client.Mvc.Areas.Social.Model.TumblrShareButtonViewModel.
2. Set the share button link ID to Model.TumblrShareButtonId.
3. Render the Model.SubscribeToShareButtonEventScript.Page 11 of 70 Sample code @model Sitecore.Social.Tumblr.Client.Mvc.Areas.Social.Model.TumblrShareButtonViewModel
Page 12 of 70

Create a Share button parameters template
You must create a parameters template to pass the parameters to the share button controls, such as Campaign and Goal.

To create a parameters template for a Share button:

   1. In the Content Editor, navigate to /sitecore/templates/System/Social/Sharing.
   2. In the Sharing folder, create a new template with the following parameters:
           ◦ Name – Tumblr Share Button Parameters
           ◦ Base template – /sitecore/templates/System/Social/Sharing/SharingControlParameters
   3. Create a __Standard Values item.
   4. In the __Standard Values item, set the Goal and Campaign fields to the appropriate share button goal and campaign.

Create a Share button sublayout
To create a share button sublayout:

   1. In the Content Editor, navigate to /sitecore/layout/Sublayouts/Social/Sharing.
   2. In the Sharing folder, create a new sublayout with the following parameters:
           ◦ Name – the name of the new Share Button sublayout, for example,Tumblr Button
           ◦ Item Location – /sitecore/layout/Sublayouts/Social/Sharing
           ◦ File Location – website/layouts/system/social/sharing
   3. Check the Create the associated C# code files check box.
   4. In the Tumblr Button item, in the Parameters Template field, select the Share Button Parameters template that you just created.

Create a Share button sublayout markup
To create a sublayout markup of a share button, for example, for Tumblr:

   1. Go to https://www.tumblr.com/buttons
   2. Copy the code:

   3. Open the \website\layouts\system\social\sharing\TumblrButton.ascx file.
   4. In the TumblrButton.ascx file:
           ◦ Paste the code that you copied from the Tumblr website.
           ◦ Replace the value of the href attribute with:
      http://www.tumblr.com/share/link?url=
Page 13 of 70 Sample code In the sample code below, the href and title attributes have been set in the code behind. The TumblrButton.ascx file:
Page 14 of 70

}

Note

The button class inherits from the Sitecore.Social.Client.Sharing.Controls.ShareButtonBase class. This base class manipulates rendering parameters.

Track sublayout Share button events
You can track Share button events to get the statistics of how many times people shared or liked a post on your website.

Update the TumblrButton.ascx.cs file with this code to enable event tracking:
namespace Sitecore.Social.Tumblr.Client.Sharing.Controls

{

    using System;

    using System.Globalization;

    using System.Web;

    using System.Web.UI.HtmlControls;

    using Sitecore.Globalization;

    using Sitecore.Social.Client.Common.Helpers;

    using Sitecore.Social.Client.Sharing.Controls;

    ///

    /// Tweet button control.

    ///

    public class TumblrButton : ShareButtonBase

    {

        ///

        /// The Tumblr share button

        ///

        protected HtmlAnchor tumblrShareButton;

        ///

        /// Handles the Load event of the Page control.

        ///

        /// The source of the event.

        /// The  instance containing the event data.

        protected void Page_Load(object sender, EventArgs e)

        {

            if (!this.IsPostBack)

            {

                this.tumblrShareButton.Title = Translate.Text(Common.Texts.ShareOnTumblr);

                this.tumblrShareButton.HRef = string.Format("http://www.tumblr.com/share/link?url={0}", HttpUtility.UrlEncode(SharingHelper.Get

                this.tumblrShareButton.InnerText = Translate.Text(Common.Texts.ShareOnTumblr);

            }

            var script = string.Format(

                CultureInfo.CurrentCulture,

                @"document.getElementById('{0}').addEventListener('click', function(){{{1}}})",

                this.tumblrShareButton.ClientID,

                SharingHelper.GetShareCallbackScript(this.GoalName, Configuration.Settings.GetSetting("Social.Tumblr.DefaultShareGoal")));

            this.Page.ClientScript.RegisterStartupScript(this.GetType(), "tumblrsubscribe" + this.tumblrShareButton.ClientID, script);

        }

    }

}

Note

When a visitor clicks the share button, a goal that is set in the rendering parameters will be triggered. If no goal has been set, the default goal will be used. This is
specified in the Social.Tumblr.DefaultShareGoal Sitecore setting:
Page 15 of 70
-->
For simplicity, this example uses Sitecore API to get a value for the Social.Tumblr.DefaultShareGoal Sitecore setting. However, you should use the Social
Connected configuration framework.
Send feedback about the documentation to docsite@sitecore.net.
Walkthrough: Configuring Social Connected for posting messages
To enable marketers to post content messages in the Social Connected module, you must configure the module to access social networks. When interacting with
social networks, the module uses the API of the social networks.
You must create a social network application for every social network that you want the module to communicate with, create a Sitecore item for the social network
application, and create a Sitecore item for the social network account.
This walkthrough outlines how to:
• Create a social network application
• Create a Sitecore item for the social network application
• Create an account folder
• Create a social network account item
• Assign security permissions to an author
• Delete a social network account item
Create a social network application
Before you can link your website to a social network, you must first create an application. The Social Connected module receives visitors' profile information from a
social network via the social network application.
You can create applications and link to the following social networks:
• Facebook
• Twitter
• LinkedIn
• Google+
Create a Facebook application
To create a Facebook application:
1. Go to https://developers.facebook.com/apps and create an application on the website platform.
2. In the Facebook application, fill in all the required fields.
3. Add a website platform.
4. Enter the URL of the webpage where you want to place the login controls.
5. In the App Domains field, enter all the CD and CM domains, and in the Site URL field, enter the CM domain:Page 16 of 70
If your Sitecore instance uses a scaled environment, Social Connector requires that the base domain for all the Content Delivery (CD) and Content Management
(CM) servers is the same.
6. On the pane on the left, click Status & Review, and click the switch to make your app publicly available.
Facebook Business Manager
Note
You can use this functionality of Social Connected starting from Sitecore XP 8 Update-2.
In case you plan to assign different Facebook applications to different Facebook login controls, you should perform additional configuration.
Starting from version 2.0, Facebook Graph API introduces application-scoped user IDs, which means that an ID of the same person is different between Facebook
applications.
To allow Social Connected properly match users across different applications, you should set up the Business Manager and link it to all Facebook applications you
are planning to use on your site. For more information on how to set up the Business Manager, visit the following website: https://business.facebook.com/
Create a Twitter application
To create a Twitter application:
1. Go to https://dev.twitter.com/apps and create a new application.
2. In the Twitter application, fill in all the required fields.
3. Enter the URL of the webpage where you want to place the login controls.
4. Set the application permissions to Read, Write and Access direct messages.
Create a LinkedIn application
To create a LinkedIn application:
1. Go to https://www.linkedin.com/secure/developer and create a new application.
2. In the LinkedIn application, fill in all the required fields.
3. Enter the URL of the webpage where you want to place the login controls.Page 17 of 70
Create a Google+ application
To create a Google+ application:
1. Go to https://console.developers.google.com/project and create a new project.
2. In the Google+ project, enable Google+ API.
3. On the Credentials page, create a new client ID.
4. In the Create Client ID dialog box:
◦ In the Authorized Javascript origins field, enter http://hostname
◦ In the Authorized redirect URI field, enter:
http://hostname/layouts/system/Social/Connector/SocialLogin.ashx?type=google_access
http://hostname/layouts/system/Social/Connector/SocialLogin.ashx?type=google_add
http://hostname/layouts/system/Social/Connector/SocialLogin.ashx?type=access
where hostname is the name of the host that is running the website.
If your Sitecore instance uses a scaled environment, in the Authorized redirect URI field, enter the same URIs replacing hostname with all the CD and CM
domains, for example:
5. On the Credentials page, in the Public API access section, click Create new Key.
Create a Sitecore item for the social network application
After you have created a social network application, you must create a Sitecore item for it. This Sitecore item contains connection keys that Sitecore uses to work
with the social network application.
To create a Sitecore item for the social network application:
1. In Sitecore, in the Content Editor, open the sitecore/system/social/applications/default folder.
2. Create an item based on the sitecore/templates/system/social/application template.
Important
The sitecore/system/social/applications/default folder must contain only one item for a social network. If you want to use several web applications for one
social network, you must create new items for each web application in the sitecore/system/social/applications folder.
3. In the new item, fill in the Application Id, Application Secret, Public API key (for Google+ only) and Network fields:
Field ValuePage 18 of 70
Facebook – the App ID value
Twitter – the API Key value
Application Id
LinkedIn – the API Key value
Google+ – the Client ID value
Facebook – the App Secret value
Twitter – the API Secret value
Application Secret
LinkedIn – the Secret Key value
Google+ – the Client Secret value
Public API key Google+ – the API Key value
Networks/Facebook
Networks/Twitter
Network
Networks/LinkedIn
Networks/Google+
Create an account folder
Before you create an account item, you can create an account folder to group your account items.
To create an account folder:
1. In Sitecore, in the Content Editor, open the sitecore/system/social/accounts folder.
2. Click the Account Folder insert option, and enter the name of the folder.
3. In the new folder, on the Content tab, in the Default Application Folder field, specify the application folder.
When you create an account item from this folder, the Add a Social Network Account wizard only displays applications from this application folder.
Create a social network account item
A social network account item stores the credentials of the social network account that you post messages to. For example, this could be a company account or a
personal account. If the messages for this account need to be reviewed before posting, a social network account item stores review settings.Page 19 of 70
To create a social network account item:
1. In the Content Editor, open the sitecore/system/social/accounts folder, and select an account folder.
2. Click the Facebook Account, Twitter Account, LinkedIn Account, Google+ Account or Social Marketer Account insert option.
The Create a Social Network Account wizard guides you through the process of creating a social network account item.
The following table shows the most relevant settings to create an account item using the wizard:
Wizard page Description
Social Network Application Select the social network application that the account uses to cooperate with the social network.
Enter the credentials of the social network user account. The module posts messages to the timeline or pages of the
specified user.
By default, an authentication session timeout is set to 60 seconds. During this period, the user can log in to the
Authentication social network. If the user does not log in to the social network within this timeframe, the wizard stops. You can
change this default timeout parameter in the social.config file, in the
Social.AddNetworkAccountWizard.AuthenticationTimeout setting.
To create an account, you must accept all the permission requests from the social network application.
If you do not want the messages to go through the review process before posting, skip this page.
Review If you want the messages to be reviewed, select a workflow to place the messages to, and assign roles for the
reviewer.
If you use the default Social Message workflow, we recommend that you assign the following security roles to the reviewer:
Messages Reviewer Role
sitecore\Social Message Workflow Reviewer
Facebook sitecore\Author
sitecore\Facebook Message Reviewer
sitecore\Social Message Workflow Reviewer
Twitter sitecore\Author
sitecore\Twitter Message Reviewer
sitecore\Social Message Workflow Reviewer
sitecore\Author
Facebook and Tweeter
sitecore\Facebook Message Reviewer
sitecore\Twitter Message Reviewer
If you use the default Social Marketer Message workflow, we recommend that you assign the sitecore\Social Marketer Message Reviewer role.
If you use your customized workflow, use the security roles that you created for this workflow.
Assign security permissions to an author
To let the authors create content messages, you must make them members of the following security roles:
• sitecore\Author
Permissions to the Content Editor, Workbox, and the Messages dialog box.
• sitecore\Social Message Author
Permissions to create, edit, and remove all messages
• sitecore\Social Message Workflow Editor
This role is required if an author works with the messages in the Social Message workflow. Permissions to use the Draft state and its commands in the Social
Message workflow.
Delete a social network account item
You can delete a network account item or a social marketer account item in the same way that you delete a Sitecore item. When you click Delete the item, the
Breaking Links dialog box appears:Page 20 of 70
If the item that you want to delete has attached messages, these messages are not deleted. However, the Link to another item option does not link the existing
messages to another item. If you want to use existing messages, you must create new messages and move the content from the existing messages to the new ones.
Send feedback about the documentation to docsite@sitecore.net.
Walkthrough: Configuring Social Connected in a scaled environment
If your Sitecore solution works in a scaled environment, you must configure the Social Connected module to work in this environment.
Prerequisites:
• The Sitecore solution must be configured according to the Sitecore scaling recommendations.
• The CM and CD servers must have access to the social network services over the Internet.
• The Core database should be shared between all the CM and CD servers or data replication should be used instead.
This walkthrough outlines how to:
• Disable Social Connected configuration files on the Processing and Reporting servers.
• Disable indexes specific to the CM servers.
• Disable the Experience Profile plugin on the CD servers.
• Enable scalability.
• Set the URL that is used in messages.
• Set up the scheduling activities.
Disable Social Connected configuration files on the Processing and Reporting Servers
On all Processing and Reporting servers:
1. In the \Website\App_Config\Include\Social folder, find all the configuration files.
2. Rename these files to [file_name].config.disabled.
Disable indexes specific to the CM servers
On all the CD servers:
1. In the \Website\App_Config\Include\Social folder, find all the configuration files with the Index.Master suffix.
2. Rename these files to [file_name].config.disabled
Disable the Experience Profile plugin on the CD servers
On all the CD servers:
1. In the \Website\App_Config\Include\Social folder, find the Sitecore.Social.ExperienceProfile.config file.
2. Rename it to Sitecore.Social.ExperienceProfile.config.disabled.
Enable scalability
On all the CD and CM servers:
1. In the \Website\App_Config\Include\Social folder, rename the Sitecore.Social.ScalabilitySettings.config.disabled file to
Sitecore.Social.ScalabilitySettings.config.
2. In the file, set the value of the Social.Scalability.ContentManagement.TasksExecutionInstance setting to the name of the CM server that performs all
the scheduled activities. This value must be the same on all the servers because only one CM server must perform the scheduling activities.
Set the URL that is used in messages
On all the CM servers:
1. In the \Website\App_Config\Include\Social folder, find the Sitecore.Social.config file.
2. Set the value of the Social.LinkDomain setting to the host name.
Set up the scheduling activities (optional)
On all the CM and CD servers except for the CM server that performs the scheduled activities:Page 21 of 70
1. In the \Website\App_Config\Include\Social folder, find the Sitecore.Social.config file.
2. In the scheduling section, for all four agents, set the interval parameter to 00:00:00.
3. If you have enabled Sitecore.Social.Klout.config, in the scheduling section, in the Sitecore.Social.Klout.Client.Tasks.SynchronizeKloutScores
agent, set the interval parameter to 00:00:00.
Send feedback about the documentation to docsite@sitecore.net.
Walkthrough: Configuring Social Connector to work with a social network
After you have installed the Social Connected module, you must configure the Social Connector before website visitors can log in to your website using social
network credentials.
This walkthrough outlines how to:
• Create a social network application
• Create a Sitecore item for the social network application
• Configure access to the visitor’s profile information
• Request approval for Facebook application permissions
• Configure and add the social network log-in control to your website
• Improve the performance of Social Connector
Create a social network application
Before you can link your website to a social network, you must first create an application. The Social Connected module receives visitors' profile information from a
social network via the social network application.
You can create applications and link to the following social networks:
• Facebook
• Twitter
• LinkedIn
• Google+
Create a Facebook application
To create a Facebook application:
1. Go to https://developers.facebook.com/apps and create an application on the website platform.
2. In the Facebook application, fill in all the required fields.
3. Add a website platform.
4. Enter the URL of the webpage where you want to place the login controls.
5. In the App Domains field, enter all the CD and CM domains, and in the Site URL field, enter the CM domain:
If your Sitecore instance uses a scaled environment, Social Connector requires that the base domain for all the Content Delivery (CD) and Content Management
(CM) servers is the same.
6. On the pane on the left, click Status & Review, and click the switch to make your app publicly available.Page 22 of 70 Facebook Business Manager Note You can use this functionality of Social Connected starting from Sitecore XP 8 Update-2. In case you plan to assign different Facebook applications to different Facebook login controls, you should perform additional configuration. Starting from version 2.0, Facebook Graph API introduces application-scoped user IDs, which means that an ID of the same person is different between Facebook applications. To allow Social Connected properly match users across different applications, you should set up the Business Manager and link it to all Facebook applications you are planning to use on your site. For more information on how to set up the Business Manager, visit the following website: https://business.facebook.com/ Create a Twitter application To create a Twitter application: 1. Go to https://dev.twitter.com/apps and create a new application. 2. In the Twitter application, fill in all the required fields. 3. Enter the URL of the webpage where you want to place the login controls. 4. Set the application permissions to Read, Write and Access direct messages. Create a LinkedIn application To create a LinkedIn application: 1. Go to https://www.linkedin.com/secure/developer and create a new application. 2. In the LinkedIn application, fill in all the required fields. 3. Enter the URL of the webpage where you want to place the login controls.
Page 23 of 70

Create a Google+ application

To create a Google+ application:

   1. Go to https://console.developers.google.com/project and create a new project.
   2. In the Google+ project, enable Google+ API.

   3. On the Credentials page, create a new client ID.
   4. In the Create Client ID dialog box:
           ◦ In the Authorized Javascript origins field, enter http://hostname
           ◦ In the Authorized redirect URI field, enter:

            http://hostname/layouts/system/Social/Connector/SocialLogin.ashx?type=google_access

            http://hostname/layouts/system/Social/Connector/SocialLogin.ashx?type=google_add

            http://hostname/layouts/system/Social/Connector/SocialLogin.ashx?type=access

            where hostname is the name of the host that is running the website.

      If your Sitecore instance uses a scaled environment, in the Authorized redirect URI field, enter the same URIs replacing hostname with all the CD and CM
      domains, for example:

   5. On the Credentials page, in the Public API access section, click Create new Key.

Create a Sitecore item for a social network application
After you have created a social network application, you must create a Sitecore item for it. This Sitecore item contains connection keys that Sitecore uses to work
with the social network application.

To create a Sitecore item for the social network application:

   1. In Sitecore, in the Content Editor, open the sitecore/system/social/applications/default folder.
   2. Create an item based on the sitecore/templates/system/social/application template.

      Important

      The sitecore/system/social/applications/default folder must contain only one item for a social network. If you want to use several web applications for one
      social network, you must create new items for each web application in the sitecore/system/social/applications folder.

   3. In the new item, fill in the Application Id, Application Secret, Public API key (for Google+ only) and Network fields:

             Field                       Value
Page 24 of 70
Facebook – the App ID value
Twitter – the API Key value
Application Id
LinkedIn – the API Key value
Google+ – the Client ID value
Facebook – the App Secret value
Twitter – the API Secret value
Application Secret
LinkedIn – the Secret Key value
Google+ – the Client Secret value
Public API key Google+ – the API Key value
Networks/Facebook
Networks/Twitter
Network
Networks/LinkedIn
Networks/Google+
Configure access to a visitor’s profile information
The first time a visitor logs in to your website with their social network credentials, the social network asks the visitor to grant your website access to the information
on their social network profile. You can configure a set of fields that the social network application requests access to.
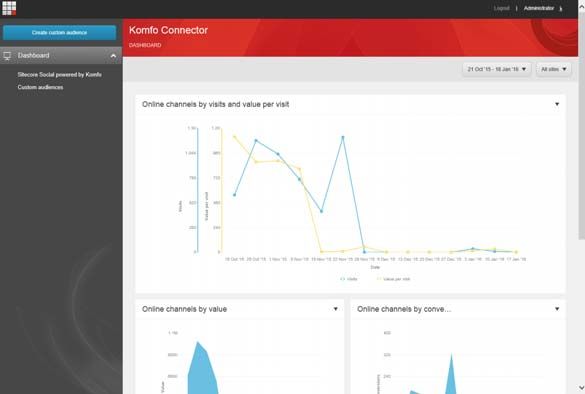
The following image, shows an example of the dialog box that a social network user sees the first time they log in to the website with their social network credentials:
To set the list of fields that the social network application can access in the visitor's profile on a social network:
1. Open the [website_root]\app_config\include\social\sitecore.social.profilemapping.[network_name].config file.
2. In the configuration section for the social network, in the configuration section for the field that you want the social network application to use, set the field
enabled parameter to true.
3. If the field is private, you must set its permission parameter according to the official social network documentation.
Important
Do not disable the fields that are enabled by default because this might affect the way that they are presented on your website.
For example, to get access to the Groups’ field on Facebook, the field section in the Sitecore.social.profilemapping.Facebook.config file should look like
this:Page 25 of 70
For more information about user profile fields, see the official documentation of the social network:
• Facebook documentation
• Twitter documentation
• LinkedIn documentation
• New Google+ API
Request approval for Facebook application permissions
This information is only relevant to Facebook applications.
After you have set the list of fields that the Facebook application can access in the Facebook visitor's profile, you must get Facebook approval for permissions. The
permissions relate to a field or group of fields. Facebook requires approval for some permissions before you can get access to the fields with those permissions.
For the Social Connected module and the Experience Profile application to work correctly, a Facebook application must have access to the following permissions:
Permission Description Requires Facebook approval
Used in the Social Connector, personalization, and in the Experience Profile
Gives access to a subset of a user's public profile fields:
• id
• name
public_profile • first_name
No
• last_name
• link
• gender
• locale
• age_range
user_friends Used in the Social Connector No
email Used in the Social Connector and personalization No
user_birthday Used in the Social Connector, personalization, and in the Experience Profile Yes
user_education_history Used in the Social Connector, personalization, and in the Experience Profile Yes
user_interests Used in the Social Connector, personalization, and in the Experience Profile Yes
user_likes Used in the Social Connector, personalization, and in the Experience Profile Yes
user_location Used in the Social Connector, personalization, and in the Experience Profile Yes
user_relationships Used in the Social Connector, personalization, and in the Experience Profile Yes
user_religion_politics Used in the Social Connector, personalization, and in the Experience Profile Yes
user_website Used in the Social Connector, personalization, and in the Experience Profile Yes
user_work_history Used in the Social Connector, personalization, and in the Experience Profile Yes
read_stream Used in the Social Connector and personalization Yes
publish_actions Used in content posting and goal posting Yes
manage_pages Used in content posting Yes
The other fields that you enable in the Sitecore.Social.ProfileMapping.Facebook.config file might require Facebook approval.
You can read more about permissions with Facebook login on Facebook's website.
You can also find more information about Facebook's review guidelines on their website.
Configure and add the social network log-in control
After you have created a social network application and a Sitecore item for it, and you have configured access to the visitor's profile information, you can configure
and add a social network log-in control to your website. The visitors use this control to log in to your website.Page 26 of 70
You can add log-in controls in the same way that you add new components on the webpage. The controls are located in the
sitecore/layout/sublayouts/social/connector folder. For the MVC layout, use the Social Connected renderings in the sitecore/layouts/Renderings/Social
MVC/Connector folder. You can customize this control by changing images, texts, and so on.
By default, the social network control uses the social web application that is stored in the sitecore/system/social/applications/default folder.
To set a non-default social network application for the social network control in the UI:
1. In the Content Editor, select the item that you want to place a login control on.
2. On the ribbon, in the Presentation tab, click Details.
3. In the Layout details dialog box, add the Login with control.
4. Click the control and in the Application field, select the application that you want the control to use.
To set a non-default social network application for the social network control using the API, pass the Application Key and Application Secret values of the
application to the API using the ApplicationCredentials class.
To set the webpage that the visitor is redirected to after they have entered social network credentials and granted access to their profile information:
1. In the Content Editor, select the item presentation details.
2. Add a Social Connector control.
3. Edit the control.
4. In the Callback URL field, enter the URL of the webpage.
If this field is blank, the module uses the URL of the current item.
Improve the performance of Social Connector
After you have performed all the required configuration actions, you can reduce the time that the Social Connector spends on finding an existing user when the
website visitor logs in to your website. To do this, in the web.config file, in the configuration/system.web/profile/properties section, paste the following
string:
Send feedback about the documentation to docsite@sitecore.net.
Walkthrough: Configuring Social Messaging
When you publish Sitecore items, Social Connected can post messages to social networks. You bind the message to the content item, and the module posts this
message automatically when you publish the content item. You can also post these messages manually without publishing the content items.
This walkthrough describes how to configure the Social Messaging feature. The Tumblr social network is used as an example.
The walkthrough outlines how to:
• Create a new Account wizard
• Create a social message template
• Create the campaign items for social network messages
• Create a social network message reviewer role
• Implement the new social network classes
• Update the social network configuration file
Create a new Account wizard
To be able to create items for social network accounts, you must create a new Account wizard.
Note
The Tumblr social network allows one user account to have multiple blogs. In the following example, posting is implemented only to the primary blog. To be able to
select the blog where you want to post messages when creating a network account, you need to implement a custom wizard. Use the Facebook Account wizard as an
example.
To create a wizard for a new social network account:
1. In the Content Editor, navigate to sitecore/templates/branches/system/social and in the Social folder create a new item, based on the Command
template (sitecore/templates/system/branches/command). You can use the Command Template insert option in the Social folder, or just duplicate the
existing item for another network. Name it, for example, Tumblr Account.
2. In the new item, in the Command field, enter social:account:add(network=Tumblr).
3. Navigate to /sitecore/templates/System/Social/Account/Account Folder.
4. In the __Standard Values subitem, in the Insert options field, add the /sitecore/templates/Branches/System/Social/Tumblr Account item.
As a result, the new Account wizard (for example, the Tumblr Account wizard), is added to the Accounts folder in /sitecore/system/Social/Accounts.
Create a social message template
Social messages are stored in the message items that are based on the social message template.
To create a social message template:
1. In the Content Editor, navigate to /sitecore/templates/System/Social/Message and in the Message folder, create a new template based on the Message
template.
2. In the Data section, add the data fields that the social network message should contain, for example, a Title field for a Tumblr blog post. The fields should be
marked as Shared.
Create the campaign items for social network messagesPage 27 of 70
By default, a message contains a link. When a user clicks the link, it triggers the relevant campaign. Campaigns are stored in the campaign items.
To create the campaign items for social network messages:
1. In the Content Editor, navigate to /sitecore/system/Marketing Control Panel/Campaigns/Social and in the Social folder, create a new item based on
the Campaign Category template (/sitecore/templates/System/Analytics/Campaign Category). Name the new item, for example, Tumblr.
2. In the new item, create the following new subitems:
◦ A new subitem based on the /sitecore/templates/System/Analytics/Campaign Category template. Name the new item, for example, Tumblr
Message Campaigns. This item will store the custom campaigns that will use the social messages.
◦ A new subitem based on the/sitecore/templates/System/Analytics/Campaign template. Name the new item, for example, Tumblr Content
Messages. This is the default campaign for content messages.
◦ A new subitem based on the /sitecore/templates/System/Analytics/Campaign template. Name the new item, for example, Tumblr Goal Messages.
This is the default campaign for goal messages.
Note
The xDB requires a campaign to be deployed before you can use it. To deploy the new campaign, on the Home tab, click Edit and then click Deploy.
Create a social network message reviewer role
If you use social message workflows, then you should create a reviewer role specific to the social network. The social message workflows are parts of the default
workflows of Social Connected.
To create a message reviewer role for a social network, for example, for Tumblr:
1. In the Role Manager, click New.
2. In the New Role dialog box, enter a name for the role, for example, Tumblr Message Reviewer.
3. In the Domain field, select sitecore.
When you create a network account, you will be able to select this new role from the list.
Implement the new social network classes
The following sections describe how to implement the new classes required to configure social messaging, and include code samples for each class.
Message Item
Implement a class that inherits from the Sitecore.Social.MessagePosting.Items.MessageItemBase class. It represents the Sitecore message item for the
specific social network.
The following code illustrates how to implement the TumblrMessageItem class for Tumblr (Sitecore.Social.Tumblr project):
namespace Sitecore.Social.Tumblr.MessagePosting.Items
{
using Sitecore.Data.Items;
using Sitecore.Social.MessagePosting.Items;
///
/// Tumblr message item.
///
public class TumblrMessageItem : MessageItemBase
{
///
/// Initializes a new instance of the class.
///
public TumblrMessageItem()
{
}
///
/// Initializes a new instance of the class.
///
/// The item.
public TumblrMessageItem(Item item)
: base(item)
{
}
///
/// Gets the value of the Title field.
///
///
/// The title.
///
public string TitleYou can also read