Staff and Student VPN User Documentation
←
→
Page content transcription
If your browser does not render page correctly, please read the page content below
Staff and Student VPN User Documentation
This document is broken down into the following sections for your convenience.
Quick installation guide
Installing the VPN software (detailed version)
System Requirements
Connecting to the University via VPN
AnyConnect on a Client PC
Using the VPN service
Connecting to your H: Drive (Windows Instructions)
Connecting to your H: Drive (Mac Instructions)
Outlook 2007 and 2010 (Staff Personal PC)
Outlook 2003 (Staff Personal PC)
Outlook (Staff University owned Laptop)
Troubleshooting
Introduction to VPN
This document provides instructions on how to connect to the VPN solution for Staff and Students to
gain access to various resources available on the Staffordshire University network Infrastructure.
Please note that the new VPN service is only available off Campus.
A VPN provides secure access to a private network using public network infrastructure to connect a
remote computer to privileged University resources.
Once connected to the VPN Staff and Student users will be able to access the following services:-
Network share access such as H:\ drive
Surf the University Web site
Access to email via Microsoft Outlook and Web Outlook
Process Overview
You will visit the URL https://vpn.staffs.ac.uk and you will be asked to enter your username and
password. After successful authentication you will be asked to install the Cisco Anyconnect software
which will then automatically make a connection to the University. (Please note that this is a one-
time process and any subsequent uses of the VPN can be made by using the Shortcut made on your
Start Menu.)
You can then map a shared drive or access other resources.
1
DJH / PSR 02/13 Ver 17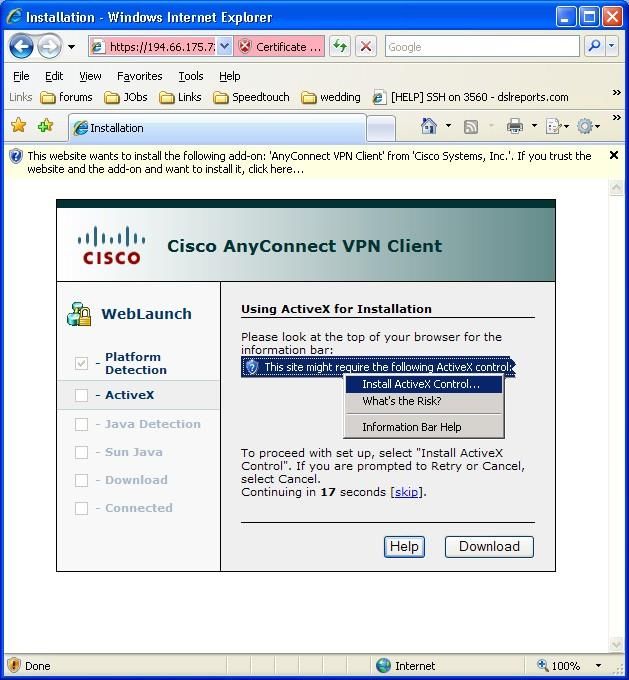
1) Quick Start Guide

This Quick Start Guide applies to all Windows, Macintosh and Linux Operating Systems supported
under the system requirements section below.

     1. Open your web browser.

     2. Navigate to https://vpn.staffs.ac.uk

     3. Select from the group box if you are a Student or Staff member.
     4. Enter your Username.

     5. Type your password in the password box and click on the login button.

     6. You will have to agree to the Terms and Conditions presented on the next screen to
        proceed. Press Continue to accept.

     7. Follow any on-screen prompts to install any browser controls. If you get any other error
        messages, or the installation fails, then please refer to the detailed installation process in the
        next section of this document, or the Troubleshooting section at the end of this document.

     8. Your web browser will now display a message stating that the installation was successful.

     9. You can now use the VPN service.

Further assistance

If you require further help can visit:-

http://www.staffs.ac.uk/about_us/university_departments/information_services/it/vpn/ or contact
3800@staffs.ac.uk

                                                                                                         2
DJH / PSR 02/13 Ver 17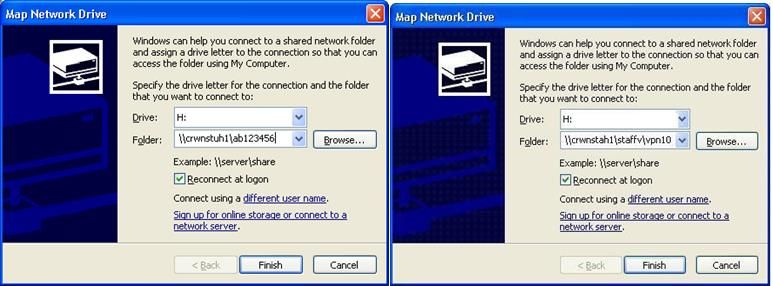
1) Installing the VPN software (detailed version)
System Requirements
You first need to check that your computer meets the minimum system and connection
requirements:-
Broadband Network Connection
o Windows XP
o Windows Vista (32-bit and 64-bit).
o Windows 7 (32-bit and 64-bit).
Please Note: As of April 2014 Microsoft have withdrawn Support for Windows XP
Apple OS
Mac OS 10.5
Mac OS 10.6.x (32-bit and 64-bit)
Unix / Linux
x86 instruction set.
o 32-bit or biarch 64-bit processor
o 32 MB RAM.
o 20 MB hard disk space.
o SuperUser privileges.
o libstdc++ users must have libstdc++ version 3.3.2 (libstdc++.so.5) or higher, but
below version 4.
o Firefox 2.0 or later with libnss3.so installed in /usr/local/lib, /usr/local/firefox/lib, or
/usr/lib. Firefox must be installed in /usr/lib or /usr/local, or there must be a
symbolic link in /usr/lib or /usr/local called Firefox that points to the Firefox
installation directory.
o libcurl 7.10 or later.
o openssl 0.9.7a or later.
o Java 5 (1.5) or later. Iced Tea is the default Java package on Fedora 8. The only
version that works for web installation is Sun Java. You must install Sun Java and
configure your browser to use that instead of the default package.
o zlib.
o gtk 2.0.0
o gdk 2.0.0,
o libpango 1.0.
o iptables 1.2.7a or later.
o tun module supplied with kernel 2.4.21 or 2.6
3
DJH / PSR 02/13 Ver 17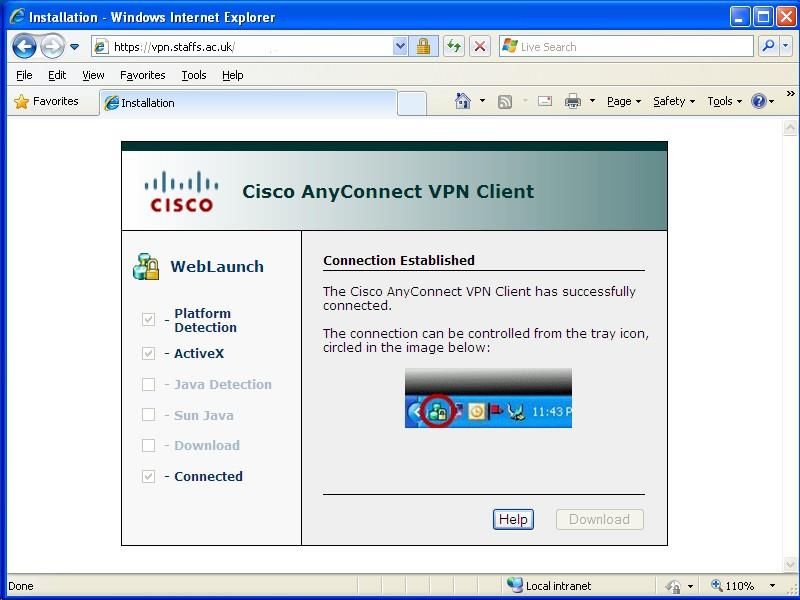
Connecting to the University via VPN

To gain access to resources via VPN users will need an internet connection from home or any other
location. For reliability issues we would recommend a wired connection.

Once you have confirmed a usable internet connection you should open a web browser and go to
https://vpn.staffs.ac.uk which will present you with the main VPN page.

Step 1. Login page requesting users login credentials.

Select the either the Student or Staff group from the drop down box and enter your username and
password in the username and password boxes.

NB. Previously usernames were in the format of staff\username or student\username. This is no
longer the case so staff \, student\ can be omitted and you can enter your username on its own.

After filling in the Group, Username and Password fields, select Login to proceed.

Step 2. Once logged in you will be presented with the University Policy.

NB. It is mandatory that you agree to terms and conditions of access. If you are unsure please visit
http://www.staffs.ac.uk/current/regulations/it/index.php for more information.

                                                                                                       4
DJH / PSR 02/13 Ver 17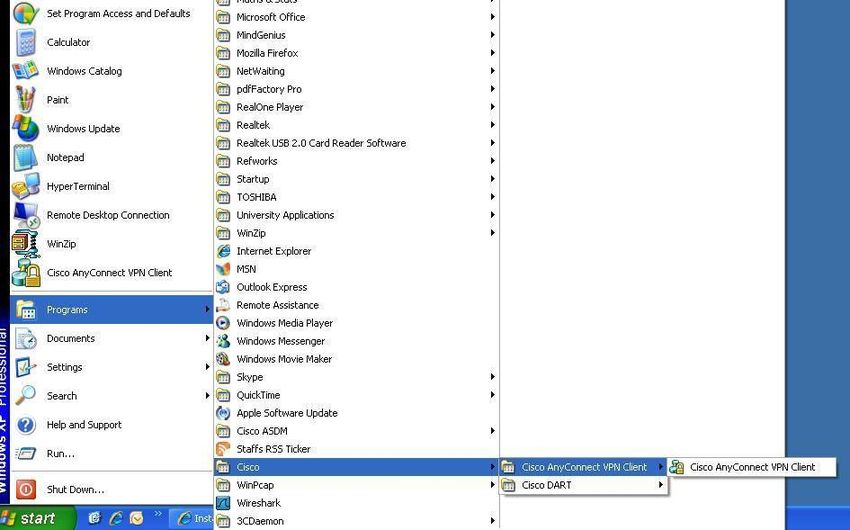
Select continue to go to the next step.

Step 3. You are then prompted to Install ActiveX Controls as below figure shows if applicable. This is
so that the correct version of AnyConnect is installed for your computer. Depending upon your web
browser, you may have to follow the on-screen instructions for installing the ActiveX Control. Please
see the troubleshooting section at the end of this document for help on this issue.

                                                                                                     5
DJH / PSR 02/13 Ver 17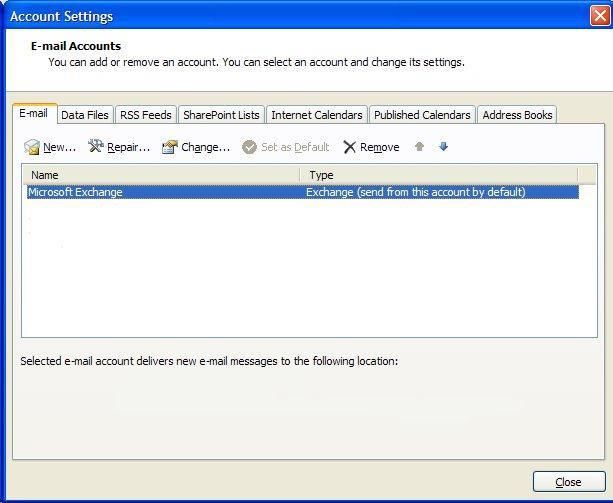
Once computer detection has been determined, the client will proceed to install itself.

     Step 4. A prompt will appear requesting you to install the AnyConnect client software on the
     machine. This will begin the automatic installation of the software. Select Install to continue.

                                                                                                        6
DJH / PSR 02/13 Ver 17
Step 5. This process can take up to 5 minutes depending on the speed of your internet connection.

Step 6. Once the AnyConnect client is downloaded, it will automatically establish a connection with
the VPN service.

You are now connected to Staffordshire University VPN system and can now continue to use
University services.

                                                                                                      7
DJH / PSR 02/13 Ver 17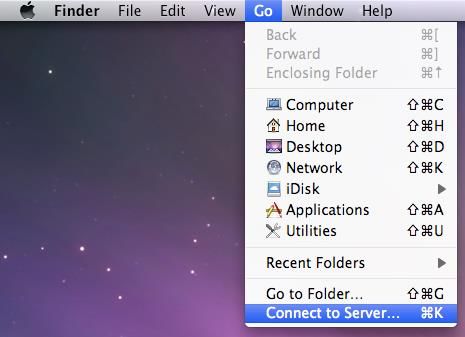
NB This is a one-time process to install the Cisco software. There will be a Start Menu (Windows
Only) shortcut on your system that should be used to start Anyconnect. Should you move computers
then you will need to repeat the above process to reinstall the client to access the service.

AnyConnect on a Client PC
Connecting
Once the AnyConnect client has been downloaded it will remain on the PC unless the user decides to
uninstall it. You do not need to go to https://vpn.staffs.ac.uk every time you wish to use the VPN.

Step 1. Go to START > Programs > Cisco > Cisco AnyConnect VPN Client > Cisco AnyConnect VPN
Client and click on the Cisco VPN Client.

Step 2. Once again it is mandatory that the user agree to the terms of use and click ‘Accept’ to
proceed. At this point the user client computer will establish a secure connection the University VPN
server.

You are now connected to Staffordshire University VPN system and can now continue to use VPN
services.
                                                                                                    8
DJH / PSR 02/13 Ver 17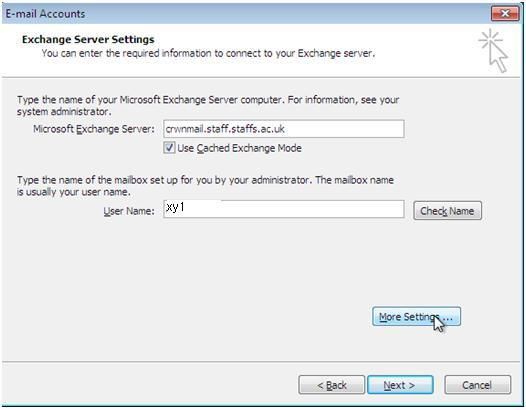
Disconnecting
Step 1.

Open the client and from the Connection tab choose Disconnect. Once disconnected it may take a
couple of minutes for network setting to take affect and the client PC may seem to freeze for a
minute or so, this is normal and is expected.

You have now disconnected from the VPN system and can now resume normal network operation.

To configure access to your H:\ drive and Outlook please see the sections below.

                                                                                                  10
DJH / PSR 02/13 Ver 17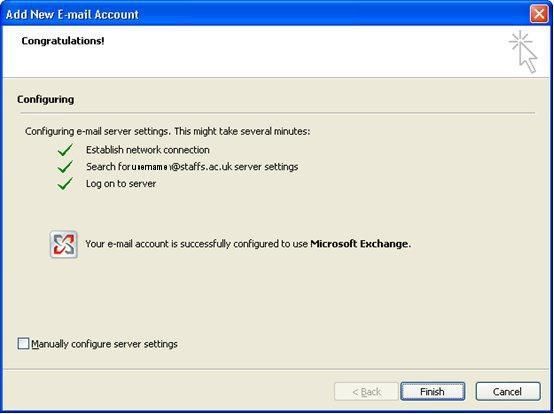
2) Using the VPN Service
Connecting to your H: Drive
Windows Instructions
In preparation to connect to your H: drive, you will need to know the area of the student or staff
server where your folder is located.
To make a connection to the H: drive you will be prompted for your staff or student folder name,
your username and your password (i.e. exactly the same username and password as when you
made the connection to the VPN service).
Note:
Student folder name will be in the format studentX where X is the first letter of your
surname followed by \ and then your username
Staff folder name is in the format staffX, where X is the first letter of your username
followed by a \ and then your username
Examples:-
If the student user ab123456 wishes to connect to their H: drive
\\crwnstuh1.student.staffs.ac.uk\StudentA\ab123456
Or the staff user vpn10 wishes to connect to their H: drive:-
\\crwnstah1.staff.staffs.ac.uk\staffV\vpn10
Step 1.
Right-click on ‘My Computer’ for Windows XP or ‘Computer’ for Windows 7 and select Map
Network Drive
10
DJH / PSR 02/13 Ver 17Step 2.
In the window that appears select a drive letter to assign the H: drive to (may we suggest drive H: as
an aid to memory).
Step 3.
In the Folder box, type
For Students \\crwnstuh1\studentX\your_student_username
For Staff \\crwnstah1\staffX\your_staff_username
(See images above)
Step 4.
Click ‘Finish’. You will then be prompted for your Staff or Student username and password details.
Your username needs to be prefixed by
For Students it is
o student\your_username
For Staff it is
o staff\your_username
Your password is entered as normal.
Step 5.
Click ‘OK’. After a few seconds, you should be connected to your H: drive and can use it as normal.
11
DJH / PSR 02/13 Ver 17Mac Instructions
In preparation to connect to your H: drive, you will need to know the area of the student or staff
server where your folder is located.
To make a connection to the H: drive you will be prompted for your staff or student folder name,
your username and your password (i.e. exactly the same username and password as when you
made the connection to the VPN service).
Note:
Student folder name will be in the format studentX where X is the first letter of your
surname followed by / and then your username
Staff folder name is in the format staffX, where X is the first letter of your username
followed by a / and then your username
Examples:-
If the student user ab123456 wishes to connect to their H: drive
smb://CRWNSTUH1.staffs.ac.uk/StudentA/ab123456
Or the staff user vpn10 wishes to connect to their H: drive:-
smb://CRWNSTAH1.staffs.ac.uk/StaffV/vpn10
Step 1.
From Finder click the Go menu and choose Connect to Server
12
DJH / PSR 02/13 Ver 17Step 2.
In the Server Address box, type
For Students smb://CRWNSTUH1.staffs.ac.uk/studentX/your_student_username
For Staff smb://CRWNSTAH1.staffs.ac.uk/staffX/your_staff_username
Step 3.
Click ‘Connect’. You will then be prompted for your Staff or Student username and password
details. Your username needs to be prefixed by
For Students it is
o student\your_username
For Staff it is
o staff\your_username
Your password is entered as normal.
Step 4.
Click ‘Connect’. After a few seconds, you should be connected to your H: drive and can use it as
normal.
13
DJH / PSR 02/13 Ver 17Configuring Outlook 2007 and 2010 for Staff
This guide is split up into the following Sections:-
Microsoft Outlook 2007 and 2010
Microsoft Outlook 2003
University Laptop Users
Microsoft Outlook 2007 and 2010
Once you have connected to the VPN service you will need to configure your outlook client with your
email account details.
1) Click START
2) Click Settings
3) Click Control Panel
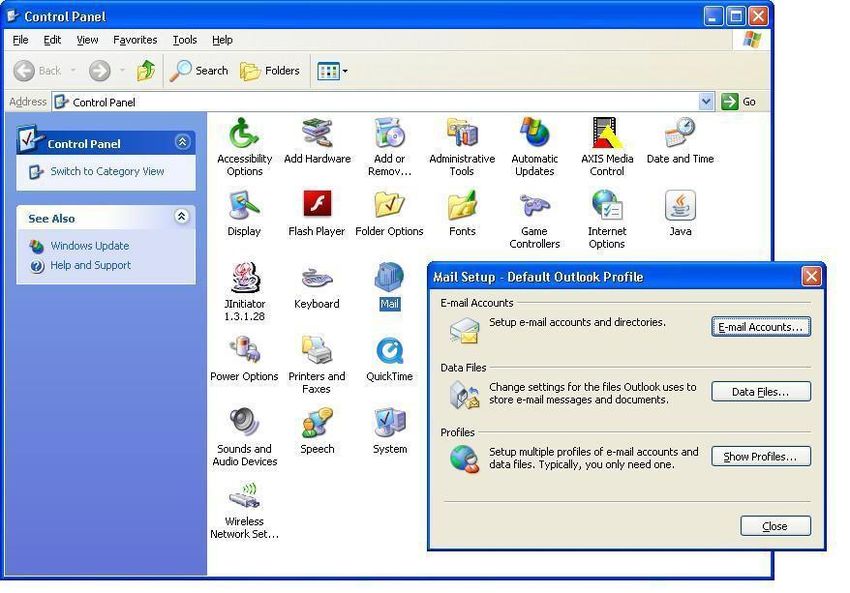
Once the control panel opens:-
1) Select Mail
2) Select Email Accounts
This will open the Account Settings Window.
14
DJH / PSR 02/13 Ver 171) Click the Email Tab
2) Select New
Here you will enter your own user credentials which are mandatory for connection to Outlook.
15
DJH / PSR 02/13 Ver 171) Enter your Name
2) Enter your email address (your.email.address@staffs.ac.uk)
3) Enter your password (this is the same password you use to log onto your University
computer)
4) Click NEXT and Outlook will ask for your username and password
When you click Next above your Outlook client will configure your email account on your computer
and you will see the below screen.
16
DJH / PSR 02/13 Ver 17You will see the screen below once Outlook has been successfully configured.
1) Click Finish
You will then see the message below; you are now ready to open your Microsoft Outlook client.
1) Click OK
You have now finished configuring Microsoft Outlook.
17
DJH / PSR 02/13 Ver 17Microsoft Outlook 2003 for Staff
Once you have connected to the VPN service you will need to configure your outlook client with your
email account details.
1) Click the START button
2) Click Settings
3) Click Control Panel
Once the control panel opens:-
1) Select Mail
2) Select Email Accounts button
This will open the Account Settings Window.
18
DJH / PSR 02/13 Ver 171) Select Microsoft Exchange Server
2) Click Next
Here you will enter your own user credentials which are mandatory for connection to Outlook.
19
DJH / PSR 02/13 Ver 171) Enter crwnmail1.staff.staffs.ac.uk in the Microsoft Exchange server box
2) Enter your username in the username box (e.g. ab1)
3) Click More Settings
At this point an error message may appear, please check you have entered the server details
correctly and press OK.
1) Select the Connection tab
2) Select Connect using my Local area Network (LAN)
3) Tick Connect to my Exchange mailbox using HTTP
4) Select Exchange Proxy Settings
The Proxy settings window will appear.
20
DJH / PSR 02/13 Ver 171) Enter crwncas1.staffs.ac.uk in the https:// box
2) Tick Connect using SSL only
3) Tick Only connect to proxy servers that have this principal name in their certificate:
4) Enter msstd:crwncas1.staffs.ac.uk in the box
5) Click OK
You will then go back to the previous window.
21
DJH / PSR 02/13 Ver 171) Click OK
You will then be presented with another window
1) Click Next
2) Flick Finish
You must then log into Outlook by using your University username and password
1) Enter your username in the format staff\username (e.g. staff\xy1)
2) Enter your password
3) Click OK
Microsoft Outlook 2003 is now setup and will start to download your email. Please be aware that
dependant upon the size of your email box this can take some time.
For increased security plese untick the remember my password option but you will have to re enter
your password every time you log onto Outlook.
You have now finished configuring Microsoft Outlook.
22
DJH / PSR 02/13 Ver 17University Laptop Users
Please note if your require administrator access contact either 3800 or your local Helpdesk for the
password.
1) If using Outlook 2010
a. Select the File menu
b. Select Account Settings
c. Select again Account Settings
d. Proceed to step 3
2) If using Outlook 2003 or 2007
a. Select the Tools menu
b. Select Account settings
c. Proceed to step 3
3) From the window select Microsoft Exchange
4) Select Change
5) Select the Connection tab
5) Select Connect using my Local area Network (LAN)
6) Tick Connect to my Exchange mailbox using HTTP
7) Select Exchange Proxy Settings
The Proxy settings window will appear.
23
DJH / PSR 02/13 Ver 178) Enter crwncas1.staffs.ac.uk in the https:// box
9) Tick Connect using SSL only
10) Tick Only connect to proxy servers that have this principal name in their certificate:
11) Enter msstd:crwncas1.staffs.ac.uk in the box
12) Click OK
You will then go back to the previous window.
24
DJH / PSR 02/13 Ver 172) Click OK
You will then be presented with another window
3) Click Next
4) Flick Finish
You have now finished configuring Microsoft Outlook.
5) Troubleshooting
Microsoft Windows
Issue: - Internet Explorer is asking me to run an activeX control, what should I do?
Solution: - This is part of the Cisco Anyconnect installation process and is safe to allow.
Step1.
Click on the message at the top of the screen that says ‘this message wants to install the following addon:
‘AnyConnect VPN Client’ and click on ‘Install ActiveX Control’.
25
DJH / PSR 02/13 Ver 17Issue: - There is a problem with this Windows installer package.
Please note: The below fix for this issue requires advanced knowledge of the Windows Registry,
if you are in doubt, please take your PC to the IT Helpdesks in the Octagon Library and IT
Centre, Thompson Library or Brindley IT Centre for support.
Step 1.
Press Windows Symbol Key and R together. Type
regedit and press enter or click on OK.
Step 2.
26
DJH / PSR 02/13 Ver 17Click on the cross to the left of HKEY_LOCAL_MACHINE to expand that section. Click on the cross to the left of
SOFTWARE
Click on the cross to the left of Microsoft
Click on the cross to the left of Windows
Click on the cross to the left of CurrentVersion
Step 3.
Right click on CurrentVersion and select New and then select Key
A new section appears with the title New Key #1 rename this key to RunOnce and press enter.
Step 4.
You can now close the registry editor. Step 5.
Re run the Cisco AnyConnect setup and the issue should now be solved. If not please attend a local Helpdesk and
seek further assistance.
Known Issues
Microsoft Windows OS
o AnyConnect requires a clean install if you upgrade from Windows XP to Windows 7.
o If you upgrade from Windows Vista to Windows 7 you must manually uninstall AnyConnect first, then after
the upgrade reinstall it manually or by establishing a web-based connection to https://vpn.staffs.ac.uk
that is configured to install it. Uninstalling before the upgrade and reinstalling AnyConnect afterwards is
necessary because the upgrade does not preserve the Cisco AnyConnect Virtual Adapter.
o Anyconnect does not support 64-bit Internet Explorer
Apple OS
o If you upgrade from one major Mac OS X release to another (for example 10.5 to 10.6) you must manually
uninstall AnyConnect first then after the upgrade reinstall it manually or by establishing a web-based connection to
https://vpn.staffs.ac.uk that is configured to install it.
o The Anyconnect client resides in the Applications folder. To access it you will need to either go to the
applications folder, or you can ‘drag’ it into your dock at the bottom of the screen.
Unix / Linux
o When connecting to the VPN service from the AnyConnect client you are presented with a message
stating that the security certificate cannot be verified. The certificate should be accepted to continue to
use the service.
o The AnyConnect client resides in the Applications folder on your system. If you want a shortcut on
your desktop, you will have to make one by ‘dragging’ it our of the Application folder.
27
DJH / PSR 02/13 Ver 17BT Infinity Issues
Some users have experienced issues with the Cisco Anyconnect client and the BT Infinity Broadband package.
Users may see their VPN connection fail and get disconnected which has been identified as an MTU (Maximum
Transmission Unit) size issue.
To resolve this you may wish to change the MTU setting on your Windows operating system.
Windows Vista / Windows 7
1) Go to Start and [Type] cmd.exe [enter] into the text box from the start menu.
2) The command prompt box opens.
3) [Type] netsh interface ipv4 interface show subinterfaces [enter]
4) You will then see a box similar to the one below.
5) Select your network connection from the list. In this case we are using “Local Area Connection”, but
you may be using a wireless connection and should substitute the entry under the “Interface” column
appropriately.
6) To set the MTU for this network interface [Type] netsh interface ipv4 set subinterface "Local Area
Connection 4" mtu=1300 store=persistent [enter]
7) [Type] netsh interface ipv4 interface show subinterfaces [enter] to check that the change has been
made as seen in the picture below.
28
DJH / PSR 02/13 Ver 178) Restart your computer and retry the VPN connection process which should now work.
Windows 8
1) Swipe / Scroll to the All Apps tile on from your Start screen.
2) Swipe / Scroll to the Windows System section.
3) Under the Windows System section press/click on Command Prompt
4) You will then see a box similar to the one below.
5) Select your network connection from the list. In this case we are using “Local Area Connection”, but
you may be using a wireless connection and should substitute the entry under the “Interface” column
appropriately.
6) To set the MTU for this network interface [Type] netsh interface ipv4 set subinterface
"Local Area Connection 4" mtu=1300 store=persistent [enter]
7) [Type] netsh interface ipv4 interface show subinterfaces [enter] to check that the change has been
made as seen in the picture below.
8) Restart your computer and retry the VPN connection process which should now work.
29
DJH / PSR 02/13 Ver 17You can also read