Acronis Backup extension for Plesk - INTEGRATION GUIDE
←
→
Page content transcription
If your browser does not render page correctly, please read the page content below
Acronis Backup extension for
Plesk

INTEGRATION GUIDE    Revision: 08/20/2020
Table of contents
       1    Introduction ....................................................................................................................3

       2    System requirements .......................................................................................................3

       3    Limitations ......................................................................................................................3

       4    Installing the extension ....................................................................................................3

       5    Enabling backup...............................................................................................................3

       6    Uninstalling the extension................................................................................................5

       7    Backup ............................................................................................................................6
    7.1     Managing backup.......................................................................................................................6
    7.2     Running a backup on demand ...................................................................................................6
    7.3     Increasing the storage quota .....................................................................................................6
       8    Recovery in the Power User view .....................................................................................8
    8.1     Downloading files ......................................................................................................................8
    8.2     Recovering files to the original location ....................................................................................8
    8.3     Downloading database dumps ..................................................................................................8
    8.4     Recovering databases to the original location ..........................................................................9
    8.5     Recovering databases as new ones ...........................................................................................9
    8.6     Downloading mailboxes.............................................................................................................9
    8.7     Recovering mailboxes to the original location ........................................................................10
    8.8     Downloading customer accounts ............................................................................................10
    8.9     Recovering customer accounts ................................................................................................10
    8.10 Recovering the entire Plesk server ..........................................................................................10
       9    Using the extension in the Service Provider view ............................................................ 12
    9.1     Recovering from the administrator interface ..........................................................................12
    9.2     Enabling self-service for customers .........................................................................................12
       10 Recovery from the customer interface ............................................................................ 12
    10.1 Exporting the entire account ...................................................................................................13
       11 Tracking the recovery progress ....................................................................................... 13

       12 Appendix ....................................................................................................................... 14
    12.1 Installing the backup agent on a Virtuozzo host......................................................................14
    12.2 Configuring a backup plan for a Plesk server...........................................................................15
    12.3 Installing the backup agent using a registration token ...........................................................16
    12.4 Unattended extension configuration ......................................................................................16
    12.5 Advanced extension configuration ..........................................................................................17

2                                                                              Copyright © Acronis International GmbH, 2003-2020
1 Introduction
This document describes how to install and use the Acronis Backup extension for Plesk. The
extension integrates Plesk with the Acronis Backup and Acronis Cyber Cloud solutions.
With the Acronis Backup extension for Plesk, a Plesk administrator can:
Back up an entire Plesk server locally, to a network folder, or to the cloud storage
Recover the entire server including all of the websites
Perform granular recovery of websites, individual files, mailboxes, or databases
Enable self-service recovery for Plesk customers
Once the extension is installed and configured, the server is backed up on a predefined schedule. A
backup can also be started on demand. The backup schedule can be configured in the backup
console.
Recovery can be performed from the Plesk interface.
2 System requirements
Plesk for Linux 17.0 and later.
The list of supported operating systems for the backup agent (Agent for Linux) is available at
https://www.acronis.com/en-us/support/documentation/BackupService/index.html#33496.html
The list of supported virtualization platforms is available at
https://www.acronis.com/en-us/support/documentation/BackupService/index.html#37870.html
The agentless backup of VMware vSphere and Microsoft Hyper-V is not supported.
For backing up Plesk running on a Virtuozzo container, both Agent for Linux and Agent for
Virtuozzo are required.
3 Limitations
Backup of individual websites is not supported. Back up the entire server instead.
Granular recovery of databases is supported only for MySQL running on the same machine as
Plesk.
Granular recovery of PostgreSQL databases is not supported.
4 Installing the extension
1. Log in to Plesk as an administrator.
2. Go to Extensions > Extensions Catalog > Select Category > Backup > Acronis Backup.
3. Click Install.
5 Enabling backup
For the information about how to back up Plesk running on a Virtuozzo container, refer to the
"Installing the backup agent on a Virtuozzo host" (p. 14) section or contact your service provider.
3 Copyright © Acronis International GmbH, 2003-2020After upgrade to Acronis Cyber Cloud 9.0 or after creation of a new account, API Client named
'webcp_client' will be created under your customer tenant in Acronis Cyber Cloud.
To enable backup with trial license
1. Go to Server Management > Acronis Backup.
2. Click Try now.
3. Specify credentials for a new account to which the machine should be assigned, the location of
the backup which will be created, and the email address to which the notifications and password
recovery email shall be sent.
4. Click Create and activate. The trial license is valid for 30 days with 100 GB of cloud storage and 1
web hosting server.
5. To encrypt your backups, enable the Encryption switch and specify the corresponding settings in
the wizard.
Be aware that there is no way to recover encrypted backups if you lose or forget the password.
After a backup plan is created and applied, the encryption settings cannot be modified. To use different
encryption settings, create a new backup plan in the Acronis backup console.
If you need to enforce encryption of backups, regardless of the backup plan encryption settings, save the
encryption settings on each machine individually. The backups will be encrypted using the AES algorithm
with a 256-bit key. In this case, the lock icon won’t be shown on the Dashboard in the Backup section, as it
represents an applied backup plan setting, not a machine one.
For more information on how to enable encryption per machine, check the following reference:
https://www.acronis.com/support/documentation/AcronisBackup_12.5/#37608.html .
6. Click Enable.
To enable backup if you have no account
1. Go to Server Management > Acronis Backup.
2. Click Buy license.
You will be redirected to the Plesk store where you have to purchase an Acronis Backup for Plesk
license.
3. Refresh or re-enter the extension page.
4. Specify the credentials for a new account, a backup storage location, and, optionally, an email
address for receiving backup notifications.
5. Click Create and activate.
6. To encrypt your backups, enable the Encryption switch and specify the corresponding settings in
the wizard.
7. Click Enable.
To enable backup of a second Plesk to the same account
1. Go to Server Management > Acronis Backup.
2. Click Buy license.
You will be redirected to the Plesk store where you have to purchase an Acronis Backup for Plesk
license.
3. Refresh or re-enter the extension page.
4. Click I have an account.
5. Specify the credentials for the account that was created during the activation of another Acronis
Backup for Plesk license.
6. Click Sign in and activate.
4 Copyright © Acronis International GmbH, 2003-20207. To encrypt your backups, enable the Encryption switch and specify the corresponding settings in the wizard. 8. Click Enable. To enable backup if you already have an account If you have enabled two-factor authentication (2FA) for your Acronis Cyber Cloud account, the backup agent must be installed according to the instruction provided in the Installing the backup agent using a registration token (p. 16) section. 1. Go to Server Management > AcronisInstalling the backup agent on a Virtuozzo host (p. 14) Backup. 2. Click I have an account. 3. Specify the backup service URL and the credentials of an account to which the machine should be assigned. This account must be created within a customer tenant (Customer administrator, Unit administrator, or User). Do not specify the credentials of a partner administrator. 4. Click Sign in and enable. 5. To encrypt your backups, enable the Encryption switch and specify the corresponding settings in the wizard. 6. Click Enable. To enable backup after reinstalling the extension or Plesk 1. Go to Server Management > Acronis Backup. 2. Specify the backup service URL and the credentials of an account to which the machine is assigned. 3. Click Sign in and enable. 4. To encrypt your backups, enable the Encryption switch and specify the corresponding settings in the wizard. 5. Click Enable. 6 Uninstalling the extension 1. Go to Server Management > Extensions > My Extensions. 2. Select Acronis Backup. 3. Click Remove. Removing the extension will also uninstall the backup agent from the Plesk server. The backup accounts you created and the backed-up data will be left intact. 5 Copyright © Acronis International GmbH, 2003-2020
7 Backup A Plesk administrator can: Enable or disable backups (p. 6) Run backups on demand (p. 6) Increase the storage quota (p. 6) 7.1 Managing backup 1. Go to Server Management > Acronis Backup. 2. Toggle the Backup switch to enable to disable backups. For the Plesk server backup, a backup plan with the specific configuration is required. When you enable backup from the Plesk interface, the extension attempts to find and apply a suitable backup plan. If several plans are found, a randomly selected one is applied. If no suitable plans are found, the default backup plan named Webcp is created and applied to the Plesk server. If you want to change the backup schedule or other parameters of the backup plan, do this in the backup console. Ensure that you do not change the parameters described in the "Configuring a backup plan for a Plesk server" (p. 15) section. Otherwise, granular recovery in the Plesk interface will not work. For the same reason, do not apply to the Plesk server other plans that do not meet the above requirements. 7.2 Running a backup on demand 1. Go to Server Management > Acronis Backup. 2. Click Run now. 7.3 Increasing the storage quota 1. Go to Server Management > Acronis Backup. 6 Copyright © Acronis International GmbH, 2003-2020
2. Click Upgrade license.

   You will be redirected to the Plesk store.
3. Refresh or re-enter the extension page.

7                                               Copyright © Acronis International GmbH, 2003-2020
8 Recovery in the Power User view
In the Power User view, a customer can:
Download (p. 8) or recover (p. 8) individual files and folders
Download (p. 8) or recover databases to their original location (p. 9) or as new ones (p. 9)
Download (p. 9) or recover (p. 10) mailboxes
Recover the entire Plesk server (p. 10)
8.1 Downloading files
1. Go to Server Management > Acronis Backup.
2. Open the Backups tab.
3. Select a recovery point.
After you select the recovery point, the corresponding backup is mounted to the Plesk server. The process
may take up to a few minutes.
4. Click Files.
5. Select the files and folders to download.
6. Click Download.
If you choose to download a single file, the download will start immediately.
If you request to download several files, a .zip file will be prepared and placed into your webspace.
Once the file is ready, download it by using the link in the notification bar or in the Operations Log,
or by using Plesk Files Manager.
8.2 Recovering files to the original location
1. Go to Server Management > Acronis Backup.
2. Open the Backups tab.
3. Select a recovery point.
After you select the recovery point, the corresponding backup is mounted to the Plesk server.
The process may take up to a few minutes.
4. Click Files.
5. Select the files and folders to recover.
6. Click Recover.
7. If at least one folder is selected, you can select the Delete any files in the original location that
were created after the backup option. If this option is enabled, all files from selected folders will
be deleted before the recovery. This option may be useful if your website were hacked, to ensure
that all malicious files are deleted.
8. Click Recover.
As a result, the selected files on the Plesk server are replaced with their copies from the backup.
8.3 Downloading database dumps
1. Go to Server Management > Acronis Backup.
8 Copyright © Acronis International GmbH, 2003-20202. Open the Backups tab. 3. Select a recovery point. 4. Click Databases. 5. Select the databases to download. 6. Click Download. As result, a .zip file with SQL dumps is prepared and placed into your webspace. 8.4 Recovering databases to the original location 1. Go to Server Management > Acronis Backup. 2. Open the Backups tab. 3. Select a recovery point. 4. Click Databases. 5. Select databases to recover. 6. Click Recover. 7. Ensure that the Add suffix to the recovered database name check box is cleared. 8. Click Recover. As a result, the selected databases are recovered to the original location. The existing databases are overwritten. If a database no longer exists, it is recreated automatically. If the missing database had a user assigned, you may need to reassign this user manually. 8.5 Recovering databases as new ones 1. Go to Server Management > Acronis Backup. 2. Open the Backups tab. 3. Select a recovery point. 4. Click Databases. 5. Select databases to recover. 6. Click Recover. 7. Select the Add suffix to the recovered database name check box, and then enter the desired suffix. 8. Click Recover. As a result, new databases with the %original_name%%suffix% name are created on the Plesk server. The existing databases are not affected. If the original databases had a user assigned, you may need to reassign this user to the new databases manually. 8.6 Downloading mailboxes 1. Go to Server Management > Acronis Backup. 2. Open the Backups tab. 3. Select a recovery point. 4. Click Mailboxes. 5. Select mailboxes to download. 6. Click Download. 9 Copyright © Acronis International GmbH, 2003-2020
As a result, a .zip file with the mailboxes' contents is prepared and placed into your webspace.

8.7       Recovering mailboxes to the original location
1.   Go to Server Management > Acronis Backup.
2.   Open the Backups tab.
3.   Select a recovery point.
4.   Click Mailboxes.
5.   Select the mailboxes to recover.
6.   Click Recover, and then confirm the action.
As a result, the selected mailboxes are recovered to the original location. If a mailbox no longer exists
on the server, it is recreated automatically. If the missing mailbox had a password set, you may need
to reset this password manually.

8.8       Downloading customer accounts
1.   Go to Server Management > Acronis Backup.
2.   Open the Backups tab.
3.   Select a recovery point.
4.   Click Customers.
5.   Select accounts to download.
6.   Click Download.
Check the results in the Operation log tab. If the customer account was exported successfully, you
can download the archive.

8.9       Recovering customer accounts
1.   Go to Server Management > Acronis Backup.
2.   Open the Backups tab.
3.   Select a recovery point.
4.   Click Customers.
5.   Select accounts to recover.
6.   Click Recover.
As a result, the selected customer accounts are recovered to the original location. If an account no
longer exists on the server, it is recreated automatically.

8.10 Recovering the entire Plesk server
1.   Go to Server Management > Acronis Backup.
2.   Open the Backups tab.
3.   Select a recovery point.
4.   Click Recover entire server, and then confirm the action.
As result, the entire server is reverted to the selected recovery point. All changes made after the
backup will be lost.

The progress of the operation can be tracked in the backup console.

10                                                      Copyright © Acronis International GmbH, 2003-2020
If the Plesk interface is not available as a result of the server failure, recover the server by using the
backup console or Acronis bootable media.

11                                                        Copyright © Acronis International GmbH, 2003-2020
9 Using the extension in the Service Provider view
In the Service Provider view, a Plesk administrator can:
Perform recovery from the administrator interface (p. 12)
Enable the self-service recovery feature (p. 12) for Plesk customers
Track progress (p. 13) of all recovery operations
9.1 Recovering from the administrator interface
The procedures are the same as described in the "Recovery in the Power User view" (p. 8) section.
The differences are as follows:
Mailbox recovery is not available.
When you request to download .zip file from the administrator interface in the Service Provider
view, the file is placed to the /usr/local/psa/var/modules/Acronis-backup/archives directory.
You can clean up this directory once the requested data is no longer needed.
When you recover a customer database as a new one, it is created under the customer to whom
the original database belongs.
9.2 Enabling self-service for customers
1. Click Service Plans.
2. Select the plan where you want to enable self-service.
3. Open the Permissions tab.
4. Select the Acronis Backup check box.
5. Click Update & Sync.
10 Recovery from the customer interface
Customers with the enabled Acronis Backup permission can browse backups in their Plesk interface
and download or recover files/folders, databases, and mailboxes.
The procedures are the same as described in the "Recovery in the Power User view" (p. 8) section.
As the administrator, you can log in under a customer account and recover the items on his/her
behalf.
12 Copyright © Acronis International GmbH, 2003-202010.1 Exporting the entire account
1. Click Acronis Backup.
2. Open the Backups tab.
3. Select a recovery point.
4. Click Export the account.
5. Check the results in the Operation log tab. If the account was exported successfully, you can
download the archive.
11 Tracking the recovery progress
A customer can see information about the recovery operations in the Operations Log. The log can be
filtered by an operation status and type. The log also contains download links for the download
operations.
In the Service Provider view, an administrator can also see which customers performed the
operations, download the log of a failed operation, and send it as a report to the developers so that
they could fix the issue.
Recovery operations performed from the Plesk interface do not appear in the backup console.
13 Copyright © Acronis International GmbH, 2003-202012 Appendix
12.1 Installing the backup agent on a Virtuozzo host
1. Log on to the host as the root user.
2. Run the installation file
./Backup_Agent_for_Linux_x86_64.bin --register-with-credentials
3. Specify the credentials of the account to which the machine should be assigned.
This account must be created within a customer tenant (Customer administrator, Unit
administrator, or User). Do not specify the credentials of a partner administrator.
4. Select the check boxes for the agents that you want to install. The following agents are available:
Agent for Linux
Agent for Virtuozzo
Agent for Virtuozzo cannot be installed without Agent for Linux.
5. Complete the installation procedure.
Troubleshooting information is provided in the file:
/usr/lib/Acronis/BackupAndRecovery/HOWTO.INSTALL
6. Open the /etc/Acronis/BackupAndRecovery.config file and find the Webcp key.
This key determines whether backup is allowed for all containers, and whether backups of a
container can be started on demand. By default, both options are set to “No”.
Set “EnableBackupForAll” = ”Yes” if you want to make the backup service available for all Plesk
containers.
If EnableBackupForAll value is set to “No”, you can enable backup for individual containers in the
Acronis web console or using REST API. You will also need to create a backup plan that meets
certain requirements described in the "Configuring a backup plan for a Plesk server" (p. 15)
section.
Set “RunBackupForAll” = ”Yes” if you want to allow Plesk administrators to run backups of a
container on demand.
If RunBackupForAll value is set to “No”, backups of all containers (for which the backup is
enabled) will run on the predefined schedule.
Example:
"Yes"
“Yes"
"Yes"
In a Virtuozzo cluster, the agent must be installed on each host registered in the cluster.
14 Copyright © Acronis International GmbH, 2003-202012.2 Configuring a backup plan for a Plesk server
You can change parameters of the default backup plan or create a new plan for your Plesk server.
The backup plan must satisfy the following requirements:
1. It must back up the entire server or all volumes that contain Plesk data.
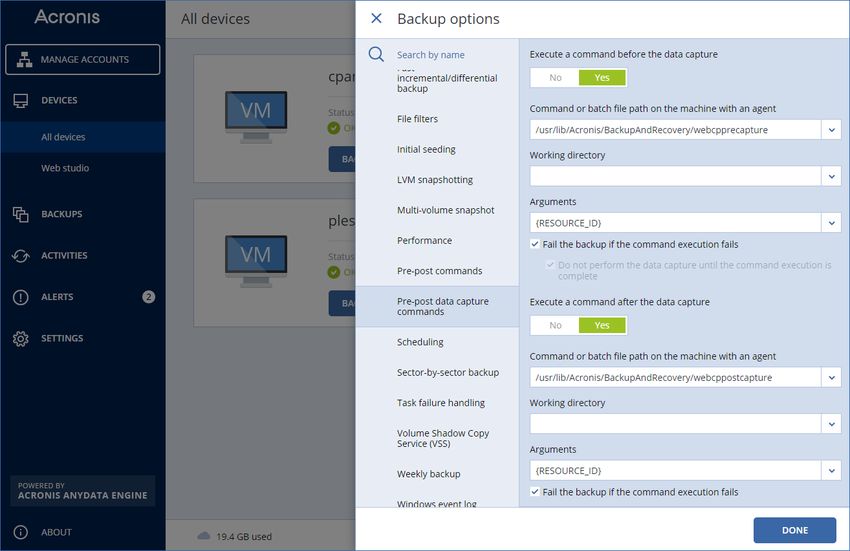
2. It must have Pre-post data capture commands configured:
Set Execute a command before the data capture to Yes
Set Command or batch file path on the machine with an agent to
/usr/lib/Acronis/BackupAndRecovery/webcpprecapture
Leave Working directory empty
Set Arguments to {RESOURCE_ID}
Set Fail the backup if the command execution fails to Yes
Set Execute a command after the data capture to Yes
Set Command or batch file path on the machine with an agent to
/usr/lib/Acronis/BackupAndRecovery/webcppostcapture
Leave Working directory empty
Set Arguments to {RESOURCE_ID}
Set Fail the backup if the command execution fails to Yes
3. Encryption can be enabled. For more information on the encryption options, please check the
Acronis Backup guide.
15 Copyright © Acronis International GmbH, 2003-202012.3 Installing the backup agent using a registration
token
1. To obtain a registration token, log in to the Acronis backup console with your credentials. Then
go to Devices and click Add.
2. Scroll down to the Registration token section and click GENERATE.
3. Set up token lifetime if necessary, click GENERATE TOKEN, then click COPY.
4. Log on to the host as the root user.
5. Run the installation file, insert the registration token value generated earlier:
./Backup_Agent_for_Linux_x86_64.bin --token=%generated token%
6. Select the respective check boxes for the agents that you want to install. The following agents
are available:
Agent for Linux
7. Complete the installation procedure.
8. Troubleshooting information is provided in the following file:
/usr/lib/Acronis/BackupAndRecovery/HOWTO.INSTALL
12.4 Unattended extension configuration
1. Log on to the host as the root user.
2. If you haven’t installed the plugin yet, run the following command:
plesk bin extension -i acronis-backup
Otherwise just skip this step.
3. Modify the following file:
/usr/local/psa/var/modules/acronis-backup/python/site-packages/acronis_backup_s
rv/bash_scripts/configurator.ini
Parameter name Required Value
acronis_cyber_cloud_login YES Tenant login name
acronis_cyber_cloud_passwor YES Tenant password
d
encryption_password NO This password will be used to create an encrypted backup
plan for your machine. If empty – regular backup plan will
be created, encryption will not be enabled.
encryption_type NO This parameter will be used to create an encrypted backup
plan for your machine. Available values are:
aes256
aes192
aes128
run_backup YES 1 - run backup, 0 – do not run backup
Two-factor authentication (2FA) must be disabled while using unattended configuration script.
4. Run a script for unattended configuration:
/usr/local/psa/var/modules/acronis-backup/python/site-packages/acronis_backup_s
rv/bash_scripts/configurator.sh
16 Copyright © Acronis International GmbH, 2003-2020If your configuration file is located in another folder, use the following parameter:
-c / --config
to pass it to the script below:
> ./configurator.sh -c=/DIR/configurator.ini
> ./configurator.sh --config=/DIR/configurator.ini
The following scenarios are supported:
If the backup agent is not installed, the script will:
Install the backup agent
Register the backup agent in Acronis Cyber Cloud
Apply encrypted or not backup plan (depending on the options, specified in the
configurator.ini file) to the machine
Run the first backup (if run_backup=1)
If the backup agent is installed, but not yet registered in Acronis Cyber Cloud, the script will:
Register the backup agent in Acronis Cyber Cloud and update it to the latest version, if
necessary
Apply encrypted or not backup plan (depending on the options, specified in the
configurator.ini file) to the machine
Run the first backup (if run_backup=1)
If the backup agent is already both installed and registered in Acronis Cyber Cloud, the script will:
Apply standard backup plan to the machine. Encrypted backup plan can be created and
applied only in case there were no suitable plans, applied to this machine before.
Run the first backup (if run_backup=1)
12.5 Advanced extension configuration
A few configuration options are available for freezing MySQL, prior to taking a snapshot. These
options are added to the following configuration file:
var/lib/Acronis/AgentCommData/freeze-mysql.sh
You can configure the below-listed parameters:
1. MYSQL_FREEZE
0 - don't lock mysql tables before backup.
1 - lock mysql tables before backup.
If MYSQL_FREEZE is set to 1, databases will be switched to Read Only mode, while taking a
snapshot to perform a backup in a consistent state. If this option is turned off, databases won't
be locked during the backup and some data can be lost.
2. MYSQL_FREEZE_TIMEOUT
Specified in seconds.
3. MYSQL_FREEZE_SNAPSHOT_TIMEOUT
Specified in seconds.
4. MYSQL_FREEZE_ONLY_MYISAM
0 - lock all tables before backup.
17 Copyright © Acronis International GmbH, 2003-2020 1 - lock only MyISAM tables before backup. 18 Copyright © Acronis International GmbH, 2003-2020
You can also read