Migration from Security Center 9 to Security Center 10
←
→
Page content transcription
If your browser does not render page correctly, please read the page content below

Migration from Security Center 9
        to Security Center 10

PAGE 1 |
Contents
           Upgrading from Security Center 9 to
           Security Center 10
           Step One:     Upgrade Procedure and What's new

           Step Two:     Kaspersky Security Center 9 Backup

           Step Three:   Upgrade the KSC 9 to KSC 10

           Step Four:    Create the structure of administration groups.

           Step Five:    Create a Network Agent deployment Task

           Step Six:     Create a Endpoint 8 deployment Task

PAGE 2 |
Step One: Kaspersky Security Center 10 Upgrade Procedure
To upgrade Kaspersky Administration Kit from 8.0 or 9.0 to Kaspersky Security Center 10.0 please take the following step:

1. Create a backup copy of the Administration Server data by using the klbackup utility. This utility is included in the application installation package and is
located in the root of the Kaspersky Administration Kit installation folder.

2. Upgrade Kaspersky Security Center 10 on Administration Server and Administration Console.

You can install Administration Server on a computer where a previous version of Administration Server is not installed and restore the data from another
computer. When you restore Administration Server data to version 10.0, all data and settings from the previous version of the application are saved.

3. Convert the previous version Protection policies or create a new Protection policies . The anti-virus protection system built on earlier versions of anti-virus
applications versions will be managed by Kaspersky Security Center 10.0. You can convert policies and tasks created for the previous version of the
Kaspersky Lab applications into the policies and tasks for the new version by using the Policies and Tasks Conversion Wizard.

4. Create the structure of administration groups and a separate Upgrade group to which add all client with the previous version and make sure you have the
previous version policy and tasks in this group

5. Create a remote installation task for new versions of Network Agent and Anti-Virus applications. Use the installation packages that were created
automatically during installation of Kaspersky Security Center 10.0.

5. Run the created task on a few machines as a test before upgrading all client. The previous versions of Network Agent and the Anti-Virus applications are
removed by the task before the new versions of Network Agent and the Anti-Virus applications are installed.

6. Add client computers, which have been upgraded to the new versions of Anti-Virus applications, to the administration group hierarchy.

    1 2 3 4 5 6 7
Kaspersky Security Center Migration Paths

Kaspersky Security Center 10 allows restoring
settings and the database from a copy created
by both version 9 and 8

                                       Kaspersky Security Center 10

                 Kaspersky Security Center 9              Kaspersky Administration Kit 8
                    9.2.69 (Critical Fix 2)                  8.0.2177 (Critical Fix 3)
                   9.0.2825 (Critical Fix 1)

                Kaspersky Administration Kit 8.5          Kaspersky Administration Kit 8
                   Service Provider Edition                  8.0.2134 (Critical Fix 2)
                 Kaspersky Security Center 9                 8.0.2090 (Critical Fix 1)
                      9.0.2786(Release)                        8.0.2048(Release)

   PAGE 4 |       1 2 3 4 5 6 7
Kaspersky Security Center New and Improved
Changes made to Kaspersky Security Center 10.0 as compared with Kaspersky Security Center 9.0:

       The functionality of capturing and installation of operating system images has been added.

       The feature of centralized remote removal of third-party applications has been implemented.

       The feature of centralized remote installation of updates for operating systems and applications has been
       implemented.

       Windows Server® Update Services functionality has been included in Administration Server.

       The license restrictions control functionality has been added; the applications registry functionality has been
       expanded.

       The functionality of hardware registry management has been added.

       The option of controlling devices' access to the organization's network using rules and the white list of devices
       (Network Access Control) has been implemented.

       The option of shared access to the client computer desktop has been added; the functionality of remote desktop
       has been expanded.

       Exchange ActiveSync Mobile devices server has been implemented.

       iOS MDM Mobile devices server has been implemented.

       The feature of sending SMS messages to mobile devices users has been implemented.

    PAGE 5 |              1 2 3 4 5 6 7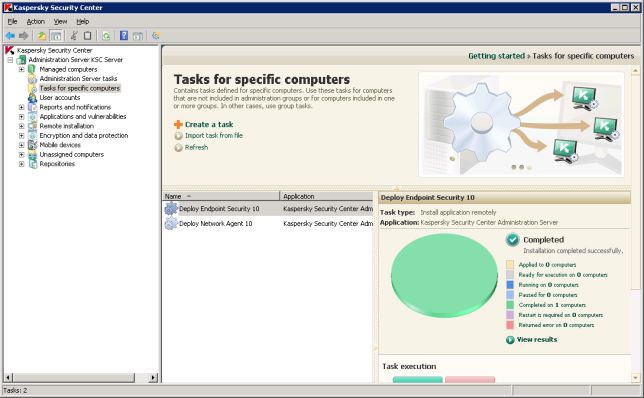
Kaspersky Security Center New and Improved
 The functionality of centralized remote installation of applications to managed mobile devices has been implemented.

 The functionality of centralized installation of certificates to managed mobile devices has been implemented.

 Support of data encryption for Kaspersky Endpoint Security 10 for Windows® has been added.

 The application control options have been expanded; the following features have been added: static analysis of
 application control rules, creation of categories based on a set of executable files on reference computers,
 display of several categories for a single executable file.

 The feature of publishing of random standalone packages on a web server integrated with Administration Server
 has been implemented.

 A selection of update agents has been included in the set of selections created by default.

 An information pane displaying the statuses of update agents has been added.

 The feature of filtering in centralized lists of Quarantine, Backup, and files with postponed processing, has been
 implemented.

 The functionality of management of the centralized list of users has been added.

 The feature of excluding selected subdivisions from search through Active Directory has been added.

 The feature of scheduling the startup of a task to a selected day of month has been added.

PAGE 6 |            1 2 3 4 5 6 7
Kaspersky Security Center New and Improved
 Automatic definition of the tasks startup distribution period has been implemented.

 The negation feature has been added for specifying search criteria for specific computers.

 The feature of specifying an existing blank database as the Administration Server database during installation,
 has been implemented.

 The feature of specifying groups as search criteria for specific computers has been added

 The feature of specifying distributed content in the settings of an update agent has been added: installation
 packages, updates, or both.

 The feature of searching for computers by user names or session names has been added; reporting on
 computer users has also been added.

 A graphic utility for Network Agent management has been implemented.

 Independent display of the license expiration date and the key expiration date in the key properties and the key
 usage report has been added.

 Display of information about the full volume of data stored in the Administration Server database and about the
 volume of events stored in the database, has been added.

 The feature of specifying criteria with the "or" operator or in rules of moving computers to administration groups,
 has been added.

PAGE 7 |            1 2 3 4 5 6 7

Kaspersky Security Center 10 Licenses
                                             KES 10 Features                      KSC 10 Features             Nodes
                                        Anti-Malware Protection            Protection Management    Workstations
                                                                                                                           Old Licenses
                                        - Virus Scan                                                                       will still work
                                        - File Anti-Virus
                                        - Mail Anti-Virus                                                                  and activate

                                 Core
                                        - Web Anti-Virus                                                                   all KES 10
                                        - IM Anti-Virus
                                                                                                                           features
                                                                                                                           except Data
                                        Network Protection                                                                 Encryption
                   Select

                                        - Firewall
                                        - Network Attack Blocker
                                        Endpoint Control                   Mobile Devices           Mobile Devices
                                        - Application Startup Control      Management
                                        - Application Privileges Control
                                        - Device Control
                                        - Web Control

                                                                                                    Servers
                                        System Watcher
        Advanced

                                        Data Encryption                    Systems Management       Imaging/Provisioning
Total

                                        Collaboration                      Mail                     Web

PAGE 8 |                    1 2 3 4 5 6 7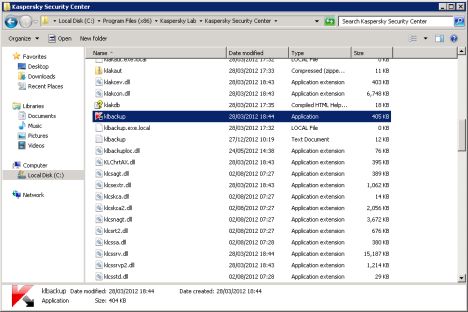
Kaspersky Security Center 10 Licenses Options
 In Kaspersky Security Center a license may cover various functionality groups.

 Basic functionality of Administration Console

 The following functions are available:

         Creation of virtual Administration Servers to manage a network of remote offices or client organizations

         Creation of a hierarchy of administration groups to manage a selection of devices as a whole

         Control of the anti-virus security status of an organization

         Remote installation of applications

         Viewing the list of operating system images available for remote installation

         Centralized configuration of applications installed on client computers

         Viewing and editing existing groups of licensed applications

         Retrieval of statistics and reports of applications' operation, as well as notifications of critical events

         Data encryption and protection management

         Viewing and editing manually the list of hardware detected by the network poll

PAGE 9 |            1 2 3 4 5 6 7
Kaspersky Security Center 10 Licenses Options
         Centralized management of files moved to Quarantine or Backup and files for which processing has been
         postponed.

 The management unit for the basic functionality is the virtual Administration Server; up to 10 virtual Administration
 Servers can be created.

 Before the application activation, or after the commercial license expires, Kaspersky Security Center runs in mode of
 basic functionality of Administration Console

 Systems Management functionality

 The following functions are available:

         Remote installation of operating systems

         Remote installation of software updates, scanning and fixing vulnerabilities

         Management of devices access to an organization's network (Network Access Control, NAC)

         Hardware inventory

         Managing groups of licensed applications

         Remote connection to client computers

 The management unit for Systems Management functionality is the client computer in the "Managed computers" group.

PAGE 10 |           1 2 3 4 5 6 7
Kaspersky Security Center 10 Licenses Options
Mobile Devices Management functionality
The Mobile Devices Management functionality is designed to manage Exchange ActiveSync and iOS MDM mobile
devices.
The following functions are available for Exchange ActiveSync mobile devices:
Creation and edition of management profiles of mobile devices, assignment of profiles to users' mailboxes
Configuration of a mobile device (mail synchronization, applications use, user password, data encryption,
connection of removable media)
Installation of certificates to mobile devices.
The following functions are available for iOS MDM mobile devices:
Creation and edition of configuration profiles, installation of configuration profiles to mobile devices
Installation of applications to a mobile device via App Store or using manifest files (.plist)
Option of blocking a mobile device, resetting the password of a mobile device, and remove all data from a
mobile device.
Also, the Mobile Devices Management functionality allows running commands provided by corresponding protocols.
The management unit of Mobile Devices Management functionality is the mobile device. A mobile device is considered to
be managed since it connects to a Mobile devices server.
PAGE 11 | 1 2 3 4 5 6 7Step Two: Kaspersky Security Center 9 Backup
Before upgrading you will need to backup your previous Kaspersky Security Center. Please go to the
following location on the C drive and run the Klbackup.exe utility: C:\Program Files (x86)\Kaspersky
Lab\Kaspersky Security Center\Klbackup.exe
1. Run the Klbackup.exe Click Next
1 2 3 4 5 6 72. Click Next and run the Backup up Administration Server data 3. Select a destination folder for the backup and set the password PAGE 13 | 1 2 3 4 5 6 7
4. The utility will then backup you policies and tasks and complete successfully.

5. Click Finish

   PAGE 14 |       1 2 3 4 5 6 7
Step Three: Upgrade the KSC 9 to KSC 10
1. Run the installation for Kaspersky Security Center 10. The Setup Wizard
automatically finds the previous version and switches to the upgrade mode

2. Click Next.

3. Accept the License agreement and Click Next.

    1 2 3 4 5 6 7
4. To be on the safe side the wizard will prompt for a backup. If you have not previously done so you can create a backup copy of the Security Center Server here. Leave the default backup folder and type in a password. If you have a backup, Click Next Note: Kaspersky Security Center 10 allows restoring the settings and the database from a copy created by both version 9 and 8 5. Click Upgrade. The Upgrade parameters can not be specified the wizard will automatically upgrade the installed components and preserve the settings from the previous version. PAGE 16 | 1 2 3 4 5 6 7
6. The upgrade process will now install the Kaspersky Endpoint Security 10
plugin and update the previous plugins installed

7. Accept the Kaspersky Endpoint Security 10 Plugin license agreement and
click Install

   PAGE 17 |       1 2 3 4 5 6 7
8. The upgrade process will now continue please wait.

9. Kaspersky Endpoint Security 10 Plugin installation completed click OK

   PAGE 18 |       1 2 3 4 5 6 7
10. The upgrade process will now continue please wait.

11. Accept the Kaspersky Endpoint Security 8 Plugin license agreement and
click Install

   PAGE 19 |      1 2 3 4 5 6 7
12. The upgrade process will now continue please wait.

13. Kaspersky Endpoint Security 8 Plugin installation completed click OK

   PAGE 20 |       1 2 3 4 5 6 7
14. The upgrade process will now complete please wait.

15. Congratulation the upgrade is complete, Click Finish

   PAGE 21 |       1 2 3 4 5 6 7
1. When you launch the Kaspersky Security Center 10 for the first time the
Policies and tasks conversion wizard starts automatically. In the first window the
administrator selects the version for the policies and tasks to be converted to.
Select Kaspersky Endpoint Security 10 for Windows and click Next
If you do not wish to convert the policies and
task at this time you can Cancel the wizard and
find it in the Properties of the Administration
Server menu.

2. Select the Policies you wish to convert to the Endpoint 10 version and click
Next

The wizard will show all active and mobile policies of all groups. Inactive
policies are not converted. Converted policies will keep the settings of the
original where it is possible.

   PAGE 22 |        1 2 3 4 5 6 7
3. Select the Tasks you wish to convert to the Endpoint 10 version and click
Next

The wizard will show all update, virus scan and inventory tasks of KES 8.

4. Click Finish

   PAGE 23 |       1 2 3 4 5 6 7
Step Four: Create the structure of administration groups
 Managed computers: This folder is intended                        Remote installation: This folder is intended
 for storage, display, configuration and modification of           for managing remote installation of operating systems
 the structure of administration groups, group policies            and applications.
 and group tasks.                                                  The Encryption and data protection:
 Administration Server tasks: This folder                          This folder is intended for managing the process of
 contains a set of tasks defined for an Administration             user data encryption on drives and removable media.
 Server. There are three types of Administration                   The Mobile devices: This folder is designed
 Server tasks: report delivery, backup copying, and                to manage Exchange ActiveSync and iOS MDM
 downloading of updates to the Administration Server               mobile devices.
 repository.
 Tasks for specific computers: This folder                         Unassigned computers: This folder
 contains tasks defined for a set of computers in                  displays the network where the Administration Server
 administration groups or in the Unassigned computers              is installed. Information about the structure of the
 folder. Such tasks are convenient for small groups of             network and computers on this network is received by
 client computers that cannot be united into a separate            the Administration Server through regular polling of
 administration group.                                             the Windows® network, IP subnets, and Active
                                                                   Directory within the corporate computer network.
 Reports and notifications:               This folder of the       Polling results are displayed in the informational area
 console tree contains a set of templates for the generation of    of the corresponding subfolders: Domains, IP subnets,
 reports about the status of the anti-virus protection on client   and Active Directory.
 computers in administration groups.
 Application and vulnerabilities: This container                   Repositories: This folder is intended for
                                                                   operations with objects used to monitor the
 allows maintaining a registry of applications and executable
                                                                   status of client computers and perform their
 files on client computers, view and install updates from
                                                                   maintenance
 Windows Update, and fix vulnerabilities detected on client
 computers.

    1 2 3 4 5 6 7
Kaspersky Security Center Structure Setup
Create groups under the Managed computers container for Servers,
Workstations, Laptops and any other client you wish to create a
group. By clicking on Managed computers and in the right hand work
area select Create a group
If you have multiple sites create sub-groups for the site and under
these groups create groups for clients.
PAGE 25 | 1 2 3 4 5 6 7Kaspersky Security Center Structure Setup
One of the main Kaspersky Security Center functions is remote
configuration of antivirus software installed on client computers. The Anti-
Virus software settings can be configured in policies. A policy is created
for a particular piece of software, and it cannot be applied to other
software. Create a policy for each type of software you wish to manage.
Under the Managed computers group and its Policy tab. These policies
with then apply down to all machine in the tree running that software. i.e.
create a policy for workstations in the Managed computers group and this
will apply to clients in the UK and USA workstation group.
Another function the Kaspersky Security Center has is the ability to run
centralised task to client managed by the Security Center. There are two
main task which need to be run to protect clients on a corporate network.
The first being the Update task this is recommended to run (When new
updates are downloaded to the repository). The second task is the Virus
Scan which is recommended to run once a week. Create an Update and
Virus scan task to execute on all client machines for each software. If this
is done on the Managed computers level it will then apply down to all
machine in the tree running that software. i.e. create a task for Windows
Workstations in the Managed computers group and this will apply to
clients in the UK and USA Windows Workstation group.
PAGE 26 | 1 2 3 4 5 6 7Kaspersky Security Center Structure Setup
The Administrator also has the option to create the policies in the group
and break the inheritance in the group properties. This will allow the
Administrator to apply different policies to different groups. i.e. if a
policy is created in the UK Windows Workstation group a policy with
different policy settings can be created in the USA Windows
Workstations group. Create a policy for each type of software you wish
to manage under the group and its Policy tab. You could also right click
on the policy and copy and paste it into another group protecting the
same software and then modify it. i.e. create a policy for Windows
Workstations in the UK group and copy and paste it into the USA
Window Workstation group to apply the same policy there or modify to
have a different policy setting.
There are two main task which need to be run to protect clients on a
corporate network. The first being the Update task this is
recommended to run (When new updates are downloaded to the
repository). The second task is the Virus Scan which is
recommended to run once a week. Create an Update and Virus scan
task to execute on all client machines. This can be done on the
Managed computers level which will then be inherited by clients
lower in the console tree unless the inheritance is broken which can
be useful for administrator if you which to have different task settings
to run on a certain groups in the structure.
PAGE 27 | 1 2 3 4 5 6 7Kaspersky Security Center New Containers Kaspersky Security Center 10 has three new added containers: The Remote installation folder is intended for managing remote installation of operating systems and applications on the network, as well as performing remote installation of applications by Kaspersky Lab and other software vendors. The Encryption and data protection folder is intended for managing the process of user data encryption on drives and removable media. The Mobile devices folder is designed to manage Exchange ActiveSync and iOS MDM mobile devices. PAGE 28 | 1 2 3 4 5 6 7
Step Five: Create a Network Agent deployment Task
1. In the Kaspersky Security Center Console click on the Managed computer container and select the Task
Tab. Then in the working area window click on Create a task.

    1 2 3 4 5 6 7
2. Task name: Deploy Network Agent 10 3. Task type: Kaspersky Security Center Administration Server - Install application remotely PAGE 30 | 1 2 3 4 5 6 7
4. Installation package: Select application Kaspersky Security Center Network
Agent (10.X.XXXX)

5. Setting: take the tick out of Do not install application if it is already
installed. If you have machine with a Network Agent installed.

   PAGE 31 |        1 2 3 4 5 6 7
6. Restart: select Do not restart the computer the Network Agent install does
not require a reboot.

7. Moving to the list of managed computers: Move unassigned computers to the
group: Managed Computers or select a preferred group

   PAGE 32 |       1 2 3 4 5 6 7
8. Select target computer: Select computers discovered by Administration
Server in the network.

9. Select client computers: Select the machines you wish to deploy to

   PAGE 33 |      1 2 3 4 5 6 7
10. Account: this will take the default account you inserted when the Security
Center was installed.

11. Task Scheduling: settings set this to Manually as you will start this task after
completion, it is also recommended to tick the Run missed tasks option ( So if
client are not powered up at the time of the task running they will run on boot
up).

   PAGE 34 |        1 2 3 4 5 6 7
12. Tick the option to Run task after Wizard completion and click Finish

You will then see the task Deploy Network Agent 10. The Pie chart in the right
hand window will change colour and if successful finish Green if not you can
select View detailed results to find out why the Network Agent did not install.

   PAGE 35 |       1 2 3 4 5 6 7
Step Six: Create an Endpoint 10 Deployment Task
1. In the Kaspersky Security Center click on Tasks for specific computer. And in the working area window
click on Create a task

    1 2 3 4 5 6 7
2. Task name: Deploy Endpoint Security 10 3. Task type: Kaspersky Security Center Administration Server - Install application remotely PAGE 37 | 1 2 3 4 5 6 7
4. Installation package: Select application Kaspersky Endpoint Security 10 for
Windows (10.X.XXXX)

5. Advanced: Click Next Do not install the Network Agent along with this
application.

   PAGE 38 |       1 2 3 4 5 6 7
6. Setting: take the tick out of Do not install application if it is already
installed. If you have machine with a Network Agent installed.

7. Restart: Select Prompt user for action and change the default message

   PAGE 39 |        1 2 3 4 5 6 7
8. Select target computer: Select computers discovered by Administration
Server in the network.

9. Select client computers: Select the machines you wish to deploy to

   PAGE 40 |      1 2 3 4 5 6 7
10. Account: this will take the default account you inserted when the Security
Center was installed.

11. Task Scheduling: settings set this to Manually as you will start this task after
completion, it is also recommended to tick the Run missed tasks option ( So if
client are not powered up at the time of the task running they will run on boot
up).

   PAGE 41 |        1 2 3 4 5 6 7
12. Tick the option to Run task after Wizard completion and click Finish

You will then see the task Deploy Network Agent 10. The Pie chart in the right
hand window will change colour and if successful finish Green if not you can
select View detailed results to find out why the Network Agent did not install.

   PAGE 42 |       1 2 3 4 5 6 7
Deployment Reports and help tools

You will now see the task Deploy Network Agent 10. The Pie chart
in the right hand window will change colour and if successful finish
Green if not you can select View detailed results to find out why the
Network Agent did not install.

   PAGE 43 |       1 2 3 4 5 6 7
PAGE 44 |
You can also read