Source Code Management, Deployment, and Release Automation - Manage Compile Errors - Compuware Test Drive
←
→
Page content transcription
If your browser does not render page correctly, please read the page content below
Compuware Test Drive
Source Code Management, Deployment, and
Release Automation – Manage Compile Errors
6/25/2019
Contents
 Getting Started with SCM - ISPW ............................................................................................. 3
 Code Changes ....................................................................................................................... 7
 Generate (AKA Compile) ....................................................................................................... 17
 Promotion ........................................................................................................................... 27
 NEXT STEPS ........................................................................................................................ 40

                                                                                                                                Page 2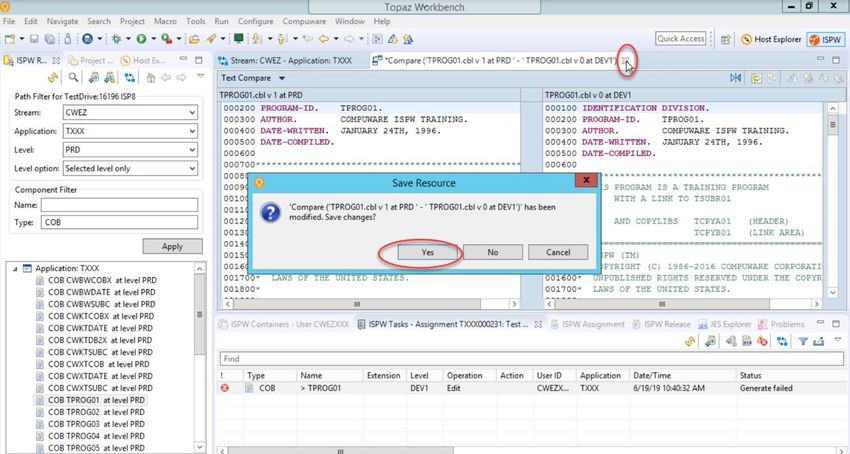
Getting Started with SCM - ISPW
The goal of this Test Drive section is to provide you with experience using Agile Source Code
Management, Deployment, and Release Automation on a mainframe platform. Compuware ISPW
enables developers to quickly and safely build, test and deploy mainframe code.

This test drive will take you through the following activities:
   •   Creating an Assignment
   •   Making code changes
   •   Create compile errors with your code changes
   •   Generating/compiling
   •   Fix compile errors using Compare/Merge feature
   •   Promotion to Test and Production runtime environments

Instructions:
   •   This guide contains many screenshots to provide a visual reference
   •   Every action you must take is in BOLD
   •   Please note each place that you must enter your own specific ID or number
   •   You must complete each step before proceeding to the next to successfully follow the guide

The Compuware Test Drive Experience requires that users complete the Building Your
Environment

http://resources.compuware.com/hubfs/Test%20Drive/Building_Environment_with_Host_and_JES_Ex
plorers_TW_Test_Drive.pdf

exercise before starting any tutorial script. If, at any point during your experience, your
host connection times out, you may need to log back in to the TestDrive host connection.

                                                                                              Page 3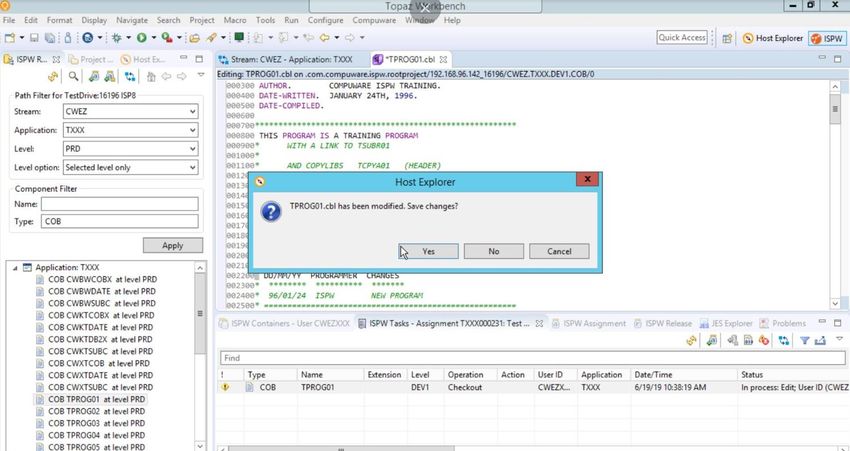
To get started in the Topaz Workbench:

   •   Open the Host Explorer perspective
   •   Click on the arrow next to Hosts,
   •   Right-click on TestDrive and select Login
   •   Logon on with the user credentials that were provided to you for with the TestDrive
       and click OK
   •   select ISPW from the Compuware menu

                                                                                      Page 4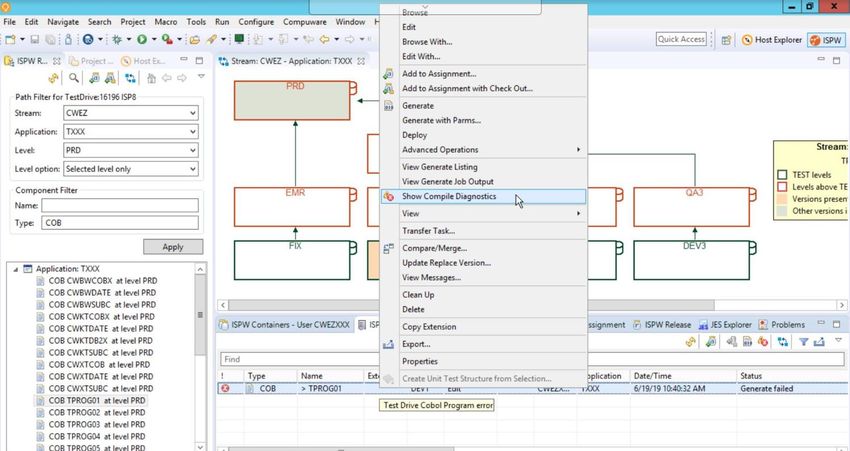
During this Test Drive you will encounter terms specific to ISPW. Here is a glossary for
your convenience.
      Terminology
       Term                    Description
       Application             Business Area

       Stream                  Development Life-Cycle used by one or more
                               Applications
       Life-Cycle              Transitional Code States (DEV, QA, PROD) in the
                               Development Life-Cycle
       Level                   Instance of a Code State (DEV, QA, PROD)
       Component               SCM managed object such as a Cobol source member.
       Component Version       An immutable version of a Component.
       Task                    An instance of a unit of work. For example, a change to
                               a Component.
       Part                    A generated object such as a load module, or a Listing
                               or a DBRM
       Warehouse               Storage location for inactive historical or overlaid
                               Component Versions (source and parts).
       Assignment Container    A package of one or more, usually related, Tasks. A
                               development container that is used to organize and
                               manage development work.
       Release Container       A package of Tasks from one or more Assignment
                               Containers. An operational container that is used to
                               organize and manage operational releases.
       Set Container           A package of Tasks at an instance in time. A special
                               ISPW container that is used internally to organize and
                               manage work requests.
       Add Task                Make a statement of intent, often because of some
                               impact analysis.
       Checkout Task           Copy source to development area
       Edit Task               Make a change to the source in the development area.
       Generate Task           Execute Compile and Link processes.
       Promote Task            Move Task forward to the next Level in the Life-Cycle.
       Regress Task            Move Task backwards to the previous Level in the Life-
                               Cycle.
       Delete Task             Remove a Task from the development area
       Fallback Task           Restore previous version of Task.
       Deploy Task             Implement Task in one or more Run Time
                               environments.

                                                                                         Page 5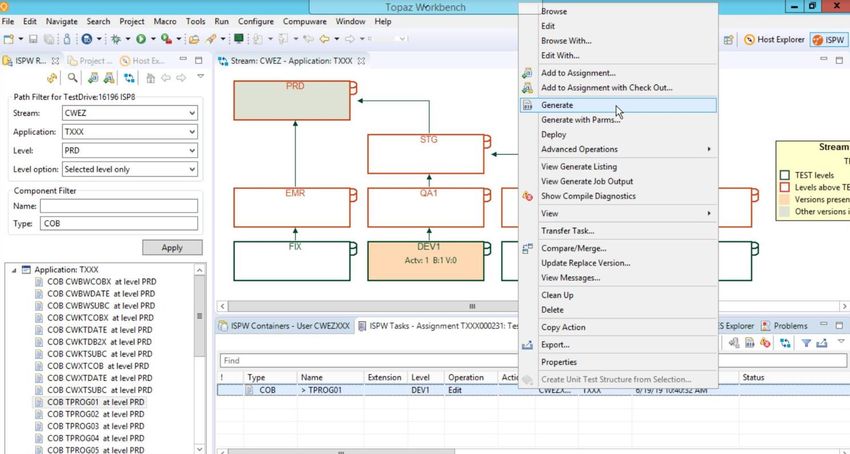
Substitute your values in the screenshots
In this Test Drive the screen shots provided have used specific values that may differ from your
assigned values. These were provided in your email notice.

         While taking the test drive, you must substitute your assigned values!

        Variable                         Your Assigned Values

        Application                      Txxx*

        Assignment Prefix                Txxx*

       * For the value of xxx, substitute the last three digits of your test drive username.

                                                                                                   Page 6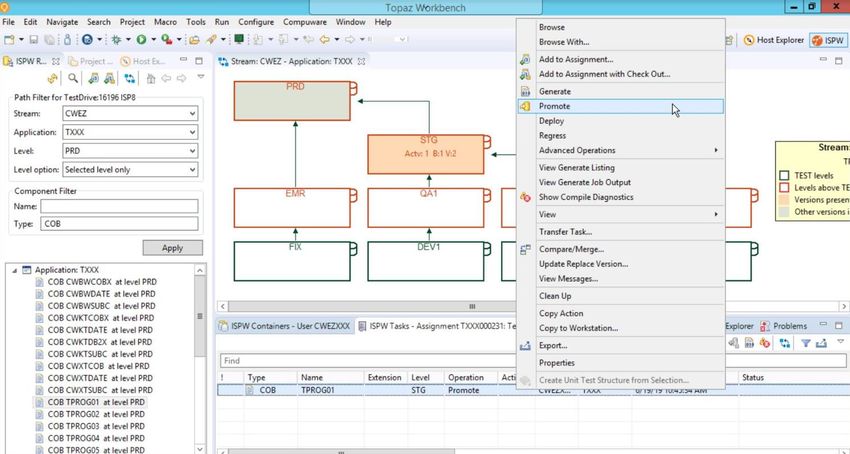
Code Changes
   Your development Task in this Test drive is to change a Cobol program using Topaz Workbench’s
    content assist, create an error in the Cobol program fix it, generate it and promote it thru the
                                  Application Life-Cycle to Production.

First, you will find and add a Cobol program into an ISPW Assignment from which you can perform all
this work.

      1. Change the Stream to CWEZ.
      2. Change the Application to your assigned application value (Txxx, where xxx is
         your unique number)
      3. Set the Level to “PRD” and ensure the Level option is set to “Selected level only”
         or “All found in level and above” these two choices will show the same results
         since there are no levels above PRD.
      4. Filter the view even further by setting the Type to COB, this will allow you to focus
         only on the Cobol program components available in your stream | application at
         the PRD level. Click Apply (circled)
          The ISPW Repository View lists the Cobol Components for your application.

                                                                                                Page 7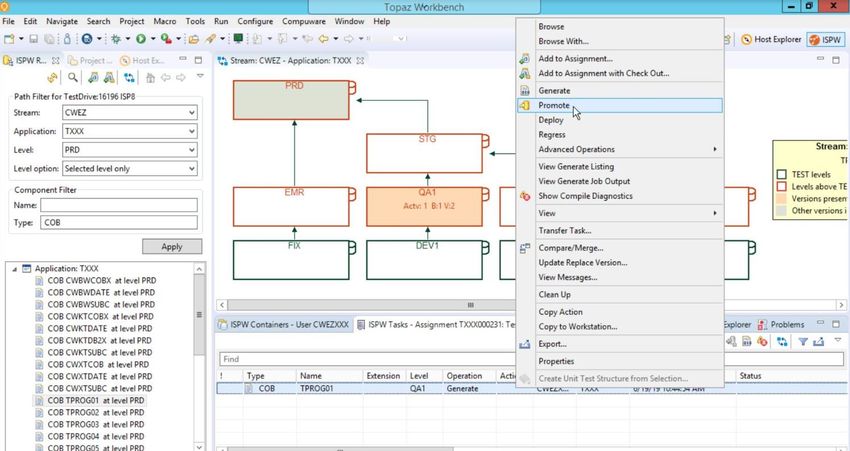
Click on TPROG01 at level PRD and click Add to Assignment with Checkout. Note, if you don’t
see TPROG01 in the list, you may need to scroll down.

From the Add Task dialog box, click the New button next to Assignment.

This will allow you to create a new Assignment Container for your program.

                                                                                     Page 8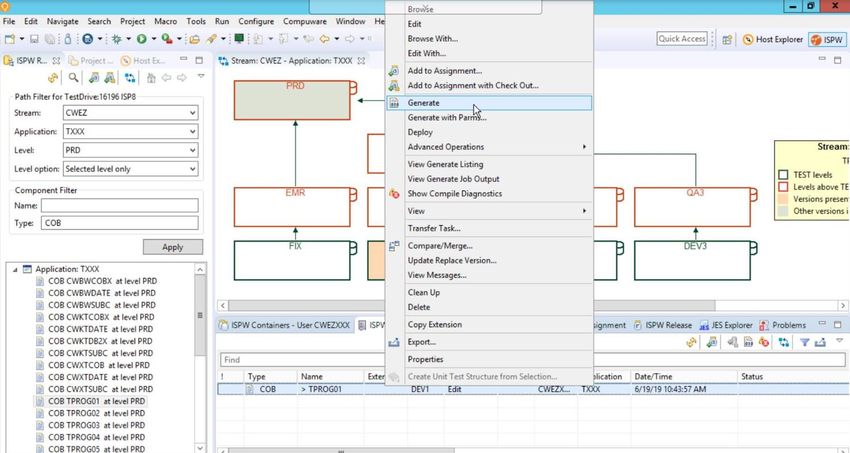
Type a description for your Assignment and Click OK.

A message will be displayed providing you with your new Assignment name. Click OK.

                                                                                     Page 9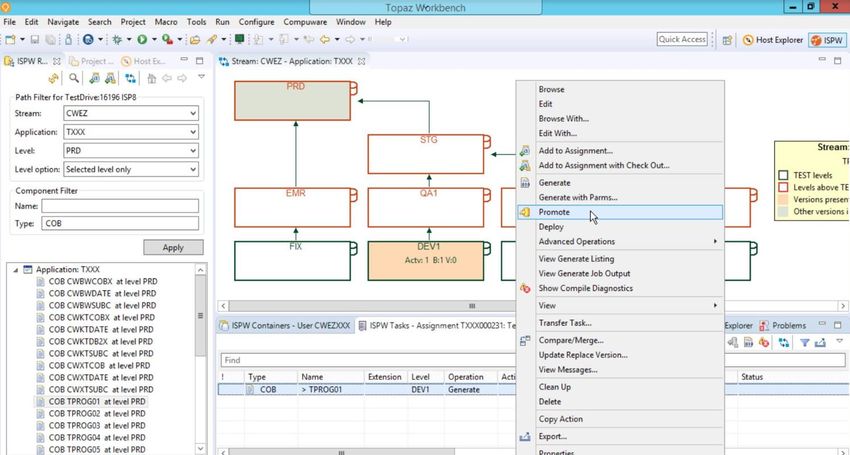
Your new Assignment has been created and is ready to have Tasks added to it. An Assignment
Container is the only Container Type in ISPW that Tasks can be added to. The Assignment Container
is where a developer will spend much of your time.

A message will be displayed to inform you that the task has been checked out to your Assignment.
Click OK.

                                                                                            Page 10
The Assignment Task List View will open and the Task that was added will be listed.
Every operation that needs to be performed on this Task and other Components which are impacted
by changing this Task (edit, impact analysis, compile, promote, deployment etc..) can be performed
from this Assignment or other Assignments.
Note that the Cobol program Task in the Assignment is checked out and sitting in the DEV1 level. The
checkout date/time and userid is reflected in the Task information. At checkout, a destination level for
the checkout was chosen – DEV1. There is also a message informing you that the program cannot be
promoted until it is regenerated.
Page 11To see the ISPW Life-Cycle, path structure, that was constructed for the Application, Click
once on the Task and then Click on the View Life-Cycle icon.
Page 12A picture of the Life-Cycle is presented. You will notice the levels containing the Versions of the
highlighted Cobol program Task are colored indicating the existence of a version of that Component at
those levels.
From this picture it is very easy to visually see where Versions exist. By choosing the DEV1 Level, you
have defined the Path to Production → DEV1-QA1-STG-PRD. Other versions of these Components may
also exist at other levels and may be passing thru the other three paths – FIX, DEV2 or DEV3.
Four paths were created for the application – one for emergencies starting at level FIX and three for
development starting at DEV1, DEV2 and DEV3. The application level structure is customizable when
defining the applications to ISPW. Any number of paths can be defined with a minimum of three
Levels.
Page 13Now that you have a Version of a Cobol program the next step would be to make changes to it.
To do this either right-click on TPROG01 and select Open or simply double-click on it.
The version’s source will be presented in SlickEdit for editing.
Click Yes
SlickEdit downloads the copybooks
Page 14Type your changes. Make sure you break the program so that it won’t compile. As an example, we
removed “ID” from PROGRAM-ID and removed the * from line 800. You can do anything you like to
break the program.
Once you have made your changes, close the SlickEdit view. Click Yes to save the changes.
Page 15Note the Operation, date/time and User ID fields have been updated to reflect the change in the Task
status.
Page 16Generate (AKA Compile)
The Cobol program will be generated/compiled, and your Assignment Task List will be updated to
reflect the new status.
• The Operation will be Generate
• The User ID, Date/Time will be updated
• The Message will be updated to reflect the successful completion of the generate
Now it is time to compile/generate the Cobol program, so we can do our testing.
To do this, Right-Click on TPROG01 and click Generate.
Page 17The status column will display a message showing that the Task is being generated.
The screen will refresh automatically when the generate is done. The Task will be updated with the
date and time of the generate, the user who performed the generate and the operation will reflect a
generate has occurred.
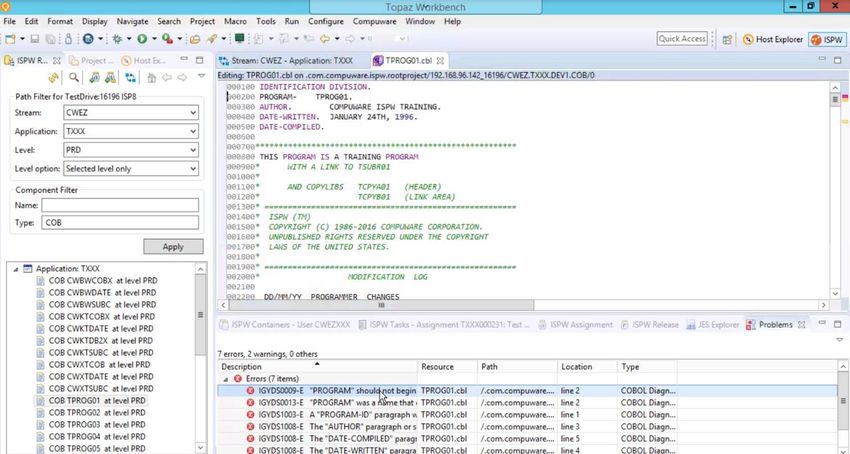
Page 18As expected, the generate fails.
Topaz Workbench allows you to display the Compile Diagnostics integrated with the source.
Right-click on the task and click Show Compile Diagnostics
Page 19Click the expand button for Errors as shown below
To go right to your error in the source code, double-click on the first error message
Page 20Click Yes.
Topaz displays the source positioned at the error:
For our purposes, we are going to resolve the errors by merging with the version in production.
Close the source by clicking on the close button.
Page 21Click on the ISPW Tasks view.
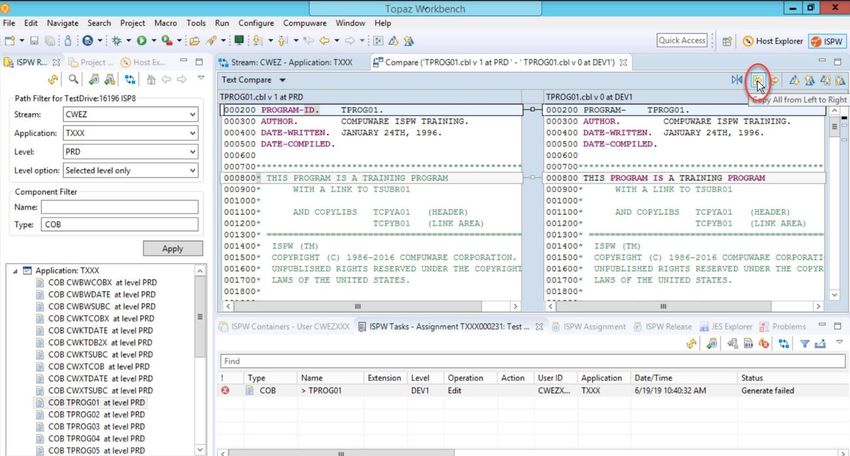
Right click on TPROG01 and click Compare/Merge.
Page 22ISPW will display a dialog for you to select the version to compare to. Click on the production
version then click OK.
The Compare view opens showing the two versions side by side.
Page 23The program on the left is TPROG01 at PRD and the program on the right is the one you just changed
in DEV1.
When you hover over your mouse cursor over the buttons above the Text Compare, you will see a
variety of selections that you can use to help fix your program.
Click the “Copy All from Left to Right” button
This copies all the differences from the production version into the current version.
This tool can also be used if you are in a concurrent development situation and you want to compare
your version of the program to another developer’s version of the program.
Page 24Close the Compare View and click yes to save your changes.
Page 25You are now ready to generate your program.
Right click on the program and select Generate.
Page 26Promotion
At this point you have
• Edited a Cobol program and made errors in your coding so that the program would not
recompile
• Used the ISPW merge/compare feature to fix said errors
• Generated your program after the errors were fixed
Now you are ready to promote your changes to the QA1 level.
To promote the Task to the QA1 level Right-Click on the Task and select Promote.
Page 27This action will create a Set Container. Sets are a special category of containers within ISPW that are
used to conduct operations such as promotion and deploy. They are temporary and created by ISPW
as needed for the work. This allows you to promote subsets of Tasks within an Assignment container
without the need to act on all, of the Tasks at once. Once you click Promote the selected Task(s) are
placed in a SET container for the promotion.
The ISPW Set processor will:
• Perform the promotion of the source to QA1
• Cleanup the DEV1 level (source and parts if applicable)
• Perform generates, in order, of all the Task(s) in the SET which require a generation
As the Task(s) in the SET are being processed you can monitor the progress by Clicking the refresh
button.
Click OK.
Page 28In the screen shot below you can see the promotion has finished – the Task has been promoted to
QA1 (see the Level value and the Operation in the Task List as well as the highlighted Level in the
picture). Note the Operation of the program reflects a Generate as the last operation. The SET
processor performed a promotion and then a generation as ISPW recognized a generate was required
or COB types at the QA1 level based on the configuration of this application.
Page 29Let us assume all the testing at the QA1 level has been successfully completed and you are ready to
promote to the STG level.
Right Click on the task as before and click Promote.
ISPW creates a Set container. The selected Task(s) are placed in a SET container for the promotion.
The ISPW Set processor will:
• Perform the promotions of all the parts to STG
• Cleanup the QA1 level (source and parts if applicable)
As the Task(s) in the SET are being processed you can monitor the progress by Clicking the refresh
button.
In the screen shot below you can see
• the Task has been selected for a Promote
• the primary ISPW started Task has started a SET processor for this SET
• the Cobol program is being promoted
Click OK.
Page 30In the screen shot below a final refresh has been done showing that
• the promotion has completed
• all the Tasks have successfully been promoted to STG
Note the Operation of the program reflects a Promote as the last operation. The SET processor
performed a promotion and recognized that a Generate was not required for COB types at the STG
level based on the configuration of this application.
Page 31Assuming all the testing at the STG level has been successfully completed, you are now ready to
promote the Tasks to the PRD level.
Right Click on the task as before and select Promote.
Note: ISPW uses your installation’s security (RACF/TopSecret/ACF2) to manage process security
(granular control of permissions by user and function). Process security defines who can perform
which commands at which levels in the Life-Cycle.
While a Developer can perhaps request the Promote operation when promoting to the STG and QA1
levels, perhaps a Change Coordinator role is responsible for requesting the Promotion to PRD.
One or more approvals can be put in place for each application/level promotion, including but not
limited to Application Manager, QA Manager, Impact, DBA, JOB Scheduling, peer, or VP roles.
Page 32A Set container will be created. The selected Task(s) are being placed in a SET container for the
promotion. The ISPW Set processor will:
• Perform the promotions of all the parts to the PRD Level
• Cleanup the STG level source and parts as applicable
Click OK.
Page 33The application has been configured to require an approval for the Promotion to PRD.
Below the STATUS shows the Tasks are locked in a SET for a Promote process but the SET needs
approval before the promote can proceed.
The Approval can be performed from
• Topaz/ISPW
• TSO/ISPW ISPF Interface
• Browser interface (including mobile)
For this Test Drive you will do the approval from Topaz/ISPW.
Click on the Task, then Right-Click on the STG box in the Life-Cycle diagram to perform the
approval. Select “APPROVE” to approve the SET promotion
ISPW will now start a SET processor to perform the promotion of the Tasks collected in the SET to the
PRD Level.
Page 34You can see in the updated screen shot below that
• SET processing has begun
• The Cobol program has been processed for a Promotion and is now at the PRD level
The Promotion to the PRD level has completed. The source and parts for the Cobol program were
moved to the PRD level Life-Cycle libraries and the STG level libraries were cleaned up as appropriate.
Page 35As a Developer you are now finished with your Assignment, so it can be closed. Assignments can be
closed manually and are usually closed to unclutter the ISPW Container List View. To Close the
Assignment first Close the “ISPW Tasks” View by clicking on the “Close” button.
Page 36Click on the ISPW Containers View
Page 37To Close your Assignment, Right Click on your Assignment and select “CLOSE”.
Page 38A Close confirmation panel is presented. Click OK to complete the Close.
For audit purposes, closed Assignments, Sets and Releases are never deleted from ISPW. They are
just filtered out of the standard day-to-day view. Once an Assignment, Set or Release is closed it is
removed from the standard filtered list, but it is still part of ISPW history and can be viewed at any
time.
Page 39You are done – your job has been to change a Cobol program. As a part of this exercise, you have
been able to use Compuware Topaz and ISPW to execute a workflow:
• Created an Assignment
• Added and checked out a Cobol program
• Changed it using SlickEdit
• Created compile errors
• Compiled/Generated the program
• Viewed the Compile diagnostics
• Fixed the compile errors using the Compare/Merge feature
• Generated the program again
• Promoted the Task from DEV1 to QA1, QA1 to STG and STG to PRD
• Approved the promotion to production
• Closed your Assignment to complete the change cycle
Congratulations! You have completed this ISPW tutorial for Compuware Test Drive.
NEXT STEPS
Click on the link below to return to the Compuware Test Drive main page and choose your next road
trip!
COMPUWARE TEST DRIVE
Page 40You can also read