PTZ Camera Companion module

    User Manual-English
←
→
Page content transcription
If your browser does not render page correctly, please read the page content below
PTZ Camera Companion module
User Manual-English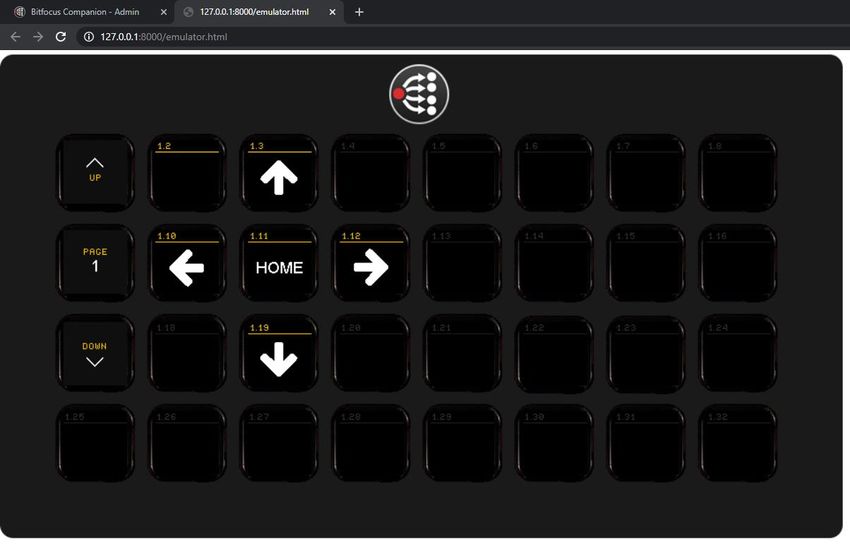
Table of Contents
Chapter 1 Instructions on Companion Module Installation....................... 2
    1.1 System Requirements ............................................................... 2
    1.2 Install with Windows 7 / 10 ....................................................... 2
    1.3 Install with Mac .......................................................................... 3
Chapter 2 Setting Instructions ................................................................... 5
    2.1 Check the Network setting ....................................................... 5
    2.2 Add new device ......................................................................... 5
    2.3 Add new button - Though by Presets page ............................ 7
    2.4 Add new button - Though by Buttons page ............................ 9
    2.5 Control the device - Through by Emulator ............................ 10
    2.6 Control the device - Through by Web buttons ..................... 10
Chapter 3 User Interface Description ...................................................... 11
    3.1 Admin User Interface .............................................................. 11
    3.2 Sidebar ..................................................................................... 12
    3.3 Instances .................................................................................. 13
    3.4 Config ....................................................................................... 14
    3.5 Buttons ..................................................................................... 15
    3.6 Surfaces ................................................................................... 16
    3.7 Log ............................................................................................ 16
    3.8 Edit button ............................................................................... 17
    3.9 Presets ..................................................................................... 18
    3.10 Import / Export ......................................................................... 19
Chapter 4 Connect Stream Deck ............................................................. 20
    4.1 Connect Stream Deck ............................................................. 20
Chapter 5 Preset Action List .................................................................... 21
    5.1 Camera-Preset Actions ........................................................... 21
    5.2 MediaPrecessor- Preset Actions............................................ 24
Chapter 6 Troubleshooting ...................................................................... 26
Copyright Information ............................................................................... 27

                                                                                                              1
Chapter 1 Instructions on Companion Module Installation
1.1 System Requirements
Windows 7 /10
Mac 10.13 or above
1.2 Install with Windows 7 / 10
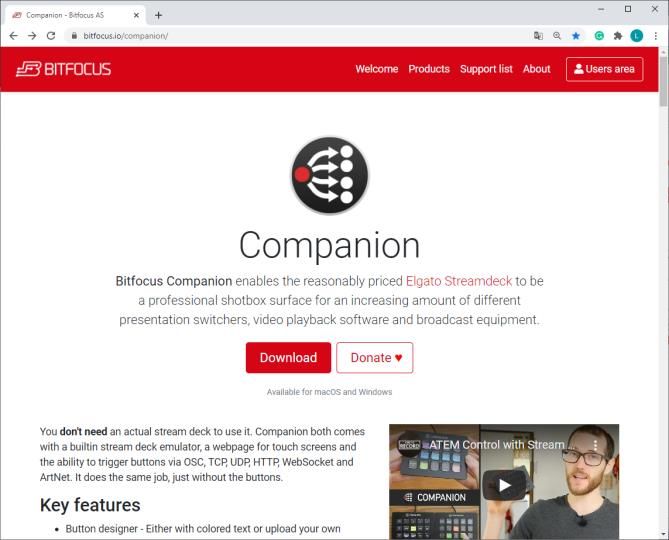
1.2.1 Please go to Companion - Bitfocus AS website and click [ Download ].
1.2.2 Sign up for free and sign in with your account to download.
1.2.3 Click [ Download ] [ Win ] to download.
1.2.4 After the download is completed, click [ companion-win64 ] to start the installation.
2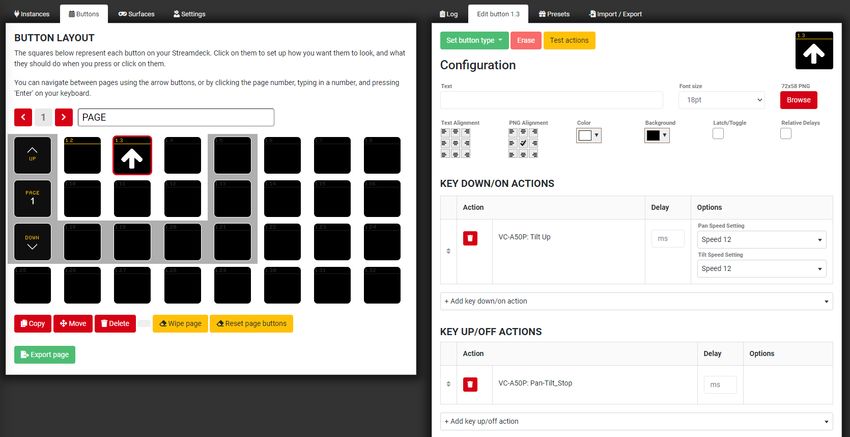
1.2.5 The installation wizard will guide you through the process. Please follow the
         instructions and press [ Next ] for the next step.

   1.2.6 When the installation is completed, press [ Finish ] to end the installation.
   1.2.7 Open the Companion software, click [ Launch GUI ] to enter the admin user
         interface.

1.3 Install with Mac
   1.3.1 Please go to Companion - Bitfocus AS website and click [ Download ].
   1.3.2 Sign up for free and sign in with your account to download.

                                                                                         3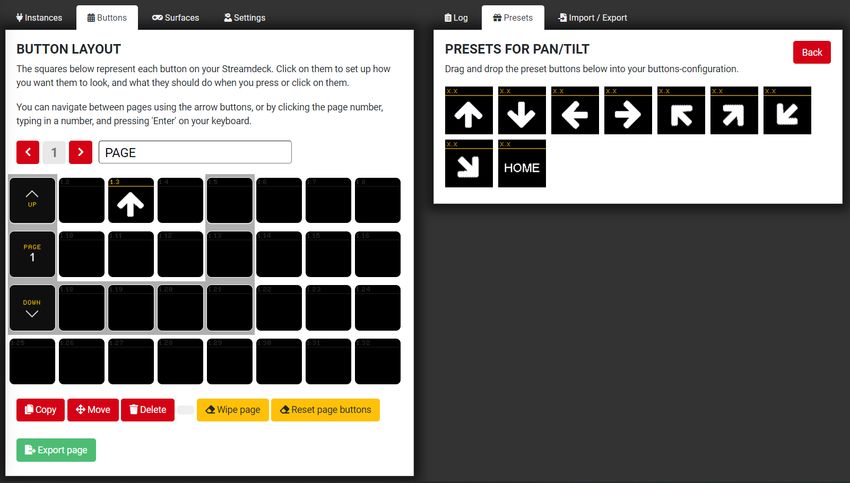
1.3.3 Click [ Downloads ] [ Mac ] to download.
1.3.4 After the download is completed, click [ Companion ] to open the Companion
software.
1.3.5 Click [ Launch GUI ] to enter the admin user interface.
4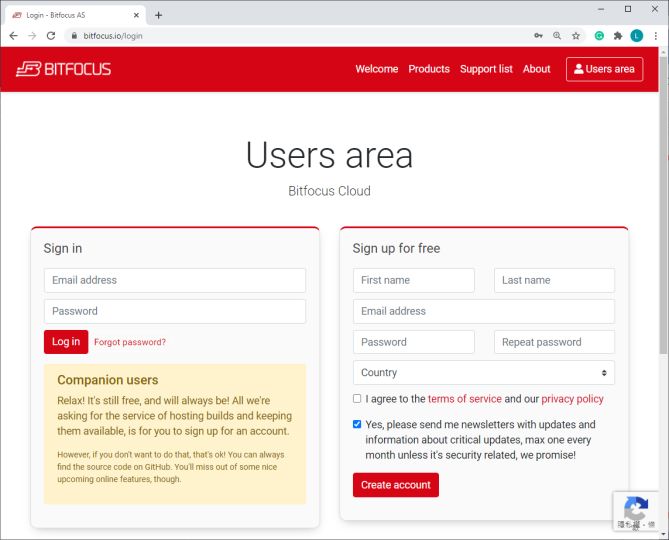
Chapter 2 Setting Instructions
2.1 Check the Network setting
2.1.1 Make sure the computer IP address must be set on the same network segment with
the device.
2.1.2 Check the IP address of the device.
2.1.3 Open the Companion software, click [ Launch GUI ] to enter the admin user interface.
2.2 Add new device
2.2.1 In [ Instances ] page, click [ Add by category ] or [ Add by manufacturer ] , or search
[ Lumens ] in the search bar [ Lumens ] Select the device model.
2.2.2 Will open a new page [ Camera Configuration ] or [ MediaPrecessor Configuration ],
you can do the device setting on this page. After finishing setting, click [ Apply
changes ].
2.2.2.1 Camera settings
Label: Enter the camera model or name, it will be easier identified.
Target IP: Enter the IP address of the camera.
Target Port:Enter “52381” (Default:52381)
5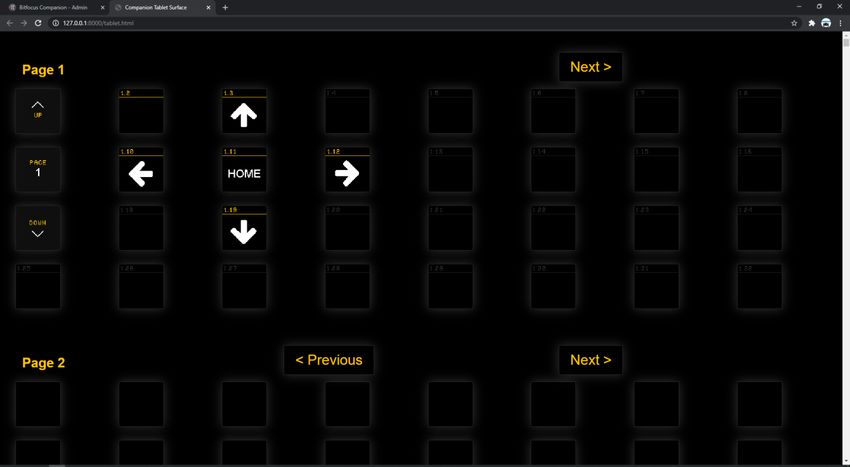
Camera id: Select[ id 1 ]
< Caution> The camera DIP switch also needs to be set on ID1
2.2.2.2 MediaPrecessor settings
Label: Enter the device model or name, it will be easier identified.
Target IP: Enter the IP address of the LC200
Target Port: Enter “5080” (Default:5080)
6
2.2.3 Press [ Instances ], the device status shows ”OK” which means the device has been
added and connected successfully.
2.3 Add new button - Though by Presets page
2.3.1 Press [ Preset ] to the preset page Select the device(The device name is displayed
at the end) Select the action type.
< Remark> Please refer to Chapter 5 Preset Actions List for the device model and
supported actions.
Equipment: Camera
Equipment: MediaPrecessor
7
2.3.2 Press [ Buttons ] to the button page, drag the action button from Presets page and
      drop to the simulation button on the [Buttons] page.

2.3.3 Click the added action button on [ Buttons ] page will open [ Edit button ] page.It will
      shows the button’s settings and can be edited on [ Edit button ] page. Please refer to
     3.8 Edit button for button settings.

                                                                                             8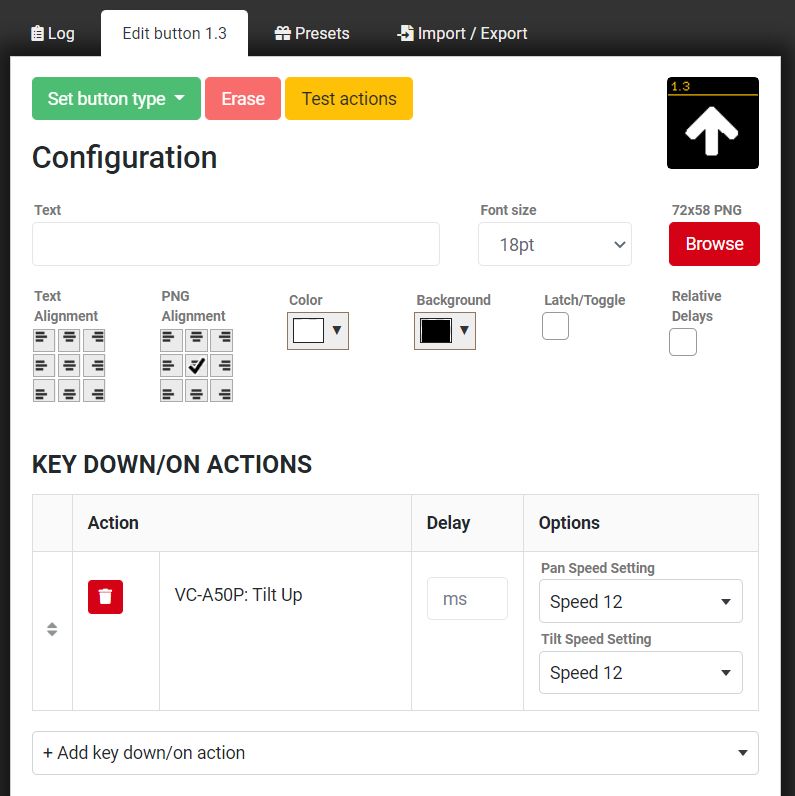
2.4 Add new button - Though by Buttons page
  2.4.1 Press [ Buttons ] to the button page, click on the blank area of the simulated button to
        open the [Edit button] page.

  2.4.2 Click [ set button type ] and select [ Regular button ] to add new button.

  2.4.3 It will shows the button’s settings and can be edited on [ Edit button ] page.
        Please refer to 3.8 Edit button for button settings.

                                                                                               9
2.5 Control the device - Through by Emulator
2.5.1 Press [ Emulator ], it will open a new window and shows the button emulator.
2.5.2 You can control the device by clicking the buttons directly.
2.6 Control the device - Through by Web buttons
2.6.1 Press [ Web buttons ], it will open a new window and shows all buttons on one monitor.
2.6.2 You can control the device by clicking the buttons directly.
If you would like to just view one page or a select few, you can add text to the
end of the URL in your browser. Just add?pages=and the page numbers you
want to see separated by a comma.
E.g.: http://127.0.0.1:8000/tablet.html?pages=2 (Includes only page 2)
http://127.0.0.1:8000/tablet.html?pages=3,7,12 (Includes only pages 3, 7, and 12)
10Chapter 3 User Interface Description
3.1 Admin User Interface
① ② ③
No Item Function Descriptions
Include Emulator, Web buttons and community links.
1 Sidebar
You can collapse the sidebar by clicking the icon on the left of Companion
logo, or shrink it by clicking the arrow at the bottom of the sidebar.
Main admin controls and
2 This is where all the connections, buttons, and actions are configured.
settings
Log, Presets,
3 This is where display log information, preset, and import/export setting.
configuration
113.2 Sidebar
①
②
③
④
⑤
⑥
⑦
⑧
No Item Function Descriptions
Emulator is a tool to test and use the setup, even if you don’t have a Stream Deck
connected. It will open in a new browser tab and will function just like a Stream Deck
1 Emulator would.
You can use keyboard hotkeys to control the emulator and trigger button presses.
Instructions are found on the bottom of the emulator page.
2 Web buttons Web buttons is a way of viewing all your buttons across all pages on a single screen.
3 Mobile buttons It will open in a new browser and display the analog button on the mobile device.
4 Bug & Features Companion GitHub to report bugs.
5 Facebook Facebook group to share information and ask questions.
6 Slack Chat The Slack group for developers.
7 Donate Donate to show your support and fund future development.
8 Getting Started Introduction to Companion’s basic principles and user interface.
123.3 Instances
① ② ③ ④
⑤
No Item Function Descriptions
Display the Module name.
1 Module
Press the question mark icon to open that module's help information.
2 Label Display the name of the newly added custom Label.
3 Status Display the current connection status with the device.
Click [ DELETE ] to delete the device.
4 Actions Click [ DISABLE ] to disable the device.
Click [ EDIT ] to edit the device setting.
5 Add Device Add a new device, either by finding it by category, by manufacturer, or through a search.
133.4 Config
①
②
③
④
①
②
③
④
No Item Function Descriptions
1 Label Enter the label will be easier to identify when you have several devices.
2 Information Display the Module’s information.
Target IP: Enter the device’s IP address in the Target IP bar.
Internet Connection Target Port: Camera: 52381; MediaPrecessor: 5080
3
Settings LUMENS Camera Address: Select [ id 1 ] (MediaPrecessor doesn’t has this
selection)
4 Apply changes Click [ Apply changes ] after you finish setting.
143.5 Buttons
①
②
③
④
No Item Function Descriptions
It can be navigated using the red left/right arrows.
1 Page Selection You can move to a specific page by clicking on the gray page number, entering in the
desired page number, and pressing the ENTER key on your keyboard.
You can add, edit and remove buttons for your Stream Deck.
2 Buttons If you hold down the SHIFT key on your keyboard, you can trigger a button directly by
clicking on it.
Copy, Move, Delete
Click on the desired action, then click on the button you want to apply that action to.
Finally click on the destination button.
3 Edit buttons Wipe page
Erases all buttons on the page and adds the navigation buttons.
Reset page buttons
Leaves the buttons intact, but adds the navigation buttons.
To download which can later be imported to another page or a different Companion
4 Export page
configuration.
153.6 Surfaces
Descriptions
This tab will show the connected Elgato Stream Decks.
If any of your Stream Decks are not showing up, press the [ Rescan USB ] button.
Use with care as rescanning will block all operations while the scan is ongoing.
If your devices are showing but they don't show the ID, you need to update your Stream Deck using the
Elgato app.
3.7 Log
Descriptions
The Log section gives status updates of commands going out and coming back to Companion. Different log levels
can be filtered.
Be sure to check here if you're running into problems with a module.
163.8 Edit button
① ② ③ ⑥
④ ⑤ ⑦
⑬
⑧ ⑨
⑩ ⑪
⑫ ⑭
No Item Function Descriptions
Regular button
Can trigger one or more actions.
Page up
Can move up to the next page set of buttons.
1 Set button type
Page number
Shows the current page number/name. Pressing this button will return to page 1.
Page down
Can move down to the previous page set of buttons.
2 Erase Erase all settings for this button.
3 Test actions Click and can test the actions you set on this button.
Enter the text you want to display on the button. You can force a newline in a label by
4 Text
typing \n where you want the newline to appear.
5 Font size Adjusting the font's size.
A live preview will be shown on here. Button information will update in real-time in the
6 live preview
Emulator and Stream Deck.
Click the red Browse button and choose the PNG (72x58px) file you want to use as a
7 Browse PNG image
button's background. Text can be applied over the image.
8 Alignment Setting the alignment of the text / PNG image.
Text color /
9 Changing the text's color / button's background color.
Background color
The Latch/Toggle checkbox changes the push behavior of the button, making the first
press of the button trigger all the Key down/on actions, and a second press of the
10 Latch/Toggle
button trigger the Key up/off actions.
When a button is pressed and is latched, its header will appear solid.
17Each action can be delayed to run a certain number of milliseconds after the button is
11 Relative delays triggered. Delays can be configured to be Absolute (default) or Relative, by toggling
the checkbox in the button styling section.
KEY DOWN / ON You can add multiple actions and set delay times for each action.
12 Multiple actions, even those from multiple modules, can be linked to a button. An
ACTIONS
action may also have options to let you customize how the action performs.
KEY UP / OFF The KEY DOWN/ON ACTIONS will be performed when the button is triggered.
13 The KEY UP/OFF ACTIONS are performed when the button is released, or when the
ACTIONS
button becomes unlatched.
INSTANCE Some modules are able to provide feedback back to the button, such as changing the
14
FEEDBACK button's foreground or background colors to reflect the current status of the device.
3.9 Presets
↓
Camera
/ MediaPrecessor
Descriptions
Click the model first then select the preset type. Drag the preset buttons onto a page's button when in the Button
Layout view. You may still need to configure the preset after adding it to a button.
Please refer to Chapter 5 Preset Actions List to see more information.
183.10 Import / Export
Descriptions
This tab lets you import or export your configuration to a ”.companionconfig” file, which can be used to backup your
configuration or move it to a new computer. You can also choose to import just a single page from your file.
You're also able to completely reset your configuration here as well.
19Chapter 4 Connect Stream Deck
4.1 Connect Stream Deck
4.1.1 Connect Stream Deck directly to a USB port on your PC or Mac. Do not use a USB hub.
4.1.2 Open the Companion software, click [ Launch GUI ] to enter the admin user interface.
4.1.3 Enter [ Surfaces ] page, press [ Rescan USB ] to scan for any newly attached Stream
Decks.
Please close down Stream Deck Software, it will not scan devices as the Stream
Deck app is running. Use with care as rescanning will block all operations while
the scan is ongoing.
4.1.4 If the newly Stream Deck Device is showing, which means connect successfully. Any
update in Companion will also update to stream Deck.
20Chapter 5 Preset Action List
5.1 Camera-Preset Actions
Model VC- VC- VC- VC- VC- VC- VC-
Item Icon
Action A50P A61P A71P BC301P BC601P BC701P TR1
Save Preset 1
~32
Save /
Recall Preset 1
Recall
~32
Preset
< Remark> VC-TR1 some specific preset positions have been used, so they are not available and won’t
show on the list. Please refer to Chapter 6 Troubleshooting to get more details.
Power On
Power Off
System Tally off
Tally Red ON
Tally Green ON
Full Auto
Manual
Shutter Priority
Iris Priority
Shutter Up
Exposure
Shutter Down
Iris Up
Iris Down
Gain Up
Gain Down
21Model VC- VC- VC- VC- VC- VC- VC-
Item Icon
Action A50P A61P A71P BC301P BC601P BC701P TR1
WB-Auto
WB-One Push
WB
R Gain Up
White
Balance
R Gain Down
B Gain Up
B Gain Down
Zoom In
Zoom Out
Focus Far
Lens
Focus Near
Auto Focus
One Push
Auto Focus
Tilt Up
Tilt Down
Pan Left
Pan / Tilt Pan Right
Pan-Tilt_UpLeft
Pan-Tilt_UpRight
Pan-Tilt_DownLef
t
22Model VC- VC- VC- VC- VC- VC- VC-
Item Icon
Action A50P A61P A71P BC301P BC601P BC701P TR1
Pan-Tilt_DownRig
ht
Pan-Tilt_Home
Image mode –
Default
Brightness +
Image Brightness -
Sharpness +
Sharpness -
Mirror On
Mirror Off
Flip On
Dig-Effect
Flip Off
Mirror + Flip On
Mirror + Flip Off
Auto-Tracking On
Auto-
Tracking
Auto-Tracking Off
235.2 MediaPrecessor- Preset Actions
5.2.1 Video/Audio
Icon Action Icon Action Icon Action Icon Action
Unmute Line &
Line & HDMI Out Channel 1 ~4
Start Record HDMI
Volume 100 Video source 1
Audio Out
Line & HDMI Out Mute PGM Channel 1 ~4
Stop Record
Volume Max Audio Out Video source 2
Audio In 1 ~4 PGM Out Unmute PGM Channel 1 ~4
Volume 25 Volume 25 Audio Out Video source 3
Audio In 1 ~4 PGM Out Audio Input 1 ~4 Channel 1 ~4
Volume 50 Volume 50 Line In Video source 4
Audio In 1 ~4 PGM Out Audio Input 1 ~4 Channel 1 ~4
Volume 75 Volume 75 Mic In Video source 5
Audio In 1 ~4 PGM Out Audio Input 1 ~4 Channel 1 ~4
Volume 100 Volume 100 HDMI In Video source 6
Audio In 1 ~4 PGM Out Audio Input 1 ~4 Channel 1 ~4
Volume Max Volume Max IP Audio Video source 7
Line & HDMI Out Mute Audio Audio Output Channel 1 ~4
Volume 25 Input 1 ~4 ALL Video source 8
Line & HDMI Out Unmute Audio Audio Output Channel 1 ~4
Volume 50 Input 1 ~4 Line Out + PGM Video source 9
Line & HDMI Out Mute Line & HDMI Audio Output Channel 1 ~4
Volume 75 Audio Out Multiview Video source 10
5.2.2 Image
Icon Action Icon Action Icon Action Icon Action
Snapshot Background Off Overlay Off Scene ID 1 ~10
Background ID
Layout ID 1 ~12 Overlay ID 1 ~10 Macro 1 ~3
1~9
5.2.3 System
Icon Action Icon Action Icon Action Icon Action
Start Backup to Stop Backup to
Standby Wake up
USB USB
5.2.4 Network
Icon Action Icon Action
Start Stream 1 ~3 Stop Stream 1 ~3
245.2.5 Camera
Icon Action Icon Action Icon Action Icon Action
Call Channel 1~4 Call Channel 1~4 Save Channel 1~4 Move CH1 ~4
Camera Preset 1 Camera Preset 7 Camera Preset 4 Camera UP
Call Channel 1~4 Call Channel 1~4 Save Channel 1~4 Move CH1 ~4
Camera Preset 2 Camera Preset 8 Camera Preset 5 Camera DOWN
Call Channel 1~4 Call Channel 1~4 Save Channel 1~4 Move CH1 ~4
Camera Preset 3 Camera Preset 9 Camera Preset 6 Camera LEFT
Call Channel 1~4 Save Channel 1~4 Save Channel 1~4 Move CH1 ~4
Camera Preset 4 Camera Preset 1 Camera Preset 7 Camera RIGHT
Call Channel 1~4 Save Channel 1~4 Save Channel 1~4 Channel 1 ~4
Camera Preset 5 Camera Preset 2 Camera Preset 8 Zoom IN
Call Channel 1~4 Save Channel 1~4 Save Channel 1~4 Channel 1 ~4
Camera Preset 6 Camera Preset 3 Camera Preset 9 Zoom OUT
25Chapter 6 Troubleshooting
This chapter describes problems you may encounter while using Companion module. If you have
questions, please refer to related chapters and follow all the suggested solutions.
No. Problems Solutions
How to setting on [Settings] Please press “Getting Started” on the sidebar to get more Settings
1.
page? information.
When setting VC-TR1 Preset Some VC-TR1 special preset positions have been used, so these
position, some preset preset positions will not be displayed when setting the preset
2. positions are not displayed. positions.
Preset position used: 0.1.5.6.7.8.80.81.95.96.99.121.122.123
Why cannot scan the Stream Please close down Stream Deck Software, it will not scan devices
3.
deck device? as the Stream Deck app is running.
Why cannot connect to the Please confirm:
camera?
1. The computer IP address is set on the same network segment
with the device.
2. The IP address of device is correct.
4. 3. Target PORT: Camera - enter 52381; MediaPrecessor - enter
5080.
If the device is PTZ camera, please also confirm:
1. Select id1 on LUMENS Camera Address.
2. The camera DIP switch is set on ID1.
26Copyright Information
Copyrights © Lumens Digital Optics Inc. All rights reserved.
Lumens is a trademark that is currently being registered by Lumens Digital Optics Inc.
Copying, reproducing or transmitting this file is not allowed if a license is not provided by Lumens Digital Optics
Inc. unless copying this file is for the purpose of backup after purchasing this product.
In order to keep improving the product, the information in this file is subject to change without prior notice.
To fully explain or describe how this product should be used, this manual may refer to names of other products or
companies without any intention of infringement.
Disclaimer of warranties: Lumens Digital Optics Inc. is neither responsible for any possible technological,
editorial errors or omissions, nor responsible for any incidental or related damages arising from providing this file,
using, or operating this product.
27You can also read