Mazda NB1
Reference Guide
←
→
Page content transcription
If your browser does not render page correctly, please read the page content below
Mazda NB1 Reference Guide
Contents
Read me first                                                                                                                                         6
  Switching on and off ..........................................................................................................................6
  Setting up............................................................................................................................................6
  GPS reception .....................................................................................................................................6
  Device not starting .............................................................................................................................6
  Sharing information with TomTom ...................................................................................................6
  Take care of your device ....................................................................................................................7
  More information ................................................................................................................................8

The memory card                                                                                                                                       9
  About your memory card ..................................................................................................................9
  Inserting your memory card ..............................................................................................................9
  Removing your memory card ............................................................................................................9
  About TomTom HOME ......................................................................................................................9
  Installing TomTom HOME ................................................................................................................10
  Initialising your memory card ..........................................................................................................10
  Updating your device .......................................................................................................................10
  Backing up your navigation device .................................................................................................11

Safety Notice                                                                                                                                       12
  Safety settings ..................................................................................................................................12

The commander                                                                                                                                       13
  About the commander .....................................................................................................................13
  Using the commander ......................................................................................................................13

Planning a route                                                                                                                                    14
  Planning a route................................................................................................................................14
  Route summary ................................................................................................................................16
  Selecting a route type ......................................................................................................................17
  Using arrival times ............................................................................................................................17
  Navigation menu options .................................................................................................................17
  Planning a route in advance ............................................................................................................18
  Viewing route information ...............................................................................................................19

Voice control                                                                                                                                       21
  Voice control .....................................................................................................................................21
  About navigation device voice control............................................................................................21
  Using voice control ..........................................................................................................................21
  Planning a trip using your voice ......................................................................................................22
  Entering addresses using your voice ..............................................................................................23
                                                                          2
The Driving View 25
About the Driving View ....................................................................................................................25
The Driving View ..............................................................................................................................25
Driving View Symbols ......................................................................................................................26
Advanced Lane Guidance 27
About lane guidance ........................................................................................................................27
Using lane guidance .........................................................................................................................27
Changing your route 28
Making changes to your route .........................................................................................................28
Change route menu ..........................................................................................................................28
About waypoints ..............................................................................................................................29
Adding the first waypoint to your route ..........................................................................................29
Adding further waypoints to your route .........................................................................................30
Changing the order of waypoints ....................................................................................................30
Deleting a waypoint..........................................................................................................................31
Changing notification settings for a waypoint ................................................................................31
Reactivating a waypoint ...................................................................................................................31
View map 33
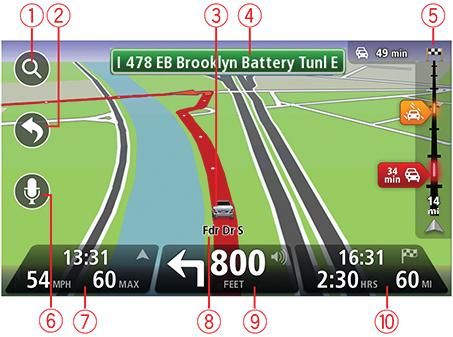
About viewing the map ....................................................................................................................33
View map ..........................................................................................................................................33
Options..............................................................................................................................................34
Cursor menu .....................................................................................................................................34
Map corrections 36
About Map Share .............................................................................................................................36
Correcting a map error .....................................................................................................................36
Types of map correction ..................................................................................................................36
Sounds and voices 40
About sounds and voices ................................................................................................................40
About voices that speak street names ............................................................................................40
Selecting a voice ..............................................................................................................................40
Changing the volume level ..............................................................................................................40
Settings 41
About Settings ..................................................................................................................................41
2D/3D settings ..................................................................................................................................41
Advanced settings ............................................................................................................................41
Car symbol ........................................................................................................................................42
Home location ..................................................................................................................................42
Favorites ...........................................................................................................................................42
3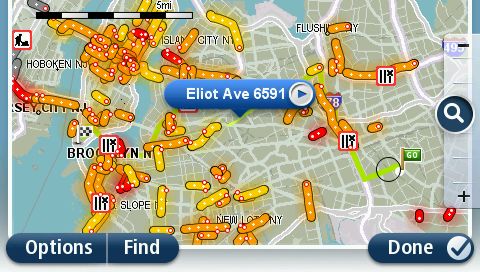
Keyboard...........................................................................................................................................43
   Make your own menu ......................................................................................................................43
   Map colors ........................................................................................................................................44
   Manage POIs.....................................................................................................................................44
   Reset factory settings .......................................................................................................................44
   Planning settings ..............................................................................................................................45
   Safety settings ..................................................................................................................................46
   Show POI on map ............................................................................................................................46
   Status bar ..........................................................................................................................................46
   Switch map .......................................................................................................................................47
   Turn off voice guidance / Turn on voice guidance .........................................................................47
   Units ..................................................................................................................................................47
   Version information ..........................................................................................................................48
   Voices................................................................................................................................................48

Points of Interest                                                                                                                                      49
   About Points of Interest ...................................................................................................................49
   Creating POIs ....................................................................................................................................49
   Using POIs to plan a route ...............................................................................................................50
   Showing POIs on the map ...............................................................................................................51
   Calling a POI......................................................................................................................................51
   Setting warnings for POIs ................................................................................................................52
   Manage POIs.....................................................................................................................................52

Help                                                                                                                                                    53
   About getting help ............................................................................................................................53
   Using Help to drive to a local service ..............................................................................................53
   Help menu options ...........................................................................................................................53

Favorites                                                                                                                                               55
   About Favorites ................................................................................................................................55
   Creating a Favorite ...........................................................................................................................55
   Using a Favorite ................................................................................................................................56
   Changing the name of a Favorite ....................................................................................................56
   Deleting a Favorite ...........................................................................................................................57

Traffic                                                                                                                                                 58
   About RDS-TMC ...............................................................................................................................58
   Safety Notice ....................................................................................................................................58
   Using traffic information ..................................................................................................................58
   Taking the fastest route ....................................................................................................................59
   Minimizing delays .............................................................................................................................59
   Making commuting to work easier ..................................................................................................60
   Getting more information about an incident...................................................................................61
   Checking traffic incidents in your area ............................................................................................61
   Changing traffic settings ..................................................................................................................62
   Traffic incidents ................................................................................................................................62

                                                                            4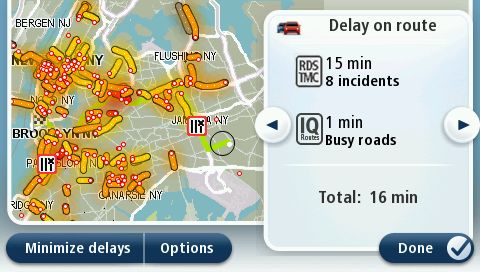
Traffic menu ......................................................................................................................................63

Speed Cameras                                                                                                                                      65
  Important ..........................................................................................................................................65
  Important ..........................................................................................................................................65
  About Speed Cameras .....................................................................................................................65
  Speed Camera warnings ..................................................................................................................65
  Changing the way you are warned ..................................................................................................66
  Safety camera symbols ....................................................................................................................66
  Report button ....................................................................................................................................67
  Reporting a new speed camera while on the move .......................................................................68
  Reporting a new speed camera while at home ..............................................................................68
  Reporting incorrect camera alerts ...................................................................................................68
  Types of fixed speed camera you can report .................................................................................68
  Speed Enforcement Zone warnings ................................................................................................69
  Speed Cameras menu ......................................................................................................................70

TomTom HOME                                                                                                                                        72
  About TomTom HOME ....................................................................................................................72
  Installing TomTom HOME ................................................................................................................72
  MyTomTom account ........................................................................................................................72
  Updating your device .......................................................................................................................73
  Introducing HOME help ...................................................................................................................74

Customer support                                                                                                                                   75
  Getting help to use your navigation device ....................................................................................75
  Status & information .........................................................................................................................75

Addendum                                                                                                                                           76

Copyright notices                                                                                                                                  79

                                                                         5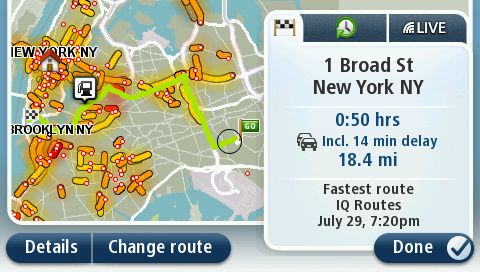
Read me first

Switching on and off
Your Mazda NB1 switches on when your car engine starts and switches off automatically when
you turn off your car's engine.
Until a connection has been established between the car and the Mazda NB1, the screen shows
audio-related information and the NAV button on the main display is inactive. In some situations
when you start the car, the navigation device may restart. If this happens, press the NAV button. A
black screen is shown and it may take up to 30 seconds for the main screen to appear.
Under extreme temperature conditions, the navigation device may not start. When the tempera-
ture is within the normal range again, the device should start. If the device fails to start automati-
cally in this situation, stop your car engine and start the car engine again.

 Note: In some situations, your navigation system may restart when turning your key in the igni-
 tion from ACC-ON to the engine start position. If this happens, it may take up to 30 seconds for
 the main screen to appear on the navigation system.

Setting up
When you first switch on your device, you have to answer a few questions to set up the device.
Answer the questions by tapping the screen.

GPS reception
When you first start your Mazda NB1 navigation device, the device may need a few minutes to
determine your GPS position and show your current position on the map. In the future, your posi-
tion will be found much faster, usually within a few seconds.
In areas where GPS reception is not possible, such as tunnels, your location may not be accurate.

Important: The GPS antenna is located in the dashboard so do not put objects on the dashboard.

Device not starting
In rare cases, your TomTom navigation module may not start correctly or may stop responding to
your taps. For example, if the device temperature is too high or too low, the system shuts down.
In rare circumstances, you may need to reset your navigation device. To reset your device, switch
off the car engine and then remove the memory card. Re-insert the memory card and switch the
car engine on again.

Sharing information with TomTom
When you first start navigating or perform a reset, your device asks for permission to collect some
information about your use of the navigation device. The information is stored on the device until
we retrieve it. We use it anonymously to improve our products and services.
                                                   6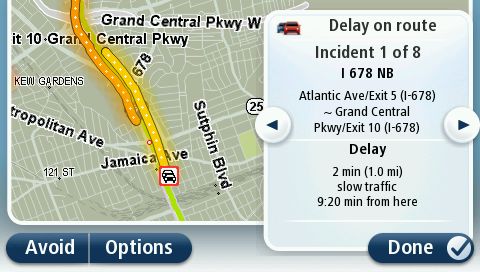
You can change whether you share this information with us at any time by doing the following:
1. In the Main Menu, tap Settings.
2. Tap Me and my device.
3. Tap My information.
4. Tap No to stop sharing or tap Yes to start sharing.
Additional information
Your navigation device will continuously collect information only if you give us your permission.
The information is stored on your device until you connect it to your PC; then the information is
sent to TomTom and deleted from your device. The information includes details that identify the
navigation device, details about routes and locations and information entered while you were
using the navigation device.
Immediately after receiving this information, TomTom automatically and irreversibly destroys any
information that allows identification of you or your device. This, now anonymous, information is
used to improve TomTom’s products and services, such as maps, reports on Points of Interest
and average speeds driven. These products and services are also used by government agencies
and businesses.
Using your navigation device, you can join the MapShare Community, or report speed cameras or
danger zones. If you choose to use either of these services, your reports, that include location
information and your MyTomTom account name, are sent to TomTom and kept together with
your MyTomTom account. TomTom then uses your information to improve its maps and safety
cameras.
If you no longer allow sharing of information, none of the above information is sent to TomTom
and information previously stored on your device is deleted.
TomTom will not give anyone else access to the information collected from your navigation de-
vice.
In choosing to provide TomTom with information you are helping to make driving better, specifi-
cally by improving maps and traffic flows and reducing congestion. We appreciate your help.
If you think that your information is not being used for the purpose for which you have provided it
to TomTom, contact us at tomtom.com/support.
See our privacy policy at tomtom.com/privacy.
Take care of your device
It is important to take care of your device as follows:
Your device is not designed for use in extreme temperatures and any such exposure may
cause permanent damage.
Do not open the casing of your device under any circumstances. Doing so may be dangerous
and will void the warranty.
Important: If you sell your car, you should remove all personal information from your navigation
device first. To remove your personal information, tap Settings and then tap Reset factory set-
tings.
7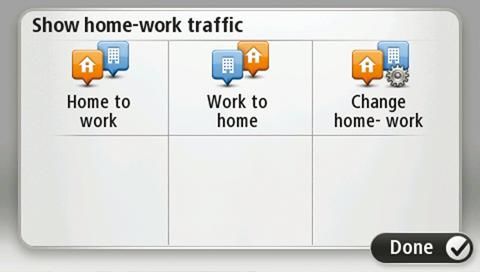
More information
The website mazdanav.com offers direct access to additional information for your product (Eng-
lish only). This includes information on the use of voice-recognition and on performing updates.
On the website, click Navigation system owner information.

                                                8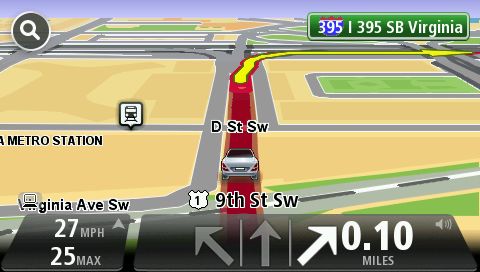
The memory card
About your memory card
A memory card is supplied with your navigation system. It includes a map of your group of coun-
tries.
Updates are regularly produced by TomTom, particularly for maps and services like speed cam-
eras. These updates are only available for download by inserting your navigation system's
memory card into a computer that is connected to the internet.
Once your new vehicle has been delivered, if a newer version of your map is available within 60
days of first using your navigation device, you can download this map for free.
Important: In order to qualify for the Latest Map Guarantee you need to check if a new map is
available within the 60 day period, and you are only entitled to one free map download.
Inserting your memory card
To insert your memory card into your Mazda NB1 in your car, do the following:
1. Switch off the ignition in the car so that the navigation system is switched off.
2. Insert the memory card, taking care to handle it carefully and that it is the right way around.
Note: Only use your memory card for operating and updating your navigation system. Do not
insert the memory card into another vehicle or into any other device such as a camera.
Removing your memory card
1. Push gently on the memory card.
2. Remove the memory card, taking care to handle it carefully.
About TomTom HOME
Using TomTom HOME you can register and manage your Mazda NB1 to receive free updates and
buy new services. It's a good idea to connect to HOME frequently so you can do the following:
Download for free the most recent map available for your device, if you connect to TomTom
HOME within 60 days of buying your device.
Download updates for your device for free, including Map Share updates and other services
included with your product.
Add new items to your device, like maps, voices and POIs, as well as buy TomTom services
and manage your subscriptions.
Share your map corrections and other content with the TomTom community.
Make and restore backups of your device.
When using HOME, you can get help with what you are doing from the HOME Help. You can also
read about all the other things that HOME can do for you.
9Tip: We recommend using a broadband internet connection whenever you connect to HOME.
Installing TomTom HOME
The steps below refer to Internet Explorer on Windows XP. If you're using another browser or
operating system, visit tomtom.com/support for more information.
To install TomTom HOME on your computer, do the following:
1. Connect your computer to the internet.
2. Click the link below to download the latest version of TomTom HOME:
tomtom.com/home
3. We recommend downloading the file to your computer by clicking Save.
4. Once the download is complete, click Open.
If you accidentally closed the Download Complete window, locate the file
TomTomHOME2winlatest.exe on your computer and double-click it.
5. If you get a security warning, click Run.
6. Click Next, then click Install.
The installation starts.
7. Once the installation is complete click Finish.
Initialising your memory card
To use a new or empty memory card with TomTom HOME, it needs to be initialized so that HOME
can detect it. To initialize your card, do the following:
1. Start the car and switch on your Mazda NB1.
2. Press the NAV button to switch to navigation mode.
The navigation screen appears.
3. Insert the new memory card into your Mazda NB1.
4. Wait for a few seconds so that the card can be initialized by your Mazda NB1.
5. Remove the card from your Mazda NB1 and insert it into the card reader connected to your
computer.
Your new card is now ready for use with TomTom HOME.
Updating your device
Before you start, make sure you have a backup of your device or memory card. For more infor-
mation, see Backing up your navigation device.
You can check for updates for your maps, services and for a whole range of other free items or
items for purchase. The instructions below describe how to update the TomTom application on
your device.
Note: LIVE Services are not available in all countries or regions, and not all LIVE Services are
available in all countries or regions. You may be able to use LIVE Services when traveling
abroad. For more information on available services, go to tomtom.com/services.
To check for an updated application version do the following:
1. Insert your memory card into the card reader connected to your computer.
102. Wait for TomTom HOME to start.
3. If HOME does not automatically check for updates, click Update my device in the HOME
menu.
Note: If you would like to install an application you downloaded previously, click Add Traffic,
Voices, Speedy Cameras, etc. and then click Items on my computer.
4. If a new application is available, it is listed on the next screen.
5. Make sure the new application is selected, then click Download updates.
HOME downloads the selected items.
6. HOME then installs the selected items on your memory card.
7. Click Done.
8. Click Device > Disconnect Device. You can then disconnect your card from your computer.
Backing up your navigation device
The easiest way to make a backup of all the contents of your TomTom navigation device is by
using TomTom HOME. You can make one backup for your device and store it on your computer.
When you make a new backup, the old backup for that device is overwritten.
1. Insert your memory card into the card reader connected to your computer.
TomTom HOME starts automatically.
Tip: If TomTom HOME does not start, do one of the following:
Windows: Click on the Start menu and go to All Programs > TomTom and then click on
TomTom HOME.
Mac: Click Go in the Finder menu and choose Applications, then double-click TomTom
HOME.
2. Click Back up and restore.
3. Click Back up my device.
4. Click Back up now.
HOME backs up your device by backing up the contents of your memory card.
5. Wait until HOME has finished creating the backup, then click Done.
To see where HOME saves your backups do one of the following:
Windows: Click Tools > TomTom HOME Preferences and then select the Folder Preferences tab.
Mac: Click TomTom HOME > Preferences... and then select the Folder Preferences tab.
To restore a backup, click Back up and restore in the HOME menu and then click Restore my de-
vice.
11Safety Notice
Some navigation devices contain a GSM/GPRS module which can interfere with electrical devices
such as cardiac pacemakers, hearing aids and aviation equipment.
Interference with these devices may endanger the health or life of you or others.
If your device includes a GSM/GPRS module, do not use it near unprotected electrical units or in
areas where the use of mobile telephones is prohibited, such as hospitals and aircraft.
Safety settings
We recommend using the safety settings to make your driving as safe as possible.
These are some of the options included in the safety settings:
Show safety reminders
Warn when driving faster than allowed
If your device supports voice control, you can also drive more safely by using voice commands to
control your navigation device.
12The commander
About the commander
The commander is an input device located near the arm rest of your car in the central console.
It has a central stick that you can move in the following ways:
Push.
Rotate left or right.
Tilt up or down.
Tilt left or right.
Using the commander
1. Push - selects the item in focus, for example, the volume control when focused on the middle
panel of the status bar in the Driving View. Switches items on or off.
2. Rotate left or right - operates slider bars, such as the volume control, and zoom in/out in the
Driving View.
3. Tilt up or down - moves the focus around the different areas of the screen or around the map
when browsing.
4. Tilt left or right - moves you between pages in a menu or between tabs on a screen.
Examples of how to carry out common tasks using the commander
To access the Main menu from the Driving View, push the stick in.
To zoom in or out in the Driving View, rotate the stick right and left.
When focused on the map in the Driving View, tilt right to access the traffic menu.
When focused on the map in the Driving View, tilt left to access the quick menu and the voice
control microphone button.
When focused on the map in the Driving View, tilt down to access the volume control in the
centre panel of the status bar.
To access the Driving View from the Main menu, tilt the stick down until you are focused on
the Done button, then push in.
To move between letters on the keyboard screen, tilt left or right. Use tilt up or down to move
to the letter above or below. You can also use rotate left or right to move between letters.
13Planning a route
Planning a route
Important: In the interest of safety and to reduce distractions while you are driving, you should
always plan a route before you start driving.
To plan a route on your Mazda NB1, do the following:
1. Tap the screen to open the Main Menu.
2. Tap Navigate to or Drive to.
3. Tap Address.
You can change the country or state setting by tapping the flag before you select a city.
4. Enter the town or city name, or the postcode.
Tip: Instead of typing the address, tap the microphone button to enter the address by speak-
ing to your Mazda NB1.
Towns with similar names are shown in the list while you type.
When the correct city or town appears in the list, tap the name to select the destination.
5. Enter the street name.
Streets with similar names are shown in the list while you type.
14When the correct street name appears in the list, tap the name to select the destination.
6. Enter the house number, then tap Done.
7. The location is shown on the map. Tap Select to continue or tap Back to enter another ad-
dress.
Tip: If you want your final destination to be a car park, tap Car park and select a location
from the list of car parks close to your general destination.
8. When the new route is shown, tap Done.
For more information about the route, tap Details.
15To change your route, for example, to travel via a particular location or to select a new desti-
nation, tap Change route.
Your device starts to guide you to your destination, using spoken instructions and on-screen di-
rections.
Route summary
The route summary shows an overview of your route, the remaining distance to your destination
and the remaining estimated trip time.
To view the route summary, tap the right-hand panel on the status bar in the Driving view or tap
View route in the Main Menu and then tap Show route summary.
If you have HD Traffic or an RDS-TMC receiver, the route summary also shows traffic information
about delays on your route.
Note: To use a TomTom traffic information service, you may need a subscription or a receiver.
Traffic services are not supported in all countries or regions. For more information, visit
tomtom.com/services.
16Selecting a route type
Every time you plan a route, you can choose to be asked about the type of route you want to plan.
To do this, tap Settings followed by Route planning and then tap Ask me every time I plan.
The types of route you can choose from are as follows:
Fastest route - the route which takes the least time.
Eco route - the most fuel-efficient route for your trip.
Shortest route - the shortest distance between the locations you set. This may not be the
quickest route, especially if the shortest route is through a town or city.
Avoid highways - a route which avoids highways.
Using arrival times
When you plan a route, your Mazda NB1 asks you if you need to arrive at a particular time.
Tap YES to enter a preferred arrival time.
Your Mazda NB1 calculates your arrival time and shows you whether you will arrive on time.
You can also use this information to work out when you need to leave. If your Mazda NB1 shows
that you will arrive 30 minutes early, you can wait and leave in 30 minutes time, rather than arrive
early.
Your arrival time is constantly recalculated during your trip. The status bar shows whether you will
arrive on time or if you are going to be late.
Tap Status bar in the Settings menu to enable or disable arrival time
notifications.
To enable arrival time notifications select Leeway.
Status bar
Navigation menu options
When you tap Navigate to or Drive to, you can set your destination in many ways, not just by
entering the address. The other options are listed below:
17Tap this button to navigate to your Home location.
You will probably use this button more than any other.
Home
Tap this button to select a Favorite as your destination.
Favorite
Tap this button to enter an address as your destination.
Address
Tap this button to select your destination from a list of places you have
recently used as destinations.
Recent destination
Tap this button to navigate to a Point of Interest (POI).
Point of Interest
Tap this button to select a point on the map as your destination using the
map browser.
Point on map
Tap this button to enter a destination using latitude and longitude values.
Latitude Longitude
Planning a route in advance
You can use your Mazda NB1 to plan a route in advance, selecting your starting point and your
destination.
Here are some more reasons to plan a route in advance:
Find out how long a trip is going to take before you start.
You can also compare trip times for the same route at different times of the day or on different
days of the week. Your Mazda NB1 uses IQ Routes when planning a route. IQ Routes calcu-
lates routes based on the real average speeds measured on roads.
Study the route of a trip you are planning.
Check a route for someone who is coming to visit you and then explain the route to them in
detail.
18To plan a route in advance, follow these steps:
1. Tap the screen to bring up the Main menu.
2. Tap the arrow button to move to the next menu screen and tap Plan route.
This button is shown while there is no planned route on your Mazda NB1.
3. Select the starting point for your trip in the same way that you would select your destination.
4. Set the destination for your trip.
5. If Route planning settings are set to Ask me every time I plan, select the type of route you
want to plan:
Fastest route - the route which takes the least time.
Eco route - the most fuel-efficient route for your trip.
Shortest route - the shortest distance between the locations you set. This may not be the
quickest route, especially if the shortest route is through a town or city.
Avoid highways - a route which avoids highways.
6. Choose the date and time that you will make the trip you are planning.
Your Mazda NB1 uses IQ Routes to work out the best possible route at that time. This is useful to
see how long a trip takes at different times of the day or on different days of the week.
Your Mazda NB1 plans the route between the two locations you selected.
Viewing route information
You can access these options for the route you last planned by tapping View route in the Main
Menu or the Details button on the route summary screen.
You can then select from the following options:
Tap this button for a list of all the turn instructions on the route.
This is very useful if you need to explain a route to someone else.
Show instructions
Tap this button to see an overview of the route using the map browser.
Show map of route
Tap this button to watch a demo of the trip. You can interrupt the demo
at any time by tapping the screen.
Show route demo
19Tap this button to open the route summary screen.
Show route sum-
mary
Tap this button to see a preview of your destination.
You can navigate to a parking lot near your destination, and view any
available information about your destination, for example, the phone
Show destination number.
Tap this button to see all the traffic incidents on your route.
Note: This button is only shown if your device has either a traffic sub-
scription or an RDS-TMC Receiver. Traffic information is not available
Show traffic on in all countries or regions. For more information about TomTom traffic
route information services, go to tomtom.com/services.
20Voice control
Voice control
There are two types of voice control.
The first type is provided by Mazda and you can read about it in the guide that came with your car.
The second type is provided by your navigation device and you can use it to plan routes and con-
trol other features of your navigation device. You do this by initially tapping the screen on the
navigation device.
About navigation device voice control
Note: Voice control is not supported on all devices or in all languages.
Instead of tapping the screen to control your Mazda NB1, you can use your voice to control your
Mazda NB1.
For example, to increase the volume on your Mazda NB1, you can say, "Increase volume" or
"Volume 50%."
To view the list of available commands, tap Help in the Main menu then tap Product manuals and
then tap What can I say.
Important: Voice control requires a computer voice. When there are no computer voices installed
on your Mazda NB1, this feature is not available.
To select a computer voice, tap Voices in the Settings menu, then tap Change voice and select a
computer voice.
Using voice control
Voice control is switched on by default if it is supported for your chosen language.
The following example shows how to use voice control to plan a trip to your Home address:
1. Tap the microphone button in the Driving view to turn on the microphone.
You see a screen with examples of commands you can say.
Tap Help in the Main menu then tap Product manuals followed by What can I say to see a full
list of commands you can say.
2. When you hear "Say a command" followed by a tone, say a command of your choice. For
example, you can say "Drive home." Your Mazda NB1 is only ready to listen after your hear the
tone.
While you are speaking the microphone monitor shows how well the device can hear your
voice:
21A green bar means the device can hear your voice.
A red bar means your voice is too loud for the device to recognize
individual words.
A gray bar means your voice is too quiet for the device to recognize
individual words.
For some phrases, your Mazda NB1 repeats what you say and asks for confirmation.
Tip: For the best recognition of what you say, speak normally without trying to articulate
words in an unnatural way. If there is excessive road noise, for example, you may need to
speak in the direction of the microphone.
3. If the command is correct, say "Yes."
If the command is incorrect, say "No" and repeat the command after you hear the prompt and
tone again.
Your Mazda NB1 plans a route from your current location to your destination.
Tip: To stop your Mazda NB1 from listening for further commands, say "Cancel." To go back
one step, say "Back."
Planning a trip using your voice
Note: It's not possible to plan a route using your voice for all maps in all countries, or in all lan-
guages.
You can navigate to any of the following types of places using your voice:
An address, including home.
Cities and towns and their centers.
Favorites.
POI categories.
POIs for named brands of, for example, restaurants, gas stations, car rental companies and
gyms.
A recent destination.
To plan a route to an address using speech, do the following:
1. Tap the voice control button in the Driving view.
2. When you hear the tone, you can say, for example "Drive to an address."
22Tip: Your device has either Navigate to or Drive to on the button in the Main Menu. When
planning a route to an address using speech, say "Navigate to address" if the button shows
Navigate to or "Drive to address" if the button shows Drive to.
3. Say the full address for your destination, for example, 112 Main Street, Riverside, California.
Numbers can be pronounced naturally or one at a time. For example, 357 can be pronounced
as "Three fifty seven" or "Three, five, seven."
Your Mazda NB1 tells you what it heard.
4. Say "Yes" if the address is correct. If shown a list of addresses, say the list number for the cor-
rect address or say "none of these."
If part of the address is incorrect, you can say something like "change the number," "change
the street," "change the city" or "change the state" to correct the incorrect part.
To begin again, say "start over."
Tip: You may want to limit the search area for addresses to one state if you drive within the
same state most of the time. To change the search area for addresses, tap Settings in the
Main menu then tap Voice control and then tap Set address search area.
Your Mazda NB1 starts to guide you to your destination, using spoken instructions and on-screen
directions.
Tips:
You can also use your voice to search for the nearest Point of interest (POI) category or a popu-
lar brand name by saying something like "Drive to the nearest doctor" or "Drive to the nearest
Starbucks."
To select a Recent destination or a Favorite, say "Drive to a recent destination" or "Drive to a
Favorite."
Entering addresses using your voice
Even if you don't use voice control to start planning a trip, you can still use your voice to enter the
address.
To start planning a trip tap Navigate to or Drive to in the Main menu, then tap Address, and then
Spoken Address.
Tap this button to enter an address entirely using speech.
Spoken address helps you to enter information without tapping the
screen.
Spoken address
Tips
To make it easier to start entering an address using your voice, you can add this button to the
Quick Menu on the Driving View. To do this, tap Make your own menu in the Settings menu
and then tap Drive to spoken address.
Your Mazda NB1 recognizes places and street names when they are spoken in the local lan-
guage using local pronunciation.
23Spoken address entry is not possible for postal codes which must be entered using the key-
board.
24The Driving View
About the Driving View
When your Mazda NB1 navigation device starts for the first time, you are shown the Driving View
along with detailed information about your current position.
Tap the center of the screen at any time to open the Main Menu.
The Driving View
1. Zoom button - tap the magnifying glass to show buttons for zooming in and out.
2. Quick menu - to enable the quick menu, tap Make your own menu in the Settings menu.
3. Your current position.
4. Road sign information or the next street name.
5. Traffic sidebar. Tap the sidebar to open the Traffic menu.
The traffic sidebar is only shown if your device has either an HD Traffic subscription or an
RDS-TMC Receiver. Traffic information is not available in all countries or regions.
6. Microphone button for voice command and control.
7. The time, your current speed and the speed limit, if known. To see the difference between
your preerred arrival time and your estimated arrival time, check the Leeway checkbox in the
Status bar settings.
Note: Not all options may be available.
Tap this part of the status bar to switch between a 3D map and a 2D map.
8. The name of the street you are on.
259. Navigation instruction for the road ahead and the distance to the next instruction. If the second
instruction is less that 150m after the first instruction, you see it shown immediately instead of
the distance.
Tap this part of the status bar to repeat the last voice instruction and to change the volume.
You can also tap here to mute the sound.
10. The remaining trip time, the remaining distance and your estimated arrival time.
Tap this part of the status bar to open the Route Summary screen.
To change the information shown in the status bar, tap Status bar in the Settings menu.
Driving View Symbols
Sound muted - this symbol is shown when the sound has been muted.
To turn the sound back on, tap the middle panel in the status bar.
Enhanced Positioning Technology (EPT) - this symbol is shown when
your device is using EPT to estimate your current location.
EPT automatically estimates your position when the GPS signal is lost
while you are driving, such as when you are in a tunnel.
26Advanced Lane Guidance
About lane guidance
Note: Lane guidance is not available for all junctions or in all countries.
Your Mazda NB1 navigation device helps you prepare for highway exits and junctions by showing
the correct driving lane for your planned route.
As you approach an exit or junction, the lane you need is shown on the screen.
Using lane guidance
There are two types of lane guidance:
Lane images
To turn lane images off, tap Settings in the Main menu, then tap Advanced settings. Clear the
checkbox for Show lane images.
Tip: Tap anywhere on the screen to return to the Driving View.
Instructions in the status bar
Tip: If no lane guidance is shown in the status bar and all lanes are highlighted, you can use
any lane.
27Changing your route
Making changes to your route
After you plan a route, you may want to change the route or even the destination. There are vari-
ous ways to change your route without the need to completely replan the entire trip.
To change the current route, tap Change route in the Main menu:
Tap this button to change the current route.
This button is only shown while there is a planned route on your device.
Change route
Change route menu
To change the current route or your destination, tap one of the following buttons:
Tap this button to find an alternative to the current route.
This button is only shown while there is a planned route on your Mazda
NB1 device.
Calculate alterna- This is a simple way to search for a different route to your current desti-
tive nation.
Your device calculates a new route from your current location, to reach
your destination using completely different roads.
The new route is shown next to the original route so that you can select
the route you want to use.
Tap this button while driving on a planned route, to avoid a roadblock or
traffic congestion on the road ahead.
Your device will suggest a new route which avoids the roads on your
Avoid roadblock current route for the selected distance.
If the roadblock or traffic congestion suddenly clears, tap Recalculate
route to replan your original route.
Important: Be aware that when a new route is calculated you might be
asked to turn off the current road immediately.
Tap this button to avoid traffic delays on a planned route.
It is not always possible to avoid all traffic delays. Though your device
continuously checks for delays on your route, you can tap this button to
Minimize delays manually start a check. Your device then calculates the best route to
avoid all or most of the delays.
Note: This button is only shown if your device has either a traffic sub-
scription or an RDS-TMC Receiver. Traffic information is not available
28in all countries or regions. For more information about TomTom traffic
information services, go to tomtom.com/services.
Tap this button to change the current destination.
When you change the destination, you are shown the same options and
asked to enter the new address in the same way as when you plan a new
Change destination route.
Tap this button to avoid part of the current route.
You are shown a list of the street names on your route. When you tap
one of the street names, your device calculates a detour to avoid the
Avoid part of route selected street. The route summary shows both the new route and your
original route. Tap the panel at the right to select one of the routes and
then tap Done.
If you do not want to use either of the routes shown in the route sum-
mary, tap Change route to find another way to change your route.
Tap this button to change your route by selecting a location you want to
travel past, perhaps to meet someone along the way.
When you select a location to travel past, you are shown the same op-
Add waypoint... tions and asked to enter the new address in the same way as when you
plan a new route.
Your device calculates the route to your destination via the selected loca-
tion.
The selected location is shown on the map using a marker.
You receive a warning when you reach your destination and when you
travel past a marked location.
About waypoints
Note: This feature is not available on all TomTom navigation devices.
You can choose to use waypoints for any of the following reasons:
You want to travel along a certain road or through a certain area on the way to your destina-
tion.
You want to make stops before reaching your final destination.
Your route can include the following types of waypoints:
Waypoints with notification - a waypoint that you are likely to want to stop and get out at, for
example, a POI, a gas station or a friend's house. You are notified when nearing and arriving at
the waypoint with voice instructions or a message.
Waypoints without notification - a waypoint that you are using to help guide your route, for
example, you want to travel from Amsterdam to Rotterdam using a certain highway. You are
not notified when nearing the waypoint.
Adding the first waypoint to your route
To add the first waypoint to your route, do the following:
291. Tap the screen to bring up the Main menu.
2. Tap Change route.
3. Tap Add waypoint.
Tip: You can also tap View map and then tap Add waypoint in the cursor menu. If your de-
vice supports Voice control, you also speak commands to add waypoints.
4. Choose the location for your waypoint from a choice of Home, Favorite, Address, Recent des-
tination, POI or you can perform a search.
On the route summary screen, a message confirms that the route is being recalculated to in-
clude the waypoint. On the Change route menu, the Travel via button changes to show that
you now have one waypoint on your current route.
Note: All waypoints are added initially as waypoints with notification. The maximum number
of waypoints you can add is four.
Adding further waypoints to your route
To add more waypoints to your route after the first one has been added, do the following:
1. Tap the screen to bring up the Main menu.
2. Tap Change route.
3. Tap Manage waypoints.
Tip: If your device supports Voice control, you also speak commands to add waypoints.
4. Tap Add.
5. Choose the location for your waypoint from a choice of Home, Favorite, Address, Recent des-
tination, POI or you can perform a search.
A message tells you where in the list of waypoints the new one has been inserted.
6. Tap Done.
On the route summary screen, a message confirms that the route is being recalculated to in-
clude your waypoints.
7. Repeat to add more waypoints.
On the Change route menu, the Manage waypoints button changes to show that you now
have several waypoints on your current route.
Note: All waypoints are added initially as waypoints with notification.
Changing the order of waypoints
Waypoints are automatically added in an optimized order but you can still change the order man-
ually if you need to. To change the order of waypoints, do the following:
1. Tap the screen to bring up the Main menu.
2. Tap Change route.
3. Tap Manage waypoints.
You see a list of your waypoints.
4. Tap the waypoint you want to move up or down.
You see a screen with the name of your waypoint at the top.
305. Tap Move up or Move down.
Your waypoint changes its position in the list and you are immediately returned to your list of
waypoints.
Tip: You cannot move an unvisited waypoint into a list of already visited waypoints.
Deleting a waypoint
To delete a waypoint, do the following:
1. Tap the screen to bring up the Main Menu.
2. Tap Change route.
3. Tap Manage waypoints.
You see a list of your waypoints.
4. Tap the waypoint you want to delete.
You see a screen with the name of your waypoint at the top.
5. Tap Delete.
Your waypoint is deleted and you are immediately returned to your list of waypoints.
Changing notification settings for a waypoint
If a waypoint has notification switched on, you see an icon next to it in your list of waypoints. To
switch notification on or off for a waypoint, do the following:
1. Tap the screen to bring up the Main menu.
2. Tap Change route.
3. Tap Manage waypoints.
You see a list of your waypoints.
4. Tap the waypoint that you want to change the notification setting for.
You see a screen with the name of your waypoint at the top.
5. Tap Switch on/off notification.
The notification setting changes for your waypoint and you are immediately returned to your
list of waypoints.
Tip: If a waypoint has already been visited, you cannot switch notification on or off.
Reactivating a waypoint
Note: You can only reactivate a waypoint that has already been visited. Visited waypoints are
grayed out.
To reactivate a waypoint, do the following:
1. Tap the screen to bring up the Main menu.
2. Tap Change route.
3. Tap Manage waypoints.
You see a list of your waypoints.
4. Tap the visited waypoint that you want to reactivate.
You see a screen with the name of your waypoint at the top.
31You can also read